


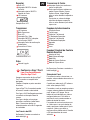
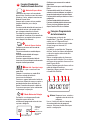
Interval 2
N2
= Number of Repeats of Basic Programme
N1
= Number of shots / bursts
Interval 1
Long
Delay
Interval 1
Long Long
Basic Programme
N1
= Number of shots / bursts
Interval 1
Long
Delay
Interval 1
Long Long
Basic Programme
N1
= Number of shots / bursts
Interval 1
Long
Interval 1
Long Long
Basic Programme
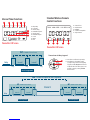
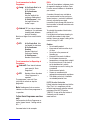
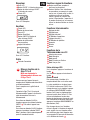
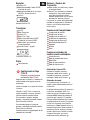
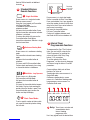
22: Channel Selector
23: Basic Timer Mode
24: Bulb Mode
25: Continuous Shooting Mode
26: Single Shot Mode
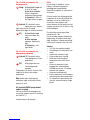
10: Centre button to confirm and accept settings
11: Arrow buttons. To select the Mode Settings,
eg. Single Shooting, Continuous Shooting, Delay,
Long, Timer, use left and right directional arrows
To adjust the values for the timer, exposure count
& intervals or channels, use the up and down
directional arrows.
Transmitter 4-Way Joypad
11
10
23 22
24
25
26
DELAY LONG INTVL1 N1 INTVL2 N2
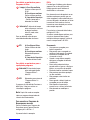
Transmitter LCD Screen
Transmitter LCD Screen
13: Delay Setting
14: Long Setting
15: Interval 1 Setting
16: N1 Number of Exposures
17: Interval 2 Setting
18: N2 Number of Repeats
19: Seconds
20: Minutes
21: Hours
13 14 15 16 17 18
19
20
21
DELAY LONG INTVL1 N1 INTVL2 N2
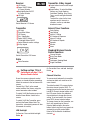
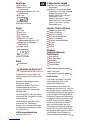
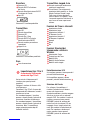
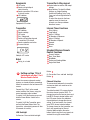
Standard Wireless Remote
Control Functions
Interval Timer Functions

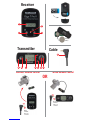
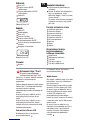
Receiver
LCD Screen
Power ON/OFF Button
& Channel Selector
Backlight Button ON/OFF
& Channel Selector
LED light
Default Receiver LCD Screen
Transmitter
LED light
Transmitter Button
LCD Screen
Play / Stop Button
Power ON/OFF Button
& Backlight Button ON/OFF
Centre Button to confirm settings
4-Way Joypad
Default Transmitter LCD Screen
Cable
Cable Connector
Transmitter 4-Way Joypad
Centre button to confirm and accept
settings
Arrow buttons. To select the Mode
Settings, eg. Single Shooting,
Continuous Shooting, Delay, Long,
Timer, use left and right directional
arrows
To adjust the values for the timer,
exposure count & intervals or
channels, use the up and down
directional arrows.
Interval Timer Functions
Delay Setting
Long Setting
Interval 1 Setting
N1 Number of Exposures
Interval 2 Setting
N2 Number of Repeats
Seconds
Minutes
Hours
Standard Wireless Remote
Control Functions
Channel Selector
Basic Timer Mode
Bulb Mode
Continuous Shooting Mode
Single Shot Mode
26
25
24
23
22
21
20
19
18
17
16
15
14
13
11
10
12
11
10
9
8
7
6
5
4
3
2
1
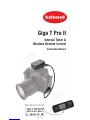
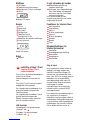
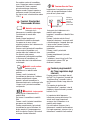
Setting up Giga T Pro II
Switching on your Giga T Pro II
Wireless Remote Control
Ensure the camera and remote control
receiver are turned off before connecting.
Attach the receiver to the hot shoe on the
camera.
Connect Giga T Pro II to the remote
control socket of the Camera, using the
correct connector cable included.
To switch On/Off the Receiver, press and
hold the Power Button. Switch on the
camera.
To switch On/Off the Transmitter, press
and hold the Power Button. Note: The
transmitter automatically powers off after
60 seconds of inactivity.
LCD Backlight
On Receiver: Press and hold backlight
Button
On Transmitter: Press and hold backlight
Button
Channel Selection
To communicate between the transmitter
and receiver, both units must be on the
same channel.
The default on both LCD screens displays
the active channel (sample: CH02). To
change channel on the receiver, press and
hold BOTH Channel selector buttons until
the LCD screen flashes. Use individual
channel buttons to change the channel
setting. To set and confirm the channel,
press BOTH channel selector buttons.
To change channel on the transmitter, use
the 4-way joypad to go to Channel
Selector mode and press the centre
button. Adjust using the 4-way joypad, set
and confirm using the centre button.
Refer to FAQ for benefits of additional
channels
9
9
3
A
IRL/GB

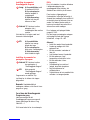
Standard Wireless
Remote Functions
Single Shot Mode
Ensure camera is in single shot mode.
Refer to camera manual.
Using the 4-way joypad, put Transmitter
into Single Shot Mode.
To autofocus Ensure camera has
autofocus enabled.
Half press the transmitter button. Green
light on transmitter and receiver indicates
autofocus is activated.
To release the shutter full press on the
Transmitter button. Red light on
transmitter and receiver indicates a single
shot has been taken.
Continuous Shooting Mode
Ensure camera is in continuous shooting
mode.
Put transmitter into continuous shooting
mode.
Half press the transmitter button to
autofocus.
Full press and HOLD transmitter button.
Camera shoots continuously for as long
as transmitter button is held down.
Bulb Mode - Long Exposures
Ensure camera is in Bulb mode.
Put transmitter into Bulb Mode.
Half press the transmitter button to
autofocus.
Full press the transmitter button to open
the shutter. Display starts counting the
period of time the shutter is open. Press
transmitter button again to close the
shutter and stop the display.
Basic Timer Modes
To set a specific number of shots and to
set a specific timed delay before taking
the first shot.
Ensure camera is in single shot mode.
Set the transmitter to Basic Timer Mode.
Press centre button. Use 4-way joypad to
select the number of shots, then the time
delay to first shot. Press centre button to
confirm and save setting.
Half press the transmitter button.
Full press Transmitter button.
Camera will autofocus between each
shot. Refer to FAQ to turn autofocus off.
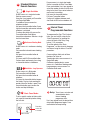
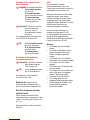
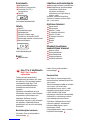
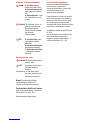
Interval Timer
Programmable Functions
To programme the Giga T Pro II interval
timer, you must set the values for the
“Basic Programme” by inputting the
values into each of the Delay, Long,
Interval 1, N1 parameters.
To set the repeats of the “Basic
Programme”, set the values for frequency
and interval using the Interval 2 and N2
parameters.
Camera settings affect each of these
functions. For series of
Timed single shots, ensure camera is in
Single Shot mode.
Continuous shooting bursts, ensure
camera is in Continuous Shooting mode.
Long expsoures, ensure camera is in
Continuous Bulb mode.
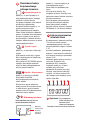
Delay: Time in hours, minutes and
seconds before whole
interval shooting
programme starts.
Use 4-way joypad to set the desired time
delay before programme begins. Press
centre button to accept setting.
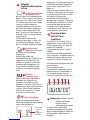
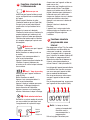
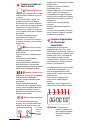
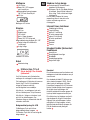
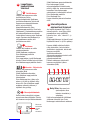
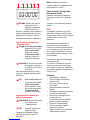
13
DELAY LONG INTVL1 N1 INTVL2 N2
13 14 15 16 17 18
C
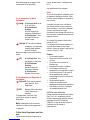
Time delay
to first shot
in seconds
Number of shots
23
24
25
26
B

To set parameters for Basic
Programme
Long: A: For Single Shot Set to
00 00 00 values
B: For Continuous
Shooting
Sets the length of the
contiuous shooting burst.
C: Bulb Exposure - Sets
the length of time the
shutter is open
Interval 1: Time interval between
shooting or, if in continuous
shooting mode, between
bursts of shooting.
Must be set higher than camera shutter
speed
N1: A: For Single Shot Sets
the Number of shot taken
B: For Continuous
Shooting
Number of bursts of
Continuous Shooting.
C: Bulb Exposure -
Number of shots taken
To set parameters for Repeating of
Programme
Interval2: Time interval between
each repeat of “Basic
Programme”
N2: Number of times the above
“Basic Programme” is
repeated.
The programme is now set. Press
(play/stop) to activate or stop the
programme.
Note: Double green flash on receiver
indicates an interval timer programme is
in operation.
To Run Basic Programme one time
only
Set parameters for Basic Programme as
normal. Ignore Interval 2 setting and set
N2 = 1
See www.hahnel.ie for examples
FAQ's
To turn off the autofocus in between shots
of sequential shooting or the Basic Timer
Function, ensure Autofocus is disabled on
your camera.
A number of channels are available on
your remote control to allow you to use
several receivers, each set to a different
channel, activated by one single
transmitter. Simply change the channel on
the transmitter as desired to activate each
seperate receiver.
To calculate the number of shots taken,
multiply N1 x N2.
If using bursts of continuous shooting, to
calculate the number of shots taken,
multiply 'frames per second' setting of the
camera x Long x N1 x N2.
Caution
• Do not modify product
• Keep receiver and transmitter dry at
all times
• Do not use in the presence of
flamable gas
• Keep out of the reach of children
• Do not expose to excessive
temperatures or strong direct sunlight
• Do not leave the unit in the trunk or
on the dashboard of a vehicle.
Overheating can result in leaking, fire
or explosion
• Observe correct polarity
• Dispose in accordance with
appropriate environmental regulations
• Take battery out of unit if stored for
an extended period of time.
R&TTE Directive Declaration
Hähnel Industries hereby declares that the
Giga T Pro II is in compliance with the
essential requirements and other relevant
provisions of the R&TTE Directive
1999/5/EC. A copy of the Declaration of
Conformity can be viewed at
www.hahnle.ie
18
17
16
15
14

Empfänger
LCD-Monitor
Power ON/OFF Taste
& Kanalauswahl
Hintergrundbeleuchtung ON / OFF
& Kanalauswahl
LED-Licht
Empfänger LCD-Monitor
Sender
LED-Licht
Sende-Taste
LCD-Monitor
Play / Stop-Taste
Power ON / OFF Taste &
Hintergrundbeleuchtung ON / OFF
Mittlere Taste zum Bestätigen
der Einstellung
4-Wege Joypad
Sender LCD-Monitor
Kabel
Anschlußkabel
4-Wege-Sender-Joypad
Mittlere Taste zum Bestätigen der
Einstellungen
Pfeiltasten: zur Auswahl der Modus-
Einstellung, z.B. Einzelbild, Serienbild,
Verzögerung, Langzeit, Timer;
benutzen Sie die links- und rechts
Richtungspfeil-Tasten
Stellen Sie die Werte für Timer,
Belichtungszähler & Intervalle oder
Kanäle mit den oben- und unten
Richtungspfeilen ein
Intervall-Timer-Funktionen
Verzögerungs-Einstellung
Langzeit-Einstellung
Intervall 1 Einstellung
N1 Anzahl der Belichtungen
Intervall 2 Einstellung
N2 Anzahl der Wiederholungen
Sekunden
Minuten
Stunden
Standard-
Funkfernbedienungs-
Einstellungen
Kanal-Auswahl
Basis-Timer-Modus
Bulb-Modus
Serienbild-Modus
Einzelbild-Modus
26
25
24
23
22
21
20
19
18
17
16
15
14
13
11
10
12
11
10
9
8
7
6
5
4
3
2
1
Einstellen des Giga t Pro II
So schalten Sie Ihr Giga T Pro II ein
Vergewissern Sie sich, dass Kamera und
Empfänger ausgeschaltet sind, bevor Sie sie
verbinden.
Befestigen Sie den Empfänger auf dem
Blitzschuh der Kamera.
Verbinden Sie das Giga T Pro II mit der
Fernbedienungsbuchse der Kamera;
verwenden Sie dazu das entsprechende,
beiligende Kabel.
Um den Empfänger ein- oder auszuschalten
halten Sie die Pwer-Taste gedrückt. Schalten
Sie die Kamera ein.
Um den Sender ein- oder auszuschalten
halten Sie die Pwer-Taste gedrückt.
Beachten Sie: wenn Sie den Sender länger
als 60 Sekunden nicht bedienen, schaltet er
sich automatisch aus.
LCD-Hintergrundbeleuchtung
Empfänger: halten Sie die
Hintergrundbeleuchtungstaste gedrückt
Sender: halten Sie die
Hintergrundbeleuchtungstaste gedrückt
Kanal-Auswahl
Damit Sender und Receiver in Verbindung
stehen müssen beide Geräte uaf den
gleichen Kanal eingestellt sein.
Die Voreinstellung zeigt auf beiden LCD-
Monitoren den aktiven Kanal (z.B.: CH02). Um
den Kanal des receivers zu wechseln halten
Sie die BEIDEN Kanalauswahltasten gedrückt
bis der LCD-Monitor aufleuchtet. Verwenden
Sie die Kanal-Tasten um die Kanaleinstellung
zu ändern. Um den Kanal einzustellen halten
Sie BEIDE Kanalauswahltasten gedrückt.
Um den Kanal des Senders zu wechseln
gehen Sie mit dem joypad in den Kanal-
Auswahlmodus und drücken die die mittlere
Auswahltaste. Ihre Auswahl können Sie mit
dem Joypad umstellen und mit der mittleren
Taste bestätigen. In den FAQ können Sie
Vorteile der weiteren Känale beschrieben
9
9
3
A
DE

Standard
Funkfernbedienungseins
tellung
Einzelbildaufnahme-Modus
Vergewissern Sie sich,
dass die Kamera auf Einzelbildaufnahme-
Modus ist. Shen Sie dazu in der Anleitung
der Kamera nach. Stellen Sie den Sender
auf Einzelbildaufnahme mit dem 4-Wege-
Joypad ein. Um den Autofokus zu
verwenden vergewissern Sie sich, dass
die Kamera im AF-Modus eingestellt ist.
Drücken Sie die Sendertaste zur Hälfte
durch. Ein grünes Licht des Senders und
Empfängers zeigt an, dass der Autofocus
eingeschaltet ist.
Zum Auslösen drückden Sie die
Sendertaste ganz durch. Ein rotes Licht
des Senders und Empfängers zeigt an,
dass ein, Einzelbild aufgenommen wurde.
Serienbildaufnahme
Vergewissern Sie sich dass
die Kamera im Serienbildmodus
eingestellt ist.
Stellen Sie den Sender aud
Serienbildaufnahme ein. Drücken Sie die
Sendetaste zur Hälfte durch um den
Autofokus zu aktivieren. Halten Sie die
Sendertaste ganz durchgedrückt. Die
Kamera nimmt Serienbildaufnahmen
solange Sie die Sendertaste gedrückt
halten.
Bulb-Modus -
Langzeitbelichtungen
Stellen Sie die Kamera und Sender im
bulb-Modus ein. Drücken Sie die
Sendetaste zur Hälft durch um den
Autofokus zu aktivieren. Drücken Sie die
Sendetaste ganz durch um den Verschluss
zu öffnen. Dücken Sie die Sendertaste
erneut um den Verschluß zu schließen
und ds Display auszuschalten.
Basis-Timer-Modus
Stellen Sie eine bestimmter Aufnahme-
Anzahl und eine bestimmte Zeitverzögerung
vor der ersten Aufnahme ein.
Vergewissern Sie sich dass die Kamera im
Einzelbildaufnahme-Modus eingestellt ist.
Stellen Sie den Sender im Basis-Timer-
Modus ein.
Drücken Sie die Auswahltaste. Stellen Sie
die Anzahl der Aufnahmen mit dem Joypad
ein; danach stellen Sie Zeit bis zur ersten
Auslösung ein. Drücken Sie die
Auswahltaste um die Einstellung zu
bestätigen und zu speichern. Drücken Sie
die Sendetaste zur Hälfte durch. Drücken
Sie danach die Sendetaste ganz durch.
Die Kamera wird vor jeder Aufnahme
autofokussieren. Lesen in den FAQ nach
um den Autofokus auszuschalten.
Programmierbare
Intervall-Timer-
Funktionen
Um den Giga T Pro II Intervall-Timer zu
programmieren, setzen Sie Werte für die
“Basis-Programmierung” ein, indem Sie
die Werte für Vezögerung,
Langzeitbelichtung, Intervall 1 und N1
eingeben.
Um die Anzahl der Wiederholungen des
“Basis-Programms” einzugeben, legen Sie
die Werte für Frequenz und Intervall mit
den Intervall 2 und N2-Parametern fest.
Die Kamereinstellungen beeinflussen jede
dieser Funktionen.
Für Serien programmierter
Einzelaufnahmen, vergewissern Sie sich
dass die Kamera im Einzelbildmodus ist.
Für Langzeitbelichtungen muss die
Kamera im “continous buln-Modus” sein.
Verzögerung: Zeitpunkt in Stunden,
Minuten und Sekunden
bevor das Intervall-
Aufnahmeprogramm startet.
Benutzen Sie den Joypad um die
gewünschte Verzögerungszeit einzugeben
bevor das Programm beginnt. Drücken Sie
die Auswahltaste um die Auswahl zu
bestätigen.
13
DELAY LONG INTVL1 N1 INTVL2 N2
13 14 15 16 17 18
C
Zeitverzöger
ung bis zur
ersten
Aufnahme in
Sekunden
Anzahl der Auslösugen
23
24
25
26
B

Einstellen der Parameter für das
Basis-Programm
Langzeit: A: Rücksetzen der Werte
Für Einzelbildaufnahme
auf 00 00 00
B: Serienbildaufnahme
legt die Dauer der Serie fest
C: Langzeitaufnahme -
Einstellen der Zeit die der
Verschluß geöffnet ist
Intervall 1: Zeitintervall zwischen
den Einzelaufnahmen
ufnahmen; oder im
Serienbildmodus zwischen
den Serien
Der eingegebene Wert muss höher sein
als die Verschlusszeit der Kamera.
N1: A: Für Einzelbildaufnahme
Anzahl der Aufnahmen
B: Im Serienbildmodus:
Anzahl der Serien
C: Bulb-Belichtung:
Anzahl der Aufnahmen
Einstellung der Parameter zur
Programmwiederholung
Intervall 2: Zeitintervall zwischen
jeder Wiederholung des
“Basis-Programms”.
N2: Anzahl der Wiederholungen
des “Basis-Programms”
Das Programm ist jetzt eingestellt.
Drücken Sie Start / Stop.
Beachten Sie: Zweimal grünes
Aufleuchten des Empfängers zeigt an,
dass das Intervalltimer-Programm läuft.
Das Basis-Programm einmalig
ablaufen lassen
Stellen Sie die Parameter des Basis-
Programms normal ein.Ignorieren Sie die
Intervall 2 Einstellung und stellen Sie N2
auf 1 ein.
Unter www.hahnel.ie finden Sie weitere
Beispiele.
FAQ's
Um den Autofokus zwischen
Serienaufnahmen oder in der Basis-
Timerfunktion auszuschalten, schalten Sie
den Autofokus an Ihrer Kamera aus.
Mehrere Kanäle können mit dem Sender
ausgewählt werden; damit können
mehrere Empfänger, auf jeweils einem
festgelegten Kanal, mit einem Sender
angesteuert werden. Wechseln Sie einfach
die Kanäle des Senders um den
jeweiligen Empfänger anzusteuern.
Um die Anzahl der Aufnahmen zu
berechenen multiplizieren N1 x N2.
Im Serienbildmodus berechnen Sie das
Anzahl der Bilder folgendermaßen:
Multiplizieren Sie die Bilder pro Sekunde x
Länger der Aufnahme x N1 x N2
Warnung
• Das produkt darf nicht verändert
werden
• Der Sender und Empfänger sollten
gegen Feuchtigkeit. Wasser und
andere Flüssigkeiten geschützt
werden
• Das Produkt darf nicht im Bereich
entzündbarer Gase verwendet werden
• Das Produkt ist nicht für Kinder
geeignet
• Das Produkt darf nicht überhitzt oder
verbrannt werden
• Das Produkt darf nicht im Kolferraum
oder im Auto unter Glas abgelegt
werden. Überhitzungs-Gefahr
• Vermeiden Sie falsche Polarität
• Das Produkt sollte nicht mit
eigelegten Batterien gelagert werden
• Die Entsorgung des Produkts muss
entsprechend der geltenden
Vorschriften erfolgen
18
17
16
15
14

Récepteur
Ecran LCD
Bouton ON/OFF & Selecteur de canaux
Bouton de rétro-éclairage ON/OFF
& Sélecteur de canaux
Témoin LED
Ecran LCD Récepteur
Emetteur
Témoin LED
Bouton de transmission
Ecran LCD
Bouton Envoi/Arret
Bonton ON/OFF & Bouton de
rétro-éclairage ON/OFF
Bouton de confirmation
des paramètres
Joypad 4 directions
Ecran LCD Emetteur
Cable
Cable de Connection
Emetteur Joypad 4 directions
Bouton central pour accepter et
confirmer les paramètres
Touches fléchées. Pour sélectionner
les paramètres par exemple: le mode
vue par vue, le mode rafale, le délai, la
minuterie en utilisant les fléches
situées à gauche ou à droite. Pour
ajuster l'intervalomètre, l'exposition &
le nombre d'intervals ou les canneaux
utilisez les touches fléchées en haut et
en bas.
Fonctions Intervalomètre
Réglage du délai
Réglage temps
Réglage intervalle 1
N1 Nombre d'expositions
Réglage intervalle 2
N2 Nombre de répétition
Secondes
Minutes
Heures
Fonctions de la
Télécommande sans Fil
Sélecteur de canaux
Mode Minuterie
Mode pose B
Mode Prise de vue Continu
Mode Vue par Vue
26
25
24
23
22
21
20
19
18
17
16
15
14
13
11
10
12
11
10
9
8
7
6
5
4
3
2
1
Mise en fonction de la
Giga T Pro II
Mise sous tension de la
télécommande à distance sans
fil Giga T Pro II
Assurez-vous que l'appareil et que le
recepteur de la télécommande soient éteint
avant toute connection
Fixez le recepteur sur la griffe flash de
l'appareil.
Connectez la Giga T Pro II à la prise de
télécommande de l'appareil, en utilisant le
cable de connection livré avec la
télécommande.
Pour allumer ou éteindre (On/Off) le
récepteur, appuyez et maintenez le bouton
ON/OFF . Puis mettre l'appareil sous
tension.
Pour allumer ou éteindre (On/Off) l'émetteur,
appuyez et maintenez le bouton ON/OFF
Note: L'émetteur s'éteint automatiquement
après 60 seconde d'inactivité.
Rétro-éclairage LCD
Sur le récepteur: appuyez et maintenez le
bouton
Sur l'émetteur: appuyez et maintenez le
bouton
Choix du canal
Pour communiquer, l'émetteur et le
recepteur doivent être sur le même canal.
La valeur par défaut sur les deux écrans
LCD affiche le même canal (CH02). Pour
changer de canal sur le récepteur, appuyez
et maintenez SIMULTANEMENT les deux
boutons (2et3) jusqu'au cligotement des
nouveaux canaux dans l'écran LCD. Puis
utilisez individuellement un des deux
bouton de selection pour changer de canal.
Pour selectionner et confirmer votre choix
appuyez et maintenez SIMULTANEMENT les
deux boutons (2et3).
Pour changer de canal sur l'émetteur,
utilisez le joypad à 4 directions changer de
canal, appyez alors sur le bouton central
pour confirmer votre choix. Reportez-vous
au paragraphe FAQ pour plus d'information
sur la sélection des canaux
9
9
3
9
2
A
FR

Fonctions standards de
la télécommande
Mode vue par vue
Assurez-vous que l'appareil est bien en mode
vue par vue. Reportez-vous au mode d'emploi
de l'apparei.
Utilisez le joypad 4 directions, et mettre
l'émetteur en mode vue per vue (Single Shot).
Pour que la mise au point automatique soit
assurée veillez à ce que l'autofocus soit en
fonction.
Appuyez à mi-course sur le bouton de
l'émetteur. Un lumière verte sur l'émetteur et le
recepteur indiquent que l'autofocus est actif.
Appuyez à fond sur le bouton pour déclencher
l'obturateur. Une lumière rouge sur l'émetteur
et le recepteur indiquent que la prise de vue a
été enregistrée.
Mode rafale
Assurez-vous que l'appareil
est bien en mode continu.
Mettre l'émetteur en mode prise de vue
en continu.
Appuyez à mis course pour obtenir la
mise au point automatique.
Appuyez à fond et maintenez le bouton de
l'émetteur. L'appareil effectuera des
prises de vue en rafalle tant que le bouton
sera maintenu.
Pose B - Temps de pose long
Assurez-vous que l'appareil est bien en
mode B (Bulb).
Mettre l'émetteur en mode B.
Appuyez à mis course pour obtenir la
mise au point automatique.
Appuyez à fond sur le bouton pour ouvrir
l'obturateur. L'affichage témoigne du
temps d'ouverture de l'obturateur.
Appuyez à nouveau sur le bouton pour
refermer l'obturateur et stoper l'affichage.
Mode minuterie de base
Pour définir un certain nombre de prise de
vue avec un délai bien spécifique avant
l'enregistrement de la première image.
Assurez-vous que l'appareil est bien en
mode vue par vue.
Assurez-vous que l'émetteur est bien en
mode minuterie (Basic Timer Mode).
Appyez sur le bouton central. Utilisez le
joypad 4 directions pour sélectionner le
nombre de vues puis le délai entre
chaque vue. Appuyez alors sur le bouton
central pour confirmer votre choix.
Appuyez à mis course sur le bouton de
l'émetteur.
Appuyez à fond sur le bouton de
l'émetteur.
L'appareil fera la mise au point entre
chaque prise de vue. Reportez-vous au
paragraphe FAQ pour supprimer
l'autofocus
Fonctions minuterie
programmable avec
interval
Pour programmer la Giga T Pro II en mode
intervallomètre, vous devez définir les
valeurs pour le mode de “minuterie de
base” en imputant le délai, le temps de
pose, l'interval1et le nombre d'intervals N1.
Pour répéter ce “programme de base”
définissez les valeurs de la fréquence et
l'interval entre chaque séquence en
utilisant l'interval 2 and le paramètre N2 .
Les réglages de l'appareil pourront affecter
ces fonctions. Pour une série en vue par
vue assurz-vous que l'appareil est bien
dans ce mode de fonctionnement.
Pour les prises de vue en rafale assurez-
vous que l'appareil est bien en mode
continu.
Pour les temps de pose long assurez-vous
que l'appareil est bien en pose B (Bulb).
Delai: Le temps en heures,
minutes et secondes doit
être défini avant le
commencement de la
programmation.
Utilisez le joypad 4 directions pour
13
DELAY LONG INTVL1 N1 INTVL2 N2
13 14 15 16 17 18
C
Délai en
seconde
entre
chaque vue
Numbre de vues
23
24
25
26
B

sélectionner le temps désiré avant le
commencement du programme. Appuyez
sur le bouton central pour confirmer cette
sélection.
Pour définir les paramètre du
programme de base
Long: A: Pour le vue par vue
sélectionnez 00 00 00
B: Pour les prises de vue
en continu
définir le temps de la rafale
C: Pour la pose B - définir
le temps d'ouverture de
l'obturateur
Intervalle 1: L'intervalle de temps
entre chaque vue ou, enter
chaque rafale doit être
supérieur au temps
d'exposition.
N1: A: Pour le vue par vue
sélectionnez le nombre de
vue à prendre.
B: Pour le mode continu
sélectionnez le nombre de
rafales.
C: Pour la pose B -
sélectionnez le nombre de
vue à prendre
Pour définir la répétition des
paramètres d'un programme
Intervalle 2: Intervalle entre
chaque répétition du
programme de base.
N2: Nombre de fois que le
“programme de base” doit
être répété
Le programme est maintenant défini.
Appuyez sur Marche/Arret (play/stop) pour
activer ou arréter le programme.
Note: Deux témoins verts sur le
recepteur indiquent le fonctionnement de
l'intervalomètre
Pour exécuter le programme de
base une seule fois
Définissez les paramètres du programme
de base comme d'habitude. Ignorez les
réglages Interval 2 et sélectionnez N2 = 1
Voir le site www.hahnel.ie pour plus d'
exemples
FAQ's
Pour désactiver l'autofocus entre chaque
prise de vue, rafale ou en mode
minuterie assurez-vous que l'autofocus
de l'appareil est désactivé.
Un certain nombre de canaux sont
disponibles sur la télécommandece qui
vous permet d'utiliser plusieurs
recepteurs, chacun sur un canal différent,
actvé par un seul émetteur.Il suffit de
changer le canal de l'émetteur pour
actver le récepteur désiré.
Pour calculer le nombre de photos prises
il faut multiplier N1 par N2.
Si vous utilisez le mode rafale; pour
calculer le nombre de photos multipliez le
nombre “d'images par seconde” par le
temps par N1et par N2
Précautions
• Ne pas modifier la produit.
• Maintenir le transmetteur et le
récepteur au sec.
• Ne pas utiliser en cas de présence de
gaz inflammable.
• Tenir hors de portée des enfants.
• Ne pas exposer à des températures
excessives,
ou aux rayons du soleil.
• Ne pas laisser sur le tableau de bord
ou la plage
arrière d’un véhicule.
• Une surchauffe peut entrainer une
fuite, l’embrasement ou l’explosion de
la batterie.
• Respecter la polarité.
• En conformité avec les
réglementations
environnementales.
• Tenir la batterie hors de l'unité si
vous n’utilisez pas l’appareil pendant
une longue période de temps.
18
17
16
15
14

Receptor
Pantalla LCD
Botón de encendido Power ON/OFF
& Selector de canal
Botón de encendido de la luz trasera
ON/OFF & Selector de canal
Luz LED
Receptor Pantalla LCD
Transmisor
Luz LED
Botón Transmisor
Pantalla LCD
Botón Play / Stop
Botón encendido Power ON/OFF
& Botón de luz trasera ON/OFF
Botón central para confirmar
las configuraciones
Panel de Control “ Joypad”
Transmisor Pantalla LCD
Cable
Cable Conector
Botones y flechas del
Transmisor
Botón central para confirmar y aceptar
las configuraciones
Flechas. Para seleccionar el modo de
configuración, por ejemplo, disparo
único, disparo contínuo, retraso,
longitud, temporizador, use las flechas
direccionales izquierda y direcha.
Para ajustar los valores del temporizador,
contador de exposiciones & intervalos o
canales, use las flechas direcionales
arriba y abajo.
Funciones del temporizador
Configuración de retardo
Configuración de long
Configuración de intervalo 1
N1 Número de exposiciones
Configuración de intervalol 2
Número de Repeticiones N2
Segundos
Minutos
Horas
Funciones estandar del
control remoto inalámbrico
Selector de canal
Modo de temporizador básico
Modo Bulbo
Modo de disparo contínuo
Modo de disparo único
26
25
24
23
22
21
20
19
18
17
16
15
14
13
11
10
12
11
10
9
8
7
6
5
4
3
2
1
Configurando el Giga
T Pro II
Encienda su control remoto
inalámbrico Giga T Pro II
Asegúrese que la cámara y el receptor del
control remoto están apagaos antes de
conectarlos.
Inserte el receptor en la zapata de flash de
la cámara.
Conecte el Giga T Pro II a la ranura de
control remoto de la cámara, usando el
cable de conexión correcto incluído.
Para encender o apagar el receptor,
presione y mantenga presionado el botón
Power. Encienda la cámara.
Para encender/apagar el transmisor,
presione y mantenga presionado el botón
Power. Nota: el transmisor
automáticamente se apaga después de 60
segundos de inactividad.
Iluminación trasera LCD
Encender el receptor: presione y
mantenga el botón de luz trasero
Encender el transmisor: presione y
mantenga el botón de luz trasero
Selección de canal
Para comunicar entre el transmisor y el
receptor, ambas unidades deben estar en el
mismo canal.
Por defecto ambas pantallas LCD muestran el
canal activo (por ejemplo: CH02). Para
cambiar el canal en el receptor, presione y
mantenga AMBOS botones de selección de
canal hasta que la pantalla LCD parpadee.
Utilice los botones individuales para cambiar
la configuración de los canales. Para cambiar
el canal en el transmisor, use el panel de
control para ir al Modo Selección de Canal y
presione el botón central. Ajuste mediante el
control de las flechas, configure y confirme
usando el botón central. Consulte la sección
“Preguntas Frecuentes” para ver los
beneficios de canales adicionales
9
9
3
A
ES

Funciones estandar del
Control Remoto
Modo de disparo único
Asegúrese que la cámara está en el modo
de disparo único. Consulte el manual de
su cámara.
Use el Panel de Control “joypad” para
configurar el transmisor en Modo de
disparo único. Para autofocus asegúrese
que la cámara tiene el autofocus activado.
Presione hasta la mitad el botón del
transmisor. La luz verde en el transmisor
y en el receptor significa que el autofocus
está activado.
Para liberar el obturador presione
completamente en el botón del
transmisor. La luz roja en el transmisor y
el receptor indica que se ha realizado un
disparo único.
Modo de disparo contínuo
Asegúrese que la cámara está en modo de
disparo contínuo.
Ponga el transmisor en el modo de disparo
contínuo.
Presione hasta la mitad el botón del
transmisor para autofocus.
Presione completamente y MANTENGA el
botón del transmisor. La cámara dispara
contínuamente durante el tiempo que el botón
del transmisor se mantenga hacia abajo.
Modo Bulbo - Exposiciones Largas
Asegúrese que la cámara está en modo Bulbo.
Ponga el transmisor en Modo Bulbo.
Presione a la mitad el botón del transmisor
para autofocus.
Presione completamente el botón del
transmisor para abrir el obturador. El display
comienza a contar el período de tiempo en el
que el obturador está abierto. Presione el
botón del transmisor de nuevo para cerrar el
obturador y parar el display.
Modo de temporizador básico
Para fijar un número específico de
disparos y fijar un tiempo específico de
retardo antes de tomar la primera foto.
Asegúrese que la cámara está en el modo
de disparo único.
Configure el transmisor al Modo de
Temporizador Básico.
Presione el botón central. Use el Panel de
Control “joypad” para seleccionar el
número de disparos, luego el tiempo de
retardo para el primer disparo. Presione el
botón central para confirmar y guardar la
configuración.
Presione hasta la mitad el botón del
transmisor.
Presione completamente el botón del
transmisor.
La cámara hará un autofocus entre cada
disparo. Consulte “Preguntas Frecuentes”
para desactivar el autofocus.
Funciones Programables
del intervalo del
temporizador
Para programas los intervalos de
temporización del Giga T Pro II, usted
debe configurar los valores del “Programa
Básico” introduciendo los valores en cada
Retardo, Largo, Invalo 1, parámetros N1.
Para configurar las repeticiones del
“Programa Básico”, configure los valores
para la frecuencia e intervalo usando el
Intervalo 2 y parámetros N2.
Las configuraciones de la cámara afectan
a cada una de estas funciones. Para
series de tiempo de disparos únicos,
asegúrese que la cámara está en modo
de disparo único.
Disparo contínuo, asegúrese que la
cámara está en modo de disparo
contínuo.
Exposiciones largas, asegúrese que la
cámara está en modo de Bulbo contínuo.
Retardo: TTiempo en horas,
minutos y segundos antes
que el programa completo
de intervalos de disparo
comience.
13
DELAY LONG INTVL1 N1 INTVL2 N2
13 14 15 16 17 18
C
El tiempo de
retardo para
el primer
disparo en
segundos
Número de disparos
23
24
25
26
B

Use el Panel de Control “joypad” para
configurar el retardo deseado antes de
que comience el programa. Presione el
botón central para aceptar la
configuración.
Para configurar los parámetros del
Programa Básico
Largo: A: Para un disparo único
configure los valores de a
00 00 00
B: Para disparo contínuo
Configure la longitud del
intervalo
C: Exposición Bulbo -
Configure la cantidad de
tiempo que estará
abierto el obturador
Intervalo 1: Intervalo de tiempo
entre disparos
Debe ser más alto que la velocidad de
obturación de la cámara
N1: A: Para Disparo Único
configure el número de
disparos a relizar
B: Para Disparo Contínuo
Número de salvas de
disparo contínuo
C: Exposición Bulbo -
Número de disparos a
realizar
Para configurar los parámetros para
Repetición de Programa para
repetición de Programa
Intervalo 2: Tiempo de intervalo
entre cada uno
N2: Número de veces que el
anterior “Programa Básico”
es repetido.
El programa está ahora fijado. Presione
(play/stop) para activar o parar el
programa.
Nota: Una luz verde doble parpadeando
en el receptor indica que un intervalo del
programa de temporización está en
operación.
Para ejecutar el Programa Básico
sólo una vez
Configure los parámetros del Programa
Básico como normal. Ignore la
configuración del Intervalo 2 y configure
N2 = 1
Ver www.hahnel.ie para ejemplos
Preguntas más frecuentes
Para apagar el autofocus entre los
disparos de tomas sequenciales o la
Función de Temporizador Básico,
asegúrese que el Autofocus está
desactivado en su cámara.
Un número de canales están disponibles
en su control remoto para permitirle a
usted utilizar varios receptores, cada uno
configurado a diferentes cananles,
activados por un único transmisor.
Símplemente cambie el canal en el
transmisor como se desee para activar
cada receptor separadamente.
Para calcular el número de disparos
tomados, multiplique N1 x N2
Si está usando disparo contínuo, para
calcular el número de disparos,
multiplique las“fotos por segundo” que la
cámara tenga configurada x Long x N1 x
N2.
Advertencia
• No modifique la producto
• Mantenga siempre secos el receptor
y el transmisor
• No lo use en presencia de gas
inflamable
• Manténgalo fuera del alcance de los
niños
• No lo exponga a una temperatura
excesiva ni a
Fuertes rayos de sol.
• No deje el aparato en el maletero ni
en el
salpicadero de un vehiculo. Un
sobrecalentamiento
puede producir fugas, fuego o
explosión
• Observe la polaridad correcta
• Actúe de acuerdo con las normas
legales del medio ambiento
• Mantenga la batería fuera del aparato
cuando no
vaya a usarse durante un largo
período de tiempo.
18
17
16
15
14

Receptor
Écran LCD
Interruptor ON/OFF & Selector
de Canais
Interruptor anterior ON/OFF &
Selector de Canais
LED luminoso
Receptor Écran LCD
Transmissor
LED luminoso
Botão Transmissor
Écran LCD
Interruptor Play / Stop
Interruptor ON/OFF & interruptor
de luz traseira ON/OFF
Interruptor Central de confirmação
de definições
Transmissor 4-Teclas
Transmissor Écran LCD
Cabo
Cabo de Ligação
Transmissor 4-Teclas
Interruptor Central para confirmar e
aceitar as definições
Teclas com Setas para selecionar os
modos: Disparo Simples, Disparo
Continuo, Atraso, Longo, Relogio,
utilize as setas direcionais esquerda e
direita
Para ajustar os valores do relógio,
intervalos de disparo e exposição
utilize as setas direcionais para baixo
e para cima.
Funções do Intervalometro
Função de Atraso
Função Longa
Defenição 1 de Intervalo
N1 Numero de Exposições
Defenição 2 de Intervalo
N2 Numero de Repetições
Segundos
Minutos
Horas
Funções Standard do Controlo
Remoto Sem Fios
Selector de Canal
Modo Básico de Relogio
Modo Bulb
Modo de Disparo Continuo
Modo de Disparo Unico
26
25
24
23
22
21
20
19
18
17
16
15
14
13
11
10
12
11
10
9
8
7
6
5
4
3
2
1
Configurar o Giga T Pro II
Ligar o seu Controlo Remoto
Sem Fios Giga T Pro II
Assegure-se que antes de ligar o Giga T
Pro II, a camera e o receptor estão
desligados.
Coloque o Receptor no porta acessórios
da camera
Ligue o Giga T Pro II ao controlo remoto
da camera, usando o cabo incluido.
Para ligar o On/Off do Receptor, pressione
e mantenha o interruptor Power da
camera.
Para ligar e desligar o transmissor
pressione e mantenha o botão Power.
Nota: O transmissor desliga-se
automaticamente ao fim de 60 segundos
de inatividade.
Luz Traseira do LCD
No Receptor: Pressione e mantenha o
botão backlight
No Transmissor: Pressione e mantenha o
botão backlight
Selecção de Canal
Para comunicar entre o transmissor e o
receptor, ambas unidades devem estar no
mesmo canal.
O padrão em ambos ecrãs LCD exibem o
canal activo (exemplo: CH02).
Para mudar o canal no receptor, pressione
e segure ambos os botões do selector de
canal até que o LCD pisque. Use os
botões de canal individual para alterar a
configuração do canal. Para definir e
confirmar o canal, pressione ambos os
botões do selector de canais.
Para mudar de canal no transmissor, use
as 4 teclas para ir ao canal selector do
modo e pressione o botão central. Ajuste
usando as 4 teclas, para definir e
confirmar utilize o botão central. Consulte
o FAQ para benefícios de canais
adicionais
9
9
3
A
PT

Funções Standard do
Controlo Remoto Sem Fios
Modo de Disparo Unico
Certifique-se de camera está no modo de
disparo único. Consulte o manual da camera.
Usando as 4 teclas, coloque transmissor em
Modo de Disparo Unico.
Assegure que a camera está em modo de
focagem automática, para a função
Autofocus.
Pressione metade do botão do transmissor. A
luz verde do emissor e do receptor indica
que a focagem automática é activada.
Para fotografar carregue totalmente no
interruptor do Transmissor. A luz vermelha do
transmissor e no receptor indica que uma
única fotografia foi efectuada
Modo de Disparo Continuo
Certifique-se de camera está no modo de
disparo contínuo.
Transmissor colocado em modo de disparo
contínuo.
Pressione metade do botão de focagem
automática do transmissor.
Pressione e segure totalmente o botão do
transmissor. A camera fotografa continuamente
enquanto o botão é pressionado.
Modo Bulb - Exposições Longas
Certifique-se a que a camera está em
modo Bulb.
Coloque o transmissor em modo Bulb.
Pressione metade do botão do
transmissor de Autofocus.
Pressione e segure totalmente o botão do
transmissor. Exposição começa a contar o
período de tempo que o obturador fica
aberto. Pressione novamente o botão do
Transmissor para para fechar o obturador
e interromper a exposição.
Modo Básico de Relogio
Para definir um número específico de
fotografias e para definir um
retardamento programado antes de fazer
a primeira fotografia.
Certifique-se que a camera está no modo de
disparo único.
Defina o transmissor para o modo Temporizador
Básico.
Pressione o botão central. Use as 4 teclas para
seleccionar o número de disparos, em seguida, o
tempo de retardamento para o primeiro disparo.
Pressione o botão central para confirmar e salvar a
configuração.
Pressione metade do botão do transmissor.
Pressione a totalidade do botão do transmissor.
Câmara vai estar em Autofocus entre cada
disparo. Consulte o FAQ retirar o Autofocus.
Fuinções Programáveis
de Intervalometro
Para programar o intervalo do
temporizador T Giga Pro II, deve definir os
valores para o "Programa Básico",
introduzindo os valores em cada um dos
Atraso, Longo, um intervalo, N1
parâmetros.
Para definir as repetições do "Programa
de Base", defina os valores de frequência
e intervalo usando o intervalo de dois
parâmetros e N2.
Alterar as configurações da câmera em
cada uma destas funções. Para as séries
de Disparo único, garantir câmara está no
modo Disparo Único.
Disparo Continuo, garantir câmara está no
modo de fotografia contínua.
Exposições Longas, garantir câmara está
no modo Bulb Contínuo.
Atraso:Tempo em horas, minutos e
segundos antes do inicio do
programa.
Use as 4 teclas para definir o tempo de
atraso desejado antes do programa
começar. Pressione o botão central para
aceitar a configuração.
13
DELAY LONG INTVL1 N1 INTVL2 N2
13 14 15 16 17 18
C
Tempo em
segundos
para o
retardamento
do primeiro
disparo
Numero de disparos
23
24
25
26
B

Para definir os parâmetros para o
Programa de Base
Longo: A: Para Disparo Único
Ajuste os valores para 00
00 00
B: Para disparo contínuo
Defina o disparo continuo.
C: Lâmpada de Exposição
- Define o tempo que o
obturador fica aberto
Intervalo 1: Intervalo de tempo
entre o disparo ou, em caso
de disparo contínuo:
Interval1 modo, entre
exposições.
Deve ser definido maior do que a
velocidade do obturador da camera
N1: A: Para Disparo Único
Define o Número de foto
tirada
B: Para disparo contínuo
Número de disparo em
contínuo
C: Lâmpada de Exposição
- Número de fotos tiradas
Para definir os parâmetros para a
repetição do programa
Intervalo 2: Intervalo de tempo
entre cada repetição do
"Programa Básico":
Interval2
N2: Número de vezes acima do
"Programa Básico" é
repetido.
O programa já está definido. Pressione o
botão (play / stop) para activar ou
interromper o programa.
Nota: Duplo flash verde no receptor
indica um programa temporizador de
intervalo em funcionamento.
Para executar o Programa de
Base apenas uma vez
Definir parâmetros para Programa de
Base como normal. Ignorar Intervalo
configuração 2 e N2 set = 1
Veja www.hahnel.ie exemplos
FAQ's
Para desligar o Autofocus entre disparo
sequencial ou na função Básica de
Relógio, garantir que o Autofocus é
desactivado na sua camera.
Um número de canais disponíveis no seu
controle remoto para permitir que use
vários receptores, cada um definido para
um canal diferente, activado por um único
transmissor. Basta mudar o canal no
transmissor, como desejado para activar
cada receptor separado.
Para calcular o número de fotos tiradas,
multiplicar N1, N2 x.
Se estiver usando disparo contínuo, para
calcular o número de fotos tiradas,
multiplicar fotos por segundo "ajuste da
camera x comprimento x N1 N2 x.
Recomenda
• Use apenas o carregador para
baterias específicas
• Não permitir que o carregador se
molhe ou fique exposto a humidade.
• Mantenha o carregador fora do
alcance de crianças
• Quando a carga estiver completa,
desligue o carregador da fonte de
alimentação.
• Nunca exerça demasiada força
quando estiver a ligar ou a desligar a
bateria, ou uma placa de contacto.
• Mantenha todos os contactos limpos.
• Não pressione para baixo qualquer
um dos contactos.
• Não provoque curto-circuito nos
contactos.
• Nunca guarde a bateria ligada ao
carregador por um de tempo.
• Não exponha a temperaturas
excessivas ou a chama inflamáveis.
• Não desmonte ou modifique o
produto.
18
17
16
15
14

Ställa in Giga T Pro II
Slå på din Giga T Pro II trådlös
fjärrkontroll
Se till att kameran och fjärrkontrollen
mottagare är avstängda innan du ansluter.
Fäst mottagaren till blixtskon på kameran.
Anslut Giga T Pro II till fjärrkontrollen
uttaget på kameran med rätt
anslutningskabel som medföljer.
Att sätta på / av mottagaren, tryck och
håll ner strömbrytaren. Slå på kameran.
Att sätta på / stänga av sändaren, tryck
och håll ner strömknappen. Obs:
Sändaren stängs av automatiskt efter 60
sekunders inaktivitet.
Bakgrundsbelysning för LCD
På Mottagare: Tryck och håll ner
bakgrundsbelysnings knappen
På Sändare: Tryck och håll ner knapp för
bakgrundsljus
Kanalval
För att kommunicera mellan sändaren och
mottagaren måste båda enheterna vara på
samma kanal.
Den standard på både LCD-skärmar visar
aktiva kanalen (exempel: CH02). För att
ändra kanal på mottagaren, håll båda
Kanalväljare knapparna tills LCD-skärmen
blinkar. Använd enskilda kanal knapparna
för att byta kanal inställningen. Att
fastställa och bekräfta kanalen genom att
trycka på båda knapparna kanalväljare.
För att byta kanal på sändaren använd 4-
vägs knappen för att gå till Kanalväljare
läge och tryck på mittknappen. Justera
med hjälp av 4-vägs knappen, set och
bekräfta med den mittersta knappen. Se
FAQ för fördelarna med ytterligare
kanaler
9
9
3
A
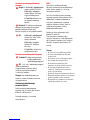
Mottagare
LCD-skärm
Power ON / OFF knappen
och Kanalväljare
Bakgrundsbelysning knappen
ON / OFF och Kanalväljare
LED-ljus
Mottagare LCD-skärm
Sändare
LED-ljus
Sändarknapp
LCD-skärm
Spela / Stopp-knappen
Power ON / OFF knapp och
bakgrundsbelysning knappen ON / OFF
Center-knapp för att bekräfta
inställningar
4-vägs knapp
Sändare LCD-skärm
Kabel
Kabelanslutning
Sändare 4-vägs knapp
Centerknapp för att bekräfta och
acceptera inställningarna
Pilknappar. För att välja Mode Settings,
till exempel. Singel Skytte, bildserier,
Delay, Long, Timer, vänster och höger
riktningspilar
För att justera värdena för timern,
exponering räkna & intervaller eller
kanaler använder upp och ner
riktningspilar.
Intervall timer-funktioner
Fördröjning Inställning
Lång Inställning
Intervall 1 Inställning
N1 antal exponeringar
Intervall 2 Inställning
N2 antal repetitioner
Sekunder
Protokoll
Timmar
Standard trådlös fjärrkontroll
Funktioners
Kanalväljare
Grundläggande timerläge
Bulb Mode
Seriebildtagningsläge
Single Shot-läget
26
25
24
23
22
21
20
19
18
17
16
15
14
13
11
10
12
11
10
9
8
7
6
5
4
3
2
1
SE

Standard Fjärrkontroll
Funktioner
Single Shot-läge
Se till kameran är i single shot-läge. Se
kamerans bruksanvisning.
Använd 4-vägs knappen för att sätta
sändaren i Single Shot.
För autofokus, se till att kameran har
autofokus aktiverat.
Tryck ner sändarknappen till hälften.
Grönt ljus på sändare och mottagare
indikerar att autofokus aktiveras.
För att utlösa slutaren tryck ner
sändarknappen helt. Rött ljus på sändare
och mottagare indikerar en bild har tagits.
Seriebildtagningsläge
Se till att kameran är i
seriebildstagningsläge.
Sätt sändaren i seriebildstagningsläge.
Tryck ner knappen till hälften på sändaren
för att fokusera.
Tryck ner helt och håll sändarknappen.
Kameran tar kontinuerligt så länge som
sändarknappen hålls nedtryckt.
Bulb Mode - långa exponeringar
Se till kameran är i Bulb-läge.
Sätt sändaren i Bulb-läge.
Tryck ner knappen på sändaren till hälften
för att fokusera.
Tryck på sändaren helt för att öppna
slutaren. Displayen börjar räkna tid
slutaren är öppen. Tryck ner sändare
knappen igen för att stänga den och
stoppa i displayen.
Grundläggande Timerläge
För att ställa ett visst antal bilder och att
ange en specifik tid innan den första
bilden tas.
Se till kameran är i single shot-läge.
Ställ in sändaren i Basic timer-läget.
Tryck på mittknappen. Använd 4-vägs
knappen för att välja antal bilder, sedan
tidsfördröjning till första bilden. Tryck
mittknappen för att bekräfta och spara
inställningen.
Tryck till hälften på sändarknappen.
Tryck ner sändarknappen helt.
Kameran kommer att fokusera mellan
varje bild. Se FAQ för att stänga av
autofokus.
Intervalltimern,
programmerbara
funktioner
För att programmera Giga T Pro II
intervalltimer, måste du ställa in värden
för "Basic programmet" genom att mata
in värdena i vart och ett av Delay, Long,
Intervall 1, N1 parametrar.
För att ställa in upprepningar av "Basic
programmet", ställ in värdena för frekvens
och intervall med intervallet 2 och N2
parametrar
Kamerainställningar påverkar var och en
av dessa funktioner. För serie
begränsad enda bild, se till att kameran är
i Single Shot-läget.
Kontinuerlig fotografering i intervall, se till
att kameran är i seriebildtagningsläge.
Lång exponering, se till att kameran är i
Bulb-läge.
Fördröjning: Tid i timmar, minuter
och sekunder innan hela
intervallupptagning
programmet startar.
Använd 4-vägs knappen för att ställa in
önskad tidsfördröjning innan programmet
börjar. Tryck ner center för att acceptera
inställningen.
13
DELAY LONG INTVL1 N1 INTVL2 N2
13 14 15 16 17 18
C
Tidsfördröjni
ng till första
bilden i
sekunder
Antal bilder
23
24
25
26
B
Strona się ładuje...
Strona się ładuje...
Strona się ładuje...
Strona się ładuje...
Strona się ładuje...
Strona się ładuje...
Strona się ładuje...
Strona się ładuje...
Strona się ładuje...
Strona się ładuje...
Strona się ładuje...
Strona się ładuje...
Strona się ładuje...
Strona się ładuje...
Strona się ładuje...
Strona się ładuje...
-
 1
1
-
 2
2
-
 3
3
-
 4
4
-
 5
5
-
 6
6
-
 7
7
-
 8
8
-
 9
9
-
 10
10
-
 11
11
-
 12
12
-
 13
13
-
 14
14
-
 15
15
-
 16
16
-
 17
17
-
 18
18
-
 19
19
-
 20
20
-
 21
21
-
 22
22
-
 23
23
-
 24
24
-
 25
25
-
 26
26
-
 27
27
-
 28
28
-
 29
29
-
 30
30
-
 31
31
-
 32
32
-
 33
33
-
 34
34
-
 35
35
-
 36
36


w innych językach
- español: Hahnel Giga T Pro II Manual de usuario
- italiano: Hahnel Giga T Pro II Manuale utente
- português: Hahnel Giga T Pro II Manual do usuário
- français: Hahnel Giga T Pro II Manuel utilisateur
- dansk: Hahnel Giga T Pro II Brugermanual