Indesit BWA 71052 W EU instrukcja
- Kategoria
- Pralki
- Typ
- instrukcja

GB
1
Contents
Installation, 2-3
Unpacking and levelling
Connecting the electricity and water supplies
The first wash cycle
Technical data
Care and maintenance, 4
Cutting off the water or electricity supply
Cleaning the washing machine
Cleaning the detergent dispenser drawer
Caring for the door and drum of your appliance
Cleaning the pump
Checking the water inlet hose
Precautions and tips, 5
General safety
Load balancing system
Disposal
Description of the washing machine
and starting a wash cycle, 6-7
Control panel
Indicator lights
Starting a wash cycle
Wash cycles, 8
Push & Wash
Table of wash cycles
Personalisation, 9
Setting the temperature
Setting the spin speed
Functions
Detergents and laundry, 10
Detergent dispenser drawer
Preparing the laundry
Garments requiring special care
Troubleshooting, 11
Service, 12
BWA 71052
Instructions for use
WASHING MACHINE
English,1
GB
PL
Cрпски,25
BG SR
Български,13
Polski,37

2
GB
Levelling the machine correctly will provide
it with stability, help to avoid vibrations and
excessive noise and prevent it from shifting
while it is operating. If it is placed on carpet or
a rug, adjust the feet in such a way as to allow
a sufficient ventilation space underneath the
washing machine.
Connecting the electricity and water
supplies
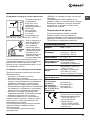
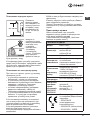
Connecting the water inlet hose
1. Connect the inlet
hose by screwing it
to a cold water tap
using a 3/4 gas thre-
aded connection (see
figure).
Before performing the
connection, allow the
water to run freely un-
til it is perfectly clear.
2. Connect the inlet
hose to the washing
machine by screwing
it onto the correspon-
ding water inlet of the
appliance, which is
situated on the top
right-hand side of the
rear part of the ap-
pliance (see figure).
3. Make sure that the hose is not folded over
or bent.
! The water pressure at the tap must fall within
the range of values indicated in the Technical
data table (see next page).
! If the inlet hose is not long enough, contact a
specialised shop or an authorised technician.
! Never use second-hand hoses.
! Use the ones supplied with the machine.
Installation
! This instruction manual should be kept in a
safe place for future reference. If the washing
machine is sold, transferred or moved, make
sure that the instruction manual remains with
the machine so that the new owner is able to
familiarise himself/herself with its operation
and features.
! Read these instructions carefully: they con-
tain vital information relating to the safe instal-
lation and operation of the appliance.
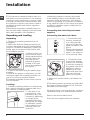
Unpacking and levelling
Unpacking
1. Remove the washing machine from its
packaging.
2. Make sure that the washing machine has
not been damaged during the transportation
process. If it has been damaged, contact the
retailer and do not proceed any further with
the installation process.
3. Remove the 4 pro-
tective screws (used
during transportation)
and the rubber wa-
sher with the cor-
responding spacer,
located on the rear
part of the appliance
(see figure).
4. Close off the holes using the plastic plugs
provided.
5. Keep all the parts in a safe place: you will
need them again if the washing machine ne-
eds to be moved to another location.
! Packaging materials should not be used as
toys for children.
Levelling
1. Install the washing machine on a flat sturdy
floor, without resting it up against walls, furni-
ture cabinets or anything else.
2. If the floor is not
perfectly level, com-
pensate for any une-
venness by tightening
or loosening the
adjustable front feet
(see figure); the angle
of inclination, measu-
red in relation to the
worktop, must not
exceed 2°.

GB
3
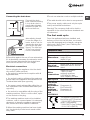
Connecting the drain hose
Connect the drain
hose, without bending
it, to a drain duct or
a wall drain situated
between 65 and 100
cm from the floor;
alternatively, placed
it over the edge of a
basin, sink or tub, fa-
stening the duct sup-
plied to the tap (see
figure). The free end
of the hose should
not be underwater.
! We advise against the use of hose extensions;
if it is absolutely necessary, the extension must
have the same diameter as the original hose
and must not exceed 150 cm in length.
Electrical connections
Before plugging the appliance into the electri-
city socket, make sure that:
• thesocketisearthedandcomplieswithall
applicable laws;
• thesocketisabletowithstandthemaximum
power load of the appliance as indicated in the
Technical data table (see opposite);
• thepowersupplyvoltagefallswithintheva-
lues indicated in the Technical data table (see
opposite);
• thesocketiscompatiblewiththeplugofthe
washing machine. If this is not the case, repla-
ce the socket or the plug.
! The washing machine must not be installed
outdoors, even in covered areas. It is extremely
dangerous to leave the appliance exposed to
rain, storms and other weather conditions.
! When the washing machine has been instal-
led, the electricity socket must remain within
easy reach.
65 - 100 cm
! Do not use extension cords or multiple sockets.
! The cable should not be bent or compressed.
! The power supply cable must only be repla-
ced by authorised technicians.
Warning! The company shall not be held re-
sponsible in the event that these standards are
not observed.
The first wash cycle
Once the appliance has been installed, and
before you use it for the first time, run a wash
cycle with detergent and no laundry, using the
wash cycle “Auto Clean” (see “Cleaning the
washing machine”).
Technical data
Model
BWA 71052
Dimensions
width 59.5 cm
height 85 cm
depth 54 cm
Capacity
from 1 to 7 kg
Electrical
connections
please refer to the technical
data plate fixed to the ma-
chine
Water
connections
maximum pressure
1 MPa (10 bar)
minimum pressure
0.05 MPa (0.5 bar)
drum capacity 52 litres
Spin speed
up to 1000 rotations per minute
Test wash
cycles in
accordance
with re-
gulations
1061/2010
and
1015/2010.
Programme 9:
Eco Cotton 60°.
Programme 9:
Eco Cotton 40°.
This appliance conforms to
the following EC Directives:
- 2004/108/EC (Electroma-
gnetic Compatibility)
- 2006/95/EC (Low Voltage)
- 2012/19/EU (WEEE)

4
GB
Care and maintenance
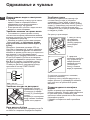
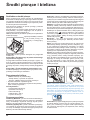
Cleaning the pump
The washing machine is fitted with a self-
cleaning pump which does not require any
maintenance. Sometimes, small items (such
as coins or buttons) may fall into the protective
pre-chamber at the base of the pump.
! Make sure the wash cycle has finished and
unplug the appliance.
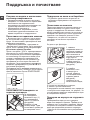
To access the pre-chamber:
1. Take off the cover
panel on the front of
the machine by first
pressing it in the cen-
tre and then pushing
downwards on both
sides until you can re-
move it (see figures).
2. Unscrew the lid
by rotating it anti-
clockwise (see figu-
re): a little water may
trickle out. This is
perfectly normal.
3. Clean the inside thoroughly.
4. Screw the lid back on.
5. Reposition the panel, making sure the hooks
are securely in place before you push it onto
the appliance.
Checking the water inlet hose
Check the inlet hose at least once a year. If
there are any cracks, it should be replaced
immediately: during the wash cycles, water
pressure is very strong and a cracked hose
could easily split open.
! Never use second-hand hoses.
Cutting off the water and electricity
supplies
•Turnoffthewatertapaftereverywashcycle.
This will limit wear on the hydraulic system inside
the washing machine and help to prevent leaks.
•Unplugthewashingmachinewhencleaningit
and during all maintenance work.
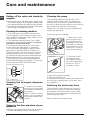
Cleaning the washing machine
•Theouterpartsandrubbercomponents
of the appliance can be cleaned using a soft
cloth soaked in lukewarm soapy water. Do not
use solvents or abrasives.
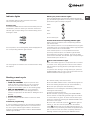
•Thewashingmachinehasa“AutoClean”
programme for its internal parts that must be
run with no load in the drum.
For maximum performance you may want
to use either the detergent (i.e. a quantity
10% the quantity specified for lightly-soiled
garments) or special additives to clean the
washing machine. We recommend running a
cleaning programme every 40 wash cycles.
To start the programme press buttons A and
B simultaneously for 5 seconds (see figure).
The programme will start automatically and
will last approximately 70 minutes. To stop the
cycle press the START/PAUSE button.
Cleaning the detergent dispenser
drawer
To remove the drawer,
press lever (1) and pull
the drawer outwards (2)
(see figure).
Wash it under running
water; this procedure
should be repeated fre-
quently.
Caring for the door and drum of your
appliance
•Alwaysleavetheportholedoorajarinorderto
prevent unpleasant odours from forming.
2
1
1
2
3
A
B

GB
5
Precautions and tips
! This washing machine was designed and constructed in
accordance with international safety regulations. The fol-
lowing information is provided for safety reasons and must
therefore be read carefully.
General safety
• Thisappliancewasdesignedfordomesticuseonly.
• This appliance can be used by children aged
from 8 years and above and persons with re-
duced physical, sensory or mental capabilities
or lack of experience and knowledge if they
have been given supervision or instruction
concerning use of the appliance in a safe way
and understand the hazards involved. Children
shall not play with the appliance. Cleaning and
user maintenance shall not be made by children
without supervision.
• Thewashingmachinemustonlybeusedbyadults,inaccor-
dance with the instructions provided in this manual.
• Donottouchthemachinewhenbarefootorwithwetor
damp hands or feet.
• Donotpullonthepowersupplycablewhenunplugging
the appliance from the electricity socket. Hold the plug
and pull.
• Donotopenthedetergentdispenserdrawerwhilethe
machine is in operation.
• Donottouchthedrainedwaterasitmayreachextreme-
ly high temperatures.
• Neverforcetheportholedoor.Thiscoulddamagethesafety
lock mechanism designed to prevent accidental opening.
• Iftheappliancebreaksdown,donotunderanycircum-
stances access the internal mechanisms in an attempt
to repair it yourself.
• Alwayskeepchildrenwellawayfromtheappliancewhile
it is operating.
• Thedoorcanbecomequitehotduringthewashcycle.
• Iftheappliancehastobemoved,workinagroupoftwo
or three people and handle it with the utmost care. Never
try to do this alone, because the appliance is very heavy.
• Beforeloadinglaundryintothewashingmachine,make
sure the drum is empty.
Load balancing system
Before every spin cycle, to avoid excessive vibrations and
to distribute the load in a uniform manner, the drum rotates
continuously at a speed which is slightly greater than the
washing rotation speed. If, after several attempts, the load is
not balanced correctly, the machine spins at a reduced spin
speed. If the load is excessively unbalanced, the washing ma-
chine performs the distribution process instead of spinning.
To encourage improved load distribution and balance, we
recommend small and large garments are mixed in the load.
Disposal
• Disposingofthepackagingmaterials:observelocal
regulations so that the packaging may be re-used.
• TheEuropeanDirective2012/19/EU-WEEEonWaste
Electrical and Electronic Equipment, requires that
old household electrical appliances must not be
disposed of in the normal unsorted municipal waste
stream. Old appliances must be collected
separately in order to optimise the recovery and
recycling of the materials they contain and reduce
the impact on human health and the environment.
The crossed out “wheeled bin” symbol on the
product reminds you of your obligation, that when
you dispose of the appliance it must be separately
collected.
Consumers should contact their local authority or
retailer for information concerning the correct
disposal of their old appliance.

6
GB
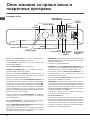
Detergent dispenser drawer: used to dispense deter-
gents and washing additives (see “Detergents and laundry”).
ON/OFF button: switches the washing machine on and off.
PUSH & WASH button: (see “Wash cycles”).
WASH CYCLE knob: programmes the wash cycles. During
the wash cycle, the knob does not move.
FUNCTION buttons with indicator light: used to select the
available functions. The indicator light corresponding to the
selected function will remain lit.
CHILD LOCK button with indicator light: to activate the
control panel lock, press and hold the button for approximately
2 seconds. When the symbol is illuminated, the control
panel is locked (apart from the ON/OFF button). This means
it is possible to prevent wash cycles from being modified
accidentally, especially where there are children in the home.
To deactivate the control panel lock, press and hold the button
for approximately 2 seconds.
TEMPERATURE button: sets the temperature or the cold
wash cycle (see “Personalisation”).
SPIN button: sets the spin speed or exclude the spin cycle
completely (see “Personalisation”).
DELAY TIMER button: delays the start of the wash cycle
by up to 9 hours.
Press the button repeatedly until the indicator light corre-
sponding to the desired delay time turns on.
When the button is pressed for the fourth time, the option
will be deactivated.
N.B.: once the START/PAUSE button has been pressed, the
delay time can only be modified by decreasing it until the set
programme is launched.
! This option is available on all programmes.
WASH CYCLE PROGRESS
indicator light
s: used to mo-
nitor the progress of the wash cycle.
The illuminated indicator light shows which phase is in pro-
gress.
DOOR LOCKED indicator light: indicates whether the door
may be opened or not (see next page).
START/PAUSE button with indicator light: starts or tempo-
rarily interrupts the wash cycles.
N.B. To pause the wash cycle in progress, press this button;
the corresponding indicator light will flash orange, while the
indicator light for the current wash cycle phase will remain lit
in a fixed manner. If the DOOR LOCKED indicator light is
switched off, the door may be opened (wait approximately
3 minutes).
To start the wash cycle from the point at which it was inter-
rupted, press this button again.
Standby mode
This washing machine, in compliance with new energy saving
regulations, is fitted with an automatic standby system which
is enabled after about 30 minutes if no activity is detected.
Press the ON-OFF button briefly and wait for the machine
to start up again.
Description of the washing
machine and starting a wash cycle
Control panel
WASH CYCLE PROGRESS
indicator lights
DOOR
LOCKED
indicator light
START/PAUSE
button with indicator
light
Detergent dispenser drawer
ON/OFF
button
WASH CYCLE
knob
DELAY TIMER
button
TEMPERATURE
button
SPIN
button
FUNCTION
buttons with
indicator lights
PUSH & WASH
button
CHILD LOCK
button with
indicator light

GB
7
Indicator lights
The indicator lights provide important information.
This is what they can tell you:
Delayed start
If the DELAY TIMER function has been activated (see “Per-
sonalisation”), after the wash cycle has been started the
indicator light corresponding to the selected delay period
will begin to flash:
As time passes, the remaining delay will be displayed and
the corresponding indicator light will flash:
The set programme will start once the selected time delay
has expired.
Wash cycle phase indicator lights
Once the desired wash cycle has been selected and has be-
gun, the indicator lights switch on one by one to indicate which
phase of the cycle is currently in progress.
Function buttons and corresponding indicator lights
When a function is selected, the corresponding indicator
light will illuminate.
If the selected function is not compatible with the program-
med wash cycle, the corresponding indicator light will flash
and the function will not be activated.
If the selected option is not compatible with another
previously selected option, the indicator light will flash
accompanied by a buzzer (3 beeps), and only the latter
option will be activated; the indicator light corresponding to
the activated option will turn on
Door locked indicator light
When the indicator light is on, the porthole door is locked
to prevent it from being opened; make sure the indicator
light is off before opening the door (wait approximately 3
minutes).
To open the door during a running wash cycle, press the
START/PAUSE button; the door may be opened once the
DOOR LOCKED indicator light turns off.
Starting a wash cycle
Rapid programming
1. LOAD THE LAUNDRY. Open the porthole door.
Load the laundry, making sure you do not exceed
the maximum load value indicated in the table of
programmes and wash cycles on the following page.
2. ADD THE DETERGENT. Pull out the detergent
dispenser drawer and pour the detergent into the
relevant compartments as described in “Detergents and
laundry”.
3. CLOSE THE DOOR.
4. Press the “PUSH & WASH” button to start the wash
programme.
Traditional programming
1. Turn the washing machine on by pressing the ON/OFF
button. All the indicator lights will turn on for a few secon-
ds, then only the indicator lights relative to the selected
programme settings will remain lit and the START/PAUSE
indicator light will flash.
2. Load the laundry and close the door.
3. Set the WASH CYCLE knob to the desired programme.
4. Set the washing temperature (see “Personalisation”).
5. Set the spin speed (see “Personalisation”).
6. Measure out the detergent and washing additives (see
“Detergents and laundry”).
7. Select the desired functions.
8. Start the wash cycle by pressing the START/PAUSE
button and the corresponding indicator light will remain lit
in a fixed manner in green. To cancel the set wash cycle,
pause the machine by pressing the START/PAUSE button
and select a new cycle.
9. At the end of the wash cycle the indicator light will
switch on. The door can be opened once the DOOR
LOCK indicator light turns off (wait approximately 3 mi-
nutes). Take out your laundry and leave the appliance door
ajar to make sure the drum dries completely. Switch the
washing machine off by pressing the ON/OFF button.
Wash
Rinse
Spin
Drain
End of wash cycle

8
GB
Wash cycles
Table of wash cycles
Push & Wash
This function allows for starting a wash cycle even when the machine is switched off without having to press the ON/OFF
button in advance, or after switching on the machine, without having activated any button and/or selector (otherwise, the
Push & Wash function will be deactivated). To start the Push & Wash cycle press and hold the relative button for 2 seconds.
The lit indicator light indicates that the cycle has started. This wash cycle is ideal for cotton or synthetic fabrics, as it washes
at a temperature of 30° and a maximum spin speed of 1000 rpm. Maximum load 3.5 kg. (Cycle duration 45’).
How does it work?
1. Load the laundry (cotton and/or synthetic garments) and close the door.
2. Pour the detergent and additives.
3. Start the programme by pressing and holding the Push & Wash button for 2 seconds. The relative indicator light turns
green and the door will lock (the DOOR LOCKED symbol turns on).
N.B.: starting the wash cycle through the Push & Wash button activates an automatic non-customisable cycle
recommended for cotton and synthetic fabrics. This programme does not allow for setting any additional options.
To open the door while an automatic cycle is under way, press the START/PAUSE button; if the DOOR LOCKED symbol
is switched off the door may be opened. Press the START/PAUSE button again to restart the wash cycle from the point at
which it was interrupted.
4. Once the programme is finished, the indicator light turns on.
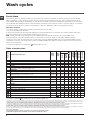
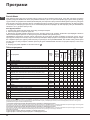
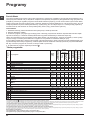
1) Test wash cycle in compliance with regulation 1061/2010: set wash cycle 9 with a temperature of 60°C.
This cycle is designed for cotton loads with a normal soil level and is the most efficient in terms of both electricity and water consumption; it should
be used for garments which can be washed at 60°C. The actual washing temperature may differ from the indicated value.
2) Test wash cycle in compliance with regulation 1061/2010: set wash cycle 9 with a temperature of 40°C.
This cycle is designed for cotton loads with a normal soil level and is the most efficient in terms of both electricity and water consumption; it should
be used for garments which can be washed at 40°C. The actual washing temperature may differ from the indicated value.
For all Test Institutes:
3) Long wash cycle for cottons: set wash cycle 6 with a temperature of 40°C.
4) Synthetic program along: set wash cycle 7 with a temperature of 40°C.
The length of cycle shown on the display or in this booklet is an estimation only and is calculated assuming standard working conditions. The actual duration can vary accor-
ding to factors such as water temperature and pressure, the amount of detergent used, the amount and type of load inserted, load balancing and any wash options selected.
* If you select programme and exclude the spin cycle, the machine will drain only.
Wash cycles
Description of the wash cycle
Max.
temp.
(°C)
Max.
speed
(rpm)
Detergents
Max. load (kg)
Residual
dampness %
Energy
consumption kWh
Total water lt
Cycle duration
Wash
Fabric
softener
Everyday 30° ECO
1
Daily cotton
30° 1000
3.5 - - - 100’
2
Daily synthetics
30° 1000
3.5 - - - 90’
3
Coloureds
30° 1000
3.5 - - - 95’
4
Delicates
30° 0
1 - - - 80’
5
Rapid 30min: to refresh lightly soiled garments quickly (not suitable for wool,
silk and clothes which require washing by hand).
30° 800
3.5 70 0.16 33 30’
Traditionals
6
Cotton (3): lightly soiled whites and delicate colours.
40°
(Max.60°)
1000
7 62 0.97 75 220’
7
Synthetics (4): lightly soiled resistant colours.
40°
(Max.60°)
1000
3.5 46 0.68 55 120’
8
Mixed
40° 1000
7 - - - 100’
9
Eco cotton 60°C (1): heavily soiled whites and resistant colours.
60° 1000
7 62 1.07 52.5 180’
9
Eco cotton 40°C (2): lightly soiled whites and delicate colours.
40° 1000
7 62 0.97 75 220’
10
White cotton: heavily soiled whites and resistant colours.
60°
(Max.90°)
1000
7 - - - 130’
Specials
11
Sport
30° 600
3.5 - - - 55’
12
Duvet: for down-stuffed garments. 30° 1000
2 - - - 110’
13
Wool: for wool, cashmere, etc. 40° 800
1.5 - - - 70’
14
Anti odour
40° 1000
3 - - - 100’
Rinse + Spin - 1000
-
7 - - - 50’
Spin + Drain - 1000
- -
7 - - - 10’
Drain only * -
- -
7 - - - 3’

GB
9
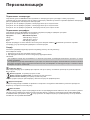
Setting the temperature
Press the TEMPERATURE button to set the wash temperature (see Table of wash cycles).
The temperature may be lowered, or even set to a cold wash (20°). The washing machine will automatically prevent you from
selecting a temperature which is higher than the maximum value set for each wash cycle.
! Exception: if the 6 programme is selected, the temperature can be increased up to a value of 60°C.
! Exception: if the 7 programme is selected, the temperature can be increased up to a value of 60°C.
! Exception: if the 10 programme is selected, the temperature can be increased up to a value of 90°C.
Setting the spin speed
Press the SPIN SPEED button to set the spin speed for the selected wash cycle.
The maximum spin speeds available for each wash cycle are as follows:
Wash cycles Maximum spin speed
Cottons 1000 rpm
Synthetics 1000 rpm
Wool 800 rpm
The spin speed may be lowered, or the spin cycle can be excluded altogether by selecting the symbol .
The washing machine will automatically prevent you from selecting a spin speed which is higher than the maximum speed
set for each wash cycle.
Functions
The various wash functions available with this washing machine will help to achieve the desired results, every time.
To activate the functions:
1. Press the button corresponding to the desired function;
2. the function is enabled when the corresponding indicator light is illuminated.
Note:
- If the selected function is not compatible with the programmed wash cycle, the corresponding indicator light will flash and
the function will not be activated.
- If the selected option is not compatible with another previously selected option, the indicator light will flash accompanied
by a buzzer (3 beeps), and only the latter option will be activated; the indicator light corresponding to the activated option
will turn on.
Stain removal
Thisoptionallowsforselectingthetypeofdirtsoastooptimallyadjustthecycleforremovingthestains.Thefollowingtypes
of dirt can be selected:
- Food, for stains caused by foodstuffs and beverages, for example.
- Work, for grease and ink stains, for example.
- Outdoor, for mud and grass stains, for example.
! The wash cycle duration varies according to the type of selected dirt.
Extra Rinse
By selecting this option, the efficiency of the rinse is increased and optimal detergent removal is guaranteed. It is particularly
useful for sensitive skin.
Easy iron
By selecting this function, the wash and spin cycles will be modified in order to reduce the formation of creases. At the end
of the cycle the washing machine will perform slow rotations of the drum, while the EASY IRON and START/PAUSE indicator
lights will flash and the led will remain lit in a fixed manner. To end the cycle, press the START/PAUSE button or the EASY
IRON button.
Personalisation

10
GB
Detergents and laundry
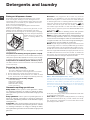
Detergent dispenser drawer
Successful washing results also depend on the correct
dose of detergent: adding too much detergent will not
necessarily result in a more efficient wash, and may in fact
cause build up on the inside of your appliance and contri-
bute to environmental pollution.
! Do not use hand washing detergents because these
create too much foam.
! Use powder detergent for white cotton garments, for pre-
washing, and for washing at temperatures over 60°C.
! Follow the instructions given on the detergent packaging.
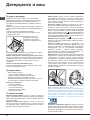
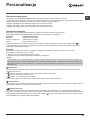
Open the detergent dispenser
drawer and pour in the deter-
gent or washing additive, as
follows.
Compartment 1: Do not pour detergent into the middle
compartment 1.
Compartment 2: Washing detergent (powder or liquid)
If liquid detergent is used, it is recommended that the remo-
vable plastic partition A (supplied) be used for proper dosage.
If powder detergent is used, place the partition into slot B.
Compartment 3: Additives (fabric softeners, etc.)
The fabric softener must not exceed the “max” level indicated
on the central pin.
Preparing the laundry
• Dividethelaundryaccordingto:
- the type of fabric/the symbol on the label
- the colours: separate coloured garments from whites.
• Emptyallgarmentpocketsandcheckthebuttons.
• Do not exceed the values listed in the “Table of wash
cycles”, which refer to the weight of the laundry when dry.
How much does your laundry weigh?
1 sheet 400-500 g
1 pillow case 150-200 g
1 tablecloth 400-500 g
1 bathrobe 900-1.200 g
1 towel 150-250 g
Garments requiring special care
Daily cotton: a 30°C cycle for cotton garments. It allows
for reducing consumption of energy for heating the water,
while guaranteeing excellent results. Suitable for lightly soiled
garments.
Daily synthetics: a 30°C cycle for synthetic garments. It
allows for reducing consumption of energy for heating the
water, while guaranteeing excellent results. Suitable for lightly
soiled garments.
Coloureds: a 30°C cycle that helps to preserve the colours;
suitable for coloured cotton and synthetic garments. It allows
for reducing consumption of energy for heating the water,
while guaranteeing excellent results. Suitable for lightly soiled
garments.
Delicates: use programme 4 to wash very delicate
garments. It is advisable to turn the garments inside out
before washing them. For best results, use liquid detergent
on delicate garments. For washing Silk items and Curtains,
select the relevant cycle and activate the option ; the
machine will end the cycle with the laundry soaked and
the indicator light will flash. To drain the water so that the
laundry can be removed, press the START/PAUSE button
ro the option .
Mixed: a 40°C cycle for washing cotton and synthetic
garments together. Suitable for lightly soiled underwear.
Sport (programme 11) is designed for washing lightly soiled
sports clothing (tracksuits, shorts, etc.); for best results, we
recommend not exceeding the maximum load indicated in the
“Programme table”. We recommend using liquid detergent,
and adding the amount suitable for a half-load.
Duvet: to wash single duvets (the weight of which should not
exceed 2 kg), cushions or clothes padded with goose down
such as puffa jackets, use the special wash programme num-
ber 12. We recommend that duvets are placed in the drum
with their edges folded inwards (see figure) and that no more
than ¾ of the total volume of the drum is used. To achieve the
best results, we recommend that a liquid detergent is used
and placed inside the detergent dispenser drawer.
Wool - Woolmark Apparel Care - Blue:
the wool wash cycle of this machine has been approved by
The Woolmark Company for the washing of wool garments
labelled as “hand wash” provided that the products are
washed according to the instructions on the garment label
and those issued by the manufacturer of this washing
machine. (M1126)
In UK, Eire, Hong Kong and India the Woolmark trade mark
is a Certification trade mark.
Anti odour: use programme 14 (Synthetics) for washing
garments with bad odours (e.g. smoke, sweat, fried food).
The programme is designed to remove bad odours while
preserving the fabric fibres.

GB
11
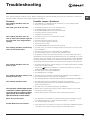
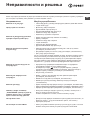
Troubleshooting
Your washing machine could fail to work. Before contacting the Technical Assistance Centre (see “Assistance”), make sure
that the problem cannot be solved easily using the following list.
Problem:
The washing machine does not
switch on.
The wash cycle does not start.
The washing machine does not
take in water (the indicator light for
the first wash cycle stage flashes
rapidly).
The washing machine continuously
takes in and drains water.
The washing machine does not
drain or spin.
The washing machine vibrates a lot
during the spin cycle.
The washing machine leaks.
The “Functions” indicator lights and the
“start/pause” indicator light flash, while
one of the “phase in progress” indicator
lights and the “door locked” indicator
light will remain lit in a fixed manner.
There is too much foam.
Push & Wash does not activate.
Possible causes / Solutions:
• Theapplianceisnotpluggedintothesocketfully,orisnotmakingcontact.
• Thereisnopowerinthehouse.
• Thewashingmachinedoorisnotclosedproperly.
• TheON/OFFbuttonhasnotbeenpressed.
• TheSTART/PAUSEbuttonhasnotbeenpressed.
• Thewatertaphasnotbeenopened.
• Adelayedstarthasbeenset.
• Thewaterinlethoseisnotconnectedtothetap.
• Thehoseisbent.
• Thewatertaphasnotbeenopened.
• Thereisnowatersupplyinthehouse.
• Thepressureistoolow.
• TheSTART/PAUSEbuttonhasnotbeenpressed.
• Thedrainhoseisnotfittedataheightbetween65and100cmfromthefloor
(see “Installation”).
• Thefreeendofthehoseisunderwater(see “Installation”).
• Thewalldrainagesystemisnotfittedwithabreatherpipe.
If the problem persists even after these checks, turn off the water tap, switch
the appliance off and contact the Assistance Service. If the dwelling is on one of
the upper floors of a building, there may be problems relating to water drainage,
causing the washing machine to fill with water and drain continuously. Special
anti-draining valves are available in shops and help to avoid this inconvenience.
• Thewashcycledoesnotincludedraining:somewashcyclesrequirethedrain
phase to be started manually.
• Theoption function is enabled: to complete the wash cycle, press the
START/PAUSE button (“Personalisation”).
• Thedrainhoseisbent(see “Installation”).
• Thedrainageductisclogged.
• Thedrumwasnotunlockedcorrectlyduringinstallation(see “Installation”).
• Thewashingmachineisnotlevel(see “Installation”).
• Thewashingmachineistrappedbetweencabinetsandwalls(see “Installation”).
• Thewaterinlethoseisnotscrewedonproperly(see “Installation”).
• Thedetergentdispenserdrawerisblocked(forcleaninginstructions,see
“Care and maintenance”).
• Thedrainhoseisnotfixedproperly(see “Installation”).
• Switchoffthemachineandunplugit,waitforapproximately1minuteand
then switch it back on again.
If the problem persists, contact the Technical Assistance Service.
• Thedetergentisnotsuitableformachinewashing(itshoulddisplaythetext
“for washing machines” or “hand and machine wash”, or the like).
• Toomuchdetergentwasused.
• AfterswitchingonthemachineacontrolotherthanPush&Washwasactiva-
ted. Switch the machine off and press the Push & Wash button.

12
GB
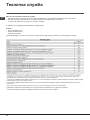
Service
Before calling for Assistance:
• Check whether you can solve the problem alone (see “Troubleshooting”);
• Restarttheprogrammetocheckwhethertheproblemhasbeensolved;
• Ifthisisnotthecase,contactanauthorisedTechnicalAssistanceCentreusingthetelephonenumberprovidedonthe
guarantee certificate.
! Always request the assistance of authorised technicians.
Have the following information to hand:
• thetypeofproblem;
• theappliancemodel(Mod.);
• theserialnumber(S/N).
This information can be found on the data plate applied to the rear of the washing machine, and can also be found on the
front of the appliance by opening the door.

BG
13
Български
Ñúäúðæàíèå
Ìîíòèðàíå, 14-15
Ðàçîïàêîâàíå è íèâåëèðàíå
Свързване към водопровода и електрозахранването
Първи цикъл на пране
Òåõíè÷åñêè äàííè
Ïîääðúæêà è ïî÷èñòâàíå, 16
Ñïèðàíå íà âîäàòà è èçêëþ÷âàíå íà åëåêòðîçàõðàíâàíåòî
Ïî÷èñòâàíå íà ïåðàëíàòà ìàøèíà
Ïî÷èñòâàíå íà ÷åêìåäæåòî çà ïåðèëíèòå ïðåïàðàòè
Поддръжка на люка и на барабана
Ïî÷èñòâàíå íà ïîìïàòà
Ïðîâåðêà íà ìàðêó÷à çà ñòóäåíàòà âîäà
Ìåðêè çà áåçîïàñíîñò è ïðåïîðúêè, 17
Общи мерки за безопасност
Система за измерване на тежестта на товара
Ðåöèêëèðàíå
Îïèñàíèå íà ïåðàëíàòà ìàøèíà è ïóñêàíåòî
íà äàäåíà ïðîãðàìà, 18-19
Òàáëî çà óïðàâëåíèå
Ñâåòëèííè èíäèêàòîðè
Âêëþ÷âàíå íà ïðîãðàìà
Ïðîãðàìè, 20
Push & Wash
Òàáëèöà ñ ïðîãðàìèòå
Ïåðñîíàëèçèðàíèÿ, 21
Çàäàâàíå íà òåìïåðàòóðàòà
Çàäàâàíå íà öåíòðîôóãàòà
Ôóíêöèè
Ïåðèëíè ïðåïàðàòè è äðåõè çà ïðàíå, 22
Чекмедже за перилни препарати
Разпределяне на дрехите за пране
Специални програми
Ïðîáëåìè è ìåðêè çà îòñòðàíÿâàíåòî èì, 23
Ñåðâèçíî îáñëóæâàíå, 24
BG
BWA 71052
Èíñòðóêöèè çà ïîëçâàíå
ÏÅÐÀËÍÀ ÌÀØÈÍÀ

14
BG
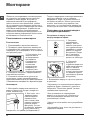
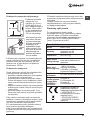
Ìîíòèðàíå
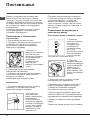
Точното нивелиране позволява машината
да бъде стабилна и да се избягват
вибрациите, шумът и преместването й
по време на работа. Когато настилката
е мокет или килим, регулирайте така
крачетата, че под пералната машина да
остане достатъчно място за вентилация.
Свързване към водопровода и
електрозахранването
Свързване на маркуча към
водопроводната мрежа
1. Свържете
захранващия
маркуч, като го
завиете към крана
за студената вода с
накрайник с газова
резба 3/4 (вижте
фигурата). Преди
да го свържете,
източете водата,
докато се избистри.
2. Свържете
маркуча за
студената вода към
пералната машина,
като го завиете
към специалния
щуцер, разположен
от задната страна,
горе вдясно (вижте
фигурата).
3. Внимавайте маркучът да не се прегъва
и притиска.
! Налягането по водопроводната мрежа
трябва да бъде в границите, указани в
таблицата “Технически данни” (вижте
следващата страница).
! Ако дължината на захранващия
маркуч не е достатъчна, обърнете се
към специализиран магазин или към
упълномощен техник.
! Никога не използвайте вече употребяван
маркуч.
! Използвайте тези, което са доставени с
пералната машина.
! Важно е да съхранявате тези инструкции,
за да можете да правите допълнителни
справки по всяко време. В случай че
пералната машина бъде продадена,
преотстъпена и или преместена, трябва
да се погрижите инструкциите винаги да я
придружават, за да се предостави на новия
собственик информация за работата на
уреда и съответните предупреждения.
! Прочетете внимателно инструкциите: те
съдържат важна информация за монтажа,
използването и безопасността.
Разопаковане и нивелиране
Разопаковане
1. Разопаковайте пералната машина.
2. Проверете дали пералната машина не
е повредена при транспортирането. Ако е
повредена, не я свързвайте, а се обърнете
към дистрибутора.
3. Отстранете 4-те
защитни винта
за предпазване
при превоза
и гумираната
опаковка със
съответния
раздалечител,
намиращи се
в задната част
(вижте фигурата).
4. Затворете отворите с предоставените
пластмасови капачки.
5. Съхранете всички части: целта е да
се монтират отново при необходимост
пералната машина да бъде транспортирана.
! Опаковъчният материал не е играчка за деца.
Нивелиране
1. Монтирайте пералната машина на
равен и твърд под, без да я опирате в
стени, мебели и др.
2. Ако подът не е
идеално равен,
компенсирайте
неравностите,
като отвиете или
завиете предните
крачета (вижте
фигурата). Ъгълът
на наклона, измерен
върху работната
повърхност, не трябва да надвишава 2°.

BG
15
Свързване на маркуча за мръсната вода
Свържете маркуча
за мръсната
вода, без да го
прегъвате, към
канализационната
тръба или
към тръбата
за отвеждане
в стената,
разположени на
височина от пода между 65 и 100 см;
или го подпрете в
края на мивката,
или на ваната,
като вържете
водача за крана
(вижте фигурата).
Свободният край
на маркуча за
мръсната вода не
трябва да бъде
потопен във вода.
! Не се препоръчва използването на
удължаващи маркучи. Ако е необходимо,
удължителят трябва да има същия
диаметър като оригиналния маркуч и да
не надвишава 150 см.
Свързване към електрическата мрежа
Преди да свържете щепсела в контакта,
проверете дали:
• контактът е заземен съгласно
действащите стандарти;
• контактът може да поеме максималната
мощност на натоварване на машината,
указана в таблицата с техническите
данни (вижте следващата страница);
• захранващото напрежение е в границите
на указаното в таблицата с технически
данни (вижте следващата страница);
• контактът отговаря на щепсела на
пералната машина. В противен случай
заменете щепсела или контакта.
! Пералната машина не се монтира на
открито, дори под навес, защото е много
опасно да се остави на влиянието на
атмосферните условия.
! Електрическият контакт на монтирана
перална машина трябва да бъде
леснодостъпен.
! Не използвайте удължители или
разклонители.
65 - 100 cm
! Кабелът не трябва да бъде огънат или
сплескан.
! Захранващият кабел трябва да се
подменя само от упълномощени техници.
Внимание! Фирмата отхвърля всякаква
отговорност в случаите, в които тези
норми не се спазват.
Първи цикъл на пране
След инсталиране и преди употреба
включете един цикъл на изпиране с
перилен препарат, но без дрехи, задавайки
програма „Автоматично почистване“ (вижте
Почистване на пералната машина).
Òåõíè÷åñêè äàííè
Ìîäåë
BWA 71052
Ðàçìåðè
øèðèíà 59,5 ñì
âèñî÷èíà 85 ñì
äúëáî÷èíà 54 ñì
Âìåñòèìîñò
îò 1 äî 7 êã.
Åëåêòðè÷åñêî
çàõðàíâàíå
Âèæ òàáåëêàòà ñ
õàðàêòåðèñòèêèòå,
ïîñòàâåíà íà ìàøèíàòà
Çàõðàíâàíå ñ
âîäà
ìàêñèìàëíî íàëÿãàíå
1 ÌÐà (10 bar)
ìèíèìàëíî íàëÿãàíå
0,05 ÌÐà (0,5 bar)
îáåì íà êàçàíà 52 ëèòðà
Ñêîðîñò íà
öåíòðîôóãàòà
äî 1000 îáîðîòà/ìèíóòà
Програми
за проверка
съгласно
Регламенти
№ 1061/2010 и
№ 1015/2010 на
Комисията
ïðîãðàìà 9;
Екî памук 60 C°.
ïðîãðàìà 9.
Екî памук 40 C°.
Ïåðàëíàòà ìàøèíà
ñúîòâåòñòâà íà ñëåäíèòå
Åâðîïåéñêè äèðåêòèâè:
- 2004/108/ÑÅ (çà
åëåêòðîìàãíèòíà
ñúâìåñòèìîñò)
- 2012/19/EU (WEEE)
- 2006/95/CE (çà íèñêî
íàïðåæåíèå)

16
BG
Поддръжка на люка и на барабана
• Оставяйте люка винаги открехнат за
избягване образуването на неприятни
миризми.
Почистване на помпата
Пералната машина е комплектована със
самопочистваща се помпа, която няма
нужда от поддръжка. Възможно е обаче
малки предмети като монети и копчета да
попаднат във филтъра, който предпазва
помпата и се намира в долната й част.
! Уверете се, че цикълът на пране е
завършил и изключете щепсела от
контакта.
За достъп до филтъра:
1. свалете
покривния панел от
предната страна на
пералната машина,
като натискате в
посока към центъра,
след това го
избутайте от двете
страни надолу и
го извадете (вижте
фигурите).
2. отвийте
капачката, като
я завъртите в
посока, обратна
на часовниковата
стрелка (вижте
фигурата):
нормално е да
изтече малко вода;
3. почистете внимателно отвътре;
4. завийте отново капачката;
5. монтирайте отново панела, като, преди да
го избутате към пералнята, се уверете, че
сте поставили правилно закрепващите куки
в специалните водачи.
Проверка на маркуча за студената
вода
Проверявайте маркуча за студената
вода поне веднъж годишно. Трябва да се
подмени, ако е напукан и нацепен, защото
по време на изпиране голямото налягане
може да предизвика внезапно спукване.
! Никога не използвайте вече употребяван
маркуч.
Поддръжка и почистване
Спиране на водата и изключване
на електрозахранването
• Затваряйте крана за вода след всяко
изпиране. По този начин се ограничава
износването на хидравличната
инсталация на пералната машина и се
ограничава опасността от течове.
• Изключвайте щепсела от
електрическото захранване, когато
почиствате пералната машина и по
време на работи по поддръжката.
Почистване на пералната машина
• Външната част и гумените части може
да се почистват с кърпа с хладка вода и
сапун. Не използвайте разтворители или
абразивни препарати.
• Пералнята разполага с програма за
„Автоматично почистване“ на вътрешните
части, което трябва да се извършва при
абсолютно празен барабан.
Прахът за пране (10% от препоръчваното
количество за слабо замърсено пране)
или специални допълнителни препарати
за почистване на пералнята може да се
ползват в добавка към програмата за
изпиране. Препоръчва се пускането на
програмата за почистване на всеки 40
изпирания. За да задействате програмата,
натиснете едновременно бутони A и B за 5
сек (вижте фигурата).
Програмата ще се активира автоматично и
ще продължи около 70 минути. За да спрете
цикъла, натиснете бутона START/PAUSE.
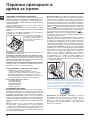
Почистване на чекмеджето за
перилни препарати
За изваждане
на чекмеджето
натиснете лост (1)
и го издърпайте
навън (2) (вижте
фигурата).
Измийте го под
течаща вода. Това
почистване трябва да
се извършва често.
2
1
1
2
3
A
B

BG
17
Мерки за безопасност и
препоръки
! Пералната машина е проектирана и произведена в
съответствие с международните норми за безопасност.
Предупрежденията тук са продиктувани от съображения
за безопасност и трябва да се четат внимателно.
Общи мерки за безопасност
• Този уред е предназначен изключително за домашна
употреба.
• Този уред може да бъде използван от
деца над 8 години и лица с ограничени
физически, сетивни или умствени
способности, или с недостатъчен опит
и познания, ако те са наблюдавани или
инструктирани относно използването
на уреда от лице, отговорно за тяхната
безопасност и разбират опасностите,
свързани с употребата на уреда. Децата не
трябва да си играят с уреда. Поддръжката и
почистването не трябва да се извършват от
деца без надзор.
• Пералната машина трябва да се използва само от
възрастни хора съгласно инструкциите, предоставени в
тази книжка.
• Не докосвайте машината, когато сте боси, с мокри или
влажни ръце или крака.
• Не изключвайте щепсела от контакта за електрически
ток, като дърпате кабела, а като хващате щепсела.
• Не отваряйте чекмеджето с перилни препарати, докато
пералната машина работи.
• Не докосвайте маркуча за мръсната вода, защото
може да е достигнал високи температури.
• Никога не отваряйте люка със сила, защото може да се
повреди обезопасителния механизъм, който предпазва
от случайно отваряне.
• В случай на повреда по никакъв повод не достигайте
до вътрешните механизми в опити за ремонт.
• Винаги контролирайте децата да не се доближават до
работещата машина.
• По време на изпиране люкът се нагрява.
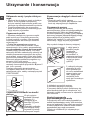
• Преместването да се извършва внимателно от
двама или трима души. Никога от сам човек, защото
пералната машина тежи много.
• Преди да заредите машината, проверете дали
барабанът е празен.
Система за измерване на тежестта на
товара
Преди всяко центрофугиране, с цел избягване на
прекалени вибрации и за да се получи равномерно
разпределяне на товара, барабанът се завърта със
скорост, малко по-висока от тази при пране. Ако
след направените последователни опити товарът
все още не е правилно разпределен, машината
извършва центрофугиране при скорост, по-ниска
от предвидената. При наличие на прекален
дисбаланс пералнята извършва разпределението
вместо центрофугата. За улесняване на по-
доброто разпределение на товара и правилното му
балансиране се препоръчва да се смесват дрехи за
пране с големи и малки размери.
Рециклиране
• Унищожаване на опаковъчния материал:
спазвайте местните норми – по този начин
опаковъчният материал може да се рециклира.
• Европейската директива 2012/19/EU - WEEE за
отпадъците от електрическо и електронно оборудване
предвижда домакинските електроуреди да не се
изхвърлят заедно с обичайните твърди градски
отпадъци. Извадените от употреба уреди трябва да
бъдат събирани отделно с цел да бъде увеличен делът
на подлежащите на повторна употреба и рециклиране
материали, от които са направени, както и да бъдат
избегнати евентуални вреди за здравето и околната
среда.
Символът със зачеркнатия контейнер е поставен върху
всички продукти, за да напомня за задължителното
разделно събиране. За по-нататъшна информация
относно правилното извеждане от употреба на
домакинските електроуреди се обърнете към
предназначената за това обществена служба или
към дистрибуторите.

18
BG
×åêìåäæå çà ïåðèëíèòå ïðåïàðàòè: çà äîçèðàíå
íà ïåðèëíèòå ïðåïàðàòè è äîáàâêèòå (âæ. “Ïåðèëíè
ïðåïàðàòè è äðåõè çà ïðàíå“).
Áóòîí ON/OFF: çà âêëþ÷âàíå è èçêëþ÷âàíå íà
ïåðàëíÿòà.
Бутон PUSH & WASH: (вижте “Програми”).
Ïðîãðàìàòîð ÏÐÎÃÐÀÌÈ: çà çàäàâàíå íà ïðîãðàìèòå.
Ïî âðåìå íà èçïúëíåíèå íà ïðîãðàìàòà êëþ÷úò îñòàâà
íåïîäâèæåí.
Áóòîíè ñúñ ñâåòëèííè èíäèêàòîðè ÔÓÍÊÖÈß: çà
ñåëåêòèðàíå íà âúçìîæíèòå ôóíêöèè. Ñâåòëèííèÿò
èíäèêàòîð çà èçáðàíàòà ôóíêöèÿ ùå ïðîäúëæè äà ñâåòè.
Áóòîí ñúñ ñâåòëèíåí èíäèêàòîð ÀÊËÅÍ ËÊ: çà
àêòèâèðàíå íà áëîêèðîâêàòà íà òàáëîòî çà óïðàâëåíèå
çàäðúæòå íàòèñíàò áóòîíà çà îêîëî ñåêóíäè. Ñèìâîëúò
ñèãíàëèçèðà ÷å òàáëîòî çà óïðàâëåíèå å áëîêèðàíî
(с изключение на бутон ON/OFF) Ïî òîçè íà÷èí ñå
âúçïðåïÿòñòâàò ñëó÷àíè ïðîìåíè â ïðîãðàìèòå
ïðåäè âñè÷êî àêî â êúùè èìà äåöà. Çà äåàêòèâèðàíå
áëîêèðîâêàòà íà òàáëîòî çà óïðàâëåíèå çàäðúæòå
íàòèñíàò áóòîíà çà îêîëî ñåêóíäè.
Áóòîí ÒÅÌÏÅÐÀÒÓÐÀ: çà çàäàâàíå íà òåìïåðàòóðà
èëè ïðàíå ñúñ ñòóäåíà âîäà (âæ. “Ïåðñîíàëèçèðàíèÿ“).
Áóòîí ÖÅÍÒÐÎÔÓÃÀ: çà çàäàâàíå íà öåíòðîôóãà èëè
çà èçêëþ÷âàíåòî (âæ. “Ïåðñîíàëèçèðàíèÿ“).
Áóòîí ОТЛОЖЕН СТАРТ: Изпълнението на
програмата може да бъде отложено в рамките на 9
часа. Натиснете многократно бутона, докато светне
индикаторът, съответстващ на желаното време
на отлагане. При четвъртото натискане на бутона
опцията ще се деактивира.
Забележка: След натискане на бутона START/
PAUSE, времето за отлагане на старта може да
се променя само с намаляване, като се стигне до
пускане на избраната програма.
! Валидна с всички програми.
Ñâåòëèííè ÈÍÄÈÊÀÒÎÐÈ À ÕÎÄ ÍÀ ÖÈÊÚË: çà äà
ñëåäâàòå õîäà íà èçïúëíåíèå íà ïðîãðàìàòà çà ïðàíå.
Âêëþ÷åíèÿò ñâåòëèíåí èíäèêàòîð ïîêàçâà ÷å ñå
èçâúðøâà îïðåäåëåíà ôàçà îò öèêúëà.
Ñâåòëèíåí èíäèêàòîð ÁËÎÊÈÐÀÍ ËÊ: çà äà ñå
ðàçáåðå äàëè ëþêúò ìîæå äà ñå îòâîðè (âæ. ñúñåäíàòà
ñòðàíèöà).
Áóòîí ñúñ ñâåòëèíåí èíäèêàòîð START/PAUSE:
çà ñòàðòèðàíå íà ïðîãðàìèòå èëè âðåìåííîòî èì
ïðåêúñâàíå.
Çàáåëåæêà: çà çàäàâàíå íà ïàóçà â ïðàíåòî íàòèñíåòå
îòíîâî áóòîíà - èíäèêàòîðúò ùå ìèãà ñ îðàíæåâà
ñâåòëèíà äîêàòî ñâåòëèííèÿò èíäèêàòîð óêàçâàù
èçïúëíåíèå íà ôàçà ùå ñâåòè íåïðåêúñíàòî. Àêî
ñâåòëèííèÿò èíäèêàòîð ÁËÎÊÈÐÀÍ ËÞÊ å óãàñíàë
ùå ìîæå äà ñå îòâîðè âðàòàòà íà ëþêà (изчакайте около
3 минути).
Çà ïðîäúëæàâàíå íà öèêúëà ïðàíå îò ìÿñòîòî â êîåòî
å áèë ïðåêúñíàò íàòèñíåòå îòíîâî òîçè áóòîí.
Ðåæèì íà stand by
 ñúîòâåòñòâèå ñ íîâèòå íîðìàòèâè çà ïåñòåíå
íà åíåðãèÿ òàçè ïåðàëíà ìàøèíà å ñíàáäåíà ñúñ
ñèñòåìà çà àâòîìàòè÷íî èçêëþ÷âàíå (stand by) êîÿòî
ñå çàäåñòâà ñëåä 30 ìèíóòè â ñëó÷à ÷å ìàøèíàòà
íå ñå èçïîëçâà. Íàòèñíåòå çà êðàòêî áóòîí ON/OFF è
èç÷àêàòå ìàøèíàòà äà ñå çàäåñòâà îòíîâî.
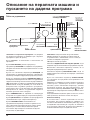
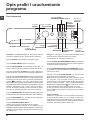
Îïèñàíèå íà ïåðàëíàòà ìàøèíà è
ïóñêàíåòî íà äàäåíà ïðîãðàìà
Òàáëî çà óïðàâëåíèå
Áóòîí
ÒÅÌÏÅÐÀÒÓÐÀ
Ñâåòëèííè ÈÍÄÈÊÀÒÎÐÈ
À ÕÎÄ ÍÀ ÖÈÊÚË
Ïðîãðàìàòîð
ÏÐÎÃÐÀÌÈ
Áóòîíè ñúñ
ñâåòëèííè
èíäèêàòîðè
ÔÓÍÊÖÈß
Ñâåòëèíåí
èíäèêàòîð
ÁËÎÊÈÐÀÍ
ËÊ
Áóòîí ñúñ
ñâåòëèíåí èíäèêàòîð
START/PAUSE
×åêìåäæå çà ïåðèëíèòå
ïðåïàðàòè
Áóòîí ON/OFF
Áóòîí
ÖÅÍÒÐÎÔÓÃÀ
Áóòîí
ÎÒËÎÆÅÍ
ÑÒÀÐÒ
Áóòîí
PUSH & WASH
Áóòîí ñúñ
ñâåòëèíåí
èíäèêàòîð
ÀÊËÅÍ ËÊ

BG
19
Ñâåòëèííè èíäèêàòîðè
Ñëåäÿùèòå ñâåòëèííè èíäèêàòîðè äàâàò âàæíà
èíôîðìàöèÿ.
Åòî êàêâî êàçâàò:
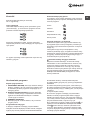
Îòëîæåí ñòàðò
Àêî å àêòèâèðàíà ôóíêöèÿòà “Çàáàâåíî âêëþ÷âàíå“ (âæ.
“Ïåðñîíàëèçèðàíèÿ“) ñëåä ïóñêàíå íà ïðîãðàìàòà ùå
ñâåòíå èíäèêàòîðúò çà èçáðàíîòî çàáàâÿíå:
 òå÷åíèå íà âðåìåòî ùå ñå âèçóàëèçèðà îñòàâàùîòî
çàáàâÿíå ÷ðåç ìèãàíå íà ñúîòâåòíèÿ ñâåòëèíåí
èíäèêàòîð:
Ñëåä êàòî èçòå÷å âðåìåòî çà îòëàãàíå íà
èçïúëíåíèåòî ïðèìèãâàùèÿò ñâåòëèíåí èíäèêàòîð
ùå óãàñíå è èçáðàíàòà ïðîãðàìà ùå ñå ñòàðòèðà.
Ñâåòëèííè èíäèêàòîðè çà òåêóùèòå ôàçè
Ñëåä êàòî å èçáðàí è ñòàðòèðàí æåëàíèÿò öèêúë íà
ïðàíå ñâåòëèííèòå èíäèêàòîðè ùå ñâåòâàò åäèí ñëåä
äðóã çà äà óêàçâàò õîäà íà öèêúëà:
Áóòîíè çà ôóíêöèÿ è ñúîòâåòíè ñâåòëèííè èíäèêàòîðè
Ïðè èçáîð íà ôóíêöèÿ ñúîòâåòíèÿò ñâåòëèíåí èíäèêàòîð
ùå ñâåòíå.
Àêî èçáðàíàòà ôóíêöèÿ íå å ñúâìåñòèìà ñúñ
çàäàäåíàòà ïðîãðàìà ñúîòâåòíèÿò ñâåòëèíåí
èíäèêàòîð ùå ìèãà è ôóíêöèÿòà íÿìà äà ñå àêòèâèðà.
Ако избраната функция не е съвместима с
друга предварително зададена функция, тази
несъвместимост се сигнализира с мигане на
светлинния индикатор и трикратно издаване на
звуков сигнал, като ще се активира само втората
функция и ще се освети съответният индикатор.
Ñâåòëèíåí èíäèêàòîð áëîêèðàí ëþê
Ñâåòåùèÿò èíäèêàòîð ïîêàçâà ÷å ëþêúò å áëîêèðàí
çà äà ñå ïðåäîòâðàòÿò ñëó÷àíè îòâàðÿíèÿ; çà
èçáÿãâàíå íà ùåòè å íåîáõîäèìî äà ñå èç÷àêà
èçãàñâàíåòî íà ñâåòëèííèÿ èíäèêàòîð ïðåäè äà ñå
îòâîðè ëþêúò (изчакайте около 3 минути).
àáåëåæêà: àêî å àêòèâèðàíà ôóíêöèÿòà “Çàáàâåíî
âêëþ÷âàíå“ ëþêúò íå ìîæå äà ñå îòâîðè çà îòâàðÿíåòî
ìó å íåîáõîäèìî ïåðàëíàòà ìàøèíà äà ñå ïîñòàâè â
ïàóçà ÷ðåç íàòèñêàíå íà áóòîí START/PAUSE.
Âêëþ÷âàíå íà ïðîãðàìà
Бързо програмиране
1. ПОСТАВЯНЕ НА ДРЕХИТЕ ЗА ПРАНЕ. Отваря се
вратичката на люка. Заредете дрехите за пране,
като внимавате да не превишите количеството на
зареждане, посочено в таблицата с програмите на
следващата страница.
2. ДOЗИРАНЕ НА ПЕРИЛНИЯ ПРЕПАРАТ. Извадете
чекмеджето и изсипете перилния препарат в
специалните ванички, както е обяснено в “Перилни
препарати и дрехи за пране”.
3. ЗАТВОРЕТЕ ЛЮКА.
4. Натиснете бутона „PUSH & WASH”, за да
стартирате програмата за изпиране.
Нормално програмиране
1. Âêëþ÷åòå ïåðàëíàòà ìàøèíà êàòî íàòèñíåòå
áóòîíà ON/OFF. Âñè÷êè èíäèêàòîðè ùå ñå âêëþ÷àò è
ùå ñâåòÿò â ïðîäúëæåíèå íà íÿêîëêî ñåêóíäè ñëåä
êîåòî ùå ïðîäúëæàò äà ñâåòÿò òåçè íà çàäàäåíàòà
ïðîãðàìà à èíäèêàòîðúò çà START/PAUSE ùå ñâåòè ñ
ïóëñèðàùà ñâåòëèíà.
Ïðàíå
Èçïëàêâàíå
Öåíòðîôóãà
Èçòî÷âàíå íà âîäàòà
Êðà íà ïðàíåòî
2. Çàðåäåòå äðåõèòå çà ïðàíå è çàòâîðåòå ëþêà.
3. Çàäàòå æåëàíàòà ïðîãðàìà ñ êëþ÷à ÏÐÎÃÐÀÌÈ.
4. Çàäàòå òåìïåðàòóðàòà íà ïðàíå (âæ.
“Ïåðñîíàëèçèðàíèÿ“).
5. Çàäàòå ñêîðîñòòà íà öåíòðîôóãèðàíå (âæ.
“Ïåðñîíàëèçèðàíèÿ“).
6. Ïîñòàâåòå ïåðèëåí ïðåïàðàò è äîáàâêè âæ.
“Ïåðèëíè ïðåïàðàòè è äðåõè çà ïðàíå“.
7. Èçáèðàíå íà æåëàíèòå ôóíêöèè.
8. Ñòàðòèðàòå ïðîãðàìàòà êàòî íàòèñíåòå áóòîí START/
PAUSE ñúîòâåòíèÿò ñâåòëèíåí èíäèêàòîð ùå ñâåòè
ïîñòîÿííî â зелен öâÿò. Çà äà îòìåíèòå çàäàäåíèÿ
öèêúë ïîñòàâåòå ìàøèíàòà â ïàóçà êàòî íàòèñíåòå
áóòîíà START/PAUSE è èçáåðåòå íîâèÿ öèêúë.
9. Êîãàòî ïðîãðàìàòà ñâúðøè ùå ñâåòíå èíäèêàòîðúò
. Ñâåòëèííèÿò èíäèêàòîð çà ÁËÎÊÈÐÀÍ ËÞÊ ùå
óãàñíå óêàçâàêè ÷å ëþêúò ìîæå äà áúäå îòâàðÿí
(изчакайте около 3 минути). Èçâàäåòå ïðàíåòî è
îñòàâåòå ëþêà ïðèòâîðåí çà äà èçñúõíå áàðàáàíúò.
Èçêëþ÷åòå ïåðàëíÿòà êàòî íàòèñíåòå áóòîíà ON/OFF.

20
BG
Ïðîãðàìè
Òàáëèöà ñ ïðîãðàìèòå
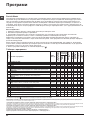
1) Програма за проверка съгласно стандарт 1061/2010: задайте програма 9 с температура 60°C.
Този цикъл е подходящ за пране на памучни, нормално замърсени тъкани и е най-ефективен от гледна точка на комбиниран разход на енергия и вода,
подходящ е за дрехи, които могат да се перат на 60°C. Действителната температура на пране може да се различава от указаната.
2) Програма за проверка съгласно стандарт 1061/2010: задайте програма 9 с температура 40°C.
Този цикъл е подходящ за пране на памучни, нормално замърсени тъкани и е най-ефективен от гледна точка на комбиниран разход на енергия и вода,
подходящ е за дрехи, които могат да се перат на 40°C. Действителната температура на пране може да се различава от указаната.
За всички институции, извършващи изпитания:
3) Продължителна програма за памук: задайте програма 6; с температура 40° C.
4) Дълга програма за синтетични тъкани: задайте програма 7 с температура 40° C.
Продължителността на цикъла, показана на дисплея или посочена в ръководството, е приблизително изчислена въз основа на стандартните условия. Реалното времетраене
може да варира в зависимост от множество фактори като температура и налягане на водата при пълнене, температура на въздуха в помещението, количество перилен препарат,
количество, вид и тегло на прането, допълнително избрани опции.
Push & Wash
Тази функция позволява да се стартира цикъл на изпиране дори и при изключена машина без предварително
натискане на бутона ON/OFF или, след включване на пералнята, без да се задейства никакъв друг бутон и/или
ключ (в противен случай програмата Push & Wash ще се деактивира). Натиснете бутона в продължение на 2
секунди за стартиране на цикъла Push & Wash. Активираният светлинен индикатор сигнализира, че цикълът е
стартиран. Този цикъл на пране е идеален за дрехи от памук и синтетика, като работната му температура е 30°,
а максималната скорост на центрофугата е 1000 оборота в минута. Зареждане мaкс. 3,5 кг. (Продължителност на
цикъла 45’).
Как се задейства?
1. Заредете прането (дрехи от памук и/или синтетика) и затворете люка.
2. Поставете перилния препарат и добавките.
3. Стартирайте програмата, като натиснете и задържите за 2 секунди бутона Push & Wash. Съответният
индикатор ще се освети в зелено, а люкът се блокира (символът за блокиран люк свети).
Забележка: Стартирането на прането чрез бутона Push & Wash активира автоматичен цикъл, подходящ за
памук и синтетика, без възможност за допълнителни настройки. Тази програма не позволява да бъдат зададени
допълнителни функции.
За да отворите люка по време на цикъл на пране, натиснете бутона START/PAUSE. Ако символът за блокиран
люк не свети, ще бъде възможно да отворите вратата. Натиснете отново бутона START/PAUSE, за да продължи
програмата от мястото, на което е била прекъсната.
4. Когато програмата завърши, се осветява индикаторът .
* С избирането на програма и изключването на центрофугата пералнята само ще източи водата.
Програми
Описание на програмата
Макс.
темп. (°C)
Макс. скорост
(обороти в минута
Перилни
препарати
и добавки
Зареждане мaкс.
(Кг)
Остатъчна
влажност %
Разход на
енергия kWh
Общ разход
на вода lt
Продължит-
елност
на цикъла
Основно
пране
Омекотител
Everyday 30° ECO
1
Ежедневно памучно
30° 1000
3,5 - - - 100’
2
Ежедневно синтетично
30° 1000
3,5 - - - 90’
3
Цветно
30° 1000
3,5 - - - 95’
4
Деликатно пране
30° 0
1 - - - 80’
5
Бързо Пране 30: Çà áúðçî îñâåæàâàíå íà íå ìíîãî çàìúðñåíè äðåõè (íå ñå
ïðåïîðú÷âà çà âúëíà êîïðèíà è äðåõè êîèòî òðÿáâà äà ñå ïåðàò íà ðúêà).
30° 800
3,5 70 0,16 33 30’
Traditionals
6
Памук (3): бели и цветни, деликатни, силно замърсени.
40°
(Max.60°)
1000
7 62 0,97 75 220’
7
Синтетични (4): цветни, устойчиви, силно замърсени
40°
(Max.60°)
1000
3,5 46 0,68 55 120’
8
Смесено
40° 1000
7 - - - 100’
9
Eкo памук 60° (1): бели и цветни, устойчиви, силно замърсени.
60° 1000
7 62 1,07 52,5 180’
9
Eкo памук 40° (2): бели и цветни, деликатни, силно замърсени.
40° 1000
7 62 0,97 75 220’
10
Памук: бели и цветни, устойчиви, силно замърсени.
60°
(Max.90°)
1000
7 - - - 130’
Specials
11
Sport
30° 600
3,5 - - - 55’
12
Пухени якета и завивки: За дрехи и завивки, подплатени с гъши пух.
30° 1000
2 - - - 110’
13
Вълнени тъкани: за вълна, кашмир и т.н.
40° 800
1,5 - - - 70’
14
Премахване на миризми
40° 1000
3 - - - 100’
Изплакване + Центрофуга
- 1000
-
7 - - - 50’
Центрофуга + Източване на водата
- 1000
- -
7 - - - 10’
Само източване на водата *
-
- -
7 - - - 3’
Strona się ładuje...
Strona się ładuje...
Strona się ładuje...
Strona się ładuje...
Strona się ładuje...
Strona się ładuje...
Strona się ładuje...
Strona się ładuje...
Strona się ładuje...
Strona się ładuje...
Strona się ładuje...
Strona się ładuje...
Strona się ładuje...
Strona się ładuje...
Strona się ładuje...
Strona się ładuje...
Strona się ładuje...
Strona się ładuje...
Strona się ładuje...
Strona się ładuje...
Strona się ładuje...
Strona się ładuje...
Strona się ładuje...
Strona się ładuje...
Strona się ładuje...
Strona się ładuje...
Strona się ładuje...
Strona się ładuje...
-
 1
1
-
 2
2
-
 3
3
-
 4
4
-
 5
5
-
 6
6
-
 7
7
-
 8
8
-
 9
9
-
 10
10
-
 11
11
-
 12
12
-
 13
13
-
 14
14
-
 15
15
-
 16
16
-
 17
17
-
 18
18
-
 19
19
-
 20
20
-
 21
21
-
 22
22
-
 23
23
-
 24
24
-
 25
25
-
 26
26
-
 27
27
-
 28
28
-
 29
29
-
 30
30
-
 31
31
-
 32
32
-
 33
33
-
 34
34
-
 35
35
-
 36
36
-
 37
37
-
 38
38
-
 39
39
-
 40
40
-
 41
41
-
 42
42
-
 43
43
-
 44
44
-
 45
45
-
 46
46
-
 47
47
-
 48
48


Indesit BWA 71052 W EU instrukcja
- Kategoria
- Pralki
- Typ
- instrukcja