Dell PowerEdge 2900 Skrócona instrukcja obsługi
- Kategoria
- Serwery
- Typ
- Skrócona instrukcja obsługi

www.dell.com | support.dell.com
Dell™ PowerEdge™ 2900 Systems
Getting Started
With Your System
Začínáme se systémem
Guide de mise en route
Erste Schritte mit dem System
Τα πρώτα βήµατα Με το σύστηµά σας
Rozpoczecie pracy z systemem
Начало работы с системой
Procedimientos iniciales con el sistema
Model ECM01


www.dell.com | support.dell.com
Dell™ PowerEdge™ 2900 Systems
Getting Started
With Your System

Notes, Notices, and Cautions
NOTE: A NOTE indicates important information that helps you make better use of your computer.
NOTICE: A NOTICE indicates either potential damage to hardware or loss of data and tells you how to avoid
the problem.
CAUTION: A CAUTION indicates a potential for property damage, personal injury, or death.
____________________
Information in this document is subject to change without notice.
© 2005 Dell Inc. All rights reserved.
Reproduction in any manner whatsoever without the written permission of Dell Inc. is strictly forbidden.
Trademarks used in this text: Dell and the DELL logo are trademarks of Dell Inc.; Intel and Xeon are registered trademarks of Intel Corporation;
Microsoft and Windows are registered trademark and Windows Server is a trademark of Microsoft Corporation; Novell and NetWare are
registered trademarks of Novell, Inc.; Red Hat is a registered trademark of Red Hat, Inc.; SUSE is a registered trademark of SUSE LINUX
Products GmbH.
Other trademarks and trade names may be used in this document to refer to either the entities claiming the marks and names or their products.
Dell Inc. disclaims any proprietary interest in trademarks and trade names other than its own.
Model ECM01
November 2005 P/N FD152 Rev. A00

Getting Started With Your System 3
System Features
The major hardware and software features of your system include:
• One or two Dual-Core Intel
®
Xeon
®
Processors 5000 Sequence.
• Support for symmetric multiprocessing (SMP), which is available on systems with two Intel Xeon
processors. SMP greatly improves overall system performance by dividing processor operations
between independent processors. To take advantage of this feature, you must use an operating
system that supports multiprocessing.
NOTE: If you decide to upgrade your system by installing a second processor, you must order the
processor upgrade kits from Dell. Not all versions of the Intel Xeon processor will work properly as
additional processors. The upgrade kit from Dell contains the correct version of the processor, heat sink,
and fan as well as the instructions for performing the upgrade.
• A minimum of 512 MB of 533 or 667 MHz (when available), Fully Buffered DIMMs (FBD),
upgradable to a maximum of 48 GB by installing combinations of 256-MB, 512-MB, 1-GB, 2-GB,
or 4-GB memory modules in the twelve memory module sockets on the system board.
The system also features redundant memory, which provides memory sparing or memory
mirroring. Either feature is available if eight or twelve identical memory modules are installed.
• Support for up to ten 3.5-inch, internal hot-pluggable Serial-Attached SCSI (SAS) or SATA hard
drives (eight 3.5-inch internal hard drives with hot-pluggable backplane board, and support for
two additional hot-pluggable 3.5-inch drives in the peripheral bay using the optional 1x2 flexbay
backplane board).
• Peripheral bay provides support for an optional optical drive and an optional half-height tape
backup unit (TBU). A full-height TBU is supported with the 1x2 flexbay bracket removed.
• An optional single, 1.44-MB, 3.5-inch diskette drive.
• An optional CD, DVD, or combination CD-RW/DVD drive.
NOTE: DVD devices are data only.
• An intrusion switch that signals the appropriate systems management software if the top cover
is opened.
• Up to two hot-pluggable, 930-W power supplies in a 1 + 1 redundant configuration.
• Six hot-pluggable system cooling fans.

4 Getting Started With Your System
The system board includes the following features:
• Six PCI slots located in an expansion-card cage. Slots 1 and 2 are 3.3-V, 64-bit, 133-MHz PCI-X slots;
slot 3 is a 3.3-V, PCIe x8 lane; slots 4 through 6 are 3.3-V, PCIe x4 lanes. Expansion-card slots
accommodate full-height, full-length expansion cards. PCIe slots accommodate up to x8 expansion
cards.
• Dedicated PCI slot for an integrated SAS host bus adapter or an optional integrated RAID controller
card with 256 MB of cache memory and a RAID battery.
NOTE: System boot is not supported from an external device attached to a SAS or SCSI adapter, including
SAS 5/E, PERC 5/E, or PERC 4e/DC. See support.dell.com for the latest support information about booting
from external devices.
• Two integrated Gigabit Ethernet NICs, capable of supporting 10-Mbps, 100-Mbps, and 1000-Mbps
data rates.
• Six USB 2.0-compliant connectors (two on the front and four on the back) capable of supporting a
diskette drive, a CD-ROM or DVD-ROM drive, a keyboard, a mouse, or a USB flash drive.
• Optional remote access controller (RAC) for remote systems management.
• An integrated VGA-compatible video subsystem with an ATI ES1000, 33-MHz PCI video controller.
This video subsystem contains 16 MB of DDR SDRAM video memory (nonupgradable). Maximum
resolution is 1600 x 1200 with 64 K colors; true-color graphics are supported in the following
resolutions: 640 x 480, 800 x 600, 1024 x 768, 1152 x 864, and 1280 x 1024. When the optional RAC
is installed, the video resolution is 1024 X 768.
• Systems management circuitry that monitors operation of the system fans as well as critical system
voltages and temperatures. The systems management circuitry works in conjunction with the systems
management software.
• Standard baseboard management controller with serial access.
• Back-panel connectors include one serial, one video, four USB, and two NIC connectors.
• Front-panel connectors include a video and two USB connectors.
• Front-panel 1x5 LCD for system ID and error messaging.
• System ID button on the front and back panels.
For more information about specific features, see "Technical Specifications" on page 10.
Supported Operating Systems
• Microsoft
®
Windows Server™ 2003 Standard and Enterprise Editions
• Microsoft Windows Small Business Server 2003, Standard and Premium Editions
• Microsoft Windows Server 2003 Standard and Enterprise x64 Editions
•Red Hat
®
Enterprise Linux AS and ES (version 3 and version 4) for Intel x86

Getting Started With Your System 5
• Red Hat Enterprise Linux AS and ES (version 4) for Intel Extended Memory 64 Technology
(Intel EM64T)
•SUSE
®
Linux Enterprise Server 9 for Intel EM64T
•Novell
®
NetWare
®
6.5 (when available; not available factory-installed)
Other Information You May Need
CAUTION: The Product Information Guide provides important safety and regulatory information. Warranty
information may be included within this document or as a separate document.
• The
Rack Installation Instructions
or
Rack Installation Guide
included with your rack solution
describes how to install your system into a rack.
• The
Hardware Owner’s Manual
provides information about system features and describes how to
troubleshoot the system and install or replace system components. The
Hardware Owner’s Manual
is available on the CDs that came with your system or on
support.dell.com
.
• CDs included with your system provide documentation and tools for configuring and managing your
system.
• Release notes or readme files may be included to provide last-minute updates to the system or
documentation or advanced technical reference material intended for experienced users or
technicians.
Obtaining Technical Assistance
If you do not understand a procedure in this guide or if the system does not perform as expected,
see your Hardware Owner’s Manual.
Dell Enterprise Training and Certification is available; see www.dell.com/training for more information.
This service may not be offered in all locations.
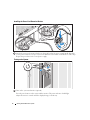
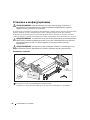
Installation and Configuration
CAUTION: Before performing the following procedure, read and follow the safety instructions and important
regulatory information in your Product Information Guide.
This section describes the steps to set up your system for the first time. The illustrations that follow show
a rack-mounted system, but the installation procedure applies in large part to a stand-alone tower
system. In place of the rack installation in step 2, refer to the documentation included with your system
on installing the stabilizer feet on your system.
CAUTION: Installing the feet on a stand-alone tower system is necessary to provide a stable foundation for the
system. Failure to install the feet poses the risk of having the system tip over, possibly causing bodily injury or
damage to the system.
CAUTION: Whenever you need to lift the system, get others to assist you. To avoid injury, do not attempt to lift
the system by yourself.

6 Getting Started With Your System
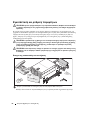
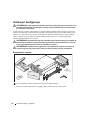
Unpacking the System
Unpack your system and identify each item.
Keep all shipping materials in case you need them later.
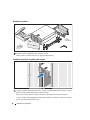
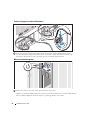
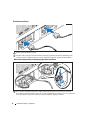
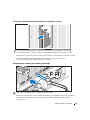
Installing the Rails and System in a Rack
Once you have read the "Safety Instructions" located in the rack installation documentation for
your system, install the rails and the system in the rack.
See your rack installation documentation for instructions on installing your system in a rack.
For a tower system, see the documentation included with your system on installing the system
stabilizer feet.

Getting Started With Your System 7
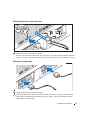
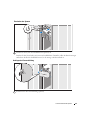
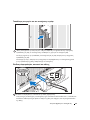
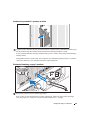
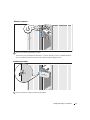
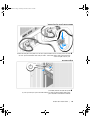
Connecting the Keyboard, Mouse, and Monitor
Connect the keyboard, mouse, and monitor (optional).
The connectors on the back of your system have icons indicating which cable to plug into each
connector. Be sure to tighten the screws (if any) on the monitor's cable connector.
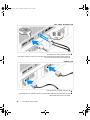
Connecting the Power
Connect the system’s power cable(s) to the system.
Plug the other end of the cable into a grounded electrical outlet or a separate power source such
as an uninterrupted power supply (UPS) or a power distribution unit (PDU).

8 Getting Started With Your System
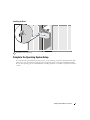
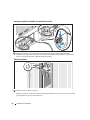
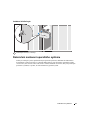
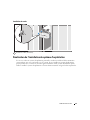
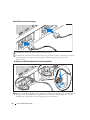
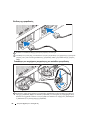
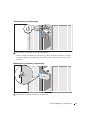
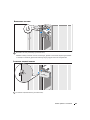
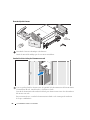
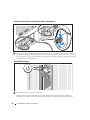
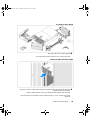
Installing the Power Cord Retention Bracket
Attach the power cord retention bracket on the right bend of the power supply handle. Bend the
system power cable into a loop as shown in the illustration and attach to the bracket’s cable clasp.
Repeat the procedure for the second power supply.
Turning on the System
Turn on the system and monitor (optional).
Press the power button on the system and the monitor. The power indicators should light.
Adjust the monitor’s controls until the displayed image is satisfactory.

Getting Started With Your System 9
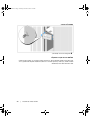
Installing the Bezel
Install the bezel (optional).
Complete the 0perating System Setup
If you purchased a preinstalled operating system, see the operating system documentation that ships
with your system. To install an operating system for the first time, see the
Quick Installation Guide
.
Be sure the operating system is installed before installing hardware or software not purchased with the
system.

10 Getting Started With Your System
Technical Specifications
Processor
Processor type One or two Dual-Core Intel Xeon Processors 5000
Sequence
Expansion Bus
Bus type PCI, PCI-X, PCIe
Expansion slots
PCI-X
two full-height, full-length 3.3-V, 64-bit, 133-MHz
(slots 1 and 2)
PCIe
one x8 lane, 3.3-V (slot 3)
three x4 lanes, 3.3-V (slots 4 through 6)
Memory
Architecture 533 or 667 MHz (when available) Fully Buffered
DIMMs (FBD)
Memory module sockets twelve 240-pin
Memory module capacities 256 MB, 512 MB, 1 GB, 2 GB, or 4 GB
Minimum RAM 512 MB (two 256-MB module)
Maximum RAM 48 GB
Drives
Hard drives up to ten 3.5-inch, internal, hot-plug SAS
or SATA
• eight drives in the internal drive bay
• two drives in the optional 1x2 flexbay
backplane expansion
Diskette drive one optional 3.5-inch, 1.44-MB
external optional USB 3.5-inch, 1.44-MB
Optical drive one optional
CD, DVD, or combination
CD-RW/DVD
NOTE:
DVD devices are data only.
external optional USB CD-ROM
external optional USB DVD-ROM
Flash drive external optional USB

Getting Started With Your System 11
Connectors
Back
NIC
Two TOE-capable RJ-45 (for integrated 1-GB
NICs)
Serial
9-pin, DTE, 16550-compatible
USB
Four 4-pin, USB 2.0-compliant
Video
15-pin VGA
Front
Video
15-pin VGA
USB
Two 4-pin, USB 2.0-compliant
Video
Video type ATI ES1000 video controller; VGA connectors
Video memory 16 MB of DDR SDRAM
Power
AC power supply (per power supply)
Wattage
930 W
Voltage
90–264 VAC, autoranging, 47–63 Hz
Heat dissipation
2697 BTU/hr maximum
Maximum inrush current
Under typical line conditions and over the entire
system ambient operating range, the inrush
current may reach 55 A per power supply for
10 ms or less
Batteries
System battery
CR 2032 3.0-V lithium ion coin cell
RAID battery (optional)
4.1-V lithium ion
Physical
Rack
Height
21.77 cm (8.57 in)
Width
44.27 cm (17.43 in) chassis only
48.27 cm (19 in) with rack flanges

12 Getting Started With Your System
Depth
66.13 cm (26.04 in) does not include control
panel or bezel; control panel adds an additional
1.3 cm (.51 in)
Weight (maximum configuration)
45.36 kg (100 lb)
Tower (without bezel)
Height
47.89 cm (18.85 in) with feet, no casters
Width
22.66 cm (8.92 in)
Depth
66.13 cm (26.04 in) does not include control
panel or bezel; control panel adds an additional
1.3 cm (.51 in)
Weight (maximum configuration)
49.9 kg (110 lb)
Environmental
NOTE: For additional information about environmental measurements for specific system
configurations, see www.dell.com/environmental_datasheets.
Temperature
Operating
10° to 35°C (50° to 95°F)
Storage
–40° to 65°C (–40° to 149°F)
Relative humidity
Operating
20% to 80% (noncondensing) with a maximum
humidity gradation of 10% per hour
Storage
5% to 95% (noncondensing)
Maximum vibration
Operating
0.26 G from 5–350Hz for 2 min in the Z axis
Storage
1.54 G from 10–250 Hz for 15 min in all
orientations
Maximum shock
Operating
One shock pulse in the positive z axis (one pulse
on each side of the system) of 41 G for up to 2 ms
Storage
Six consecutively executed shock pulses in the
positive and negative x, y, and z axes (one pulse
on each side of the system) of 71 G for up to 2 ms
Altitude
Operating
–16 to 3048 m (–50 to 10,000 ft)
Storage
–16 to 10,600 m (–50 to 35,000 ft)
Physical (continued)

www.dell.com | support.dell.com
Dell™ PowerEdge™ 2900 Systems
Začínáme
se systémem

Poznámky, upozornění a výstrahy
POZNÁMKA: POZNÁMKA označuje důležitou informaci, která vám pomůže při lepším využívání vašeho
počítače.
UPOZORNĚNÍ: UPOZORNĚNÍ poukazuje na možnost poškození hardwaru nebo ztráty dat a poskytuje
návod, jak se danému problému vyhnout.
POZOR: Výstraha („POZOR“) poukazuje na riziko poškození majetku, poranění nebo smrtelného
úrazu.
____________________
Informace obsažené v tomto dokumentu podléhají změnám bez předchozího upozornění.
© 2005 Dell Inc. Všechna práva vyhrazena.
Reprodukce jakýmkoli způsobem bez písemného povolení společnosti Dell Computer Corporation je přísně zakázána.
Ochranné známky použité v tomto textu: Dell a logo DELL jsou ochranné známky společnosti Dell Inc.; Intel a Xeon jsou registrované ochranné
známky společnosti Intel; Microsoft a Windows jsou registrované ochranné známky a Windows Server je ochranná známka společnosti
Microsoft; Novell a NetWare jsou registrované ochranné známky společnosti Novell, Inc.; Red Hat je registrovaná ochranná známka společnosti
Red Hat, Inc.; SUSE je registrovaná ochranná známka společnosti SUSE LINUX Products GmbH.
V tomto dokumentu mohou být použity další ochranné známky a obchodní názvy odkazující na subjekty, kterým tyto známky či názvy patří,
nebo na jejich výrobky. Společnost Dell Inc. se zříká jakýchkoli vlastnických zájmů o jiné než vlastní ochranné známky a obchodní názvy.
Model ECM01
Listopad 2005 P/N FD152 Rev. A00

Začínáme se systémem 15
Systémové funkce
Hlavní hardwarové a softwarové funkce systému jsou:
•
Jeden nebo dva dvoujádrové procesory řady Intel
®
Xeon
®
5000.
•
Podpora SMP (symmetric multiprocessing), která je k dispozici u systémů se dvěma procesory
Intel Xeon. SMP výrazně zvyšuje celkový výkon systému rozdělením procesorových operací mezi
nezávislé procesory. Pro využití výhod této funkce je třeba použít operační systém podporující SMP.
POZNÁMKA: Jestliže se rozhodnete pro upgrade vašeho systému instalací druhého
procesoru, je nutné objednat procesorovou sadu pro upgrade od společnosti Dell. Ne všechny
verze procesorů Intel Xeon jsou na pozici druhého procesoru plně funkční. Sada pro upgrade
od společnosti Dell obsahuje správnou verzi procesoru, chladič a ventilátor, jakož i pokyny
k provedení upgradu.
•
Minimálně 512 MB v pamět’ových modulech FB-DIMM (fully buffered) s frekvencí 533 nebo
667 MHz (je-li k dispozici), s možností rozšíření až na 48 GB instalací příslušných kombinací
pamět’ových modulů o velikostech 256 MB, 512 MB, 1 GB, 2 GB nebo 4 GB do dvanácti slotů na
systémové desce.
Systém pracuje i s redundantní pamětí, která umožňuje sparing a zrcadlení paměti. Každá z těchto
funkcí je k dispozici v případě, že je nainstalováno osm nebo dvanáct identických pamět’ových
modulů.
•
Podpora až deseti sériově propojených SCSI (SAS) nebo SATA pevných disků, 3,5 palce, interní
hot-plug (osm interních disků 3,5 palce na hot-plug backplane desce a podpora dvou dalších hot-plug
disků 3,5 palce v periferní pozici s použitím volitelné 1x2 flexbay backplane desky).
•
Periferní pozice (drive bay) poskytuje podporu pro volitelnou optickou mechaniku a volitelné
polovysoké páskové zálohovací zařízení. Polovysoké páskové zařízení je možné instalovat v případě,
že je demontován držák pro 1x2 flexbay.
•
Volitelná jedna disketová mechanika 1,44 MB, 3,5 palce.
•
Volitelná CD, DVD mechanika nebo CD-RW/DVD kombo.
POZNÁMKA: DVD zařízení jsou určena pouze pro data.
•
Spínač při vniknutí, který předává příslušnému softwaru systémové správy signál v případě, že dojde
k otevření vrchního krytu.
•
Až dva hot-plug napájecí zdroje 930 W v konfiguraci 1 + 1 záložní.
•
Šest hot-plug chladicích ventilátorů.

16 Začínáme se systémem
Systémová deska má následující funkce:
•
Šest PCI slotů umístěných v kleci pro rozšiřující karty. Sloty 1 a 2 jsou 3,3 V, 64 bit, 133 MHz PCI-X
sloty; slot 3 je 3,3 V, PCIe x8 lane; sloty 4 až 6 jsou 3,3V, PCIe x4 lane. Do slotů pro rozšiřující karty je
možné instalovat celovysoké, celodélkové rozšiřující karty. Do slotů PCIe je možné instalovat rozšiřující
karty až x8.
•
Dedikovaný slot pro integrovaný SAS host bus adaptér nebo volitelnou integrovanou kartu RAID řadiče
s 256 MB cache paměti a RAID baterií.
POZNÁMKA: Bootování systému není podporováno z externího zařízení připojeného k adaptéru
SAS nebo SCSI, včetně SAS 5/E, PERC 5/E nebo PERC 4e/DC. Aktuální informaci k podpoře při
bootování z externích zařízení naleznete na adrese support.dell.com.
•
Dvě integrovaná sít’ové karty Gigabit Ethernet podporující datový přenos rychlostí 10 Mbps, 100 Mbps
a 1000 Mbps.
•
Šest konektorů USB 2.0 (dva na přední a čtyři na zadní straně) podporující disketovou mechaniku,
CD-ROM nebo DVD-ROM mechaniku, klávesnici, myš nebo USB flash disk.
•
Volitelný ovladač pro vzdálený přístup umožňující vzdálenou správu systému.
•
Integrovaný VGA kompatibilní grafický subsystém s ATI ES1000, 33 MHz PCI grafickou kartou. Tento
grafický subsystém disponuje 16 MB DDR SDRAM grafické paměti (bez možnosti rozšíření). Maximální
rozlišení je 1600 x 1200 bodů při 64k barev; grafiky true color jsou podporovány v následujících
rozlišeních: 640 x 480, 800 x 600, 1024 x 768, 1152 x 864 a 1280 x 1024. Je-li nainstalována volitelná
karta ovladače pro vzdálený přístup, je grafické rozlišení 1024 x 768.
•
Okruhy systémové správy monitorující funkci systémových ventilátorů a kritická napětí a teploty
v systému. Okruhy systémové správy spolupracují se softwarem systémové správy.
•
Standardní BMC (baseboard managment controller) se sériovým přístupem.
•
Konektory na zadním panelu - jeden sériový port, jeden video, čtyři USB a dva sít’ové konektory.
•
Konektory na předním panelu - video a dva USB konektory.
•
1x5 LCD na předním panelu pro zobrazení ID systému a chybových hlášení.
•
Tlačítko ID systému na předním a zadním panelu.
Pro více informací o specifických funkcích viz „Technická specifikace“ na straně 22.
Podporované operační systémy
•
Microsoft
®
Windows Server™ 2003 Standard a Enterprise Editions
•
Microsoft Windows Small Business Server 2003, Standard a Premium Editions
•
Microsoft Windows Server 2003 Standard a Enterprise x64 Editions
•
Red Hat
®
Enterprise Linux AS a ES (verze 3 a verze 4) pro Intel x86
•
Red Hat Enterprise Linux AS a ES (verze 4) pro Intel Extended Memory 64 Technology (Intel EM64T)
•
SUSE
®
Linux Enterprise Server 9 pro Intel EM64T
•
Novell
®
NetWare
®
6.5 (je-li k dispozici; není k dispozici jako továrně předinstalovaný OS)

Začínáme se systémem 17
Další užitečné informace
POZOR: Informační příručka výrobku obsahuje důležité bezpečnostní a právní informace.
Informace o záruce je součástí tohoto dokumentu nebo je přiložena samostatně.
•
Pokyny pro instalaci do stojanu
nebo
Příručka pro instalaci do stojanu
dodané s vaším stojanovým
systémem popisují instalaci vašeho systému do stojanu.
•
Uživatelská příručka k hardwaru
obsahuje informaci o funkcích systému a popisuje řešení problémů
se systémem a instalaci nebo výměnu systémových komponent.
Uživatelská příručka k hardwaru
je
k dispozici na CD, která byla dodána s vaším systémem, nebo na adrese
support.dell.com
.
•
CD dodaná se systémem obsahují dokumentaci a nástroje pro konfiguraci a správu vašeho systému.
•
Poznámky a soubory „readme“ mohou být také součástí dodávky a obsahují poslední aktualizace k
systému nebo dokumentaci, příp. rozšířené technické materiály určené zkušeným uživatelům a technikům.
Odborná pomoc
Nerozumíte-li některému z postupů popsaných v této příručce nebo nepracuje-li systém podle očekávání,
nahlédněte do Uživatelské příručky k hardwaru.
Společnosti Dell rovněž nabízí trénink a certifikaci (Dell Enterprise Training and Certification); pro více
informací navštivte www.dell.com/training. Tato služba nemusí být nabízena ve všech regionech.
Instalace a konfigurace
POZOR: Před provedením následujícího postupu si pročtěte a postupujte podle bezpečnostních
pokynů a důležitých předpisů uvedených v Informační příručce výrobku.
V této části jsou popsány kroky, které je nutné provést při první instalaci vašeho systému. Následující
obrázky znázorňují systém instalovaný do stojanu, postup instalace se však většinou vztahuje na samostatně
stojící tower systém. Namísto kroku 2, který popisuje instalaci do stojanu, prosím nahlédněte do
dokumentace dodané s vaším systém, ve které je popsán postup instalace stabilizačních noh.
POZOR: Instalace stabilizačních noh je u samostatně stojícího tower systému nutná, jen tak
lze zajistit stabilní základnu celého systému. Neprovedete-li instalaci stabilizačních noh,
hrozí nebezpečí převrácení systému a následného zranění osob nebo poškození systému.
POZOR: Při každém zvedání systému požádejte o asistenci. Systém nezvedejte sami,
vyvarujete se tak možného zranění.

18 Začínáme se systémem
Rozbalení systému
Rozbalte systém a identifikujte jeho jednotlivé součásti.
Veškerý obalový materiál uschovejte pro případ pozdější potřeby.
Instalace kolejniček a systému do stojanu
Nejprve si přečtěte „Bezpečnostní pokyny“ uvedené v instalační dokumentaci stojanu a systému,
potom proveďte instalaci kolejniček a systém do stojanu.
Pokyny pro instalaci systému do stojanu naleznete v dokumentaci pro instalování stojanu.
U tower systému prosím nahlédněte do dokumentace dodané se systémem, ve které jsou uvedeny
pokyny pro instalaci stabilizačních noh.
Strona jest ładowana ...
Strona jest ładowana ...
Strona jest ładowana ...
Strona jest ładowana ...
Strona jest ładowana ...
Strona jest ładowana ...
Strona jest ładowana ...
Strona jest ładowana ...
Strona jest ładowana ...
Strona jest ładowana ...
Strona jest ładowana ...
Strona jest ładowana ...
Strona jest ładowana ...
Strona jest ładowana ...
Strona jest ładowana ...
Strona jest ładowana ...
Strona jest ładowana ...
Strona jest ładowana ...
Strona jest ładowana ...
Strona jest ładowana ...
Strona jest ładowana ...
Strona jest ładowana ...
Strona jest ładowana ...
Strona jest ładowana ...
Strona jest ładowana ...
Strona jest ładowana ...
Strona jest ładowana ...
Strona jest ładowana ...
Strona jest ładowana ...
Strona jest ładowana ...
Strona jest ładowana ...
Strona jest ładowana ...
Strona jest ładowana ...
Strona jest ładowana ...
Strona jest ładowana ...
Strona jest ładowana ...
Strona jest ładowana ...
Strona jest ładowana ...
Strona jest ładowana ...
Strona jest ładowana ...
Strona jest ładowana ...
Strona jest ładowana ...
Strona jest ładowana ...
Strona jest ładowana ...
Strona jest ładowana ...
Strona jest ładowana ...
Strona jest ładowana ...
Strona jest ładowana ...
Strona jest ładowana ...
Strona jest ładowana ...
Strona jest ładowana ...
Strona jest ładowana ...
Strona jest ładowana ...
Strona jest ładowana ...
Strona jest ładowana ...
Strona jest ładowana ...
Strona jest ładowana ...
Strona jest ładowana ...
Strona jest ładowana ...
Strona jest ładowana ...
Strona jest ładowana ...
Strona jest ładowana ...
Strona jest ładowana ...
Strona jest ładowana ...
Strona jest ładowana ...
Strona jest ładowana ...
Strona jest ładowana ...
Strona jest ładowana ...
Strona jest ładowana ...
Strona jest ładowana ...
Strona jest ładowana ...
Strona jest ładowana ...
Strona jest ładowana ...
Strona jest ładowana ...
Strona jest ładowana ...
Strona jest ładowana ...
Strona jest ładowana ...
Strona jest ładowana ...
Strona jest ładowana ...
Strona jest ładowana ...
Strona jest ładowana ...
Strona jest ładowana ...
Strona jest ładowana ...
Strona jest ładowana ...
Strona jest ładowana ...
Strona jest ładowana ...
Strona jest ładowana ...
Strona jest ładowana ...
Strona jest ładowana ...
Strona jest ładowana ...
Strona jest ładowana ...
Strona jest ładowana ...
Strona jest ładowana ...
Strona jest ładowana ...
Strona jest ładowana ...
Strona jest ładowana ...
-
 1
1
-
 2
2
-
 3
3
-
 4
4
-
 5
5
-
 6
6
-
 7
7
-
 8
8
-
 9
9
-
 10
10
-
 11
11
-
 12
12
-
 13
13
-
 14
14
-
 15
15
-
 16
16
-
 17
17
-
 18
18
-
 19
19
-
 20
20
-
 21
21
-
 22
22
-
 23
23
-
 24
24
-
 25
25
-
 26
26
-
 27
27
-
 28
28
-
 29
29
-
 30
30
-
 31
31
-
 32
32
-
 33
33
-
 34
34
-
 35
35
-
 36
36
-
 37
37
-
 38
38
-
 39
39
-
 40
40
-
 41
41
-
 42
42
-
 43
43
-
 44
44
-
 45
45
-
 46
46
-
 47
47
-
 48
48
-
 49
49
-
 50
50
-
 51
51
-
 52
52
-
 53
53
-
 54
54
-
 55
55
-
 56
56
-
 57
57
-
 58
58
-
 59
59
-
 60
60
-
 61
61
-
 62
62
-
 63
63
-
 64
64
-
 65
65
-
 66
66
-
 67
67
-
 68
68
-
 69
69
-
 70
70
-
 71
71
-
 72
72
-
 73
73
-
 74
74
-
 75
75
-
 76
76
-
 77
77
-
 78
78
-
 79
79
-
 80
80
-
 81
81
-
 82
82
-
 83
83
-
 84
84
-
 85
85
-
 86
86
-
 87
87
-
 88
88
-
 89
89
-
 90
90
-
 91
91
-
 92
92
-
 93
93
-
 94
94
-
 95
95
-
 96
96
-
 97
97
-
 98
98
-
 99
99
-
 100
100
-
 101
101
-
 102
102
-
 103
103
-
 104
104
-
 105
105
-
 106
106
-
 107
107
-
 108
108
-
 109
109
-
 110
110
-
 111
111
-
 112
112
-
 113
113
-
 114
114
-
 115
115
-
 116
116


Dell PowerEdge 2900 Skrócona instrukcja obsługi
- Kategoria
- Serwery
- Typ
- Skrócona instrukcja obsługi