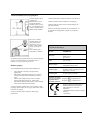
HOTPOINT/ARISTON AQ83D 29 EU/B instrukcja
- Kategoria
- Pralki
- Typ
- instrukcja

EN
1
Contents
Installation, 2-3
Unpacking and levelling
Connecting the electricity and water supplies
Technical data
Description of the machine, 4-5
Touch control panel
Running a wash cycle, 6
Wash cycles and options, 7
Table of wash cycles
Wash options
Detergents and laundry, 8
Detergent
Preparing the laundry
Washing recommendations
Precautions and advice, 9
General safety
Load balancing system
Disposal
Opening the porthole door manually
Care and maintenance, 10
Cutting off the water and electricity supplies
Cleaning the machine
Cleaning the detergent dispenser drawer
Caring for your appliance drum
Cleaning the pump
Checking the water inlet hose
Trouble shooting, 11
Assistance, 12
WASHING MACHINE
AQUALTIS
AQ83D 29
Instructions for
installation and use
English,1
EN
Polski,13
PL
UA
Українська,37
Română,25
RO
LV
,49

EN
2
Installation
! This instruction manual should be kept in a safe place
for future reference. If the washing machine is sold, given
away or moved, please ensure the manual is kept with
the machine, so that the new owner may benefit from the
advice contained within it.
! Read these instructions carefully: they contain vital
information relating to the safe installation and operation of
the appliance.
! Inside the pack containing this manual, you will also find
the guarantee and all the details necessary for installation.
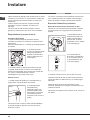
Unpacking and levelling
Unpacking
1. Once you have removed all the packaging from the
washing machine, make sure it has not been damaged
during transportation.
If it has been damaged, contact the retailer and do not
proceed any further with the installation process.
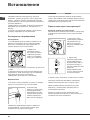
2. Remove the 4 protective
screws (used during
transportation) and the
corresponding spacer,
located on the rear part of
the appliance (see figure).
3. Close off the holes using the plastic plugs supplied in the
pack.
4. Keep all the parts in a safe place; they will be needed
again if the washing machine is moved to another location,
to prevent the inside of the appliance being damaged.
! Packaging materials should not be used as toys for
children.
Levelling
1. Place the washing machine on a flat sturdy floor, without
resting it up against walls or cabinets.
2. If the floor is uneven, the
front feet of the machine
may be adjusted until
it reaches a horizontal
position (the angle of
inclination must not exceed
2 degrees).
! If the appliance is levelled correctly, it will be more stable
and much less likely to cause vibrations and noise while it
is operating, particularly during the spin cycle.
! If it is placed on carpet or a rug, adjust the feet in such a
way as to allow a sufficient ventilation space underneath
the washing machine.
Connecting the electricity and water
supplies
Connecting the water inlet hose
! Before connecting the inlet hose to the water supply, run
the water until it is perfectly clear.
1. Connect the inlet hose
to the machine by screwing
it onto the cold water inlet
of the appliance, which is
situated on the top right-
hand side of the rear part of
the appliance (see figure).
2. Connect the inlet hose
by screwing it to a cold
water tap using a 3/4 gas
threaded connection (see
figure).
3. Make sure that the hose is not folded over or bent.
! The water pressure at the tap must fall within the values
indicated in the Technical data table (see next page).
! If the inlet hose is not long enough, contact a specialised
shop or an authorised technician.
! Never use second-hand or old inlet hoses; use the
products supplied with the machine.

EN
3
Technical data
Model
AQ83D 29
Dimensions
width 59.5 cm
height 85 cm
depth 58 cm
Capacity
from 1 to 8 kg
Electrical
connections
please refer to the technical data plate
fixed to the machine
Water connections
maximum pressure 1 MPa (10 bar)
minimum pressure 0.05 MPa (0.5 bar)
drum capacity 58 litres
Spin speed
up to 1200 rotations per minute
Test wash cycles
in accordance
with directives
1061/2010 and
1015/2010
programme
; Cotton standard 60 °C;
programme
; Cotton standard 40 °C.
This appliance conforms to the following
EC Directives:
- 2004/108/EC (Electromagnetic Compa-
tibility)
- 2006/95/EC (Low Voltage)
- 2012/19/EU
Connecting the drain hose
Connect the drain hose to
drain duct piping or a wall
drain located between 65
and 100 cm above the floor,
making sure it is not bent
at all.
Alternatively, rest the
drain hose on the side of
a washbasin or bathtub,
fastening the duct supplied
to the tap (see figure).
The free end of the hose
should not be underwater.
! We advise against the use of hose extensions; if it is
absolutely necessary, the extension must have the same
diameter as the original hose and must not exceed 150 cm
in length.
Electrical connections
Before plugging the appliance into the electricity socket,
make sure that:
• thesocketisearthedandcomplieswithallapplicable
laws;
• thesocketisabletowithstandthemaximumpowerload
of the appliance as indicated in the Technical data table
(see opposite);
• thepowersupplyvoltagefallswithinthevaluesindicated
in the Technical data table (see opposite);
• thesocketiscompatiblewiththeplugoftheappliance.
If this is not the case, have the socket or the plug
replaced.
! The machine must not be installed outdoors, even in
covered areas. It is extremely dangerous to leave the
appliance exposed to rain, storms and other weather
conditions.
! The mains socket must remain within easy reach after the
washing machine has been installed.
! Do not use extension cords or multiple sockets.
! The cable should not be bent or compressed.
! The power supply cable and plug must only be replaced
by authorised technicians.
Warning! The company shall not be held responsible in the
event that these regulations are not respected.
65 - 100 cm

EN
4
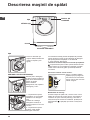
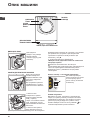
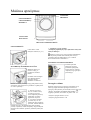
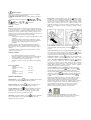
3. extra compartment: Bleach
! The use of extra compartment 3 excludes the pre-
wash function.
washing additives compartment: for fabric softener
or liquid additives. We recommend that the maximum
level indicated by the grille is not exceeded, and that
concentrated fabric softeners are diluted.
TOUCH CONTROL PANEL
To adjust the settings, gently
press the icon inside the
sensitive (touch control) area
as illustrated in the figure.
Standby mode
This washing machine, in compliance with new energy
saving regulations, is fitted with an automatic standby
system which is enabled after about 30 minutes if no
activity is detected. Press the ON-OFF
button briefly and
wait for the machine to start up again.
PORTHOLE DOOR
Always use the handle to
open the porthole door (see
figure).
DETERGENT DISPENSER DRAWER
The detergent dispenser
drawer is located inside
the machine and can be
accessed by opening the
door.
For more information on
detergent measures, please
refer to the chapter entitled
“Detergents and laundry”.
1. pre-wash compartment:
use powder detergent.
! Before pouring in the
detergent, make sure that
extra compartment 3 has
been removed.
2. main wash compartment:
If liquid detergent is used,
it is recommended that the
removable plastic partition A
(supplied) be used for proper dosage.If powder detergent is
used, place the partition into slot B.
3
1
2
1
8
0
2
1
0
1
5
0
1
2
0
9
0
6
0
B
A
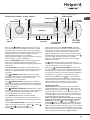
Description of the machine
CONTROL
PANEL
PORTHOLE DOOR
PORTHOLE DOOR
HANDLE
KICK STRIP

EN
55
WASH CYCLE
SELECTOR knob
Button with
ON/OFF
indicator light
Touch control panel
Button with ON/OFF indicator light: press this briefly
to switch the machine on or off. The green indicator light
indicates that the machine is switched on. To switch off the
washing machine during the wash cycle, press and hold the
button for approximately 3 seconds; if the button is pressed
briefly or accidentally the machine will not switch off. If the
machine is switched off during a wash cycle, this wash cycle
will be cancelled.
WASH CYCLE SELECTOR knob: may be turned in either
direction. To select the most suitable wash cycle, please refer
to the “Table of wash cycles”.
The knob will not move during the wash cycle.
M1-M2-M3 buttons: press and hold one of the buttons to
store a cycle with your own set preferences in the memory
of the machine. To recall a previously-stored cycle, press the
corresponding button.
TEMPERATURE
button: press to modify or exclude the
temperature setting; the value selected will appear on the
display above (see “Running a wash cycle”).
SPIN CYCLE
button: press to modify or exclude the spin
cycle; the value selected will appear on the display above (see
“Running a wash cycle”).
DELAYED START
button: press to set a delayed start for
the selected wash cycle; the set delay time will appear on the
display above (see “Running a wash cycle”).
OPTION buttons: press to select the available options. The
indicator light corresponding to the selected option will remain
lit (see “Running a wash cycle”).
WASH CYCLE PHASE icons: these illuminate to indicate the
progress of the wash cycle (Wash
– Rinse – Spin –
Drain ). The text lights up when the cycle is complete.
START/PAUSE button with indicator light: when the green
indicator light flashes slowly, press the button to start a wash
cycle. Once the cycle has begun the indicator light will remain
lit in a fixed manner. To pause the wash cycle, press the
button again; the indicator light will flash in an orange colour. If
the “LOCK”
indicator light is switched off, the door may be
opened. To start the wash cycle from the point at which it was
interrupted, press the button again.
LOCK
indicator light: indicates that the porthole door is
locked. To open the door, pause the wash cycle (see “Running
a wash cycle”).
CONTROL PANEL LOCK
button with indicator light: to
activate or deactivate the control panel lock, press and hold
the button for approximately 2 seconds. when the indicator
light is illuminated, the control panel is locked. This means
it is possible to prevent wash cycles from being modified
accidentally, especially where there are children in the home.
ECO indicator light: the
icon lights up when, after altering the
washing parameters, an energy saving of at least 10% is made.
Furthermore, before the machine enters “Standby” mode, the
icon will light up for a few seconds; when the machine is switched
off the estimated energy saving will be around the 80% mark.
CHANGE LANGUAGEsThe first time the machine is
switched on, the first language will flash on the display. The
“
“, “OK” and “V” symbols will appear on the display, in line
with the 3 buttons on the right-hand side. The languages
change automatically every 3”; alternatively, they can be
changed by pressing the buttons next to the “
“ and “V”
symbols. Use the “OK” button to confirm the language, which
will be set after 2”. If no buttons are pressed, the automatic
language change will begin again after 30”.
To change the language, switch the machine on and off
again; in the 30” time period after it has been switched
off, press and hold the temperature
+spin
+delayed start buttons simultaneously for 5’’. A short
sound alert will be emitted and the set language will flash
on the display.
Press the buttons next to the “ “ and “V”
symbols to change the language. Use the button next to the
“OK” symbol to confirm the language, which will be set after
2”. If no buttons are pressed, the language set previously will
be displayed after 30”. Switch on the machine.
TEMPERATURE
button
OPTION
buttons
SPIN
button
DISPLAY
M1
M3
ECO
indicator light
DELAYED START
button
START/PAUSE button
with indicator light
LOCK indicator light
WASH
CYCLE
PHASE
icons
CONTROL PANEL LOCK
button with indicator light
M2

EN
6
WARNING: before you use the washing machine for the
first time, run a wash cycle with detergent and no laundry,
using the 90° cottons cycle without pre-wash.
1. SWITCH THE MACHINE ON. Press the button. All
the indicator lights will illuminate for 1 second and the
text AQUALTIS will appear on the display; the indicator
light corresponding to the
button will then remain lit in
a constant manner and the START/PAUSE indicator light
will flash.
2. SELECT THE PROGRAMME. Turn the PROGRAMME
KNOB left or right, until the required programme has
been selected; the name of the programme will appear
on the display. A temperature and spin speed is set for
each programme; these may be adjusted. The cycle
duration will also appear on the display.
3. LOAD THE LAUNDRY. Open the porthole door.
Load the laundry, making sure you do not exceed the
maximum load value indicated in the table of wash
cycles on the following page.
4. MEASURE OUT THE DETERGENT. Pull out the
detergent dispenser drawer and pour the detergent into
the relevant compartments as described in “Description
of the machine”.
5. CLOSE THE PORTHOLE DOOR.
6. CUSTOMISE THE WASH CYCLE. Use the relevant
buttons on the control panel:
Modify the temperature and/or spin speed.
The machine automatically displays the maximum
temperature and spin speed values set for the selected
cycle, or the most recently-used settings if they are
compatible with the selected cycle. The temperature can
be decreased by pressing the
button, until the cold
wash “OFF” setting is reached. The spin speed may be
progressively reduced by pressing the
button, until
it is completely excluded “OFF”. If these buttons are
pressed again, the maximum values are restored.
! Exception: if the
programme is selected, the
temperature can be increased up to a value of 90°C.
Setting a delayed start.
To set a delayed start for the selected cycle, press the
corresponding button repeatedly until the required delay
period has been reached. During the setting procedure,
the delay period and the text “Starts in:” will be
displayed, along with the flashing
symbol. After the
delayed start has been set, the symbol will remain
fixed on the display, which will also indicate the duration
of the selected cycle with the text “Ends in:” and the
cycle duration. Press the DELAYED START button just
once to display the delay time set previously.
After the countdown has begun, the display will show
the text “Starts in:” and the delay period. Once the
set delay time has elapsed, the machine will begin its
cycle and the display will show “Ends in:” and the time
remaining until the end of the cycle.
To remove the delayed start option, press the button
until the display shows the text OFF; the symbol will
disappear.
Modify the cycle settings.
•Press the button to activate the option; the name
of the option will then appear on the display and
the corresponding indicator light will illuminate.
• Press the button again to deactivate the option; the
name of the option will then appear on the display
followed by the text OFF, and the corresponding
indicator light will switch off.
! If the selected option is not compatible with the
selected wash cycle, this incompatibility will be signalled
by the flashing of the indicator light and a sound alert
(3 beeps); the option will not be activated.
! If the selected option is not compatible with another
option that has been selected previously, the indicator
light corresponding to the first option selected will
flash and only the second option will be activated; the
indicator light corresponding to the button will remain lit
in a constant manner.
! The options may affect the recommended load value and/
or the duration of the cycle.
7. START THE PROGRAMME. Press the START/PAUSE
button. The corresponding indicator light remains lit in a
fixed manner and the porthole door locks (the
LOCK
indicator light illuminates). The icons corresponding to
the wash cycle phases will light up during the cycle to
indicate which phase is currently in progress.
To change a wash cycle once it has already started,
pause the washing machine by pressing the START/
PAUSE button; then select the desired cycle and press
the START/PAUSE button again.
To open the door during a wash cycle, press the START/
PAUSE button; if the LOCK indicator light is switched
off you may open the door. Press the START/PAUSE
button again to restart the wash cycle from the point at
which it was interrupted.
8. THE END OF THE WASH CYCLE. This is indicated
by the illuminated text END. The porthole door may be
opened immediately. If the START/PAUSE indicator light
is flashing, press the button to end the cycle. Open the
door, unload the laundry and switch off the machine.
! If you wish to cancel a cycle which has already begun,
press and hold the
button until the cycle stops and the
machine switches off.
Bag for quilts, curtains and delicate garments
The Aqualtis washing machine makes it easier for you
to wash even the most valuable and delicate garments
in complete confidence thanks to the special bag which
protects the laundry (this is supplied with the machine).
We recommend that the bag is used every time you wash
quilts and padded items with an outer layer made
using synthetic material.
Running a wash cycle

EN
7
Wash cycles and options
Wash options
Super Wash
This option offers a high-
performance wash due to the
greater quantity of water used in
the initial phase of the cycle, and
due to the increased wash cycle
duration, is particularly useful for
the removal of stubborn stains.
It can be used with or without
bleach. If you desire bleaching,
insert the extra tray compartment
(3) into compartment 1. When
pouring in the bleach, be careful
not to exceed the “max” level
marked on the central pivot (see
figure). To bleach laundry without carrying out a full wash
cycle, pour the bleach into the extra compartment 3, select the
“Rinse” cycle and activate the “Super Wash” option .
! It cannot be used in conjunction with , , , , ,
, , .
Extra rinse
By selecting this option, the efficiency of the rinse is increased
and optimal residual detergent removal is guaranteed. It is
particularly useful for skin which is sensitive to detergents. We
recommend this option is used with a full load of washing, or
when a large amount of detergent is required.
! It cannot be used in conjunction with
, , , , .
Easy Iron
By selecting this option, the wash and spin cycles will be
modified in order to reduce the formation of creases.
At the end of the cycle the washing machine drum will
rotate slowly; the “Easy Iron” and START/PAUSE indicator
lights will flash. To end the cycle press the START/PAUSE
button or the “Easy Iron” button.
! It cannot be used in conjunction with
, , , , , .
Prewash
If this function is selected, the pre-wash cycle will run; this is
useful for removing stubborn stains.
N.B.: put the detergent in the relevant compartment.
! It cannot be used in conjunction with
, , , , ,
, , , , (60°), , .
3
1
2
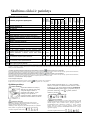
Table of wash cycles
Icon
Description of the wash cycle
Max.
temp. (°C)
Max.
speed
(rpm)
Detergent and additives
Max. load (kg)
Residual
dampness %
Energy con-
sumption kWh
Total water lt
Cycle dura-
tion
Prewash
Wash
Bleach
Fabric
softener
Synthetics Resistant 60° 800
3 45 1,11 48 115’
Synthetics Resistant (4) 40° 800
3 45 0,74 46 100’
Whites
60° 1200
-
4 - - - 200’
Coloureds
40° 1200
4 53 0,88 69 105’
Darks
30° 800 -
-
4 - - - 75’
Shirts
40° 600 -
2 - - - 75’
Duvets: for down-stuffed garments. 30° 1000 -
-
2 - - - 105’
Bed&Bath for bedlinen and towels. 60° 1200
8 - - - 150’
Rinse
- 1200 - -
8 - - - 49’
Spin and Pump out - 1200 - - - - 8 - - - 16’
Anti Allergy
60° 1200 -
-
4 - - - 200’
Ultradelicates
30° 0 -
-
1 - - - 75’
Wool: for wool, cashmere, etc. 40° 800 -
-
2 - - - 105’
Mix 30': to refresh lightly soiled garments quickly (not suitable for
wool, silk and clothes which require washing by hand).
30° 800 -
-
3 70 0,11 41 30’
Cotton Standard 60°C (1): heavily soiled whites and resistant colours.
60°
(Max. 90°)
1200
(3)
8 53 1,04 55 200’
Cotton Standard 40°C (2): lightly soiled whites and delicate colours. 40° 1200 -
8 53 0,92 73 190’
Cotton Standard 20°C: lightly soiled whites and delicate colours. 20° 1200 -
8 - - - 180’
Note: 10 minutes after the START, the machine will recalculate the time remaining until the end of the wash cycle on the basis of the load inside it; this value
will then be shown on the display.
The length of cycle shown on the display or in this booklet is an estimation only and is calculated assuming standard working conditions. The actual duration can vary accor-
ding to factors such as water temperature and pressure, the amount of detergent used, the amount and type of load inserted, load balancing and any wash options selected.
1) Test wash cycle in compliance with directive 1061/2010: set wash cycle with a temperature of 60°C.
This cycle is designed for cotton loads with a normal soil level and is the most efficient in terms of both electricity and water consumption; it should be used for
garments which can be washed at 60°C. The actual washing temperature may differ from the indicated value.
2) Test wash cycle in compliance with directive 1061/2010: set wash cycle
with a temperature of 40°C.
This cycle is designed for cotton loads with a normal soil level and is the most efficient in terms of both electricity and water consumption; it should be used for
garments which can be washed at 40°C. The actual washing temperature may differ from the indicated value.
3) At 60 °C the “Prewash” function cannot be selected.
For all Test Institutes:
2) Long wash cycle for cottons: set wash cycle
with a temperature of 40°C.
4) Long wash cycle for synthetics: set wash cycle with a temperature of 40°C.

EN
8
Detergents and laundry
Duvets: to wash double or single duvets (the weight
of which should not exceed 2 kg), cushions or clothes
padded with goose down such as puffa jackets, use the
special
wash cycle. We recommend that duvets are
placed in the drum with their edges folded inwards (see
figure) and that no more than ¾ of the total volume of the
drum is used. To achieve the best results, we recommend
that a liquid detergent is used and placed inside the
detergent dispenser drawer.
Quilts: to wash quilts with a synthetic outer layer, use the
bag provided and set the wash cycle to
.
Bedlinen and towels: Use programme to wash bed
linen and towels in one single cycle: it optimises softener
performance and helps you save time and energy. We
recommend the use of powder detergent
Anti Allergy: use programme
to remove major allergens
such as pollen, mites, cat’s and dog’s hair.
Ultradelicates: use programme
to wash very delicate
garments having strasses or sequins.
We recommend turning the garments inside out before
washing and placing small items into the special bag
for washing delicates. Use liquid detergent on delicate
garments for best results.
To wash Silk garments and Curtains (these should be
folded and placed inside the bag provided), select cycle
and then option (in this case it will also be possible
to enable the “Extra Rinse” option); the machine will
end the cycle while the laundry is soaking and the
indicator light will flash. To drain the water so that the
laundry may be removed, press the START/PAUSE button
or the
button.
Wool: the wool wash cycle on this Hotpoint-Ariston
machine has been tested and approved by The Woolmark
Company for washing wool garments labelled as hand
washable provided that the garments are washed
according to the instructions on the garment label
and those issued by the manufacturer of this washing
machine. Hotpoint-Ariston is the first washing machine
brand to be approved by The Woolmark Company for
Apparel Care- Platinum for its washing performance and
consumption of energy and water.
Cotton Standard 20°C: ideal for lightly soiled cotton
loads. The effective performance levels achieved at cold
temperatures, which are comparable to washing at 40°,
are guaranteed by a mechanical action which operates at
varying speed, with repeated and frequent peaks.
Detergent
The type and quantity of detergent required depend on
the type of fabric you are washing (cotton, wool, silk,
etc.), as well as its colour, the washing temperature, the
level of soiling and the hardness of the water in the area.
Measuring out the detergent carefully will avoid wastage
and help to protect the environment: although they are
biodegradable, detergents still contain ingredients which
alter the balance of nature.
We recommend the following:
• usepowderdetergentsforwhitecottongarmentsand
pre-washing.
• useliquiddetergentsfordelicatecottongarmentsand
for all low-temperature wash cycles.
• usegentleliquiddetergentsforwoolandsilk
garments.
The detergent should be poured into the relevant
compartment - or the dispenser placed directly inside the
drum - before the wash cycle begins. In the latter case, it will
not be possible to select the Cottons with pre-wash cycle.
! Use powder detergent for white cotton garments, for
pre-washing, and for washing at temperatures over 60°C
! Follow the instructions given on the detergent packaging.
! Do not use hand washing detergents because these
create too much foam.
Preparing the laundry
• Shakeoutthegarmentsbeforeloadingthemintothe
machine.
• Dividethelaundryaccordingfabrictype(symbolonthe
washing instruction label) and colour, making sure you
separate the coloured garments from the white ones;
• Emptyallpocketsandcheckthebuttons;
• Donotexceedthevalueslistedinthe“Table of wash cycles”,
which refer to the weight of the laundry when dry.
How much does your laundry weigh?
1 sheet 400-500 g
1 pillowcase 150-200 g
1 tablecloth 400-500 g
1 bathrobe 900-1200 g
1 towel 150-250 g
1 pair of jeans 400-500 g
1 shirt 150-200 g
Washing recommendations
Whites: use this cycle to wash white clothes. The
programme is designed to maintain the brightness of
white clothes over time.
Coloureds: use this cycle
to wash bright coloured
clothes. The programme is designed to maintain bright
colours over time.
Darks: Use cycle
to wash dark-coloured garments.
This programme is designed to maintain dark colours
over time. We recommend using a liquid detergent for the
best results when washing dark-coloured garments.
Shirts: use the special
wash cycle to wash shirts in
different fabrics and colours to guarantee they receive the
best possible care.

EN
9
Precautions and tips
! The machine was designed and constructed in
accordance with international safety regulations. The
following information is provided for safety reasons and
must therefore be read carefully.
General safety
• Thisappliancewasdesignedfordomesticuseonly.
• Thisapplianceisnotintendedforusebypersons
(including children) with reduced physical, sensory
or mental capabilities, or lack of experience and
knowledge, unless they have been given supervision
or instruction concerning use of the appliance by a
person responsible for their safety. Children should be
supervised to ensure that they do not play with the
appliance.
• Donottouchthemachinewhenbarefootorwithwetor
damp hands or feet.
• Donotpullonthepowersupplycablewhenunplugging
the appliance from the electricity socket. Hold the plug
and pull.
• Donottouchthedrainedwaterasitmayreach
extremely high temperatures.
• Neverforcetheportholedoor.Thiscoulddamagethe
safety lock mechanism designed to prevent accidental
opening.
• Iftheappliancebreaksdown,donotunderany
circumstances access the internal mechanisms in an
attempt to repair it yourself.
• Alwayskeepchildrenwellawayfromtheappliancewhile
it is operating.
• Ifitmustbemoved,proceedwiththehelpoftwoor
three people and handle it with the utmost care. Never
try to do this alone, because the appliance is very heavy.
• Beforeloadinglaundryintothewashingmachine,make
sure the drum is empty.
Load balancing system
Before every spin cycle, to avoid excessive vibrations
before every spin and to distribute the load in a uniform
manner, the drum rotates continuously at a speed which
is slightly greater than the washing rotation speed. If,
after several attempts, the load is not balanced correctly,
the machine spins at a reduced spin speed. If the load is
excessively unbalanced, the washing machine performs
the distribution process instead of spinning. To encourage
improved load distribution and balance, we recommend
small and large garments are mixed in the load.
Disposal
• Disposingofthepackagingmaterials:observelocal
regulations so that the packaging may be re-used.
• TheEuropeanDirective2012/19/EUrelatingtoWaste
Electrical and Electronic Equipment (WEEE) states
that household appliances should not be disposed of
using the normal solid urban waste cycle. Exhausted
appliances should be collected separately in order to
optimise the cost of re-using and recycling the materials
inside the machine, while preventing potential damage
to the atmosphere and to public health.
The crossed-out dustbin is marked on all products
to remind the owner of their obligations regarding
separated waste collection.
For more information relating to the correct disposal of
household appliances, owners should contact their local
authorities or appliance dealer.
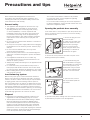
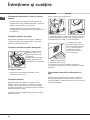
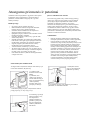
Opening the porthole door manually
In the event that it is not possible to open the porthole door
due to a powercut, and if you wish to remove the laundry,
proceed as follows:
1. remove the plug from the
electrical socket.
2. make sure the water level
inside the machine is lower
than the door opening; if
it is not, remove excess
water using the drain hose,
collecting it in a bucket as
indicated in the figure.
3. remove the cover panel on the lower front part of the
washing machine (see overleaf).
4. pull outwards using the
tab as indicated in the figure,
until the plastic tie-rod is freed
from its stop position; pull
downwards until you hear a
“click”, which indicates that
the door is now unlocked.
5. open the door; if this is
still not possible repeat the
procedure.
6. reposition the panel, making sure the hooks are securely
in place before you push it onto the appliance.

EN
10
Care and maintenance
Cutting off the water and electricity
supplies
• Turnoffthewatertapaftereverywashcycle.Thiswill
limit wear on the hydraulic system in the machine and
help to prevent leaks.
• Unplugtheappliancewhencleaningitandduringall
maintenance work.
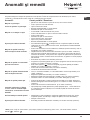
Cleaning the machine
The outer parts and rubber components of the appliance
can be cleaned using a soft cloth soaked in lukewarm
soapy water. Do not use solvents or abrasives.
Cleaning the detergent dispenser
drawer
To remove the drawer, press
lever (1) and pull the drawer
outwards (2) (see figure).
Wash it under running water;
this procedure should be
repeated frequently.
Caring for your appliance drum
• Alwaysleavethedoorajartopreventunpleasantodours
from forming.
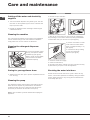
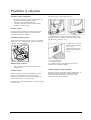
Cleaning the pump
The washing machine is fitted with a self-cleaning pump
which does not require any maintenance. Sometimes,
small items (such as coins or buttons) may fall into the
protective pre-chamber at the base of the pump.
! Make sure the wash cycle has finished and unplug the
appliance.
To access the pre-chamber:
1. take off the cover panel on the front of the machine by
first pressing it in the centre and then pushing downwards
on both sides until you can remove it (see figures);
2. position a container so that
it will collect the water which
flows out (approximately 1.5 l)
(see figure);
3. unscrew the lid by rotating
it in an anti-clockwise
direction (see figure);
4. clean the inside thoroughly;
5. screw the lid back on;
6. reposition the panel, making sure the hooks are securely
in place before you push it onto the appliance.
Checking the water inlet hose
Check the inlet hose at least once a year. If there are any
cracks, it should be replaced immediately: during the wash
cycles, water pressure is very strong and a cracked hose
could easily split open.
1
2
1
2
1
2

EN
11
Trouble shooting
Your washing machine could occasionally fail to work. Before contacting the Technical Assistance Centre (see “Assistance”),
make sure that the problem cannot be solved easily using the following list.
Problem:
The washing machine does not
switch on.
The wash cycle does not start.
The washing machine does not fill
with water.
The washing machine door
remains locked.
The machine continuously fills
with water and drains.
The washing machine does not
drain or spin.
The machine vibrates a lot during
the spin cycle.
The washing machine leaks.
The icons corresponding to the
“Phase in progress” flash rapidly
at the same time as the ON/OFF
indicator light.
There is too much foam.
The washing machine door
remains locked.
Possible causes / Solutions:
• Theapplianceisnotpluggedintothesocketfully,ornotenoughtomake
contact.
• Thereisnopowerinthehouse.
• Thedoorisnotclosedproperly.
• TheSTART/PAUSEbuttonhasnotbeenpressed.
• Thewatertaphasnotbeenopened.
• Adelayedstarthasbeenset.
• Thewaterinlethoseisnotconnectedtothetap.
• Thehoseisbent.
• Thewatertaphasnotbeenopened.
• Thereisnowatersupplyinthehouse.
• Thepressureistoolow.
• TheSTART/PAUSEbuttonhasnotbeenpressed.
• Ifyouhaveselectedthe function, at the end of the cycle the washing
machine drum will rotate slowly; to end the cycle press the START/PAUSE
button or the
button.
• Thedrainhoseisnotfittedataheightbetween65and100cmfromthefloor
(see “Installation”).
• Thefreeendofthehoseisunderwater(see “Installation”).
• Ifthedwellingisononeoftheupperfloorsofabuilding,theremaybe
problems relating to water drainage, causing the washing machine to fill with
water and drain continuously. Special anti-draining valves are available in shops
and help to prevent this inconvenience.
• Thewalldrainagesystemisnotfittedwithabreatherpipe.
• Thewashcycledoesnotincludedraining:Somewashcyclesrequirethedrain
phase to be started manually (see “Wash cycles and options”).
• The option is enabled: to complete the wash cycle, press the START/
PAUSE button (“Wash cycles and options”).
• Thedrainhoseisbent(see Installation).
• Thedrainageductisclogged.
• Thedrumwasnotunlockedcorrectlyduringinstallation(see “Installation”).
• Themachineisnotlevel(see “Installation” ).
• Themachineistrappedbetweencabinetsandwalls(see “Installation”).
• Theloadisunbalanced(see “Detergents and laundry”).
• Thewaterinlethoseisnotscrewedonproperly(see“Installation”).
• Thedetergentdispenserisblocked(tocleanit,see “Care and maintenance”).
• Thedrainhoseisnotfixedinplaceproperly(see“Installation”).
• Switchoffthemachineandunplugit,waitforapproximately1minuteand
then switch it back on again. If the problem persists, contact the Technical
Assistance Service.
• Thedetergentisnotsuitableformachinewashing(itshoulddisplaythetext
“for washing machines” or “hand and machine wash”, or the like).
• Toomuchdetergentwasused.
• Performthemanualunlockingprocedure(see “Precautions and tips”).
!
Note: to exit “Demo mode”, switch machine off, press and hold the two and buttons simultaneously for 3 seconds.

EN
12
Before calling for Assistance:
• Checkwhetheryoucansolvetheproblembyyourself(see“Trouble shooting”);
• Restartthewashcycletocheckwhethertheproblemhasbeensolved;
• Ifithasnot,contacttheAuthorisedTechnicalAssistanceService.
! If the washing machine has been installed or used incorrectly, you will have to pay for the call-out service.
! Always request the assistance of authorised technicians.
Please have the following information to hand:
• thetypeofproblem;
• theappliancemodel(Mod.);
• theserialnumber(S/N).
The above information can be found on the data plate located on the appliance itself.
Assistance

13
PL
Polski
Spis treści
Instalacja, 14-15
Rozpakowanie i wypoziomowanie
Podłączenia hydrauliczne i elektryczne
Dane techniczne
Opis urządzenia, 16-17
Panel sterowania “touch control”
Jak wykonać cykl prania, 18
Programy i opcje, 19
Tabela programów
Opcje
Środki piorące i bielizna, 20
Środek piorący
Przygotowanie bielizny
Zalecenia dotyczące prania
Zalecenia i środki ostrożności, 21
Ogólne zasady bezpieczeństwa
System równoważenia ładunku
Utylizacja
Ręczne otwieranie drzwiczek
Utrzymanie i konserwacja, 22
Odłączenie wody i prądu elektrycznego
Czyszczenie maszyny
Czyszczenie szuadki na środki piorące
Czyszczenie bębna
Czyszczenie pompy
Kontrola przewodu doprowadzającego wodę
Nieprawidłowości w działaniu i sposoby
ich usuwania, 23
Serwis Techniczny, 24
PL
PRALKA
AQUALTIS
AQ83D 29
Instrukcja instalacji i obsługi

PL
14
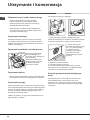
! Należy zachować niniejszą książeczkę, aby móc z niej
skorzystać w każdej chwili. W przypadku sprzedaży,
odstąpienia lub przeprowadzki należy upewnić się, że
pozostanie razem z pralką.
! Należy uważnie przeczytać instrukcję obsługi:
zawiera ona ważne informacje dotyczące instalacji oraz
właściwego i bezpiecznego użytkowania pralki.
!W kopercie zawierającej niniejszą instrukcję, oprócz
gwarancji, znajdują się detale pomagające przy instalacji.
Rozpakowanie i wypoziomowanie
Rozpakowanie
1. Po wypakowaniu pralki upewnić się, że nie doznała
uszkodzeń podczas transportu.
W przypadku stwierdzenia uszkodzeń nie podłączać jej i
skontaktować się ze sprzedawcą.
2. Odkręcić 4 śruby
ochronne umocowane
na czas transportu oraz
odpowiednią rozpórkę,
znajdujące się w części
tylnej (patrz rysunek).
3. Zatkać otwory przy pomocy plastikowych korków
znajdujących się w kopercie.
4. Przechowywać wszystkie części; jeśli pralka będzie
przenoszona, powinny zostać ponownie zamontowane
uszkodzeń celu uniknięcia uszkodzeń wewnętrznych.
! Części opakowania nie są zabawkami dla dzieci.
Poziomowanie
1. Ustawić pralkę na płaskiej i twardej podłodze; nie
opierać jej o ściany lub meble.
2. Skompensować
nierówności odkręcając
lub przykręcając nóżki aż
urządzenie znajdzie się w
położeniu poziomym (jego
nachylenie nie powinno
przekraczać 2 stopnii).
! Dokładne wypoziomowanie powoduje, że urządzenie
jest stabilne i umożliwia wyeliminowanie drgań i hałasów,
zwłaszcza podczas fazy wirowania.
! W razie ustawienia na dywanie lub wykładzinie
dywanowej należy tak wyregulować nóżki, aby pod pralką
pozostawała wolna przestrzeń niezbędna dla wentylacji.
Podłączenia hydrauliczne i elektryczne
Podłączenie rury pobierania wody
! Przed podłączeniem przewodu zasilającego do sieci
wodociągowej spuścić wodę aż do pojawienia się
przejrzystej wody.
1. Podłączyć do urządzenia
przewód doprowadzający
wodę, przykręcając
go do odpowiedniego
otworu dopływowego,
znajdującego się w tylnej
części pralki, z prawej
strony u góry (patrz
rysunek)..
2. Podłączyć przewód
zasilający poprzez
przykręcenie go do zaworu
wody zimnej z otworem
z gwintem rurowym
drobnozwojowym ¾ (patrz
rysunek).
3. Zwrócić uwagę, aby na przewodzie nie było zagięć ani
zwężeń.
! Ciśnienie wody w kurku powinno mieścić się w
przedziale podanym w tabeli Danych technicznych (patrz
strona obok).
! Jeśli długość przewodu doprowadzającego
wodę jest niewystarczająca, należy zwrócić się do
specjalistycznego sklepu lub do autoryzowanego
technika.
! Nigdy nie należy stosować używanych lub starych
przewodów zasilających, lecz tych, które znajdują się na
wyposażeniu urządzenia.
Instalacja

15
PL
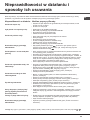
Podłączenie przewodu odpływowego
Podłączyć rurę odpływową
wody do kanalizacji lub
otworu spustowego w
ścianie umieszczonego
na wysokości od 65 cm
do 1 m od ziemi, unikając
zginania jej.
Alternatywnie można
oprzeć ją na brzegu zlewu
lub wanny, przymocowując
do kranu załączony do
pralki prowadnik (zobacz
rysunek).
Wolny koniec rury
odpływowej nie powinien
pozostawać zanurzony w
wodzie.
! Odradza się używanie rur-przedłużaczy; jeśli
przedłużacz jest jednak konieczny, powinien mieć on
ten sam przekrój, co rura oryginalna, i nie powinien
przekraczać 150 cm długości.
Podłączenie elektryczne
Przed włożeniem wtyczki do gniazdka elektrycznego
należy się upewnić, czy:
• gniazdko posiada uziemienie i jest zgodne z
obowiązującymi przepisami;
• gniazdko jest w stanie wytrzymać maksymalne
obciążenie mocy urządzenia, wskazane w tabeli
Danych technicznych (patrz obok);
• napięcie zasilania mieści się w wartościach
wskazanych w tabeli Danych technicznych (patrz
obok);
• gniazdko jest kompatybilne z wtyczką urządzenia.
W przeciwnym razie należy wymienić gniazdko lub
wtyczkę.
! Nie należy instalować pralki na otwartym powietrzu,
nawet jeśli miejsce to jest chronione daszkiem, gdyż
wystawienie urządzenia na działanie deszczu i burz jest
bardzo niebezpieczne.
! Po zainstalowaniu urządzenia gniazdko elektryczne
powinno być łatwo dostępne.
! Nie używać przedłużaczy ani wtyczek wielokrotnych.
! Kabel nie powinien być zgięty ani zgnieciony.
! Kabel zasilania elektrycznego oraz wtyczka mogą być
wymieniane wyłącznie przez upoważnionych techników.
Uwaga! Producent nie ponosi żadnej odpowiedzialności,
jeśli powyższe normy nie będą przestrzegane.
65 - 100 cm
Dane techniczne
Model AQ83D 29
Wymiary
szerokość cm 59,5
wysokość cm 85
głêbokość cm 58
Pojemność od 1 do 8 kg
Dane prądu
elektrycznego
dane techniczne umieszczone są na
tabliczce na maszynie
Dane sieci
wodociągowej
Maksymalne ciśnienie 1 MPa (10 barów)
ciśnienie minimalne 0,05 MPa (0,5 barów)
pojemność bębna 58 litrów
Szybkość
wirowania
do 1200 obrotów na minutę
Programy testowe
zgodnie z dyrekt-
ywami 1061/2010 i
1015/2010
program
; Bawełna Standardowy 60 °C;
program
; Bawełna Standardowy 40 °C.
Urządzenie to zostało wyprodukowane
zgodnie z następującymi przepisami CE:
- 2004/108/CE (o Kompatybilności
Elektromagnetycznej)
- 2012/19/EU
- 2006/95/CE (o Niskim Napięciu)

PL
16
celu użycia środka piorącego w proszku, należy wsunąć
ściankę w zgłębienie B.
3. dodatkowy pojemnik: Wybielacz
! Użycie dodatkowego pojemniczka 3 wyklucza
pranie wstępne.
pojemnik na dodatkowe środki: zmiękczające lub
dodatki płynne. Zaleca się nigdy nie przekraczać
maksymalnego poziomu podanego na siatce i
rozcieńczać skoncentrowane środki zmiękczające.
Panel sterowania “touch control”
Aby zmienić ustawienia
przycisnąć lekko ikonę
wewnątrz czułego pola
(touch control) jak wskazano
na rysunku.
Funkcja stand by
Pralka ta, w myśl nowych norm europejskich związanych
z oszczędnością elektryczną, posiada system auto
wyłączenia (stand by), który włącza się po 30 minutach
nie użytkowania. Ponownie lekko wcisnąć przycisk
ON-OFF
i poczekać, aż pralka ponownie włączy się.
DRZWICZKI
W celu otwarcia drzwiczek
posługiwać się zawsze
odpowiednim uchwytem
(patrz rysunek).
SZUFLADKA NA ŚRODKI PIORĄCE
Znajduje się wewnątrz
maszyny, aby uzyskać do
niej dostęp należy otworzyć
drzwiczki.
Informacje dotyczące
dozowania środków
piorących znajdują się w
rozdziale „Środki piorące i
bielizna”.
1. pojemnik do prania
wstępnego: stosować środek
piorący w proszku.
! Przed wsypaniem środka
piorącego należy sprawdzić,
czy nie jest włożona
dodatkowa przegródka 3.
2. pojemnik do prania:
W przypadku stosowania
środka piorącego w
płynie, zaleca się użycie ścianki A dostarczonej na
wyposażeniu, która ułatwia prawidłowe dozowanie. W
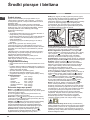
PULPIT
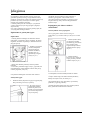
STEROWANIA
DRZWICZKI
UCHWYT
DRZWICZEK
PODEST
REGULOWANE NÓŻKI
Opis urządzenia
3
1
2
1
8
0
2
1
0
1
5
0
1
2
0
9
0
6
0
B
A

17
PL
17
Panel sterowania “touch control”
Przycisk z kontrolką ON/OFF: nacisnąć na chwilę
przycisk w celu włączenia lub wyłączenia maszyny. Zielona
kontrolka wskazuje, że maszyna jest włączona. W celu
wyłączenia pralki podczas prania konieczne jest dłuższe
przytrzymanie naciśniętego przycisku, przez około 3
sek.; krótkie lub przypadkowe naciśnięcie nie wystarczy
do wyłączenia maszyny. Wyłączenie maszyny podczas
trwającego prania anuluje program prania.
Pokrętło PROGRAMÓW: może być obracane w obydwu
kierunkach. W celu wybrania najlepszego programu należy
sprawdzić „Tabela programów”. W czasie trwania programu
pokrętło pozostaje nieruchome.
Przyciski M1-M2-M3: przytrzymać wciśnięty jeden z
przycisków w celu zapisania w pamięci cyklu oraz własnych
preferowanych ustawień. W celu przywołania cyklu
zapisanego uprzednio wcisnąć odpowiedni przycisk.
Przycisk
TEMPERATURY: nacisnąć w celu dokonania
zmiany lub wykluczenia temperatury, wartość wskazywana
jest na umieszczonym wyżej ekranie (patrz „Jak wykonać
cykl prania”).
Przycisk
WIROWANIE: nacisnąć w celu dokonania
zmiany lub wykluczenia wirówki, wartość wskazywana jest na
umieszczonym wyżej ekranie (patrz „Jak wykonać cykl prania”).
Przycisk
OPÓŹNIONE URUCHOMIENIE: nacisnąć w
celu ustawienia opóźnionego uruchomienia wybranego
programu, wartość ustawionego opóźnienia widoczna jest na
umieszczonym wyżej ekranie (patrz ”Jak wykonać cykl prania”).
Przyciski OPCJI: nacisnąć w celu wybrania dostępnych
opcji. Kontrolka odpowiadająca wybranej opcji pozostanie
włączona (patrz „Jak wykonać cykl prania”).
Ikony FAZY PRANIA: włączają się wskazując
zaawansowanie cyklu (Pranie
– Płukanie –
Wirowanie – Wypompowanie ). Napis zapala się,
kiedy cykl zostaje zakończony.
Przycisk z kontrolką START/PAUSE: kiedy zielona kontrolka
pulsuje powoli należy nacisnąć przycisk w celu uruchomienia
prania. Po uruchomieniu cyklu kontrolka świeci w sposób
ciągły. W celu wybrania trybu pauzy podczas prania
nacisnąć ponownie przycisk, kontrolka zacznie pulsować
w kolorze pomarańczowym. Jeśli kontrolka „LOCK”
jest wyłączona, można otworzyć drzwiczki pralki. W celu
ponownego uruchomienia prania od miejsca, w którym
zostało przerwane, należy ponownie nacisnąć przycisk.
Kontrolka
LOCK: wskazuje, że drzwiczki są zablokowane.
W celu otwarcia drzwiczek konieczne jest włączenie pauzy
cyklu (patrz „Jak wykonać cykl prania”).
Przycisk oraz kontrolka
BLOKADA PRZYCISKÓW:
w celu uruchomienia lub wyłączenia blokady panelu
sterowania przytrzymać naciśnięty przycisk przez około
2 sekundy. Włączona kontrolka wskazuje, że panel
sterowania został zablokowany. W ten sposób uniemożliwia
się dokonywanie przypadkowych zmian w programach,
zwłaszcza, jeśli w domu obecne są dzieci.
Kontrolka ECO: Ikona
włączy się, gdy, podczas zmiany
parametrów prania, zostanie zaoszczędzone co najmniej
10% energii. Przed wejściem maszyny w tryb „Stand by”,
ikona zaświeci się przez kilka sekund; gdy maszyna jest
wyłączona, odzysk energii elektrycznej określony jest na
około 80%.
ZMIANA JĘZYKA
Jeśli maszyna zostanie włączona po raz pierwszy na
wyświetlaczu ukaże się migająca ikona pierwszego
języka. Odpowiednio do 3 przycisków, po prawej stronie
wyświetlacza ukażą się symbole “
” , “OK” i “V”. Języki
zmieniają się automatycznie co 3’’ lub poprzez przyciśnięcie
przycisków obok symboli ‘’
” i “V”. Przyciskiem “OK”
potwierdza się język, który ustala się po 2’’. Jeśli nie
zostanie przyciśnięty żaden przycisk, po 30’’ zmiana
automatyczna języka ponownie zacznie się.
W celu zmiany języka należy włączyć i wyłączyć
urządzanie, a następnie w ciągu 30 sekund wcisnąć
równocześnie przyciski temperatury
+wirowanie
+start z opóźnieniem przez 5 sekund. Rozlegnie się
krótki sygnał dźwiękowy, a na wyświetlaczu będzie migał
wybrany język. Po przyciśnięciu przycisków obok symboli
„
” i „V” zmienia się język. Przyciskiem obok symbolu
“OK” potwierdza się język, który ustala się po 2’’. Jeśli
nie zostanie przyciśnięty żaden przycisk, po 30’’ zostanie
wyświetlony język wcześniej ustalony.
Pokrętło
PROGRAMÓW
Przycisk z kontrolką
ON/OFF
Ekran
M1
M2
M3
Przyciski
OPCJI
Przycisk
OPÓŹNIONE
URUCHOMIENIE
Przycisk TEMPERATURY
Kontrolka
LOCK
Przycisk WIROWANIE
Przycisk oraz kontrolka
BLOKADA
PRZYCISKÓW
Kontrolka
EKO
Przycisk z kontrolką
START / PAUSE
Ikony FAZY
PRANIA

PL
18
UWAGA: kiedy po raz pierwszy używa się pralki należy
wykonać cykl prania bez wsadu, ale z użyciem środka
piorącego nastawiając program bawełny 90° bez prania
wstępnego.
1. WŁĄCZENIE MASZYNY. Wcisnąć przycisk .
Wszystkie kontrolki zaświeca się przez 1 sekundę a
na ekranie pojawi się napis AQUALTIS, a następnie
pozostanie świecąc się stałym światłem kontrolka
przycisku
oraz pulsować będzie kontrolka START/
PAUSE.
2. WYBÓR PROGRAMU. Obracać Pokrętło
PROGRAMÓW w prawo lub w lewo aż do
odnalezienia potrzebnego programu, nazwa programu
pojawi się na ekranie; teraz powiązana jest z
temperaturą oraz prędkością wirowania, które mogą
zostać zmienione. Na wyświetlaczu pojawi się czas
trwania cyklu.
3. ZAŁADUNEK BIELIZNY. Otworzyć drzwiczki. Włożyć
bieliznę uważając, aby nie przekroczyć wielkości
ładunku wskazanej w tabeli programów na następnej
stronie.
4. DOZOWANIE ŚRODKA PIORĄCEGO. Wysunąć
szuadkę i wsypać środek piorący do odpowiednich
pojemników, tak jak wyjaśniono to w „Opis
urządzenia”.
5. ZAMKNIĘCIE DRZWICZEK.
6. PERSONALIZACJA CYKLU PRANIA Posługiwać się
odpowiednimi przyciskami panelu sterowania:
Zmienić temperaturę i/lub wirowanie.
Maszyna automatycznie wyświetla temperaturę i
przewidziane maksymalne wartości dla ustawionego
programu lub ostatnie wartości, jeśli są zgodne z
wybranym programem. Poprzez naciśnięcie przycisku
zmniejsza się stopniowo temperaturę aż do prania
w zimnej wodzie (OFF). Poprzez naciśnięcie przycisku
zmniejsza się stopniowo wirowanie aż do jego
wyłączenia (OFF). Dodatkowe naciśnięcie przycisków
przywróci maksymalne przewidywane wartości.
! Wyjątek: wybierając program
temperaturę można
podnieść aż do 90°.
Nastawić opóźniony start.
W celu ustawienia opóźnionego startu wybranego
programu należy wduszać odpowiedni przycisk aż
do osiągnięcia żądanego czasu opóźnienia. Podczas
ustawiania wyświetlony zostanie czas opóźnienia
wraz z pulsującym napisem „Start za:” i migającym
symbolem
. Po nastawieniu opóźnionego startu na
wyświetlaczu zostanie wyświetlony nieruchomy symbol
i następnie wyświetlony zostanie ustawiony czas
trwania cyklu z napisem „ Koniec za:” i czas trwania
cyklu. Po jednorazowym naciśnięciu przycisku START
OPÓŹNIONY wyświetlony zostaje tylko jeden raz czas
ustawionego opóźnienia.
Wyświetlacz pokaże napis “Start za:”. I czas
opóźnienia. Po zakończeniu ustawionego czasu
opóźnienia, maszyna włączy się i na wyświetlaczu
ukaże się napis: „Koniec za:” i pozostały czas do
zakończenia cyklu. W celu usunięcia opóźnionego
uruchomienia wciskać przycisk aż do pojawienia się
napisu OFF; symbol
zgaśnie.
Zmiana charakterystyki cyklu.
• Wcisnąć przycisk w celu uruchomienia opcji, na
ekranie pojawi się nazwa a odpowiednie
zacienienie przycisku włączy się.
• Wcisnąć ponownie przycisk w celu wyłączenia
opcji; na ekranie pojawi się nazwa opcji plus OFF i
podcieniowanie wyłączy się.
! Jeśli wybrana opcja nie jest zgodna z nastawionym
programem, niezgodność zostanie zasygnalizowana
przez pulsowanie kontrolki i sygnał akustyczny
(3 sygnały) a opcja nie będzie aktywowana.
! Jeśli wybrana opcja nie jest zgodna z inną, ustawioną
uprzednio, kontrolka odpowiadająca pierwszej opcji
będzie pulsować i uruchomiona zostanie jedynie opcja
druga, kontrolka uruchomionej opcji będzie świecić
stale.
! Opcje mogą zmieniać zalecane obciążenie i/lub czas
trwania cyklu.
7. URUCHOMIENIE PROGRAMU. Nacisnąć przycisk
START/PAUSE. Odpowiednia kontrolka zaświeci
stałym światłem a drzwiczki zostaną zablokowane
(kontrolka LOCK
świeci się). Ikony odpowiadające
fazom prania zaświecą się podczas cyklu wskazując
bieżącą fazę.
W celu dokonania zmiany programu w czasie trwania
cyklu należy wybrać funkcję pauzy naciskając na
przycisk START/PAUSE a następnie wybrać żądany
cykl i nacisnąć ponownie przycisk START/PAUSE.
W celu otworzenia drzwi, gdy cykl prania jest włączony
należy nacisnąć przycisk START/PAUSE; jeśli
kontrolka LOCK
jest zgaszona otwarcie drzwi będzie
możliwe. Nacisnąć ponownie przycisk START/PAUSE,
aby uruchomić program od momentu, w którym został
przerwany.
8. KONIEC PROGRAMU. Wskazywany jest przez
zaświecenie napisu END. Drzwiczki pralki można
otworzyć natychmiast. Jeśli kontrolka START/PAUSE
pulsuje, nacisnąć przycisk w celu zakończenia
cyklu. Otworzyć drzwiczki, wyjąć bieliznę i wyłączyć
urządzenie.
! Jeśli uruchomiony już cykl ma być anulowany należy
przytrzymać dłużej naciśnięty przycisk
, aż cykl
zostanie przerwany i urządzenie wyłączy się.
Torba na pikowane kołdry, zasłony i delikatne tkaniny
Dzięki specjalnemu workowi dostarczonemu z
produktem, pralka Aqualtis pozwala na wypranie cennych
i delikatnych rzeczy chroniąc je przed zniszczeniem.
Zaleca się zastosować go do prania kołder
pikowanych i puchowych z syntetycznym wsypem.
Jak wykonać cykl prania

19
PL
19
Opcje
Super Wash
Dzięki zastosowaniu
większej ilości wody
podczas fazy początkowej
cyklu i zastosowaniu
dłuższego czasu, opcja
ta gwarantuje pranie o
wysokiej skuteczności.
Funkcja ta przydatna jest
w celu usuwania bardziej
opornych plam. Może być
używana z i bez wybielacza.
Jeśli zamierza się wykonać
cykl wybielania należy wstawić dodatkowy pojemniczek
3, na wyposażeniu, do przegródki 1. Nie przekraczać
maksymalnej ilości wybielacza w płynie, podanej na
głównym wskaźniku (zobacz rysunek). Aby wykonać
tylko wybielanie bez kompletnego cyklu prania, należy
wlać wybielacz do dodatkowego pojemnika 3 i nastawić
program „Płukanie”
oraz uruchomić opcję „Super
Wash” .
! Nie można jej zastosować przy programach , ,
, , , , , .
Extra Płukanie
Wybierając tę opcję zwiększa się skuteczność płukania i
zapewnia się maksymalne usuwanie środka piorącego.
Jest przydatne dla włókna szczególnie wrażliwego na
środki piorące. Radzimy używać tej opcji z pralką o
pełnym wsadzie i z większą ilością środka piorącego.
! Nie można jej zastosować przy programach
, , , , .
Łatwe Prasowanie
Wybierając tę opcję pranie oraz wirowanie zostaną
odpowiednio zmienione w celu ograniczenia powstawania
zgnieceń. Po zakończeniu cyklu pralka wykona powolne
obroty bębna, kontrolki „Łatwe Prasowanie” oraz START/
PAUSE będą pulsowały. W celu zakończenia cyklu nacisnąć
przycisk START/PAUSE lub przycisk „Łatwe Prasowanie”.
! Nie można jej zastosować przy programach
, , ,
, , .
Pranie wstępne
W przypadku wyboru tej funkcji zostanie wykonane pranie
wstępne, które ułatwia usunięcie uporczywych plam.
N.B.: Należy umieścić środek piorący w odpowiedniej
przegródce.
! Nie można jej zastosować przy programach
, ,
, , , , , , , (60°), , .
Programy i opcje
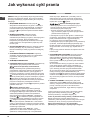
Tabela programów
3
1
2
Uwaga: po około 10 minutach od START, urządzenie na podstawie wsadu obliczy i pokaże czas pozostały do zakończenia programu.
1) Program kontrolny zgodny z normą 1061/2010: ustawić program
, wybierając temperaturę 60°C.
Ten cykl jest odpowiedni do prania średnio zabrudzonej odzieży bawełnianej i jest najbardziej wydajnym cyklem pod względem łącznego zużycia energii
elektrycznej i wody; należy go używać do odzieży przeznaczonej do prania w 60 °C. Rzeczywista temperatura prania może się różnić od podanej.
2) Program kontrolny zgodny z normą 1061/2010: ustawić program , wybierając temperaturę 40°C.
Ten cykl jest odpowiedni do prania średnio zabrudzonej odzieży bawełnianej i jest najbardziej wydajnym cyklem pod względem łącznego zużycia energii
elektrycznej i wody; należy go używać do odzieży przeznaczonej do prania w 40 °C. Rzeczywista temperatura prania może się różnić od podanej.
3) W temperaturze 60 °C nie można włżczyż funkcji “Pranie wstępne”.
Dla wszystkich Instytucji homologacyjnych:
2) Program bawełna, długi: ustawić program , wybierając temperaturę 40°C.
4) Program syntetyczne, długi: ustawić program
, wybierając temperaturę 40°C.
Czas trwania cyklu wskazany na wyświetlaczu lub w instrukcji jest czasem oszacowanym dla standardowych warunków. Rzeczywisty czas trwania cyklu może się
zmieniać w zależności od wielu czynników, takich jak temperatura i ciśnienie wody na wlocie, temperatura otoczenia, ilość detergentu, ilość i rodzaj pranej odzieży,
wyważenie ładunku, wybrane opcje dodatkowe.
Ikona
Opis programu
Temp.
maks.
(°C)
Prędkość
maks. (obroty
na minutę)
Środki piorące i
dodatki
£adunek max
(kg)
Wilgotność
resztkowa %
Zużycie ener-
gii kWh
Woda łącznie
lt
Czas trwania
cyklu
Pranie
wstępne
Pranie
Wybie-
lacz
Środek
zmiękc-
zający
Syntetyczne Odporne
60° 800
3 45 1,11 48 115’
Syntetyczne Odporne (4)
40° 800
3 45 0,74 46 100’
Białe
60° 1200
-
4 - - - 200’
Kolorowe
40° 1200
4 53 0,88 69 105’
Ciemne
30° 800 -
-
4 - - - 75’
Koszule
40° 600 -
2 - - - 75’
Kołdry: do odzieży ocieplanej gęsim puchem.
30° 1000 -
-
2 - - - 105’
Bed&Bath: do bielizny poœcielowej i k¹pielowej.
60° 1200
8 - - - 150’
Płukanie
- 1200 - -
8 - - - 49’
Wirowanie i Wypompowanie
- 1200 - - - -
8 - - - 16’
Antyalergiczne
60° 1200 -
-
4 - - - 200’
Delikatne
30° 0 -
-
1 - - - 75’
Wełna: do wełny, kaszmiru, itp.
40° 800 -
-
2 - - - 105’
Mix 30’: W celu szybkiego odświeżenia lekko zabrudzonych tkanin (niew-
skazany dla wełny, jedwabiu i tkanin przeznaczonych do prania ręcznego).
30° 800 -
-
3 70 0,11 41 30’
Bawełna Standardowy 60°C (1): tkaniny białe i kolorowe, wytrzymałe,
mocno zabrudzone.
60°
(Max. 90°)
1200
(3)
8 53 1,04 55 200’
Bawełna Standardowy 40°C (2): tkaniny białe lekko zabrudzone i delikat-
ne kolorowe.
40° 1200 -
8 53 0,92 73 190’
Bawełna Standardowy 20°C: tkaniny białe lekko zabrudzone i delikatne
kolorowe.
20° 1200 -
8 - - - 180’

PL
20
Kołdry: aby wyprać produkty wypełnione puchem gęsim,
takie jak kołdry dla dwóch osób lub pojedyncze (nieważące
więcej niż 2 kg), poduszki, kurtki puchowe, należy
zastosować właściwy program
. Należy włożyć produkty
puchowe do bębna wyginając rogi do wnętrza (patrz
rysunki) ale tak, aby nie przekroczyć ¾ jego pojemności.
Aby uzyskać optymalne wyniki prania zaleca się wlanie
do szuadki płynnego środka do prania.
Kołdry pikowane: aby wyprać kołdry pikowane z
syntetycznym wypełnieniem, należy zastosować
dostarczony w tym celu worek i ustawić program
.
Bielizna kąpielowa i pościelowa: w celu wyprania
bielizny kąpielowej i pościelowej w jednym cyklu, należy
użyć programu
, który optymalizuje zużycie środka
piorącego i pozwala oszczędzać czas i pieniądze.
Zalecamy stosowanie środka piorącego w proszku.
Antyalergiczne: programu
należy używać do usuwania
głównych alergenów, takich jak pyłki, roztocza, sierść kotów i psów.
Delikatne: używać programu do prania bardzo
delikatnej odzieży, ozdobionej cekinami lub koralikami.
Zalecamy wywrócenie ubrań na lewą stronę i włożenie
małych części odzieży do woreczka przeznaczonego
specjalnie do prania delikatnych ubrań.
Dla osiągnięcia najlepszych efektów, zalecamy stosowanie
środka piorącego w płynie do tkanin delikatnych.
Do prania jedwabiu i zasłon (należy je złożyć i włożyć do
dostarczonego worka), należy wybrać cykl
i włączyć
opcję (w tym przypadku możliwe będzie również
włączenie opcji „Extra Płukanie”); urządzenie zakończy
cykl z zamoczoną bielizną, a kontrolka
będzie migać.
W celu odprowadzenia wody i wyjęcia prania, należy
nacisnąć przycisk START/PAUSE lub przycisk
.
Wełna: cykl prania „Wełna” niniejszej pralki Hotpoint-
Ariston został przetestowany i zatwierdzony przez
Woolmark Company jako odpowiedni do prania odzieży
wełnianej przeznaczonej wyłącznie do prania ręcznego,
pod warunkiem, że pranie jest przeprowadzane zgodnie
z instrukcjami podanymi na etykiecie ubrania oraz
ze wskazówkami dostarczonymi przez producenta
urządzenia. Hotpoint-Ariston to pierwsza marka pralek,
która uzyskała od Woolmark Company certykat
Woolmark Apparel Care - Platinum ze względu na
osiągane rezultaty prania oraz zużycie wody i energii.
Bawełna Standardowy 20°C: idealny do zabrudzonej
bielizny bawełnianej. Dobre wyniki prania w zimnej wodzie,
porównywalne z praniem w 40°, są gwarantowane dzięki
działaniu mechanicznemu, wykonywanemu ze zmienną
prędkością, której maksymalne wartości powtarzają się w
krótkich odstępach czasu.
Środki piorące i bielizna
Środek piorący
Wybór oraz ilość środka piorącego zależne są od
rodzaju tkaniny (bawełna, wełna, jedwab...), od koloru,
od temperatury prania, od stopnia zabrudzenia oraz od
twardości wody.
Dokładne dozowanie środka piorącego zapobiega
marnotrawstwu i przyczynia się do ochrony środowiska:
środki piorące, mimo że ulegają biodegradacji, zawsze
zawierają składniki, które zakłócają równowagę
środowiska naturalnego.
Zaleca się:
• stosowanie środków piorących w proszku dla tkanin z
białej bawełny i do prania wstępnego.
• stosowanie środków piorących w płynie dla delikatnych
tkanin z bawełny oraz dla wszystkich programów z
niską temperaturą.
• stosowanie płynnych środków piorących do wełny i
jedwabiu.
Środek piorący powinien być włożony przed
rozpoczęciem prania do odpowiedniej komory lub do
dozownika wkładanego bezpośrednio do bębna. W takim
przypadku nie można wybrać cyklu Bawełna z praniem
wstępnym.
! Środki piorące w proszku należy stosować do tkanin z
białej bawełny i do prania wstępnego oraz do prania w
temperaturze przekraczającej 60°C.
! Należy stosować się do zaleceń podanych na
opakowaniu środka piorącego.
! Nie używać środków do prania ręcznego, ponieważ
tworzą za dużo piany.
Przygotowanie bielizny
• Rozprostować dobrze ubrania przed włożeniem ich do
pralki.
• Podzielić bieliznę według rodzajów tkaniny (symbol na
etykiecie ubrania) oraz koloru uważając na oddzielenie
odzieży kolorowej od białej;
• Opróżnić kieszenie i sprawdzić guziki;
• Nie przekraczać wartości wskazanych w „Tabela
programów” odnoszących się do ciężaru bielizny suchej.
Ile waży bielizna?
1 prześcieradło 400 – 500 gr
1 poszewka 150 – 200 gr
1 obrus 400 – 500 gr
1 szlafrok 900 – 1200 gr
1 ręcznik do rąk 150 – 250 gr
1 spodnie jeansowe 400 – 500 gr
1 koszula 150 – 200 gr
Zalecenia dotyczące prania
Białe: z cyklu należy korzystać do prania białych
tkanin. Program został opracowany tak, aby chronił przed
szarzeniem białych tkanin.
W celu osiągnięcia najlepszych wyników zaleca się
stosowanie detergentu w proszku.
Kolorowe: z cyklu
należy korzystać do prania tkanin
o jasnych kolorach. Program został opracowany tak, aby
chronił kolory przed blaknięciem.
Ciemne: cyklu
należy używać do prania ciemnej odzieży.
Program został opracowany w celu ochrony ciemnych
kolorów przed blaknięciem. Dla osiągnięcia najlepszych
efektów, zalecamy stosowanie środka piorącego w płynie,
najlepiej przeznaczonego do prania ciemnej odzieży.
Koszule: Należy używać odpowiedniego cyklu
do prania koszul z różnego materiału i koloru w celu
zagwarantowania jak najlepszej ochrony ubrań.
Strona się ładuje...
Strona się ładuje...
Strona się ładuje...
Strona się ładuje...
Strona się ładuje...
Strona się ładuje...
Strona się ładuje...
Strona się ładuje...
Strona się ładuje...
Strona się ładuje...
Strona się ładuje...
Strona się ładuje...
Strona się ładuje...
Strona się ładuje...
Strona się ładuje...
Strona się ładuje...
Strona się ładuje...
Strona się ładuje...
Strona się ładuje...
Strona się ładuje...
Strona się ładuje...
Strona się ładuje...
Strona się ładuje...
Strona się ładuje...
Strona się ładuje...
Strona się ładuje...
Strona się ładuje...
Strona się ładuje...
Strona się ładuje...
Strona się ładuje...
Strona się ładuje...
Strona się ładuje...
Strona się ładuje...
Strona się ładuje...
Strona się ładuje...
Strona się ładuje...
Strona się ładuje...
Strona się ładuje...
Strona się ładuje...
Strona się ładuje...
-
 1
1
-
 2
2
-
 3
3
-
 4
4
-
 5
5
-
 6
6
-
 7
7
-
 8
8
-
 9
9
-
 10
10
-
 11
11
-
 12
12
-
 13
13
-
 14
14
-
 15
15
-
 16
16
-
 17
17
-
 18
18
-
 19
19
-
 20
20
-
 21
21
-
 22
22
-
 23
23
-
 24
24
-
 25
25
-
 26
26
-
 27
27
-
 28
28
-
 29
29
-
 30
30
-
 31
31
-
 32
32
-
 33
33
-
 34
34
-
 35
35
-
 36
36
-
 37
37
-
 38
38
-
 39
39
-
 40
40
-
 41
41
-
 42
42
-
 43
43
-
 44
44
-
 45
45
-
 46
46
-
 47
47
-
 48
48
-
 49
49
-
 50
50
-
 51
51
-
 52
52
-
 53
53
-
 54
54
-
 55
55
-
 56
56
-
 57
57
-
 58
58
-
 59
59
-
 60
60


