Alpina SF-1012 Instrukcja obsługi
- Kategoria
- Blendery
- Typ
- Instrukcja obsługi

1
EN
SF-1012
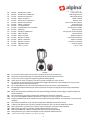
Blender with Grinder
Instruction for use
DE
SF-1012
Standmixer mit Mahlwerk
Bedienungshinweise
NL
SF-1012
Blender met hakmolen
Gebruiksaanwijzing
FR
SF-1012
Mixeur et Hacheur
Mode d`emploi
IT
SF-1012
Frullatore con macinatore
Manuale d´uso
ES
SF-1012
Batidora con picadora
Instrucciones de utilización
PL
SF-1012
Mikser z młynkiem
Instrukcja użycia
HU
SF-1012
Turmixgép-daráló
Használati utasítás
PT
SF-1012
Liquidificadora com trituradora
Instruções de utilização
GR
SF-1012
Μπλέντερ
Οδηγίες Χρήσης
RU
SF-1012
Блендер с дробилкой
Инструкции по эксплуатации
CZ
SF-1012
Mixér s drtičem
Návod k použití
SK
SF-1012
Mixér a mlynček
Návod na použitie
RO
SF-1012
Blender cu râşniţă
Instrucţiuni de utilizare
HR
SF-1012
Mikser s drobilicom
Uputa za uporabu
SR
SF-1012
Blender sa mlinom
Uputstvo za upotrebu
TR
SF-1012
Öğütücülü mikser
Kullanım talimatı
AR
SF-1012
SF-1012
EN:
For your own safety read these instructions carefully before using the appliances.
DE:
Bitte lesen Sie diese Anleitungen vor Inbetriebnahme des Geräts aufmerksam durch.
NL:
Leest u voor het eerste gebruik zorgzaam de gebruiksaanwijzing door.
FR :
Avant que vous utiliser cet appareil, lisez bien ce mode d´emploi pour votre sécurité.
IT:
Per garantire la sicurezza personale raccomandiamo leggere attentamente il presente Manuale, ancora prima
dell´uso dell´apparecchio elettrodomestico
ES:
Por su seguridad lea estas instrucciones detenidamente antes de utilizar el electrodoméstico.
PL:
Dla własnego bezpieczeństwa proszę uważnie przeczytać niniejszą instrukcję przed rozpoczęciem eksploatacji
urządzenia.
HU:
Kérjük a készülék első üzembehelyezése előtt saját biztonsága érdekében olvassa végig a használati utasítást és
kövesse előírásait.
PT:
Para sua segurança, leia estas instruções com atenção antes de utilizar o aparelho.
GR:
Για τη δική σας ασφάλεια διαβάστε προσεκτικά τις οδηγίες πριν από τη χρήση των συσκευών.
RU:
В целях вашей безопасности внимательно прочитайте инструкции прежде, чем приступить к эксплуатации
прибора.
CZ:
Před použitím spotřebiče si kvůli své vlastní bezpečnosti důkladně přečtěte tento návod.
SK:
V záujme vašej bezpečnosti si pozorne prečítajte tieto pokyny skôr, než začnete používať zariadenia.
RO:
Pentru propria dvs. siguranţă, citiţi cu atenţie aceste instrucţiuni înainte de a utiliza aparatele.
HR:
Radi vlastite sigurnosti prije uporabe uređaja pažljivo pročitajte ovu uputu.
SR:
Radi svoje bezbednosti, pažljivo pročitajte ovo uputstvo pre korišćenja uređaja.
TR:
Kendi güvenliğiniz için, aletleri kullanmadan önce bu talimatları dikkatlice okuyun.
AR:

2
EN
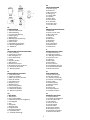
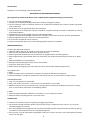
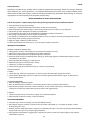
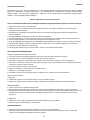
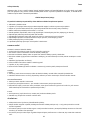
PARTS DESCRIPTION
1. Measuring Cup
2. Blender Lid
3. 48oz. Glass Jar
4. Sealing ring
5. Cutting blade
6. Cup base
7. Motor Base
8. Rotary switch
9. Jar Assembly
10. Grinder cover
11. Grinder base
DE
KOMPONENTEN
1. Deckel Einfüllschacht
2. Deckel Mixkrug
3. 1,4 Liter Glas-Mixkrug
4. Dichtungsring
5. Messerwerk
6. Befestigungsring Glaskrug
7. Motoreinheit
8. Drehschalter
9. Glas-Mixkrug (komplett)
10. Abdeckung Mahlwerk
11. Mahlwerk
NL
ONDERDELEN BESCHRIJVING
1. Maatbeker
2. Deksel van de mixer
3. 48oz. glazen pot
4. Afsluitring
5. Snijmes
6. Bekerbasis
7. Motorbasis
8. Draaiknop
9. Pot vastzekstuk
10. Maler deksel
11. Maler basis
FR
DESCRITPION DES PIECES DETACHEES
1. Verre mesureur
2. Couvercle du mixeur
3. Bol mélangeur 1,4 l
4. Joint d’étanchéité
5. Lames
6. Support de lame
7. Bloc moteur
8. Sélecteur de vitesse
9. Ensemble bol plus couvercle
10. Couvercle du hacheur
11. Base du hacheur
IT
DESCRIZIONE DELLE PARTI
1. Coppa misurazione
2. Coperchio frullatore
3. 1.360,78g. Contenitore
4. Anello di tenuta
5. Taglierino
6. Base coppa
7. Base motore
8. Tasto rotazione
9. Assemblaggio bicchiere
10. Coperchio macinatore
11. Base macinatore
ES
DESCRIPCIÓN DE LAS PIEZAS
1. Tapón dosificador
2. Tapa de la batidora
3. 48oz (1,42 L) Jarra de vidrio
4. Anillo de sellado
5. Cuchilla de corte
6. Base de la jarra
7. Base del motor
8. Interruptor giratorio
9. Conjunto de la jarra
10. Tapa de la picadora
11. Base de la picadora
PL
OPIS ELEMENTÓW
1. Kubek odmierzający
2. Pokrywka miksera
3. 1,4 litrowy szklany słój
4. Pierścień uszczelniający
5. Ostrze tnące
6. Podstawa kubka
7. Podstawa silnika
8. Pokrętło
9. Złożony słój
10. Pokrywa młynka
11. Podstawa młynka
HU
A GÉP RÉSZEI
1. Mérőcsésze
2. A turmixgép fedele
3. 48 unciás (1,4 literes) üvegkehely
4. Tömítőgyűrű
5. Kés
6. Kehelytalp
7. Motoros alap
8. Forgókapcsoló
9. Összeszerelt kehely
10. A daráló fedele
11. A daráló őrlőserlege
PT
DESCRIÇÃO DAS PEÇAS
1. Tampa medidora
2. Tampa da liquidificadora
3. Jarro de vidro 1,36 L
4. Anel vedante
5. Lâmina de corte
6. Anel de fixação
7. Base do motor
8. Interruptor rotativo
9. Montagem do jarro
10. Tampa da trituradora
11. Base da trituradora

3
GR
Περιγραφή αντικειμένου:
1.Κύπελλο μέτρησης
2. Καπάκι
3. Γυάλινο βάζο
4. Δακτύλιος στεγανοποίησης
5. Λεπίδα κοπής
6. Βάση κυπέλλου
7. Βαση μοτέρ
8 Περιστροφικός διακόπτης
9. Κανάτα
10.Κάλυμμα Γριντερ
11 Βάση Γριντερ
RU
ОПИСАНИЕ ПРИБОРА
1. Мерная чаша
2. Крышка блендера
3. 1360.78 г Стеклянный кувшин
4. Герметичное кольцо
5. Режущее лезвие
6. Основа для чаши
7. Основа мотора
8. Переключатель ротора
9. Кувшин
10. Крышка дробилки
11. Основа дробилки
CZ
POPIS ČÁSTÍ
1. Odměrka
2. Víčko mixéru
3. Skleněná nádoba 1,4 l
4. Těsnící kroužek
5. Díl s ostřím
6. Základna nádoby
7. Základna s motorem
8. Otočný spínač
9. Smontovaná nádoba
10. Kryt drtiče
11. Základna drtiče
SK
POPIS SÚČASTÍ
1. Odmerka
2. Kryt mixéra
3. 48 oz. sklenená nádoba
4. Tesniaci krúžok
5. Rezací nôž
6. Podstavec pohára
7. Základná časť motora
8. Otočný spínač
9. Zostava nádoby
10. Kryt mlynčeka
11. Základná časť mlynčeka
RO
PREZENTAREA COMPONENTELOR
1. Recipient de dozare
2. Capac blender
3. Recipient de sticlă de 1,4 l (48oz)
4. Garnitură de închidere
5. Cuţit de mărunţire
6. Suport cană
7. Bloc motor
8. Comutator rotativ
9. Ansamblu recipient
10. Capac râşniţă
11. Suport râşniţă
HR
OPIS DIJELOVA
1. Mjerica
2. Poklopac miksera
3. Stakleni vrč 1360.78 g
4. Brtveni prsten
5. Oštrica noža
6. Podloga mjerice
7. Podnožje motora
8. Okretni prekidač
9. Sklop vrča
10. Poklopac drobilice
11. Podnožje drobilice
SR
OPIS DELOVA
1. Merica
2. Poklopac blendera
3. 1,42 l Staklena posuda
4. Zaptivni prsten
5. Nož
6. Postolje posude
7. Kućište sa motorom
8. Rotacioni prekidač
9. Sklopljena posuda
10. Poklopac mlina
11. Postolje mlina
TR
PARÇA AÇIKLAMALARI
1. Ölçüm Kupası
2. Mikser Kapağı
3. 48 oz. Cam Kavanoz
4. Sızdırmazlık halkası
5. Kesme bıçağı
6. Kupa tabanı
7. Motor Tabanı
8. Döner düğme
9. Kavanoz Komplesi
10. Öğütücü kapağı
11. Öğütücü tabanı
AR
1
2
348
4
5
6
7
8
9
10
11

4
ENGLISH
Dear Customer,
Thank you for choosing this ALPINA home appliance. Your Alpina appliance comes with a 2 year warranty and will
provide years of service if looked after properly. The ALPINA name brings you Quality, Reliability and Dependability. We
hope you will continue to make ALPINA your first choice in home appliances.
IMPORTANT SAFEGUARDS
When using electrical appliances, basic safety precautions should be followed:
1. Read all instructions carefully.
2. Make sure the power supply corresponds to one on the rating label.
3. To avoid electrical shock, do not immerse electrical parts in water or other liquid.
4. Do not allow children to operate or play with the appliance.
5. Unplug from outlet when not in use, or before putting on/taking off parts.
6. Do not use with damaged electrical cord or plug.
7. If damaged or malfunction occurs, refer to an authorized service center only.
8. Do not place on or near hot surfaces.
9. Never pull the appliance by the power cord.
10. Do not use the appliance other than intended household use.
INSTRUCTION FOR USE
Assembling & Inserting the Glass Jar:
1. Put the rubber sealing ring (4) on the inner edge of the blade unit (5).
2. Put the blade unit with sealing ring into the cup base (6).
3. Insert the assembled Cup Base onto the bottom of the glass jar and secure tightly.
4. Mount the glass jar (3) onto the cup base unit and turn clockwise until glass jar locks into place.
5. Mount the Measure Cup (1) onto the Lid (2).
6. Secure the Lid onto Glass Jar and press down.
7. Make sure that the blender is switched off.
8. Place the jar (9) on to the motor base (7) and press down until securely engaged.
How to Use
A. Blender
1. Place the foodstuff you wish to process into the glass jar, put the lid and close securely.
2. Place the measuring cap into the hole of the lid and turn clockwise to lock and start blending.
SPEED SETTING
1. Low : for light usage of liquids
2. High : for more solid consistency – for mixing liquids and solid foodstuffs
3. M (Pulse setting): for ice crushing & short, powerful impulse movements (The switch does not permanently engage in
the ‘M’ setting. You have to hold the switch or turn it repeatedly.)
B. Grinder
1. Place the dry foodstuff (e.g. coffee bean, almonds etc.) into the grinder base.
2. Put the cover, close it securely and start milling.
USEFUL TIPS:
1. All parts of the blender must be thoroughly cleaned before using.
2. To achieve the best results, place small portions (2-3cm) into the glass jar one by one instead of placing a large
quantity at once.
3. When mixing solid ingredients start with a small amount of liquid. Gradually add more through the opening in the lid,
hold the top when operating this device.
4. For stirring solid or thick liquid ingredients we recommend that you use the blender in pulse mode to prevent the
blades from becoming stuck.

5
ENGLISH
Warning:
This appliance is equipped with a grounded, Type G, 3-pin power supply cord. This is a safety feature. Do not attempt to
defeat the safety purpose of this plug.
CLEANING & MAINTENANCE
1. Make sure the appliance is unplugged from electrical outlet before cleaning.
2. Wipe the outside body of the appliance with damp cloth.
3. All removable parts are suitable for dishwasher. Glass jar must be empty before unscrewing the retraining ring, be
careful with the cutting blade or just fill the empty glass jar of water, place it on the motor base and use M setting
several times. Rinse until it’s clean.
4. DO NOT IMMERSE THE UNIT, OR FILL THE GRINDING CHAMBER WITH WATER OR ANY OTHER LIQUID.
DISPOSAL OF YOUR OLD APPLIANCE
1. When this crossed-out wheeled bin symbol is attached to a product it means the product is covered by
the European Directive 2002/96/EC.
2. All electrical and electronic products should be disposed of separately from the municipal waste
stream via designated collection facilities appointed by the government or the local authorities.
3. The correct disposal of your old appliance will help prevent potential negative consequences for the
environment and human health.
4. For more detailed information about disposal of your old appliance, please contact your city office,
waste disposal service or the shop where you purchase the product.
SPECIFICATION
Model No.:
SF-1012
Voltage:
220-240V ~ 50/60Hz
Wattage:
500W
GUARANTEE
This product is guaranteed for a period of 2 years from the date of purchase against defects in materials and
workmanship. Under this guarantee the manufacturer undertakes to repair or replace any parts found to be defective,
provided the product is brought back to the purchase address. This guarantee is only valid if the appliance has been
used in accordance with the instructions, and that it has not been modified, repaired or interfered with by any
unauthorized person, or damaged through misuse.
This guarantee does not cover wear and tear, or breakables such as ceramic items, etc. If the product fails to operate
and needs to be returned, pack it carefully, enclosing your name and address and the reason for return and bring it to
the address of purchase. If within the guarantee period, please also provide the guarantee card and proof of purchase.
Email Address Service:
Note: If any discrepancy appears in other languages, the ENGLISH version shall prevail.

6
DEUTSCH
Sehr geehrter Kunde,
Vielen Dank, dass Sie sich für ein ALPINA Haushaltsgerät entschieden haben. Hiermit haben Sie sich für die besten
Haushaltsgeräte mit einer 2-jährigen Garantie und vielen Jahren zuverlässiger Dienste entschieden. Mit ALPINA
entscheiden Sie sich für Qualität, Zuverlässigkeit und Verlässlichkeit. Wir hoffen, dass Sie sich auch weiterhin für ALPINA
Produkte bei der Auswahl Ihrer Haushaltsgeräte entscheiden werden.
WICHTIGE SICHERHEITSHINWEISE
Bei der Benutzung von Elektrogeräten folgen Sie bitte stets diesen allgemeinen Sicherheitshinweisen:
1. Lesen Sie alle Anleitungen aufmerksam durch.
2. Vergewissern Sie sich, dass Ihre Netzspannung mit den Angaben auf dem Typenschild übereinstimmt.
3. Zur Vermeidung von Stromschlag tauchen Sie elektrische Bauteile keinesfalls in Wasser oder sonstige Flüssigkeiten ein.
4. Lassen Sie Kinder das Gerät nicht bedienen und auch nicht damit spielen.
5. Ziehen Sie vor dem Anbau/Abbau von Zubehörteilen und bei Nichtbenutzung bitte den Netzstecker.
6. Benutzen Sie das Gerät nicht mit beschädigtem Netzkabel oder -stecker.
7. Wenden Sie sich bei Beschädigung oder Fehlfunktion stets an einen autorisierten Kundendienst.
8. Nicht auf oder in unmittelbarer Nähe von heißen Oberflächen aufstellen.
9. Halten und ziehen Sie das Gerät nicht am Kabel.
10. Benutzen Sie das Gerät nur für seinen Bestimmungszweck im Haushalt.
BEDIENUNGSHINWEISE
Glas-Mixkrug montieren und ansetzen:
1. Setzen Sie den Dichtungsring (4) innen am Messerwerk (5) auf.
2. Setzen Sie das Messerwerk mit dem Dichtungsring in den Befestigungsring für den Glaskrug (6) ein.
3. Setzen Sie die Messereinheit unten im Glaskrug ein und drehen Sie diese fest an.
4. Drehen Sie den Glaskrug (3) nach rechts, bis er einrastet.
5. Setzen Sie den Deckel für den Einfüllschacht (1) auf den Deckel für den Mixkrug (2).
6. Drücken Sie die Deckeleinheit fest auf den Glaskrug.
7. Vergewissern Sie sich, dass der Standmixer ausgeschaltet ist.
8. Setzen Sie den montierten Glas-Mixkrug (9) auf die Motoreinheit (7) und achten Sie darauf, dass beide Teile sicher
miteinander verbunden sind.
Bedienung
A. Mixer
1. Geben Sie die zu zerkleinernden Speisen in den Glaskrug und setzen Sie den Deckel fest auf.
2. Setzen Sie den Deckel für den Einfüllschacht auf und drehen Sie ihn nach rechts an.
SCHALTSTUFEN
1. Niedrig: Mixen von Flüssigkeiten.
2. Hoch: Festere Zutaten – Mixen von Flüssigkeiten und festen Zutaten.
3. M (Impuls): Zerkleinern von Eis und kurze kraftvolle Impulse (der Schalter rastet in „M” Stellung nicht ein, Sie müssen
den Schalter jeweils festhalten).
B. Mahlwerk
1. Geben Sie die trockenen Zutaten (beispielsweise Kaffeebohnen, Mandeln usw.) in das Mahlwerk.
2. Setzen Sie die Abdeckung auf und mahlen Sie.
TIPPS:
1. Bitte reinigen Sie alle Teile des Mixers gründlich, bevor Sie ihn benutzen.
2. Für beste Ergebnisse geben Sie immer nur kleinere Mengen (Füllhöhe 2-3 cm) in den Glaskrug, anstatt alle Zutaten
auf einmal einzufüllen.
3. Beim Zerkleinern fester Zutaten geben Sie etwas Flüssigkeit hinzu. Füllen Sie nach und nach mehr Zutaten durch den
Einfüllschacht im Deckel ein. Halten Sie den Deckel während des Betriebs fest.
4. Zum Mixen fester oder zähflüssiger Zutaten empfehlen wir die Benutzung des Impulsschalters, damit kann sich das
Messerwerk nicht festsetzen.

7
DEUTSCH
Warnung:
Dieses Gerät ist mit einem geerdeten Stecker ausgestattet und muss an einer geerdeten Steckdose angeschlossen
werden.
REINIGUNG UND PFLEGE
1. Nehmen Sie das Gerät vor der Reinigung vom Netz.
2. Reinigen Sie die Außenseite des Geräts mit einem feuchten Lappen.
3. Alle Anbauteile sind spülmaschinenfest. Der Glaskrug muss leer sein, bevor Sie den Befestigungsring abschrauben.
Bitte seien Sie mit dem Messerwerk sehr vorsichtig. Alternativ füllen Sie den Glaskrug mit Wasser, betreiben Sie den
Mixer mehrmals mit Impuls in „M”-Stellung und spülen Sie ihn dann aus.
4. GERÄT NICHT IN WASSER ODER FLÜSSIGKEITEN TAUCHEN; MAHLKAMMER NICHT MIT WASSER ODER FLÜSSIGKEITEN
FÜLLEN.
Entsorgung von Altgeräten
1. Die durchkreuzte Mülltonne bedeutet, dass dieses Produkt der europäischen Richtlinie 2002/96/EC
unterliegt.
2. Alle elektrischen und elektronischen Geräte müssen getrennt vom Hausmüll über Sammelstellen
entsorgt werden.
3. Die ordnungsgemäße Entsorgung Ihres Altgerätes hilft beim Umweltschutz.
4. Für weitere Informationen zur Entsorgung von Altgeräten wenden Sie sich bitte an Ihre
Ortsverwaltung oder an Ihren Fachhändler.
Spezifikationen
Modelnummer:
SF-1012
Netzspannung:
220-240V ~ 50/60HZ
Leistung:
500W
Garantie
Dieses Produkt kommt mit einer 2-jährigen Garantie ab Kaufdatum für Material- und Fertigungsfehler auf. Unter dieser
Garantie repariert oder ersetzt der Hersteller fehlerhafte Komponenten, sofern das Gerät bei dem Fachhändler
eingereicht wird, von dem es erworben wurde. Die Garantie gilt nur, sofern das Gerät entsprechend der
Bedienungsanleitung benutzt, nicht verändert oder repariert wurde und auch nicht auf andere Weise, nicht
autorisierten Eingriffen Dritter ausgesetzt war oder zweckentfremdet wurde.
Diese Garantie deckt keine Verschleißteile und keine leicht zerbrechlichen Teile wie Keramik ab. Zeigt das Gerät
Fehlfunktionen und muss umgetauscht werden, so verpacken Sie es bitte ordnungsgemäß und fügen Ihren Namen und
Ihre Anschrift sowie eine Problembeschreibung bei und geben Sie es an Ihren Fachhändler zurück. Bitte legen Sie
während der Garantiezeit auch Garantiekarte und Kaufbeleg bei.
Serviceadresse (E-Mail):

8
NEDERLANDS
Geachte klant,
Wij danken u voor de aankoop van dit ALPINA product.
BELANGRIJKE VEILIGHEIDSWAARSCHUWINGEN
Bij het gebruik van elektrische producten moet u altijd bepaalde veiligheidsmaatregelen in acht nemen:
1. Lees alle instructies zorgvuldig door.
2. Verzeker u ervan dat de netvoeding overeenkomt met die op het gegevensplaatje.
3. Om een elektrische schok te voorkomen, adviseren wij u elektrische onderdelen niet in water of andere vloeistoffen
onder te dompelen.
4. Laat kinderen nooit het apparaat bedienen of ermee spelen.
5. Trek de stekker uit het stopcontact wanneer het product niet gebruikt wordt, of voordat er onderdelen af- of terug
erop worden geplaatst.
6. Niet gebruiken met een beschadigd snoer of een beschadigde stekker.
7. Wanneer het apparaat beschadigd is of defect raakt, neem dan alleen contact op met een erkende reparatiedienst.
8. Plaats dit apparaat niet op of in de buurt van hete oppervlakken.
9. Trek nooit aan het apparaat met het netsnoer.
10. Gebruik het apparaat alleen voor het huishoudelijke gebruik waarvoor het bedoeld is.
GEBRUIKSINSTRUCTIES
De glazen pot plaatsen & vastzetten:
1. Plaats de rubbere afsluitring (4) aan de binnenste rand van het mes onderdeel(5).
2. Plaats het mes onderdeel met de afsluitring in de beker basis (6).
3. Plaats de gemonteerde beker basis aan de onderkant van de glazen bot en draai deze goed vast.
4. Plaats de glazen beker (3) op de beker basis en draai de beker met de klok mee totdat de glazen beker op zijn plaats
klikt.
5. Plaats de maatbeker (1) op het deksel (2).
6. Bevestig het deksel op de glazen beker en druk naar beneden.
7. Zorg ervoor dat de mixer uit staat.
8. Plaats de beker montage (9) op de motor basis (7) en druk naar beneden totdat deze goed vast zit.
Hoe gebruik ik het?
A. Mixer
1. Plaats het voedsel wat u wilt verwerken in de glazen pot, plaats het deksel en sluit het goed.
2. Plaats de maatbeker in het gat van het deksel en draai met de klok mee om vast te zetten en begin te mixen.
SNELHEIDSINSTELLING
1. Laag : voor licht gebruik met vloeistoffen
2. Hoog : voor vastere consistentie – voor het mixen van vloeistoffen en vast voedsel
3. M (Pulse instelling): voor ijs fijn maken & korte, krachtige impuls momenten (De knop blijft niet op de ‘M’ instelling
staan. U moet de knop vast houden of herhaaldelijk draaien.)
B. Maler
1. Plaats het droge voedsel (bijv. koffiebonen, amandelen, etc.) in het basis van de maler.
2. Plaats het deksel, maak het goed vast en start met malen.
HANDIGE TIPS:
1. Alle delen van de mixen moeten voor gebruik grondig gereinigd worden.
2. Om het beste resultaat te behalen, plaatst u kleine porties (2-3cm) in de glazen pot één voor één i.p.v. een grote
hoeveelheid tegelijk erin te doen.
3. Als u vaste ingrediënten mixt begin dan met een kleine hoeveelheid vloeistof. Voeg steeds meer toe door de opening
in het deksel, houd de bovenkant vast als u het apparaat gebruikt.
4. Voor het mixen van vast of dikvloeibare ingrediënten raden wij u aan dat u de mixer in pulse modus gebruikt zodat de
messen niet stuk gaan.

9
NEDERLANDS
Waarschuwing:
Dit apparaat is uitgerust met een geaarde stekker, type G. Dit is een veiligheidsonderdeel. Probeer het veiligheidsdoel
van deze stekker niet te omzeilen.
REINIGING & ONDERHOUD
1. Zorg ervoor dat de stekker uit het stopcontact genomen is voor u het apparaat schoonmaakt.
2. Veeg de buitenkant van het apparaat af met een vochtige doek.
3. Alle verwijderbare delen zijn geschikt voor de vaatwasser. De glazen pot moet leeg tijn voordat u de afsluitring
verwijdert, wees voorzichtig met het mes of vul de lege glazen pot enkel met water, plaats het op de motor basis en
gebruik de ‘M’ instelling meerdere malen. Schoonspoelen totdat het schoon is.
4. DOMPEL HET APPARAAT NIET ONDER EN VUL DE MAALRUIMTE NIET MET WATER OF ENIGE ANDERE VLOEISTOF.
WEGGOOIEN VAN UW APPARAAT
1. Wanneer dit doorgekruiste vuilnisbaksymbool zich op het product bevindt dan betekent het dat het
valt onder Europese richtlijn 2002/96/EC.
2. Alle elektrische en elektronische producten dienen apart van de gemeentelijke afvalstroom
weggegooid te worden via aangewezen inzamelfaciliteiten aangewezen door de overheid of lokale
autoriteiten.
3. Het correct weggooien van uw oude apparaat zal bijdragen aan het voorkomen van potentiële
negatieve gevolgen voor het milieu en de menselijke gezondheid.
4. Voor meer gedetailleerde informatie over het weggooien van uw oude apparaat kunt u contact
opnemen met uw gemeente, vuilnisdienst of de winkel waar u het product gekocht heeft.
SPECIFICATIE
Modelnr.:
SF-1012
Voltage:
220-240V ~ 50/60Hz
Vermogen:
500W
GARANTIE
Dit product heeft een garantieperiode van 2 jaar tegen defekten in materialen en vakmanschap. Onder deze garantie is
de fabrikant verplicht alle onderdelen met defekten te vervangen indien het product volgens de gebruiksaanwijzing
werd gebruikt. Wanneer er handelingen door niet-erkende personen zijn verricht en/of het product door verkeerd
gebruik beschadigd werd, geldt de garantie niet.
Verder geldt deze garantie niet voor slijtage of barsten en/of voor licht breekbare producten zoals ceramiek, enz.
Wanneer het product niet functioneert en teruggebracht moet worden, pakt u het dan voorzichtig in, zet uw naam met
adres erbij en de reden waarom u het product terugbrengt. Brengt u het daarna terug naar het adres waar u het
product gekocht heeft. Let erop dat u het garantiekaartje en de kassabon erbij voegt.
E-mail Service-adres:

10
FRANÇAIS
Cher Client,
Merci pour le choix d'un appareil ménager ALPINA. Nous vous en offrons une garantie de 2 ans, un entretien adéquat de
l'appareil garantira plusieurs années d'utilisation. ALPINA vous assure une bonne qualité et une fiabilité pour toujours.
Nous espérons que vous continuez à faire des appareils électroménagers ALPINA votre premier choix.
CONSEILS DE SÉCURITÉ IMPORTANTS
Lors de toute utilisation d’un appareil électrique, il est essentiel de prendre un certain nombre de précautions
élémentaires, notamment :
1. Lisez attentivement toutes les instructions.
2. Vérifiez que votre tension secteur correspond bien à l'un des voltages indiqués sur la plaque signalétique de l’appareil.
3. Pour éviter tout risque d'électrocution, ne plongez pas les parties électriques dans l'eau ou tout autre liquide.
4. Veillez à ce que les enfants n'utilisent et ne jouent avec l’appareil.
5. Débranchez l’appareil lorsque n’est pas utilisé, avant de le nettoyer et avant tout entretien.
6. Ne pas s’en servir si le cordon ou la fiche sont abîmés.
7. Si l’appareil est endommagé ou ne fonctionne pas, confier toute réparation à un centre de service agréé.
8. Ne pas placer l’appareil au-dessus ou à proximité de surfaces chaudes.
9. Ne tirez jamais sur le cordon.
10. Cet appareil n’est destiné qu’à un usage domestique, ne l’utilisez pas à d'autres fins.
INSTRUCTIONS
Assemblage et insertion du bol mélangeur
1. Déposer le joint d’étanchéité en caoutchouc (4) à la base de la lame (5).
2. Insérer la lame et le joint d'étanchéité sur le support de lame (6).
3. Insérer fermement l’ensemble précédemment assemblé à la base du bol en verre.
4. Poser le bol mélangeur sur le support de lame (3), ajustez et tourner dans le sens des aiguilles d’une montre jusqu’à
ce que le bol soit verrouillé.
5. Insérer le verre mesureur (1) dans le couvercle (2).
6. Placer le couvercle sur le bol mélangeur et appuyer fermement.
7. S’assurer que le mixeur est sur la position arrêt.
8. Poser le bol mélangeur assemblé (9) sur le bloc moteur (7) et appuyer jusqu’à ce qu'il soit verrouillé.
Mode d’emploi
A. Mixeur
1. Placer les aliments à mixer dans le bol mélangeur, mettre le couvercle et le verrouiller.
2. Insérer le verre mesureur dans le couvercle, le tourner dans le sens des aiguilles d une montre et commencer à mixer.
REGLAGE DE LA VITESSE
1. Lent pour mélanger des liquides.
2. Rapide pour des aliments plus solides ou pour mélanger des aliments solides et liquides.
3. M (impulsions) : pour piler de la glace ou donner des impulsions puissantes et brèves (l'interrupteur ne peut pas
rester sur cette position, il faut répéter l’opération).
B. Hacheur
1. Placer les aliments secs (café en grains, amandes, etc.) dans la base du hacheur.
2. Mettre le couvercle, le verrouiller et commencer à moudre.
CONSEILS PRATIQUES :
1. Tous les éléments du mixeur doivent être soigneusement nettoyés avant utilisation.
2. Pour de meilleurs résultats, placer de petites quantités (2-3 cm) dans le bol mélangeur et procéder en plusieurs fois
plutôt que de tout mixer en une fois.
3. Pour mixer des aliments solides, ajouter un peu de liquide. Puis ajouter le reste des aliments par l’ouverture du
couvercle : tenir le bol par le haut pendant le fonctionnement.
4. Pour mélanger des aliments liquides et épais ou solides, nous recommandons d’utiliser le mode impulsion pour éviter
que la lame ne se bloque.

11
FRANÇAIS
Avertissement :
Cet appareil comprend un cordon muni d’une prise à 3 broches dont une de mise à la terre. C’est une mesure de
sécurité. N’essayez pas de la modifier car elle ne deviendra d’aucune sécurité.
NETTOYAGE ET ENTRETIEN
1. Avant de nettoyer l'appareil assurez-vous qu'il est débranché du secteur.
2. Nettoyez l’extérieur du corps de l’appareil à l’aide d’un chiffon humide.
3. Toutes les parties mobiles peuvent être nettoyées au lave vaisselle. Le bol mélangeur doit être vidé avant d'enlever
l’anneau ; faire attention à la lame, ou bien remplir le bol avec de l'eau et le remettre sur le bloc moteur avant
d'utiliser plusieurs fois la position Impulsions. Rinse until it’s clean.
4. NE PLONGEZ PAS L’APPAREIL DANS L’EAU, ET NE METTEZ PAS DE L'EAU OU TOUT AUTRE LIQUIDE DANS LE BOL DE
BROYAGE.
Se débarrasser de votre appareil usagé
1. Lorsque ce symbole d'une poubelle à roue barrée est attaché à un produit, cela signifie que le
produit est couvert par la Directive Européenne 2002/96/EC.
2. Tous les produits électriques et électroniques doivent être mis au rebut séparément des ordures
ménagères mais dans des centres de collectes prévus à cet effet par les pouvoirs publics et les
autorités locales.
3. La mise au rebut correcte de votre appareil usagé aidera à prévenir les conséquences négatives
potentielles contre l'environnement et la santé humaine.
4. Pour plus d’informations sur le mode d’élimination de votre appareil usagé, veuillez prendre contact
avec les pouvoirs publics locaux, le service de traitement des déchets, ou l’endroit où vous avez
acheté le produit.
Spécifications
N° du modèle:
SF-1012
Tension:
220-240V ~ 50/60Hz
Puissance:
500W
Garantie
Ce produit est garanti pour une durée de 2 années à compter de votre date d’achat contre tout défaut de matériel et
vice de fabrication. Pendant cette période de garantie, le fabricant s’engage à réparer le produit défectueux ou le
remplacer, pourvu qu'il soit retourné à l'adresse où il a été acheté. Cette garantie s’applique uniquement au cas où
l’appareil a été utilisé conformément aux consignes d’instructions et à condition qu'il n’ait pas fait l’objet d’une
quelconque modification ou réparation par une personne non habilitée, ou pour toute mauvaise utilisation.
Cette garantie ne s’applique pas en cas d’usure normale du produit, ou dans l’éventualité d’une casse d’accessoires dits
fragiles tels que des composants céramiques. Si le produit ne fonctionne plus, le ranger, l’emballer soigneusement,
ajouter votre nom, adresse et indiquer le motif du retour et retourner le produit défectueux au lieu d’achat. Si le retour
s’opère pendant la période de garantie, joindre la carte de garantie avec la preuve d’achat (facture ou reçu).
Service d'adresses e-mail :

12
ITALIANO
Gentile utente,
Grazie per aver scelto l’elettrodomestico ALPINA. Il vostro Alpina è fornito di una garanzia di 2 anni e fornirà anni di
servizio se ve ne prederete cura. Il nome ALPINA vi offre qualità, affidabilità e sicurezza. Speriamo che continuerà a
scegliere i prodotti ALPINA come elettrodomestici per la sua casa.
AVVERTENZE IMPORTANTI
Quando si utilizza l’elettrodomestico, è necessario seguire le precauzioni di sicurezza:
1. Leggere le istruzioni attentamente.
2. Assicurarsi che l’alimentazione corrisponda a quella sull’etichetta.
3. Per evitare shock elettrico, non immergere parti elettriche in acqua o altri liquidi.
4. Non consentire ai bambini di giocare o usare l'elettrodomestico.
5. Scollegare dalla presa quando non in uso, o prima di staccare/mettere le parti.
6. Non adoperate la macchina con il cavo elettrico o la spina danneggiati.
7. Se si verifica guasto o danno, fare riferimento ad un centro d’assistenza autorizzato.
8. Non porre su superfici calde o vicine.
9. Non tirare l’apparecchio dal cavo elettrico.
10. Non utilizzare l’apparecchio oltre che per l’uso per il quale è ideato.
ISTRUZIONI PER L’USO
Assemblaggio e inserimento coppa di vetro:
1. Mettere l’anello di tenuta 84) nel lato interno dell’unità lama (5).
2. Mettere l’unità lama con l’anello sigillante nella base della coppa (6).
3. Inserire la base della coppa assemblata sotto la coppa di vetro e stringere.
4. Montare la coppa di vetro (3) sulla base dell’unità e regolare la coppa e girare in senso orario l’unità fin quando
scatta.
5. Montare la coppa di misurazione (1) sul coperchio (2).
6. Assicurare il coperchio sulla coppa e premere.
7. Accertarsi che il frullatore sia spento.
8. Porre l’assemblaggio (9) sulla base motore (7) e premere fin quando a posto.
Utilizzo:
A. Frullatore
1. Porre il cibo che si desidera elaborare nella coppa, mettere il coperchio e chiudere.
2. Porre la coppa di misurazione nel foro del coperchio e girare in senso orario e iniziare a miscelare.
IMPOSTAZIONE VELOCITA’
1. Bassa: per uso leggero con liquidi
2. Alta: per maggiore consistenza solida – per mischiare liquidi e cibo solido
3. M (impostazione impulso); per rompere ghiaccio e movimento di impulsi potente (Il tasto non si impegna
permanentemente nell’impostazione “M”. Tenere il tasto e girarlo ripetutamente.)
B. Macinatore
1. Porre il cibo secco (chicchi di caffè, mandorle, ecc) nella base del macinatore.
2. Mettere il coperchio, chiudere e iniziare a macinare.
CONSIGLI UTILI:
1. Tutte le parti del miscelatore devono essere pulite bene prima dell’uso.
2. Per ottenere migliori risultati, porre piccole parti (2-3 cm) nella coppa uno ad uno invece di mettere grandi quantità.
3. Quando si mischiano ingredienti solidi iniziare con una piccola quantità di liquido. Aggiungere gradualmente
attraverso l’apertura, tenere la parte superiore quando si usa il dispositivo.
4. Per usare ingredienti solidi o liquidi consigliamo di usare il frullatore a modalità impulsi per evitare che le lame si
inceppino

13
ITALIANO
Avvertenza:
Questo apparecchio è dotato di un cavo di alimentazione tipo G 3-pin. È una caratteristica di sicurezza. Non cercare di
smontare la macchina.
Pulizia e manutenzione
1. Accertarsi che l’unità sia scollegata dalla presa elettrica prima della pulizia.
2. Pulire lungo il corpo dell’apparecchio con un panno umido.
3. Tutte le parti rimovibili sono adatta per la lavastoviglie. La coppa di vetro deve essere svuotata svitando l’anello,
attenzione alle lame o riempire la coppa di acqua, porla sulla base motore e usare M molte volte. Pulire a fondo
4. NON IMMERGERE L’UNITA’ O RIEMPIRE LA CAMERA DI MACINATURA CON ACQUA O ALTRI LIQUIDI.
Rimozione dell’apparecchio vecchio
1. Quando questo simbolo del cestino sbarrato è attaccato ad un prodotto significa che esso è coperto
dalla direttiva europea 2002/96/EC.
2. Tutti i prodotti elettrici ed elettronici dovrebbero essere eliminate separatamente dai rifiuti
comunali attraverso le strutture di raccolta designate dal governo o autorità locali.
3. La rimozione corretta dell’apparecchio vecchio aiuta a evitare conseguenze negative per l’ambiente
e la salute umana.
4. Per informazioni più dettagliate sulla rimozione del prodotto, contattare il comune locale, il sevizio di
rimozione dei rifiuti, il negozio dove avete acquistato il prodotto.
Specifiche tecniche
Modello Nr.:
SF-1012
Tensione:
220-240V ~ 50/60Hz
Vattagio:
500W
GARANZIA
Questo prodotto è garantito per un periodo di 2 anni dalla data di acquisto contro difetti del materiale e mano d’opera.
Con questa garanzia, il produttore è tenuto alla riparazione o sostituzione di qualsiasi parte che è difettosa se il prodotto
viene portato dove è stato acquistato. Questa garanzia è valida solo se l’elettrodomestico è stato usato secondo le
istruzioni e non è stato modificato, riparato o è stato modificato da persone non autorizzate, o danneggiato a causa di
cattivo utilizzo.
Questa garanzia non copre logorio e rotture e porcellane. Se il prodotto non funziona e necessita di essere restituito,
impacchettarlo attentamente accludendo il vostro nome e indirizzo e il motivo della restituzione e portatelo al luogo di
acquisto. Se nel periodo di garanzia, fornite anche la scheda e la prova di acquisto/fattura/ricevuta di vendita.
Indirizzo e-mail assistenza:

14
ESPAÑOL
Estimado cliente,
Gracias por elegir este electrodoméstico ALPINA. Su equipo Alpina viene con 2 años de garantía y le proporcionará años
de servicio si lo cuida adecuadamente. El nombre de ALPINA le trae Calidad, Fiabilidad y Confianza. Esperamos que
continúe pensando en ALPINA como la primera elección para sus electrodomésticos.
MEDIDAS DE SEGURIDAD IMPORTANTES
Cuando use aparatos eléctricos, debería seguir precauciones de seguridad básicas:
1. Lea todas las instrucciones detenidamente.
2. Asegúrese de que la corriente eléctrica se corresponde con la de la etiqueta de identificación.
3. Para evitar descargas eléctricas, no sumerja las partes eléctricas en agua o en otro líquido.
4. No deje que los niños utilicen o jueguen con el aparato.
5. Desconéctelo de la toma de corriente cuando no lo esté usando, o antes de colocar o sacar piezas.
6. No lo use con el cable o el enchufe dañados.
7. Si ocurre una avería o una disfunción, llévelo solamente a un centro de reparaciones autorizado.
8. No lo coloque sobre o cerca de superficies calientes.
9. Nunca tire del aparato por el cable de alimentación.
10. No utilice el aparato para otra cosa que no sea el uso doméstico previsto.
INSTRUCCIONES DE USO
Montar e insertar la jarra de vidrio:
1. Coloque el anillo de sellado de goma (4) en el borde interior de la unidad de cuchillas (5).
2. Coloque la unidad de cuchillas con el anillo de sellado en la base de la jarra (6).
3. Inserte la base de la jarra montada en la parte inferior de la jarra de vidrio y apriete firmemente.
4. Monte la jarra de vidrio (3) sobre la unidad base de la jarra y gire hacia la derecha hasta que la jarra de vidrio se fije en
su posición.
5. Monte el tapón dosificador (1) sobre la tapa (2).
6. Fije la tapa en la jarra de vidrio y presione hacia abajo.
7. Compruebe que la licuadora está apagada.
8. Coloque la jarra (9) en la base del motor (7) y presione hacia abajo hasta que se ajuste correctamente.
Cómo se utiliza
A. Picadora
1. Coloque el alimento que desea procesar dentro de la jarra de vidrio, coloque la tapa y cierre correctamente.
2. Coloque el tapón dosificador en el orificio de la tapa y gire hacia la derecha para que se cierre y comience a mezclar.
AJUSTE DE LA VELOCIDAD
1. Bajo: para uso ligero de líquidos
2. Alto: para una consistencia más sólida - para mezclar líquidos y alimentos sólidos
3. M (ajuste de pulso): para picar hielo y cortos, enérgicos movimientos de pulso (El interruptor no se activa de forma
permanente en el ajuste ‘M’. Debe que mantener pulsado el interruptor o encenderlo repetidamente.)
B. Picadora
1. Coloque los alimentos secos (por ejemplo, grano de café, almendras, etc) en la base de la picadora.
2. Ponga la tapa, cierre firmemente y comience a picar.
CONSEJOS ÚTILES:
1. Se deben limpiar a fondo todas las piezas dela licuadora antes de usar.
2. Para lograr los mejores resultados, coloque pequeñas porciones (2-3 cm) en la jarra de vidrio de una en una en vez de
colocar una gran cantidad a la vez.
3. Cuando mezcle ingredientes sólidos, comience con una pequeña cantidad de líquido. Añada más poco a poco a través
de la abertura de la tapa, sostenga la parte superior cuando utilice este dispositivo.
4. Para revolver ingredientes que sean líquidos espesos o sólidos, se recomienda que utilice la licuadora en el modo de
pulso para evitar que se enganchen las cuchillas.

15
ESPAÑOL
Advertencia:
Este electrodoméstico está equipado con un cable de corriente de 3-pines, tipo G, con toma de tierra. Esta es una
función de seguridad. No intente eliminar esta característica de seguridad del enchufe.
LIMPIEZA Y MANTENIMIENTO
1. Compruebe que el aparato está desenchufado de la toma de corriente antes de limpiarlo.
2. Limpie el cuerpo exterior del aparato usando un trapo húmedo.
3. Todas las piezas desmontables se pueden lavar en el lavavajillas. Se debe vaciar la jarra de vidrio antes de quitar el
anillo de reciclaje, tenga cuidado con la cuchilla de corte o simplemente llene la jarra de vidrio vacía de agua,
colóquela en la base del motor y utilice el ajuste M varias veces. Enjuague hasta que esté limpia.
4. NO SUMERJA LA UNIDAD, O LLENE LA CÁMARA DE PICAR DE AGUA O CUALQUIER OTRO LÍQUIDO.
ELIMINACIÓN DE SU APARATO VIEJO
1. Cuando el símbolo de un cubo de basura cruzado por un aspa está marcando un producto, indica que el
producto está cubierto por la Directiva Europea 2002/96/EC.
2. Todos los productos eléctricos y electrónicos deberían ser eliminados separándolos de la basura
normal del hogar, a través de los centros de recolección designados por el gobierno o por las
autoridades locales.
3. La eliminación correcta de su aparato viejo ayudará a evitar las potenciales consecuencias negativas
para el medio ambiente y para la salud humana.
4. Para una información más detallada sobre como deshacerse de su aparato viejo, por favor póngase en
contacto con la oficina local del servicio de recogida municipal o en la tienda donde compró el
producto.
ESPECIFICACIONES
Número de modelo:
SF-1012
Tensión:
220-240 V ~ 50/60Hz
Potencia:
500 W
GARANTÍA
Este producto está garantizado por un periodo de 2 años desde la fecha de compra contra defectos en el material y en la
mano de obra. Bajo esta garantía el fabricante asume la reparación o la sustitución de cualquier pieza que se encuentre
defectuosa, proporcionando el producto de vuelta a la dirección de compra. Esta garantía sólo es válida si el aparato ha
sido utilizado según las instrucciones, y que no haya sido modificado, reparado o interferido por una persona no
autorizada, o se haya averiado por mal empleo.
Esta garantía no cubre el desgaste natural, o las piezas sujetas a roturas como elementos cerámicos, etc. Si el producto
deja de funcionar y necesita ser devuelto, empaquételo cuidadosamente, con su nombre y dirección y la razón de la
devolución, y llévelo al lugar de compra. Si aún está dentro del periodo de garantía, por favor incluya también la tarjeta
de garantía y la prueba de compra.
Dirección de correo electrónico:
info@alpinaeuropa.com

16
POLSKI
Szanowny Kliencie,
Dziękujemy za wybranie tego wysokiej jakości urządzenia gospodarstwa domowego ALPINA. Do Twojego urządzenia
Alpina dołączona jest 2-letnia gwarancja, a w przypadku odpowiedniego korzystania samo urządzenie będzie działać
latami. Nazwa ALPINA oznacza jakość, rzetelność i możliwość polegania na jej produktach. Mamy nadzieję, że w dalszym
ciągu będziesz do domu kupować przede wszystkim produkty Alpiny.
WAŻNE INFORMACJE NA TEMAT BEZPIECZEŃSTWA
Podczas korzystania z urządzeń elektrycznych należy przestrzegać podstawowych zasad bezpieczeństwa:
1. Przed użyciem przeczytaj całą instrukcję.
2. Upewnij się, że zasilanie odpowiada oznaczonemu na tabliczce znamionowej.
3. Aby uniknąć porażenia elektrycznego nie zanurzaj części elektrycznych w wodzie, ani innych płynach.
4. Nie pozwól, by dzieci obsługiwały, lub bawiły się urządzeniem.
5. Jeśli urządzenie nie pracuje, lub przed składaniem/rozkładaniem, odłącz je od zasilania.
6. Nie używaj, jeśli kabel elektryczny lub wtyczka są uszkodzone.
7. Jeśli pojawi się uszkodzenie lub nieprawidłowe działanie, zwróć się wyłącznie do autoryzowanego punktu napraw.
8. Nie stawiaj na lub w pobliżu gorących powierzchni.
9. Nigdy nie ciągnij urządzenia za kabel zasilania.
10. Nie używaj urządzenia w celach innych, niż te, do których zostało przeznaczone.
INSTRUKCJA UŻYTKOWANIA
Składanie i wkładanie szklanego słoja:
1. Połóż gumowy pierścień uszczelniający (4) na wewnętrznej krawędzi ostrzy (5).
2. Włóż ostrza z pierścieniem uszczelniającym do podstawy kubka (6).
3. Włóż złożoną podstawę kubka na spód szklanego słoja i zabezpiecz.
4. Zamontuj szklany słój (3) na podstawie kubka i dokręć go, przekręcając zgodnie ze wskazówkami zegara, aż szklany
słój zablokuje się w miejscu.
5. Zamontuj kubek odmierzający (1) na pokrywce (2).
6. Zabezpiecz pokrywkę na szklanym słoju i naciśnij.
7. Upewnij się, że mikser jest wyłączony.
8. Umieść złożony słój (9) na podstawie silnika (7) i naciśnij, aż się zablokuje.
Zasada korzystania
A. Mikser
1. Umieść żywność, którą chcesz przetworzyć, w szklanym słoju, nałóż pokrywkę i bezpiecznie zamknij.
2. Umieść kubek odmierzający w otworze w pokrywie i przekręć zgodnie ze wskazówkami zegara, by zabezpieczyć i
rozpocząć miksowanie.
USTAWIANIE PRĘDKOŚCI
1. Mała: do lekkiego miksowania płynów.
2. Duża: do bardziej stałych produktów - do mieszania płynów i stałych produktów żywnościowych.
3. M (ustawienie pulsujące: do kruszenia lodu oraz krótkich, silnych ruchów impulsowych). (W ustawieniu „M”
przełącznik nie włącza się na stałe. Musisz go przytrzymać, albo ciągle włączać.)
B. Młynek
1. Umieść suchą żywność (np. ziarno kawy, migdały, itd.) w podstawie młynka.
2. Załóż pokrywę, bezpiecznie zamknij i rozpocznij mielenie.
UŻYTECZNE WSKAZÓWKI:
1. Wszystkie części miksera muszą być przez użyciem dokładnie umyte.
2. Aby osiągnąć najlepsze rezultaty, w szklanym słoju umieszczaj małe kawałki (2 - 3 cm) jeden po drugim, zamiast
wrzucać dużą ilość na raz.
3. Podczas mieszania składników stałych, rozpocznij od niewielkiej ilości płynu. Przez otwór w pokrywie powoli dodawaj
więcej. Podczas tej czynności przytrzymuj górę urządzenia.
4. Aby wymieszać stałe składniki, lub gęste płyny, zalecamy korzystanie z miksera w trybie pulsującym, aby zapobiec
zablokowaniu się ostrzy.

17
POLSKI
Ostrzeżenie:
Niniejsze urządzenie jest wyposażone w uziemiony, 3-bolcowy kabel zasilania typu G. Jest to zabezpieczenie. Nie należy
próbować samemu modyfikować zabezpieczenia tej wtyczki.
CZYSZCZENIE I KONSERWACJA
1. Przed czyszczeniem upewnij się, że urządzenie zostało odłączone od głównego zasilania i że ostygło.
2. Stronę zewnętrzną urządzenia wyczyść wilgotną szmatką.
3. Wszystkie odłączane elementy mogą być myte w zmywarce do naczyń. Szklany słój musi być opróżniony przed
odkręceniem pozostającego pierścienia. Należy uważać z ostrzami, lub po prostu wypełnić szklany słój wodą, umieścić
na podstawie silnika i użyć kilka razy ustawienia M. Opłucz, aż słój będzie czysty.
4. NIE ZANURZAJ URZĄDZENIA W WODZIE, ANI NIE WYPEŁNIAJ POJEMNIKA MIELĄCEGO WODĄ, ANI ŻADNYM INNYM
PŁYNEM.
Likwidacja starego urządzenia
1. Jeśli produktowi towarzyszy symbol przekreślonego pojemnika na śmieci, oznacza to, iż produkt
podlega dyrektywie Unii Europejskiej 2002/96/EC.
2. Wszystkie elektryczne i elektroniczne produkty powinny być likwidowane osobno od odpadów
domowych, poprzez punkty zbioru, wyznaczone przez rząd lub władze lokalne.
3. Prawidłowa likwidacja starego urządzenia pomoże zapobiec możliwemu negatywnemu wpływowi na
środowisko i zdrowie ludzkie.
4. W celu zasięgnięcia dalszych informacji o likwidacji starego urządzenia, proszę skontaktować się z
miejscowym ratuszem, punktem zbioru odpadów domowych, lub sklepem, w którym zakupiono
produkt.
Specyfikacja
Model nr:
SF-1012
Napięcie:
220-240V ~ 50/60Hz
Moc w watach:
500W
GWARANCJA
Gwarantuje się, że produkt będzie działać prawidłowo i że będzie wolny od wad produkcyjnych w przeciągu 2 lat od daty
zakupu. Zgodnie z niniejszą gwarancją producent naprawi lub wymieni wszelkie wadliwe części, z zastrzeżeniem, że
produkt musi być przyniesiony do punktu zakupu. Gwarancja ta jest ważna wyłącznie, jeśli urządzenie było
eksploatowane zgodnie z instrukcją, oraz że nie było modyfikowane, naprawiane lub w inny sposób naruszone przez
osoby nieupoważnione, lub nie zostało uszkodzone przez nieprawidłowe użycie.
Niniejsza gwarancja nie pokrywa zużycia, rozdarcia, ani stłuczenia części ceramicznych, itp. Jeśli produkt nie będzie
działać i konieczny jest jego zwrot, zapakuj go ostrożnie, załączając swoje nazwisko i adres, oraz powód zwrotu i przynieś
do punktu zakupu. Jeśli gwarancja będzie jeszcze ważna, przynieś kartę gwarancyjną oraz dowód zakupu.
Adres email serwisu:

18
MAGYAR
Tisztelt Vásárló!
Köszönjük, hogy ezt a minőségi ALPINA otthoni készüléket választotta. Az Ön Alpina készülékére 2 év garancia van, és a
szervizelése a későbbiekben is biztosított. Az ALPINA név az Ön számára a minőséget, a megbízhatóságot és a
biztonságot szavatolja. Reméljük, hogy továbbra is elsősorban az ALPINA termékeket választja otthoni készülékeinek
beszerzése során.
Fontos biztonsági tanácsok
Elektromos gépek használatakor alapvető biztonsági intézkedéseket kell betartani:
1. Olvasson el figyelmesen minden utasítást.
2. Ellenőrizze, hogy az áramforrás megfelel a követelményeknek.
3. Elektromos sokk elkerülése miatt ne merítse vízbe vagy más folyadékba az elektromos részeket.
4. Ne engedje a gyermekeket hogy működtessék, vagy játszanak a géppel.
5. Áramtalanítsa, mikor nem használja, vagy mielőtt részeket szerel le vagy fel.
6. Ne használja sérült áramkábellel.
7. Ha megsérül, vagy hibás működés lép fel, csak engedélyezett szervizhez forduljon.
8. Ne helyezze forró felületre vagy ennek közelébe vagy ne hagyja kinn.
9. Soha ne húzza ki a kábeltől fogva.
10. Ne használja a gépet másra, mint amire készült.
HASZNÁLATI ÚTMUTATÓ
Az üvegkehely összeállítása és felhelyezése:
1. Helyezze a (4) gumi tömítőgyűrűt az (5) késegység belső peremére.
2. Helyezze a tömítőgyűrűs késegységet a (6) kehelytalpba.
3. Helyezze az összeszerelt kehelytalpat az üvegkehely aljára, és rögzítse szorosan.
4. Helyezze a (3) üvegkelyhet a kehelytalp egységbe és fordítsa el jobbra, az óramutató járása szerint, amíg az
üvegkehely a helyére nem rögzül.
5. Illessze az (1) mérőcsészét a (2) fedélbe.
6. Helyezze a fedelet az üvegkehelyre, és nyomja a helyére.
7. Ellenőrizze, hogy a turmixgép ki van-e kapcsolva. Ha nincs, kapcsolja ki.
8. Helyezze a (9) összeszerelt kehelyt a (7) motoros alapra, és nyomja jól a helyére.
Használat
A. Turmixgép
1. Helyezze a turmixolni kívánt nyersanyagokat az üvegkehelybe, helyezze a fedelet a kehelyre, és ellenőrizze, hogy
szorosan rajta van-e.
2. Helyezze a mérőcsészét a fedél nyilásába és fordítsa el jobbra a rögzítéshez és a turmixolás elkezdéséhez.
A FORDULATSZÁM BEÁLLÍTÁSA
1. Low (kicsi): folyadékokhoz
2. High (nagy): folyadék és szilárd összetevők keverékeinek turmixolásához
3. M (Pulse, rövid keverés): jégaprításhoz és rövid idejű, erőteljes turmixoláshoz. (Az M állásban nem marad meg a
kapcsoló. Ahogy elengedik, a turmixgép leáll.)
B. Daráló
1. Helyezze az aprítandó élelmiszert (pl. kávét, mandulát, stb.) a daráló őrlőserlegébe.
2. Tegye rá a fedelét, rögzítse, és indítsa el a darálást.
HASZNOS TANÁCSOK:
1. A turmixgépet használat előtt alaposan meg kell tisztítani.
2. Jobb, ha több kis adagot (2-3 cm-t) darál vagy turmixol, mintha egyszerre darálna/turmixolna egy nagy adagot.
3. Folyékony és szilárd ételek turmixolását kezdje a szilárd összetevőkkel, és kevés folyadékkal. A fedél nyílásán keresztül
fokozatosan töltse rá a többi folyadékot. A gép használata közben tartsa kezével a fedelét.
4. Szilárd vagy sűrűnfolyós összetevők keverését végezze M állásban, rövid menetekben, hogy a kés ne ragadjon az
ételbe.

19
MAGYAR
Figyelmeztetés:
A készülék G típusú, védőföldeléses készülék, háromérintkezős dugasszal. A harmadik érintkező áramütés ellen véd. Ne
iktassa ki, ne bütykölje meg.
TISZTÍTÁS ÉS KARBANTARTÁS
1. Tisztítás előtt feltétlenül húzza ki a gép vezetékét a konnektorból.
2. A gép külső felülete nedves kendővel tisztítható.
3. A gép összes levehető része mosogatógépben tisztítható. Az üvegkehelyről csak üres állapotban csavarja le a
rögzítőgyűrűt. Vigyázzon, mert a kés éles. Az üvegkehely tiszta vizes turmixolással is kitisztítható. Töltse fel csapvízzel,
helyezze a motoros alapra, és nyomja többször egymás után M állásba az indítókapcsolót. Végül öblítse tisztára.
4. A DARÁLÓT TILOS VÍZBE MERÍTENI, ÉS TILOS ŐRLŐSERLEGÉBE VIZET VAGY MÁS FOLYADÉKOT TÖLTENI.
Az elhasznált készülék eltávolítása
1. Ha az áthúzott kerekes tartály látható a terméknél, az azt jelenti, hogy a terméket az EU 2002/96/EC
előírásnak megfelelően kell kezelni.
2. Valamennyi elektromos és elektronikai terméket a háztartási hulladékoktól külön, a kijelölt
gyűjtőhelyeken vagy a helyi hatóságok által megjelölt helyen kell leadni.
3. A készülék megfelelő eltávolítása támogatja a környezet és az emberi egészségre vonatkozó negatív
hatású következményeinek elkerülését.
4. További részletes információkért a készülék eltávolításával kapcsolatban kérjük vegye fel a
kapcsolatot a helyi hivatallal, a hulladékhasznosító hellyel vagy a kereskedéssel, ahol a terméket
vásárolta.
Műszaki adatok:
Modell szám:
SF-1012
Feszültség:
220-240V ~ 50/60Hz
Fogyasztás:
500W
GARANCIA
A termék 2 éves időszakra garantált a vásárlás dátumától számítva gyártási hibák ellen. A garancia értelmében a gyártó
vállalja a javítást vagy cserét, ha alkatrész meghibásodik, feltéve, hogy a terméket visszajuttatják a vásárlási helyre. A
garancia csak akkor érvényes, ha az utasításoknak megfelelően használják és nem módosította, javította nem
engedélyezett személyzet vagy ha nem megfelelő használat miatt romlott el.
A garancia nem érvényes kopásra, vagy a törékeny részekre, pl. kerámia, stb. Ha a termék nem működik vagy vissza kell
küldeni, csomagolja be gondosan, feltüntetve nevét és címét és a visszaküldés okát és hozza el a vásárlás helyére.
Amennyiben a garanciás időszakban van, kérjük mellékelje a garanciaszelvényt és a vásárlási bizonylatot.
Szerviz e-mail cím:

20
PORTUGUÊS
Estimado(a) cliente,
Obrigado por escolher este electrodoméstico ALPINA. O seu aparelho Alpina vem com uma garantia de 2 anos e irá
funcionar durante muitos anos, se cuidado devidamente. A marca ALPINA oferece-lhe Qualidade, Fiabilidade e
Confiança. Esperamos que continue a eleger a ALPINA como a sua primeira opção no que toca a electrodomésticos.
PRECAUÇÕES DE SEGURANÇA IMPORTANTES
Quando utilizar aparelhos eléctricos, deve respeitar as seguintes precauções básicas de segurança:
1. Leia com atenção todas as instruções.
2. Certifique-se de que a fonte de alimentação corresponde à indicada na etiqueta de classificação.
3. Para evitar o risco de choque eléctrico, não mergulhe as partes eléctricas dentro de água ou outros líquidos.
4. Não permita que o aparelho seja operado por crianças ou seja utilizado para brincar.
5. Desligue a ficha da tomada quando não utilizar o aparelho ou instalar/retirar peças.
6. Não utilize o aparelho com um cabo eléctrico ou uma ficha danificados.
7. Se ocorrer algum dano ou avaria, contacte apenas um centro de assistência autorizado.
8. Não coloque o aparelho sobre ou perto de superfícies quentes.
9. Nunca desligue o aparelho puxando pelo cabo de alimentação.
10. Não utilize o aparelho para outro fim além do uso doméstico destinado.
INSTRUÇÕES DE UTILIZAÇÃO
Montagem e colocação do jarro de vidro:
1. Coloque o anel vedante de borracha (4) no bordo interno do elemento da lâmina (5).
2. Coloque o elemento da lâmina com o anel vedante no anel de fixação (6).
3. Introduza este conjunto montado na parte de baixo do jarro de vidro e fixe firmemente.
4. Coloque o jarro de vidro (3) no elemento do anel de fixação e rode-o no sentido dos ponteiros do relógio até encaixar
e prender no lugar.
5. Coloque a tampa medidora (1) na tampa (2).
6. Fixe a tampa no jarro de vidro e empurre para baixo.
7. Certifique-se de que a liquidificadora está desligada.
8. Coloque o jarro (9) na base do motor (7) e empurre para baixo até encaixar firmemente.
Como utilizar
A. Liquidificadora
1. Coloque os alimentos que deseja processar no jarro de vidro, ponha a tampa e feche bem.
2. Coloque a tampa medidora no orifício da tampa e rode no sentido dos ponteiros do relógio para trancar e começar a
misturar.
AJUSTE DE VELOCIDADE
1. Baixa: para uma utilização leve de líquidos
2. Alta: para uma consistência mais sólida – para misturar alimentos líquidos e sólidos.
3. M (Pulse “Impulso”): para picar gelo e obter impulsos poderosos e breves. (O interruptor não está permanentemente
engrenado na posição “M”. Tem que segurar o interruptor ou rodá-lo repetidamente.)
B. Trituradora
1. Coloque alimentos secos (por ex. grãos de café, amêndoas, etc.) na base da trituradora.
2. Ponha a tampa, feche-a bem e comece a triturar.
DICAS ÚTEIS:
1. Todas as partes da liquidificadora devem estar bem limpas antes de serem utilizadas.
2. Para conseguir melhores resultados, coloque pequenas porções (2-3 cm) no jarro de vidro, uma a uma, em vez de
colocar uma grande quantidade de uma vez só.
3. Quando misturar ingredientes sólidos, comece com uma quantidade de líquido pequena. Vá acrescentando mais aos
poucos pela abertura da tampa. Segure a parte de cima do aparelho quando trabalhar com ele.
4. Para misturar ingredientes sólidos ou espessos, recomendamos utilizar a liquidificadora em modo “pulse” a fim de
evitar que as lâminas prendam.
Strona się ładuje...
Strona się ładuje...
Strona się ładuje...
Strona się ładuje...
Strona się ładuje...
Strona się ładuje...
Strona się ładuje...
Strona się ładuje...
Strona się ładuje...
Strona się ładuje...
Strona się ładuje...
Strona się ładuje...
Strona się ładuje...
Strona się ładuje...
Strona się ładuje...
Strona się ładuje...
Strona się ładuje...
Strona się ładuje...
Strona się ładuje...
-
 1
1
-
 2
2
-
 3
3
-
 4
4
-
 5
5
-
 6
6
-
 7
7
-
 8
8
-
 9
9
-
 10
10
-
 11
11
-
 12
12
-
 13
13
-
 14
14
-
 15
15
-
 16
16
-
 17
17
-
 18
18
-
 19
19
-
 20
20
-
 21
21
-
 22
22
-
 23
23
-
 24
24
-
 25
25
-
 26
26
-
 27
27
-
 28
28
-
 29
29
-
 30
30
-
 31
31
-
 32
32
-
 33
33
-
 34
34
-
 35
35
-
 36
36
-
 37
37
-
 38
38
-
 39
39


Alpina SF-1012 Instrukcja obsługi
- Kategoria
- Blendery
- Typ
- Instrukcja obsługi
w innych językach
- čeština: Alpina SF-1012 Návod k obsluze
- español: Alpina SF-1012 El manual del propietario
- italiano: Alpina SF-1012 Manuale del proprietario
- Deutsch: Alpina SF-1012 Bedienungsanleitung
- slovenčina: Alpina SF-1012 Návod na obsluhu
- português: Alpina SF-1012 Manual do proprietário
- français: Alpina SF-1012 Le manuel du propriétaire
- Türkçe: Alpina SF-1012 El kitabı
- English: Alpina SF-1012 Owner's manual
- русский: Alpina SF-1012 Инструкция по применению
- Nederlands: Alpina SF-1012 de handleiding
- română: Alpina SF-1012 Manualul proprietarului