
1
GB
WASHING MACHINE
Instructions for use
Contents
Installation, 2-3
Unpacking and levelling
Connecting the electricity and water supplies
The first wash cycle
Technical data
Care and maintenance, 4
Cutting off the water and electricity supplies
Cleaning the washing machine
Cleaning the detergent dispenser drawer
Caring for the door and drum of your appliance
Cleaning the pump
Checking the water inlet hose
Precautions and tips, 5
General safety
Disposal
Description of the washing machine, 6-7
Control panel
Display
Running a wash cycle, 8
Wash cycles and options, 9
Table of programmes and wash cycles
Wash options
Detergents and laundry, 10
Detergent dispenser drawer
Preparing the laundry
Special wash cycles
Load balancing system
Troubleshooting, 11
Service, 12
FMG 723
English,1
GB
PT
Polski,25
PL
Português,13

2
GB
Installation
! This instruction manual should be kept in a safe
place for future reference. If the washing machine
is sold, transferred or moved, make sure that the
instruction manual remains with the machine so
that the new owner is able to familiarise himself/
herself with its operation and features.
! Read these instructions carefully: they
contain vital information relating to the safe
installation and operation of the appliance.
Unpacking and levelling
Unpacking
1. Remove the washing machine from its
packaging.
2. Make sure that the washing machine has
not been damaged during the transportation
process. If it has been damaged, contact the
retailer and do not proceed any further with
the installation process.
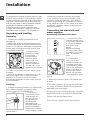
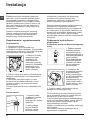
3. Remove the 4
protective screws
(used during
transportation)
and the rubber
washer with the
corresponding
spacer, located on
the rear part of the
appliance (see figure).
4. Close off the holes using the plastic plugs
provided.
5. Keep all the parts in a safe place: you will
need them again if the washing machine
needs to be moved to another location.
! Packaging materials should not be used as
toys for children.
Levelling
1. Install the washing machine on a flat sturdy
floor, without resting it up against walls,
furniture cabinets or anything else.
2. If the floor is
not perfectly level,
compensate for
any unevenness
by tightening or
loosening the
adjustable front
feet (see figure); the
angle of inclination,
measured in relation
to the worktop, must
not exceed 2°.
Levelling the machine correctly will provide
it with stability, help to avoid vibrations and
excessive noise and prevent it from shifting
while it is operating. If it is placed on carpet or
a rug, adjust the feet in such a way as to allow
a sufficient ventilation space underneath the
washing machine.
Connecting the electricity and
water supplies
Connecting the water inlet hose
1. Connect the inlet
hose by screwing it to
a cold water tap using
a 3/4 gas threaded
connection (see
figure).
Before performing
the connection, allow
the water to run freely
until it is perfectly
clear.
2. Connect the
inlet hose to the
washing machine by
screwing it onto the
corresponding water
inlet of the appliance,
which is situated on
the top right-hand
side of the rear part
of the appliance (see
figure).
3. Make sure that the hose is not folded over
or bent.
! The water pressure at the tap must fall within
the range of values indicated in the Technical
data table (see next page).
! If the inlet hose is not long enough, contact a
specialised shop or an authorised technician.
! Never use second-hand hoses.
! Use the ones supplied with the machine.

3
GB
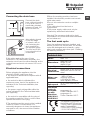
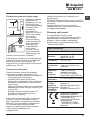
Connecting the drain hose
Connect the drain
hose, without bending
it, to a drain duct or
a wall drain situated
between 65 and 100
cm from the floor;
alternatively, placed
it over the edge
of a basin, sink or
tub, fastening the
duct supplied to
the tap (see figure).
The free end of the
hose should not be
underwater.
! We advise against the use of hose
extensions; if it is absolutely necessary, the
extension must have the same diameter as the
original hose and must not exceed 150 cm in
length.
Electrical connections
Before plugging the appliance into the
electricity socket, make sure that:
• the socket is earthed and complies with all
applicable laws;
• the socket is able to withstand the
maximum power load of the appliance as
indicated in the Technical data table (see
opposite);
• the power supply voltage falls within the
values indicated in the Technical data table
(see opposite);
• the socket is compatible with the plug of
the washing machine. If this is not the case,
replace the socket or the plug.
! The washing machine must not be installed
outdoors, even in covered areas. It is
extremely dangerous to leave the appliance
exposed to rain, storms and other weather
conditions.
65 - 100 cm
! When the washing machine has been
installed, the electricity socket must remain
within easy reach.
! Do not use extension cords or multiple
sockets.
! The cable should not be bent or
compressed.
! The power supply cable must only be
replaced by authorised technicians.
Warning! The company shall not be held
responsible in the event that these standards
are not observed.
The first wash cycle
Once the appliance has been installed, and
before you use it for the first time, run a wash
cycle with detergent and no laundry, using
wash cycle number auto clean (see “Cleaning
the washing machine”).
Technical data
Model
FMG 723
Dimensions
width 59.5 cm
height 85 cm
depth 54 cm
Capacity
from 1 to 7 kg
Electrical
connections
please refer to the technical
data plate fixed to the ma-
chine
Water con-
nections
maximum pressure
1 MPa (10 bar)
minimum pressure
0.05 MPa (0.5 bar)
drum capacity 52 litres
Spin speed
up to 1200 rotations per
minute
Test wash
cycles in
accordan-
ce with
directives
1061/2010
1015/2010
programme 4
;
Cotton Standard 60°C.
programme 5
;
Cotton Standard 40°C.
This appliance conforms to
the following EC Directives:
- 2004/108/EC (Electroma-
gnetic Compatibility)
- 2006/95/EC (Low Voltage)
- 2012/19/EU (WEEE)

4
GB
Care and maintenance
Cutting off the water and
electricity supplies
• Turn off the water tap after every wash cycle.
This will limit wear on the hydraulic system
inside the washing machine and help to
prevent leaks.
• Unplug the washing machine when cleaning
it and during all maintenance work.
Cleaning the washing machine
• The outer parts and rubber components
of the appliance can be cleaned using a soft
cloth soaked in lukewarm soapy water. Do not
use solvents or abrasives.
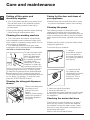
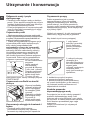
• The washing machine has a auto clean
programme for its internal parts that must be
run with no load in the drum.
To help the wash cycle
you may want to use
either the detergent
(i.e. a quantity 10%
the quantity specified
for lightly-soiled
garments) or special
additives to clean the
washing machine. We
recommend running a
cleaning programme every 40 wash cycles.
To start the programme press buttons A and
B simultaneously for 5 seconds (see figure).
The programme will start automatically and will
run for about 70 minutes. To stop the cycle
press the START/PAUSE button.
Cleaning the detergent dispenser
drawer
Remove the dispenser
by raising it and
pulling it out (see
figure).
Wash it under running
water; this operation
should be repeated
frequently.
1
2
A
B
Caring for the door and drum of
your appliance
• Always leave the porthole door ajar in order
to prevent unpleasant odours from forming.
Cleaning the pump
The washing machine is fitted with a self-
cleaning pump which does not require any
maintenance. Sometimes, small items (such as
coins or buttons) may fall into the pre-chamber
which protects the pump, situated in its bottom
part.
! Make sure the wash cycle has finished and
unplug the appliance.
To access the pre-chamber:
1. using a
screwdriver, remove
the cover panel on
the lower front part of
the washing machine
(see figure);
2. unscrew the lid
by rotating it anti-
clockwise (see figure):
a little water may
trickle out. This is
perfectly normal;
3. clean the inside thoroughly;
4. screw the lid back on;
5. reposition the panel, making sure the hooks
are securely in place before you push it onto
the appliance.
Checking the water inlet hose
Check the inlet hose at least once a year. If
there are any cracks, it should be replaced
immediately: during the wash cycles, water
pressure is very strong and a cracked hose
could easily split open.
! Never use second-hand hoses.

5
GB
Precautions and tips
! This washing machine was designed and constructed
in accordance with international safety regulations. The
following information is provided for safety reasons and
must therefore be read carefully.
General safety
• This appliance was designed for domestic use only.
•
This appliance can be used by children
aged from 8 years and above and
persons with reduced physical, sensory or
mental capabilities or lack of experience
and knowledge if they have been given
supervision or instruction concerning use of
the appliance in a safe way and understand
the hazards involved. Children shall not
play with the appliance. Cleaning and user
maintenance shall not be made by children
without supervision.
• Do not touch the machine when barefoot or with wet or
damp hands or feet.
• Do not pull on the power supply cable when unplugging
the appliance from the electricity socket. Hold the plug
and pull.
• Do not open the detergent dispenser drawer while the
machine is in operation.
• Do not touch the drained water as it may reach
extremely high temperatures.
• Never force the porthole door. This could damage the safety
lock mechanism designed to prevent accidental opening.
• If the appliance breaks down, do not under any
circumstances access the internal mechanisms in an
attempt to repair it yourself.
• Always keep children well away from the appliance while
it is operating.
• The door can become quite hot during the wash cycle.
• If the appliance has to be moved, work in a group of two
or three people and handle it with the utmost care. Never
try to do this alone, because the appliance is very heavy.
• Before loading laundry into the washing machine, make
sure the drum is empty.
Disposal
• Disposing of the packaging materials: observe local
regulations so that the packaging may be re-used.
• The European Directive 2012/19/EU on Waste Electrical
and Electronic Equipment, requires that old household
electrical appliances must not be disposed of in the
normal unsorted municipal waste stream. Old appliances
must be collected separately in order to optimise the
recovery and recycling of the materials they contain and
reduce the impact on human health and the environment.
The crossed out “wheeled bin” symbol on the product
reminds you of your obligation, that when you dispose of
the appliance it must be separately collected. Consumers
should contact their local authority or retailer for information
concerning the correct disposal of their old appliance.

6
GB
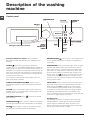
Description of the washing
machine
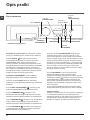
Control panel
TEMPERATURE
button
WASH
CYCLE
SELECTOR
KNOB
Detergent dispenser drawer
ON/OFF
button
SPIN
button
START/PAUSE
button and indicator
light
DISPLAY
DELAY
TIMER
button
OPTION
buttons and
indicator lights
Detergent dispenser drawer: used to dispense
detergents and washing additives (see “Detergents and
laundry”).
ON/OFF
button: press this briefly to switch the
machine on or off. The START/PAUSE indicator light which
flashes slowly in a green colour shows that the machine is
switched on. To switch off the washing machine during the
wash cycle, press and hold the button for approximately 3
seconds; if the button is pressed briefly or accidentally the
machine will not switch off.
If the machine is switched off during a wash cycle, this
wash cycle will be cancelled.
WASH CYCLE SELECTOR KNOB: used to set the
desired wash cycle (see “Table of programmes and wash
cycles”).
OPTION buttons and indicator lights: press to select the
available options. The indicator light corresponding to the
selected option will remain lit.
CLEANING ACTION
button : to select the desired
wash intensity.
TEMPERATURE
button: press to reduce or completely
exclude the temperature; the value appears on the display.
SPIN
button: press to reduce or completely exclude
the spin cycle; the value appears on the display.
DELAYED START
button: press to set a delayed start
for the selected wash cycle; the delay period appears on
the display.
START/PAUSE button and indicator light: when the green
indicator light flashes slowly, press the button to start a
wash cycle. Once the cycle has begun the indicator light
will remain lit in a fixed manner. To pause the wash cycle,
press the button again; the indicator light will flash in an
amber colour. If the
symbol is not illuminated, the door
may be opened (wait approximately 3 minutes). To start
the wash cycle from the point at which it was interrupted,
press the button again.
CHILD LOCK button: to activate the control panel lock,
press and hold the button for approximately 2 seconds.
When the symbol
is illuminated, the control panel
is locked (apart from the ON/OFF button). This means it
is possible to prevent wash cycles from being modified
accidentally, especially where there are children in the
home. To deactivate the control panel lock, press and hold
the button for approximately 2 seconds.
Standby mode
This washing machine, in compliance with new energy
saving regulations, is fitted with an automatic standby
system which is enabled after about 30 minutes if no
activity is detected. Press the ON-OFF button briefly and
wait for the machine to start up again.
CLEANING
ACTION
button
CHILD
LOCK
button

7
GB
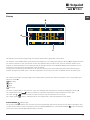
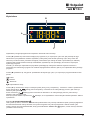
Display
The display is useful when programming the machine and provides a great deal of information.
The duration of the available wash cycles and the remaining time of a running cycle appear in section A (the display will show
the maximum duration of the cycle chosen, which may decrease after several minutes, since the effective duration of the
programme varies depending on the wash load and the settings chosen); if the DELAYED START option has been set, the
countdown to the start of the selected wash cycle will appear.
Pressing the corresponding button allows you to view the maximum spin speed and temperature values attained by the
machine during the set wash cycle, or the values selected most recently, if these are compatible with the set wash cycle.
The “wash cycle phases” corresponding to the selected wash cycle and the “wash cycle phase” of the running wash cycle
appear in section B:
Main wash
Rinse
Spin
Pump out
The icons corresponding to “temperature”, “spin” and “delayed start” (working from the left) are displayed in section C.
The “temperature” bars
indicate the maximum temperature level which may be selected for the set cycle.
The “spin” bars
indicate the maximum spin level which may be selected for the set cycle.
The “delay” symbol
, when lit, indicates that the set “delayed start” value has appeared on the display.
DOOR LOCKED
indicator light:
The lit symbol indicates that the door is locked. To prevent any damage, wait until the symbol turns off before opening the door.
To open the door while a cycle is in progress, press the START/PAUSE button; if the DOOR LOCKED
symbol is switched
off the door may be opened (wait approximately 3 minutes).
B
C
A

8
GB
Running a wash cycle
1. SWITCH THE MACHINE ON. Press the button;
the START/PAUSE indicator light will flash slowly in a
green colour.
2. LOAD THE LAUNDRY. Open the porthole door.
Load the laundry, making sure you do not exceed
the maximum load value indicated in the table of
programmes and wash cycles on the following page.
3. MEASURE OUT THE DETERGENT. Pull out the
detergent dispenser drawer and pour the detergent into
the relevant compartments as described in “Detergents
and laundry”.
4. CLOSE THE DOOR.
5. SELECT THE WASH CYCLE. Use the WASH CYCLE
SELECTOR knob to select the desired wash cycle. A
temperature and spin speed is set for each wash cycle;
these values may be adjusted. The duration of the cycle
will appear on the display.
6. CUSTOMISE THE WASH CYCLE. Use the relevant
buttons:
Modify the temperature and/or spin speed.
The machine automatically displays the maximum
temperature and spin speed values set for the selected
cycle, or the most recently-used settings if they are
compatible with the selected cycle. The temperature
can be decreased by pressing the
button, until
the cold wash “OFF” setting is reached. The spin
speed may be progressively reduced by pressing
the
button, until it is completely excluded (the
“OFF” setting). If these buttons are pressed again, the
maximum values are restored.
! Exception: if the 4 programme is selected, the
temperature can be increased up to a value of 90°C.
Setting a delayed start.
To set a delayed start for the selected cycle, press the
corresponding button repeatedly until the required delay
period has been reached. When this option has been
activated, the
symbol lights up on the display. To
remove the delayed start setting, press the button until
the text “OFF” appears on the display.
Set the desired wash intensity.
Option
makes it possible to optimise washing based
on the level of soil in the fabrics and on desired wash
cycle intensity.
Select the wash programme: the cycle will be
automatically set to “Normal” as optimised for garments
with an average level of soil (this setting is not applicable
to the “Wool” cycle, which is automatically set to
“Delicate”).
For heavily-soiled garments press
button until
the “Intensive” level is reached. This level ensures
a high-performance wash due to a larger quantity of
water used in the initial phase of the cycle and due to
increased drum rotation. It is useful when removing the
most stubborn stains.
It can be used with or without bleach. If you desire
bleaching, insert the extra tray compartment (4) into
compartment 1. When pouring in the bleach, be careful
not to exceed the “max” level marked on the central
pivot (see figure pag. 10).
For lightly-soiled garments or a more delicate treatment
of the fabrics, press
button until the “Delicate”
level is reached. The cycle will reduce drum rotation
to ensure washing results that are perfect for delicate
garments.
Modify the cycle settings.
• Press the button to enable the option; the indicator
light corresponding to the button will switch on.
• Press the button again to disable the option; the
indicator light will switch off.
! If the selected option is not compatible with the set
wash cycle, the indicator light will flash and the option
will not be activated.
! If the selected option is not compatible with a previously
selected one, the indicator light corresponding to the first
function selected will flash and only the second option will
be activated; the indicator light for the option which has
been activated will be illuminated.
! The options may affect the recommended load value
and/or the duration of the cycle.
7. START THE WASH CYCLE. Press the START/
PAUSE button. The corresponding indicator light will
turn green, remaining lit in a fixed manner, and the
door will be locked (the DOOR LOCKED
symbol will
be lit). To change a wash cycle while it is in progress,
pause the washing machine using the START/PAUSE
button (the START/PAUSE indicator light will flash
slowly in an amber colour); then select the desired cycle
and press the START/PAUSE button again.
To open the door while a cycle is in progress, press
the START/PAUSE button; if the DOOR LOCKED
symbol is switched off the door may be opened (wait
approximately 3 minutes). Press the START/PAUSE
button again to restart the wash cycle from the point at
which it was interrupted.
8. THE END OF THE WASH CYCLE. This will be
indicated by the text “END” on the display; when the
DOOR LOCKED
symbol switches off the door may
be opened (wait approximately 3 minutes). Open the
door, unload the laundry and switch off the machine.
! If you wish to cancel a cycle which has already begun,
press and hold the
button. The cycle will be stopped
and the machine will switch off.

9
GB
Wash cycles and options
Wash options
! If the selected option is not compatible with the set
wash cycle, the indicator light will flash and the option will
not be activated.
! If the selected option is not compatible with a previously
selected one, the indicator light corresponding to the first
function selected will flash and only the second option will be
activated; the indicator light for the option which has been
activated will be illuminated.
Extra Rinse
By selecting this option, the efficiency of the rinse is
increased and optimal detergent removal is guaranteed. It
is particularly useful for sensitive skin.
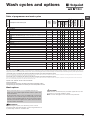
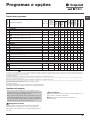
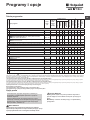
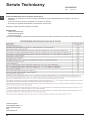
Table of programmes and wash cycles
Wash cycles
Description of the wash cycle
Max.
temp.
(°C)
Max.
speed
(rpm)
Detergents
Max. load (kg)
Residual dam-
pness%
Energy con-
sumptionkWh
Total water lt
Cycle duration
Prewash
Wash
Bleach
Fabric
softener
CLEAN Plus
1
Anti Stain
40° 1200
-
4 - - - 180’
2
Anti Stain Quick
40° 1200 -
-
3,5 - - - 60’
3
Whites
60° 1200
-
4 - - - 180’
4
Cotton Standard 60°C (1): heavily soiled whites and resistant colours.
60°
(Max. 90°)
1200
(3)
7 53 0.94 52.5 160’
5
Cotton Standard 40°C (2): lightly soiled resistant and delicate colours.
40° 1200 -
7 53 0.93 77 140’
6
Synthetics: heavily soiled resistant colours.
60° 800
3,5 44 0.93 47 115’
6
Synthetics (4): lightly soiled resistant colours.
40° 800
3,5 44 0.57 46 100’
SPECIALS
7
Anti allergy Plus
60° 1200 -
4 - - - 195’
8
Anti allergy Delicate
40° 1200 -
4 - - - 195’
9
Wool: for wool, cashmere, etc.
40° 800 -
-
1,5 - - - 70’
10
Delicates
30° 0 -
-
1 - - - 80’
ECO
11
Cotton Standard 20°C: lightly soiled resistant and delicate colours.
20° 1200 -
7 - - - 170’
12
Eco Cottons
Cold Water
1200 -
-
7 53 0.17 63 80’
13
Eco Synthetics
Cold Water
800 -
-
3 48 0.07 30 70’
14
Eco Fast 30’
Cold Water
800 -
-
3 71 0.04 34 30’
Partial Programmes
Rinse
- 1200 - - -
7 - - - 36’
Spin and Pump out
- 1200 - - - - 7 - - - 10’
Pump out only *
- OFF - - - - 7 - - - 3’
1) Test wash cycle in compliance with directive 1061/2010: set wash cycle 4 with a temperature of 60°C.
This cycle is designed for cotton loads with a normal soil level and is the most efficient in terms of both electricity and water consumption; it should be used for garments which can be washed at
60°C . The actual washing temperature may differ from the indicated value.
2) Test wash cycle in compliance with directive 1061/2010: set wash cycle 5 with a temperature of 40°C.
This cycle is designed for cotton loads with a normal soil level and is the most efficient in terms of both electricity and water consumption; it should be used for garments which can be washed at
40°C . The actual washing temperature may differ from the indicated value.
3) At 60 °C the “Prewash” function cannot be selected.
For all Test Institutes:
2) Long wash cycle for cottons: set wash cycle 5 with a temperature of 40°C.
4) Long wash cycle for synthetics: set wash cycle 6 with a temperature of 40°C.
Prewash
If this function is selected, the pre-wash cycle will run; this
is useful for removing stubborn stains.
N.B.: Put the detergent in the relevant compartment.
* If you select programme and exclude the spin cycle, the machine will drain only.
The length of cycle shown on the display or in this booklet is an estimation only and is calculated assuming standard working conditions. The actual duration can vary accor-
ding to factors such as water temperature and pressure, the amount of detergent used, the amount and type of load inserted, load balancing and any wash options selected.

10
GB
Detergents and laundry
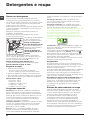
Detergent dispenser drawer
Successful washing results also depend on the correct
dose of detergent: adding too much detergent will not
necessarily result in a more efficient wash, and may in
fact cause build up on the inside of your appliance and
contribute to environmental pollution.
! Use powder detergent for white cotton garments, for pre-
washing, and for washing at temperatures over 60°C.
! Follow the instructions given on the detergent packaging.
! Do not use hand washing detergents; they create too
much foam.
Open the detergent
dispenser drawer and pour
in the detergent or washing
additive, as follows.
compartment 1: Pre-
wash detergent (powder)
Before pouring in the
detergent, make sure that
extra compartment 4 has
been removed.
compartment 2: Detergent for the wash cycle
(powder or liquid)
If liquid detergent is used, it is recommended that the
removable plastic partition A (supplied) be used for proper
dosage.
If powder detergent is used, place the partition into slot B.
compartment 3: Additives (fabric softeners, etc.)
The fabric softener should not overflow the grid.
extra compartment 4: Bleach
Preparing the laundry
• Divide the laundry according to:
- the type of fabric/the symbol on the label
- the colours: separate coloured garments from whites.
• Empty all garment pockets and check the buttons.
• Do not exceed the listed values, which refer to
the weight of the laundry when dry: see “Table of
programmes and wash cycles”.
How much does your laundry weigh?
1 sheet 400-500 g
1 pillow case 150-200 g
1 tablecloth 400-500 g
1 bathrobe 900-1,200 g
1 towel 150-250 g
Special wash cycles
Anti Stain: the programme 1 is suitable to heavily-soiled
garments with resistant colours. It ensures a washing class
that is higher than the standard class (A class).
When running the programme, do not mix garments of
different colours. We recommend the use of powder
detergent. Pre-treatment with special additives is
recommended if there are obstinate stains.
Anti Stain Quick: this programme is ideal for washing
the most difficult daily stains in 1 hour. It is ideal for mixed
fabrics and coloured garments, caring for your clothes as
it washes.
M
AX
1
2
4
3
A
B
Whites: use this cycle 3 to wash white clothes. The
programme is designed to maintain the brightness of white
clothes over time. Use powder detergent for best results.
Anti allergy Plus: use programme 7 to remove major
allergens such as pollen, mites, cat’s and dog’s hair.
Anti allergy Delicate: cycle studied for cotton laundry and
other resistant fabrics to guarantee the removal of pollen and
cat and dog hair already at 40°.
Wool: the wool wash cycle of this machine has been
approved by The Woolmark Company for the washing of
wool garments labelled as “hand wash” provided that the
products are washed according to the instructions on the
garment label and those issued by the manufacturer of this
washing machine (M1126)
Delicates: use programme 10 to wash very delicate
garments having strasses or sequins.
To wash silk garments and curtains select the cycle 10 and
set the “Delicate” level from option
.
We recommend turning the garments inside out before
washing and placing small items into the special bag
for washing delicates. Use liquid detergent on delicate
garments for best results.
Eco cycles
The Eco Cycles assure energy saving by eliminating the
need of heating water and it’s an advantage both to your
energy bill and the environment! These innovative Eco
programmes (12 Eco Cottons, 13 Eco Synthetics and
14 Eco Fast 30’) are available for various fabrics and
different quantity of garment; they have been designed to
guarantee a high cleaning action even at low temperature
and can be used for lightly to medium soiled loads. Eco
Cycles give the best results thanks to an intensified wash
action, water optimization and are carried out in the same
average time of a standard cycle. For the best washing
results with Eco Cycles we recommend the usage of a
liquid detergent.
Cotton Standard 20°C ideal for lightly soiled cotton
loads. The effective performance levels achieved at cold
temperatures, which are comparable to washing at 40°,
are guaranteed by a mechanical action which operates at
varying speed, with repeated and frequent peaks.
Load balancing system
Before every spin cycle, to avoid excessive vibrations
before every spin and to distribute the load in a uniform
manner, the drum rotates continuously at a speed which
is slightly greater than the washing rotation speed. If,
after several attempts, the load is not balanced correctly,
the machine spins at a reduced spin speed. If the load is
excessively unbalanced, the washing machine performs
the distribution process instead of spinning. To encourage
improved load distribution and balance, we recommend
small and large garments are mixed in the load.

11
GB
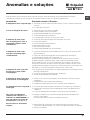
Troubleshooting
Your washing machine could occasionally fail to work. Before contacting the Technical Assistance Service (see “ Service”),
make sure that the problem cannot be solved easily using the following list.
Problem:
The washing machine does not
switch on.
The wash cycle does not start.
The washing machine does not fill
with water (the text “H2O” flashes
on the display).
The washing machine
continuously takes in and drains
water.
The washing machine does not
drain or spin.
The washing machine vibrates a
lot during the spin cycle.
The washing machine leaks.
The “option” and START/PAUSE
indicator lights flash rapidly and
an error code appears on the
display (e.g.: F-01, F-..).
There is too much foam.
Possible causes / Solutions:
• The appliance is not plugged into the socket fully, or not enough to make contact.
• There is no power in the house.
• The washing machine door is not closed properly.
• The ON/OFF button has not been pressed.
• The START/PAUSE button has not been pressed.
• The water tap has not been opened.
• A delayed start has been set.
• The water inlet hose is not connected to the tap.
• The hose is bent.
• The water tap has not been opened.
• There is no water supply in the house.
• The pressure is too low.
• The START/PAUSE button has not been pressed.
• The drain hose is not fitted at a height between 65 and 100 cm from the floor
(see “Installation”).
• The free end of the hose is under water (see “Installation”).
• The wall drainage system is not fitted with a breather pipe.
If the problem persists even after these checks, turn off the water tap, switch the
appliance off and contact the Technical Assistance Service. If the dwelling is on one
of the upper floors of a building, there may be problems relating to water drainage,
causing the washing machine to fill with water and drain continuously. Special anti-
draining valves are available in shops and help to prevent this inconvenience.
• The wash cycle does not include draining: some cycles require the draining
process to be enabled manually.
• The drain hose is bent (see “Installation”).
• The drainage duct is clogged.
• The drum was not unlocked correctly during installation (see “Installation”).
• The washing machine is not level (see “Installation”).
• The washing machine is trapped between cabinets and walls (see “Installation”).
• The water inlet hose is not screwed on properly (see “Installation”).
• The detergent dispenser drawer is blocked (for cleaning instructions, see “Care
and maintenance”).
• The drain hose is not fixed properly (see “Installation”).
• Switch off the machine and unplug it, wait for approximately 1 minute and then
switch it back on again.
If the problem persists, contact the Technical Assistance Service.
• The detergent is not suitable for machine washing (it should display the text “for
washing machines” or “hand and machine wash”, or the like).
• Too much detergent was used.

12
GB
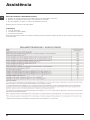
Service
Before contacting the Technical Assistance Service:
• Check whether you can solve the problem alone (see “Troubleshooting”);
• Restart the wash cycle to check whether the problem has been solved;
• If this is not the case, contact an authorised Technical Assistance Centre.
! Always request the assistance of authorised technicians.
Have the following information to hand:
• the type of problem;
• the appliance model (Mod.);
• the serial number (S/N).
This information can be found on the data plate applied to the rear of the washing machine, and can also be found on the
front of the appliance by opening the door.

13
PT
Português
PT
MÁQUINA DE LAVAR ROUPA
Sumário
Instalação, 14-15
Desembalar e nivelar
Ligações hidráulicas e eléctricas
Primeiro ciclo de lavagem
Dados técnicos
Manutenção e cuidados, 16
Interromper a alimentação de água e de corrente eléctrica
Limpar a máquina de lavar roupa
Limpar a gaveta dos detergentes
Cuidados com a porta de vidro e o tambor
Limpar a bomba
Verificar o tubo de alimentação de água
Precauções e conselhos, 17
Segurança geral
Eliminação
Descrição da máquina
de lavar roupa, 18-19
Painel de comandos
Visor
Como efectuar um ciclo de lavagem, 20
Programas e opções, 21
Tabela dos programas
Opções de Lavagem
Detergentes e roupa, 22
Gaveta dos detergentes
Preparar a roupa
Programas especiais
Sistema de balanceamento da carga
Anomalias e soluções, 23
Assistência, 24
FMG 723
Instruções para a utilização

14
PT
Instalação
! É importante guardar este livrete para
poder consultá-lo a qualquer momento. Se a
máquina for vendida, cedida ou transferida,
certifique-se que este livrete permaneça com
a máquina para informar o novo proprietário
acerca do seu funcionamento e das
respectivas advertências.
! Leia com atenção estas instruções: há
importantes informações acerca da instalação,
da utilização e da segurança.
Desembalar e nivelar
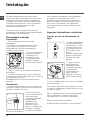
Desembalar
1. Tire a máquina de lavar roupa da
embalagem.
2. Verifique se a máquina de lavar roupa
sofreu danos no transporte. Se estiver
danificada não efectue a sua ligação e
contacte o revendedor.
3. Tire os 4 parafusos
de protecção para
o transporte e a
borrachinha com
o respectivo calço,
situados na parte
traseira (veja a figura).
4. Tape os furos com as tampas em plástico
fornecidas.
5. Guarde todas as peças: se for necessário
transportar a máquina de lavar roupa, terão de
ser montadas outra vez.
! Embalagens não são brinquedos para as
crianças!
Nivelamento
1. Instale a máquina de lavar roupa sobre um
pavimento plano e rígido, sem encostá-la em
paredes, móveis nem outro.
2. Se o pavimento
não for perfeitamente
horizontal, para
compensar qualquer
irregularidade,
desatarraxe ou
atarraxe os pés
dianteiros (veja a
figura); ; o ângulo de
inclinação, medido
no plano de trabalho,
não deve ultrapassar 2°.
Um cuidadoso nivelamento dá estabilidade
à máquina e evita vibrações, ruídos e
deslocamentos durante o funcionamento.
Se houver tapete ou alcatifa, regule os pés
De modo a que debaixo da máquina de
lavar roupa haja um espaço suficiente para
ventilação.
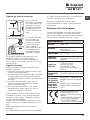
Ligações hidráulicas e eléctricas
Ligação do tubo de alimentação da
água
1. Realize a ligação do
tubo de alimentação
parafusando-o a uma
torneira de água fria
com bocal de rosca
de 3/4 gás (veja a
figura).
Antes de realizar esta
ligação, haja a água
escorrer até estar
límpida.
2. Ligue o tubo de
alimentação na
máquina de lavar
roupa atarraxando-o
no apropriado
fornecimento da
água, na parte
traseira, em cima à
direita (veja a figura).
3. Tome cuidado para o tubo não ser dobrado
nem esmagado.
! A pressão hídrica da torneira deve ser entre
os valores da tabela dos Dados técnicos (veja
a página ao lado).
! Se o comprimento do tubo de alimentação
não for suficiente, contacte uma oficina
especializada ou um técnico autorizado.
! Nunca utilize tubos já usados.
! Utilize aqueles fornecidos com a máquina.

15
PT
Ligação do tubo de descarga
Ligue o tubo de
descarga, sem dobrá-
lo, a uma conduta de
descarga ou a uma
descarga na parede
situada entre 65 e
100 cm de altura do
chão;
ou coloque na beira
de um lavabo ou
de uma banheira,
prenda na torneira
a guia fornecida
(veja a figura). A
ponta solta do tubo
de descarga não
deve permanecer
emergida na água.
! É desaconselhado empregar tubos de
extensão; mas se for indispensável, a
extensão deve ter o mesmo diâmetro do
tubo original e não medir mais de 150 cm de
comprimento.
Ligação eléctrica
Antes de ligar a ficha na tomada eléctrica,
certifique-se que:
• a tomada tenha uma ligação à terra e seja
nos termos da legislação;
• a tomada tenha a capacidade para suportar
a carga máxima de potência da máquina,
indicada na tabela dos Dados técnicos (veja
ao lado);
• a tensão de alimentação seja entre os
valores indicados na tabela dos Dados
técnicos (veja ao lado);
• a tomada seja compatível com a ficha
da máquina de lavar roupa. Se não for,
substitua a tomada ou a ficha.
! Esta máquina de lavar roupa não deve ser
instalada ao aberto, nem mesmo abrigada,
porque é muito perigoso deixá-la exposta à
chuva e às tempestades.
! Depois de ter instalado a máquina de lavar
roupa, o acesso à tomada eléctrica deve ser
fácil.
! Não empregue extensões nem fichas
múltiplas.
! O cabo não deve ser dobrado nem apertado.
65 - 100 cm
! O cabo de alimentação deve ser substituído
somente por técnicos autorizados.
Atenção! O fabricante declina toda a
responsabilidade se estas regras não forem
respeitadas.
Primeiro ciclo de lavagem
Depois da instalação, antes de usar, efectue
um ciclo de lavagem com detergente mas
sem roupa, defina o programa “Auto Limpeza”
(veja “Limpar a máquina de lavar roupa”).
Dados técnicos
Modelo
FMG 723
Medidas
largura 59,5 cm
altura 85 cm
profundidade 54 cm
Capacidade
de 1 a 7 kg
Ligações
eléctricas
veja a placa das caracterí-
sticas técnicas colocada na
máquina
Ligações
hídricas
pressão máxima
1 MPa (10 bars)
pressão mínima
0,05 MPa (0,5 bar)
capacidade do tambor
52 litros
Velocidade
da centrifu-
gação
até 1200 rotações por minuto
Programas
de controlo
conforme as
directivas
1061/2010
1015/2010
programa 4; programas de
lavagem normal de algodão
60ºC;
programa 5; programas de
lagem normal de algodão
40ºC.
Esta aparelhagem é em
conformidade com as
seguintes Directivas Comu-
nitárias:
- 2004/108/CE (Compatibili-
dade Electromagnética)
- 2012/19/EU (WEEE)
- 2006/95/CE (Baixa Tensão)

16
PT
Manutenção e cuidados
Cuidados com a porta de vidro e o
tambor
• Deixe a porta sempre entreaberta para evitar
que se formem odores desagradáveis.
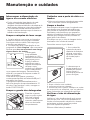
Limpar a bomba
Esta máquina de lavar roupa é equipada com
uma bomba com limpeza automática que
não precisa de operações de manutenção.
Entretanto pode acontecer que pequenos
objectos (moedinhas, botões) caiam na pré-
câmara que protege a bomba, situada na
parte inferior da mesma.
! Certifique-se que o ciclo de lavagem tenha
terminado e tire a ficha da tomada.
Para obter acesso à pré-câmara:
1. tire o painel de
cobertura da parte
dianteira da máquina
de lavar roupa com
ajuda de uma chave
de fendas (veja a
figura);
2. desenrosque a
tampa girando-a no
sentido anti-horário
(veja a figura). é
normal que perca um
pouco de água;
3. limpe o interior com cuidado;
4. enrosque outra vez a tampa;
5. monte outra vez o painel, certifique-se, antes
de empurrá-la na máquina, que os ganchos
foram colocados nas respectivas ranhuras.
Verificar o tubo de alimentação
de água
Verifique o tubo de alimentação pelo menos
uma vez por ano. Se houver rachaduras ou
fendas, será necessário substitui-lo: durante
as lavagens as fortes pressões podem
provocar repentinas quebras.
! Nunca utilize tubos já usados.
Interromper a alimentação de
água e de corrente eléctrica
• Feche a torneira da água depois de cada
lavagem. Desta maneira diminuiu-se o
desgaste do sistema hidráulico da máquina de
lavar roupa e elimina-se o risco de inundação.
• Tire a ficha da tomada eléctrica quando for
limpar a máquina de lavar roupa e durante os
trabalhos de manutenção.
Limpar a máquina de lavar roupa
• A parte externa e as peças em borracha
podem ser limpas com um pano molhado
com água morna e sabão. Não empregue
solventes nem abrasivos.
• A máquina de lavar roupa dispõe de um
programa de “Auto Limpeza” das suas partes
internas que deve ser efectuado sem carga
alguma dentro do tambor.
O detergente
(na quantidade
equivalente ao 10%
daquela recomendada
para peças pouco
sujas) ou aditivos
específicos para a
limpeza da máquina
de lavar roupa,
poderão ser utilizados
como coadjuvantes
no programa de lavagem. Recomenda-se
efectuar o programa de limpeza a cada 40
ciclos de lavagem.
Para activar o programa, pressione
contemporaneamente as teclas A e B por 5
segundos (ver figura).
O programa iniciará automaticamente e
terá uma duração de aproximadamente 70
minutos. Para terminar o ciclo, carregar no
botão START/PAUSE.
Limpar a gaveta dos detergentes
Para tirar a gaveta,
erga-a e puxe-a para
fora (veja a figura).
Lave-a com água
corrente; esta limpeza
deve ser efectuada
frequentemente.
1
2
A
B

17
PT
informações sobre o correcto desmantelamento
dos electrodomésticos, contacte o serviço público
especializado ou os revendedores.
Precauções e conselhos
! Esta máquina de lavar roupa foi projectada e fabricada
em conformidade com os regulamentos internacionais de
segurança. Estas advertências são fornecidas por razões
de segurança e devem ser lidas com atenção.
Segurança geral
• Este aparelho foi projectado exclusivamente para um
uso doméstico.
•
Este aparelho pode ser utilizado por
crianças com mais de 8 anos e por pessoas
com capacidades físicas, sensoriais ou
mentais reduzidas ou com experiência e
conhecimentos insuficientes, caso sejam
supervisionadas ou caso tenham recebido
instruções adequadas em relação ao uso do
aparelho de forma segura, compreendendo
os perigos associados. As crianças não
devem brincar com o aparelho. A manutenção
e limpeza não devem ser efectuadas por
crianças sem supervisão.
• Não toque na máquina com os pés descalços nem
com as mãos ou os pés molhados ou húmidos.
• Não puxe o cabo eléctrico para tirar a ficha da tomada,
pegue a ficha mesmo.
• Não abra a gaveta dos detergentes enquanto a
máquina estiver a funcionar.
• Não toque a água de descarga, que poderá chegar a
temperaturas altas.
• Em nenhum caso force a porta para abri-la: poderá
danificar o mecanismo de segurança que a protege
contra aberturas acidentais.
• Se houver avarias, em nenhum caso mexa nos
mecanismos internos para tentar reparar.
• Verifique sempre que criança não se aproximem da
máquina a funcionar.
• Durante a lavagem a porta de vidro tende a aquecer-se.
• Se for preciso deslocá-la, são precisas pelo menos
duas ou três pessoas, com a máxima atenção. Nunca
sozinho porque a máquina é muito pesada.
• Antes de colocar a roupa controle que o tambor esteja
vazio.
Eliminação
• Eliminação do material de embalagem:
obedeça os regulamentos locais, de maneira que as
embalagens possam ser reutilizadas.
• A directiva Europeia 2012/19/EU relativa aos resíduos
de equipamentos eléctricos e electrónicos prevê
que os electrodomésticos não devem ser eliminados
no normal fluxo dos resíduos sólidos urbanos. Os
aparelhos que deixaram de ser utilizados devem
ser recolhidos separadamente para optimizar a taxa
de recuperação e reciclagem dos materiais que os
compõem e impedir potenciais danos à saúde e ao
meio ambiente. O símbolo do contentor de lixo barrado
com uma cruz está presente em todos os produtos
para lembrar o dever de recolha selectiva. Para mais

18
PT
Descrição da máquina
de lavar roupa
Painel de comandos
Tecla da
TEMPERATURA
Selector de
PROGRAMAS
Gaveta dos detergentes
Tecla ON/OFF
Tecla
CENTRIFUGAÇÃO
Tecla e indicador
luminoso
START/PAUSE
Visor
Tecla
INÍCIO
POSTERIOR
Teclase indicadores
luminosos de
OPÇÃO
Gaveta dos detergentes: para colocar detergentes e
aditivos (veja “Detergentes e roupa”).
Tecla ON/OFF
: carregue brevemente na tecla para
ligar ou desligar a máquina. O indicador luminoso START/
PAUSE que pisca lentamente com a cor verde, indica
que a máquina está ligada. Para desligar a máquina de
lavar roupa durante a lavagem, é necessário manter
pressionado a tecla por mais tempo, aproximadamente 3
segundos; uma pressão breve ou acidental não anulará o
funcionamento da máquina. O desligar a máquina durante
uma lavagem em curso anula a própria lavagem.
Selector de PROGRAMAS: para seleccionar o programa
desejado (veja a “Tabela dos programas”).
Botões e indicadores luminosos OPÇÃO: para
seleccionar as opções disponíveis. O indicador luminoso
correspondente à opção seleccionada permanecerá
aceso.
Tecla
INTENSIDADE LAVAGEM
: pressione para
seleccionar a intensidade de lavagem desejada.
Tecla TEMPERATURA
: pressionar para reduzir ou
excluir a temperatura; o valor é indicado no visor.
Tecla CENTRIFUGAÇÃO
: pressionar para reduzir ou
excluir completamente a centrifugação; o valor é indicado
no visor.
Tecla INÍCIO POSTERIOR
: pressionar para
programar um início atrasado do programa escolhido; o
atraso é indicado no visor.
Tasto com indicador luminoso START/PAUSE: quando
o indicador luminoso verde, acender intermitentemente,
carregue na tecla para iniciar uma lavagem. Quando o
ciclo iniciar, o indicador permanecerá aceso fixo. Para
colocar em pausa a lavagem, carregar novamente no
botão; o indicador ficará intermitente com uma luz laranja.
Se o símbolo
não estiver iluminado, será possível
abrir a porta de vidro (aguarde aproximadamente 3
minutos). Para fazer iniciar a lavagem do ponto em que foi
interrompida, carregar novamente na tecla.
Tecla BLOQUEIO DAS TECLAS: para activar o
bloqueio do painel de comandos, manter pressionada a
tecla durante aproximadamente 2 segundos. O símbolo
aceso indica que o painel de comandos está
bloqueado. Deste modo, impedem-se modificações
acidentais dos programas (à excepção da tecla ON/OFF),
sobretudo se houver crianças em casa. Para desactivar o
bloqueio do painel de comandos, mantenha pressionada a
tecla durante aproximadamente 2 segundos.
Modalidade de Stand by
Esta máquina de lavar roupa, em conformidade com as
novas normas sobre a economia energética, dispõe de
um sistema de desligação automática (stand by) que entra
em função aproximadamente 30 minutos depois, no caso
de inutilização. Carregue brevemente no botão
ON/OFF e
aguarde até a reactivação da máquina.
Tecla
INTENSIDADE
LAVAGEM
Tecla
BLOQUEIO
DAS
TECLAS

19
PT
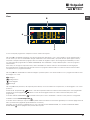
Visor
O visor é útil para programar a máquina e fornece muitas informações.
Na secção A é visualizada a duração dos vários programas à disposição e com o ciclo iniciado o tempo restante para o
fim do mesmo (no visor é visualizada a duração máxima do ciclo seleccionado, que pode diminuir após alguns minutos,
enquanto a duração efectiva do programa varia com base na carga de roupa e nas configurações realizadas); no caso
em que tenha sido programado um INÍCIO POSTERIOR, será visualizado o tempo Restante para o início do programa
seleccionado.
Além disto, ao carregar na respectiva tecla, serão visualizados os valores máximos da velocidade de centrifugação e
de temperatura que a máquina pode efectuar conforme o programa seleccionado ou os últimos valores seleccionados
compatíveis com o programa escolhido.
Na secção B são visualizadas as “fases de lavagem” previstas para o ciclo seleccionado e com o programa iniciado a “fase
de lavagem” em curso.
Lavagem
Enxaguamento
Centrifugação
Descarga
Na secção C estão presentes, da esquerda para a direita, os ícones relativos à “temperatura”, à “centrifugação” e ao “Início
posterior”.
As barras da “temperatura”
indicam o nível de temperatura relativo ao máximo seleccionável para o ciclo programado.
As barras da “centrifugação”
indicam o nível de centrifugação relativo ao máximo seleccionável para o ciclo
programado.
O símbolo “INÍCIO POSTERIOR”
iluminado indica que no visor é visualizado o valor do “Início posterior” configurado.
Indicador luminoso Porta bloqueada
O símbolo aceso indica que a porta está bloqueada. Para evitar danos é necessário aguardar que o símbolo apaga antes de
abrir a porta de vidro (aguarde aproximadamente 3 minutos).
Para abrir a porta durante a realização de um ciclo, carregar na tecla START/PAUSE; se o símbolo PORTA DE VIDRO
BLOQUEADA
estiver apagado será possível abrir a porta.
B
C
A

20
PT
Como efectuar um ciclo de
lavagem
1. LIGAR A MÁQUINA. Carregue na tecla ; o
indicador luminoso START/PAUSE piscará lentamente
na cor verde.
2. COLOCAR A ROUPA Abrir a porta de vidro. Coloque
a roupa dentro da máquina prestando atenção para
não superar a carga máxima indicada na tabela dos
programas na página seguinte.
3. DOSAGEM DO DETERGENTE.Extrair a gaveta e
deitar o detergente nos específicos recipientes como
explicado no parágrafo “Detergentes e roupa”.
4. FECHAR A PORTA DE VIDRO.
5. Escolha do programa. Seleccione com o selector
dos PROGRAMAS o programa desejado; ao mesmo
é associada uma temperatura e uma velocidade de
centrifugação que podem ser modificadas. No visor
aparecerá a duração do ciclo.
6. PERSONALIZAR O ciclo de lavagem. Utilizar as
específicas teclas:
Modificar a temperatura e/ou a centrifugação.
A máquina visualiza automaticamente a temperatura e a
centrifugação máximas para o programa seleccionado
ou as últimas seleccionadas se compatíveis com o
programa escolhido. Carregando no botão
pode-se
reduzir a temperatura progressivamente até a lavagem
a frio “OFF”. Carregando no botão
pode-se reduzir
a centrifugação progressivamente até a sua exclusão
“OFF”. Uma posterior pressão dos botões colocará os
valores novamente aos máximos previstos.
! Excepção: seleccionando o programa 4 a temperatura
pode ser aumentada até a 90ºC.
Programar um início posterior.
Para programar o início atrasado do programa
escolhido, carregue no botão relativo até alcançar o
tempo de atraso desejado. Quando a opção estiver
activa, no visor ilumina-se o símbolo
. Para cancelar
a opção de início posterior, carregue novamente na
tecla até que no visor apareça a escrita “OFF”.
Configurar a intensidade de lavagem desejada.
A opção
permite optimizar a lavagem conforme
o grau de sujidade dos tecidos e à intensidade de
lavagem desejada.
Seleccionar o programa de lavagem, o ciclo será
configurado automaticamente no nível “Normal”,
optimizado para peças mediamente sujas (configuração
não válida para o ciclo “Lã” que configura-se
automaticamente no nível “Delicate”).
Para peças muito sujas, pressione a tecla
até
chegar ao nível “Intensive”. Este nível garante uma
lavagem de alto desempenho, graças ao uso de uma
maior quantidade de água na fase inicial do ciclo e a
uma maior movimentação mecânica, útil para eliminar
as manchas mais resistentes. Pode ser utilizada com
ou sem lixívia.Se quiser efectuar o branqueamento,
coloque o recipiente adicional 4, fornecido com o
produto, no recipiente 1. Quando deitar a lixívia, não
ultrapasse o nível “máx” indicado no pino central (veja a
figura da pág. 22).
Para peças pouco sujas ou para um tratamento mais
delicado dos tecidos, pressione a tecla
até alcançar
o nível “Delicate”.
O ciclo reduzirá a movimentação
mecânica para garantir resultados de lavagem perfeitos
para as peças delicadas.
Modificar as características do ciclo.
• Pressionar o botão para activar a opção; o indicador
luminoso correspondente ao botão irá acender-se.
• Carregar novamente no botão para desactivar a opção;
o respectivo indicador luminoso irá apagar-se.
! Se a opção seleccionada não for compatível com o
programa definido, o indicador luminoso acender-se-á
intermitente e a opção não ficará activa.
! Se a opção seleccionada não for compatível com uma
outra programada anteriormente, o respectivo indicador
luminoso irá piscar e ficará activa somente a segunda, o
indicador luminoso do botão irá acender-se.
! As opções podem variar a carga recomendada e/ou a
duração do ciclo.
7. INICIAR O PROGRAMA. Carregar no botão START/
PAUSE. O respectivo indicador luminoso ficará azul
fixo e a porta de vidro irá bloquear-se (símbolo PORTA
BLOQUEADA
aceso). Para modificar um programa
durante a realização de um ciclo, colocar a máquina
de lavar roupa em pausa carregando na tecla START/
PAUSE (o indicador luminoso START/PAUSE irá piscar
lentamente na cor laranja); seleccionar então o ciclo
desejado e carregar novamente no botão START/
PAUSE.
Para abrir a porta durante a realização de um ciclo,
carregar no botão START/PAUSE; se o símbolo PORTA
BLOQUEADA
estiver apagado será possível abrir a
porta (aguarde aproximadamente 3 minutos). Carregar
novamente no botão START/PAUSE para fazer iniciar o
programa do ponto em que foi interrompido.
8. FIM DO PROGRAMA. É indicado pela escrita “END”
no visor, quando o símbolo PORTA BLOQUEADA
irá apagar-se será possível abrir a porta (aguarde
aproximadamente 3 minutos). Abrir a porta, retirar a
roupa e desligar a máquina.
! Se desejar anular um ciclo já iniciado, carregue por
alguns segundos na tecla
. O ciclo será interrompido e a
máquina irá desligar-se.
Strona się ładuje...
Strona się ładuje...
Strona się ładuje...
Strona się ładuje...
Strona się ładuje...
Strona się ładuje...
Strona się ładuje...
Strona się ładuje...
Strona się ładuje...
Strona się ładuje...
Strona się ładuje...
Strona się ładuje...
Strona się ładuje...
Strona się ładuje...
Strona się ładuje...
Strona się ładuje...
-
 1
1
-
 2
2
-
 3
3
-
 4
4
-
 5
5
-
 6
6
-
 7
7
-
 8
8
-
 9
9
-
 10
10
-
 11
11
-
 12
12
-
 13
13
-
 14
14
-
 15
15
-
 16
16
-
 17
17
-
 18
18
-
 19
19
-
 20
20
-
 21
21
-
 22
22
-
 23
23
-
 24
24
-
 25
25
-
 26
26
-
 27
27
-
 28
28
-
 29
29
-
 30
30
-
 31
31
-
 32
32
-
 33
33
-
 34
34
-
 35
35
-
 36
36


w innych językach
- português: Hotpoint FMG 723M EU Guia de usuario
- English: Hotpoint FMG 723M EU User guide