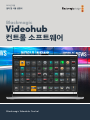
Blackmagic Videohub Control Software Instrukcja obsługi
- Typ
- Instrukcja obsługi

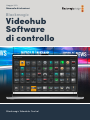
Blackmagic
Videohub
Control Software
Blackmagic Videohub Control
May 2023
Installation and Operation Manual


Welcome
Thank you for purchasing Videohub!
We hope you share our dream for the television industry to become truly creative by
allowing anyone to have access to the highest quality video.
Previously, high end television and post production required investing in millions of dollars
of hardware, and professional SDI routers have always been way too costly for most people
to afford. HD-SDI is even more expensive and, until now, only the largest post production
and television facilities could afford HD-SDI routing. Videohub changes all that! Some
Videohub models not only give you HD-SDI, but also the latest Ultra HD format, enabling
you to pipe 4K 60p video around your studio using 12G SDI.
This instruction manual contains all the information you’ll need to install your Videohub,
although it’s always a good idea to ask a technical assistant for help if you are not sure
what IP addresses are, or if you don’t know much about computer networks. Videohub is
easy to install, however there are a few slightly technical preferences you will need to set
after you install it.
Please check our web site at www.blackmagicdesign.com and click the support page to
download the latest updates to this manual and Videohub software. Lastly, please register
your Videohub when downloading software updates so we can keep you updated when
new software is released. We are constantly working on new features and improvements,
so we would love to hear from you!
We hope you get years of use from your Videohub and have lots of fun connecting
everyone in your facility together!
Grant Petty
CEO Blackmagic Design
English


Getting Started
Blackmagic Videohub Control
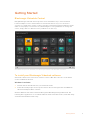
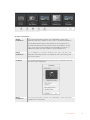
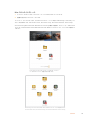
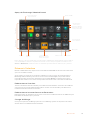
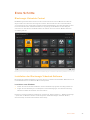
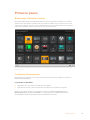
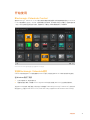
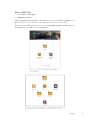
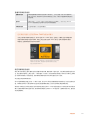
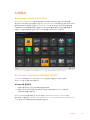
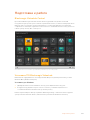
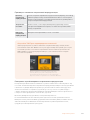
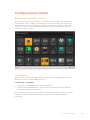
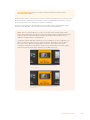
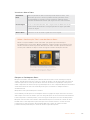
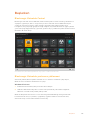
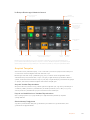
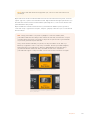
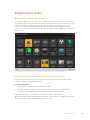
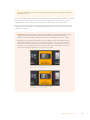
Using Blackmagic Videohub Control provides a fast and intuitive way to view and switch
between multiple sources and destinations. Videohub Control is easy to use because it
operates on a single video output at a time. Selecting a destination (output) pushbutton shows
which source (input) is connected to it by illuminating the source pushbutton. To change the
source, simply click on a different source pushbutton. It’s that easy!
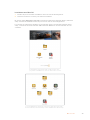
Videohub Control provides an intuitive, icon-driven representation of the Videohub connections
To install your Blackmagic Videohub software
Videohub software runs on the latest ‘Ventura’ version of Mac OS. It also runs on the 64 bit
version of Windows 10 and 11.
Windows Installation
1 Double click the installer file from your downloads folder.
2 Follow the install prompts and accept the terms in the License Agreement and Windows
willautomatically install the software.
Click the Windows Start button and then All Programs>Blackmagic Design>Videohub. The
following three applications are contained within the folder: Videohub Control, Videohub Setup
and Videohub Hardware Panel Setup.
5Getting Started

Mac OS Installation
1 Double click the installer file from your downloads folder.
2 Follow the install prompts to complete the installation.
A folder called “Blackmagic Videohub” will be created within your ‘applications’ folder
containing the following three applications: Videohub Control, Videohub Setup and Videohub
Hardware Panel Setup.
For detailed information on Videohub Setup and Videohub Hardware Panel Setup, refer to the
Videohub 12G and Videohub 6G instruction manuals in your computer’s Videohub folder.
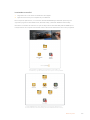
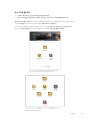
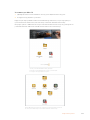
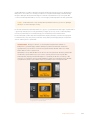
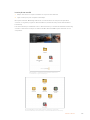
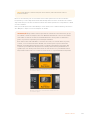
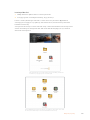
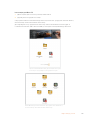
To install the Videohub software, double click the installer
andfollow the prompts
The Blackmagic Videohub folder contains three Videohub applications.
VideohubControl, Videohub Setup, and Videohub Hardware Panel Setup
6Getting Started

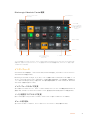
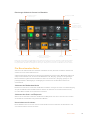
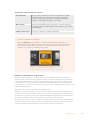
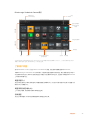
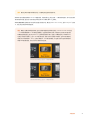
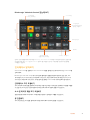
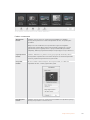
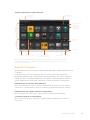
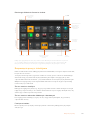
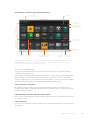
Blackmagic Videohub Control at a Glance
Scrollbars indicate
not all pushbuttons
are visible
Title Bar shows
Videohub type
Highlighted Pushbuttons
denote paired connections
Pushbutton View
List View
Sources AreaDestinations Area
Destinations
Area Search
Sources Area Search
Settings
Use TAKE
Reveal SourceDivider Bar
Click and drag the window edges to resize Blackmagic Videohub Control to fit your screen size.
Drag the Divider Bar up or down to reveal more or less of the “Sources” and “Destinations” areas
and use the Scroll Bars to scroll the areas.
Getting to Know the Interface
Launch Videohub Control and click on the ‘select a videohub’ button and then select the
Videohub you wish to control
If the input, output and remote connections have not yet been labeled in Blackmagic Videohub
Setup, then the source pushbuttons will appear as ‘input’, followed by their respective numbers.
Likewise, the destination pushbuttons will appear as ‘output’, followed by their respective
numbers. These inputs and outputs correspond to the connector numbers on the Videohub.
Resizing the Interface
Click and drag the bottom right hand corner to proportionally resize the interface to best fit your
screen size. Alternatively, drag a window edge to resize either vertically or horizontally.
Resizing the Sources and Destinations Areas
Drag the divider bar up and down and use the scroll bars to scroll the respective areas.
Switching Views
You can switch between pushbutton view and list view by clicking the icons in the bottom
right corner.
7Getting Started

Using the Dynamic Search
Both the sources and destinations areas contain a search icon, which allows you to search for
text dynamically. This is useful if you have many pushbuttons and quickly want to locate a
pushbutton with a specific name. Begin by typing the name you wish to search for. As you type
each letter, the pushbuttons that are displayed will be dynamically filtered.
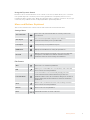
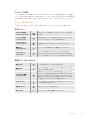
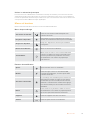
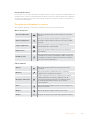
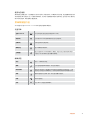
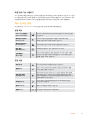
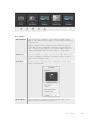
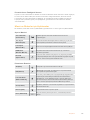
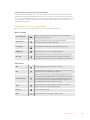
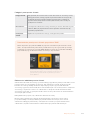
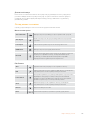
Menu and Buttons Explained
This section describes the various buttons and menu items in Videohub Control.
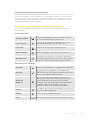
Settings Menu
Select Videohub Select from a list of Videohubs that are currently connected to
your network.
Save Layout Save customized pushbutton layouts for the different
environments in which you use your Videohub.
Load Layout Load previously saved pushbutton layouts.
Edit Buttons Displays the Edit Buttons for editing the pushbuttons.
Reset All
Displays all of the inputs and outputs of the connected Videohub
and replaces customized icons with the default icon. Source,
destination and deck control settings are maintained.
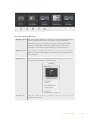
Edit Buttons
Add Add a source or destination pushbutton.
Edit Allows you to set the SDI source or destination, deck control and
the icon for the selected pushbutton.
Lock and Unlock
Lock a destination to avoid accidentally changing the video
source which is routed to that destination. If you click on a
pushbutton that’s locked, the Lock button changes into an Unlock
button. Simply click the Unlock button to unlock the destination
pushbutton.
Clear Deletes source, destination and deck control settings as well as
theicon for the selected pushbutton.
Remove Removes the selected pushbutton.
Done Click the Done button to exit the edit mode.
8Getting Started

Click Edit Buttons to display the above buttons.
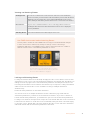
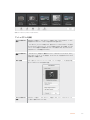
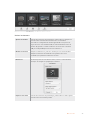
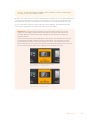
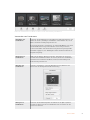
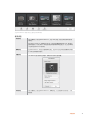
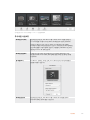
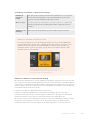
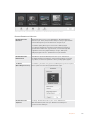
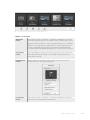
Using Pushbuttons
Adding
Pushbuttons
Select the Settings button and then select “Edit Buttons”. Click on the
Add button and choose whether to add a source or destination pushbutton.
The Set Button window appears and allows you to set the SDI source or
destination, RS-422 deck control and the icon for the pushbutton. In most
cases, deck control is grouped with the associated SDI connections, e.g.,
SDI Input 1 would be associated with the corresponding Remote 1.
Editing
Pushbuttons
Select “Edit Buttons” and click the pushbutton you wish to edit. Click on the
Edit button and modify the source or destination, deck control settings and
theicon as required.
Set Button The Set Button window allows icon selection, source or destination selection
and deck control configuration.
Moving
Pushbuttons
Select the Settings button and then select “Edit Buttons”. Click and drag the
pushbutton to a new position.
9Getting Started

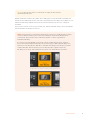
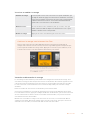
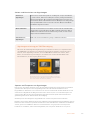
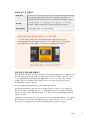
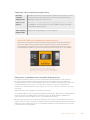
Viewing and Switching Routes
Viewing Routes In order to see which video source has been routed to a video destination,
suchas a monitor, press the button in the destinations panel to make the button
illuminate. The associated video source button will illuminate in the sources
panel, making it immediately obvious which source is connected to the monitor.
Reveal Source If you select a destination but the source is currently positioned offscreen,
clicking the Reveal Source button will scroll the Sources area to display the
source pushbutton.
Switching Routes Select the destination icon followed by the source icon.
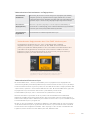
Use TAKE Confirmation before Switching Routes
You may wish to enable the “Use TAKE” button to help prevent unintentional changes
to video routes. Once enabled, any attempt to change a video route using a
pushbutton will cause a red “TAKE” button to appear. Select the button to confirm or
click the current source or destination pushbutton to cancel.
This destination is unlocked and is available to
any Videohubuser on the network. The associated
videosource is illuminated in the Sources panel and
thesource name “DaVinci” is displayed.
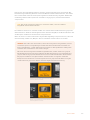
Locking and Unlocking Routes
Locking a destination will avoid accidentally changing the video source which is routed to that
destination. To lock a route, select the destination pushbutton and double click. Apadlock icon
will appear in the top-right corner of the destination pushbutton and will prevent anyone else
from using the destination device until it is unlocked from your computer. Locking a destination
still leaves the associated video source available for routing to multiple destinations
simultaneously.
Double click the pushbutton to unlock the destination.
You can also lock one or multiple destinations via the edit buttons page. Shift click the
destination pushbuttons you wish to lock and click the lock button. If you select a mixture of
locked and unlocked pushbuttons, you will have the option to lock the unlocked pushbuttons.
Locking a route between an input and an output also locks the RS-422 deck control connection
between the two devices to avoid other users accidentally seizing the deck control belonging
to the video source. The RS-422 connection between the video source and video destination
will remain locked until the destination pushbutton is unlocked.
10Getting Started

TIP To toggle the lock status of a destination, simply double click the
destination pushbutton.
A black padlock icon with a curved line above will appear on any destination pushbuttons
locked by other Videohub devices. The video destination devices will not be available to you
until the destination pushbuttons have been unlocked from the other users’ computers
and iPads.
If you need to unlock a route set by another user, launch Videohub Setup, select the Outputs
tab and click the destination’s lock icon.
NOTE It is important to note which routing level is selected, as it will affect the locking
of routes. Universal video hub consists of an SDI video level and an RS-422 deck
control level. These levels can be switched together or can be separated for
individual switching.
If you have selected SDI 422 on the level controls, it will lock both ports, however,
ifyou select SDI or RS422 it will only lock the selected port. When the RS-422 port is
locked you can still switch to SDI video, and when the SDI port is locked you can still
switch to RS-422. This means that you can still route video signals even if the
RS-422 port is locked, and still have deck control even if the SDI port is locked.
Locally locked destinations display a white padlock icon.
Remotely locked destinations display a black padlock icon.
11Getting Started

Help
Getting Help
The fastest way to obtain help is to go to the Blackmagic Design online support pages and
check the latest support material available for your Blackmagic Design Videohub.
Blackmagic Design online support pages
The latest manual, software and support notes can be found at the Blackmagic Design support
center at www.blackmagicdesign.com/support.
Blackmagic Design Forum
Another useful resource is the Blackmagic Design Forum. The forum is a place to find similar
questions and quick solutions from either Blackmagic staff or fellow customers with extensive
knowledge.
Contacting Blackmagic Design support
If you can’t find the help you need in our support material, please use the “Send us an email”
button to email a support request. Alternatively, click on the “Find your local support team”
button and call your nearest Blackmagic Design support office.
Checking the version currently installed
To check which version of Videohub Control is installed on your computer, open the Blackmagic
Videohub Control application. From the Blackmagic Videohub Control menu, select About
Blackmagic Videohub and note the version number.
How to get the latest updates
After checking the version of your Blackmagic Videohub Control on your computer, please visit
the Blackmagic Design support center at www.blackmagicdesign.com/support to check for the
latest updates. While it is usually a good idea to run the latest updates, it is a wise practice to
avoid updating any software if you are in the middle of an important project.
12Help

Regulatory Notices
Disposal of Waste of Electrical and Electronic Equipment Within the European Union.
The symbol on the product indicates that this equipment must not be disposed of with other
waste materials. In order to dispose of your waste equipment, it must be handed over to a
designated collection point for recycling. The separate collection and recycling of your waste
equipment at the time of disposal will help conserve natural resources and ensure that it is
recycled in a manner that protects human health and theenvironment. For more information
about where you can drop off your waste equipment for recycling, please contact your local
cityrecycling office or the dealer from whom you purchased the product.
This equipment has been tested and found to comply with the limits for a Class A digitaldevice,
pursuant to Part 15 of the FCC rules. These limits are designed to provide reasonable protection
against harmful interference when the equipment is operated inacommercial environment.
This equipment generates, uses, and can radiate radio frequency energy and, if not installed
and used in accordance with the instructions, maycause harmful interference to radio
communications. Operation of this product in aresidential area is likely to cause harmful
interference, in which case the user will be required to correct the interference at
personal expense.
Operation is subject to the following two conditions:
1 This device may not cause harmful interference.
2 This device must accept any interference received, including interference that
may cause undesired operation.
ISED Canada Statement
This device complies with Canadianstandards for Class A digital apparatus.
Any modifications or use of this product outside its intended use could void compliance to
these standards.
Connection to HDMI interfaces must be made with high quality shielded HDMI cables.
This equipment has been tested for compliance with the intended use in a commercial
environment. If the equipment is used in a domestic environment,
it may cause radio interference.
13Regulatory Notices

Safety Information
For protection against electric shock, the equipment must be connected to a mains socket
outlet with a protective earth connection. In case of doubt contact a qualifiedelectrician.
To reduce the risk of electric shock, do not expose this equipment to dripping orsplashing.
Product is suitable for use in tropical locations with an ambient temperature of up to 40oC.
Ensure that adequate ventilation is provided around the product and that it is not restricted.
When rack mounting, ensure that the ventilation is not restricted by adjacent equipment.
No operator serviceable parts inside product. Refer servicing to your local Blackmagic Design
service center.
Some products have the facility to connect small form-factor transceiver (SFP) optical fibre
modules. Only use Laser class 1 optical SFP modules.
Recommended Blackmagic Design SFP modules:
– 3G-SDI: PL-4F20-311C
Use only at altitudes not more than 2000m above sea level.
State of California statement
This product can expose you to chemicals such as trace amounts of polybrominated biphenyls
within plastic parts, which is known to the state of California to cause cancer and birth defects
or other reproductive harm.
For more information go to www.P65Warnings.ca.gov.
Warning for Authorized Service Personnel
Disconnect power from both power inlets before servicing!
Caution — Double Pole/ Neutral Fusing
The power supply contained in this equipment has a fuse in both line and neutral conductors
and is suitable for connection to the IT power distribution systemin Norway.
14Safety Information

Warranty
Limited Warranty
Blackmagic Design warrants that Videohub routers will be free from defects in materials and
workmanship for a period of 36 months from the date of purchase excluding connectors, cables,
cooling fans, fiber optic modules, fuses, keyboards and batteries which will be free from defects
in materials and workmanship for a period of 12 months from the date of purchase. Blackmagic Design
warrants that Videohub Master Control and Videohub Smart Control will be free from defects in
materials and workmanship for a period of 12 months from the date of purchase. If a product proves
to be defective during this warranty period, Blackmagic Design, atits option, either will repair the
defective product without charge for parts and labor, or will provide a replacement in exchange
for the defective product.
In order to obtain service under this warranty, you the Customer, must notify Blackmagic Design
of the defect before the expiration of the warranty period and make suitable arrangements for the
performance of service. The Customer shall be responsible for packaging and shipping the
defective product to a designated service center nominated by Blackmagic Design, with shipping
charges pre paid. Customer shall be responsible for paying all shipping changes, insurance, duties,
taxes, and any other charges for products returned to us for any reason.
This warranty shall not apply to any defect, failure or damage caused by improper use or improper
or inadequate maintenance and care. Blackmagic Design shall not be obligated to furnish service
under this warranty: a) to repair damage resulting from attempts by personnel other than
Blackmagic Design representatives to install, repair or service the product, b) to repair damage
resulting from improper use or connection to incompatible equipment, c) to repair any damage or
malfunction caused by the use of non Blackmagic Design parts or supplies, or d) to service a
product that has been modified or integrated with other products when the effect of such a
modification or integration increases the time or difficulty of servicing the product. THIS WARRANTY
IS GIVEN BY BLACKMAGIC DESIGN IN LIEU OF ANY OTHER WARRANTIES, EXPRESS OR IMPLIED.
BLACKMAGIC DESIGN AND ITS VENDORS DISCLAIM ANY IMPLIED WARRANTIES OF
MERCHANTABILITY OR FITNESS FOR A PARTICULAR PURPOSE. BLACKMAGIC DESIGN’S
RESPONSIBILITY TO REPAIR OR REPLACE DEFECTIVE PRODUCTS IS THE WHOLE AND EXCLUSIVE
REMEDY PROVIDED TO THE CUSTOMER FOR ANY INDIRECT, SPECIAL, INCIDENTAL OR
CONSEQUENTIAL DAMAGES IRRESPECTIVE OF WHETHER BLACKMAGIC DESIGN OR THE
VENDOR HAS ADVANCE NOTICE OF THE POSSIBILITY OF SUCH DAMAGES. BLACKMAGIC
DESIGN IS NOT LIABLE FOR ANY ILLEGAL USE OF EQUIPMENT BY CUSTOMER. BLACKMAGIC
IS NOT LIABLE FOR ANY DAMAGES RESULTING FROM USE OF THIS PRODUCT. USER OPERATES
THIS PRODUCT AT OWN RISK.
© Copyright 2023 Blackmagic Design. All rights reserved. ‘Blackmagic Design’, ‘DeckLink’, ‘HDLink’, ‘Workgroup Videohub’,
‘Multibridge Pro’, ‘Multibridge Extreme’, ‘Intensity’ and ‘Leading the creative video revolution’ are registered trademarks in the
US and other countries. All other company and product names may be trademarks of their respective companies with which they
are associated.
15Warranty

日本語
Blackmagic
Videohub
コントロ ールソフトウェア
Blackmagic Videohub Control
2023年5月
インストール/オペレーションマニュアル

ようこそ
このたびはVideohubをお買い求めいただき誠にありがとうございます。
弊 社では 、誰もが 最高 品質の映 像を使 用できるようにすることで、テレビ 業 界を真にクリエイティブ
な業界にするという夢を、ユーザーの皆様と共有できればと考えています。
従 来 、ハ イ エ ン ド の テ レ ビ 制 作 会 社 や ポ ス トプ ロ ダ ク シ ョ ン は 、ハ ー ド ウ ェ ア に 多 額 を 費 や す 必 要
がありましたが、プロ仕様の
SDI
ル ー テ ィ ン グ ス イ ッ チ ャ ー は 非 常 に 高 価 な た め 、多 く の 人 々 は 手 が
届きませ んでした 。
HD
-
SDI
はさらに高価で、今に到るまで
HD
-
SDI
ル ー ティン グ 機 器 を 導 入で きる
のは、大規模なポストプロダクションスタジオやテレビ局に限られていました。しかし、Videohub
の 登 場 に よりこの 状 況 が 大 きく変わりま す。Videohubで は 機 種 に よって、HD-SDIだけではなく、
最新の
Ultra
HD
フォーマットも 扱 うこと が で きるた め 、
12G
-
SDI
で
4K
60p
ビデオをスタジオ中どこ
にで も 送 信 で きます。
このマニュアルには、Videohubをインストールする際に必要な情報がすべて記載されています。し
かし、IPアドレスやコンピューターネットワークに関してあまり詳しくない場合は、技術的なアシス
トを専門家から得ることをお勧めします。Videohubのインストールは非 常に簡単ですが、インスト
ール後にやや技術的な環境設定がいくつか必要となります。
弊 社 の ウ ェ ブ サ イ ト( www.blackmagicdesign.com/jp)のサポートページで、このマニュアルおよび
Videohubソフトウェアの最新バージョンをダウンロードしてください。最後に、ソフトウェアアップデ
ートをダウンロードする際に、現在使 用されている
Videohub
を 登 録 い た だ け れ ば 、新 し い ソ フ ト ウ
ェアのリリース時にお客様にお知らせいたします。常に新機能の開発および製品の改善に努めてい
ますので、ユーザーの皆様からご意見をいただければ幸いです。
Videohub
を長年にわたってご使用いただき、スタジオ内のあらゆる機材を接続して楽しんでいた
だ けることを 願 って お りま す。
グ ラント・ペ テ ィ
Blackmagic Design CEO


はじめに
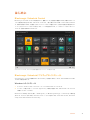
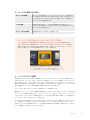
Blackmagic Videohub Control
Blackmagic Videohub Controlを使用すると、複数のソース/送 信先の確認および切り替えをスピーデ
ィかつ直感的に実行できます。
Videohub
Control
は、一度に操作するのは単一のビデオ出力のみなの
で、簡単に使用できます。送信先(出力)のプッシュボタンを選択すると、該当の送信先に接続された
ソース( 入 力)のプッシュボタン が点 灯しま す。ソースを 変 更するには 、ソースのプッシュボタンをクリッ
クします。必要な作業はこれだけです。
Videohub Controlは、Videohub接続の直感的なアイコンベースの操作が可能
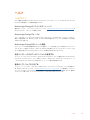
Blackmagic Videohubソフトウェアの インストール
Videohubソ フ ト ウ ェ ア は 、最 新 の Mac OS「Ventura」で 使 用 で き ま す 。さ ら に 、64-bitのWindows 10お
よび11で も 使 用 で きま す。
Windowsへのインストール
1 ダウンロードしたフォルダーのインストーラーファイルをダブルクリックします。
2
イ ン ス ト ー ル 表 示 に 従 い 、「 License Agreement」で 規 約 に 同 意 し ま す 。Windowsがソフトウェアを
自 動 で インストールします。
Windowsの「 START」 ボ タ ン を 押 し 、「 All Programs」>「 Blackmagic Design」>「 Videohub」の順に選
択 し ま す 。フ ォ ル ダ ー 内 に は 以 下 の 3つのアプリケーションが含まれます:Videohub Control、Videohub
Setup、Videohub Hardware Panel Setup。
19
はじめに

Mac OSへのインストール
1 ダウンロードしたフォルダーのインストーラーファイルをダブルクリックします。
2 画面の指示に従ってインストールします。
アプリケーションフォルダー内に、以下の
3
つのアプリケーションを含む「
Blackmagic
Videohub
」フ ォ
ル ダー が 作 成 さ れ ま す:Videohub Control、Videohub Setup、Videohub Hardware Panel Setup。
Videohub
Setup
および
Videohub
Hardware
Panel
Setup
に 関 す る 詳 細 は 、コ ン ピ ュ ー タ ー の
Videohub
フォルダーの中にあるVideohub 12Gおよび Videohub 6Gの インストラ クション・マニュアル を 参 照 して
ください。
Videohubソフトウェアをインストールするには、インストー
ラーをダブルクリックし、画面の指示に従います。
Blackmagic Videohubフォルダーには、以下のアプリケーションが含まれます。
Videohub Control、Videohub Setup、Videohub Hardware Panel Setup。
20
はじめに
Strona się ładuje...
Strona się ładuje...
Strona się ładuje...
Strona się ładuje...
Strona się ładuje...
Strona się ładuje...
Strona się ładuje...
Strona się ładuje...
Strona się ładuje...
Strona się ładuje...
Strona się ładuje...
Strona się ładuje...
Strona się ładuje...
Strona się ładuje...
Strona się ładuje...
Strona się ładuje...
Strona się ładuje...
Strona się ładuje...
Strona się ładuje...
Strona się ładuje...
Strona się ładuje...
Strona się ładuje...
Strona się ładuje...
Strona się ładuje...
Strona się ładuje...
Strona się ładuje...
Strona się ładuje...
Strona się ładuje...
Strona się ładuje...
Strona się ładuje...
Strona się ładuje...
Strona się ładuje...
Strona się ładuje...
Strona się ładuje...
Strona się ładuje...
Strona się ładuje...
Strona się ładuje...
Strona się ładuje...
Strona się ładuje...
Strona się ładuje...
Strona się ładuje...
Strona się ładuje...
Strona się ładuje...
Strona się ładuje...
Strona się ładuje...
Strona się ładuje...
Strona się ładuje...
Strona się ładuje...
Strona się ładuje...
Strona się ładuje...
Strona się ładuje...
Strona się ładuje...
Strona się ładuje...
Strona się ładuje...
Strona się ładuje...
Strona się ładuje...
Strona się ładuje...
Strona się ładuje...
Strona się ładuje...
Strona się ładuje...
Strona się ładuje...
Strona się ładuje...
Strona się ładuje...
Strona się ładuje...
Strona się ładuje...
Strona się ładuje...
Strona się ładuje...
Strona się ładuje...
Strona się ładuje...
Strona się ładuje...
Strona się ładuje...
Strona się ładuje...
Strona się ładuje...
Strona się ładuje...
Strona się ładuje...
Strona się ładuje...
Strona się ładuje...
Strona się ładuje...
Strona się ładuje...
Strona się ładuje...
Strona się ładuje...
Strona się ładuje...
Strona się ładuje...
Strona się ładuje...
Strona się ładuje...
Strona się ładuje...
Strona się ładuje...
Strona się ładuje...
Strona się ładuje...
Strona się ładuje...
Strona się ładuje...
Strona się ładuje...
Strona się ładuje...
Strona się ładuje...
Strona się ładuje...
Strona się ładuje...
Strona się ładuje...
Strona się ładuje...
Strona się ładuje...
Strona się ładuje...
Strona się ładuje...
Strona się ładuje...
Strona się ładuje...
Strona się ładuje...
Strona się ładuje...
Strona się ładuje...
Strona się ładuje...
Strona się ładuje...
Strona się ładuje...
Strona się ładuje...
Strona się ładuje...
Strona się ładuje...
Strona się ładuje...
Strona się ładuje...
Strona się ładuje...
Strona się ładuje...
Strona się ładuje...
Strona się ładuje...
Strona się ładuje...
Strona się ładuje...
Strona się ładuje...
Strona się ładuje...
Strona się ładuje...
Strona się ładuje...
Strona się ładuje...
Strona się ładuje...
Strona się ładuje...
Strona się ładuje...
Strona się ładuje...
Strona się ładuje...
Strona się ładuje...
Strona się ładuje...
Strona się ładuje...
Strona się ładuje...
Strona się ładuje...
Strona się ładuje...
Strona się ładuje...
Strona się ładuje...
Strona się ładuje...
Strona się ładuje...
Strona się ładuje...
Strona się ładuje...
Strona się ładuje...
Strona się ładuje...
Strona się ładuje...
Strona się ładuje...
Strona się ładuje...
Strona się ładuje...
Strona się ładuje...
Strona się ładuje...
Strona się ładuje...
Strona się ładuje...
Strona się ładuje...
Strona się ładuje...
Strona się ładuje...
Strona się ładuje...
Strona się ładuje...
Strona się ładuje...
Strona się ładuje...
Strona się ładuje...
Strona się ładuje...
Strona się ładuje...
Strona się ładuje...
-
 1
1
-
 2
2
-
 3
3
-
 4
4
-
 5
5
-
 6
6
-
 7
7
-
 8
8
-
 9
9
-
 10
10
-
 11
11
-
 12
12
-
 13
13
-
 14
14
-
 15
15
-
 16
16
-
 17
17
-
 18
18
-
 19
19
-
 20
20
-
 21
21
-
 22
22
-
 23
23
-
 24
24
-
 25
25
-
 26
26
-
 27
27
-
 28
28
-
 29
29
-
 30
30
-
 31
31
-
 32
32
-
 33
33
-
 34
34
-
 35
35
-
 36
36
-
 37
37
-
 38
38
-
 39
39
-
 40
40
-
 41
41
-
 42
42
-
 43
43
-
 44
44
-
 45
45
-
 46
46
-
 47
47
-
 48
48
-
 49
49
-
 50
50
-
 51
51
-
 52
52
-
 53
53
-
 54
54
-
 55
55
-
 56
56
-
 57
57
-
 58
58
-
 59
59
-
 60
60
-
 61
61
-
 62
62
-
 63
63
-
 64
64
-
 65
65
-
 66
66
-
 67
67
-
 68
68
-
 69
69
-
 70
70
-
 71
71
-
 72
72
-
 73
73
-
 74
74
-
 75
75
-
 76
76
-
 77
77
-
 78
78
-
 79
79
-
 80
80
-
 81
81
-
 82
82
-
 83
83
-
 84
84
-
 85
85
-
 86
86
-
 87
87
-
 88
88
-
 89
89
-
 90
90
-
 91
91
-
 92
92
-
 93
93
-
 94
94
-
 95
95
-
 96
96
-
 97
97
-
 98
98
-
 99
99
-
 100
100
-
 101
101
-
 102
102
-
 103
103
-
 104
104
-
 105
105
-
 106
106
-
 107
107
-
 108
108
-
 109
109
-
 110
110
-
 111
111
-
 112
112
-
 113
113
-
 114
114
-
 115
115
-
 116
116
-
 117
117
-
 118
118
-
 119
119
-
 120
120
-
 121
121
-
 122
122
-
 123
123
-
 124
124
-
 125
125
-
 126
126
-
 127
127
-
 128
128
-
 129
129
-
 130
130
-
 131
131
-
 132
132
-
 133
133
-
 134
134
-
 135
135
-
 136
136
-
 137
137
-
 138
138
-
 139
139
-
 140
140
-
 141
141
-
 142
142
-
 143
143
-
 144
144
-
 145
145
-
 146
146
-
 147
147
-
 148
148
-
 149
149
-
 150
150
-
 151
151
-
 152
152
-
 153
153
-
 154
154
-
 155
155
-
 156
156
-
 157
157
-
 158
158
-
 159
159
-
 160
160
-
 161
161
-
 162
162
-
 163
163
-
 164
164
-
 165
165
-
 166
166
-
 167
167
-
 168
168
-
 169
169
-
 170
170
-
 171
171
-
 172
172
-
 173
173
-
 174
174
-
 175
175
-
 176
176
-
 177
177
-
 178
178
-
 179
179
-
 180
180
-
 181
181
-
 182
182
-
 183
183


Blackmagic Videohub Control Software Instrukcja obsługi
- Typ
- Instrukcja obsługi
w innych językach
- español: Blackmagic Videohub Control Software Manual de usuario
- italiano: Blackmagic Videohub Control Software Manuale utente
- Deutsch: Blackmagic Videohub Control Software Benutzerhandbuch
- português: Blackmagic Videohub Control Software Manual do usuário
- français: Blackmagic Videohub Control Software Manuel utilisateur
- 日本語: Blackmagic Videohub Control Software ユーザーマニュアル
- Türkçe: Blackmagic Videohub Control Software Kullanım kılavuzu