
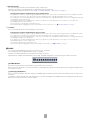
1
ROOM ER
ROOM ER
ROOM ER
Owner’s Manual
Owner’s Manual
Owner’s Manual
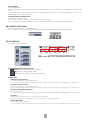
What Are ADD-ON EFFECTS?
ADD-ON EFFECTS are software packages that install additional high-quality effects programs on digital
consoles.
What is Room ER?
Room ER is one of the effects programs that can be used as ADD-ON EFFECTS.
It simulates the change in a room’s reflected sound that occurs as a monaural sound source or the listening point moves around.
You can set things like the path of movement and the size of the room, and thereby change the volume, orientation, and sound.
What is the Interactive Spatial Sound Processor (iSSP)?
iSSP is a technology that combines two components. The first is a geometric sound simulator that
attenuates sound according to an estimate of the sound reflection that results from the shape of a room.
The simulation considers the direction of the sound source and the room’s surface materials when
determining the sound. The second is multi-channel signal processor technology that uses information
about the position of the sound source to perform distance attenuation based on the balance and delay/
filter for each output channel.
iSSP technology is used in Room ER.
Special Notices
• Copying of the commercially available music sequence data and/or digital audio files is strictly prohibited except for your personal use.
• The software and this Owner’s Manual are exclusive copyrights of Yamaha Corporation.
• Copying of the software or reproduction of this manual in whole or in part by any means is expressly forbidden without the written consent of the
manufacturer.
•Yamaha makes no representations or warranties with regard to the use of the software and documentation and cannot be held responsible for the
results of the use of this manual and the software.
• The screen displays as illustrated in this Owner’s Manual are for instructional purposes, and may appear somewhat different from the screens that
appear on your computer.
• The company names and product names in this Owner’s Manual are the trademarks or registered trademarks of their respective companies.
© 2005 Yamaha Corporation. All rights reserved.

2
Installing Room ER
See the ADD-ON EFFECTS Installation Guide for more information on installing Room ER.
Using Room ER
As with other effects, you can recall and edit the Room ER program on the console or in Studio Manager.
The basic operation is as follows:
1 Select one of the internal effects processors.
2 Patch the signal to and from the currently selected effects processor.
3 Locate the Effects Library page.
4 Select and recall Room ER.
n When you recall the program, all effects processor outputs will be muted temporarily.
5 Locate the Effects Edit page.
6 Set the parameters. (See the “Part Names and Functions” on page 3 for more information on Room ER parameters.)
The procedure for recalling and editing Room ER varies depending on the console you are using.
Refer to the Owner’s Manual that came with your console for more information.
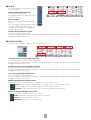
Editing Parameters in Studio Manager
In Studio Manager, editable parameters appear in both the Room ER window and the Generic Editor window.
The Room ER window enables you to edit Room ER specific parameters, and the Generic Editor window enables you to edit
parameters common to Room ER and other Effects.
Refer to the Studio Manager Owner’s Manual for your console for more information on the Generic Editor window.
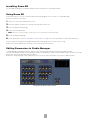
Studio Manager Generic Editor window

3
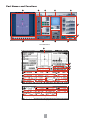
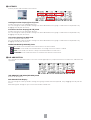
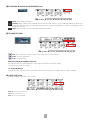
Part Names and Functions
1
1
9
!
@
3
268@
)
!
47 9
5
3
)
7
4
5
8
6
#
4 5
) !
@
)
)
Console display
Room ER window

4
1 Position View
In this view you can display or edit the shape or size of the room, the position and orientation of the listener and sound
source, and the path of the automation.
1 Relative Position Display
Normally, this displays the angle of the sound source as seen from the orientation of the listener, the distance between the
sound source and the listener, and the angle of the sound source as seen from the direction of the listener.
When you click on a Key Point (see section “3 Path” below), the angle of the Key Point, as seen from the listener, is
displayed along with the distance between the listener and the Key Point.
If the Key Points are KEY 1 and KEY 2, the angle is displayed as ---°. However, this is not defined as the angle for KEY 1 and
KEY 2. An angle is displayed because the START KEY has the initial angle setting that is used at the start.
2 Room Shape and Size
You can shape the room by changing its aspect ratio. Use the mouse to drag the four corners of the room while in Position
View.
The aspect ratio of the room can also be changed by following the instructions in “3 SCALE” on page 6.
In the room size display, one unit equals one meter.
The size of the room can also be changed by following the instructions in “3 SCALE” on page 6.
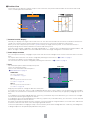
3 Path
The automation path is determined by three points.
These are called “Key Points.”
There is more information about the path in
“) AUTOMATION” on page 9.
START KEY
This is the start position.
See “START KEY” on page 9.
KEY 1
This is the point aimed at after the start.
See “KEY 1” on page 10.
KEY 2
This is the point aimed at after KEY 1.
See “KEY 2” on page 10.
Drag any of the points to change the direction of the path.
If you press the <Shift> key, a plus (+) sign is added beside the mouse cursor, and you can simultaneously select multiple
Key Points, the sound source or the listener. You can then move them all simultaneously as a group by dragging only one of
them.
If you drag the mouse while holding down the <Ctrl> key (<command> key on the Macintosh), you can move in a straight
line while still maintaining the angle to the listener.
If you drag the mouse while holding down the <Alt> key (<option> key on the Macintosh), you can move in a circle while still
maintaining the distance from the listener.
Any point can be placed outside the room. However, if you will actually be using automation, the sound source and listener
must move within the walls of the room, without going outside of them.
To move the path without changing its shape, select all the Key Points while holding down the <Shift> key, then drag them,
or drag a midpoint on the path displayed between two points.
5
5
4
4
2
1
2
3
1
START KEY
KEY 1
KEY 2

5
4 Sound Source
You can change the position and orientation of the sound source.
However, orientation is not displayed for an omni directional sound source.
(For information about directivity, see the “DIRECT.CHARACTER/[SRC TYPE] Knob” on page 6.)
Changing the Position and Orientation of the Sound Source
If you press the <Shift> key, a plus (+) sign is added beside the mouse cursor, and you can simultaneously select multiple Key Points,
the sound sources or listener. You can then move them all simultaneously as a group by dragging only one of them.
If you drag the mouse while holding down the <Ctrl> key (<command> key on the Macintosh), you can move in a straight line while still
maintaining the angle to the listener.
If you drag the mouse while holding down the <Alt> key (<option> key on the Macintosh), you can move in a circle while still
maintaining the distance to the listener.
The sound source cannot be placed outside the room.
For information about changing the position and orientation of the sound source, see “4 SOUND SOURCE” on page 6.
5 Listener
You can change the position and orientation of the listener.
Changing the Position and Orientation of the Listener
If you press the <Shift> key, a plus (+) sign is added beside the mouse cursor, and you can simultaneously select multiple Key Points,
the sound source or the listener. You can then move them all simultaneously as a group by dragging only one of them.
If you drag the mouse while holding down the <Ctrl> key (<command> key on the Macintosh), you can move in a straight line while still
maintaining the angle to the sound source.
If you drag the mouse while holding down the <Alt> key (<option> key on the Macintosh), you can move in a circle while still
maintaining the distance to the sound source.
The listener cannot be placed outside the room.
For information about changing the position and orientation of the listener, see “5 LISTENER” on page 7.
2 MARK
You can record and display Key Points, the sound source, or listener.
The recorded location is displayed with a plus (+) symbol.
However, the Mark information is erased when the editor is closed.
Furthermore, if multiple Room ER effects are running, the Mark information is shared, and each reflects the other.
[STORE] Button
Records the position of the selected Key Point, sound source, or listener.
When you press this button, it causes the buttons [1] through [10] to blink. Record the object by selecting the button where
you want to record it.
[1] through [10] Buttons
Press one of these buttons after pressing the [STORE] button records the position of the selected Key Point, sound source,
or listener.
The buttons can be turned ON or OFF, but the plus (+) marks showing the recorded positions are displayed only when the
buttons are ON or the mouse is over the button.

6
3 SCALE
The scale settings are related to the size and
shape of the room.
[SCALE] Slider/[SCALE] Knob
Changes the size of the room.
The markings indicate the longer side length
of the room in meters.
SCALE Display
Displays the longer side length of the room in
meters.
You can change this value by double clicking
in the Room ER window, then typing a
number from the keyboard, or by dragging
vertically with the mouse.
ASPECT Display/[ASPECT] Knob
Changes the aspect ratio of the room.
You can change this value by double clicking in the Room ER window, then typing a number from the keyboard, or by
dragging vertically with the mouse.
4 SOUND SOURCE
Sets the position, orientation and directivity of the sound source.
Left/Right Position Display/[SRC L/R] Knob
Positions the sound source in the horizontal direction.
You can change this value by double clicking in the Room ER window, then typing a number from the keyboard, or by
dragging vertically with the mouse.
Front/Rear Position Display/[SRC F/R] Knob
Positions the sound source in the Front/Rear direction.
You can change this value by double clicking in the Room ER window, then typing a number from the keyboard, or by
dragging vertically with the mouse.
Orientation Display/[SRC DIR] Knob
Sets the orientation of the sound source.
You can change this value by double clicking in the Room ER window, then typing a number from the keyboard, or by
dragging vertically with the mouse.
DIRECTION MODE/[SRC MODE] Knob
These modes relate to the direction of the sound source when it has been shifted.
MANUAL: In this mode, the orientation does not change even if the sound source is shifted.
LIS: In this mode, the sound source is always oriented towards the listener.
FORWARD: In this mode the sound source is oriented in the direction of movement.
DIRECT.CHARACTER/[SRC TYPE] Knob
These modes relate to the directivity of the sound source.
OMNI: This mode is omnidirectional, and has no directivity.
WIDE: This mode has wide directivity.
NARROW: This mode has narrow directivity.

7
5 LISTENER
Sets the position and orientation of the listener.
Left/Right Position Display/[LIS L/R] Knob
Positions the listener in the Left/Right direction.
You can change this value by double clicking in the Room ER window, then typing a number from the keyboard, or by
dragging vertically with the mouse.
Front/Rear Position Display/[LIS F/R] Knob
Positions the listener in the Front/Rear direction.
You can change this value by double clicking in the Room ER window, then typing a number from the keyboard, or by
dragging vertically with the mouse.
Orientation Display/[LIS DIR] Knob
Sets the orientation of the listener.
You can change this value by double clicking in the Room ER window, then typing a number from the keyboard, or by
dragging vertically with the mouse.
DIRECTION MODE/[LIS MODE] Knob
These modes relate to the orientation of the listener when it has been shifted.
MANUAL: In this mode, the orientation does not change even if the listener is shifted.
SRC: In this mode, the listener is always oriented towards the sound source.
FORWARD: In this mode the listener is oriented in the direction of movement.
6 AIR ABSORPTION
This simulates the attenuation that occurs in the sound’s high frequency component when the sound source and listener are
separated.
[AIR ABSORPTION] Slider/[AIR ABS] Knob
Sets the Air Absorption.
AIR ABSORPTION Display
You can change this value by double clicking, then typing a number from the keyboard, or by dragging vertically with the
mouse.
Attenuation grows stronger as you increase the number entered here.

8
7 WALL CHARACTER
Sets characteristics for sound that is reflected from the walls.
Simulates the material of the walls.
Graph
Graphs the volume of the reflected sound and attenuation of its high frequency component.
If you move the cursor in the graph, a bending point (■) is displayed. You can edit the graph by dragging this point with the
mouse.
DELAY [ON] Button/[DELAY] Knob
Sets whether or not to include a delay time for the distance from the sound source to the listener.
This is normally ON, but when Room ER is being used for a surround mix in a composition, it will cause a deviation rhythm
with respect to other instruments, and should be turned OFF.
[REF] Display/[WALL REF] Knob
Adjusts the volume of reflected sound.
You can change this value by double clicking in the Room ER window, then typing a number from the keyboard, or by
dragging vertically with the mouse.
[LPF] Display/[REF LPF] Knob
Adjusts attenuation of the high frequency component of the reflected sound.
You can change this value by double clicking in the Room ER window, then typing a number from the keyboard, or by
dragging vertically with the mouse.
8 SURROUND MODE
Sets surround characteristics.
SURROUND MODE Display
When the surround mode is 6.1, “6.1” is displayed. “3-1” is displayed for 3-1 surround, and “5.1” is displayed for all others.
[DIV] Knob/[DIV F] Knob
Sets right and left for the front center signal, along with the percentage sent to the center channel.
When the surround mode is 6.1, [DIV.F] is displayed. For all others, [DIV] is displayed.
[DIV.F] is always displayed in the Generic Editor window and console.
DIV/DIV F Display
Sets the DIV/DIV F value.
You can change this value by double clicking, then typing a number from the keyboard, or by dragging vertically with the
mouse.
If the setting is zero, only L/R is used. If 50 is set, the ratio between L/R and the center will be 50:50. When 100 is set, the
signal will go to the center channel only.
[DIV R] Knob
Sets right and left for the rear center signal, along with the percentage sent to the center channel.
This is displayed in the Room ER window only when Surround Mode is 6.1. Otherwise it will be grayed out.

9
DIV R Display
Sets the DIV R value.
You can change this value by double clicking, then typing a number from the keyboard, or by dragging vertically with the
mouse.
If the setting is zero, only L/R is used. If 50 is set, the ratio between L/R and the center will be 50:50. When 100 is set, the
signal will go to the center channel only.
[LINK] Button/[F/R LINK] Knob
Links DIV R to the DIV F value.
When the two are linked, the DIV R value will be the same as the DIV F.
This is displayed in the Room ER window only when Surround Mode is 6.1 . Otherwise it will be grayed out.
9 CURRENT TIME Display
Displays the Timecode. This cannot be edited.
If it is in offline mode or the Clock Reference setting is MIDI CLOCK, 00:00:00.00 will always be displayed.
) AUTOMATION
Settings related to Automation.
AUTOMATION Button/[AUTO] Knob
SRC: Moves the sound source along a path.
LIS: Moves the listener along a path.
OFF: Turns OFF Automation. No path is displayed.
START KEY
Left/Right Position Display
Positions the START KEY in the Left/Right direction.
You can change this value by double clicking, then typing a number from the keyboard, or by dragging vertically with the mouse.
Front/Rear Position Display
Positions the START KEY in the Front/Rear direction.
You can change this value by double clicking, then typing a number from the keyboard, or by dragging vertically with the mouse.
Orientation Display/[INI.DIR] Knob
Orientation at the start.
You can change this value by double clicking, then typing a number from the keyboard, or by dragging vertically with the mouse.
[S] Button
Sets the displayed Current Time as the Timecode for the START KEY.
This button is disabled if it is in offline mode or the Clock Reference setting is MIDI CLOCK.
START TIME CODE
The Timecode for the START KEY.
You can change this value by double clicking, then typing a number from the keyboard, or by dragging vertically with the mouse.

10
KEY 1
Left/Right Value Display
The KEY 1 position in the Left/Right direction.
You can change this value by double clicking, then typing a number from the keyboard, or by dragging vertically with the mouse.
Front/Back Position Display
The KEY 1 position in the Front/Rear direction.
You can change this value by double clicking, then typing a number from the keyboard, or by dragging vertically with the mouse.
[1] Button
Sets the displayed Current Time as the Timecode for KEY 1.
This button is disabled if it is in offline mode or the Clock Reference setting is MIDI CLOCK.
DELTA/[KEY1FRM] Knob
The difference between the START KEY Timecode and the KEY 1 Timecode.
You can change this value by double clicking in the Room ER window, then typing a number from the keyboard, or by dragging
vertically with the mouse.
KEY1 TIME CODE
The Timecode for KEY 1.
You can change this value by double clicking, then typing a number from the keyboard, or by dragging vertically with the mouse.
KEY 2
Left/Right Value Display
The KEY 2 position in the Left/Right direction.
You can change this value by double clicking, then typing a number from the keyboard, or by dragging vertically with the mouse.
Front/Back Position Display
The KEY 2 position in the Front/Rear direction.
You can change this value by double clicking, then typing a number from the keyboard, or by dragging vertically with the mouse.
[2] Button
Sets the displayed Current Time as the Timecode for KEY 2.
This button is disabled if it is in offline mode or the Clock Reference setting is MIDI CLOCK.
DELTA/[KEY2FRM] Knob
The difference between the KEY 1 Timecode and the KEY 2 Timecode.
If zero is set, KEY 2 is not displayed.
You can change this value by double clicking in the Room ER window, then typing a number from the keyboard, or by dragging
vertically with the mouse.
KEY2 TIME CODE
The Timecode for KEY 2.
You can change this value by double clicking, then typing a number from the keyboard, or by dragging vertically with the mouse.
END KEY
Settings related to the Automation end point.
DELTA/[FRM LEN] Knob
The difference between the KEY 2 Timecode and the END KEY Timecode.
[FRM LEN] is the difference between Timecode for the START KEY and the END KEY.
You can change this value by double clicking, then typing a number from the keyboard, or by dragging vertically with the mouse.
END KEY TIME CODE
The Timecode for the END KEY.
You can change this value by double clicking in the Room ER window, then typing a number from the keyboard, or by dragging
vertically with the mouse.
[E] Button
Sets the displayed Current Time as the Timecode for the END KEY.

11
! PLAYBACK MODE Button/[PB MODE] Knob
ONCE: Move to KEY 2 and finish.
GO&REV: Move to KEY 2. After stopping there for the Timecode amount set for the END KEY DELTA, go back to the
START KEY. After moving to the START KEY, this repeats the operation of going KEY 1 → KEY 2 and returning, just as
was done at the start.
LOOP: Move from KEY 2 to the START KEY, and loop from there.
@ TRANSPORT BAR
RTZ: Return automation object (sound source or listener) to the start position.
STOP: Turn OFF Automation.
PLAY: Start Automation.
SMOOTH [ON] Button/[SMOOTH] Knob
An ON/OFF switch for switching between sharp angles for the path and smooth angles.
Tur ning this ON smooths the angles.
TC TRG [ON] Button
An ON/OFF switch that sets whether automation starts automatically when the START KEY Timecode is satisfied.
# [JOYSTICK] Knob
Settings related to JOYSTICK on the console.
SRC: Moves the sound source.
LIS: Moves the listener.
OFF: Turns OFF JOYSTICK.
-
 1
1
-
 2
2
-
 3
3
-
 4
4
-
 5
5
-
 6
6
-
 7
7
-
 8
8
-
 9
9
-
 10
10
-
 11
11


Yamaha AE041 Instrukcja obsługi
- Typ
- Instrukcja obsługi
- Ten podręcznik jest również odpowiedni dla
w innych językach
- čeština: Yamaha AE041 Návod k obsluze
- español: Yamaha AE041 El manual del propietario
- italiano: Yamaha AE041 Manuale del proprietario
- Deutsch: Yamaha AE041 Bedienungsanleitung
- svenska: Yamaha AE041 Bruksanvisning
- português: Yamaha AE041 Manual do proprietário
- français: Yamaha AE041 Le manuel du propriétaire
- Türkçe: Yamaha AE041 El kitabı
- English: Yamaha AE041 Owner's manual
- dansk: Yamaha AE041 Brugervejledning
- русский: Yamaha AE041 Инструкция по применению
- suomi: Yamaha AE041 Omistajan opas
- Nederlands: Yamaha AE041 de handleiding
- română: Yamaha AE041 Manualul proprietarului
Powiązane dokumenty
-
Yamaha AE041 Instrukcja obsługi
-
-
-
Yamaha V3 Instrukcja obsługi
-
-
-
Yamaha PLG150 Instrukcja obsługi
-
-
-