Whirlpool MBM 1522/HA instrukcja
- Kategoria
- Lodówko-zamrażarki
- Typ
- instrukcja

I
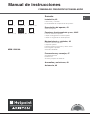
Istruzioni per luso
COMBINATO FRIGORIFERO/CONGELATORE
Italiano, 1 Français, 21
Espanol, 41Deutsch, 31
English,11
GBI F
ED
MBM 1522/HA
Sommario
Installazione, 2
Posizionamento e collegamento
Reversibilità apertura porte
Descrizione dellapparecchio, 3
Vista dinsieme
Avvio e utilizzo, 4-5
Avviare lapparecchio
Utilizzare al meglio il frigorifero
Utilizzare al meglio il congelatore
Manutenzione e cura, 6
Escludere la corrente elettrica
Pulire lapparecchio
Evitare muffe e cattivi odori
Sbrinare lapparecchio
Sostituire la lampadina
Precauzioni e consigli, 7
Sicurezza generale
Smaltimento
Risparmiare e rispettare lambiente
Anomalie e rimedi, 8
Assistenza, 9
Assistenza attiva 7 giorni su 7
Polski, 51
PL

2
I
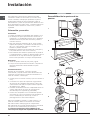
Installazione
1
2
3
4
5
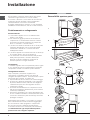
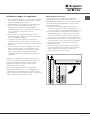
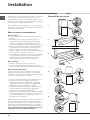
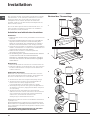
Reversibilità apertura porte
! È importante conservare questo libretto per poterlo
consultare in ogni momento. In caso di vendita,
di cessione o di trasloco, assicurarsi che resti insieme
allapparecchio per informare il nuovo proprietario
sul funzionamento e sui relativi avvertimenti.
! Leggere attentamente le istruzioni: ci sono importanti
informazioni sullinstallazione, sulluso e sulla sicurezza.
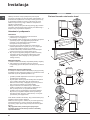
Posizionamento e collegamento
Posizionamento
1. Posizionare lapparecchio in un ambiente ben
aerato e non umido.
2. Non ostruire le griglie posteriori di ventilazione:
compressore e condensatore emettono calore e
richiedono una buona aerazione per funzionare
bene e contenere i consumi elettrici.
3. Lasciare una distanza di almeno 10 cm tra la parte
superiore dellapparecchio ed eventuali mobili
sovrastanti e di almeno 5 cm tra le fiancate e
mobili/pareti laterali.
4. Lasciare lapparecchio lontano da fonti di calore (la
luce solare diretta, una cucina elettrica).
5. Per mantenere una ottimale distanza del prodotto
dalla parete posteriore, montare i distanzieri
presenti nel kit di installazione seguendo le
istruzioni presenti sul foglio dedicato.
Livellamento
1. Installare lapparecchio su un pavimento piano e rigido.
2. Se il pavimento non fosse perfettamente orizzontale,
compensare svitando o avvitando i piedini anteriori.
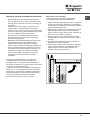
Collegamento elettrico
Dopo il trasporto, posizionare lapparecchio
verticalmente e attendere almeno 3 ore prima di
collegarlo allimpianto elettrico. Prima di inserire la spina
nella presa della corrente, accertarsi che:
la presa abbia la messa a terra e sia a norma di legge;
la presa sia in grado di sopportare il carico massimo
di potenza della macchina, indicato nella targhetta
caratteristiche posta nel vano frigorifero in basso
a sinistra (es 150 W);
la tensione di alimentazione sia compresa nei valori
indicati nella targhetta caratteristiche, posta in basso
a sinistra (es 220-240 V);
la presa sia compatibile con la spina dellapparecchio.
In caso contrario richiedere la sostituzione della spina
a un tecnico autorizzato (vedi Assistenza); non usare
prolunghe e multiple.
! Ad apparecchio installato, il cavo elettrico e la presa
della corrente devono essere facilmente raggiungibili.
! Il cavo non deve subire piegature o compressioni.
! Il cavo deve essere controllato periodicamente
e sostituito solo da tecnici autorizzati (vedi Assistenza).
! Lazienda declina ogni responsabilità qualora
queste norme non vengano rispettate.
∅ 3
mm

I
3
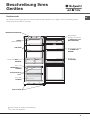
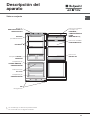
Descrizione
dellapparecchio
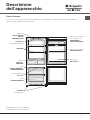
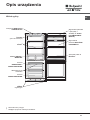
Vista dinsieme
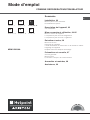
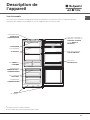
Le istruzioni sulluso valgono per diversi modelli per cui è possibile che la figura presenti particolari differenti
rispetto a quelli dellapparecchio acquistato.
Balconcino estraibile
con coperchio con
PORTAUOVA e
SCATOLA BURRO
*
Balconcino estraibile
PORTAOGGETTI
Balconcino
BOTTIGLIE
Manopola
REGOLAZIONE
DELLA
TEMPERATURA
Lampadina
(vedi Manutenzione)
RIPIANO
Cassetto
FRUTTA e
VERDURA
Vano
CONGELAMENTO e
CONSERVAZIONE
Vano
CONSERVAZIONE
PIEDINO
di regolazione
*
Available only on certain models.
Variabili per numero e/o posizione
Bacinella ghiaccio
Ice Care

4
I
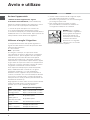
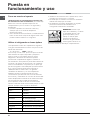
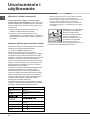
Avvio e utilizzo
Avviare lapparecchio
! Prima di avviare lapparecchio, seguire
le istruzioni sullinstallazione (vedi Installazione).
! Prima di collegare lapparecchio pulire bene i vani e
gli accessori con acqua tiepida e bicarbonato.
1. Inserire la spina nella presa e accertarsi che
si accenda la lampada di illuminazione interna.
2. Ruotare la manopola per LA REGOLAZIONE DELLA
TEMPERATURA su un valore medio. Dopo qualche ora
sarà possibile inserire alimenti nel frigorifero.
Utilizzare al meglio il frigorifero
La temperatura all'interno del reparto frigorifero si
regola automaticamente in base alla posizione della
manopola del termostato.
1 = meno freddo
MAX = più freddo
Si consiglia, comunque, una posizione media
Per aumentare lo spazio e disposizione e migliorare
l'aspetto estetico, questo apparecchio ha la "parte
raffreddante" posizionata all'interno della parete
posteriore del reparto frigo. Tale parete, durante il
funzionamento, si presenterà coperta di brina, oppure
di goccioline di acqua a secondo se il compressore è
in funzione o in pausa. Non preoccupatevi di questo!
Il frigorifero sta lavorando in modo normale.
Se si imposta la manopola per LA REGOLAZIONE
DELLA TEMPERATURA su valori alti, con grossi
quantitativi di alimenti e con una temperatura
ambiente elevata, lapparecchio può funzionare di
continuo, favorendo uneccessiva formazione di brina
ed eccessivi consumi elettrici: ovviare spostando la
manopola verso i valori più bassi (verrà effettuato uno
sbrinamento automatico).
Negli apparecchi statici laria circola in modo naturale:
quella più fredda tende a scendere perché più
pesante. Ecco come sistemare gli alimenti:
Cibo Disposizione nel frigorifero
'EVRIITIWGITYPMXS 7STVEMGEWWIXXMJVYXXEIZIVHYVE
*SVQEKKMJVIWGLM 7STVEMGEWWIXXMJVYXXEIZIVHYVE
'MFMGSXXM 7YUYEPWMEWMVMTMERS
7EPEQMTERIMR
GEWWIXXEGMSGGSPEXE
7YUYEPWMEWMVMTMERS
*VYXXEIZIVHYVE 2IMGEWWIXXMJVYXXEIZIVHYVE
9SZE 2IPPkETTSWMXSFEPGSRGMRS
&YVVSIQEVKEVMRE 2IPPkETTSWMXSFEPGSRGMRS
&SXXMKPMIFMFMXIPEXXI 2IKPMETTSWMXMFEPGSRGMRM
1
2
Inserire soltanto alimenti freddi o appena tiepidi,
non caldi (vedi Precauzioni e consigli).
Ricordarsi che gli alimenti cotti non si mantengono
più a lungo di quelli crudi.
Non inserire liquidi in recipienti scoperti:
provocherebbero un aumento di umidità con
conseguente formazione di condensa.
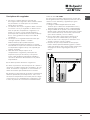
RIPIANI: pieni o a griglia.
Sono estraibili e regolabili in
altezza grazie alle apposite
guide (vedi figura), per
linserimento di contenitori
o alimenti di notevole
dimensione. Per regolare
laltezza non è necessario
estrarre completamente il ripiano.

I
5
WATER LEVEL
MAX
WATER LEVEL
MAX
WATER LEVEL
MAX
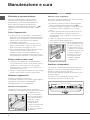
Utilizzare al meglio il congelatore
Non ricongelare alimenti che stanno per scongelare
o scongelati; tali alimenti devono essere cotti per
essere consumati (entro 24 ore).
Gli alimenti freschi da congelare non devono essere
posti a contatto con quelli già congelati; vanno
sistemati nel vano superiore CONGELAMENTO e
CONSERVAZIONE dove la temperatura scende sotto i
-18°C e garantisce una buona velocità di
congelamento.
Non mettere nel congelatore bottiglie di vetro
contenenti liquidi, tappate o chiuse ermeticamente,
perché potrebbero rompersi.
La quantità massima giornaliera di alimenti da
congelare è indicata sulla targhetta caratteristiche,
posta nel vano frigorifero in basso a sinistra (esempio:
Kg/24h 4).
Al fine di ottenere un spazio maggiore nel reparto
freezer potete togliere i cassetti dalle loro sedi
(tranne quello più in basso e leventuale cassetto
COOL CARE ZONE a temperatura variabile),
sistemando gli alimenti direttamente sulle piastre
evaporanti.
! Durante il congelamento evitare di aprire la porta.
! In caso di interruzione di corrente o di guasto, non
aprire la porta del congelatore: in questo modo
congelati e surgelati si conserveranno senza
alterazioni per circa 9-14 ore.
! Se per lungo tempo permane la temperatura
ambiente più fredda di 14°C, non si raggiungono
completamente le temperature necessarie per una
lunga conservazione nel reparto freezer e il periodo di
conservazione risulterà pertanto ridotto.
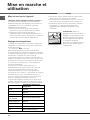
Bacinella ghiaccio Ice
Care.
Il fatto di essere poste sulla parte superiore dei
cassetti riposti nel vano freezer assicura una
maggiorepulizia: (il ghiaccio non viene più a contatto
con gli alimenti) ed ergonomia (non si sgocciola in
fase di caricamento).
1. Estrarre la bacinella spingendola verso lalto.
Verificare che la bacinella sia completamente
vuota e riempirla dacqua attraverso lapposito foro.
2. Fare attenzione a non superare il livello indicato
(MAX WATER LEVEL). Troppa acqua ostacola la
fuoriuscita dei ghiaccioli (se succede, attendere
che il ghiaccio si sciolga e svuotare la bacinella).
3. Ruotare la bacinella di 90°: lacqua riempie le forme
per il principio dei vasi comunicanti (vedi figura).
4. Chiudere il foro con il coperchio in dotazione e
riporre la bacinella.
5. Quando il ghiaccio sarà formato (tempo minimo
circa 8 ore) battere la bacinella su una superficie
dura e bagnarne lesterno per far staccare i
ghiaccioli; farli poi uscire dal foro.

6
I
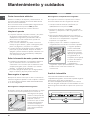
Manutenzione e cura
Escludere la corrente elettrica
Durante i lavori di pulizia e manutenzione è
necessario isolare lapparecchio dalla rete di
alimentazione staccando la spina dalla presa.
Non è sufficiente portare la manopola per la
regolazione della temperatura sulla posizione OFF
(apparecchio spento) per eliminare ogni contatto
elettrico.
Pulire lapparecchio
Le parti esterne, le parti interne e le guarnizioni in
gomma possono essere pulite con una spugnetta
imbevuta di acqua tiepida e bicarbonato di sodio o
sapone neutro. Non usare solventi, abrasivi,
candeggina o ammoniaca.
Gli accessori estraibili possono essere messi a
bagno in acqua calda e sapone o detersivo per
piatti. Sciacquarli e asciugarli con cura.
Il retro dellapparecchio tende a coprirsi di polvere,
che può essere eliminata utilizzando con
delicatezza, dopo aver spento l'apparecchio e
staccato la presa di corrente, la bocchetta lunga
dellaspirapolvere, impostato su una potenza media.
Evitare muffe e cattivi odori
Lapparecchio è fabbricato con materiali igienici
che non trasmettono odori. Per mantenere questa
caratteristica è necessario che i cibi vengano
sempre protetti e chiusi bene. Ciò eviterà anche
la formazione di macchie.
Nel caso si voglia spegnere lapparecchio per un lungo
periodo, pulire linterno e lasciare le porte aperte.
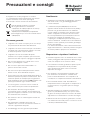
Sbrinare lapparecchio
! Attenersi alle istruzioni sottostanti.
Per sbrinare lapparecchio non usare oggetti taglienti
ed appuntiti che potrebbero danneggiare
irreparabilmente il circuito refrigerante.
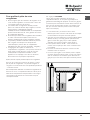
Sbrinare il vano frigorifero
Il frigorifero è dotato di sbrinamento automatico:
lacqua viene convogliata verso la parte posteriore da
un apposito foro di
scarico (vedi figura)
dove il calore prodotto
dal compressore la fa
evaporare. Lunico
intervento da fare
periodicamente
consiste nel pulire il foro
di scarico affinché
lacqua possa defluire
liberamente.
1 1
2
Sbrinare il vano congelatore
Se lo strato di brina è superiore ai 5 mm è necessario
effettuare lo sbrinamento manuale:
1. posizionare la manopola per LA REGOLAZIONE
DELLA TEMPERATURA nella posizione OFF.
2. Avvolgere surgelati e congelati in carta da giornale
e metterli in un altro congelatore o in un luogo
fresco.
3. Lasciare aperta la porta finché la brina non si sia
sciolta completamente; facilitare loperazione
sistemando nel vano congelatore contenitori con
acqua tiepida.
4. Pulire e asciugare con cura il vano congelatore
prima di riaccendere lapparecchio.
5. Alcuni apparecchi sono dotati del SISTEMA DRAIN
per convogliare lacqua
allesterno: lasciare che
l'acqua defluisca in un
contenitore (vedi figura)
6. Prima di inserire i cibi
nel vano congelatore
attendere circa 2 ore
per il ripristino delle
condizioni ideali di
conservazione.
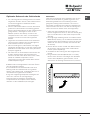
Sostituire la lampadina
Per sostituire la lampadina di illuminazione del vano
frigorifero, staccare la spina dalla presa di corrente.
Seguire le istruzioni riportate qui sotto.
Accedere alla lampada togliendo la protezione come
indicato in figura.
Sostituirla con una analoga di potenza a quella
indicata sulla protezione (15 W o 25 W).

I
7
Precauzioni e consigli
! Lapparecchio è stato progettato e costruito
in conformità alle norme internazionali di sicurezza.
Queste avvertenze sono fornite per ragioni
di sicurezza e devono essere lette attentamente.
Questa apparecchiatura è conforme
alle seguenti Direttive Comunitarie:
- 73/23/CEE del 19/02/73 (Bassa Tensione)
e successive modificazioni;
- 89/336/CEE del 03/05/89 (Compatibilità
Elettromagnetica) e successive modificazioni.
- 2002/96/CE.
Sicurezza generale
Lapparecchio è stato concepito per un uso di tipo
non professionale allinterno dellabitazione.
Lapparecchio deve essere usato per conservare e
congelare cibi, solo da persone adulte e secondo
le istruzioni riportate in questo libretto.
Lapparecchio non va installato allaperto,
nemmeno se lo spazio è riparato, perché è molto
pericoloso lasciarlo esposto a pioggia e temporali.
Non toccare lapparecchio a piedi nudi o con le
mani o i piedi bagnati o umidi.
Non toccare le parti interne raffreddanti: cè
pericolo di ustionarsi o ferirsi.
Non staccare la spina dalla presa della corrente
tirando il cavo, bensì afferrando la spina.
È necessario staccare la spina dalla presa prima di
effettuare operazioni di pulizia e manutenzione. Non è
sufficiente portare le manopole per la regolazione
della temperatura sulla posizione OFF (apparecchio
spento) per eliminare ogni contatto elettrico.
In caso di guasto, in nessun caso accedere ai
meccanismi interni per tentare una riparazione.
Non utilizzare, allinterno degli scomparti
conservatori di cibi congelati, utensili taglienti ed
appuntiti o apparecchi elettrici se non sono del tipo
raccomandato dal costruttore.
Non mettere in bocca cubetti appena estratti dal
congelatore.
Non permettere ai bambini di giocare con
lapparecchio. In nessun caso devono sedersi sui
cassetti o appendersi alla porta.
Gli imballaggi non sono giocattoli per bambini.
Smaltimento
Smaltimento del materiale di imballaggio: attenersi
alle norme locali, così gli imballaggi potranno
essere riutilizzati.
La direttiva Europea 2002/96/CE sui rifiuti di
apparecchiature elettriche ed elettroniche (RAEE),
prevede che gli elettrodomestici non debbano
essere smaltiti nel normale flusso dei rifiuti solidi
urbani. Gli apparecchi dismessi devono essere
raccolti separatamente per ottimizzare il tasso di
recupero e riciclaggio dei materiali che li
compongono ed impedire potenziali danni per la
salute e lambiente. Il simbolo del cestino barrato è
riportato su tutti i prodotti per ricordare gli obblighi
di raccolta separata.
Per ulteriori informazioni, sulla corretta dismissione
degli elettrodomestici, i detentori potranno rivolgersi
al servizio pubblico preposto o ai rivenditori.
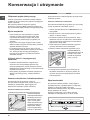
Risparmiare e rispettare lambiente
Installare lapparecchio in un ambiente fresco e ben
aerato, proteggerlo dallesposizione diretta ai raggi
solari, non disporlo vicino a fonti di calore.
Per introdurre o estrarre gli alimenti, aprire le porte
dellapparecchio il più brevemente possibile.
Ogni apertura delle porte causa un notevole
dispendio di energia.
Non riempire con troppi alimenti lapparecchio:
per una buona conservazione, il freddo deve
poter circolare liberamente. Se si impedisce la
circolazione, il compressore lavorerà continuamente.
Non introdurre alimenti caldi: alzerebbero la
temperatura interna costringendo il compressore a
un grosso lavoro, con grande spreco di energia
elettrica.
Sbrinare lapparecchio qualora si formasse del
ghiaccio (vedi Manutenzione); uno spesso strato
di ghiaccio rende più difficile la cessione di freddo
agli alimenti e fa aumentare il consumo di energia.
Mantenere efficienti e pulite le guarnizioni, in modo
che aderiscano bene alle porte e non lascino uscire
il freddo (vedi Manutenzione).

8
I
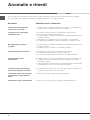
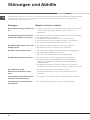
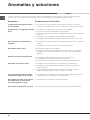
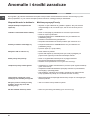
Anomalie e rimedi
Può accadere che lapparecchio non funzioni. Prima di telefonare allAssistenza (vedi Assistenza), controllare
che non si tratti di un problema facilmente risolvibile aiutandosi con il seguente elenco.
Possibili cause / Soluzione:
La spina non è inserita nella presa della corrente o non abbastanza
da fare contatto, oppure in casa non cè corrente.
Le porte non chiudono bene o le guarnizioni sono rovinate.
Le porte vengono aperte molto spesso.
La manopola per LA REGOLAZIONE DELLA TEMPERATURA non è in
posizione corretta
Il frigorifero o il congelatore sono stati riempiti eccessivamente.
La temperatura ambiente di lavoro del prodotto è inferiore a 14°C.
La manopola per LA REGOLAZIONE DELLA TEMPERATURA non è in
posizione corretta.
Gli alimenti sono a contatto con la parete posteriore.
La porta non è ben chiusa o viene aperta di continuo.
La temperatura dellambiente esterno è molto alta.
Lo spessore della brina supera i 2-3 mm (vedi Manutenzione).
Lapparecchio non è stato installato ben in piano (vedi Installazione).
Lapparecchio è stato installato tra mobili o oggetti che vibrano
ed emettono rumori.
Il gas refrigerante interno produce un leggero rumore anche quando
il compressore è fermo: non è un difetto, è normale.
Le temperature elevate sono necessarie per evitare la formazioni di
condensa in particolari zone del prodotto
Si tratta del normale funzionamento del prodotto.
Il foro di scarico dellacqua è otturato (vedi Manutenzione).
Anomalie:
La lampada di illuminazione
interna non si accende.
Il frigorifero e il congelatore
raffreddano poco.
Nel frigorifero gli alimenti
si gelano.
Il motore funziona di continuo.
Lapparecchio emette
molto rumore.
La temperatura di alcune parti
esterne del frigorifero è elevata.
La parete in fondo alla cella frigo
presenta brina o goccioline di
acqua.
Sul fondo del frigo cè dellacqua.

I
9
Assistenza
9
Prima di contattare lAssistenza:
Verificare se lanomalia può essere risolta autonomamente (vedi Anomalie e Rimedi).
In caso negativo, contattare il Numero Unico Nazionale 199.199.199.
Comunicare:
il tipo di anomalia
il modello della macchina (Mod.)
il numero di serie (S/N)
Queste informazioni si trovano
sulla targhetta caratteristiche posta
nel vano frigorifero in basso a sinistra.
Assistenza Attiva 7 giorni su 7
Se nasce il bisogno di assistenza o manutenzione basta chiamare il Numero Unico Nazionale
199.199.199* .
Un operatore sarà a tua completa disposizione per fissare un appuntamento con un tecnico del Centro
Assistenza Autrorizzato più vicino a casa tua.
È attivo 7 giorni su 7, sabato e domenica compresi, e non lascia mai inascoltata una richiesta.
*Al costo di 14,25 centesimi di Euro al minuto(iva inclusa) dal Lun. al Ven. dalle 08:00 alle 18:30, il Sab. dalle
08:00 alle 13:00 e di 5,58 centesimi di Euro al minuto (iva inclusa) dal Lun. al Ven. dalle 18:30 alle 08:00, il Sab.
dalle 13:00 alle 08:00 e i giorni festivi, per chi chiama da telefono fisso.
Per chi chiama da radiomobile le tariffe sono legate al piano tariffario delloperatore telefonico utilizzato.
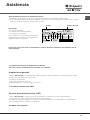
Mod.
RG 2330
TI
Cod.
93139180000 S/N 704211801
220 - 240 V- 50 Hz 150 W
W
Fuse
A
Max 15 w
Total
Gross
Bruto
Brut
Compr.
Kompr.
Syst.
R 134 a
kg 0,090
Gross
Bruto
Brut
340
Net
Util
Utile
Gross
Bruto
Brut
Freez. Capac
Poder de Cong
75
Made in Italy 13918
Test
P.S-I.
Pressure
HIGH-235
LOW 140
kg/24 h
4,0
Class
Clase
N
Classe
modello
numero di serie

10
I
195071070.00
05/2008 - Xerox Business Services

GB
REFRIGERATOR/FREEZER COMBINATION
Contents
Installation, 12
Positioning and connection
Reversible doors
Description of the appliance, 13
Overall view
Start-up and use, 14-15
Starting the appliance
Using the refrigerator to its full potential
Using the freezer to its full potential
Maintenance and care, 16
Switching the appliance off
Cleaning the appliance
Avoiding mould and unpleasant odours
Defrosting the appliance
Replacing the light bulb
Precautions and tips, 17
General safety
Disposal
Respecting and conserving the environment
Troubleshooting, 18
Assistance, 19
Operating Instructions
Italiano, 1 Français, 21English,11
GBI F
Espanol, 41Deutsch, 31
ED
MBM 1522/HA
Polski, 51
PL

12
GB
Installation
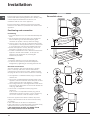
Reversible doors
! Before placing your new appliance into operation
please read these operating instructions carefully. They
contain important information for safe use, for
installation and for care of the appliance.
! Please keep these operating instructions for future
reference. Pass them on to possible new owners of the
appliance.
Positioning and connection
Positioning
1. Place the appliance in a well-ventilated humidity-free
room.
2. Do not obstruct the rear fan grills. The compressor
and condenser give off heat and require good
ventilation to operate correctly and save energy.
3. Leave a space of at least 10 cm between the top part
of the appliance and any furniture above it, and at least
5 cm between the sides and any furniture/side walls.
4. Ensure the appliance is away from any sources of
heat (direct sunlight, electric stove, etc.).
5. In order to maintain the correct distance between the
appliance and the wall behind it, fit the spacers
supplied in the installation kit, following the
instructions provided.
Levelling
1. Install the appliance on a level and rigid floor.
2. If the floor is not perfectly horizontal, adjust the
refrigerator by tightening or loosening the front feet.
Electrical connections
After the appliance has been transported, carefully
place it vertically and wait at least 3 hours before
connecting it to the electricity mains. Before inserting
the plug into the electrical socket ensure the following:
The appliance is earthed and the plug is compliant
with the law.
The socket can withstand the maximum power of the
appliance, which is indicated on the data plate located
on the bottom left side of the fridge (e.g. 150 W).
The voltage must be in the range between the values
indicated on the data plate located on the bottom left
side (e.g. 220-240V).
The socket is compatible with the plug of the
appliance.
If the socket is incompatible with the plug, ask an
authorised technician to replace it (see Assistance).
Do not use extension cords or multiple sockets.
! Once the appliance has been installed, the power
supply cable and the electrical socket must be easily
accessible.
! The cable must not be bent or compressed.
! The cable must be checked regularly and replaced by
authorised technicians only (see Assistance).
! The manufacturer declines any liability should
these safety measures not be observed.
1
2
3
4
5
∅ 3
mm

GB
13
Description of the
appliance
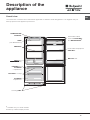
Overall view
The instructions contained in this manual are applicable to different model refrigerators. The diagrams may not
directly represent the appliance purchased.
*
Available only on certain models.
Varies by number and/or position.
Removable lidded
shelf with EGG TRAY
and BUTTER DISH
*
Removable multipurpose
SHELVES
BOTTLE shelf
TEMPERATURE
CONTROL
LAMP
(see Maintenance)
SHELVES
FRUIT and
VEGETABLE VEGETABLE
VEGETABLE VEGETABLE
VEGETABLE bin
FREEZER and
STORAGE
compartment
STORAGE
compartment
Levelling FEET
ICE CARE ice tray

14
GB
Start-up and use
1
2
Starting the appliance
! Before starting the appliance, follow the
installation instructions (see Installation).
! Before connecting the appliance, clean the
compartments and accessories well with lukewarm
water and bicarbonate.
1. Insert the plug into the socket and ensure that the
internal light illuminates.
2. Turn the TEMPERATURE ADJUSTMENT knob to an
average value. After a few hours you will be able to
put food in the refrigerator.
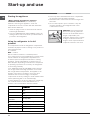
Using the refrigerator to its full
potential
The temperature inside the refrigerator compartment
automatically adjusts itself according to the position of
the thermostat knob.
1 = warmest
MAX = coldest
We recommend, however, a medium position.
The cooling section of the refrigerator is located inside
the back wall of the refrigerator compartment for
increased space and improved aesthetics. During
operation, the back wall will be covered in frost or
water droplets depending on whether the compressor
is operating or paused. Do not worry, the refrigerator
is functioning normally.
If the TEMPERATURE ADJUSTMENT knob has been
set on high values with large quantities of food and
with a high ambient temperature, the appliance can
operate continuously, resulting in excessive frost
formation and excessive energy consumption:
compensate for this by shifting the knob towards lower
values (defrosting will occur automatically).
In static appliances, the air circulates in a natural way:
the colder air tends to move downwards as it is
heavier. The food should be stored as follows:
Fresh fish and meat
Above the fruit and vegetable
bins
Fresh cheese
Above the fruit and vegetable
bins
Cooked food On any shelf
Salami, bread loaf,
chocolate
On any shelf
Fruit and vegetables In the fruit and vegetable bins
Eggs On the shelf provided
Butter and margarine On the shelf provided
Bottles, drinks, milk On the shelf provided
Place only cold or lukewarm foods in the compartment,
not hot foods (see Precautions and tips).
Remember that cooked foods do not last longer than
raw foods.
Do not store liquids in open containers. They will
increase humidity in the refrigerator and cause
condensation to form.
SHELVES: with or without grill.
Due to the special guides the
shelves are removable and the
height is adjustable (see
diagram), allowing easy storage
of large containers and food.
Height can be adjusted without
complete removal of the shelf.

GB
15
WATER LEVEL
MAX
WATER LEVEL
MAX
WATER LEVEL
MAX
Using the freezer to its full potential
Do not re-freeze food that is defrosting or that has
already been defrosted. These foods must be cooked
and eaten (within 24 hours).
Fresh food that needs to be frozen must not come into
contact with food that has already been defrosted.
Fresh food must be stored above the grill in the
freezer compartment and if possible be in direct
contact with the walls (side and rear), where the
temperature drops below -18°C and guarantees rapid
freezing.
Do not place glass bottles which contain liquids, and
which are corked or hermetically sealed in the freezer
because they could break.
The maximum quantity of food that may be frozen daily
is indicated on the plate containing the technical
properties located on the bottom left side of the
refrigerator compartment (for example: Kg/24h: 4)
In order to obtain a greater amount of space in the
freezer compartment, you may remove the bins
(except the lowest bin and the special COOL CARE
ZONE bin, which has an adjustable temperature)
and place the food directly onto the evaporator
plates.
! Do not open the door during freezing.
! If there is a power cut or malfunction, do not open the
freezer door. This will help maintain the temperature
inside the freezer, ensuring that foods are conserved for
at least 9 -14 hours.
! If the room temperature drops below 14°C for an
extended period of time, the ideal temperature will not be
reached in the freezer compartment and food
preservation will be reduced.
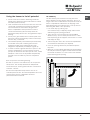
ICE CARE tray
The fact that they are situated on the top part of the
freezer drawers ensures greater cleanliness: the ice no
longer comes into contact with the food placed inside the
freezer compartment; furthermore, the dripping of the
water during filling is avoided (a lid to cover up the hole
after filling with water is also provided).
1. Pull out the tray by pushing it up.
Check that the tray is ompletely empty and fill it with
water through the opening provided.
2. Take care not to exceed the level indicated (MAX
WATER LEVEL). Excess water prevents the ice cubes
from dispensing (if this happens, wait for the ice to melt
and empty the tray).
3. Turn the tray 90°: due to the connected compartments
each mould fills with water (see diagram).
4. Close the opening with the lid provided and put the
tray back.
5. When the ice has formed (minimum time approximately
8 hours) knock the tray against a hard surface and wet
the outside so that the ice cubes come loose and take
them out through the opening.

16
GB
Maintenance and care
Switching the appliance off
During cleaning and maintenance it is necessary to
disconnect the appliance from the electricity supply.
It is not sufficient to set the temperature adjustment knobs
on OFF (appliance off) to eliminate all electrical contact.
Cleaning the appliance
The external and internal parts, as well as the rubber
seals may be cleaned using a sponge that has been
soaked in lukewarm water and bicarbonate of soda
or neutral soap. Do not use solvents, abrasive
products, bleach or ammonia.
The removable accessories may be soaked in warm
water and soap or dishwashing liquid. Rinse and dry
them carefully.
The back of the appliance may collect dust which
can be removed by delicately using the hose of a
vacuum cleaner set on medium power. The
appliance must be switched off and the plug must
be pulled out before cleaning the appliance.
Avoiding mould and unpleasant odours
The appliance is manufactured with hygienic
materials which are odour free. In order to maintain
an odour free refrigerator and to prevent the
formation of stains, food must always be covered or
sealed properly.
If you want to switch the appliance off for an
extended period of time, clean the inside and leave
the doors open.
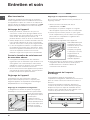
Defrosting the appliance
! Follow the instructions below.
Do not use objects with sharp or pointed edges to
defrost the appliance as these may damage the
refrigeration circuit beyond repair.
Defrosting the refrigerator compartment
The refrigerator has an automatic defrosting function:
water is ducted to the
back of the appliance by
a special discharge
outlet (see diagram)
where the heat produced
by the compressor
causes it to evaporate. It
is necessary to clean the
discharge hole regularly
so that the water can
flow out easily.
1 1
2
Defrosting the freezer compartment
If the frost layer is greater than 5 mm, it is necessary
to defrost manually:
1. Set the TEMPERATURE ADJUSTMENT knob to the
position
OFF
.
2. Wrap frozen foods in newspaper and place them in
another freezer or in a cool place.
3. Leave the door open until the frost has melted
completely. This can be made easier by placing
containers with lukewarm water in the freezer
compartment.
4. Certain appliances are fitted with the DRAIN
SYSTEM to lead the
water outside: let the
water flow into a
container (see diagram).
5. Clean and dry the freezer compartment carefully
before switching the appliance on again.
6. Wait for approximately 2 hours, i.e. until the ideal
storage conditions have been restored, before
placing food in the freezer compartment.
Replacing the light bulb
To replace the light bulb in the refrigerator
compartment, pull out the plug from the electrical
socket. Follow the instructions below.
Access the light bulb by removing the cover as
indicated in the diagram.
Replace it with a similar light bulb within the power
range indicated on the cover (15W or 25W).

GB
17
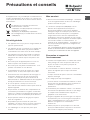
Precautions and tips
! The appliance was designed and manufactured in
compliance with international safety standards. The
following warnings are provided for safety reasons
and must be read carefully.
This appliance complies with the following
Community Directives:
- 73/23/EEC of 19/02/73 (Low Voltage) and
subsequent amendments;
-89/336/EEC of 03.05.89 (Electromagnetic
Compatibility) and subsequent amendments;
- 2002/96/CE..
General safety
The appliance was designed for domestic use inside
the home and is not intended for commercial or
industrial use.
The appliance must be used to store and freeze food
products by adults only and according to the
instructions in this manual.
The appliance must not be installed outdoors, even in
covered areas. It is extremely dangerous to leave the
appliance exposed to rain and storms.
Do not touch the appliance with bare feet or with wet or
moist hands and feet.
Do not touch the internal cooling elements: this
could cause skin abrasions or frost/freezer burns.
When unplugging the appliance always pull the plug
from the mains socket, do not pull on the cable.
Before cleaning and maintenance, always switch off the
appliance and disconnect it from the electrical supply.
It is not sufficient to set the temperature adjustment
knobs on OFF (appliance off) to eliminate all electrical
contact.
In the case of a malfunction, under no circumstances
should you attempt to repair the appliance yourself.
Repairs carried out by inexperienced persons may
cause injury or further malfunctioning of the appliance.
Do not use any sharp or pointed utensils or electrical
equipment - other than the type recommended by the
manufacturer - inside the frozen food storage
compartments.
Do not put ice cubes taken directly from the freezer into
your mouth.
Do not allow children to tamper with the controls or play
with the appliance. Under no circumstance should they
be allowed to sit on the bins or to hang from the door.
Keep packaging material out of the reach of children! It
can become a choking or suffocation hazard.
Disposal
Observe local environmental standards when
disposing packaging material for recycling
purposes.
The European Directive 2002/96/EC on Waste
Electrical and Electronic Equipment (WEEE),
requires that old household electrical appliances
must not be disposed of in the normal unsorted
municipal waste stream. Old appliances must be
collected separately in order to optimise the
recovery and recycling of the materials they contain
and reduce the impact on human health and the
environment. The crossed out wheeled bin
symbol on the product reminds you of your
obligation, that when you dispose of the appliance
it must be separately collected.
Consumers should contact their local authority or
retailer for information concerning the correct
disposal of their old appliance.
Respecting and conserving the
environment
Install the appliance in a fresh and well-ventilated
room. Ensure that it is protected from direct sunlight
and do not place it near heat sources.
Try to avoid keeping the door open for long periods
or opening the door too frequently in order to
conserve energy.
Do not fill the appliance with too much food:
cold air must circulate freely for food to be
preserved properly. If circulation is impeded, the
compressor will work continuously.
Do not place hot food directly into the refrigerator.
The internal temperature will increase and force the
compressor to work harder and will consume more
energy.
Defrost the appliance if ice forms (see
Maintenance). A thick layer of ice makes cold
transference to food products more difficult and
results in increased energy consumption.
Regularly check the door seals and wipe clean to
ensure they are free of debris and to prevent cold
air from escaping (see Maintenance).

18
GB
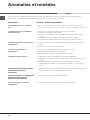
Troubleshooting
Malfunctions:
The internal light does not
illuminate.
The refrigerator and the freezer do
not cool well.
The food inside the refrigerator is
beginning to freeze.
The motor runs continuously.
The appliance makes a lot of noise.
Some of the external parts of the
refrigerator become hot.
The back wall of the refrigerator unit
is covered in frost or droplets of
water.
There is water at the bottom of the
refrigerator.
Possible causes / Solutions:
The plug has not been inserted into the electrical socket, or not far
enough to make contact, or there is no power in the house.
The doors do not close properly or the seals are damaged.
The doors are opened too frequently.
The TEMPERATURE ADJUSTMENT knob is not in the correct position
The refrigerator or the freezer have been over-filled.
The atmospheric temperature of the area surrounding the appliance is
lower than 14°C.
The TEMPERATURE ADJUSTMENT knob is not in the correct position.
The food is in contact with the back inside wall of the refrigerator.
The door is not closed properly or is continuously opened.
The outside ambient temperature is very high.
The thickness of the frost exceeds 2-3 mm (see Maintenance).
The appliance has not been installed on a level surface (see
Installation).
The appliance has been installed between cabinets that vibrate and
make noise.
The internal refrigerant makes a slight noise even when the
compressor is off. This is not a defect, it is normal.
These raised temperatures are necessary in order to avoid the
formation of condensation on certain parts of the product.
This shows the appliance is operating normally.
The water discharge hole is blocked (see Maintenance).

GB
19
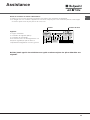
Assistance
Before calling for Assistance:
Check if the malfunction can be solved on your own (see Troubleshooting).
If after all the checks, the appliance still does not operate or the problem persists, call the nearest
Service Centre
Communicating:
type of malfunction
appliance model (Mod.)
serial number (S/N)
This information can be found on the data
plate located on the bottom left side of the
refrigerator compartment.
Never call on unauthorized technicians and always refuse spare parts which are not originals.
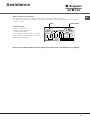
Mod.
RG 2330
TI
Cod.
93139180000 S/N 704211801
220 - 240 V- 50 Hz 150 W
W
Fuse
A
Max 15 w
Total
Gross
Bruto
Brut
Compr.
Kompr.
Syst.
R 134 a
kg 0,090
Gross
Bruto
Brut
340
Net
Util
Utile
Gross
Bruto
Brut
Freez. Capac
Poder de Cong
75
Made in Italy 13918
Test
P.S-I.
Pressure
HIGH-235
LOW 140
kg/24 h
4,0
Class
Clase
N
Classe
model serial number

20
GB
195071070.00
05/2008 - Xerox Business Services
Strona się ładuje...
Strona się ładuje...
Strona się ładuje...
Strona się ładuje...
Strona się ładuje...
Strona się ładuje...
Strona się ładuje...
Strona się ładuje...
Strona się ładuje...
Strona się ładuje...
Strona się ładuje...
Strona się ładuje...
Strona się ładuje...
Strona się ładuje...
Strona się ładuje...
Strona się ładuje...
Strona się ładuje...
Strona się ładuje...
Strona się ładuje...
Strona się ładuje...
Strona się ładuje...
Strona się ładuje...
Strona się ładuje...
Strona się ładuje...
Strona się ładuje...
Strona się ładuje...
Strona się ładuje...
Strona się ładuje...
Strona się ładuje...
Strona się ładuje...
Strona się ładuje...
Strona się ładuje...
Strona się ładuje...
Strona się ładuje...
Strona się ładuje...
Strona się ładuje...
Strona się ładuje...
Strona się ładuje...
Strona się ładuje...
Strona się ładuje...
-
 1
1
-
 2
2
-
 3
3
-
 4
4
-
 5
5
-
 6
6
-
 7
7
-
 8
8
-
 9
9
-
 10
10
-
 11
11
-
 12
12
-
 13
13
-
 14
14
-
 15
15
-
 16
16
-
 17
17
-
 18
18
-
 19
19
-
 20
20
-
 21
21
-
 22
22
-
 23
23
-
 24
24
-
 25
25
-
 26
26
-
 27
27
-
 28
28
-
 29
29
-
 30
30
-
 31
31
-
 32
32
-
 33
33
-
 34
34
-
 35
35
-
 36
36
-
 37
37
-
 38
38
-
 39
39
-
 40
40
-
 41
41
-
 42
42
-
 43
43
-
 44
44
-
 45
45
-
 46
46
-
 47
47
-
 48
48
-
 49
49
-
 50
50
-
 51
51
-
 52
52
-
 53
53
-
 54
54
-
 55
55
-
 56
56
-
 57
57
-
 58
58
-
 59
59
-
 60
60


Whirlpool MBM 1522/HA instrukcja
- Kategoria
- Lodówko-zamrażarki
- Typ
- instrukcja
w innych językach
- español: Whirlpool MBM 1522/HA Guía del usuario
- italiano: Whirlpool MBM 1522/HA Guida utente
- Deutsch: Whirlpool MBM 1522/HA Benutzerhandbuch
- français: Whirlpool MBM 1522/HA Mode d'emploi
- English: Whirlpool MBM 1522/HA User guide