
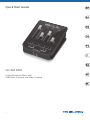
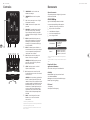
Quick Start Guide
GO XLR MINI
Online Broadcast Mixer with
USB/Audio Interface and Midas Preamp
V 1.0

About this document
This Quick Start Guide will help you set up, connect and begin
operating your GO XLR MINI.
GO XLR MINI App
The GO XLR app is REQUIRED to operate your GO XLR MINI.
GO XLR app key features include:
• • EQ, Compress and Gate your mic
• • Set up and dene mixer controls
• • Change product lighting
• • Direct access to product manuals
• • Access to TC Helicon support
* Windows is either a registered trademark or trademark of Microsoft Corporation in the
United States and/or other countries.
† Windows 10 operating system is recommended due to this system’s audio
re-mapping capabilities.
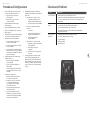
Driver, Application and
Firmware Download
www.tc-helicon.com/Categories/c/Tchelicon/Downloads
Get help!
YouTube Tutorials - https://www.youtube.com/channel/
UCLuCYhAAOD-wMQaXDNhvFbQ
Web Support - www.tc-helicon.com/brand/tchelicon/support
Discord - https://discord.gg/8Ebg3Sp
Follow us!
@helicongaming
www.instagram.com/helicongaming/
Minimum Hardware:
PC-based Hardware
-Core 2 DUO CPU
-Ethernet port
-1 GB RAM
Recommended Operating Systems:
Windows*
-Windows 7, 32-bit or 64-bit
-Windows 8, 32-bit or 64 bit
-Windows 10, 32-bit or 64-bit
†
1. Download and install the driver/application package.
You may be asked to reboot during this process:
a. https://www.tc-helicon.com/Categories/c/
Tchelicon/Downloads
b. In the “Product” row, scroll down and click on
“GO XLR MINI”.
2. When the driver and app install has completed,
close the application.
3. Connect GO XLR MINI via USB to your computer.
4. Wait for GO XLR MINI to power up (just a few seconds).
5. Re-open the GO XLR App.
6. The bottom corner of the GO XLR App window should say
“GO XLR MINI connected via USB”.
7. Open the Windows “Sound Settings” panel:
a. Under “Choose your output device”, choose “System
(TC-Helicon GO XLR MINI)”.
b. Under “Choose your input device”, choose “Chat Mic
(TC-Helicon GO XLR MINI)”.
c. These actions set your main Windows sound output
to the “System” fader (slider) on GO XLR MINI and
designate your XLR MIC INPUT or 3.5mm MIC input as
your main mic input.
8. For any chat applications like Discord, Skype, TeamSpeak,
In-game chat, etc.:
a. Pick “Chat Mic (TC-Helicon GoXLR Mini)”
as your INPUT device.
b. Pick “Chat (TC-Helcion GoXLR Mini)”
as your OUTPUT device.
c. These actions set your chat program’s volume control
to the “Chat” fader (slider) on GO XLR MINI.
9. For music, games or other applications:
a. On the Windows “Sound Settings” panel, click on
“Other Sound Options” at the bottom.
b. Make sure your game, music player, etc. is playing
audio. (You won’t see your program listed if it’s not
currently making any sound).
c. Find the program you’d like to assign to a fader (slider)
in the list.
d. Click the dropdown list to the right of the program
name, and choose the slider you’d like that program
to appear on. For example, you might pick “Music
(TC-Helicon GoXLR Mini)” for Spotify.
10. In your broadcast program, choose “Broadcast
Stream Mix (TC-Helicon GoXLR Mini)” as your ONLY
incoming audio device:
a. In OBS, go to File → Settings → Audio:
i. Choose “Broadcast Stream Mix (TC-Helicon
GoXLR Mini)” as your Mic/Auxiliary Audio Device.
ii. For ALL other devices, pick DISABLED.
b. In SLOBS, click on the cog wheel in the top right corner:
i. Click on Audio.
ii. Choose “Broadcast Stream Mix (TC-Helicon GoXLR
Mini” as your Mic/Auxiliarly Device 1.
iii. For ALL other audio devices, pick DISABLED.
c. In XSplit choose Tools → Settings → Audio:
i. Under Microphone, choose “Broadcast Stream
Mix (TC-Helicon GoXLR Mini)”.
ii. For Audio Preview and System
Sound choose NONE.
iii. You may get a warning popup. Click ok!
11. These steps should get you up and running. For all other
features, we have a great series of YouTube videos, an
active Discord community, full user manual and wonderful
support team. Please use the links in the Get Help! Section to
connect with us.
Setup StepsWelcome
3Quick Start Guide2 GO XLR MINI

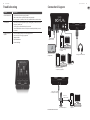
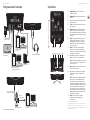
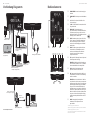
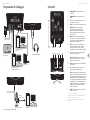
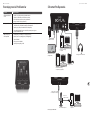
Troubleshooting Connection Diagram
Studio Vocal Mic
External Audio Device
(if applicable)
Gaming Headset with Mic
Dedicated Streaming
Computer (if applicable)
Gaming/Streaming
Computer
Gaming Console
ComputerBlue Yeti Microphone
Power via
USB (no audio)
Audio out to GO XLR
via headphone output
Blue Yeti Mic Recommended Connection
Problem Possible Solution
Excessive hum and noise • • Check to make sure all outlets are properly grounded.
• • Make sure audio cables are away from power adapters and power supplies
• • If necessary, purchase a “ground loop isolater” device (available from Amazon and other retailers).
I can’t hear my mic • • Ensure that you’ve gone through the Mic Setup steps, including picking “Condenser (24 V)” if your
mic requires “phantom power”.
• • Check to see that your mic mute button hasn’t been activated.
• • Connect EITHER an XLR OR a 3.5 mm mic. The XLR jack is automatically disabled when you connect
a 3.5 mm mic.
The App won’t connect to
my device
• • Close the GO XLR App by clicking on the “X” in the upper right corner.
• • Select “Exit” from the “Close App” pop-up window.
• • Unplug GO XLR MINI.
• • Plug GO XLR MINI back in.
• • Restart the GO XLR App.
5Quick Start Guide4 GO XLR MINI

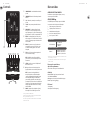
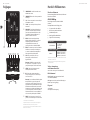
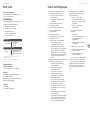
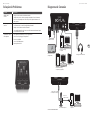
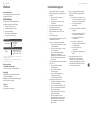
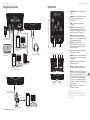
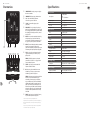
(1) CHANNEL FADERS - Control individual channel levels in
your mix.
(2) CHANNEL MUTE - Switches o the matching channel in
the mixer.
(3) !@#$* - Button lets you instantly censor and “bleep out”
your mic.
(4) “COUGH” - Mutes your microphone while the button
is held.
(5) XLR MIC INPUT - For audio input from professional
microphones. For condenser-style microphones that
require “phantom power”, go to the MIC tab in the GO XLR
app and activate the “Condenser” setting under MIC TYPE.
(6) LINE IN - For audio input from devices such as phones,
tablets, computers, etc. The LINE IN connection can also be
used in a “2 PC” streaming setup to send chat alerts back
into GO XLR MINI.
(7) LINE OUT - Contains an exact copy of your broadcast
stream audio. This connection can be used to connect
to a dedicated streaming computer or other devices
like speakers.
(8) USB - Input for PC connection, rmware updates and
remote control with GO XLR app.
NOTE: GO XLR MINI is designed for use with USB 2.0
ports. USB 3.0/3.1 ports can cause audio dropouts and
disconnections.
(9) OPTICAL - Input for connection to SONY PlayStation
†
or
Microsoft Xbox
‡
consoles.
(10) MIC - Input for connection to headset microphones.
Typically, this headset connection will be a pink connector.
NOTE: If you intend to use the popular Blue Yeti*
microphone, which has its own built-in headphone
output, you should run that built-in headphone output
into the GO XLR MINI’s MIC input. For Blue Yeti mics
powered via USB, plug the USB connector directly into
your computer for power, but do not select the Blue Yeti as
an audio source on the computer. Instead, the Blue Yeti’s
headphone output will be the audio source for mixing
inside GO XLR MINI.
(11) PHONES - Output jack for your headphones. Typically,
the headphone connector will be a green connector.
*Yeti is a registered trademark of Blue Microphones.
†PlayStation is a registered trademark or trademark of Sony Interactive Entertainment Inc.
SONY is a registered trademark of Sony Corporation.
‡Xbox is either a registered trademark or trademark of Microsoft Corporation in the United
States and/or other countries.
(5) (6) (7) (8) (9)
(11)(10)
(2) (3) (4)(1)
Controls
ACERCA DE ESTE DOCUMENTO
Esta Guía de inicio rápido lo ayudará a congurar, conectar y
comenzar a operar su GO XLR MINI.
GO XLR MINI App
Se REQUIERE la aplicación GO XLR para operar su GO XLR MINI.
Las características clave de la aplicación GO XLR incluyen:
• • Ecualiza, comprime y cancela tu micrófono
• • Congurar y denir controles de mezcla
• • Cambiar la iluminación del producto
• • Acceso directo a manuales de productos
• • Acceso al soporte de TC Helicon
* Windows es una marca comercial registrada o una marca comercial de Microsoft Corporation
en los Estados Unidos y / o en otros países.
† Se recomienda el sistema operativo Windows 10 debido a las capacidades de reasignación
de audio de este sistema.
Descarga de controladores,
aplicaciones y rmware
www.tc-helicon.com/Categories/c/Tchelicon/Downloads
Get help!
YouTube Tutorials - https://www.youtube.com/channel/
UCLuCYhAAOD-wMQaXDNhvFbQ
Web Support - www.tc-helicon.com/brand/tchelicon/support
Discord - https://discord.gg/8Ebg3Sp
Follow us!
@helicongaming
www.instagram.com/helicongaming/
Minimum Hardware:
PC-based Hardware
-Core 2 DUO CPU
-Ethernet port
-1 GB RAM
Recommended Operating Systems:
Windows*
-Windows 7, 32-bit or 64-bit
-Windows 8, 32-bit or 64 bit
-Windows 10, 32-bit or 64-bit
†
Bienvenidos
76 GO XLR MINI Quick Start Guide

1. Descargue e instale el paquete de controlador / aplicación.
Es posible que se le solicite que reinicie durante este proceso:
a. https://www.tc-helicon.com/Categories/c/
Tchelicon/Downloads
b. En la la "Producto", desplácese hacia abajo y haga
clic en "GO XLR MINI".
2. Cuando se haya completado la instalación del controlador
y la aplicación, cierre la aplicación.
3. Conecte el GO XLR MINI a través de USB a su computadora.
4. Espere a que GO XLR MINI se encienda (solo unos segundos).
5. Vuelva a abrir la aplicación GO XLR.
6. La esquina inferior de la ventana de la aplicación GO XLR
debe decir "GO XLR MINI conectado a través de USB".
7. Abra el panel "Conguración de sonido" de Windows:
a. En "Elija su dispositivo de salida", elija "Sistema
(TC-Helicon GO XLR MINI)".
b. En "Elija su dispositivo de entrada", elija "Chat Mic
(TC-Helicon GO XLR MINI)".
c. Estas acciones conguran la salida de sonido principal
de Windows en el fader (control deslizante) del
“Sistema” en el GO XLR MINI y designan su entrada XLR
MIC INPUT o 3.5mm MIC como su entrada principal de
micrófono.
8. Para cualquier aplicación de chat como Discord, Skype,
TeamSpeak, chat en el juego, etc.
a. Elija “Chat Mic (TC-Helicon GoXLR Mini)” como su
dispositivo de ENTRADA.
b. Elija "Chat (TC-Helcion GoXLR Mini)" como su
dispositivo de SALIDA.
c. Estas acciones conguran el control de volumen
de su programa de chat en el deslizador (deslizador)
"Chat" en el GO XLR MINI.
9. Para música, juegos u otras aplicaciones:
a. En el panel "Conguración de sonido" de Windows, haga
clic en "Otras opciones de sonido" en la parte inferior.
b. Asegúrese de que su juego, reproductor de música, etc.
esté reproduciendo audio. (No verá su programa en la
lista si actualmente no emite ningún sonido).
c. Busque el programa que le gustaría asignar a un fader
(deslizador) en la lista.
d. Haga clic en la lista desplegable a la derecha
del nombre del programa y elija el control deslizante
en el que desea que aparezca ese programa. Por ejemplo,
puede elegir "Música (TC-Helicon GoXLR Mini)" para Spotify.
10. En su programa de transmisión, elija "Broadcast Stream
Mix (TC-Helicon GoXLR Mini)" como su ÚNICO dispositivo
de audio entrante:
a. In OBS, go to File → Settings → Audio:
i. Elija "Broadcast Stream Mix (TC-Helicon
GoXLR Mini)" como su micrófono / dispositivo
de audio auxiliar.
ii. Para TODOS los demás dispositivos,
elija DISABLED.
b. En SLOBS, haga clic en la rueda dentada en la esquina
superior derecha:
i. Haga clic en Audio.
ii. Elija “Broadcast Stream Mix (TC-Helicon
GoXLR Mini”) como su dispositivo de micrófono
/ auxiliar 1.
iii. Para TODOS los demás dispositivos de audio,
elija DISABLED.
c. In XSplit choose Tools → Settings → Audio:
i. En Micrófono, elija “Broadcast Stream Mix
(TC-Helicon GoXLR Mini)”.
ii. Para Vista previa de audio y Sonido del sistema,
elija NINGUNO.
iii. Es posible que aparezca una ventana emergente
de advertencia. ¡Haga clic en Aceptar!
11. Estos pasos deberían ayudarle a empezar a trabajar. Para
todas las demás funciones, tenemos una gran serie de videos
de YouTube, una comunidad Discord activa, un manual de
usuario completo y un maravilloso equipo de soporte. Utilice
los enlaces de la sección ¡Obtenga ayuda! Sección para
conectar con nosotros.
Pasos de Conguración Solución de problemas
Problema Solución Posible
Zumbido y ruido excesivos • • Verique que todos los tomacorrientes estén debidamente conectados a tierra.
• • Asegúrese de que los cables de audio estén alejados de adaptadores y fuentes de alimentación.
• • Si es necesario, compre un dispositivo "aislador de bucle de tierra" (disponible en Amazon
y otros minoristas).
No puedo escuchar
mi micrófono
• • Asegúrese de haber seguido los pasos de conguración del micrófono, incluida la selección de
"Condensador (24 V)" si su micrófono requiere "alimentación fantasma".
• • Verica que el botón de silencio del micrófono no esté activado.
• • Conecte ya sea un XLR O un micrófono de 3,5 mm. El conector XLR se desactiva automáticamente
cuando conecta un micrófono de 3,5 mm.
La aplicación no se conecta
a mi dispositivo
• • Cierre la aplicación GO XLR haciendo clic en la "X" en la esquina superior derecha.
• • Seleccione "Salir" en la ventana emergente "Cerrar aplicación".
• • Desenchufe el GO XLR MINI.
• • Vuelva a conectar el GO XLR MINI.
• • Reinicie la aplicación GO XLR.
9Quick Start Guide8 GO XLR MINI

Diagrama de Conexión
Studio Vocal Mic
External Audio Device
(if applicable)
Gaming Headset with Mic
Dedicated Streaming
Computer (if applicable)
Gaming/Streaming
Computer
Gaming Console
ComputerBlue Yeti Microphone
Power via
USB (no audio)
Audio out to GO XLR
via headphone output
Connexion recommandée de Blue Yeti Mic
11Quick Start Guide10 GO XLR MINI
(1) CHANNEL FADERS - Controle los niveles de canales
individuales en su mezcla.
(2) CHANNEL MUTE - Apaga el canal correspondiente en el
mezclador.
(3) !@#$* - El botón te permite censurar instantáneamente y
“apagar” tu micrófono.
(4) “COUGH” - Silencia el micrófono mientras se mantiene
presionado el botón.
(5) XLR MIC INPUT - Para entrada de audio de micrófonos
profesionales. Para micrófonos de tipo condensador
que requieren “alimentación fantasma”, vaya a la pestaña
MIC en la aplicación GO XLR y active el ajuste “Condenser”
en MIC TYPE.
(6) LINE IN - Para la entrada de audio de dispositivos como
teléfonos, tabletas, computadoras, etc. La conexión
LINE IN también se puede usar en una conguración
de transmisión de “2 PC” para enviar alertas de chat de
regreso al GO XLR MINI.
(7) LINE OUT - Contiene una copia exacta del audio de
su transmisión. Esta conexión se puede utilizar para
conectarse a una computadora de transmisión dedicada
u otros dispositivos como altavoces.
(8) USB - Entrada para conexión a PC, actualizaciones de
rmware y control remoto con la aplicación GO XLR.
NOTE: GO XLR MINI está diseñado para usarse con puertos
USB 2.0. Los puertos USB 3.0 / 3.1 pueden causar cortes y
desconexiones de audio.
(9) OPTICAL - Entrada para la conexión a las consolas SONY
PlayStation † o Microsoft Xbox ‡.
(10) MIC - Entrada para conexión a micrófonos de diadema.
Normalmente, esta conexión de auriculares será un
conector rosa.
NOTE: Si tiene la intención de utilizar el popular micrófono
Blue Yeti *, que tiene su propia salida de auriculares
incorporada, debe ejecutar esa salida de auriculares
incorporada en la entrada MIC del GO XLR MINI. Para los
micrófonos Blue Yeti alimentados a través de USB, conecte
el conector USB directamente a su computadora para
obtener energía, pero no seleccione el Blue Yeti como
fuente de audio en la computadora. En cambio, la salida
de auriculares del Blue Yeti será la fuente de audio para
mezclar dentro del GO XLR MINI.
(11) PHONES - Toma de salida para tus auriculares.
Normalmente, el conector de auriculares será
un conector verde.
*Yeti es una marca registrada de Blue Microphones.
† PlayStation es una marca comercial registrada o una marca comercial de Sony Interactive
Entertainment Inc. SONY es una marca comercial registrada de Sony Corporation.
‡ Xbox es una marca comercial registrada o una marca comercial de Microsoft Corporation en
los Estados Unidos y / o en otros países.
(5) (6) (7) (8) (9)
(11)(10)
(2) (3) (4)(1)
Controles

À propos de ce document
Ce guide de démarrage rapide vous aidera à congurer, connecter
et commencer à utiliser votre GO XLR MINI.
GO XLR MINI App
L'application GO XLR est REQUISE pour utiliser votre GO XLR MINI.
Les principales fonctionnalités de l'application GO XLR comprennent:
• • Égalisez, compressez et portez votre micro
• • Congurer et dénir les commandes du mélangeur
• • Changer l'éclairage du produit
• • Accès direct aux manuels des produits
• • Accès au support TC Helicon
* Windows est une marque déposée ou une marque commerciale de Microsoft Corporation
aux États-Unis et / ou dans d'autres pays.
† Le système d'exploitation Windows 10 est recommandé en raison des capacités de
re-mappage audio de ce système.
Téléchargement du pilote, de
l'application et du micrologiciel
www.tc-helicon.com/Categories/c/Tchelicon/Downloads
Obtenir de l'aide!
YouTube Tutoriels - https://www.youtube.com/channel/
UCLuCYhAAOD-wMQaXDNhvFbQ
Web Soutien - www.tc-helicon.com/brand/tchelicon/support
Discord - https://discord.gg/8Ebg3Sp
Suivez nous!
@helicongaming
www.instagram.com/helicongaming/
Minimum Hardware:
PC-based Hardware
-Core 2 DUO CPU
-Ethernet port
-1 GB RAM
Recommended Operating Systems:
Windows*
-Windows 7, 32-bit or 64-bit
-Windows 8, 32-bit or 64 bit
-Windows 10, 32-bit or 64-bit
†
1. Téléchargez et installez le package pilote / application.
Vous pouvez être invité à redémarrer pendant ce processus:
a. https://www.tc-helicon.com/Categories/c/
Tchelicon/Downloads
b. Dans la ligne «Produit», faites déler vers le bas et
cliquez sur «GO XLR MINI».
2. Une fois l'installation du pilote et de l'application terminée,
fermez l'application.
3. Connectez GO XLR MINI via USB à votre ordinateur.
4. Attendez que le GO XLR MINI s'allume
(quelques secondes seulement).
5. Rouvrez l'application GO XLR.
6. Le coin inférieur de la fenêtre de l'application GO XLR devrait
indiquer «GO XLR MINI connecté via USB».
7. Ouvrez le panneau "Paramètres audio" de Windows:
a. Sous «Choisissez votre périphérique de sortie»,
choisissez «Système (TC-Helicon GO XLR MINI)».
b. Sous «Choisissez votre périphérique d'entrée»,
choisissez «Chat Mic (TC-Helicon GO XLR MINI)».
c. Ces actions dénissent votre sortie audio principale de
Windows sur le fader «Système» (curseur) sur GO XLR
MINI et désignent votre entrée MIC XLR ou entrée MIC
3.5 mm comme entrée micro principale.
8. Pour toutes les applications de chat telles que Discord,
Skype, TeamSpeak, le chat en jeu, etc.:
a. Choisissez «Chat Mic (TC-Helicon GoXLR Mini)»
comme périphérique INPUT.
b. Choisissez «Chat (TC-Helcion GoXLR Mini)»
comme périphérique de SORTIE.
c. Ces actions dénissent le contrôle du volume
de votre programme de chat sur le fader «Chat»
(curseur) sur GO XLR MINI.
9. Pour la musique, les jeux ou d'autres applications:
a. Dans le panneau «Paramètres audio» de Windows,
cliquez sur «Autres options sonores» en bas.
b. Assurez-vous que votre jeu, lecteur de musique, etc.
joue de l'audio. (Vous ne verrez pas votre programme
répertorié s'il n'émet actuellement aucun son).
c. Recherchez le programme que vous souhaitez attribuer
à un fader (curseur) dans la liste.
d. Cliquez sur la liste déroulante à droite du nom du
programme et choisissez le curseur sur lequel vous
souhaitez que ce programme apparaisse. Par exemple,
vous pouvez choisir «Musique (TC-Helicon GoXLR Mini)»
pour Spotify.
10. Dans votre programme de diusion, choisissez «Broadcast
Stream Mix (TC-Helicon GoXLR Mini)» comme SEUL appareil
audio entrant:
a. In OBS, choose Tools → Settings → Audio:
i. Choisissez «Broadcast Stream Mix
(TC-Helicon GoXLR Mini)» comme micro /
périphérique audio auxiliaire.
ii. Pour TOUS les autres appareils,
sélectionnez DÉSACTIVÉ.
b. Dans SLOBS, cliquez sur la roue dentée dans le coin
supérieur droit:
i. Cliquez sur Audio.
ii. Choisissez «Broadcast Stream Mix
(TC-Helicon GoXLR Mini») comme micro /
périphérique auxiliaire 1.
iii. Pour TOUS les autres appareils audio,
choisissez DÉSACTIVÉ.
c. In XSplit choose Tools → Settings → Audio:
i. Sous Microphone, choisissez «Broadcast Stream
Mix (TC-Helicon GoXLR Mini)».
ii. Pour l'aperçu audio et le son du système,
choisissez AUCUN.
iii. Vous pouvez obtenir une fenêtre contextuelle
d'avertissement. Cliquez sur OK!
11. Ces étapes devraient vous permettre d'être opérationnel.
Pour toutes les autres fonctionnalités, nous avons une
superbe série de vidéos YouTube, une communauté Discord
active, un manuel d'utilisation complet et une merveilleuse
équipe d'assistance. Veuillez utiliser les liens dans la rubrique
Obtenir de l'aide! Section pour se connecter avec nous.
Étapes de CongurationBienvenu
13Quick Start Guide12 GO XLR MINI

Dépannage
Problème Solution Possible
Bourdonnement
et bruit excessifs
• • Assurez-vous que toutes les prises sont correctement mises à la terre.
• • Assurez-vous que les câbles audio sont éloignés des adaptateurs secteur
et des blocs d'alimentation
• • Si nécessaire, achetez un «isolateur de boucle de masse»
(disponible auprès d'Amazon et d'autres détaillants).
Je n'entends pas
mon micro
• • Assurez-vous que vous avez suivi les étapes de conguration du micro, y compris la sélection
de «Condenseur (24 V)» si votre micro nécessite une «alimentation fantôme».
• • Vériez que le bouton de coupure du micro n’a pas été activé.
• • Connectez SOIT un XLR OU un micro 3.5 mm. La prise XLR est automatiquement désactivée
lorsque vous connectez un micro 3.5 mm.
L'application ne se
connecte pas à mon
appareil
• • Fermez l'application GO XLR en cliquant sur le «X» dans le coin supérieur droit.
• • Sélectionnez «Quitter» dans la fenêtre contextuelle «Fermer l'application».
• • Débranchez le GO XLR MINI.
• • Rebranchez GO XLR MINI.
• • Redémarrez l'application GO XLR.
Diagramme de Connexion
Studio Vocal Mic
External Audio Device
(if applicable)
Gaming Headset with Mic
Dedicated Streaming
Computer (if applicable)
Gaming/Streaming
Computer
Gaming Console
ComputerBlue Yeti Microphone
Power via
USB (no audio)
Audio out to GO XLR
via headphone output
Connexion recommandée du Blue Yeti Mic
15Quick Start Guide14 GO XLR MINI

(1) CHANNEL FADERS - Contrôlez les niveaux de canaux
individuels dans votre mix.
(2) CHANNEL MUTE - Désactive le canal correspondant dans
le mélangeur.
(3) !@#$* - Le bouton vous permet de censurer et de «biper»
instantanément votre micro.
(4) “COUGH” - Coupe votre microphone lorsque le bouton
est maintenu.
(5) XLR MIC INPUT - Pour l’entrée audio de microphones
professionnels. Pour les microphones à condensateur
qui nécessitent une «alimentation fantôme», accédez
à l’onglet MIC de l’application GO XLR et activez le
paramètre «Condenser» sous MIC TYPE.
(6) LINE IN - Pour l’entrée audio d’appareils tels que
téléphones, tablettes, ordinateurs, etc. La connexion
LINE IN peut également être utilisée dans une
conguration de diusion en continu «2 PC»
pour renvoyer des alertes de chat dans GO XLR MINI.
(7) LINE OUT - Contient une copie exacte de votre ux audio
de diusion. Cette connexion peut être utilisée pour
se connecter à un ordinateur de streaming dédié ou à
d’autres appareils tels que des haut-parleurs.
(8) USB - Entrée pour connexion PC, mises à jour
du micrologiciel et contrôle à distance avec
l’application GO XLR
Remarquer: GO XLR MINI est conçu pour être utilisé
avec les ports USB 2.0. Les ports USB 3.0 / 3.1 peuvent
provoquer des interruptions et des déconnexions audio.
(9) OPTICAL - Entrée pour la connexion aux consoles
SONY PlayStation† ou Microsoft Xbox‡.
(10) MIC - Entrée pour la connexion aux microphones
du casque. En règle générale, cette connexion casque
sera un connecteur rose.
Remarquer: Si vous avez l'intention d'utiliser le populaire
microphone Blue Yeti *, qui possède sa propre sortie
casque intégrée, vous devez exécuter cette sortie casque
intégrée dans l'entrée MIC du GO XLR MINI. Pour les micros
Blue Yeti alimentés via USB, branchez le connecteur USB
directement sur votre ordinateur pour l'alimentation, mais
ne sélectionnez pas le Blue Yeti comme source audio sur
l'ordinateur. Au lieu de cela, la sortie casque du Blue Yeti
sera la source audio pour le mixage dans GO XLR MINI.
(11) PHONES - Prise de sortie pour vos écouteurs. En règle
générale, le connecteur du casque sera un connecteur vert.
* Yeti est une marque déposée de Blue Microphones.
† PlayStation est une marque déposée ou une marque commerciale de Sony Interactive
Entertainment Inc. SONY est une marque déposée de Sony Corporation.
‡ Xbox est une marque déposée ou une marque commerciale de Microsoft Corporation aux
États-Unis et / ou dans d'autres pays.
(5) (6) (7) (8) (9)
(11)(10)
(2) (3) (4)(1)
Réglages
Über dieses Dokument
Diese Kurzanleitung hilft Ihnen beim Einrichten, Anschließen und
Bedienen Ihres GO XLR MINI.
GO XLR MINI App
Die GO XLR App ist erforderlich, um Ihren GO XLR MINI
zu bedienen.
Zu den Hauptfunktionen der GO XLR-App gehören:
• • EQ, Compress und Gate deines Mikrofons
• • Mischersteuerung einrichten und denieren
• • Produktbeleuchtung ändern
• • Direkter Zugri auf Produkthandbücher
• • Zugri auf TC Helicon-Unterstützung
* Windows ist entweder eine eingetragene Marke oder eine Marke der Microsoft Corporation
in den USA und / oder anderen Ländern.
† Das Windows 10-Betriebssystem wird aufgrund der Audio-Neuzuordnungsfunktionen
dieses Systems empfohlen.
Treiber-, Anwendungs-
und Firmware-Download
www.tc-helicon.com/Categories/c/Tchelicon/Downloads
Hilfe bekommen!
YouTube Tutorials - https://www.youtube.com/channel/
UCLuCYhAAOD-wMQaXDNhvFbQ
Web-Support - www.tc-helicon.com/brand/tchelicon/support
Discord - https://discord.gg/8Ebg3Sp
Folge uns!
@helicongaming
www.instagram.com/helicongaming/
Minimum Hardware:
PC-based Hardware
-Core 2 DUO CPU
-Ethernet port
-1 GB RAM
Recommended Operating Systems:
Windows*
-Windows 7, 32-bit or 64-bit
-Windows 8, 32-bit or 64 bit
-Windows 10, 32-bit or 64-bit
†
Herzlich Willkommen
17Quick Start Guide16 GO XLR MINI

1. Laden Sie das Treiber- / Anwendungspaket herunter und
installieren Sie es. Möglicherweise werden Sie während
dieses Vorgangs zum Neustart aufgefordert:
a. https://www.tc-helicon.com/Categories/c/
Tchelicon/Downloads
b. Scrollen Sie in der Zeile „Produkt“ nach unten
und klicken Sie auf „GO XLR MINI“.
2. Schließen Sie die Anwendung, wenn die Treiber-
und App-Installation abgeschlossen ist.
3. Verbinden Sie den GO XLR MINI über USB mit
Ihrem Computer.
4. Warten Sie, bis der GO XLR MINI eingeschaltet ist
(nur einige Sekunden).
5. Önen Sie die GO XLR App erneut.
6. In der unteren Ecke des GO XLR App-Fensters sollte
"GO XLR MINI über USB verbunden" angezeigt werden.
7. Önen Sie das Windows-Fenster „Soundeinstellungen“:
a. Wählen Sie unter „Wählen Sie Ihr Ausgabegerät“
die Option „System (TC-Helicon GO XLR MINI)“.
b. Wählen Sie unter "Wählen Sie Ihr Eingabegerät"
die Option "Chat-Mikrofon (TC-Helicon GO XLR MINI)".
c. Mit diesen Aktionen stellen Sie Ihren Windows-
Haupttonausgang auf den Fader „System“
(Schieberegler) des GO XLR MINI ein und legen Ihren
XLR-MIC-EINGANG oder Ihren 3.5-mm-MIC-Eingang
als Hauptmikrofoneingang fest.
8. Für alle Chat-Anwendungen wie Discord, Skype, TeamSpeak,
In-Game-Chat usw.:
a. Wählen Sie "Chat Mic (TC-Helicon GoXLR Mini)"
als EINGABE-Gerät.
b. Wählen Sie "Chat (TC-Helcion GoXLR Mini)"
als OUTPUT-Gerät.
c. Mit diesen Aktionen stellen Sie die Lautstärkeregelung
Ihres Chat-Programms auf den "Chat" -Fader
(Schieberegler) von GO XLR MINI.
9. Für Musik, Spiele oder andere Anwendungen:
a. Klicken Sie im Windows-Bereich „Toneinstellungen“
unten auf „Andere Tonoptionen“.
b. Stellen Sie sicher, dass Ihr Spiel, Musikplayer
usw. Audio wiedergibt. (Ihr Programm wird nicht
aufgelistet, wenn es gerade keinen Ton erzeugt.)
c. Suchen Sie in der Liste das Programm, das Sie einem
Fader (Schieberegler) zuweisen möchten.
d. Klicken Sie auf die Dropdown-Liste rechts neben dem
Programmnamen und wählen Sie den Schieberegler
aus, auf dem das Programm angezeigt werden soll.
Sie können beispielsweise "Musik (TC-Helicon GoXLR
Mini)" für Spotify auswählen.
10. Wählen Sie in Ihrem Broadcast-Programm "Broadcast
Stream Mix (TC-Helicon GoXLR Mini)" als EINZIGES
eingehendes Audiogerät:
a. In OBS, go to File → Settings → Audio:
i. Wählen Sie „Broadcast Stream Mix (TC-Helicon
GoXLR Mini)“ als Mikrofon- / Zusatz-Audiogerät.
ii. Wählen Sie für ALLE anderen Geräte die Option
DEAKTIVIERT.
b. Klicken Sie in SLOBS auf das Zahnrad in der oberen
rechten Ecke:
i. Klicken Sie auf Audio.
ii. Wählen Sie „Broadcast Stream Mix (TC-Helicon
GoXLR Mini“) als Mikrofon / Zusatzgerät 1.
iii. Wählen Sie für ALLE anderen
Audiogeräte DISABLED.
c. In XSplit Gehen Sie zu Datei → die Einstellungen →
Audio:
i. Wählen Sie unter Mikrofon die Option „
Broadcast Stream Mix (TC-Helicon GoXLR Mini)“.
ii. Wählen Sie für Audio Preview
und System Sound NONE.
iii. Möglicherweise wird ein Warn-Popup angezeigt.
OK klicken!
11. Diese Schritte sollten Sie zum Laufen bringen. Für alle
anderen Funktionen haben wir eine großartige Reihe
von YouTube-Videos, eine aktive Discord-Community,
ein vollständiges Benutzerhandbuch und ein wunderbares
Support-Team. Bitte benutzen Sie die Links in der Hilfe!
Abschnitt, um mit uns zu verbinden.
Einrichtungsschritte Fehlerbehebung
Problem Mögliche Lösung
Übermäßiges Brummen
und Lärm
• • Stellen Sie sicher, dass alle Steckdosen ordnungsgemäß geerdet sind.
• • Stellen Sie sicher, dass die Audiokabel nicht in der Nähe von Netzteilen und Netzteilen sind
• • Kaufen Sie bei Bedarf ein "Ground Loop Isolater" -Gerät (erhältlich bei Amazon und
anderen Händlern).
Ich kann mein Mikrofon
nicht hören
• • Stellen Sie sicher, dass Sie die Schritte zum Einrichten des Mikrofons ausgeführt haben, einschließlich
der Auswahl von "Kondensator (24 V)", wenn Ihr Mikrofon "Phantomspeisung" benötigt.
• • Überprüfen Sie, ob Ihre Mikrofon-Stummschalttaste nicht aktiviert wurde.
• • Schließen Sie entweder ein XLR- oder ein 3,5-mm-Mikrofon an. Die XLR-Buchse wird automatisch
deaktiviert, wenn Sie ein 3,5-mm-Mikrofon anschließen.
Die App stellt keine
Verbindung zu meinem
Gerät her
• • Schließen Sie die GO XLR App, indem Sie auf das „X“ in der oberen rechten Ecke klicken.
• • Wählen Sie im Popup-Fenster "App schließen" die Option "Beenden".
• • Ziehen Sie den Stecker aus der Steckdose GO XLR MINI.
• • Stecken Sie den GO XLR MINI wieder ein.
• • Starten Sie die GO XLR App neu.
19Quick Start Guide18 GO XLR MINI

Verbindung Diagramm
Studio Vocal Mic
External Audio Device
(if applicable)
Gaming Headset with Mic
Dedicated Streaming
Computer (if applicable)
Gaming/Streaming
Computer
Gaming Console
ComputerBlue Yeti Microphone
Power via
USB (no audio)
Audio out to GO XLR
via headphone output
Blue Yeti Mic Empfohlener Anschluss
(1) CHANNEL FADERS - Steuern Sie einzelne Kanalpegel in
Ihrem Mix.
(2) CHANNEL MUTE - Schaltet den passenden Kanal im Mixer
aus.
(3) !@#$* - Mit der Taste können Sie Ihr Mikrofon sofort
zensieren und “piepen”.
(4) “COUGH” - Schaltet Ihr Mikrofon stumm, während Sie die
Taste gedrückt halten.
(5) XLR MIC INPUT - Für den Audioeingang von
professionellen Mikrofonen. Bei Kondensatormikrofonen,
die „Phantomspeisung“ benötigen, rufen Sie in der GO
XLR-App die Registerkarte „MIC“ auf und aktivieren Sie die
Einstellung „Condenser“ unter MIC TYPE.
(6) LINE IN - Für Audioeingaben von Geräten wie Telefonen,
Tablets, Computern usw. Die LINE IN-Verbindung kann
auch in einem Streaming-Setup mit 2 PCs verwendet
werden, um Chat-Benachrichtigungen an GO XLR MINI
zurückzusenden.
(7) LINE OUT - Enthält eine genaue Kopie Ihres Broadcast-
Stream-Audios. Diese Verbindung kann verwendet
werden, um eine Verbindung zu einem dedizierten
Streaming-Computer oder anderen Geräten wie
Lautsprechern herzustellen.
(8) USB - Eingabe für PC-Verbindung, Firmware-Updates und
Fernbedienung mit der GO XLR-App.
BEACHTEN: GO XLR MINI wurde für die Verwendung mit
USB 2.0-Anschlüssen entwickelt. USB 3.0 / 3.1-Anschlüsse
können zu Audioausfällen und -trennungen führen.
(9) OPTICAL - Eingabe für die Verbindung zu SONY
PlayStation † oder Microsoft Xbox ‡ Konsolen.
(10) MIC - Eingang zum Anschluss an Headset-Mikrofone. In
der Regel handelt es sich bei dieser Headset-Verbindung
um einen rosa Anschluss.
BEACHTEN: Wenn Sie das beliebte Blue Yeti * -Mikrofon
verwenden möchten, das über einen eigenen integrierten
Kopfhörerausgang verfügt, sollten Sie diesen integrierten
Kopfhörerausgang in den MIC-Eingang des GO XLR MINI
einspeisen. Stecken Sie bei Blue Yeti-Mikrofonen, die
über USB mit Strom versorgt werden, den USB-Anschluss
direkt an Ihren Computer, um ihn mit Strom zu versorgen.
Wählen Sie den Blue Yeti jedoch nicht als Audioquelle am
Computer aus. Stattdessen wird der Kopfhörerausgang
des Blue Yeti die Audioquelle für das Mischen in GO XLR
MINI sein.
(11) PHONES - Ausgangsbuchse für Ihre Kopfhörer.
Normalerweise ist der Kopfhöreranschluss ein
grüner Anschluss.
* Yeti ist eine eingetragene Marke von Blue Microphones.
† PlayStation ist eine eingetragene Marke oder Marke von Sony Interactive Entertainment Inc.
SONY ist eine eingetragene Marke der Sony Corporation.
‡ Xbox ist entweder eine eingetragene Marke oder eine Marke der Microsoft Corporation in
den USA und / oder anderen Ländern.
(5) (6) (7) (8) (9)
(11)(10)
(2) (3) (4)(1)
Bedienelemente
21Quick Start Guide20 GO XLR MINI

Sobre este documento
Este Guia de Início Rápido o ajudará a congurar, conectar e
começar a operar seu GO XLR MINI.
GO XLR MINI App
O aplicativo GO XLR é NECESSÁRIO para operar seu GO XLR MINI.
Os principais recursos do aplicativo GO XLR incluem:
• • EQ, comprimir e ativar seu microfone
• • Congurar e denir os controles do mixer
• • Alterar a iluminação do produto
• • Acesso direto aos manuais do produto
• • Acesso ao suporte TC Helicon
* Windows é uma marca registrada ou marca comercial da Microsoft Corporation
nos Estados Unidos e / ou outros países.
† O sistema operacional Windows 10 é recomendado devido aos recursos
de remapeamento de áudio deste sistema.
Download de driver,
aplicativo e rmware
www.tc-helicon.com/Categories/c/Tchelicon/Downloads
Get help!
YouTube Tutoriais - https://www.youtube.com/channel/
UCLuCYhAAOD-wMQaXDNhvFbQ
Web Support - www.tc-helicon.com/brand/tchelicon/support
Discord - https://discord.gg/8Ebg3Sp
Siga-nos!
@helicongaming
www.instagram.com/helicongaming/
Minimum Hardware:
PC-based Hardware
-Core 2 DUO CPU
-Ethernet port
-1 GB RAM
Recommended Operating Systems:
Windows*
-Windows 7, 32-bit or 64-bit
-Windows 8, 32-bit or 64 bit
-Windows 10, 32-bit or 64-bit
†
1. Baixe e instale o pacote de driver / aplicativo. Você pode
ser solicitado a reiniciar durante este processo:
a. https://www.tc-helicon.com/Categories/c/
Tchelicon/Downloads
b. Na linha “Produto”, role para baixo e clique em
“GO XLR MINI”.
2. Quando a instalação do driver e do aplicativo
for concluída, feche o aplicativo.
3. Conecte o GO XLR MINI via USB ao seu computador.
4. Aguarde até que o GO XLR MINI seja ligado
(apenas alguns segundos).
5. Abra novamente o aplicativo GO XLR.
6. O canto inferior da janela do GO XLR App deve dizer
“GO XLR MINI conectado via USB”.
7. Abra o painel “Congurações de Som” do Windows:
a. Em “Escolha seu dispositivo de saída”,
escolha “Sistema (TC-Helicon GO XLR MINI)”.
b. Em “Escolha seu dispositivo de entrada”, escolha
“Microfone para bate-papo (TC-Helicon GO XLR MINI)”.
c. Essas ações denem a saída de som principal do
Windows para o fader "Sistema" (controle deslizante)
no GO XLR MINI e designam sua entrada XLR MIC INPUT
ou MIC de 3.5 mm como sua entrada de microfone
principal.
8. Para qualquer aplicativo de bate-papo como Discord, Skype,
TeamSpeak, bate-papo dentro do jogo, etc:
a. Escolha “Chat Mic (TC-Helicon GoXLR Mini)”
como seu dispositivo INPUT.
b. Escolha “Chat (TC-Helcion GoXLR Mini)”
como seu dispositivo de SAÍDA.
c. Essas ações denem o controle de volume
do programa de bate-papo para o fader
(controle deslizante) “Chat” no GO XLR MINI.
9. Para música, jogos ou outros aplicativos:
a. No painel “Congurações de som” do Windows,
clique em “Outras opções de som” na parte inferior.
b. Certique-se de que seu jogo, reprodutor de
música, etc. esteja reproduzindo áudio. (Você não
verá seu programa listado se ele não estiver fazendo
nenhum som).
c. Encontre o programa que deseja atribuir a um fader
(controle deslizante) na lista.
d. Clique na lista suspensa à direita do nome do programa
e escolha o controle deslizante no qual deseja que o
programa apareça. Por exemplo, você pode escolher
“Música (TC-Helicon GoXLR Mini)” para o Spotify.
10. Em seu programa de transmissão, escolha “Broadcast
Stream Mix (TC-Helicon GoXLR Mini)” como seu ÚNICO
dispositivo de áudio de entrada:
a. In OBS, go to File → Settings → Audio:
i. Escolha “Broadcast Stream Mix (TC-Helicon
GoXLR Mini)” como seu microfone / dispositivo
de áudio auxiliar.
ii. Para TODOS os outros dispositivos,
escolha DESATIVADO.
b. Em SLOBS, clique na roda dentada no canto
superior direito:
i. Clique em Áudio.
ii. Escolha “Broadcast Stream Mix (TC-Helicon
GoXLR Mini” como seu microfone /
dispositivo auxiliar 1).
iii. Para TODOS os outros dispositivos de áudio,
escolha DISABLED.
c. In XSplit choose Tools → Settings → Audio:
i. Em Microfone, escolha “Broadcast Stream Mix
(TC-Helicon GoXLR Mini)”.
ii. Para Pré-visualização de áudio e Som
do sistema, escolha NENHUM.
iii. Você pode obter um pop-up de aviso. Clique OK!
11. Essas etapas devem ajudá-lo a começar a trabalhar. Para
todos os outros recursos, temos uma grande série de vídeos
do YouTube, uma comunidade Discord ativa, manual do
usuário completo e equipe de suporte maravilhosa. Por
favor, use os links em Get Help! Seção para se conectar
conosco.
Etapas de ConguraçãoBem-vinda
23Quick Start Guide22 GO XLR MINI

Solução de Problemas
Problema Solução Possível
Zumbido e ruído
excessivos
• • Verique se todas as tomadas estão devidamente aterradas.
• • Certique-se de que os cabos de áudio estejam longe de adaptadores e fontes de alimentação
• • Se necessário, compre um dispositivo “isolador de loop de terra” (disponível na Amazon e em
outros varejistas).
Eu não consigo ouvir meu
microfone
• • Certique-se de ter executado as etapas de conguração do microfone, incluindo a escolha
de “Condensador (24 V)” se o seu microfone exigir “alimentação fantasma”.
• • Verique se o botão de silenciar o microfone não foi ativado.
• • Conecte um XLR OU um microfone de 3.5 mm. O conector XLR é automaticamente desativado quando
você conecta um microfone de 3.5 mm.
O aplicativo não se conecta
ao meu dispositivo
• • Feche o aplicativo GO XLR clicando no “X” no canto superior direito.
• • Selecione “Sair” na janela pop-up “Fechar aplicativo”.
• • Desconecte o GO XLR MINI.
• • Conecte o GO XLR MINI novamente.
• • Reinicie o aplicativo GO XLR.
Diagrama de Conexão
Studio Vocal Mic
External Audio Device
(if applicable)
Gaming Headset with Mic
Dedicated Streaming
Computer (if applicable)
Gaming/Streaming
Computer
Gaming Console
ComputerBlue Yeti Microphone
Power via
USB (no audio)
Audio out to GO XLR
via headphone output
Conexão recomendada do Blue Yeti Mic
25Quick Start Guide24 GO XLR MINI

(1) CHANNEL FADERS - Controle os níveis de canais
individuais em sua mixagem.
(2) CHANNEL MUTE - Desativa o canal correspondente
no mixer.
(3) !@#$* - O botão permite que você censure e “desligue”
instantaneamente seu microfone.
(4) “COUGH” - Silencia o microfone enquanto o botão é
pressionado.
(5) XLR MIC INPUT - Para entrada de áudio de microfones
prossionais. Para microfones tipo condensador que
requerem “alimentação fantasma”, vá para a guia MIC
no aplicativo GO XLR e ative a conguração “Condensador”
em MIC TYPE.
(6) LINE IN - Para entrada de áudio de dispositivos como
telefones, tablets, computadores, etc. A conexão LINE
IN também pode ser usada em uma conguração de
streaming de “2 PCs” para enviar alertas de bate-papo
de volta ao GO XLR MINI.
(7) LINE OUT - Contém uma cópia exata do áudio do seu
stream de transmissão. Esta conexão pode ser usada para
conectar a um computador de streaming dedicado ou
outros dispositivos como alto-falantes.
(8) USB - Entrada para conexão de PC, atualizações de
rmware e controle remoto com app GO XLR.
OBSERVAÇÃO: GO XLR MINI foi projetado para uso com
portas USB 2.0. As portas USB 3.0 / 3.1 podem causar
falhas e desconexões de áudio.
(9) OPTICAL - Entrada para conexão a consoles SONY
PlayStation † ou Microsoft Xbox ‡.
(10) MIC - Entrada para conexão com microfones de fone
de ouvido. Normalmente, esta conexão de fone de ouvido
será um conector rosa.
OBSERVAÇÃO: Se você pretende usar o popular microfone
Blue Yeti *, que tem sua própria saída de fone de ouvido
embutida, você deve executar essa saída de fone de ouvido
integrada na entrada MIC do GO XLR MINI. Para microfones
Blue Yeti alimentados por USB, conecte o conector USB
diretamente em seu computador para alimentação, mas
não selecione o Blue Yeti como uma fonte de áudio no
computador. Em vez disso, a saída de fone de ouvido do
Blue Yeti será a fonte de áudio para mixagem dentro do
GO XLR MINI.
(11) PHONES - Conector de saída para fones de ouvido.
Normalmente, o conector do fone de ouvido será
um conector verde.
* Yeti é uma marca registrada da Blue Microphones.
† PlayStation é uma marca registrada ou marca comercial da Sony Interactive Entertainment
Inc. SONY é uma marca registrada da Sony Corporation.
‡ Xbox é uma marca registrada ou marca comercial da Microsoft Corporation nos Estados
Unidos e / ou outros países.
(5) (6) (7) (8) (9)
(11)(10)
(2) (3) (4)(1)
Controles
Questo documento
Questa guida rapida ti aiuterà a congurare, collegare e iniziare
a utilizzare il tuo GO XLR MINI.
GO XLR MINI App
L'app GO XLR è NECESSARIA per utilizzare il GO XLR MINI.
Le caratteristiche principali dell'app GO XLR comprendono:
• • Equalizzazione, compressione e gate del microfono
• • Imposta e denisce i controlli del mixer
• • Cambia l'illuminazione del prodotto
• • Accesso diretto ai manuali dei prodotti
• • Accesso al supporto TC Helicon
* Windows è un marchio registrato o un marchio di Microsoft Corporation negli Stati Uniti
e/o in altri paesi.
† Il sistema operativo Windows 10 è consigliato per le capacità di rimappatura audio di questo
sistema.
Download di driver,
applicazioni e rmware
www.tc-helicon.com/Categories/c/Tchelicon/Downloads
Get Help!
YouTube Tutorials - https://www.youtube.com/channel/
UCLuCYhAAOD-wMQaXDNhvFbQ
Web Support - www.tc-helicon.com/brand/tchelicon/support
Discord - https://discord.gg/8Ebg3Sp
Follow us!
@helicongaming
www.instagram.com/helicongaming/
Minimum Hardware:
PC-based Hardware
-Core 2 DUO CPU
-Ethernet port
-1 GB RAM
Recommended Operating Systems:
Windows*
-Windows 7, 32-bit or 64-bit
-Windows 8, 32-bit or 64 bit
-Windows 10, 32-bit or 64-bit
†
Benvenuto
27Quick Start Guide26 GO XLR MINI

1. Scaricare e installare il pacchetto driver/app. È possibile
che sia chiesto di riavviare durante questo processo:
a. https://www.tc-helicon.com/Categories/c/
Tchelicon/Downloads
b. Nella riga “Product”, scorrere verso il basso
e cliccate su “GO XLR MINI”.
2. Al termine dell'installazione del driver e dell'app,
chiudere l'applicazione.
3. Collegate GO XLR MINI tramite USB al vostro computer.
4. Attendete che GO XLR MINI si accenda (solo pochi secondi).
5. Riaprite l'app GO XLR.
6. Nell'angolo inferiore della nestra dell'app GO XLR dovrebbe
essere visualizzato “GO XLR MINI connected via USB”.
7. Apri il pannello “Impostazioni audio” di Windows:
a. In “Scegli il tuo dispositivo di output”, scegliete
“Sistema (TC-Helicon GO XLR MINI)”.
b. In “Scegli il tuo dispositivo di input”, scegli “Chat Mic
(TC-Helicon GO XLR MINI)”.
c. Queste azioni impostano l'uscita audio principale di
Windows sul fader “System” (cursore) su GO XLR MINI
e designano il vostro XLR MIC INPUT o MIC 3.5mm come
ingresso microfono principale.
8. Per qualsiasi applicazione di chat come Discord, Skype,
TeamSpeak, chat di gioco, ecc:
a. Scegliete “Chat Mic (TC-Helicon GoXLR Mini)”
come dispositivo INPUT.
b. Scegliete “Chat (TC-Helcion GoXLR Mini)” come
dispositivo OUTPUT.
c. Queste azioni impostano il controllo del volume del
tuo programma di chat sul fader (cursore) “Chat” su
GO XLR MINI.
9. Per musica, giochi o altre applicazioni:
a. Nel pannello “Impostazioni audio” di Windows,
fare clic su “Altre opzioni audio” in basso.
b. Assicuratevi che il vostro gioco, lettore musicale,
ecc. Stia riproducendo l'audio. (Non vedrete
il vostro programma elencato se attualmente
non sta emettendo alcun suono).
c. Trovate il programma che desiderate assegnare
a un fader (cursore) nell'elenco.
d. Cliccate sul menu a tendina a destra del nome
del programma e scegli il dispositivo di scorrimento
su cui desideri che venga visualizzato il programma.
Ad esempio, potreste scegliere “Musica”.
10. Nel tuo programma di trasmissione, scegli “Broadcast
Stream Mix (TC-Helicon GoXLR Mini)” come UNICO dispositivo
audio in entrata:
a. In OBS, andate su File → Impostazioni → Audio:
i. Scegli “Broadcast Stream Mix (TC-Helicon
GoXLR Mini)” come Mic/Auxiliary Audio Device.
ii. Per TUTTI gli altri dispositivi, selezionate “DISABLED”.
b. In SLOBS, cliccate sulla ruota dentata nell'angolo
in alto a destra:
i. Cliccate su Audio.
ii. Scegliete “Broadcast Stream Mix (TC-Helicon
GoXLR Mini” come Mic/Auxiliarly Device 1.
iii. Per TUTTI gli altri dispositivi audio,
selezionate “DISABLED”.
c. In XSplit andate su File → Impostazioni → Audio:
i. In Microphone, scegliete “Broadcast Stream Mix
(TC-Helicon GoXLR Mini)”.
ii. Per Audio Preview e System Sound
scegliete NONE.
iii. È possibile che sia mostrato un popup di avviso.
Fare clic su OK!
11. Questi passaggi dovrebbero consentirti di essere subito
operativo. Per tutte le altre funzioni, abbiamo una
fantastica serie di video di YouTube, una comunità attiva
in Discord, un manuale utente completo e un meraviglioso
team di supporto. Vi invitiamo a usare i link in “Get Help!”
Sezione per connettersi con noi. (TC-Helicon GoXLR Mini)”
per Spotify.
Procedura di Congurazione Soluzione dei Problemi
Problema Possibile Soluzione
Eccessivo ronzio e rumore • • Vericate che tutte le prese siano adeguatamente messe a terra.
• • Assicuratevi che i cavi audio siano lontani dagli adattatori di alimentazione e dagli alimentatori
• • Se necessario, acquistate un dispositivo “isolatore di messa a terra” (disponibile su Amazon
e altri rivenditori)
Non riesco a sentire il mio
microfono
• • Assicuratevi di aver eseguito i passaggi di congurazione del microfono, inclusa la selezione
di “Condenser (24 V)” se il microfono richiede “alimentazione phantom”.
• • Verica che il pulsante di MUTE del microfono non sia stato attivato.
• • Collega sia un XLR o un microfono da 3.5mm. L'XLR è disattivato automaticamente quando
collegate un microfono da 3.5mm.
L'app non si connette al
mio dispositivo
• • Chiudi l'app GO XLR facendo clic sulla “X” nell'angolo in alto a destra.
• • Seleziona “Exit” dalla nestra a comparsa “Close App”.
• • Scollegate GO XLR MINI.
• • Ricollegate GO XLR MINI.
• • Rilanciate l'app GO XLR.
29Quick Start Guide28 GO XLR MINI

Diagramma di Cablaggio
Studio Vocal Mic
External Audio Device
(if applicable)
Gaming Headset with Mic
Dedicated Streaming
Computer (if applicable)
Gaming/Streaming
Computer
Gaming Console
ComputerBlue Yeti Microphone
Power via
USB (no audio)
Audio out to GO XLR
via headphone output
Connessione consigliata per il microfono Blue Yeti
(1) CHANNEL FADERS - Controllano i livelli dei singoli
canali nel mix.
(2) CHANNEL MUTE - Silenzia il corrispondente canale
del mixer.
(3) !@#$* - Tasto per censurare il microfono ed emettere
un “segnale acustico” all’istante.
(4) “COUGH” - Silenzia il microfono nché è premuto il tasto.
(5) XLR MIC INPUT - Ingresso audio per microfoni
professionali. Per i microfoni a condensatore che
richiedono alimentazione phantom andate alla
scheda MIC nell’app GO XLR e attivate l’impostazione
“Condenser” MIC TYPE.
(6) LINE IN - Ingresso audio da dispositivi come telefoni,
tablet, computer, ecc. La connessione LINE IN può essere
usata anche in una congurazione di streaming “2 PC”
per inviare avvisi di chat a GO XLR MINI.
(7) LINE OUT - Contiene una copia esatta dell’audio in
streaming della trasmissione. Potete usare questa
connessione per connettessione a un computer di
streaming dedicato o ad altri dispositivi come altoparlanti.
(8) USB - Connessione per PC, aggiornamenti rmware e
controllo remoto con app GO XLR.
NOTA: GO XLR MINI è progettato per essere usato con
porte USB 2.0. Le porte USB 3.0/3.1 possono provocare
interruzioni e disconnessioni audio.
(9) OPTICAL - Collegamento per console SONY PlayStation †
o Microsoft Xbox ‡.
(10) MIC - Collegamento per headset. In genere, questa
connessione headset ha un connettore rosa.
NOTA: Se intendete usare il famoso microfono Blue Yeti*,
che ha la sua uscita per cue incorporata, dovreste usare
questa uscita per cua incorporata nell'ingresso MIC del
GO XLR MINI. Per i microfoni Blue Yeti alimentati tramite
USB, collegate il connettore USB direttamente al computer
per l'alimentazione, ma non selezionare Blue Yeti come
sorgente audio sul computer. Invece, l'uscita per le cue
del Blue Yeti sarà la sorgente audio per il missaggio
all'interno di GO XLR MINI.
(11) PHONES - Uscita per cua. In genere, il connettore per
la cua è di colore verde.
*Yeti è un marchio registrato di Blue Microphones.
†PlayStation è un marchio registrato o un marchio di Sony Interactive Entertainment Inc.
SONY è un marchio registrato di Sony Corporation.
‡Xbox è un marchio registrato o un marchio di Microsoft Corporation negli Stati Uniti
e/o in altri paesi.
(5) (6) (7) (8) (9)
(11)(10)
(2) (3) (4)(1)
Controlli
31Quick Start Guide30 GO XLR MINI

Over dit document
Deze snelstartgids helpt je bij het installeren, aansluiten en
gebruiken van je GO XLR MINI.
GO XLR MINI App
De GO XLR-app is VEREIST om je GO XLR MINI te bedienen.
De belangrijkste kenmerken van de GO XLR-app zijn:
• • EQ, comprimeer en gate je microfoon
• • Mixerbedieningen instellen en deniëren
• • Verander productverlichting
• • Directe toegang tot producthandleidingen
• • Toegang tot TC Helicon-ondersteuning
* Windows is een gedeponeerd handelsmerk of handelsmerk van Microsoft Corporation in de
Verenigde Staten en / of andere landen.
† Het besturingssysteem Windows 10 wordt aanbevolen vanwege de mogelijkheden voor het
opnieuw toewijzen van audio van dit systeem.
Driver, applicatie
en rmware downloaden
www.tc-helicon.com/Categories/c/Tchelicon/Downloads
Krijg hulp!
YouTube Tutorials - https://www.youtube.com/channel/
UCLuCYhAAOD-wMQaXDNhvFbQ
Web Support - www.tc-helicon.com/brand/tchelicon/support
Discord - https://discord.gg/8Ebg3Sp
Volg ons!
@helicongaming
www.instagram.com/helicongaming/
Minimum Hardware:
PC-based Hardware
-Core 2 DUO CPU
-Ethernet port
-1 GB RAM
Recommended Operating Systems:
Windows*
-Windows 7, 32-bit or 64-bit
-Windows 8, 32-bit or 64 bit
-Windows 10, 32-bit or 64-bit
†
1. Download en installeer het driver- / applicatiepakket.
Mogelijk wordt u tijdens dit proces gevraagd om opnieuw
op te starten:
a. https://www.tc-helicon.com/Categories/c/
Tchelicon/Downloads
b. Scroll naar beneden in de rij "Product" en klik
op "GO XLR MINI".
2. Sluit de applicatie wanneer de installatie van het
stuurprogramma en de app is voltooid.
3. Verbind GO XLR MINI via USB met je computer.
4. Wacht tot GO XLR MINI is opgestart (slechts een paar
seconden).
5. Open de GO XLR-app opnieuw.
6. In de benedenhoek van het GO XLR App-venster moet staan
"GO XLR MINI aangesloten via USB".
7. Open het venster "Geluidsinstellingen" van Windows:
a. Kies onder 'Kies uw uitvoerapparaat' de optie 'Systeem
(TC-Helicon GO XLR MINI)'.
b. Kies onder "Kies uw invoerapparaat" voor "Chat Mic
(TC-Helicon GO XLR MINI)".
c. Deze acties stellen je belangrijkste Windows-
geluidsuitvoer in op de "System" -fader
(schuifregelaar) op GO XLR MINI en wijzen je XLR MIC
INPUT of 3.5 mm MIC-ingang aan als je belangrijkste
microfooningang.
8. Voor alle chattoepassingen zoals Discord, Skype, TeamSpeak,
In-game chat, enz .:
a. Kies "Chat Mic (TC-Helicon GoXLR Mini)"
als uw INPUT-apparaat.
b. Kies "Chat (TC-Helcion GoXLR Mini)"
als uw OUTPUT-apparaat.
c. Deze acties stellen de volumeregeling van
je chatprogramma in op de "Chat"
-fader (schuifregelaar) op GO XLR MINI.
9. Voor muziek, games of andere toepassingen:
a. In het Windows "Geluidsinstellingen" paneel, klik
onderaan op "Andere geluidsopties".
b. Zorg ervoor dat uw game, muziekspeler, enz. Audio
afspeelt. (Je programma wordt niet vermeld als het
momenteel geen geluid maakt).
c. Zoek in de lijst het programma dat u aan een fader
(schuifregelaar) wilt toewijzen.
d. Klik op de vervolgkeuzelijst rechts van de
programmanaam en kies de schuifregelaar waarop
u dat programma wilt laten verschijnen. U kunt
bijvoorbeeld "Muziek (TC-Helicon GoXLR Mini)"
kiezen voor Spotify.
10. Kies in je uitgezonden programma "Broadcast Stream
Mix (TC-Helicon GoXLR Mini)" als je ENIGE inkomende
audioapparaat:
a. Ga in OBS naar Bestand → Instellingen → Audio:
i. Kies "Broadcast Stream Mix (TC-Helicon GoXLR
Mini)" als uw microfoon / hulpaudioapparaat.
ii. Kies voor ALLE andere apparaten
UITGESCHAKELD.
b. Klik in SLOBS op het tandwiel in de rechterbovenhoek:
i. Klik op Audio.
ii. Kies "Broadcast Stream Mix (TC-Helicon GoXLR
Mini" als uw microfoon / hulpapparaat 1.
iii. Voor ALLE andere audioapparaten kiest
u UITGESCHAKELD.
c. Kies in XSplit Tools → Instellingen → Audio:
i. Kies onder Microfoon "Broadcast Stream Mix
(TC-Helicon GoXLR Mini)".
ii. Kies GEEN voor Audiovoorbeeld
en Systeemgeluid.
iii. U krijgt mogelijk een waarschuwingspop-up.
Klik OK!
11. Met deze stappen kunt u aan de slag. Voor alle
andere functies hebben we een geweldige reeks
YouTube-video's, een actieve Discord-community,
een volledige gebruikershandleiding en een geweldig
ondersteuningsteam. Gebruik de links in de Get Help!
Sectie om met ons in contact te komen.
InstallatiestappenWelkom
33Quick Start Guide32 GO XLR MINI

Probleemoplossen
Probleem Mogelijke Oplossing
Overmatig gezoem
en lawaai
• • Controleer of alle stopcontacten goed zijn geaard.
• • Zorg ervoor dat audiokabels uit de buurt zijn van voedingsadapters en voedingen
• • Koop indien nodig een "aardlusisolator" (verkrijgbaar bij Amazon en andere detailhandelaren).
Ik kan mijn microfoon
niet horen
• • Zorg ervoor dat je de stappen voor het instellen van de microfoon hebt doorlopen, inclusief het kiezen
van "Condenser (24 V)" als je microfoon "fantoomvoeding" nodig heeft.
• • Controleer of de knop voor het dempen van de microfoon niet is geactiveerd.
• • Sluit OF een XLR OF een 3.5 mm microfoon aan. De XLR-aansluiting wordt automatisch uitgeschakeld
wanneer u een microfoon van 3.5 mm aansluit.
De app maakt geen
verbinding met mijn
apparaat
• • Sluit de GO XLR-app door op de "X" in de rechterbovenhoek te klikken.
• • Selecteer "Afsluiten" in het pop-upvenster "App sluiten".
• • Koppel de GO XLR MINI los.
• • Sluit de GO XLR MINI weer aan.
• • Start de GO XLR-app opnieuw.
Verbindingsdiagram
Studio Vocal Mic
External Audio Device
(if applicable)
Gaming Headset with Mic
Dedicated Streaming
Computer (if applicable)
Gaming/Streaming
Computer
Gaming Console
ComputerBlue Yeti Microphone
Power via
USB (no audio)
Audio out to GO XLR
via headphone output
Blue Yeti Mic aanbevolen verbinding
35Quick Start Guide34 GO XLR MINI

(1) CHANNEL FADERS - Regel individuele kanaalniveaus
in uw mix.
(2) CHANNEL MUTE - Schakelt het bijpassende kanaal
in de mixer uit.
(3) !@#$* - Met de knop kunt u uw microfoon onmiddellijk
censureren en “bliep uit”.
(4) “COUGH” - Dempt uw microfoon terwijl de knop
wordt ingedrukt.
(5) XLR MIC INPUT - Voor audio-invoer van professionele
microfoons. Voor condensatormicrofoons die
“fantoomvoeding” nodig hebben, ga je naar het tabblad
MIC in de GO XLR-app en activeer je de instelling
“Condensor” onder MIC TYPE.
(6) LINE IN - Voor audio-invoer van apparaten zoals telefoons,
tablets, computers, enz. De LINE IN-aansluiting kan ook
worden gebruikt in een “2 PC” -streamingopstelling om
chatwaarschuwingen terug te sturen naar GO XLR MINI.
(7) LINE OUT - Bevat een exacte kopie van uw uitgezonden
streamaudio. Deze verbinding kan worden gebruikt om
verbinding te maken met een speciale streamingcomputer
of andere apparaten zoals luidsprekers.
(8) USB - Ingang voor pc-verbinding, rmware-updates
en afstandsbediening met GO XLR-app.
NOTITIE: GO XLR MINI is ontworpen voor gebruik met USB
2.0-poorten. USB 3.0 / 3.1-poorten kunnen audio-uitval
en verbroken verbindingen veroorzaken.
(9) OPTICAL - Ingang voor aansluiting op SONY PlayStation †
of Microsoft Xbox ‡ consoles.
(10) MIC - Ingang voor aansluiting op headsetmicrofoons.
Meestal is deze headset-aansluiting een roze connector.
NOTITIE: Als je van plan bent de populaire Blue Yeti *
-microfoon te gebruiken, die zijn eigen ingebouwde
hoofdtelefoonuitgang heeft, moet je die ingebouwde
hoofdtelefoonuitgang in de MIC-ingang van de GO XLR
MINI laten lopen. Voor Blue Yeti-microfoons die via USB
worden gevoed, steekt u de USB-connector rechtstreeks
in uw computer voor stroomvoorziening, maar selecteert
u de Blue Yeti niet als audiobron op de computer. In plaats
daarvan zal de hoofdtelefoonuitgang van de Blue Yeti de
audiobron zijn voor het mixen in de GO XLR MINI.
(11) PHONES - Uitgangsaansluiting voor uw koptelefoon.
Meestal is de hoofdtelefoonconnector een groene connector.
* Yeti is een geregistreerd handelsmerk van Blue Microphones.
† PlayStation is een geregistreerd handelsmerk of handelsmerk van Sony Interactive
Entertainment Inc. SONY is een geregistreerd handelsmerk van Sony Corporation.
‡ Xbox is een gedeponeerd handelsmerk of handelsmerk van Microsoft Corporation in de
Verenigde Staten en / of andere landen.
(5) (6) (7) (8) (9)
(11)(10)
(2) (3) (4)(1)
Besturing
Om detta dokument
Denna snabbstartsguide hjälper dig att ställa in,
ansluta och börja använda din GO XLR MINI.
GO XLR MINI App
GO XLR-appen krävs för att använda din GO XLR MINI.
GO XLR-appens nyckelfunktioner inkluderar:
• • EQ, komprimera och stäng din mikrofon
• • Ställ in och deniera mixerkontroller
• • Byt produktbelysning
• • Direkt åtkomst till produkthandböcker
• • Tillgång till TC Helicon-stöd
* Windows är antingen ett registrerat varumärke eller varumärke som tillhör Microsoft
Corporation i USA och / eller andra länder.
† Windows 10-operativsystem rekommenderas på grund av det här systemets kapacitet för
ljudåtergivning.
Hämta drivrutin, applikation
och fast programvara
www.tc-helicon.com/Categories/c/Tchelicon/Downloads
Get help!
YouTube Tutorials - https://www.youtube.com/channel/
UCLuCYhAAOD-wMQaXDNhvFbQ
Web Support - www.tc-helicon.com/brand/tchelicon/support
Discord - https://discord.gg/8Ebg3Sp
Follow us!
@helicongaming
www.instagram.com/helicongaming/
Minimum Hardware:
PC-based Hardware
-Core 2 DUO CPU
-Ethernet port
-1 GB RAM
Recommended Operating Systems:
Windows*
-Windows 7, 32-bit or 64-bit
-Windows 8, 32-bit or 64 bit
-Windows 10, 32-bit or 64-bit
†
Välkommen
37Quick Start Guide36 GO XLR MINI

1. Ladda ner och installera drivrutinen / applikationspaketet.
Du kan bli ombedd att starta om under denna process:
a. https://www.tc-helicon.com/Categories/c/
Tchelicon/Downloads
b. I "Produkt" -raden, rulla ner och klicka på
"GO XLR MINI".
2. När drivrutinen och appen har slutförts stänger du appen.
3. Anslut GO XLR MINI via USB till din dator.
4. Vänta tills GO XLR MINI startar (bara några sekunder).
5. Öppna GO XLR-appen igen.
6. Det nedre hörnet av GO XLR App-fönstret ska säga
”GO XLR MINI ansluten via USB”.
7. Öppna Windows-ljudpanelen:
a. Välj “System (TC-Helicon GO XLR MINI)” under “Välj din
utmatningsenhet”.
b. Under "Välj din inmatningsenhet" väljer du
"Chattmikrofon (TC-Helicon GO XLR MINI)".
c. Dessa åtgärder ställer in din huvudsakliga Windows-
ljudutgång till "System" -fadern (skjutreglaget) på GO
XLR MINI och anger din XLR MIC INPUT eller 3.5 mm
MIC-ingång som din huvudsakliga mikrofoningång.
8. För alla chattapplikationer som Discord, Skype,
TeamSpeak, chatt i spelet, etc.:
a. Välj "Chat Mic (TC-Helicon GoXLR Mini)"
som din INPUT-enhet.
b. Välj "Chat (TC-Helcion GoXLR Mini)"
som din OUTPUT-enhet.
c. Dessa åtgärder ställer in ditt chattprograms
volymkontroll till "Chat" -fader (skjutreglage) på
GO XLR MINI.
9. För musik, spel eller andra applikationer:
a. Klicka på "Övriga ljudalternativ" längst ner på
Windows "Ljudinställningar" -panelen.
b. Se till att ditt spel, din musikspelare etc. spelar ljud.
(Du ser inte ditt program listat om det för närvarande
inte gör något ljud).
c. Hitta det program du vill tilldela en fader
(skjutreglage) i listan.
d. Klicka på listrutan till höger om programnamnet och
välj skjutreglaget du vill att programmet ska visas på.
Du kan till exempel välja “Musik (TC-Helicon GoXLR
Mini)” för Spotify.
10. I ditt sändningsprogram väljer du “Broadcast Stream Mix
(TC-Helicon GoXLR Mini)” som ENDAST inkommande ljudenhet:
a. Gå till File i OBS → Inställningar → Audio:
i. Välj "Broadcast Stream Mix (TC-Helicon GoXLR
Mini)" som din mikrofon / extra ljudenhet.
ii. Välj INAKTIVERAD för ALLA andra enheter.
b. I SLOBS klickar du på kugghjulet i det övre högra hörnet:
i. Klicka på Ljud.
ii. Välj "Broadcast Stream Mix (TC-Helicon GoXLR
Mini" som din mikrofon / extra enhet 1.
iii. Välj INAKTIVERAD för ALLA andra ljudenheter.
c. Välj Verktyg i XSplit → Inställningar → Audio:
i. Välj "Broadcast Stream Mix (TC-Helicon GoXLR
Mini)" under mikrofon.
ii. Välj INGEN för ljudförhandsgranskning och
systemljud.
iii. Du kan få en varnings popup. Klicka ok!
11. Dessa steg ska få dig igång. För alla andra funktioner
har vi en fantastisk serie YouTube-videor, en aktiv Discord-
community, fullständig användarmanual och underbart
supportteam. Använd länkarna i Get Help! Avsnitt för
att få kontakt med oss.
Installationssteg Felsökning
Problem Möjlig lösning
För mycket brum
och buller
• • Kontrollera att alla uttag är ordentligt jordade.
• • Se till att ljudkablar är borta från nätadaptrar och nätaggregat
• • Om det behövs, köp en "jordslinga isolator" -enhet (tillgänglig från Amazon
och andra återförsäljare).
Jag hör inte min mikrofon • • Se till att du har gått igenom stegen för mikrofoninställningar, inklusive att välja "Kondensor (24 V)"
om din mikrofon kräver "fantommatning".
• • Kontrollera att din mikrofonavstängningsknapp inte har aktiverats.
• • Anslut antingen en XLR ELLER en 3.5 mm mikrofon. XLR-uttaget inaktiveras automatiskt när
du ansluter en 3.5 mm mikrofon.
Appen ansluter inte till
min enhet
• • Stäng GO XLR-appen genom att klicka på “X” i det övre högra hörnet.
• • Välj "Avsluta" i popup-fönstret "Stäng app".
• • Koppla ur GO XLR MINI.
• • Anslut GO XLR MINI igen.
• • Starta om GO XLR-appen.
39Quick Start Guide38 GO XLR MINI
Strona się ładuje...
Strona się ładuje...
Strona się ładuje...
Strona się ładuje...
Strona się ładuje...
Strona się ładuje...
-
 1
1
-
 2
2
-
 3
3
-
 4
4
-
 5
5
-
 6
6
-
 7
7
-
 8
8
-
 9
9
-
 10
10
-
 11
11
-
 12
12
-
 13
13
-
 14
14
-
 15
15
-
 16
16
-
 17
17
-
 18
18
-
 19
19
-
 20
20
-
 21
21
-
 22
22
-
 23
23
-
 24
24
-
 25
25
-
 26
26


TC HELICON GoXLR MINI Skrócona instrukcja obsługi
- Typ
- Skrócona instrukcja obsługi
- Niniejsza instrukcja jest również odpowiednia dla
w innych językach
- español: TC HELICON GoXLR MINI Guía de inicio rápido
- italiano: TC HELICON GoXLR MINI Guida Rapida
- Deutsch: TC HELICON GoXLR MINI Schnellstartanleitung
- svenska: TC HELICON GoXLR MINI Snabbstartsguide
- português: TC HELICON GoXLR MINI Guia rápido
- français: TC HELICON GoXLR MINI Guide de démarrage rapide
- English: TC HELICON GoXLR MINI Quick start guide
- Nederlands: TC HELICON GoXLR MINI Snelstartgids
Powiązane artykuły
Inne dokumenty
-
Yamaha ZG02 instrukcja
-
Silvercrest SGH 7 A2 Operation and Safety Notes
-
Behringer B12X Skrócona instrukcja obsługi
-
Turbosound M10 Skrócona instrukcja obsługi
-
-
Behringer MA400 Instrukcja obsługi
-
-
Turbosound IX15 Skrócona instrukcja obsługi
-
-
Sharkoon X-Tatic SP Specyfikacja