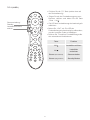
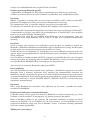
Q Acoustics M2 Soundbase Instrukcja obsługi
- Kategoria
- Głośniki soundbar
- Typ
- Instrukcja obsługi

1
Qm2
MANUAL

2

3
Important safety information and warnings
Introduction
Package contents
Feature summary
Product description
Use scenarios
Features
Top panel
Front
Rear panel
Remote control
Operating Q Acoustics Unit
On / In / Wall EQ
Power and standby
Intelligent Pre-Amplifier (IPA™)
Auto On / Off
Auto On / Off Times
Auto source select
Low source gain (LSG™)
Source volume control
Bluetooth®
MoviEQ™
Lip Sync
Cable / satellite remote control
Specification
Warranty
Contents
4
6
6
7
8
9
10
15
16
20
22
23

4
Important Safety Information and Warnings
1 Notices
1.1 FCC Statement (For US Customers)
This device complies with Part 15 of the FCC Rules. Operation is subject to the following two conditions: (1) this device may
not cause harmful interference, and (2) this device must accept any interference received, including interference that may cause
undesired operation.
This equipment has been tested and found to comply with the limits for a Class B digital device, pursuant to part 15 of the FCC
Rules. These limits are designed to provide reasonable protection against harmful interference in a residential installation. This
equipment generates, uses and can radiate radio frequency energy and if not installed and used in accordance with the instruction
manual, may cause harmful interference to radio communications. However, there is no guarantee that interference will not occur in
a particular installation. If this equipment does cause harmful interference to radio or television reception, which can be determined by
turning the equipment off and on, the user is encouraged to try to correct the interference by one or more of the following measures:
• Reorient or relocate the receiving antenna.
• Increase the separation between equipment and receiver.
• Connect the equipment into an outlet on a circuit different from that to which the receiver is connected.
• Consult the dealer or an experienced radio/TV technician for help.
1.2 FCC Radiation Exposure
This equipment complies with FCC radiation exposure limits set forth for an uncontrolled environment. This equipment should be
installed and operated with a minimum distance of 8 in/20cm between the radiator and your body.
This transmitter must not be co-located or operated in conjunction with any other antenna or transmitter.
CAUTION! Any changes or modifications made to this device that are not expressly approved by Q Acoustics may void the user’s
authority to operate the equipment.
1.3 Industry Canada Statement (for Canadian Customers)
CAN ICES-3 (B)/NMB-3(B)
The device meets the exemption from the routine evaluation limits set out in section 2.5 of RSS 102 and is in full compliance with
RSS-102 RF. Users can obtain information on RF exposure
and compliance from Industry Canada.
This device complies with Industry Canada licence-exempt RSS standard(s). Operation is subject to the following two conditions:
1) This device may not cause harmful interference, and
2) This device must accept any interference received, including interference that may cause undesired operation.
1.4 Bluetooth®
This unit contains a Class 2 Bluetooth® transmitter working at 2.4GHz.
2 Safety Information and Warnings
2.1 Instructions
Read and understand these instructions before you use your Soundbar. If damage is caused by failure to follow these instructions,
the warranty does not apply. Please keep these instructions in a safe place.
Read these instructions.
Keep these instructions.
Heed all warnings.
Follow all instructions.
Do not use this apparatus near water.
Clean only with dry cloth.
Do not block any ventilation openings. Install in accordance with the manufacturer’s instructions.
Do not install near any heat sources such as radiators, heat registers, stoves, or other apparatus (including amplifiers that produce
heat.
Protect the power cord from being walked on or pinched particularly at plugs, convenience receptacles, and the point where they
exit from the apparatus.
Only use attachments/accessories specifie by the manufacturer.
Use only with the cart, stand, tripod, bracket, or table specifie by the manufacturer, or sold with the apparatus. When a cart is used,
use caution when moving the cart/apparatus combination to avoid injury from tip-over.
Unplug this apparatus during lightning storms or when unused for long periods of time.
Refer all servicing to qualifie service personnel. Servicing is required when the apparatus has been damaged in any way, such as
power-supply cord or plug is damaged, liquid has been spilled or objects have fallen into the apparatus, the apparatus has been
exposed to rain or moisture, does not operate normally, or has been dropped.
2.2 Installation
• The mains plug is the means of disconnecting the unit from the mains supply and shall be readily accessible.
• Only use the accessories supplied with the unit.

5
• To prevent injury,this apparatus must be securely attached to the floor/wall in accordance with the installation instructions.
• Never install this product in a confined space. Always leave a space or at least four inches around the product for ventilation.
• The ventilation should not be impeded by covering the ventilation openings with items,such as newspapers,table-cloths,curtains,etc.
• Do not place any sources of danger on the apparatus (for example: liquid filled objects, lighted candles).
• The use of apparatus is in tropical and/or moderate climates.
2.3 Moisture
• To reduce the risk of fire or electric shock, this apparatus should not be exposed to rain, moisture, dripping or splashing.
• Do not use this apparatus near water.
2.4 Remote Control Battery
The remote control supplied with this unit contains a coin/button cell battery. To prevent battery leakage which may result in bodily
injury, property damage, or damage to the unit:
• Install the battery correctly, + and - as marked on the unit.
• Remove the battery when the unit is not used for a long time.
• Do not expose the battery or remote control to excessive heat, including sunshine.
• CAUTION: Danger of explosion if battery is incorrectly replaced. Replace only with the same or equivalent type.
• WARNING - DO NOT INGEST BATTERY - CHEMICAL BURN HAZARD.
• If the battery is swallowed, it can cause severe internal burns in just 2 hours and can lead to death. Keep new and used batteries
away from children. If the battery compartment does not close securely, stop using the product and keep it away from children. If you
think batteries might have been swallowed or placed inside any part of the body, seek immediate medical attention
Disposal of Batteries
The battery supplied contains perchlorate material and in many areas batteries may not be disposed of with your household waste.
Please ensure you dispose of batteries according to local regulations.
The battery supplied does not contain the heavy metals mercury or cadmium.
2.5 Servicing
Servicing is required when the unit or mains cord has been damaged in any way, liquid has been spilled or objects have fallen into
the apparatus, the apparatus has been exposed to rain or moisture, it does not operate normally, or has been dropped.
Refer all servicing to qualified service personnel.
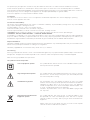
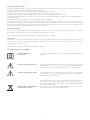
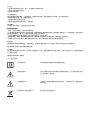
3.0 Symbols used on this product
Class II Equipment Symbol
High Voltage Hazard Symbol
Hazard Warning Symbol
Waste Electrical and Electronic
Equipment Symbol
This symbol indicates that the unit has a Class II double insulation system,
and no protective earth provided.
This symbol indicates uninsulated material within your unit may cause an
electrical shock. For the safety of everyone in your household, please do
not remove the product covering.
The ‘exclamation mark’ calls attention to features for which you should
read this manual closely to prevent operation and maintenance problems.
WARNING: To reduce the risk of fire or electric shock, this apparatus
should not exposed to rain or moisture and object filled with liquids, such
as vases, should not be placed on this apparatus.
CAUTION: To prevent electric shock, match wide blade of plug to wide
slot, fully insert.
This symbol indicates that when the unit is to be discarded, it must
be separated from other household-type waste and sent to separate
collection facilities for recovery and recycling of electrical and electronic
equipment.
Please make sure you are familiar with your local rules on the separate
collection of electrical and electronic products.

6
Thank you for purchasing Q Acoustics.
This manual is intended to take you through the setup and installation of the M2. It will help provide a trouble
free setup and optimum performance from the product.
Please read the instructions, important safety information and warnings carefully before installation and use,
to ensure the safe and satisfactory operation of this product.
We hope you enjoy the Q Acoustics experience.
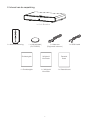
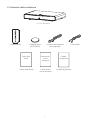
Introduction
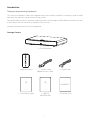
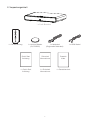
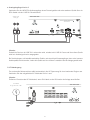
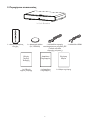
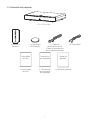
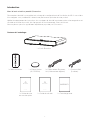
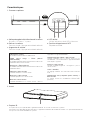
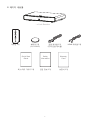
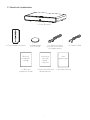
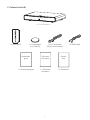
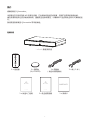
Package Content
SOURCE
EQ
QUICK START GUID E QUICK START GUID E
WARRANTY
1 x Q m2 Soundbar
1 x Remote Control
1 x Quick Start Guide 1 x SAFETY
INFORMATION
1 x Warranty Card
1 x Mains Cable
(Regional mains cable)
1 x HDMI Cable

7
IPA™ – Q Acoustic’s Intelligent Pre-Amplifier removes the need for a remote control through a
signal sensing matrix to enable auto source selection and auto on/off.
MoviEQ™ – Q Acoustic’s Movie EQ helps to maximise the drama and excitement of a movie or
TV soundtrack. Toggle it on or off for music and movie settings.
NFC – Near Field Connection allows simple connection of Bluetooth® devices by tapping the
NFC location on the Q Acoustics speaker.
HDMI ARC – High Definition Multimedia Interface Audio Return Channel removes the need for
additional Optical or Analogue audio cables between source and speaker.
CEC – Consumer Electronics Control syncronises TV remote control of Volume, Mute and
Standby for easy integration of our Q Acoustics speaker.
Bluetooth® – An international wireless connection used for streaming audio from all compatible
devices.
aptX™ – A high definition audio CODEC used for Bluetooth® streaming.
AVRCP – A Bluetooth control protocol that synchronises your device control of Volume and
Mute for easy integration of our Q Acoustics speaker.
DAC – Digital to Analogue Converter which determines the bit depth and sample rate of the Q
Acoustics speaker; the higher the number, the better the audio quality.
BMR – Balanced Mode Radiators are Q Acoustics mid/high driver of choice, they have a flat
radiating surface which enables their dispersion to fill a room with sound.
DVC – Dual Voice Coil subwoofers are Q Acoustics subwoofer driver of choice, it has two voice
coils in one driver for greater flexibility of design and improved bass control.
Sub Out – A Phono subwoofer output for connection to an external subwoofer. On some of
our older products the additional sub out provides a huge bottom end when used with a Q
Acoustics subwoofer.
Dynamic Bass – Improved response, loudness, depth and control of bass frequencies is
achieved through our dynamic bass enhancement system, to perfectly integrate our inbuilt
DVC subwoofer.
User EQ – User control of EQ setting for best acoustic performance. This can be changed
dependent upon speaker position, mounting, or user preference.
LSG™ –Q Acoustic’s Low Source Gain switch increases the incoming signal level to get
maximum performance from your system when connected to low output signal equipment via
HDMI or Optical.
Power Rating – Total continuous power rating of the system in Watts. Eg. BT3 = 2 x 50W =
100W.
Lip Sync – Adjustable delay for lip synchronisation between TV/screen and Q Acoustics
speaker.
3.5mm – 3.5mm jack socket for Analogue input.
RCA – Stereo phono socket for Analogue input.
Feature summary

8
The Qm2 is simplicity redefined; where beautifully engineered sound meets beautiful design.
This is an elegantly compact soundbar with a big heart to fill your living room without the clutter of a full Hi-Fi
system or even a soundbar with a large external subwoofer.
Q Acoustic’s new Intelligent Pre-Amplifier (IPA™) is designed to seamlessly integrate into your home setup.
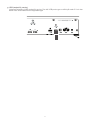
The Qm2 is a true plug and play soundbar. Connect it to your television using the ARC HDMI input and
forget about it. The Qm2 becomes one with your TV, leaving you to discover both sides of this unique
product, Music and Movies.
Turn on the Qm2 and Music mode is enabled by default. Our built in aptX® Bluetooth® wireless input
frees the world of music at your fingertips to fill your home with superbly detailed and dynamic audio
reproduction. Discover subtle layers in your music that have been left previously unheard and enjoy music
as was intended!
Switch on the TV and the Qm2 automatically brings clarity of speech and a depth of soundscape that
transforms your TV sound… and when you engage the MoviEQ™ your home will rumble with powerful bass
and dynamics for that full blooded movie experience!
Product description

9
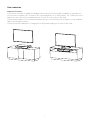
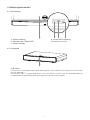
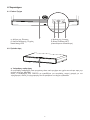
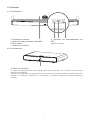
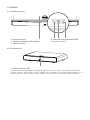
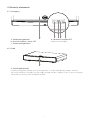
Use scenarios
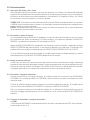
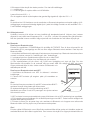
Important Cautions:
• Q Acoustics accepts no liability for damages caused by incorrect assembly, installation or improper use.
• If you choose to place your TV ontop of this soundbar please do so with caution. The TV base must not
extend over the sides of the soundbar and the TV must sit in the centre of the Qm2.
• For best performance it is recommended that this product is used ontop of an AV stand or inside a cabinet.
Please see illustrations below.
• Do not exceed the maximum TV weight limit of 25kg when placing a TV ontop of the Qm2.

10
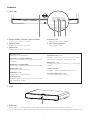
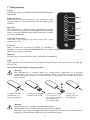
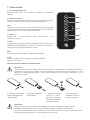
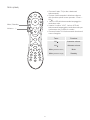
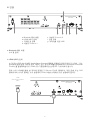
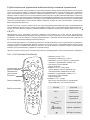
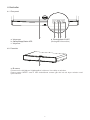
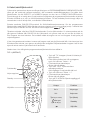
a. Deep standby / Standby / Source select
5s press / 2s press / 1s press
b. Volume Down
Single press / press and hold
c. Volume Up
Single press / press and hold
d. Status LED
See LED indications below
e. NFC Pairing Position
Removable sticker
a. IR Sensor
The IR sensor is hidden behind the speaker grille in the centre towards the top of the Unit.
This sensor MUST be unobstructed for direct line-of-sight to the remote, or the remote will not be able to control the Unit.
No Light = Off
Power cord is disconnected.
Dim Red = Off (DEEP STANDBY)
Power cord is connected and the Unit is in DEEP
STANDBY.
Solid Red = Off (STANDBY)
Power cord is connected and the Unit is in STANDBY.
Solid Purple = On
HDMI input is the active source.
Solid White = On
Optical input is the active source.
Solid Blue = On
Bluetooth® input is the active source and is Paired
with a Bluetooth® device.
Quick Blue Flash = On
Bluetooth® input is the active source and is currently
searching for a Bluetooth® device to Pair with.
Solid Green = On
Analogue input (Line in 1 or Line in 2) is the active
source.
Yellow = MoviEQ™
MovieEQ™ setting is toggled between On / Off.
Any Colour Slow Flash = On
Currently active source is MUTED.
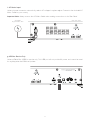
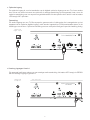
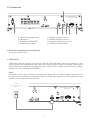
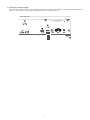
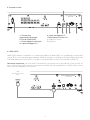
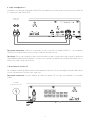
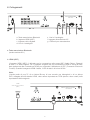
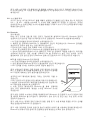
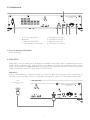
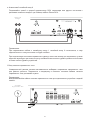
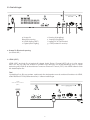
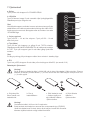
1. Top Panel
2. Front
Features
b a d c
e
a

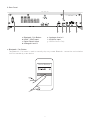
11
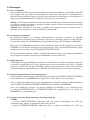
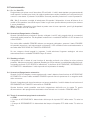
a. Bluetooth® Pair Button
b. HDMI™ (ARC) Input
c. Digital Optical Input
d. Analogue Line In 1
e. Analogue Line In 2
f. AC Mains Input
g. USB for Service Only
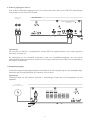
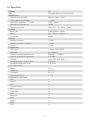
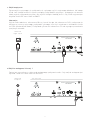
3. Rear Panel
a
fb c deg
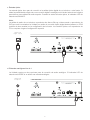
a. Bluetooth® Pair Button
The Bluetooth® Pair button is used to manually drop any current Bluetooth® connection and make the
Unit Discoverable by a new device.
Device Settings
MY DEVICES
Q M2 Connected

12
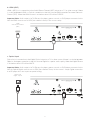
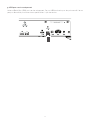
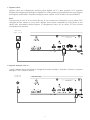
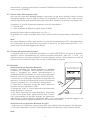
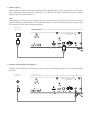
b. HDMI (ARC)
HDMI™ (ARC) is for connection to the Audio Return Channel (ARC) output on a TV or other source. If there
is a choice between HDMI™ or Optical connection to the Unit choose HDMI to enable Consumer Electronic
Control (CEC). When the HDMI source is active the status LED will be PURPLE.
Important Note: Audio output of a TV, Blu-ray disc player, games console, or DVD player connected to the
Unit via HDMI, must be set to PCM (two channel stereo) in the source setup.
c. Optical Input
Optical In is for connection to the Digital Optical output on a TV or other source. If there is a choice between
Digital or Analogue connection to the Unit choose Digital for superior audio quality. When the Digital Source
is active the status LED will be WHITE.
Important Note: Audio output of a TV, Blu-ray disc player, games console, or DVD player connected to the
Unit via Optical Digital, must be set to PCM (two-channel stereo) in the source’s setup. Digital connection
to a CD player does not require a special setting.
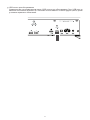
HDMI
Audio Return Channel
(ARC)
AUDIO OUT
Digital - Optical

13
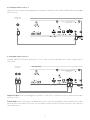
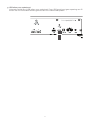
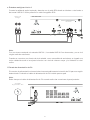
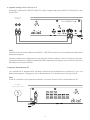
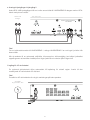
d. Analogue Inputs Line In 1
The Unit has two options for Analogue audio connection. The Status LED will be GREEN when an Analogue
input is in use.
e. Analogue Inputs Line In 2
Connect the RCA L&R audio output from a TV or other source to the LINE IN 2 sockets using a Phono
RCA cable.
Important Note: With a jack plugged into LINE IN 1, LINE IN 2 is switched-off and no audio will be heard
from this source.
Please Note: When connecting to a variable level source, such as a headphone output, better audio quality
will be achieved by having the source set at a higher volume level and the Unit at a lower level, than the
other way around.
AUDIO OUT
Headphones
AUDIO OUT
Analogue

14
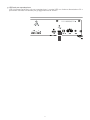
f. AC Mains Input
Universal power connector automatically selects AC voltage for a given region. Connect to the included AC
Mains Cable for your country.
Important Note: Always remove the AC Mains Cable when making connections to the Rear Panel.
g. USB for Service Only
Universal Serial Bus (USB) for service only. This USB port will not provide 5V power, and cannot be used
for anything other than Service Updates.
AC MAINS
Regional mains cable

15
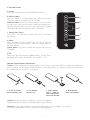
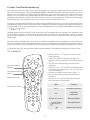
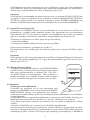
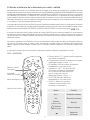
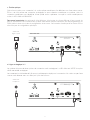
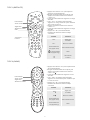
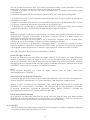
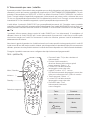
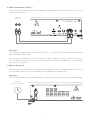
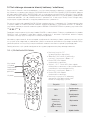
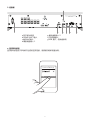
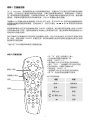
a. Power
Press this button to turn the Unit STANDBY ON/OFF.
b. Source select
Press this button to manually select the audio input source.
The status LED will change colour accordingly.
Important Note: When the Source button is used, the Unit
will stay on the selected source and disable the Intelligent Pre-
Amplifier (IPA) automatic source selection. IPA functions will be
reactivated after the Unit has been put in STANDBY.
c. Volume Up / Down
Press VOL + to increase the volume. Press VOL – to reduce
the volume.
d. Mute
Press this button once to MUTE the Unit. Status LED will
SLOW FLASH to indicate MUTE. Press this button again to
un-mute the Unit.
Please Note: Long press of Mute will also put the Unit into
STANDBY.
e. EQ
Short press the EQ button to toggle MoviEQ™ On and Off. If
the Yellow LED flashes and remains on, MoviEQ™ is On.
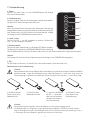
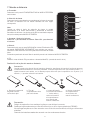
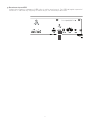
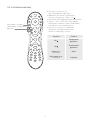
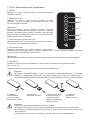
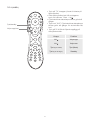
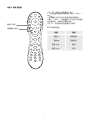
Caution: When replacing the lithium battery in the remote, make sure that the replacement battery is
inserted with the correct polarity. Place the battery so that the positive (+) side faces up with the tray held so
the surface with the dot and (+) is facing up.
Remote Control battery replacement
a. Push small tab
toward battery slot.
b. Pull battery
drawer out.
c. Insert battery
with “+” side up
and slide drawer
back into remote.
d. Slide drawer
back into remote.
Caution: Danger of explosion if battery is incorrectly replaced.
Replace only with the same or equivalent battery type (CR2025)
Warning: Do not expose batteries to excessive heat such as direct sunlight, fire or the like.
Dispose of dead batteries in accordance with local regulations.
4. Remote control
a
b
c
d
e

16
1. On / In+ / In-
This EQ switch should be the first thing you set on your Unit. The Unit has been voiced by our acoustic
experts to get the best audio performance possible for the three most common placements within a
room.
Simply select the placement that best fits your living environment using the switch on the Rear Panel, and
let Q Acoustics handle the rest.
ON = On a cabinet
IN+ = In a large cabinet
IN- = In a small cabinet
2. Power and standby
With the AC Mains turned off, plug in the AC Mains Cable. Once all Rear Panel audio connections are
made, turn the AC Mains ON. The speakers will enter STANDBY, and show a RED status LED.
Exit STANDBY by turning a connected source ON, or by pressing the STANDBY button on either the Top
Panel or the IR remote. The LED will then change colour according to the AUTO SOURCE SELECT rules.
If NO input signals are detected, the Unit will select the Analogue input and then automatically enter
STANDBY after 20 minutes.
3. Intelligent Pre-Amplifier (IPA™)
In normal operation the IPA™ will be active.
Q Acoustics IPA™ is designed so the user requires the minimum amount of effort to get full functionality.
The IPA™ will AUTO ON/OFF and AUTO SOURCE SELECT according to our carefully designed
intelligence matrix.
4. Auto On / Off
When connected to an audio source, the Unit has an AUTO ON function and will come out of STANDBY
when it detects an active audio signal is connected.
When the audio signal is stopped for a pre-defined period of time, the Unit has an AUTO OFF function
and will go into STANDBY.
This, for example, allows easy integration of the Unit with your TV, automatically turning ON and OFF in
synchronisation with your TV STANDBY control.
5. Auto On / Off Times
5.1. HDMI™
• ON time is determined by the CEC response time of your TV; it can take between 0-10s.
• OFF time is determined by the CEC response time of your TV; it can take between 0-5s.
5.2. Optical
• ON time is immediate once the red Optical light from your source comes on.
• OFF time is immediate once the red Optical light from your source turns off.
Please Note: Some televisions continue their optical output when the TV is in STANDBY. The Unit will not
AUTO OFF under these circumstances and the STANDBY control must be used.
Operating Q Acoustics Unit

17
5.3. Bluetooth®
• ON time is determined by the AVRCP response time of your Bluetooth® device; once your device is
connected, and you press Play it can take between 1-5s.
• OFF time is determined by the AVRCP response time of your Bluetooth® device. Once you turn
Bluetooth® off, or disconnect your device it can take between 1-3s.
5.4. Line In 1 / 2
• ON time is determined by the audio signal level; when the signal level is audible it can take between
1-3s.
• OFF time is determined by the audio signal level; when the signal level is not audible it will take 20
minutes.
Please Note: If the user places the Unit in STANDBY while a source is still playing, the AUTO ON function
will be disabled until the source is stopped. This will prevent the Unit from unwanted AUTO ON.
For Line In 1/2 the signal must be at a not audible level for 20 minutes before the Unit AUTO ON will
function.
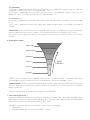
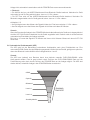
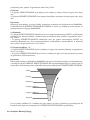
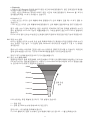
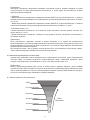
6. Auto source select
Optical input
HDMI™ ARC
Bluetooth®
Line in 1
Line in 2
Standby
INPUT
PRIORITY
The IPA™ follows a priority list for connected audio sources. A connected HDMI™ source that starts to play
has the highest priority, followed by Optical, then Bluetooth® and finally Analogue 1 and 2:
Important Note: The IPA™ can be overridden at any time by a simple manual SOURCE SELECTION from
the user. Simply press the SOURCE SELECT button on the remote, or a short press of the STANDBY
Button on the Unit.
The IPA™ will reactivate once the Unit has been put into STANDBY.
7. Low source gain (LSG™)
During our extensive testing we found that on a number of manufacturer’s equipment the digital signal
output level is lower than the expected Full Scale (FS). To allow our users to get the best audio experience
from the Q Acoustics Unit we have included a LSG™ switch.
The LSG™ switch can be found on the Rear Panel, and has two settings.
1 = Normal gain
2 = Increased 6dB of gain for Optical and HDMI™ sources

18
You should first listen to your setup with LSG™ = 1
If you find your signal level to be quite low from your TV/DVD player/Music source, please select LSG™
= 2.
Please Note: You will not require the LSG™ if you are using a Streamer/CD player Optical output. Hi-Fi
audio equipment will output FS digital audio. Audio will be highly distorted if you have LSG™ = 2 in this
scenario.
8. Source volume control
Audio sources will initially be set at a DEFAULT volume level. The volume can be adjusted separately for
each source using the VOL + and VOL – buttons on the Top Panel or IR remote. Once adjusted, the IPA™
will remember the new volume level for the currently selected source, and will return to that level each
time that source is re-selected.
9. Bluetooth®
9.1. Pairing a Bluetooth® device
The unit is designed to be Discoverable when in STANDBY, to allow AUTO ON. It is also designed to
automatically go into Pairing mode if there is no Bluetooth® device connected. To Pair your Bluetooth®
source:
1. Connect the AC Mains Cable to the Unit and switch ON.
2. Make sure Bluetooth® is enabled on the device to be Paired. The Bluetooth® controls are typically
found in the device’s ‘Settings’ or ‘Connections’ menu.
3. On your device’s list of discoverable devices, you should now see ‘Q M2’.
4. Select ‘Q M2’ and your device will now be Paired via Bluetooth® and Connected.
5. From within the music player on your device, select ‘Q M2’ as the audio output and press Play. Unless
the remote has been used to manually select another source and override the IPA™, or a higher priority
source is active, the Unit will switch to Bluetooth® input and the LED will turn Blue.
9.2. Pairing a Bluetooth® device with NFC
1. Connect the AC Mains Cable to the unit and switch ON.
2. Make sure Bluetooth® and NFC are enabled in the device settings.
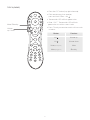
3. Place NFC device on the top surface of the Unit, in the location indicated.
Please Note: You may need to rotate your device for NFC to connect, as NFC coils are in different
locations within different devices. Please see your device instruction manual for correct NFC operation.
The distance needed for successful NFC Pairing can vary from device to device.
4. The NFC device will automatically register on screen when an NFC connection has been made.
5. Follow on-screen instructions to complete NFC Pairing. This usually involves selecting to allow NFC
Pairing.
6. Your device will now be Paired, and Connected via Bluetooth®, and will function as any other Bluetooth®
source when pressing Play from within the device music player.
Please Note: Although starting to Play a track on the connected source will cause the Unit to switch to
Bluetooth®, the Unit will stay on Bluetooth® until the source is Disconnected. It will not switch to a lower
priority source whilst the player is Paused.
Please Note: The IPA™ will switch to Bluetooth® the first time a connected device sends any audio signal,
including message alerts, notification and key press effects.
Please Note: When Connected, the device’s volume and mute buttons will control the Unit using AVRCP.
You will also notice that if you switch away from the Bluetooth® source, your currently playing track will
PAUSE for you.
Not all Bluetooth® devices are AVRCP compatible.

19
9.3. Going out of range
When a Connected device goes out of range, the Unit will remain on the Bluetooth® channel. When the
device returns in range it will automatically re-connect to the Unit. In many cases Play must be pressed
on the device to resume audio playback. Whilst out of range, the Unit source can still be changed using
the SOURCE SELECT button or by turning on a higher priority source.
Please Note: If the Bluetooth® source does not come back into range for 20 minutes the Unit will
automatically go into STANDBY.
9.4. Pairing more than one Bluetooth® device
The Unit can have up to eight Bluetooth® devices in its Pairing list. When you Pair with the 9th device the
details of the first device will be lost.
Once the Unit is connected with a device, it will stop automatically searching for other devices to Pair with
or Connect to. To Connect to another device, either Disconnect the currently connected source on the
device itself or press the Bluetooth® Pair button on the Rear Panel of the Unit.
9.5. Coming out of standby
If there is a Paired device in proximity to the Unit when it comes out of STANDBY it will automatically
initiate a connection to the device. It will not switch to Bluetooth® input until Play is pressed on the device.
10. MoviEQ™
MoviEQ™ is Q Acoustics’ preferred balance to maximize the excitement and drama from your TV and
Movie viewing.
MoviEQ™ is simply toggled On or Off by pressing the Remote Control EQ button. The LED will indicate
whether MoviEQ™ is turned on by a flash pattern shown below:
Yellow flash x 2 + yellow = MoviEQ™ On
Yellow flash x 2 + red = MoviEQ™ Off
11. Lip Sync
The Unit has a lip sync feature for its HDMI™ and Optical inputs. This allows up to 50ms of delay to be
added to the audio for synchronisation with a screen. When in Lip Sync mode, the lip sync is adjustable
in 10ms steps using the Vol + and – buttons.
To enter Lip Sync mode simply double tap the Bluetooth® Pair button on the Rear Panel of the Unit.
The lip sync time is then adjusted and displayed by the following flash pattern, the LED will maintain the
colour of the currently selected source:
0ms = 2 flash
10ms = 4 flash
20ms = 6 flash
30ms = 8 flash
40ms = 10 flash
50ms = 12 flash
After 30 seconds of no other button presses the Unit will exit Lip Sync mode and return to normal
operation. You will only have to set the Lip Sync once as the Unit remembers the delay times for both
HDMI™ and Optical separately.

20
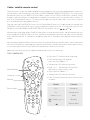
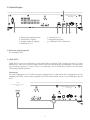
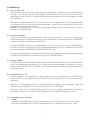
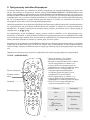
• Press the “TV” button (top left of remote).
• Point remote away from receiver,
press and hold “Select + 0”.
• The remote’s LED will flash red twice.
• Enter “1217”. The remote’s LED will flash
red twice to confirm correct code.
• Press and hold “Select + 1”.
• The remote’s LED will flash red twice.
• Press TV and your remote controls will now work
as below:
Button Function
Vol + Volume up
Vol - Volume down
Mute (short press) Mute
or Mute (long press) Standby
Source select
TYPE 1 (SATELLITE)
TV
1
+
23
6
5
4
789
0
SELECTVOL
MUTE
Volume up / down
Mute / Standby
Standby
Source select
The Q Acoustics system has been designed for easy integration into your home entertainment system as it
has the ability to be controlled by many types of PROGRAMMABLE REMOTE CONTROL. This may include
the remote control for your SATELLITE and CABLE system if it has PUNCH THROUGH capability. Punch
through is the common term for being able to program your remote control to send IR codes to both a TV
and an AV Preamplifier/Processor. To use punch through you normally select the TV you wish to support
first, and then the AV Preamplifier/Processor.
The Unit uses the PHILIPS RC5 protocol for AV Preamplifiers/Processors. Programming your remote with
PHILIPS AV codes should allow you to control volume and mute of your Unit. In some cases you may also
be able to control STANDBY and SOURCE SELECT with buttons such as and .
Manufacturers often offer several PHILIPS code options for their remote controls. We recommend that you
work through the PHILIPS code list for your remote and experiment with each one until you find one that
works well with the Unit. It is easiest to recognise when one is working by pressing the volume up/down
buttons.
We cannot guarantee that the Unit will work with your particular remote as the IR codes it sends are outside
our control, however by supporting the commonly used Philips standard we hope to have made it as easy
as possible to gain control of your device with the remote control of your choice.
Below we show how two typical programmable remote controls can be set up.
Cable / satellite remote control
Strona się ładuje...
Strona się ładuje...
Strona się ładuje...
Strona się ładuje...
Strona się ładuje...
Strona się ładuje...
Strona się ładuje...
Strona się ładuje...
Strona się ładuje...
Strona się ładuje...
Strona się ładuje...
Strona się ładuje...
Strona się ładuje...
Strona się ładuje...
Strona się ładuje...
Strona się ładuje...
Strona się ładuje...
Strona się ładuje...
Strona się ładuje...
Strona się ładuje...
Strona się ładuje...
Strona się ładuje...
Strona się ładuje...
Strona się ładuje...
Strona się ładuje...
Strona się ładuje...
Strona się ładuje...
Strona się ładuje...
Strona się ładuje...
Strona się ładuje...
Strona się ładuje...
Strona się ładuje...
Strona się ładuje...
Strona się ładuje...
Strona się ładuje...
Strona się ładuje...
Strona się ładuje...
Strona się ładuje...
Strona się ładuje...
Strona się ładuje...
Strona się ładuje...
Strona się ładuje...
Strona się ładuje...
Strona się ładuje...
Strona się ładuje...
Strona się ładuje...
Strona się ładuje...
Strona się ładuje...
Strona się ładuje...
Strona się ładuje...
Strona się ładuje...
Strona się ładuje...
Strona się ładuje...
Strona się ładuje...
Strona się ładuje...
Strona się ładuje...
Strona się ładuje...
Strona się ładuje...
Strona się ładuje...
Strona się ładuje...
Strona się ładuje...
Strona się ładuje...
Strona się ładuje...
Strona się ładuje...
Strona się ładuje...
Strona się ładuje...
Strona się ładuje...
Strona się ładuje...
Strona się ładuje...
Strona się ładuje...
Strona się ładuje...
Strona się ładuje...
Strona się ładuje...
Strona się ładuje...
Strona się ładuje...
Strona się ładuje...
Strona się ładuje...
Strona się ładuje...
Strona się ładuje...
Strona się ładuje...
Strona się ładuje...
Strona się ładuje...
Strona się ładuje...
Strona się ładuje...
Strona się ładuje...
Strona się ładuje...
Strona się ładuje...
Strona się ładuje...
Strona się ładuje...
Strona się ładuje...
Strona się ładuje...
Strona się ładuje...
Strona się ładuje...
Strona się ładuje...
Strona się ładuje...
Strona się ładuje...
Strona się ładuje...
Strona się ładuje...
Strona się ładuje...
Strona się ładuje...
Strona się ładuje...
Strona się ładuje...
Strona się ładuje...
Strona się ładuje...
Strona się ładuje...
Strona się ładuje...
Strona się ładuje...
Strona się ładuje...
Strona się ładuje...
Strona się ładuje...
Strona się ładuje...
Strona się ładuje...
Strona się ładuje...
Strona się ładuje...
Strona się ładuje...
Strona się ładuje...
Strona się ładuje...
Strona się ładuje...
Strona się ładuje...
Strona się ładuje...
Strona się ładuje...
Strona się ładuje...
Strona się ładuje...
Strona się ładuje...
Strona się ładuje...
Strona się ładuje...
Strona się ładuje...
Strona się ładuje...
Strona się ładuje...
Strona się ładuje...
Strona się ładuje...
Strona się ładuje...
Strona się ładuje...
Strona się ładuje...
Strona się ładuje...
Strona się ładuje...
Strona się ładuje...
Strona się ładuje...
Strona się ładuje...
Strona się ładuje...
Strona się ładuje...
Strona się ładuje...
Strona się ładuje...
Strona się ładuje...
Strona się ładuje...
Strona się ładuje...
Strona się ładuje...
Strona się ładuje...
Strona się ładuje...
Strona się ładuje...
Strona się ładuje...
Strona się ładuje...
Strona się ładuje...
Strona się ładuje...
Strona się ładuje...
Strona się ładuje...
Strona się ładuje...
Strona się ładuje...
Strona się ładuje...
Strona się ładuje...
Strona się ładuje...
Strona się ładuje...
Strona się ładuje...
Strona się ładuje...
Strona się ładuje...
Strona się ładuje...
Strona się ładuje...
Strona się ładuje...
Strona się ładuje...
Strona się ładuje...
Strona się ładuje...
Strona się ładuje...
Strona się ładuje...
Strona się ładuje...
Strona się ładuje...
Strona się ładuje...
Strona się ładuje...
Strona się ładuje...
Strona się ładuje...
Strona się ładuje...
Strona się ładuje...
Strona się ładuje...
Strona się ładuje...
Strona się ładuje...
Strona się ładuje...
Strona się ładuje...
Strona się ładuje...
Strona się ładuje...
Strona się ładuje...
Strona się ładuje...
Strona się ładuje...
Strona się ładuje...
Strona się ładuje...
Strona się ładuje...
Strona się ładuje...
Strona się ładuje...
Strona się ładuje...
Strona się ładuje...
Strona się ładuje...
Strona się ładuje...
Strona się ładuje...
Strona się ładuje...
Strona się ładuje...
Strona się ładuje...
Strona się ładuje...
Strona się ładuje...
Strona się ładuje...
Strona się ładuje...
Strona się ładuje...
Strona się ładuje...
Strona się ładuje...
Strona się ładuje...
Strona się ładuje...
Strona się ładuje...
Strona się ładuje...
Strona się ładuje...
Strona się ładuje...
Strona się ładuje...
Strona się ładuje...
Strona się ładuje...
Strona się ładuje...
Strona się ładuje...
Strona się ładuje...
Strona się ładuje...
Strona się ładuje...
Strona się ładuje...
Strona się ładuje...
Strona się ładuje...
Strona się ładuje...
Strona się ładuje...
Strona się ładuje...
Strona się ładuje...
Strona się ładuje...
Strona się ładuje...
Strona się ładuje...
Strona się ładuje...
Strona się ładuje...
Strona się ładuje...
Strona się ładuje...
Strona się ładuje...
Strona się ładuje...
Strona się ładuje...
Strona się ładuje...
Strona się ładuje...
Strona się ładuje...
Strona się ładuje...
Strona się ładuje...
Strona się ładuje...
Strona się ładuje...
Strona się ładuje...
Strona się ładuje...
Strona się ładuje...
Strona się ładuje...
Strona się ładuje...
Strona się ładuje...
Strona się ładuje...
Strona się ładuje...
-
 1
1
-
 2
2
-
 3
3
-
 4
4
-
 5
5
-
 6
6
-
 7
7
-
 8
8
-
 9
9
-
 10
10
-
 11
11
-
 12
12
-
 13
13
-
 14
14
-
 15
15
-
 16
16
-
 17
17
-
 18
18
-
 19
19
-
 20
20
-
 21
21
-
 22
22
-
 23
23
-
 24
24
-
 25
25
-
 26
26
-
 27
27
-
 28
28
-
 29
29
-
 30
30
-
 31
31
-
 32
32
-
 33
33
-
 34
34
-
 35
35
-
 36
36
-
 37
37
-
 38
38
-
 39
39
-
 40
40
-
 41
41
-
 42
42
-
 43
43
-
 44
44
-
 45
45
-
 46
46
-
 47
47
-
 48
48
-
 49
49
-
 50
50
-
 51
51
-
 52
52
-
 53
53
-
 54
54
-
 55
55
-
 56
56
-
 57
57
-
 58
58
-
 59
59
-
 60
60
-
 61
61
-
 62
62
-
 63
63
-
 64
64
-
 65
65
-
 66
66
-
 67
67
-
 68
68
-
 69
69
-
 70
70
-
 71
71
-
 72
72
-
 73
73
-
 74
74
-
 75
75
-
 76
76
-
 77
77
-
 78
78
-
 79
79
-
 80
80
-
 81
81
-
 82
82
-
 83
83
-
 84
84
-
 85
85
-
 86
86
-
 87
87
-
 88
88
-
 89
89
-
 90
90
-
 91
91
-
 92
92
-
 93
93
-
 94
94
-
 95
95
-
 96
96
-
 97
97
-
 98
98
-
 99
99
-
 100
100
-
 101
101
-
 102
102
-
 103
103
-
 104
104
-
 105
105
-
 106
106
-
 107
107
-
 108
108
-
 109
109
-
 110
110
-
 111
111
-
 112
112
-
 113
113
-
 114
114
-
 115
115
-
 116
116
-
 117
117
-
 118
118
-
 119
119
-
 120
120
-
 121
121
-
 122
122
-
 123
123
-
 124
124
-
 125
125
-
 126
126
-
 127
127
-
 128
128
-
 129
129
-
 130
130
-
 131
131
-
 132
132
-
 133
133
-
 134
134
-
 135
135
-
 136
136
-
 137
137
-
 138
138
-
 139
139
-
 140
140
-
 141
141
-
 142
142
-
 143
143
-
 144
144
-
 145
145
-
 146
146
-
 147
147
-
 148
148
-
 149
149
-
 150
150
-
 151
151
-
 152
152
-
 153
153
-
 154
154
-
 155
155
-
 156
156
-
 157
157
-
 158
158
-
 159
159
-
 160
160
-
 161
161
-
 162
162
-
 163
163
-
 164
164
-
 165
165
-
 166
166
-
 167
167
-
 168
168
-
 169
169
-
 170
170
-
 171
171
-
 172
172
-
 173
173
-
 174
174
-
 175
175
-
 176
176
-
 177
177
-
 178
178
-
 179
179
-
 180
180
-
 181
181
-
 182
182
-
 183
183
-
 184
184
-
 185
185
-
 186
186
-
 187
187
-
 188
188
-
 189
189
-
 190
190
-
 191
191
-
 192
192
-
 193
193
-
 194
194
-
 195
195
-
 196
196
-
 197
197
-
 198
198
-
 199
199
-
 200
200
-
 201
201
-
 202
202
-
 203
203
-
 204
204
-
 205
205
-
 206
206
-
 207
207
-
 208
208
-
 209
209
-
 210
210
-
 211
211
-
 212
212
-
 213
213
-
 214
214
-
 215
215
-
 216
216
-
 217
217
-
 218
218
-
 219
219
-
 220
220
-
 221
221
-
 222
222
-
 223
223
-
 224
224
-
 225
225
-
 226
226
-
 227
227
-
 228
228
-
 229
229
-
 230
230
-
 231
231
-
 232
232
-
 233
233
-
 234
234
-
 235
235
-
 236
236
-
 237
237
-
 238
238
-
 239
239
-
 240
240
-
 241
241
-
 242
242
-
 243
243
-
 244
244
-
 245
245
-
 246
246
-
 247
247
-
 248
248
-
 249
249
-
 250
250
-
 251
251
-
 252
252
-
 253
253
-
 254
254
-
 255
255
-
 256
256
-
 257
257
-
 258
258
-
 259
259
-
 260
260
-
 261
261
-
 262
262
-
 263
263
-
 264
264
-
 265
265
-
 266
266
-
 267
267
-
 268
268
-
 269
269
-
 270
270
-
 271
271
-
 272
272
-
 273
273
-
 274
274
-
 275
275
-
 276
276
-
 277
277


Q Acoustics M2 Soundbase Instrukcja obsługi
- Kategoria
- Głośniki soundbar
- Typ
- Instrukcja obsługi
w innych językach
Powiązane artykuły
Inne dokumenty
-
Blaupunkt LS200SUB Instrukcja obsługi
-
audizio SB80 Instrukcja obsługi
-
-
audizio 100.294 Instrukcja obsługi
-
Kruger Matz KM0352 Instrukcja obsługi
-
Yamaha RX-A2000 Instrukcja obsługi
-
-
-
-