Electrolux EMS2840 Instrukcja obsługi
- Kategoria
- Mikrofale
- Typ
- Instrukcja obsługi

8221914 - 20 - 02
Multi Language
User Manual
Model EMS2840

The symbol on the product or on its packaging indicates that this product may not be treated as household waste. Instead it shall
be handed over to the applicable collection point for the recycling of electrical and electronic equipment. By ensuring this product is
disposed of correctly, you will help prevent potential negative consequences for the environment and human health, which could
otherwise be caused by inappropriate waste handling of this product. For more detailed information about recycling of this product,
please contact your local city office, your household waste disposal service or the shop where you purchased the product.
,
. ,
. ,
,
. -
, , .
Simbol
na proizvodu ili na njegovoj ambalaži ozna uje da se s tim proizvodom ne smije postupiti kao s otpadom iz doma instva.
Umjesto toga treba biti uru
en prikladnim sabirnim to kama za recikliranje elektroni kih i elektri kih aparata. Ispravnim odvoženjem
ovog proizvoda sprije
it ete potencijalne negativne posljedice na okoliš i zdravlje ljudi, koje bi ina e mogli ugroziti
neodgovaraju
im rukovanjem otpada ovog proizvoda. Za detaljnije informacije o recikliranju ovog proizvoda molimo Vas da
kontaktirate Vaš lokalni gradski ured, uslugu za odvoženje otpada iz doma
instva ili trgovinu u kojoj ste kupili proizvod.
Symbol
na výrobku nebo jeho balení udává, že tento výrobek nepat í do domácího odpadu. Je nutné odvézt ho do sb rného
místa pro recyklaci elektrického a elektronického za
ízení. Zajišt ním správné likvidace tohoto výrobku pom žete zabránit
negativním d
sledk mproživotníprostedí a lidské zdraví, které by jinak byly zp sobeny nevhodnou likvidací tohoto výrobku.
Podrobn
jší informace o recyklaci tohoto výrobku zjistíte u p íslušného místního ú adu, služby pro likvidaci domovního odpadu nebo
v obchod
, kde jste výrobek zakoupili.
A terméken vagy a csomagoláson található
szimbólum aztjelzi, hogy a termék nem kezelhet háztartási hulladékként.Ehelyett a
terméket el kell szállítani az elektromos éselektronikai készülékek újrahasznosítására szakosodottmegfelel
begy jt helyre.Azzal,
hogy gondoskodik ezen termék helyes hulladékbahelyezésér
l, segít megel zni azokat, a környezetre és az emberiegészségre
gyakorolt potenciális kedvez
tlen következményeket,amelyeket ellenkez esetben a termék nem megfelel hulladékkezelése
okozhatna.Ha részletesebb tájékoztatásra van szüksége a termékújrahasznosítására vonatkozóan, kérjük, lépjen kapcsolatba ahelyi
önkormányzattal, a háztartási hulladékok kezelését végz
szolgálattal vagy azzal a bolttal, ahol a terméket vásárolta.
Symbol
na produkcie lub na opakowaniu oznacza, e tego produktu nie wolno traktowa tak, jak innych odpadów domowych.
Nale
y odda go do wła ciwego punktu skupu surowców wtórnych zajmuj cego si złomowanym sprz tem elektrycznym i
elektronicznym. Wła
ciwa utylizacja i złomowanie pomaga w eliminacji niekorzystnego wpływu złomowanych produktów na
rodowisko naturalne oraz zdrowie. Aby uzyska szczegółowe dane dotycz ce mo liwo ci recyklingu niniejszego urz dzenia, nale y
skontaktowa
si z lokalnym urz dem miasta, słu bami oczyszczania miasta lub sklepem, w którym produkt został zakupiony.
Simbolul
de pe produs sau de pe ambalaj indic faptul c produsul nu trebuie aruncat împreun cu gunoiul menajer. Trebuie
predat la punctul de colectare corespunz
tor pentru reciclarea echipamentelor electrice i electronice. Asigurându-v c a i eliminat în
mod corect produsul, ajuta
ilaevitareapotenialelor consecin e negative pentru mediul înconjur tor ipentrus n tatea persoanelor,
consecin
e care ar putea deriva din aruncarea necorespunz toare a acestui produs. Pentru mai multe informa ii detaliate despre
reciclarea acestui produs, v
rug ms contacta i biroul local, serviciul pentru eliminarea de eurilor sau magazinul de la care l-a i
achizi
ionat.
Symbol
na výrobku alebo na jeho obale znamená, že s výrobkom sa nesmie zaobchádza ako s domovým odpadom. Namiesto
toho ho treba odovzda
v zbernom stredisku na recykláciu elektrických alebo elektronických zariadení. Zabezpe te, že tento výrobok
bude zlikvidovaný správnym postupom, aby ste predišli negatívnym vplyvom na životné prostredie a
udské zdravie, obybolo
spôsobené nesprávnym postupom pri jeho likvidácii. Podrobnejšie informácie o recyklácii tohto výrobku získate, ak zavoláte miestny
úrad vo Vašom bydlisku, zberné suroviny alebo obchod, v ktorom ste výrobok kúpili.
Simbol
na izdelku ali njegovi embalaži ozna uje, da z izdelkom ni dovoljeno ravnati kot z obi ajnimi gospodinjskimi
odpadki, Izdelek odpeljite na ustrenzo zbirno mesto za predelavo elektri
ne in elektronske opreme.
S pravilnim na
inom odstranjevanja izdelka boste pomagali prepreViti morebitne negativne posledice in vplive na okolje
in zdravje ljudi, ki bi se lahko pojavile v primeru nepravilnega odstranjevanja izdelka.
Za podrobnejše informacije o odstranjevanju in predelavi izdelka se obrnite na pristojen mestni organ za odstranjevanje
odpadkov, komunalno službo ali na trgovino, v kateri ste izdelek kupili.

EMS2840 t English
3
Before using your microwave oven 4
Technical data 4
Safety instructions 5
– Utensil safety 5
– Testing suitability of Cookware 5
– Food safety 6
– Safety Instructions when Cooking with Grill 7
– Installation 8
– Oven utensils and accessories guide 9
– Unpacking 9
How to operate your microwave oven 10
– Name and function of parts 10
– Turntable Installation 10
– Control panel 11
– Setting the Clock 12
– Child Safety Lock 12
– To Stop the Oven 12
– Switching the beeper off 13
– Quick Start 13
– Microwave Power setting Guide 13
– Microwave cooking 14
– Cooking with Grill 14
– Combination Cooking 15
– Automatic Defrost 16
– Automatic Reheat 17
Charts 18
– Recommendations for Cooking with Grill 18
– Recommendations for Cooking with
Microwave and Grill 18
– Recommendations for Manual Defrost 19
– Auto Reheat Programmes Chart 20
– Auto Defrost Programmes Chart 21
Microwave Hints 22
Care and cleaning 23
– Cleaning the accessories (turntable and support) 23
– Cleaning the interior 23
– Cleaning the Grill 23
– Cleaning the exterior 23
Guarantee Conditions 24
Contents

EMS2840 t English
4
Thank you for having chosen a Electrolux product. We are convinced that you will find your new microwave
oven very useful and that it will be of great help to you. As with all new kitchen appliances, it will take some
time to learn all the new functions and features, but with time, this oven will become indispensable to you.
Read through the instruction manual carefully. In order that you can get the best from your new Electrolux
Microwave Oven, the following instructions have been prepared. Please make sure you read them carefully.
It is important that this instruction book is retained with the appliance for future reference. Should the appliance
be sold or transferred to another owner, or if you move house and leave the appliance, always ensure that the
book is supplied with the appliance or that the new owner can be acquainted with the functioning of the
appliance and the relevant warnings.
Please ensure you have read the whole instruction book before using the appliance and that you follow the
recommendations given.
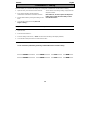
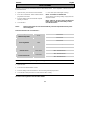
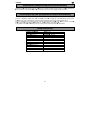
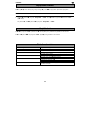
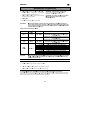
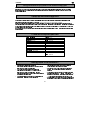
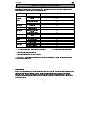
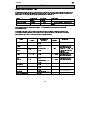
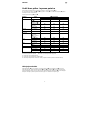
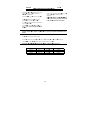
Overall dimension Weight 17 kg
Width 519 mm
Volume 28 Litre
Depth 454 mm
Height 303 mm
Power source 230V, 50 Hz
Cavity dimension Fuse 16A
Width 337 mm
Power consumption 2800W
Depth 341.5 mm
Height 254 mm
Power output 900W
Grill 1300W
Congratulations on the purchase of your new Microwave Oven
Before using your Microwave Oven
Technical data

EMS2840 t English
5
READ CAREFULLY AND KEEP FOR FUTURE REFERENCE
• The built-in safety interlock switches prevent the
microwave oven from operating when the door is
open.
• Do not tamper with them, or attempt to operate
the oven with the door open as open door
operation can result in exposure to microwave
energy.
• Do not allow food spills or cleaner residue to
accumulate on door sealing surfaces. See the
Cleaning and Care section for cleaning
instructions.
• It is particularly important that the oven door
closes properly and that there is no damage to
the: (1) door (warped), (2) hinges and latches
(broken or insecure), (3) door seals and sealing
surface.
WARNING : If the door,
hinges/latches or door seals are damaged,
the microwave must not be operated until
it has been repaired by a authorized
service person.
WARNING : It is hazardous for
anyone except factory trained service
personnel to service or make adjustments
to this oven. Contact your nearest
authorised service agent if service should
be required.
• Do not remove the outer case, door or control
panel at any time. Doing so may cause exposure
to extremely high voltage.
• Install or locate this oven only in accordance with
‘installation instructions’ found in this manual.
•
Use the appliance for its intended use as
described in this manual. Do not use corrosive
chemicals in this appliance. This type of oven is
specifically designed to heat, cook, or defrost
food. It is not designed for industrial or laboratory
use neither for commercial use as this will
invalidate the guarantee.
•
Do not operate the oven empty. If food or water is
not present to absorb the microwave energy, the
magnetron tube can be damaged.
•
Do not store this appliance outdoors. Do not use
this product near water.
•
Do not attempt to dry clothing or newspapers in
the microwave oven. These items can ignite.
•
Do not use the cavity for storage purposes. Do
not leave paper products, cooking utensils, or
food in the cavity when not in use.
•
The temperature of accessible surfaces may be
high when the appliance is operating.
WARNING : If smoke is observed,
switch off or unplug the appliance and
keep the door closed in order to stifle any
flames. Never use water.
WARNING : Only allow children or
infirm persons to use the microwave,
without supervision, when adequate
instructions have been given so that the
child or infirm person is able to use the
microwave in a safe way and understand
the hazards of improper use.
Utensil safety
•
Only use utensils that are suitable for use in a
microwave oven.
•
Most glass, glass ceramic and heat-resistant
glass-ware utensils are excellent for use in the
micro-wave oven. Although microwave energy will
not heat most glass and ceramic items, these
utensils can become hot as heat transfers from
the food to the container. The use of oven gloves
to remove dishes is recommended.
Testing suitability of cookware
•
Utensils should be checked to ensure they are
suitable for use in Microwave Ovens.
•
Place the cookware in the microwave along with a
glass half full of water. Heat on (900W) (100%) for
one minute. If the cookware feels hot, you should
not use it. If it is just slightly warm, you can use it
for reheating but not for cooking. If the dish is
room temperature, it is suitable for microwave
cooking.
Important Safety instructions.

EMS2840 t English
6
• Paper napkins, wax paper, paper towels, plates,
cups, cartons, freezer wrap and cardboard are
great convenience utensils. Always be sure
containers are filled with food to absorb energy
and thus avoid the possibility of overheating or
ignition.
• Many plastic dishes, cups, freezer containers and
plastic wraps may be used in the microwave
oven. Follow manufacturer’s instructions when
using plastics in the oven. Avoid using plastic
utensils with foods that have high fat or sugar
content since these foods reach high
temperatures and could melt some plastics.
•
Do not leave oven unattended, and look at it from
time to time when heating or cooking food in
plastic, paper or other combustible containers.
•
Metal utensils and utensils with metallic trim
should not be used in the microwave oven, unless
specifically recommended for microwave use.
•
Containers with restricted openings, such as
bottles, should not be used for microwave
cooking.
•
Use caution when removing a lid or cover from a
dish to avoid steam burns.
Foil containers
Shallow foil containers may safely be used to reheat
foods in your microwave oven providing the following
rules are observed:
1.
Foil containers should not be more than 3 cms
(1 1/4”) deep.
2.
Foil lids must not be used.
3.
The foil containers must be at least two-thirds full
of food. Empty containers must never be used.
4.
Foil containers should be used singly in the
microwave oven and should not be allowed to
touch the sides. If your oven has a metal turntable
or cooking rack, the foil container should be
placed on an upturned oven-proof plate.
5.
Foil containers should never be re-used in the
microwave oven.
6.
If the microwave oven has been in use for 15
minutes or more, allow it to cool before using it
again.
7.
The container and turntable may become hot
during use, take great care when removing either
from the oven. It is advisable to use an oven cloth
or glove when doing so.
8.
Remember when using an aluminium foil
container that the reheating or cooking times may
be longer than you are used to, always ensure
that the food is piping hot before serving.
Food safety
•
Do not heat food in a can in the microwave oven.
Always remove the food to a suitable container.
•
Deep fat frying should not be done in the
microwave oven, because the fat temperature
cannot be controlled, hazardous situations can
result.
•
Popcorn may be prepared in the microwave oven,
but only in special packages or utensils designed
specifically for this purpose. This cooking
operation should never be unattended.
•
Pierce foods with non-porous skins or
membranes to prevent steam build-up and
bursting. Apples, potatoes, chicken livers, and
egg yolks are examples of items that should be
pierced.
•
The contents of feeding bottles and baby food jars
are to be stirred or shaken and the temperature is
to be checked before consumption, in order to
avoid burns.
WARNING : Liquids or other foods
must not be heated in sealed containers
since they are liable to explode.
WARNING : Microwave heating of
beverages can result in delayed eruptive
boiling, therefore care must be taken when
handling the container.
WARNING : When heating liquids,
e.g. soups, sauces and beverages in your
microwave oven, overheating the liquid
beyond boiling point can occur without
evidence of bubbling. This could result in a
sudden boil over of the hot liquid. To
prevent this possibility the following steps
should be taken:

EMS2840 t English
7
1. Avoid using straight-sided containers with narrow
necks.
2. Do not overheat.
3. Stir the liquid before placing the container in the
oven and again halfway through the heating time.
4. After heating, allow to stand in the oven for a
short time, stirring again before carefully removing
the container.
WARNING : Some products such as
whole eggs and sealed containers – for
example, closed glass jars – may explode
and should not be heated in this oven.
Occasionally, poached eggs may explode
during cooking. Always pierce the yolk,
then cover and allow the standing time of
one minute before removing cover.
It is quite normal for steam to be emitted
around the door, or for misting to occur on the
door, or even for water droplets to appear
below the door during the cooking cycle. This
is merely condensation from the heat of the
food and does not affect the safety of your
oven. The door is not intended to seal
the oven cavity completely.
• Do not force the turntable to rotate by hand. This
may cause malfunctioning.
• Arcing in the oven during microwave operation
usually occurs from use of metallic utensils.
Continuous arcing, however, can damage the
unit. Stop the programme and check the utensil.
• Care should be taken not to obstruct any air vents
located on the top, rear, side and bottom of the
oven.
m WARNING : Do not use this oven for
commercial purposes.This oven is made
for domestic use only.
Safety instructions when
cooking with grill, combination modes.
1. The glass viewing window may break if water is
spilled on it during grill cooking.
2. Be sure to use an oven glove when loading and
unloading the oven. Containers get very hot in the
oven, so be careful not to burn yourself. The turn-
table and metal rack also get very hot so be sure
to use an oven glove when handling them.
3. Do not touch the inner or outer viewing window
with metal components when loading or unloading
the oven. The inside of the door and oven get
very hot so take care when attending food in the
oven.
4. Do not put the turntable or containers in cold
water or try to cool them quickly after use.
5. Do not place items on top of the cabinet. The top
of the cabinet gets very hot, so anything placed
on it may be damaged by the heat.
6. Preheat your oven only when using the Grill,
never when using microwave or combination
modes (Microwave and Grill)
Warning : When the appliance is
used in combination mode, Children
should only use the oven under adult
supervision due to the temperature
generated.
Keep these instructions!

EMS2840 t English
8
1. Remove any promotion label from the door.
2. The oven should be installed on a flat, level
surface. The surface must be strong enough to
safely bear the weight (17 kg) of the oven, and
the contents. To avoid the possibility of causing
vibration or noise the oven must be in a stable
position.
3. Keep the oven away from heat and water.
Exposure to heat and water can lower oven
efficiency and lead to malfunctioning, so be sure to
install the oven away from heat and water sources.
4. Do not block air vents on the top and the sides of
the cabinet and also do not place any articles on
the top of the oven. If air vents are blocked during
operation, the oven may overheat, and this may
lead to malfunctioning. Hot air escapes from the
vents, so be sure not to obstruct it or let curtains
come between the oven and the rear wall.
5. Place the oven as far away from radios and TV’s
as possible. This oven does conform to EEC
requirements of radio interference suppression, but
some interference may occur if it is placed too
close to a radio or TV, so keep them as far apart
as possible.
6. If positioned in a corner, leave a gap of at least
10 cm from the walls and 10 cm above the
microwave.
IMPORTANT! The oven can be placed almost
anywhere in the kitchen. Make sure the oven is
placed on a flat, level surface and that vents as
well as the surface underneath the oven are not
blocked (for sufficient ventilation).
Connecting to the mains
The oven is delivered with the power cord and a plug
for 230V, 50Hz, earthed socket outlet.
Earth protection minimises the risks should a short
circuit occur. Check to ensure the voltage of the oven
matches the supply.
N.B. If the oven is connected to the socket via an
extension cord, make sure the cord is earthed.
This appliance must not be used on a non-
earth protected power supply. Contact an
electrician if you are uncertain regarding
electrical connection of the oven or
provision of earth protection of the
supply.
This appliance must be earthed. If this
appliance is fitted with a non-rewireable
plug for which your socket is unsuitable, it
must be replaced by the manufacturer, its
service agent or similarly qualified persons
in order to avoid a hazard.
If the supply cord is damaged, it must be
replaced by the manufacturer, its service
agent or similarly qualified persons in
order to avoid a hazard.
Installation.

EMS2840 t English
9
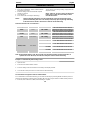
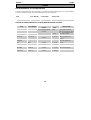
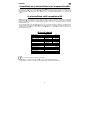
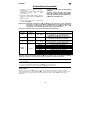
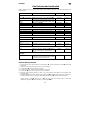
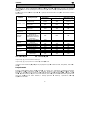
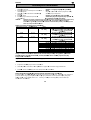
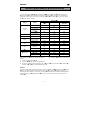
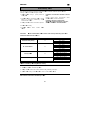
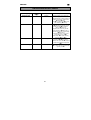
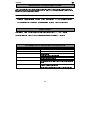
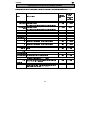
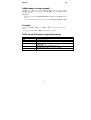
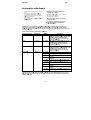
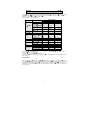
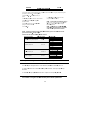
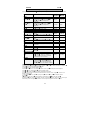
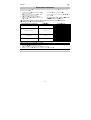
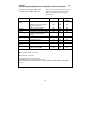
A variety of Utensils and Materials may be used for cooking in your microwave oven. For your safety and to
prevent damaging utensils and your oven choose appropriate utensils and materials for each cooking method.
The list below is a general guide.
Mode of operation
Material Utensils
Microwave Grill Combination
Corning ware YES YES YES
Heat resistant glass
ware
YES*1 YES YES*1
Glass ware with metal
decoration
NO NO NO
Ceramic &
Glass
Lead crystal glass NO NO NO
China
Without metal
decoration
YES YES NO
Pottery*2 YES YES YES
Microwave oven
heat-proof wear
YES NO NO
Plastic
Plastic wrap YES NO NO
Metal Baking pan NO YES NO
Aluminium foil*3 YES YES YES
Cups, plates, towels YES NO NO
Paper
Waxed paper YES NO NO
Wood NO NO NO
Grill rack NO YES YES
Turntable YES YES YES
Accessories
Turntable support YES YES YES
YES: Utensils and accessories to use NO: Utensils and accessories to avoid
*1 Only if there is no metal trim.
*2 Only if it does not have a glaze containing metal.
*3 NOTE: Use aluminium foil only for shielding purposes, over use may cause arcing.
Unpacking
N.B. When you unpack the oven, check that the product is free from damage. Damage or any missing parts must be
reported immediately to the retailer. The oven, parts of the oven or the accessories may be wrapped by a protection foil. If
so, you must remove this foil before using the oven. Do not leave packing material so that small children can play with it.
This can be hazardous.
Oven utensils and accessories guide

EMS2840 t English
10
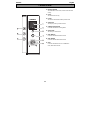
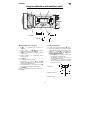
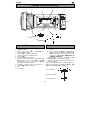
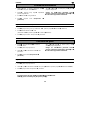
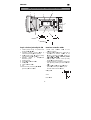
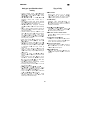
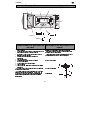
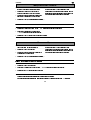
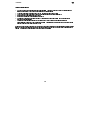
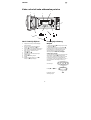
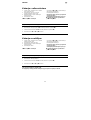
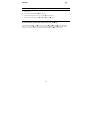
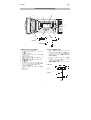
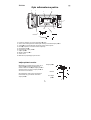
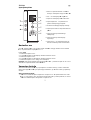
1. Cooking compartment. Wipe the compartment
clean after using the oven.
2. Viewing window. Food can be checked while the
microwave oven is in operation.
3. Oven door. The door must always be firmly
closed while cooking.
4. Safety Latch and Interlock System.
5. Control panel.
6. Drive shaft for turntable.
7. Turntable.
8. Turntable support.
9. Grill Element.
10. Grilling rack, used for most cooking and
browning/grilling.
1. Place the turntable support on the cavity Bottom.
2. Place the turntable on top of the turntable support
as shown in the diagram. Make sure that turntable
hub is securely locked in the turntable shaft. Never
place the turntable upside down.
• Both turntable and turntable support must always be
used during cooking.
• All food and containers of food are always placed on
this turntable for cooking.
• This turntable rotates clockwise and anticlockwise;
this is normal.
Turntable
Roller rest
Turntable Shaft
1
2
3
5
4
6
7
8
4
9
10
How to operate your microwave oven
Name and function of parts Turntable Installation

EMS2840 t English
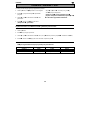
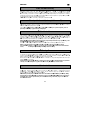
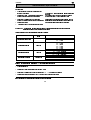
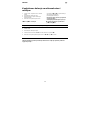
11
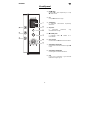
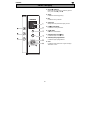
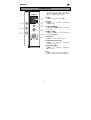
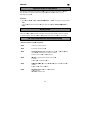
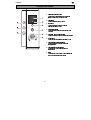
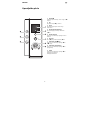
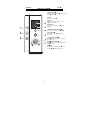
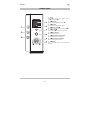
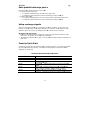
1. Display Window
To view either Cook time, Power level and time
of day.
2. Clock
To set the time of day
3. Power
To set the desired Microwave power level
4. Stop/Clear
To stop or pause your Microwave
5. Setting Control Knob
Used to set desired cooking times.
6. Quick Start
To start your microwave
7. Auto Defrost
Used to set desired Defrost mode.
8. Auto Reheat
Used to set desired Reheat mode.
9. Grill
Used to set desired Grill or Combination
Grill / Microwave mode.
Control Panel

EMS2840 t English
12
When your oven is plugged in for the first time or when power resumes after a power interruption, the display
window flash and show " 88:88 "
This oven can be set for 12hr mode or 24hr mode, to set 24hr mode press the Clock button once, to set 12hr
mode press the clock button twice.
Example: To set 4.30 (12 hr mode)
1. Touch the Clock button twice.
2. Set the time to " 4:00 " using the setting control knob
3. Touch the Clock Button
4. Set the time to " 4:30 " using the setting control knob
5. Touch the Clock button. (The Time will now be set)
NOTE : It is possible to display the current time even after starting the mode set, by pressing the
Clock button (the time is displayed for 2 seconds).
This oven has a safety feature which prevents the accidental running of the oven by a child. After the lock has
been set, no part of the microwave oven will operate until the child lock feature has been cancelled.
To set:
1. Touch the ’ Stop/Clear ’ button and the ’ Clock ’ button at the same time. ’ L ’ will appear in the display.
To cancel the child lock, simply touch the ’ Stop/Clear ’ button and the ’ Clock ’ button at the same time.
There are two way to stop the oven whilst it is in use.
1. Press the Stop/Clear button
• You may restart the oven by pressing the Start button
• Pressing Stop/Clear again will reset the current programme
2. Open the door
• You may restart the oven by closing the door and pressing the Start button
• Pressing Stop/Clear again will cancel the current programme
Setting the Clock
Child safety lock
To Stop the Oven

EMS2840 t English
13
This oven has a feature which allows you to turn off the beeper. When this is set you will turn off the beeps
which occur when you press a button, this will also disarm the beeps which occur at the end of a program.
To set:
1. Touch the ’ Stop/Clear ’ button and the ’ Start ’ button at the same time. ’ OFF ’ will appear in the display.
To cancel, simply touch the ’ Stop/Clear ’ button and the ’ Start ’ button at the same time.
Pressing the ’ Start ’ button allows you to start your microwave at full power (900W) for 30 seconds.
Each time you press the ’ Start ’ button you will increase the cooking time by 30 seconds.
Power Setting Suggested use
100W Keeping warm : Keeping foods warm
180W
Thawing frozen foods.
Simmer : Completing the cooking cycle of some pot roasts.
Casseroles and stews.
300W
Baked custards or cheesecakes.
Medium : Faster defrosting for casseroles and stews.450W
Baking cakes and sponge puddings
Reheat : Reheating of casseroles and stews..
Reheating pre-cooked foods.
600W
Roasting joints of meat and poultry.
900W Max Power; Boiling or reheating liquids. Cooking vegetables.
Preheating a browning dish.
Quick Start
Microwave Power setting Guide
Switching the Beeper Off

EMS2840 t English
14
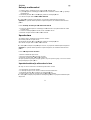
1. Open the door, place the food on the turntable.
Close the door.
2. Press the ’ Power ’ button until the desired power
level is reached.
3. Set the desired time by turning the setting control
knob.
4. Press Start (The oven begins cooking.)
To turn off the oven during cooking, simply touch the
Stop/Clear button.
Note: After use, be sure to press the Stop/Clear
button Twice as this will ensure that you have
reset the microwave.
Example: To cook at 450W for 15 minutes
1. Touch the Power button 3 times ( ’ 450 ’ should now be showing in the display window).
2. Turn the setting control knob
( ’ 15:00 ’ should now be showing in the display window).
3. Press start. The Oven will now start cooking.
1. Open the door, place the food on the Grill rack.
2. Press The Grill button once.
3. Set the desired time by turning the setting control
knob.
4. Close the Door.
5. Press Start (The oven begins cooking.)
To turn off the oven during cooking, simply touch the
Stop/Clear button.
Note: After use, be sure to press the Stop/Clear
button Twice as this will ensure that you have
reset the microwave.
Note: You may detect smoke or a burning smell
when using your grill for the first time, this is
normal and not a sign that the oven is out order.
To avoid this problem, when using your grill for
the first time, heat the oven without any food for
10 minutes on grill.
Example: To cook with Grill for 15 minutes
1. Touch the Grill button X 1
2. Turn the setting control knob. ( ’ 15:00 ’ Should now be showing in the display window).
3. Press start. The Oven will now start.
You should preheat the grill before use.
To preheat the grill you should set the grill as described above for 3 - 4 minutes.
Microwave Cooking
Cooking With Grill

EMS2840 t English
15
This oven offers you a choice three settings for cooking with combined Grill and Microwave Cooking
1. Open the door, place the food on the Grill rack.
2. Press The Grill button until the required
combination of Microwave and Grill is reached.
3. Set the desired time by turning the setting control
knob.
4. Close the door then press Start (The oven
begins cooking.)
To turn off the oven during cooking, simply touch the
Stop/Clear button.
Note: After use, be sure to press the Stop/Clear
button Twice as this will ensure that you have
reset the microwave.
Example: To cook with Grill and 450W microwave power for 15 minutes
1. Open the door
2. Touch the Grill button X 3
3. Turn the setting control knob. ( ’ 15:00 ’ Should now be showing in the display window).
4. Close the door then press start. The Oven will now start.
You do not need to preheat the grill during combined Microwave and Grill cooking.
Combination Grill Setting Press Button Grill Power Microwave Power
Combi 1 2 times Full 600W
Combi 2 3 times Full 450W
Combi 3 4 times Full 300W
Combination Cooking

EMS2840 t English
16
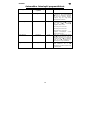
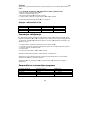
1. Open the door, place the food on the turntable.
2. Press the ’ Auto Defrost ’ button until the desired
programme is reached.
3. Turn the setting control knob until the required
quantity is reached.
4. Close the door.
5. Press Start (The oven begins defrosting.)
NOTE : For details See Table Below.
To turn off the oven during cooking, simply touch the
Stop/Clear button.
NOTE : After use, be sure to press the Stop/Clear
button Twice as this will ensure that you have
reset the microwave.
NOTE : During Automatic Defrost the oven will automatically select the required microwave
power and defrosting time. The oven will stop and/or beep part way through defrosting
to allow food to be stirred or turned. Press Start to resume defrosting.
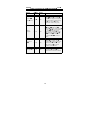
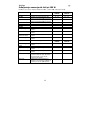
Selection Chart for Auto Cook functions :-
Auto Programme Press Button Portion Size Remarks
Meat Once 200 - 2000g
The Oven will stop part way through
defrosting to allow food to be stirred or
turned. Press Start to resume defrosting.
Poultry Twice 200 - 2000g
The Oven will stop part way through
defrosting to allow food to be stirred or
turned. Press Start to resume defrosting.
Fish
Three Times
200 - 2000g
The Oven will stop part way through
defrosting to allow food to be stirred or
turned. Press Start to resume defrosting.
125 - 1000g
for 125g
Turn after 10 beeps. at 30 seconds
for 250g
Turn after 10 beeps. at 60 seconds
for 375g
Turn after 10 beeps. at 90 seconds
for 500g
Turn after 10 beeps. at 120 seconds
for 625g
Turn after 10 beeps. at 150 seconds
for 750g
Turn after 10 beeps. at 180 seconds
for 875g
Turn after 10 beeps. at 210 seconds
Bread / Cake
Four Times
for 1000g
Turn after 10 beeps. at 240 seconds
Note : During Defrost Bread / Cake, the oven will only stop when 10 beeps are heard if the door is
opened. Stir or turn the food, close the door and press start to resume defrosting.
Example: To automatically defrost 500g of Fish.
1. Open the door.
2. Touch the Auto defrost button 3 times
3. Turn the setting control knob until 500 is showing in the display window.
4. Close the door then press start. The Oven will now start defrosting.
See Auto Defrost Programme Chart for further details.
As an alternative to Automatic Defrosting you can defrost manually by selecting 180W microwave power. To
speed up the defrosting of dense foods over 450g (1lb), the oven may be started on 900W (100%) power for
1 - 3 minutes, then reduced to (180W) until defrosting is complete.
Automatic Defrost

EMS2840 t English
17
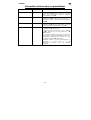
This oven can be used to automatically ReHeat Chilled Ready Meals, Fresh Vegetables, Chicken Pieces and
Frozen Bread Rolls.
1. Open the door, place the food on the turntable.
2. Press the ’ Auto Reheat ’ button until the desired
programme is reached.
3. Turn the setting control knob until the required
quantity is reached.
4. Close the door.
5. Press Start (The oven begins cooking.)
NOTE : For details See Table Below
To turn off the oven during cooking, simply touch the
Stop/Clear button.
NOTE : After use, be sure to press the Stop/Clear
button Twice as this will ensure that you have
reset the microwave.
NOTE : During AUTO COOK the oven will automatically select the required microwave power
and cooking time.
Selection Chart for Auto Cook functions :-
Auto Programme Press Button Portion Size
300 - 350 g
400 - 450 g
Chilled Ready Meals
Once
500 - 550 g
200 - 250 g
300 - 350 g
400 - 450 g
500 - 550 g
600 - 650 g
Fresh Vegetables
Twice
700 - 750 g
200 - 300 g (1 Piece)
400 - 500 g (2 Pieces)
600 - 700 g (3 Pieces)
Chicken Pieces Three Times
800 - 900 g (4 Pieces)
100 - 150 g (2 Pieces)
200 - 250 g (4 Pieces)
Frozen Bread Rolls
Four Times
300 - 350 g (6 Pieces)
Example: To automatically cook 500g of Fresh Vegetables.
1. Open the door.
2. Touch the Auto Reheat button 2 times
3. Turn the setting control knob until 500 - 550 is showing in the display window.
4. Close the door then press start. The Oven will now start cooking.
See Auto Cook Programme Chart for further details.
Auto Reheat

EMS2840 t English
18
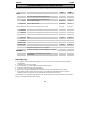
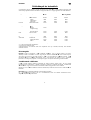
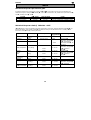
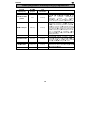
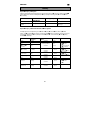
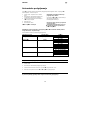
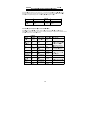
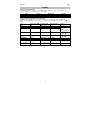
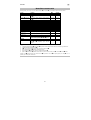
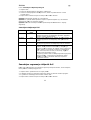
Recommendations for cooking with Grill
All foods should be placed on the grill rack with a non metal dish placed underneath to catch any food spillage
or juices to minimise cleaning. Turn all food halfway through the cooking time.
Food QTY. (Weight) Cooking time Special notes
Toast 2 Slices 4 – 5 min
Cheese on Toast 4 Slices 6 – 7 min 4 – 5 min. to toast. 2 min. with topping
General recommendations for cooking with Microwave and Grill
Food QTY (Weight)
Power Selector
position
Cooking
time
Special notes
Bacon 4 (100 g) Combi 3 7- 9 min
Roast Beef (Boned) 900 g
Roast Pork (Loin) 900 g
Microwave Only 600 W
Combi 2
25 min
5 - 6 min
Brush with oil. Season
with salt and pepper. Allow
15 – 20 minutes standing
time after cooking.
Pork Chops 2 - 3(450 g)
Combi 2
20 - 25 min
Brush with oil. Season
with salt, pepper and
paprika.
Chicken, Halved
lengthways
Legs
450 g
800 g
Combi 1
Combi 1
15 - 20 min
25 - 30 min
Brush with oil. Season
with salt, pepper and
paprika.
Frozen Hamburger 4 (200 g) Combi 2 12 - 15 min
Sausages 450 g Only Combi 1 10 - 15 min
Fish Steak 2 (350 g) Combi 3 22 – 24 min
Brush with oil, Season
with salt and pepper.
Frozen Potato,
Hash Brown
2 (150 g)
Combi 2
16 – 18 min.
Charts

EMS2840 t English
19
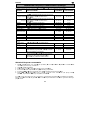
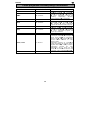
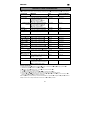
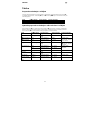
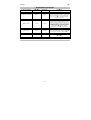
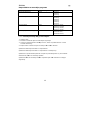
Some foods such as bread and fruit, can successfully be thawed manually by using this power setting (180W).
FOOD PREPARATION
Defrost
time
STANDING
TIME
Bread
Small loaf
Place on microwave-proof rack or kitchen paper.
Turn over halfway through defrosting time.
8–10 min. 10–15 min.
Sliced large loaf
Place on microwave-proof rack or kitchen paper.
Turn over halfway through defrosting time.
10–13 min. 10 min
2 slices Place on kitchen paper. 45–60 sec. 5 min.
1 bread roll Place on kitchen paper. 45–60 sec. 5 min.
2 bread rolls Place on kitchen paper. 1–11/2 min. 5 min.
Cakes and Pastry
Gateau 450g/1 lb Remove from packaging, place on plate. 9–11 min. 15–30 min.
Cheesecake
450g/1 lb
Remove from packaging, place on plate. 9–11 min. 15–30 min.
Pie (cooked)
450g/1 lb
Remove from packaging, place on plate. 7– 9 min. 15–30 min.
Pastry 450g/1 lb Remove from packaging, place on plate. 7– 9 min. 15–30 min.
Butter
250g/8.8 oz
(1 packet)
If foil wrapped, remove from wrapper and place on a
plate
3– 4 min. 5–10 min.
Fruit
225g/8 oz
Soft berry fruits
Place in a single layer in a shallow dish. 5– 6 min. 5–10 min.
450g/1 lb
Soft berry fruits
Place in a single layer in a shallow dish.
7– 8 min. 5–10 min.
Plated meal
400g/14 oz
Cover with a plate or non P.V.C. cling film.
To reheat, microwave on 100% (900W)for 3–4 minutes.
7– 8 min 5–10 min.
Vegetables
It is not necessary to defrost vegetables before cooking.
All vegetables can be thawed and cooked on
100% (900W)
Defrosting Tips
1.
It is better to underestimate defrosting time if you are unsure. Food will continue to defrost during the
standing time.
2.
Separate food as soon as possible.
3.
Turn large items, e.g. joints, halfway through the defrosting time.
4.
Remove any thawed food as soon as possible.
5.
Remove or open any packaging before defrosting.
6.
Place food in a larger container than that which it was frozen in, this will allow for easy stirring.
7.
Begin thawing poultry, breast side down and turn over halfway through defrosting time or at pause.
Delicate areas such as wing tips can be shielded with small pieces of smooth foil.
Standing time is very important, particularly for large, dense foods which cannot be stirred to ensure that the
centre is completely defrosted before cooking.
Recommendations for Manual Defrost

EMS2840 t English
20
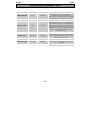
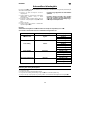
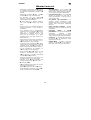
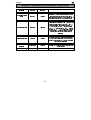
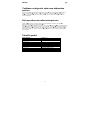
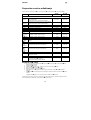
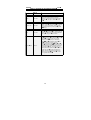
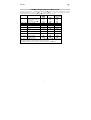
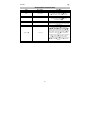
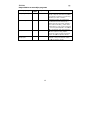
Auto Programme Press Button Standing Time Recommendations
Chilled Ready Meal Once 3 minutes
Put the meal on a ceramic plate and cover it
with microwave cling film. This programme is
suitable for the meals consisting of 3
components (e. g. meat with sauce, vegetables
and side dishes like potatoes, rice or pasta).
Fresh Vegetables
Twice 3 minutes
Weigh the vegetables after washing, cleaning
and cutting into a similar size. Put them into a
glass bowl with lid. Add 45 ml (3 tablespoons)
water when cooking 200- 450 g, add 60 ml (4
tablespoons) for 500- 650 g and add 75 ml (5
tablespoons) for 700- 750 g. Stir after cooking.
(When cooking bigger quantities, stir once
during cooking.)
Chicken Pieces
Three Times 3 minutes
Brush the chicken pieces with oil and spice
them with pepper, salt and paprika. Put them
on the grill rack with the skin- side down. Turn
over when the oven beeps.
Frozen Bread Rolls
Four Times 2 Minutes
Put frozen bread rolls upside down in a circle
on the grill rack. Turn over, as soon as the
oven beeps.
Auto Reheat Programmes Chart
Strona się ładuje...
Strona się ładuje...
Strona się ładuje...
Strona się ładuje...
Strona się ładuje...
Strona się ładuje...
Strona się ładuje...
Strona się ładuje...
Strona się ładuje...
Strona się ładuje...
Strona się ładuje...
Strona się ładuje...
Strona się ładuje...
Strona się ładuje...
Strona się ładuje...
Strona się ładuje...
Strona się ładuje...
Strona się ładuje...
Strona się ładuje...
Strona się ładuje...
Strona się ładuje...
Strona się ładuje...
Strona się ładuje...
Strona się ładuje...
Strona się ładuje...
Strona się ładuje...
Strona się ładuje...
Strona się ładuje...
Strona się ładuje...
Strona się ładuje...
Strona się ładuje...
Strona się ładuje...
Strona się ładuje...
Strona się ładuje...
Strona się ładuje...
Strona się ładuje...
Strona się ładuje...
Strona się ładuje...
Strona się ładuje...
Strona się ładuje...
Strona się ładuje...
Strona się ładuje...
Strona się ładuje...
Strona się ładuje...
Strona się ładuje...
Strona się ładuje...
Strona się ładuje...
Strona się ładuje...
Strona się ładuje...
Strona się ładuje...
Strona się ładuje...
Strona się ładuje...
Strona się ładuje...
Strona się ładuje...
Strona się ładuje...
Strona się ładuje...
Strona się ładuje...
Strona się ładuje...
Strona się ładuje...
Strona się ładuje...
Strona się ładuje...
Strona się ładuje...
Strona się ładuje...
Strona się ładuje...
Strona się ładuje...
Strona się ładuje...
Strona się ładuje...
Strona się ładuje...
Strona się ładuje...
Strona się ładuje...
Strona się ładuje...
Strona się ładuje...
Strona się ładuje...
Strona się ładuje...
Strona się ładuje...
Strona się ładuje...
Strona się ładuje...
Strona się ładuje...
Strona się ładuje...
Strona się ładuje...
Strona się ładuje...
Strona się ładuje...
Strona się ładuje...
Strona się ładuje...
Strona się ładuje...
Strona się ładuje...
Strona się ładuje...
Strona się ładuje...
Strona się ładuje...
Strona się ładuje...
Strona się ładuje...
Strona się ładuje...
Strona się ładuje...
Strona się ładuje...
Strona się ładuje...
Strona się ładuje...
Strona się ładuje...
Strona się ładuje...
Strona się ładuje...
Strona się ładuje...
Strona się ładuje...
Strona się ładuje...
Strona się ładuje...
Strona się ładuje...
Strona się ładuje...
Strona się ładuje...
Strona się ładuje...
Strona się ładuje...
Strona się ładuje...
Strona się ładuje...
Strona się ładuje...
Strona się ładuje...
Strona się ładuje...
Strona się ładuje...
Strona się ładuje...
Strona się ładuje...
Strona się ładuje...
Strona się ładuje...
Strona się ładuje...
Strona się ładuje...
Strona się ładuje...
Strona się ładuje...
Strona się ładuje...
Strona się ładuje...
Strona się ładuje...
Strona się ładuje...
Strona się ładuje...
Strona się ładuje...
Strona się ładuje...
Strona się ładuje...
Strona się ładuje...
Strona się ładuje...
Strona się ładuje...
Strona się ładuje...
Strona się ładuje...
Strona się ładuje...
Strona się ładuje...
Strona się ładuje...
Strona się ładuje...
Strona się ładuje...
Strona się ładuje...
Strona się ładuje...
Strona się ładuje...
Strona się ładuje...
Strona się ładuje...
Strona się ładuje...
Strona się ładuje...
Strona się ładuje...
Strona się ładuje...
Strona się ładuje...
Strona się ładuje...
Strona się ładuje...
Strona się ładuje...
Strona się ładuje...
Strona się ładuje...
Strona się ładuje...
Strona się ładuje...
Strona się ładuje...
Strona się ładuje...
Strona się ładuje...
Strona się ładuje...
Strona się ładuje...
Strona się ładuje...
Strona się ładuje...
Strona się ładuje...
Strona się ładuje...
Strona się ładuje...
Strona się ładuje...
Strona się ładuje...
Strona się ładuje...
Strona się ładuje...
Strona się ładuje...
-
 1
1
-
 2
2
-
 3
3
-
 4
4
-
 5
5
-
 6
6
-
 7
7
-
 8
8
-
 9
9
-
 10
10
-
 11
11
-
 12
12
-
 13
13
-
 14
14
-
 15
15
-
 16
16
-
 17
17
-
 18
18
-
 19
19
-
 20
20
-
 21
21
-
 22
22
-
 23
23
-
 24
24
-
 25
25
-
 26
26
-
 27
27
-
 28
28
-
 29
29
-
 30
30
-
 31
31
-
 32
32
-
 33
33
-
 34
34
-
 35
35
-
 36
36
-
 37
37
-
 38
38
-
 39
39
-
 40
40
-
 41
41
-
 42
42
-
 43
43
-
 44
44
-
 45
45
-
 46
46
-
 47
47
-
 48
48
-
 49
49
-
 50
50
-
 51
51
-
 52
52
-
 53
53
-
 54
54
-
 55
55
-
 56
56
-
 57
57
-
 58
58
-
 59
59
-
 60
60
-
 61
61
-
 62
62
-
 63
63
-
 64
64
-
 65
65
-
 66
66
-
 67
67
-
 68
68
-
 69
69
-
 70
70
-
 71
71
-
 72
72
-
 73
73
-
 74
74
-
 75
75
-
 76
76
-
 77
77
-
 78
78
-
 79
79
-
 80
80
-
 81
81
-
 82
82
-
 83
83
-
 84
84
-
 85
85
-
 86
86
-
 87
87
-
 88
88
-
 89
89
-
 90
90
-
 91
91
-
 92
92
-
 93
93
-
 94
94
-
 95
95
-
 96
96
-
 97
97
-
 98
98
-
 99
99
-
 100
100
-
 101
101
-
 102
102
-
 103
103
-
 104
104
-
 105
105
-
 106
106
-
 107
107
-
 108
108
-
 109
109
-
 110
110
-
 111
111
-
 112
112
-
 113
113
-
 114
114
-
 115
115
-
 116
116
-
 117
117
-
 118
118
-
 119
119
-
 120
120
-
 121
121
-
 122
122
-
 123
123
-
 124
124
-
 125
125
-
 126
126
-
 127
127
-
 128
128
-
 129
129
-
 130
130
-
 131
131
-
 132
132
-
 133
133
-
 134
134
-
 135
135
-
 136
136
-
 137
137
-
 138
138
-
 139
139
-
 140
140
-
 141
141
-
 142
142
-
 143
143
-
 144
144
-
 145
145
-
 146
146
-
 147
147
-
 148
148
-
 149
149
-
 150
150
-
 151
151
-
 152
152
-
 153
153
-
 154
154
-
 155
155
-
 156
156
-
 157
157
-
 158
158
-
 159
159
-
 160
160
-
 161
161
-
 162
162
-
 163
163
-
 164
164
-
 165
165
-
 166
166
-
 167
167
-
 168
168
-
 169
169
-
 170
170
-
 171
171
-
 172
172
-
 173
173
-
 174
174
-
 175
175
-
 176
176
-
 177
177
-
 178
178
-
 179
179
-
 180
180
-
 181
181
-
 182
182
-
 183
183
-
 184
184
-
 185
185
-
 186
186
-
 187
187
-
 188
188
-
 189
189
-
 190
190
-
 191
191
-
 192
192


Electrolux EMS2840 Instrukcja obsługi
- Kategoria
- Mikrofale
- Typ
- Instrukcja obsługi
w innych językach
- slovenčina: Electrolux EMS2840 Používateľská príručka
- română: Electrolux EMS2840 Manual de utilizare
Powiązane artykuły
-
Electrolux EMS2040S Instrukcja obsługi
-
-
-
-
Electrolux EMS2120 Instrukcja obsługi
-
-
-
-
Electrolux EMS21400W Instrukcja obsługi
-