Indesit BWSA 61253 W EU instrukcja
- Kategoria
- Pralki
- Typ
- instrukcja

GB
1
Contents
Installation, 2-3
Unpacking and levelling
Connecting the electricity and water supplies
The first wash cycle
Technical data
Care and maintenance, 4
Cutting off the water or electricity supply
Cleaning the washing machine
Cleaning the detergent dispenser drawer
Caring for the door and drum of your appliance
Cleaning the pump
Checking the water inlet hose
Precautions and tips, 5
General safety
Load balancing system
Disposal
Description of the washing machine
and starting a wash cycle, 6-7
Control panel
Indicator lights
Starting a wash cycle
Wash cycles, 8
Push & Wash
Table of wash cycles
Personalisation, 9
Setting the temperature
Setting the spin speed
Functions
Detergents and laundry, 10
Detergent dispenser drawer
Preparing the laundry
Garments requiring special care
Troubleshooting, 11
Service, 12
BWSA 61253
Instructions for use
WASHING MACHINE
English,1
GB
HU
DE PL
Deutsch,13
Polski,25
Magyar,37

2
GB
Levelling the machine correctly will provide
it with stability, help to avoid vibrations and
excessive noise and prevent it from shifting
while it is operating. If it is placed on carpet or
a rug, adjust the feet in such a way as to allow
a sufficient ventilation space underneath the
washing machine.
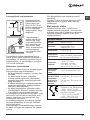
Connecting the electricity and water
supplies
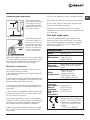
Connecting the water inlet hose
1. Insert seal A into
the end of the inlet
hose and screw the
latter onto a cold wa-
ter tap with a 3/4 gas
threaded mouth (see
figure).
Before making the
connection, allow the
water to run freely un-
til it is perfectly clear.
2. Connect the inlet
hose to the washing
machine by screwing
it onto the correspon-
ding water inlet of the
appliance, which is
situated on the top
right-hand side of the
rear part of the ap-
pliance (see figure).
3. Make sure that the hose is not folded over
or bent.
! The water pressure at the tap must fall within
the range of values indicated in the Technical
data table (see next page).
! If the inlet hose is not long enough, contact a
specialised shop or an authorised technician.
! Never use second-hand hoses.
! Use the ones supplied with the machine.
Installation
! This instruction manual should be kept in a
safe place for future reference. If the washing
machine is sold, transferred or moved, make
sure that the instruction manual remains with
the machine so that the new owner is able to
familiarise himself/herself with its operation
and features.
! Read these instructions carefully: they con-
tain vital information relating to the safe instal-
lation and operation of the appliance.
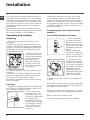
Unpacking and levelling
Unpacking
1. Remove the washing machine from its
packaging.
2. Make sure that the washing machine has
not been damaged during the transportation
process. If it has been damaged, contact the
retailer and do not proceed any further with
the installation process.
3. Remove the 4 pro-
tective screws (used
during transportation)
and the rubber wa-
sher with the cor-
responding spacer,
located on the rear
part of the appliance
(see figure).
4. Close off the holes using the plastic plugs
provided.
5. Keep all the parts in a safe place: you will
need them again if the washing machine ne-
eds to be moved to another location.
! Packaging materials should not be used as
toys for children.
Levelling
1. Install the washing machine on a flat sturdy
floor, without resting it up against walls, furni-
ture cabinets or anything else.
2. If the floor is not
perfectly level, com-
pensate for any une-
venness by tightening
or loosening the
adjustable front feet
(see figure); the angle
of inclination, measu-
red in relation to the
worktop, must not
exceed 2°.
A

GB
3
Connecting the drain hose
Connect the drain
hose, without bending
it, to a drain duct or
a wall drain situated
between 65 and 100
cm from the floor;
alternatively, placed
it over the edge of a
basin, sink or tub, fa-
stening the duct sup-
plied to the tap (see
figure). The free end
of the hose should
not be underwater.
! We advise against the use of hose extensions;
if it is absolutely necessary, the extension must
have the same diameter as the original hose
and must not exceed 150 cm in length.
Electrical connections
Before plugging the appliance into the electri-
city socket, make sure that:
• thesocketisearthedandcomplieswithall
applicable laws;
• thesocketisabletowithstandthemaximum
power load of the appliance as indicated in the
Technical data table (see opposite);
• thepowersupplyvoltagefallswithintheva-
lues indicated in the Technical data table (see
opposite);
• thesocketiscompatiblewiththeplugofthe
washing machine. If this is not the case, repla-
ce the socket or the plug.
! The washing machine must not be installed
outdoors, even in covered areas. It is extremely
dangerous to leave the appliance exposed to
rain, storms and other weather conditions.
! When the washing machine has been instal-
led, the electricity socket must remain within
easy reach.
65 - 100 cm
! Do not use extension cords or multiple sockets.
! The cable should not be bent or compressed.
! The power supply cable must only be repla-
ced by authorised technicians.
Warning! The company shall not be held re-
sponsible in the event that these standards are
not observed.
The first wash cycle
Once the appliance has been installed, and
before you use it for the first time, run a wash
cycle with detergent and no laundry, using the
wash cycle “Auto Clean” (see “Cleaning the
washing machine”).
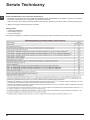
Technical data
Model
BWSA 61253
Dimensions
width 59.5 cm
height 85 cm
depth 42.5 cm
Capacity
from 1 to 6 kg
Electrical
connections
please refer to the technical
data plate fixed to the ma-
chine
Water
connections
maximum pressure
1 MPa (10 bar)
minimum pressure
0.05 MPa (0.5 bar)
drum capacity 40 litres
Spin speed
up to 1200 rotations per minute
Test wash
cycles in
accordance
with re-
gulations
1061/2010
and
1015/2010.
Programme 9:
Eco Cotton 60°.
Programme 9:
Eco Cotton 40°.
This appliance conforms to
the following EC Directives:
- EMC - 2014/30/EU (Elec-
tromagnetic Compatibility)
- LVD - 2014/35/EU (Low
Voltage)
- 2012/19/EU (WEEE)

4
GB
Care and maintenance
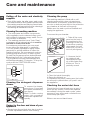
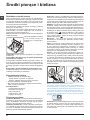
Cleaning the pump
The washing machine is fitted with a self-
cleaning pump which does not require any
maintenance. Sometimes, small items (such
as coins or buttons) may fall into the protective
pre-chamber at the base of the pump.
! Make sure the wash cycle has finished and
unplug the appliance.
To access the pre-chamber:
1. Take off the cover
panel on the front of
the machine by first
pressing it in the cen-
tre and then pushing
downwards on both
sides until you can re-
move it (see figures).
2. Unscrew the lid
by rotating it anti-
clockwise (see figu-
re): a little water may
trickle out. This is
perfectly normal.
3. Clean the inside thoroughly.
4. Screw the lid back on.
5. Reposition the panel, making sure the hooks
are securely in place before you push it onto
the appliance.
Checking the water inlet hose
Check the inlet hose at least once a year. If
there are any cracks, it should be replaced
immediately: during the wash cycles, water
pressure is very strong and a cracked hose
could easily split open.
! Never use second-hand hoses.
Cutting off the water and electricity
supplies
• Turnoffthewatertapaftereverywashcycle.
This will limit wear on the hydraulic system inside
the washing machine and help to prevent leaks.
• Unplugthewashingmachinewhencleaningit
and during all maintenance work.
Cleaning the washing machine
• Theouterpartsandrubbercomponents
of the appliance can be cleaned using a soft
cloth soaked in lukewarm soapy water. Do not
use solvents or abrasives.
• Thewashingmachinehasa“AutoClean”
programme for its internal parts that must be
run with no load in the drum.
For maximum performance you may want
to use either the detergent (i.e. a quantity
10% the quantity specified for lightly-soiled
garments) or special additives to clean the
washing machine. We recommend running a
cleaning programme every 40 wash cycles.
To start the programme press buttons A and
B simultaneously for 5 seconds (see figure).
The programme will start automatically and
will last approximately 75 minutes. To stop the
cycle press the START/PAUSE button.
Cleaning the detergent dispenser
drawer
To remove the drawer,
press lever (1) and pull
the drawer outwards (2)
(see figure).
Wash it under running
water; this procedure
should be repeated fre-
quently.
Caring for the door and drum of your
appliance
• Alwaysleavetheportholedoorajarinorderto
prevent unpleasant odours from forming.
2
1
1
2
3
A
B

GB
5
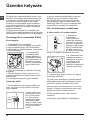
Precautions and tips
! This washing machine was designed and constructed in
accordance with international safety regulations. The fol-
lowing information is provided for safety reasons and must
therefore be read carefully.
General safety
•Thisappliancewasdesignedfordomesticuseonly.
• This appliance can be used by children aged
from 8 years and above and persons with re-
duced physical, sensory or mental capabilities
or lack of experience and knowledge if they
have been given supervision or instruction
concerning use of the appliance in a safe way
and understand the hazards involved. Children
shall not play with the appliance. Cleaning and
user maintenance shall not be made by children
without supervision.
•Thewashingmachinemustonlybeusedbyadults,inaccor-
dance with the instructions provided in this manual.
•Donottouchthemachinewhenbarefootorwithwetor
damp hands or feet.
•Donotpullonthepowersupplycablewhenunplugging
the appliance from the electricity socket. Hold the plug
and pull.
•Donotopenthedetergentdispenserdrawerwhilethe
machine is in operation.
•Donottouchthedrainedwaterasitmayreachextreme-
ly high temperatures.
•Neverforcetheportholedoor.Thiscoulddamagethesafety
lock mechanism designed to prevent accidental opening.
•Iftheappliancebreaksdown,donotunderanycircum-
stances access the internal mechanisms in an attempt
to repair it yourself.
•Alwayskeepchildrenwellawayfromtheappliancewhile
it is operating.
•Thedoorcanbecomequitehotduringthewashcycle.
•Iftheappliancehastobemoved,workinagroupoftwo
or three people and handle it with the utmost care. Never
try to do this alone, because the appliance is very heavy.
•Beforeloadinglaundryintothewashingmachine,make
sure the drum is empty.
Load balancing system
Before every spin cycle, to avoid excessive vibrations and
to distribute the load in a uniform manner, the drum rotates
continuously at a speed which is slightly greater than the
washing rotation speed. If, after several attempts, the load is
not balanced correctly, the machine spins at a reduced spin
speed. If the load is excessively unbalanced, the washing ma-
chine performs the distribution process instead of spinning.
To encourage improved load distribution and balance, we
recommend small and large garments are mixed in the load.
Disposal
•Disposingofthepackagingmaterials:observelocal
regulations so that the packaging may be re-used.
• TheEuropeanDirective2012/19/EU-WEEEonWaste
Electrical and Electronic Equipment, requires that
old household electrical appliances must not be
disposed of in the normal unsorted municipal waste
stream. Old appliances must be collected
separately in order to optimise the recovery and
recycling of the materials they contain and reduce
the impact on human health and the environment.
The crossed out “wheeled bin” symbol on the
product reminds you of your obligation, that when
you dispose of the appliance it must be separately
collected.
Consumers should contact their local authority or
retailer for information concerning the correct
disposal of their old appliance.

6
GB
Detergent dispenser drawer: used to dispense deter-
gents and washing additives (see “Detergents and laundry”).
ON/OFF button: switches the washing machine on and off.
PUSH & WASH button:
(see “Wash cycles”).
WASH CYCLE knob: programmes the wash cycles. During
the wash cycle, the knob does not move.
FUNCTION buttons with indicator light: used to select the
available functions. The indicator light corresponding to the
selected function will remain lit.
CHILD LOCK button with indicator light: to activate the
control panel lock, press and hold the button for approximately
2 seconds. When the symbol
is illuminated, the control
panel is locked (apart from the ON/OFF button). This means
it is possible to prevent wash cycles from being modified
accidentally, especially where there are children in the home.
To deactivate the control panel lock, press and hold the button
for approximately 2 seconds.
TEMPERATURE button: sets the temperature or the cold
wash cycle (see “Personalisation”).
SPIN button: sets the spin speed or exclude the spin cycle
completely (see “Personalisation”).
DELAY TIMER button: delays the start of the wash cycle
by up to 9 hours.
Press the button repeatedly until the indicator light corre-
sponding to the desired delay time turns on.
When the button is pressed for the fourth time, the option
will be deactivated.
N.B.: once the START/PAUSE button has been pressed, the
delay time can only be modified by decreasing it until the set
programme is launched.
! This option is available on all programmes.
WASH CYCLE PROGRESS
indicator light
s: used to mo-
nitor the progress of the wash cycle.
The illuminated indicator light shows which phase is in pro-
gress.
DOOR LOCKED indicator light: indicates whether the door
may be opened or not (see next page).
START/PAUSE button with indicator light: starts or tempo-
rarily interrupts the wash cycles.
N.B. To pause the wash cycle in progress, press this button;
the corresponding indicator light will flash orange, while the
indicator light for the current wash cycle phase will remain lit
in a fixed manner. If the DOOR LOCKED
indicator light is
switched off, the door may be opened (wait approximately
3 minutes).
To start the wash cycle from the point at which it was inter-
rupted, press this button again.
Standby mode
This washing machine, in compliance with new energy saving
regulations, is fitted with an automatic standby system which
is enabled after about 30 minutes if no activity is detected.
Press the ON-OFF button briefly and wait for the machine
to start up again.
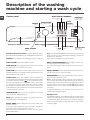
Description of the washing
machine and starting a wash cycle
Control panel
WASH CYCLE PROGRESS
indicator lights
DOOR
LOCKED
indicator light
START/PAUSE
button with indicator
light
Detergent dispenser drawer
ON/OFF
button
WASH CYCLE
knob
DELAY TIMER
button
TEMPERATURE
button
SPIN
button
FUNCTION
buttons with
indicator lights
PUSH & WASH
button
CHILD LOCK
button with
indicator light

GB
7
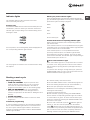
Indicator lights
The indicator lights provide important information.
This is what they can tell you:
Delayed start
If the DELAY TIMER function has been activated (see “Per-
sonalisation”), after the wash cycle has been started the
indicator light corresponding to the selected delay period
will begin to flash:
As time passes, the remaining delay will be displayed and
the corresponding indicator light will flash:
The set programme will start once the selected time delay
has expired.
Wash cycle phase indicator lights
Once the desired wash cycle has been selected and has be-
gun, the indicator lights switch on one by one to indicate which
phase of the cycle is currently in progress.
Function buttons and corresponding indicator lights
When a function is selected, the corresponding indicator
light will illuminate.
If the selected function is not compatible with the program-
med wash cycle, the corresponding indicator light will flash
and the function will not be activated.
If the selected option is not compatible with another
previously selected option, the indicator light will flash
accompanied by a buzzer (3 beeps), and only the latter
option will be activated; the indicator light corresponding to
the activated option will turn on
Door locked indicator light
When the indicator light is on, the porthole door is locked
to prevent it from being opened; make sure the indicator
light is off before opening the door (wait approximately 3
minutes).
To open the door during a running wash cycle, press the
START/PAUSE button; the door may be opened once the
DOOR LOCKED indicator light turns off.
Starting a wash cycle
Rapid programming
1. LOAD THE LAUNDRY. Open the porthole door.
Load the laundry, making sure you do not exceed
the maximum load value indicated in the table of
programmes and wash cycles on the following page.
2. ADD THE DETERGENT. Pull out the detergent
dispenser drawer and pour the detergent into the
relevant compartments as described in “Detergents and
laundry”.
3. CLOSE THE DOOR.
4. Press the “PUSH & WASH” button to start the wash
programme.
Traditional programming
1. Turn the washing machine on by pressing the ON/OFF
button. All the indicator lights will turn on for a few secon-
ds, then only the indicator lights relative to the selected
programme settings will remain lit and the START/PAUSE
indicator light will flash.
2. Load the laundry and close the door.
3. Set the WASH CYCLE knob to the desired programme.
4. Set the washing temperature (see “Personalisation”).
5.
Set the spin speed (see “Personalisation”).
6. Measure out the detergent and washing additives (see
“Detergents and laundry”).
7. Select the desired functions.
8. Start the wash cycle by pressing the START/PAUSE
button and the corresponding indicator light will remain lit
in a fixed manner in green. To cancel the set wash cycle,
pause the machine by pressing the START/PAUSE button
and select a new cycle.
9. At the end of the wash cycle the
indicator light will
switch on. The door can be opened once the DOOR
LOCK
indicator light turns off (wait approximately 3 mi-
nutes). Take out your laundry and leave the appliance door
ajar to make sure the drum dries completely. Switch the
washing machine off by pressing the ON/OFF button.
Wash
Rinse
Spin
Drain
End of wash cycle

8
GB
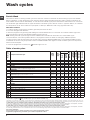
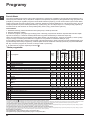
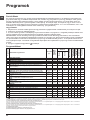
Wash cycles
Table of wash cycles
Push & Wash
This function allows for starting a wash cycle even when the machine is switched off without having to press the ON/OFF
button in advance, or after switching on the machine, without having activated any button and/or selector (otherwise, the
Push & Wash function will be deactivated). To start the Push & Wash cycle press and hold the relative button for 2 seconds.
The lit indicator light indicates that the cycle has started. This wash cycle is ideal for cotton or synthetic fabrics, as it washes
at a temperature of 30° and a maximum spin speed of 1000 rpm. Maximum load 3.5 kg. (Cycle duration 45’).
How does it work?
1. Load the laundry (cotton and/or synthetic garments) and close the door.
2. Pour the detergent and additives.
3. Start the programme by pressing and holding the Push & Wash button for 2 seconds. The relative indicator light turns
green and the door will lock (the DOOR LOCKED symbol turns on).
N.B.: starting the wash cycle through the Push & Wash button activates an automatic non-customisable cycle
recommended for cotton and synthetic fabrics. This programme does not allow for setting any additional options.
To open the door while an automatic cycle is under way, press the START/PAUSE button; if the DOOR LOCKED symbol
is switched off the door may be opened. Press the START/PAUSE button again to restart the wash cycle from the point at
which it was interrupted.
4. Once the programme is finished, the
indicator light turns on.
1) Test wash cycle in compliance with regulation 1061/2010: set wash cycle 9 with a temperature of 60°C.
This cycle is designed for cotton loads with a normal soil level and is the most efficient in terms of both electricity and water consumption; it should
be used for garments which can be washed at 60°C. The actual washing temperature may differ from the indicated value.
2) Test wash cycle in compliance with regulation 1061/2010: set wash cycle 9 with a temperature of 40°C.
This cycle is designed for cotton loads with a normal soil level and is the most efficient in terms of both electricity and water consumption; it should
be used for garments which can be washed at 40°C. The actual washing temperature may differ from the indicated value.
For all Test Institutes:
3) Long wash cycle for cottons: set wash cycle 6 with a temperature of 40°C.
4) Synthetic program along: set wash cycle 7 with a temperature of 40°C.
The length of cycle shown on the display or in this booklet is an estimation only and is calculated assuming standard working conditions. The actual duration can vary accor-
ding to factors such as water temperature and pressure, the amount of detergent used, the amount and type of load inserted, load balancing and any wash options selected.
* If you select programme and exclude the spin cycle, the machine will drain only.
Wash cycles
Description of the wash cycle
Max.
temp.
(°C)
Max.
speed
(rpm)
Detergents
Max. load (kg)
Residual
dampness %
Energy
consumption kWh
Total water lt
Cycle duration
Wash
Fabric
softener
Everyday 30° ECO
1
Daily cotton
30° 1200
3 - - - 100’
2
Daily synthetics
30° 1000
3 - - - 90’
3
Coloureds
30° 1000
3 - - - 95’
4
Delicates
30° 0
0.5 - - - 80’
5
Rapid 30min: to refresh lightly soiled garments quickly (not suitable for wool,
silk and clothes which require washing by hand).
30° 800
3 71 0.20 30 30’
Traditionals
6
Cotton (3): lightly soiled whites and delicate colours.
40°
(Max.60°)
1200
6 53 0.97 63 230’
7
Synthetics (4): lightly soiled resistant colours.
40°
(Max.60°)
1000
3 44 0.61 45 115’
8
Mixed
40° 1200
6 - - - 125’
9
Eco cotton 60°C (1): heavily soiled whites and resistant colours.
60° 1200
6 53 0.78 50.0 200’
9
Eco cotton 40°C (2): lightly soiled whites and delicate colours.
40° 1200
6 53 0.97 63 230’
10
White cotton: heavily soiled whites and resistant colours.
60°
(Max.90°)
1200
6 - - - 125’
Specials
11
Sport
30° 600
2.5 - - - 50’
12
Duvet: for down-stuffed garments. 30° 1000
1 - - - 100’
13
Wool: for wool, cashmere, etc. 40° 800
1 - - - 65’
14
Anti odour
40° 1000
2.5 - - - 135’
Rinse + Spin - 1200
-
6 - - - 50’
Spin + Drain - 1200
- -
6 - - - 10’
Drain only * -
- -
6 - - - 3’

GB
9
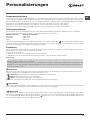
Setting the temperature
Press the TEMPERATURE button to set the wash temperature (see Table of wash cycles).
The temperature may be lowered, or even set to a cold wash (20°). The washing machine will automatically prevent you from
selecting a temperature which is higher than the maximum value set for each wash cycle.
! Exception: if the 6 programme is selected, the temperature can be increased up to a value of 60°C.
! Exception: if the 7 programme is selected, the temperature can be increased up to a value of 60°C.
! Exception: if the 10 programme is selected, the temperature can be increased up to a value of 90°C.
Setting the spin speed
Press the SPIN SPEED button to set the spin speed for the selected wash cycle.
The maximum spin speeds available for each wash cycle are as follows:
Wash cycles Maximum spin speed
Cottons 1200 rpm
Synthetics 1000 rpm
Wool 800 rpm
The spin speed may be lowered, or the spin cycle can be excluded altogether by selecting the symbol .
The washing machine will automatically prevent you from selecting a spin speed which is higher than the maximum speed
set for each wash cycle.
Functions
The various wash functions available with this washing machine will help to achieve the desired results, every time.
To activate the functions:
1. Press the button corresponding to the desired function;
2. the function is enabled when the corresponding indicator light is illuminated.
Note:
- If the selected function is not compatible with the programmed wash cycle, the corresponding indicator light will flash and
the function will not be activated.
- If the selected option is not compatible with another previously selected option, the indicator light will flash accompanied
by a buzzer (3 beeps), and only the latter option will be activated; the indicator light corresponding to the activated option
will turn on.
Stain removal
Thisoptionallowsforselectingthetypeofdirtsoastooptimallyadjustthecycleforremovingthestains.Thefollowingtypes
of dirt can be selected:
- Food, for stains caused by foodstuffs and beverages, for example.
- Work, for grease and ink stains, for example.
- Outdoor, for mud and grass stains, for example.
! The wash cycle duration varies according to the type of selected dirt.
Extra Rinse
By selecting this option, the efficiency of the rinse is increased and optimal detergent removal is guaranteed. It is particularly
useful for sensitive skin.
Easy iron
By selecting this function, the wash and spin cycles will be modified in order to reduce the formation of creases. At the end
of the cycle the washing machine will perform slow rotations of the drum, while the EASY IRON and START/PAUSE indicator
lights will flash and the led will remain lit in a fixed manner. To end the cycle, press the START/PAUSE button or the EASY
IRON button.
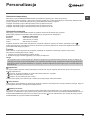
Personalisation

10
GB
Detergents and laundry
Detergent dispenser drawer
Successful washing results also depend on the correct
dose of detergent: adding too much detergent will not
necessarily result in a more efficient wash, and may in fact
cause build up on the inside of your appliance and contri-
bute to environmental pollution.
! Do not use hand washing detergents because these
create too much foam.
! Use powder detergent for white cotton garments, for pre-
washing, and for washing at temperatures over 60°C.
! Follow the instructions given on the detergent packaging.
Open the detergent dispenser
drawer and pour in the deter-
gent or washing additive, as
follows.
Compartment 1: Do not pour detergent into the middle
compartment 1.
Compartment 2: Washing detergent (powder or liquid)
If liquid detergent is used, it is recommended that the remo-
vable plastic partition A (supplied) be used for proper dosage.
If powder detergent is used, place the partition into slot B.
Compartment 3: Additives (fabric softeners, etc.)
The fabric softener must not exceed the “max” level indicated
on the central pin.
Preparing the laundry
• Dividethelaundryaccordingto:
- the type of fabric/the symbol on the label
- the colours: separate coloured garments from whites.
• Emptyallgarmentpocketsandcheckthebuttons.
• Do not exceed the valueslisted in the “Table of wash
cycles”, which refer to the weight of the laundry when dry.
How much does your laundry weigh?
1 sheet 400-500 g
1 pillow case 150-200 g
1 tablecloth 400-500 g
1 bathrobe 900-1.200 g
1 towel 150-250 g
Garments requiring special care
Daily cotton: a 30°C cycle for cotton garments. It allows
for reducing consumption of energy for heating the water,
while guaranteeing excellent results. Suitable for lightly soiled
garments.
Daily synthetics: a 30°C cycle for synthetic garments. It
allows for reducing consumption of energy for heating the
water, while guaranteeing excellent results. Suitable for lightly
soiled garments.
Coloureds: a 30°C cycle that helps to preserve the colours;
suitable for coloured cotton and synthetic garments. It allows
for reducing consumption of energy for heating the water,
while guaranteeing excellent results. Suitable for lightly soiled
garments.
Delicates: use programme 4 to wash very delicate
garments. It is advisable to turn the garments inside out
before washing them. For best results, use liquid detergent
on delicate garments. For washing Silk items and Curtains,
select the relevant cycle and activate the option ; the
machine will end the cycle with the laundry soaked and
the indicator light will flash. To drain the water so that the
laundry can be removed, press the START/PAUSE button
ro the option .
Mixed: a 40°C cycle for washing cotton and synthetic
garments together. Suitable for lightly soiled underwear.
Sport (programme 11) is designed for washing lightly soiled
sports clothing (tracksuits, shorts, etc.); for best results, we
recommend not exceeding the maximum load indicated in the
“Programme table”. We recommend using liquid detergent,
and adding the amount suitable for a half-load.
Duvet: to wash single duvet (the weight of which should not
exceed 1 kg), cushions or clothes padded with goose down
such as puffa jackets, use the special wash cycle number 12.
We recommend that duvets are placed in the drum with their
edges folded inwards (see figure) and that no more than ¾
of the total volume of the drum is used. To achieve the best
results, we recommend that a liquid detergent is used and
placed inside the detergent dispenser drawer.
Wool - Woolmark Apparel Care - Blue:
the wool wash cycle of this machine has been approved by
The Woolmark Company for the washing of wool garments
labelled as “hand wash” provided that the products are
washed according to the instructions on the garment label
and those issued by the manufacturer of this washing
machine. (M1128)
In UK, Eire, Hong Kong and India the Woolmark trade mark
is a Certification trade mark.
Anti odour: use programme 14 (Synthetics) for washing
garments with bad odours (e.g. smoke, sweat, fried food).
The programme is designed to remove bad odours while
preserving the fabric fibres.

GB
11
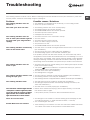
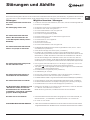
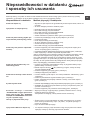
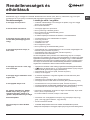
Troubleshooting
Your washing machine could fail to work. Before contacting the Technical Assistance Centre (see “Assistance”), make sure
that the problem cannot be solved easily using the following list.
Problem:
The washing machine does not
switch on.
The wash cycle does not start.
The washing machine does not
take in water (the indicator light for
the first wash cycle stage flashes
rapidly).
The washing machine continuously
takes in and drains water.
The washing machine does not
drain or spin.
The washing machine vibrates a lot
during the spin cycle.
The washing machine leaks.
The “Functions” indicator lights and the
“start/pause” indicator light flash, while
one of the “phase in progress” indicator
lights and the “door locked” indicator
light will remain lit in a fixed manner.
There is too much foam.
Push & Wash does not activate.
Possible causes / Solutions:
•Theapplianceisnotpluggedintothesocketfully,orisnotmakingcontact.
•Thereisnopowerinthehouse.
•Thewashingmachinedoorisnotclosedproperly.
•TheON/OFFbuttonhasnotbeenpressed.
•TheSTART/PAUSEbuttonhasnotbeenpressed.
•Thewatertaphasnotbeenopened.
•Adelayedstarthasbeenset.
•Thewaterinlethoseisnotconnectedtothetap.
•Thehoseisbent.
•Thewatertaphasnotbeenopened.
•Thereisnowatersupplyinthehouse.
•Thepressureistoolow.
•TheSTART/PAUSEbuttonhasnotbeenpressed.
•Thedrainhoseisnotfittedataheightbetween65and100cmfromthefloor
(see “Installation”).
•Thefreeendofthehoseisunderwater(see “Installation”).
•Thewalldrainagesystemisnotfittedwithabreatherpipe.
If the problem persists even after these checks, turn off the water tap, switch
the appliance off and contact the Assistance Service. If the dwelling is on one of
the upper floors of a building, there may be problems relating to water drainage,
causing the washing machine to fill with water and drain continuously. Special
anti-draining valves are available in shops and help to avoid this inconvenience.
•Thewashcycledoesnotincludedraining:somewashcyclesrequirethedrain
phase to be started manually.
• Theoption function is enabled: to complete the wash cycle, press the
START/PAUSE button (“Personalisation”).
•Thedrainhoseisbent(see “Installation”).
•Thedrainageductisclogged.
•Thedrumwasnotunlockedcorrectlyduringinstallation(see “Installation”).
•Thewashingmachineisnotlevel(see “Installation”).
• Thewashingmachineistrappedbetweencabinetsandwalls(see “Installation”).
•Thewaterinlethoseisnotscrewedonproperly(see “Installation”).
•Thedetergentdispenserdrawerisblocked(forcleaninginstructions,see
“Care and maintenance”).
•Thedrainhoseisnotfixedproperly(see “Installation”).
•Switchoffthemachineandunplugit,waitforapproximately1minuteand
then switch it back on again.
If the problem persists, contact the Technical Assistance Service.
•Thedetergentisnotsuitableformachinewashing(itshoulddisplaythetext
“for washing machines” or “hand and machine wash”, or the like).
•Toomuchdetergentwasused.
• AfterswitchingonthemachineacontrolotherthanPush&Washwasactiva-
ted. Switch the machine off and press the Push & Wash button.

12
GB
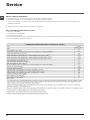
Service
Before calling for Assistance:
• Check whether you can solve the problem alone (see “Troubleshooting”);
•Restarttheprogrammetocheckwhethertheproblemhasbeensolved;
•Ifthisisnotthecase,contactanauthorisedTechnicalAssistanceCentreusingthetelephonenumberprovidedonthe
guarantee certificate.
! Always request the assistance of authorised technicians.
Have the following information to hand:
• thetypeofproblem;
• theappliancemodel(Mod.);
• theserialnumber(S/N).
This information can be found on the data plate applied to the rear of the washing machine, and can also be found on the
front of the appliance by opening the door.

DE
13
INHALTSVERZEICHNIS
Installation, 14-15
Auspacken und Aufstellen
Wasser- und Elektroanschlüsse
Erster Waschgang
Technische Daten
Reinigung und Pflege, 16
Abstellen der Wasser- und Stromversorgung
Reinigung des Gerätes
Reinigung der Waschmittelschublade
Pflege der Gerätetür und Trommel
Reinigung der Pumpe
Kontrolle des Wasserzulaufschlauchs
Vorsichtsmaßregeln und Hinweise, 17
Allgemeine Sicherheit
System zur Auswuchtung der Wäscheladung
Entsorgung
Beschreibung des Waschvollautomaten und
Starten eines Waschprogramms, 18-19
Bedienblende
Kontrollleuchten
Starten eines Waschprogramms
Waschprogramme, 20
Push & Wash
Programmtabelle
Personalisierungen, 21
Temperatureinstellung
Schleudereinstellung
Funktionen
Waschmittel und Wäsche, 22
Waschmittelschublade
Vorsortieren der Wäsche
Besondere Wäscheteile
Störungen und Abhilfe, 23
Kundendienst, 24
BWSA 61253
Bedienungsanleitungen
WASCHVOLLAUTOMAT
Deutsch
DE

14
DE
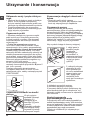
Aufstellung
! Es ist äußerst wichtig, diese Bedienung-sanleitung
sorgfältig aufzubewahren, um sie jederzeit zu Rate
ziehen zu können. Sorgen Sie dafür, dass sie im
Falle eines Umzugs oder einer Übergabe an einen
anderen Benutzer das Gerät stets begleitet, damit
auch der neue Inhaber die Möglichkeit hat, diese
zu Rate zu ziehen.
! Lesen Sie bitte folgende Hinweise aufmer-
ksam durch: sie liefern wichtige Informationen
hinsichtlich der Installation, des Gebrauchs und
der Sicherheit.
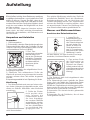
Auspacken und Aufstellen
Auspacken
1. Gerät auspacken.
2. Sicherstellen, dass der Waschvollautomat keine
Transportschäden erlitten hat. Schließen Sie das
Gerät im Falle einer Beschädigung bitte nicht an
und kontaktieren Sie Ihren Händler.
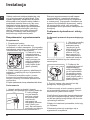
3. Die 4 Tran-
sportschutz-schrauben
ausschrauben und
das an der Rückwand
befindliche Gummiteil
und das entsprechen-
de Abstandsstück
abnehmen (siehe
Abbildung).
4. Die Löcher mittels der mitgelieferten Kunst-
stoffstöpsel schließen.
5. Sämtliche Teile aufbewahren: Sollte der
Waschvoll-automat erneut transportiert werden
müssen, müssen diese Teile wieder eingesetzt
werden.
! Verpackungsmaterial ist kein Spielzeug für Kinder.
Nivellierung
1. Der Waschvollautomat muss auf einem ebe-
nen, festen Untergrund aufgestellt werden, ohne
diesen an Wände, Möbelteile oder ähnliches
anzulehnen.
2. Sollte der Boden
nicht perfekt eben
sein, müssen die
Unebenheiten durch
An- bzw. Ausdrehen
der vorderen Stellfüße
ausgeglichen werden
(siehe Abbildung), der
auf der Arbeitsfläche
zu ermittelnde Nei-
gungsgrad darf 2°
nicht überschreiten.
Eine präzise Nivellierung verleiht dem Gerät die
erforderliche Stabilität, durch die Vibrationen,
Betriebsgeräusche und ein Verrücken des
Gerätes vermieden werden. Bei Teppichböden
müssen die Stellfüße so reguliert werden, dass
ein ausreichender Freiraum zur Belüftung unter
dem Waschvollautomaten gewährleistet ist.
Wasser- und Elektroanschlüsse
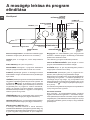
Anschluss des Zulaufschlauches
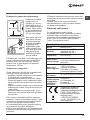
1. Legen Sie die
Gummidichtung A in
das Anschlussstück
des Zulaufschlauches
ein und drehen Sie
dieses an einen mit
Gewindeanschluss
von ¾ G versehenen
Kaltwasserhahn (siehe
Abbildung). Lassen
Sie das Wasser vor dem Anschluss so lange
auslaufen, bis klares Wasser austritt.
2. Das andere Ende
des Schlauches an
den oben rechts am
Rückteil des Wasch-
vollautomaten befindli-
chen Wasseranschluss
anschließen (siehe Ab-
bildung).
3. Der Schlauch darf nicht eingeklemmt oder
abgeknickt werden.
! Der Wasserdruck muss innerhalb der Werte
liegen, die in der Tabelle der Technischen Daten
angegeben sind (siehe nebenstehende Seite).
! Sollte der Zulaufschlauch nicht lang genug sein,
dann wenden Sie sich bitte an einen Fachhändler
oder an einen autorisierten Fachmann.
! Verwenden Sie niemals bereits gebrauchte
Schläuche.
! Verwenden Sie die Schläuche, die mit dem
Gerät geliefert wurden.
A

DE
15
Anschluss des Ablaufschlauches
Schließen Sie den
Ablaufschlauch, ohne
ihn dabei zu knicken,
an eine Ablaufleitung,
oder an einen in der
Wand, in einer Höhe
von 65cm bis 100cm
an;
oder hängen Sie
diesen in ein Becken
oder eine Wanne ein;
befestigen Sie den
Schlauch in diesem
Falle mittels der mi-
tgelieferten Führung
an dem Wasserhahn
(siehe Abbildung).
Das freie Ablau-
fschlauchende darf
nicht unter Wasser bleiben.
! Verlängerungsschläuche sollten nicht ein-
gesetzt werden, sollte dies jedoch absolut
unvermeidlich sein, muss die Verlängerung
denselben Durchmesser des Originalschlau-
chs aufweisen und darf eine Länge von 150
cm nicht überschreiten.
Elektroanschluss
Vor Einfügen des Netzsteckers in die Steckdo-
se ist sicherzustellen, dass:
• dieSteckdoseübereinenormgerechte
Erdung verfügt;
• dieSteckdosedieindenTechnischenDa-
ten angegebenen Höchstlast des Gerätes
trägt (siehe nebenstehende Tabelle);
• dieStromspannungdenindenTechnischen
Daten angegebenen Werten entspricht (sie-
he nebenstehende Tabelle);
• dieSteckdosemitdemNetzsteckerdes
Waschvollautomaten kompatibel ist. An-
dernfalls muss der Netzstecker (oder die
Steckdose) ersetzt werden.
! Der Waschvollautomat darf nicht im Freien
installiert werden, auch nicht, wenn es sich um
einen geschützten Platz handelt. Es ist gefährlich,
das Gerät Gewittern und Unwettern auszusetzen.
! Die Steckdose muß jederzeit zugänglich sein.
65 - 100 cm
! Verwenden Sie bitte keine Verlängerungen
oder Mehrfachstecker.
! Das Netzkabel darf nicht gebogen bzw. ein-
geklemmt werden.
! Das Versorgungskabel darf nur durch autori-
sierte Fachkräfte ausgetauscht werden.
Achtung! Der Hersteller übernimmt keinerlei
Haftung, sollten diese Vorschriften nicht genau
beachtet werden.
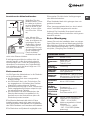
Erster Waschgang
Lassen Sie nach der Installation bzw. vor erstma-
ligem Gebrauch erst einen Waschgang (mit Wa-
schmittel) ohne Wäsche durchlaufen. Stellen Sie
hierzu das Waschprogramm „AUTO REINIGEN“
ein (siehe „Reinigung des Gerätes“).
Technische Daten
Modell
BWSA 61253
Abmessun-
ge
Breite 59,5 cm
Höhe 85 cm
Tiefe 42,5 cm
Fassung-
svermögen
1 bis 6 kg
Elektroan-
schlüsse
siehe das am Gerät befindli-
che Typenschild
Wasseran-
schlüsse
Höchstdruck 1 MPa (10 bar)
Mindestdruck 0,05 MPa (0,5 bar)
Trommelvolumen 40 Liter
Schleuder-
touren
bis zu 1200 U/min.
Prüfpro-
gramme
gemäß der
vorschriften
1061/2010
und
1015/2010
Programm 9;
Eco Baumwolle 60°C.
Programm 9;
Eco Baumwolle 40°C.
Dieses Gerät entspricht den
folgenden EG-Richtlinien:
- EMC - 2014/30/EU
(elektromagnetische Verträ-
glichkeit)
- 2012/19/EU - WEEE
- LVD - 2014/35/EU (Nieder-
spannung)

16
DE
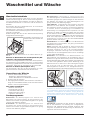
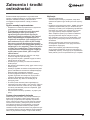
Reinigung und Pflege
Abstellen der Wasser- und Strom-
versorgung
• DrehenSiedenWasserhahnnachjedemWa-
schvorgang zu. Hierdurch wird der Verschleiß
der Wasseranlage verringert und Wasserlecks
vorgebeugt.
• ZiehenSiedenNetzsteckerausderSteckdo-
se, bevor Sie Ihren Waschvollautomaten
reinigen.
Reinigung des Gerätes
•DieGehäuseteileunddieTeileausGummi
können mit einem mit warmer Spülmittellauge
angefeuchteten Tuch gereinigt werden. Vermei-
den Sie den Einsatz von Löse- und Scheuermit-
teln.
•DieWaschmaschineverfügtüberein„AUTO
REINIGEN“-Programm der inneren Teile, das gän-
zlich ohne Wäsche durchgeführt werden muss.
Als Hilfsmittel können bei diesem Waschgang
Waschmittel (10 % von der für gering versch-
mutzte Kleidungsstücke empfohlenen Menge)
oder spezifische Zusatzstoffe für die Reinigung
von Waschmaschinen verwendet werden. Es
wird empfohlen, das Reinigungsprogramm alle
40 Waschgänge durchzuführen.
Um das Programm zu aktivieren, drücken Sie
fünf Sekunden lang gleichzeitig die Tasten A
und B (siehe abb.). Das Programm startet
automatisch und dauert etwa 75 Minuten. Um
den Zyklus anzuhalten, drücken Sie die Taste
START/PAUSE.
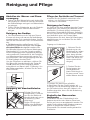
Reinigung der Waschmittelschu-
blade
Drücken Sie auf den
Arretierhebel (1) und zie-
hen Sie die Waschmit-
telschublade nach vorne
hin heraus (2) (siehe
Abbildung).
Spülen Sie sie regel-
mäßig unter fließendem
Wasser gründlich aus.
Pflege der Gerätetür und Trommel
•LassenSiedieGerätetürstetsleichtoffen
stehen, um die Bildung unangenehmer
Gerüche zu vermeiden.
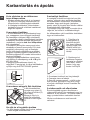
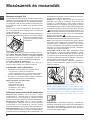
Reinigung der Pumpe
Ihr Gerät ist mit einer selbstreinigenden Pumpe
ausgerüstet, eine Wartung ist demnach nicht
erforderlich. Es könnte jedoch vorkommen,
dass kleine Gegenstände (Münzen, Knöpfe) in
die zum Schutz der Pumpe dienende Vorkam-
mer (befindlich unter der Pumpe) fallen.
! Vergewissern Sie sich, dass der Waschgang
abgeschlossen ist und ziehen Sie den Netz-
stecker heraus.
Zugang zur Vorkammer:
1. Nehmen Sie die
Abdeckung an der
Gerätefront ab, indem
Sie zur Mitte hin drü-
cken, dann drücken
Sie beide Seiten nach
unten und ziehen sie
heraus (siehe Abbil-
dungen).
2. Drehen Sie den
Deckel gegen den
Uhrzeigersinn ab
(siehe Abbildung): es
ist ganz normal, wenn
etwas Wasser austritt.
3. Reinigen Sie das Innere gründlich;
4. Schrauben Sie den Deckel wieder auf.
5. Bringen Sie die Abdeckung wieder an. Stel-
len Sie hierbei sicher, dass die Haken in die
Schlitze eingreifen, bevor Sie die Abdeckung
fest andrücken.
Kontrolle des Wasserzulau-
fschlauchs
Kontrollieren Sie den Zulaufschlauch min-
destens einmal im Jahr. Weist er Risse bzw.
Brüche auf, muss er ausgetauscht werden. Der
starke Druck während des Waschprogramms
könnte zu plötzlichem Platzen führen.
! Verwenden Sie niemals bereits gebrauchte
Schläuche.
2
1
1
2
3
A
B

DE
17
Vorsichtsmaßregeln und
Hinweise
! Der Waschvollautomat wurde nach den strengsten inter-
nationalen Sicherheitsvorschriften entworfen und gebaut.
Nachstehende Hinweise werden aus Sicherheitsgründen
geliefert und sollten aufmerksam gelesen werden.
Allgemeine Sicherheit
•DiesesGerätwurdeausschließlichfürdenEinsatzim
privaten Haushalt konzipiert.
•DiesesGerätdarfvonKindernab8Jahren
und von Personen mit eingeschränkten kör-
perlichen, sensorischen oder geistigen Fähi-
gkeiten oder mit unzureichender Erfahrung
und Kenntnis verwendet werden, vorausge-
setzt, sie werden überwacht oder sie haben
eine ausreichende Einweisung in die sichere
Nutzung des Geräts erhalten und haben die
damit verbundenen Gefahren verstanden.
Erlauben Sie Kindern nicht, mit dem Gerät zu
spielen. Wartung und Reinigung dürfen nicht
von unbeaufsichtigten Kindern ausgeführt
werden.
•DerWaschvollautomatdarfnurvonErwachsenenund
gemäß den Anleitungen dieses Handbuchs bedient wer-
den.
•BerührenSiedasGerätnicht,wennSiebarfußsind,
und auch nicht mit nassen oder feuchten Händen oder
Füßen.
•ZiehenSiedenGerätesteckernichtamKabelausder
Steckdose, sondern nur am Netzstecker selbst.
•ÖffnenSiedieWaschmittelschubladenicht,wenndas
Gerät in Betrieb ist.
•BerührenSienichtdasAblaufwasser,eskönntesehr
heiß sein.
•ÖffnenSiedieGerätetürnichtmitGewalt:DerSicherhei-
ts-Schließmechanismus könnte hierdurch beschädigt
werden.
•BeietwaigenStörungenversuchenSiebittenicht,Innen-
teile selbst zu reparieren.
•HaltenSieKinderstetsvondeminBetriebbefindlichen
Gerät fern.
•WährenddesWaschgangskanndieGerätetürsehrheiß
werden.
•MussdasGerätversetztwerden,solltenhierfürzwei
oder drei Personen verfügbar sein. Versetzen Sie es
niemals allein, das Gerät ist äußerst schwer.
•BevorSiedieWäscheeinfüllen,stellenSiebittesicher,
dass die Wäschetrommel leer ist.
System zur Auswuchtung der Wäscheladung
Um zu starke Vibrationen, die durch Unwucht beim
Schleudern entstehen, zu vermeiden, sorgt das Gerät für
eine gleichmäßige Verteilung der Wäscheladung durch
Rotationen der Trommel. Sollte die Wäscheladung nach
Ablauf mehrerer Versuche immer noch nicht korrekt verteilt
sein, schleudert das Gerät die Wäsche bei einer niedrige-
ren Geschwindigkeit als die der vorgesehenen Schleuder-
geschwindigkeit. Sollte die Wäsche extrem ungleichmäßig
verteilt sein, führt das Gerät anstelle des Schleudergangs
einen Wäscheverteilungs-Zyklus durch. Um eine optima-
le Verteilung der Wäscheladung und somit eine korrekte
Auswuchtung zu begünstigen, sollten große und kleine
Wäscheteile gemischt eingefüllt werden.
Entsorgung
•EntsorgungdesVerpackungsmaterials:BefolgenSiedie
lokalen Vorschriften, Verpackungsmaterial kann wieder-
verwertet werden.
•GemäßderEuropäischenRichtlinie2012/19/EU-WEEE
über Elektro- und Elektronik-Altgeräte dürfen Elektrohau-
shalts-Altgeräte nicht über den herkömmlichen Hau-
shaltsmüllkreislauf entsorgt werden.
Altgeräte müssen separat gesammelt werden, um die
Wiederverwertung und das Recycling der beinhalte-
ten Materialien zu optimieren und die Einflüsse auf die
Umwelt und die Gesundheit zu reduzieren. Das Symbol
„durchgestrichene Mülltonne“ auf jedem Produkt erinnert
Sie an Ihre Verpflichtung, dass Elektrohaushaltsgeräte
gesondert entsorgt werden müssen. Endverbraucher
können sich an Abfallämter der Gemeinden wenden, um
mehr Informationen über die korrekte Entsorgung ihrer
Elektrohaushaltsgeräte zu erhalten.

18
DE
Waschmittelschublade: für Waschmittel und Zusätze
(siehe „Waschmittel und Wäsche“).
Taste ON/OFF: zum Ein- und Ausschalten Ihres Waschvol-
lautomaten.
Taste PUSH & WASH: (siehe “Waschprogramme”).
Wählschalter PROGRAMME: zur Wahl der Waschpro-
gramme. Während des Programmablaufs bleibt der Schalter
feststehend.
Tasten mit Kontrollleuchten FUNKTIONEN: zur Einstellung
der verfügbaren Funktionen. Die der gewählten Einstellung
entsprechende Kontrollleuchte bleibt eingeschaltet.
Taste mit Kontrollleuchte TASTENSPERRE: Zur Aktivierung
der Sperre der Bedienblende halten Sie die Taste ca. 2
Sekunden lang gedrückt. Das eingeschaltete Symbol
zeigt an, dass die Bedienblende gesperrt ist. Auf diese Weise
wird verhindert, dass ein Programm aus Versehen geändert
wird, vor allem (mit Ausnahme der Taste ON/OFF), wenn
kleine Kinder im Hause sind. Zur Deaktivierung der Sperre
der Bedienblende halten Sie die Taste ca. 2 Sekunden lang
gedrückt.
Taste TEMPERATUREN: zur Einstellung der Waschtem-
peratur oder einer Kaltwäsche (siehe „Personalisierungen“).
Taste SCHLEUDERN: oder um das Schleudern auszu-
schliessen (siehe „Personalisierungen“).
Taste STARTZEITVORWAHL: der Start des Waschpro-
gramms kann bis zu 9 Stunden verschoben werden. Drücken
Sie die Taste mehrmals, bis die der gewünschten Zeitver-
schiebung entsprechende Kontrollleuchte aufleuchtet. Ein
vierter Tastendruck deaktiviert die Funktion.
N.B.: Ist die Taste START/PAUSE einmal gedrückt, kann
der gewählte Zeitverschiebungswert nur noch herabgesetzt
werden bis zum Start des eingestellten Programms.
! Obiges gilt für alle Programme.
Kontrollleuchten PROGRAMMABLAUF: zur Kontrolle des
Waschprogrammablaufs.
Die eingeschaltete Kontrollleuchte zeigt die laufende Pro-
grammphase an.
Kontrollleuchte GERÄTETÜR GESPERRT: diese Taste
zeigt an, ob die Gerätetür geöffnet werden kann oder nicht
(siehe Nebenseite).
Taste mit Kontrollleuchte START/PAUSE: mittels dieser
Taste werden die Waschprogramme gestartet oder kurz
unterbrochen.
NB: Durch Drücken dieser Taste, kann das Waschprogramm
zeitweilig unterbrochen werden (Pause). Die entsprechende
Kontrollleuchte schaltet auf orangefarbenes Blinklicht, die
Kontrollleuchte der bestehenden Programmphase dage-
gen schaltet auf Dauerlicht. Sobald die Kontrollleuchte
GERÄTETÜR GESPERRT erlischt, kann die Gerätetür
geöffnet werden (etwa 3 Minuten). Um das Programm an
der Stelle, an der es unterbrochen wurde, wieder in Gang
zu setzen, drücken Sie diese Taste erneut.
Funktion Standby
Zur Erfüllung der neuen Richtlinien zum Energieverbrauch
ist diese Waschmaschine mit einem automatischen Aus-
schaltsystem (Standby) ausgestattet, das nach 30 Minuten
des Nichtgebrauchs in Funktion tritt. Drücken Sie kurz die
Taste ON-OFF und warten Sie, bis sich die Maschine wieder
einschaltet.
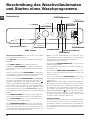
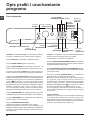
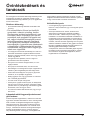
Beschreibung des Waschvollautomaten
und Starten eines Waschprogramms
Kontrollleuchten
PROGRAMMABLAUF
Kontrollleuchte
GERÄTETÜR
GESPERRT
Taste mit
Kontrollleuchte
START/PAUSE
Bedienblende
Taste ON/OFF
Taste
STARTZEITVORWAHL
Waschmittelschublade
Wählschalter
PROGRAMME
Taste
TEMPERATUREN
Taste
SCHLEUDERN
Tasten mit
Kontrollleuchten
FUNKTIONEN
Taste
PUSH & WASH
Taste mit
Kontrollleuchte
TASTENSPERRE

DE
19
Kontrollleuchten
Die Kontrollleuchten liefern wichtige Hinweise.
Sie signalisieren:
Startzeitvorwahl
Wurde die Funktion „Startzeitvorwahl” (siehe „Personalisie-
rungen“) aktiviert, und das Programm in Gang gesetzt,
schaltet die Kontrollleuchte, die der eingestellten Zeitver-
schiebung entspricht, auf Blinklicht:
Nach und nach wird die bis zum effektiven Start noch
verbleibende Zeit eingeblendet, die entsprechende Kon-
trollleuchte blinkt:
Nach Ablauf der eingestellten Verzögerungszeit startet das
ausgewählte Programm.
Laufende Programmphase
Wurde das Waschprogramm gewählt und gestartet,
leuchten die Kontrollleuchten nach und nach auf, und
zeigen so den jeweiligen Programmstand an.
Funktionstasten und entsprechende Kontroll-
leuchten
Nach der Wahl einer Funktion leuchtet die entsprechen-
deTaste auf. Ist die gewählte Funktion nicht vereinbar mit
dem eingestellten Programm, schaltet die entsprechende
Kontrollleuchte auf Blinklicht und die Funktion wird nicht
aktiviert. Ist die gewählte Funktion nicht mit einer zuvor
ausgewählten vereinbar, schaltet die entsprechende Kon-
trollleuchte auf Blinklicht, es ertönt ein akustisches Signal
(3 Signaltöne) und nur die zweite Funktion wird aktiviert (die
entsprechende Kontrollleuchte schaltet sich ein).
Kontrollleuchte Gerätetür gesperrt:
Ist diese Kontrollleuchte eingeschaltet, bedeutet dies,
dass das Bullauge gesperrt ist; warten Sie, bis die Leuchte
erlischt, um das Bullauge zu öffnen (etwa 3 Minuten). Um
während eines laufenden Programms das Bullauge zu
öffnen, drücken Sie die Taste START/PAUSE; ist die der
GERÄTETÜR GESPERRT entsprechende Kontrollleuchte
ausgeschaltet, kann das Bullauge geöffnet werden.
Starten eines Waschprogramms
Schnellprogrammierung
1. EINFÜLLEN DER WÄSCHE.ÖffnenSiedieGerätetür.
Füllen Sie die Wäsche ein. Achten Sie hierbei bitte da-
rauf, die in der Programmtabelle (auf der nächsten Seite)
angegebene Wäschemenge nicht zu überschreiten.
2. DOSIERUNG DES WASCHMITTELS. Ziehen Sie
die Waschmittelschublade heraus und füllen Sie das
Waschmittel in die entsprechenden Kammern (siehe
“Waschmittel und Wäsche“).
3. SCHLIESSEN SIE DIE GERÄTETÜR.
4. Drücken sie die taste “PUSH & WASH”, um das
Waschprogramm zu starten.
Herkömmliche Programmierung
1. Schalten Sie das Gerät über die ON/OFF-Taste ein.
Sämtliche Kontrollleuchten leuchten für einige Sekunden
auf, dann bleiben die Kontrollleuchten der Einstellungen
des ausgewählten Programms eingeschaltet und die Kon-
trollleuchte START/PAUSE schaltet auf Blinklicht.
2. Füllen Sie die Wäsche ein, und schließen Sie die
Gerätetür.
Hauptwäsche
Spülen
Schleudern
Abpumpen
Ende des Waschgangs
3. Stellen Sie mittels des Wählschalters PROGRAMME das
gewünschte Programm ein.
4. Stellen Sie die Waschtemperatur ein (siehe „Personali-
sierungen“).
5. Stellen Sie die Schleuderstufe ein (siehe „Personalisie-
rungen“).
6. Füllen Sie Waschmittel und Zusätze ein (siehe „Wasch-
mittel und Wäsche“).
7. Wählen Sie die gewünschten Funktionen.
8. Setzen Sie das Programm mit der Taste START/PAUSE
in Gang. Die entsprechende Kontrollleuchte bleibt einge-
schaltet (grün Dauerlicht). Um die Waschprogramm-Ein-
stellung rückgängig zu machen, muss das Gerät auf Pause
geschaltet werden. Drücken Sie hierzu die Taste START/
PAUSE. Wählen Sie daraufhin das neue Programm.
9. Nach Ablauf des Waschprogramms leuchtet die Kontrol-
lleuchte auf. Sobald die Kontrollleuchte GERÄTETÜR
GESPERRT erlischt, kann das Bullauge geöffnet werden
(etwa 3 Minuten). Nehmen Sie die Wäsche aus der Maschi-
ne und lassen Sie die Gerätetür leicht offen stehen, damit
die Trommel trocknen kann. Schalten Sie den Waschvollau-
tomaten durch Drücken der ON/OFF-Taste aus.

20
DE
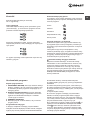
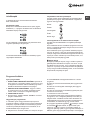
Waschprogramme
Programmtabelle
Push & Wash
Mit dieser Funktion kann ein Waschzyklus auch bei ausgeschalteter Maschine gestartet werden, ohne zuerst die ON/OFF-
Taste zu drücken oder ohne, nach dem Einschalten der Maschine, weitere Tasten und/oder Drehschalter zu drücken (wird
doch eine Taste gedrückt, wird das Programm Push & Wash deaktiviert). Zum Starten des Zyklus Push & Wash halten Sie
die Taste 2 Sekunden gedrückt. Die eingeschaltete Kontrollleuchte zeigt an, dass der Zyklus gestartet ist. Der Waschzyklus
ist ideal für Baumwolle und Synthetik, da er mit einer Temperatur von 30° und einer maximalen Schleuderumdrehung von
1000 U/Min. arbeitet. Max. Wäschefüllung 3,5 kg. (Programmdauer 45’).
Wie funktioniert das?
1. Wäsche einfüllen (Baumwolle und/oder Synthetik) und Gerätetür schließen.
2. Waschmittel und Zusätze einfüllen.
3. Das Programm starten (die Taste Push & Wash 2 Sekunden lang gedrückt halten). Die zugehörige Kontrollleuchte schaltet
auf grünes Dauerlicht und die Gerätetür sperrt (Symbol GERÄTETÜR GESPERRT leuchtet).
N.B.: Der Programmstart mit der Taste Push & Wash aktiviert einen automatischen Zyklus für Baumwolle und Synthetik, der
nicht weiter individualisiert werden kann. Bei diesem Programm können keine weiteren Optionen eingestellt werden.
Um während eines laufenden Programms die Gerätetür zu öffnen, drücken Sie die Taste START/PAUSE; wenn das Symbol
GERÄTETÜR GESPERRT erloschen ist, kann die Gerätetür geöffnet werden. Drücken Sie die Taste START/PAUSE erneut,
um das Programm an der Stelle, an der es unterbrochen wurde, wieder in Gang zu setzen.
4. Nach Ablauf des Waschprogramms leuchtet die Kontrollleuchte auf.
1) Prüfprogramm gemäß 1061/2010: Das Programm 9 mit einer Temperatur von 60°C.
Dieser Zyklus ist für den Waschvorgang von normal schmutziger Baumwollwäsche geeignet; es ist der wirksamste in Bezug auf den kombinierten Energie-Wasser-Verbrauch; für bei 60°C. zu wa-
schende Wäsche zu verwenden. Die effektive Waschtemperatur kann von der angegebenen abweichen.
2) Prüfprogramm gemäß 1061/2010: Das Programm 9 mit einer Temperatur von 40°C.
Dieser Zyklus ist für den Waschvorgang von normal schmutziger Baumwollwäsche geeignet; es ist der wirksamste in Bezug auf den kombinierten Energie-Wasser-Verbrauch; für bei 40°C. zu wa-
schende Wäsche zu verwenden. Die effektive Waschtemperatur kann von der angegebenen abweichen.
Für alle Testinstitute:
3) Langes Baumwollprogramm: Das Programm 6 mit einer Temperatur von 40°C.
4) Langes Synthetikprogramm: Programm 7 und eine Temperatur von 40°C einstellen.
* Bei Auswahl des Programms und Ausschluss der Schleuder, führt die Maschine nur den abpumpen aus.
Die auf dem Display und in der Bedienungsanleitung genannte Zyklusdauer wird ausgehend von Standardbedingungen berechnet. Die effektiv benötigte Zeit kann aufgrund zahlreicher Faktoren wie
Temperatur und Druck des Zulaufwassers, Raumtemperatur, Waschmittelmenge, Art, Menge und Verteilung der Waschladung sowie der gewählten Zusatzfunktionen variieren.
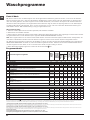
Waschprogram-
me
Beschreibung des Programms
Max.
Tempe-
ratur
(°C)
Max.
Schleu-
der Ge-
schwin-
digkeit
(U/min)
Waschmittel
Max. Bela-
dungs-
menge (kg)
Restfeuchti-
gkeit %
Energiever-
brauch kWh
Wasser gesamt
lt
Programm-
dauer
Hauptwä-
sche
Weichspü-
ler
Everyday 30° ECO
1 Baumwolle
30° 1200
3 - - - 100’
2 Kunstfaser
30° 1000
3 - - - 90’
3 Buntwäsche
30° 1000
3 - - - 95’
4 Feine Wäsche
30° 0
0,5 - - - 80’
5
30 Min Baumwolle: zum kurzen Auffrischen leicht verschmutzter Wäsche
(nicht geeignet für Wolle, Seide und Handwäsche).
30° 800
3 71 0,20 30 30’
Traditionals
6
Baumwolle (3): leicht verschmutzte Weißwäsche und empfindliche Bun-
twäsche.
40°
(Max.60°)
1200
6 53 0,97 63 230’
7
Synthetik (4): stark verschmutzte, farbechte Buntwäsche.
40°
(Max.60°)
1000
3 44 0,61 45 115’
8 Mischwäsche
40° 1200
6 - - - 125’
9
Eco Baumwolle 60°C (1): stark verschmutzte Weiß- und farbechte
Buntwäsche.
60° 1200
6 53 0,78 50,0 200’
9
Eco Baumwolle 40°C (2): leicht verschmutzte Weißwäsche und em-
pfindliche Buntwäsche.
40° 1200
6 53 0,97 63 230’
10
Baumwolle: stark verschmutzte Weiß- und farbechte Buntwäsche.
60°
(Max.90°)
1200
6 - - - 125’
Specials
11 Sport
30° 600
2,5 - - - 50’
12
Bettdecken: wäsche- bzw. Kleidungsstücke mit Daunenfüllung. 30° 1000
1 - - - 100’
13
Wolle: wolle, Kaschmir usw. 40° 800
1 - - - 65’
14 Anti-Geruch
40° 1000
2,5 - - - 135’
Spülen + Schleudern - 1200
-
6 - - - 50’
Schleudern + Abpumpen - 1200
- -
6 - - - 10’
Nur abpumpen * -
- -
6 - - - 3’
Strona się ładuje...
Strona się ładuje...
Strona się ładuje...
Strona się ładuje...
Strona się ładuje...
Strona się ładuje...
Strona się ładuje...
Strona się ładuje...
Strona się ładuje...
Strona się ładuje...
Strona się ładuje...
Strona się ładuje...
Strona się ładuje...
Strona się ładuje...
Strona się ładuje...
Strona się ładuje...
Strona się ładuje...
Strona się ładuje...
Strona się ładuje...
Strona się ładuje...
Strona się ładuje...
Strona się ładuje...
Strona się ładuje...
Strona się ładuje...
Strona się ładuje...
Strona się ładuje...
Strona się ładuje...
Strona się ładuje...
-
 1
1
-
 2
2
-
 3
3
-
 4
4
-
 5
5
-
 6
6
-
 7
7
-
 8
8
-
 9
9
-
 10
10
-
 11
11
-
 12
12
-
 13
13
-
 14
14
-
 15
15
-
 16
16
-
 17
17
-
 18
18
-
 19
19
-
 20
20
-
 21
21
-
 22
22
-
 23
23
-
 24
24
-
 25
25
-
 26
26
-
 27
27
-
 28
28
-
 29
29
-
 30
30
-
 31
31
-
 32
32
-
 33
33
-
 34
34
-
 35
35
-
 36
36
-
 37
37
-
 38
38
-
 39
39
-
 40
40
-
 41
41
-
 42
42
-
 43
43
-
 44
44
-
 45
45
-
 46
46
-
 47
47
-
 48
48


Indesit BWSA 61253 W EU instrukcja
- Kategoria
- Pralki
- Typ
- instrukcja
w innych językach
- Deutsch: Indesit BWSA 61253 W EU Benutzerhandbuch
- English: Indesit BWSA 61253 W EU User guide