Amica WCF1K15B7.1 Instrukcja obsługi
- Kategoria
- Chłodziarki do wina
- Typ
- Instrukcja obsługi
Niniejsza instrukcja jest również odpowiednia dla

Wine cooler / Weinklimaschrank / Vinotéka /
Vinotéka / Cave à vin / Chłodziarka do wina /
Vinoteca / Hladilnik za vino
WCF1K* / WCB1K* / WCU2K* /
WFBB* / WBA* / WBB* / WFBA* /
WK 341*S / WCB2K*
IO-RFW-0015/11
(11.2020)
OPERATING INSTRUCTIONS EN
GEBRAUCHSANWEISUNG DE
NÁVOD K OBSLUZE CS
NÁVOD NA OBSLUHU SK
NOTICE D’UTILISATION FR
INSTRUKCJA OBSŁUGI PL
MANUAL DE INSTRUCCIONES ES
NAVODILA ZA UPORABO SL


- 3 -
EN- Table of contents
GUIDELINES CONCERNING THE SAFETY OF USE 12
INSTALLATION AND OPERATING CONDITIONS OF THE APPLIANCE 14
CLIMATE RANGE 15
PRACTICAL EVERYDAY TIPS 16
UNPACKING 17
DISPOSAL OF OLD APPLIANCE 18
CONTROLS 19
APPLIANCE CONTROLS- SINGLE AND DUAL ZONE 19
TO SWITCH THE POWER ON/OFF 19
TO CHANGE THE TEMPERATURE 19
OPTIMAL TEMPERATURE SELECTION 20
TO USE THE INTERNAL LIGHT 20
INTERNAL HUMIDITY 20
TEMPERATURE DISPLAY 20
SILENT MODE 20
DYNAMIC COOLING MODE 20
WEEKEND MODE 21
TEMPERATURE ALARM 21
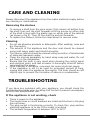
CARE AND CLEANING 22
REMOVING THE SHELVES 22
CLEANING 22
TROUBLESHOOTING 22
IF THE APPLIANCE IS NOT WORKING, CHECK 22
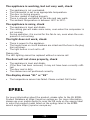
THE APPLIANCE IS WORKING, BUT NOT VERY WELL, CHECK 23
THE APPLIANCE IS NOISY, CHECK 23
THE LIGHT DOES NOT WORK, CHECK 23
THE DOOR WILL NOT CLOSE PROPERLY, CHECK 23
THE DISPLAY SHOWS “E1” OR “E2” 23
EPREL 23
WARRANTY AND AFTER SALES SERVICE 24
WARRANTY 24

- 4 -
DE- Inhaltsverzeichnis
SICHERHEITSHINWEISE 26
INBETRIEBNAHME UND BETRIEBSBEDINGUNGEN DES GERÄTES 29
KLIMAKLASSE 30
PRAKTISCHE RATSCHLÄGE 30
AUSPACKEN 32
ENTSORGUNG VON ALTGERÄTEN 33
STEUERUNGSKOMPONENTEN 34
STEUERUNGSKOMPONENTEN- EIN UND ZWEI ZONEN 34
STROM EINSCHALTEN / AUSSCHALTEN 34
ÄNDERUNG DER TEMPERATUR 34
WAHL DER OPTIMALEN TEMPERATUR 35
INNENBELEUCHTUNG 35
LUFTFEUCHTIGKEIT IM KÜHLSCHRANK 35
TEMPERATURANZEIGE 35
LEISER BETRIEB 35
DYNAMISCHE KÜHLUNG 35
WOCHENENDMODUS 36
TEMPERATUR-ALARM 36
REINIGUNG UND WARTUNG 37
HERAUSNEHMEN DER REGALE 37
REINIGUNG 37
PROBLEMLÖSUNG 37
WENN DAS GERÄT NICHT FUNKTIONIERT, PRÜFEN SIE: 37
WENN DAS GERÄT ZWAR FUNKTIONIERT, ABER NICHT GUT, PRÜFEN SIE: 38
WENN DAS GERÄT LÄRM MACHT, PRÜFEN SIE: 38
WENN DIE BELEUCHTUNG NICHT FUNKTIONIERT, PRÜFEN SIE: 38
WENN DIE TÜR NICHT RICHTIG SCHLIESST, PRÜFEN SIE: 38
WENN IN DER ANZEIGE „E1” ODER „E2” ERSCHEINT: 38
EPREL 38
GARANTIE, NACHVERKAUF-SERVICE 39
GARANTIE 39

- 5 -
CS- Obsah
POKYNY TÝKAJÍCÍ SE BEZPEČNOSTI POUŽÍVÁNÍ 41
INSTALACE A PROVOZNÍ PODMÍNKY SPOTŘEBIČE 43
KLIMATICKÁ TŘÍDA 44
PRAKTICKÉ RADY 45
VYBALENÍ 46
LIKVIDACE OPOTŘEBOVANÝCH ZAŘÍZENÍ 47
OVLÁDACÍ PRVKY 48
OVLÁDACÍ PRVKY – JEDNA A DVĚ ZÓNY 48
ZAPNUTÍ/VYPNUTÍ NAPÁJENÍ 48
ZMĚNA TEPLOTY 48
VÝBĚR OPTIMÁLNÍ TEPLOTY 49
VNITŘNÍ OSVĚTLENÍ 49
VNITŘNÍ VLHKOST 49
DISPLEJ TEPLOTY 49
TICHÝ REŽIM 49
REŽIM DYNAMICKÉHO CHLAZENÍ 49
VÍKENDOVÝ REŽIM 50
TEPLOTNÍ ALARM 50
ČIŠTĚNÍ A ÚDRŽBA 51
VYTAHOVÁNÍ POLIC 51
ČISTĚNÍ 51
ŘEŠENÍ PROBLÉMŮ 51
POKUD ZAŘÍZENÍ NEFUNGUJE, ZKONTROLUJTE 51
POKUD ZAŘÍZENÍ NEFUNGUJE DOBŘE, ZKONTROLUJTE 52
POKUD JE ZAŘÍZENÍ HLUČNÉ, ZKONTROLUJTE 52
POKUD NEFUNGUJE OSVĚTLENÍ, ZKONTROLUJTE 52
POKUD DVÍŘKA NEJSOU DOBŘE ZAVŘENÁ, ZKONTROLUJTE 52
POKUD NA DISPLEJI SVÍTÍ “E1” NEBO “E2” 52
EPREL 52
ZÁRUKA, POPRODEJNÍ SERVIS 53
ZÁRUKA 53

- 6 -
SK- Obsah
DÔLEŽITÉ BEZPEČNOSTNÉ POKYNY 55
INŠTALÁCIA A PREVÁDZKOVÉ PODMIENKY SPOTREBIČA 58
KLIMATICKÁ TRIEDA 59
PRAKTICKÉ RADY 59
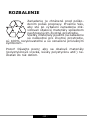
ROZBALENIE 61
LIKVIDÁCIA ZARIADENÍ 62
OVLÁDACIE PRVKY 63
OVLÁDACIE PRVKY – JEDNA A DVE ZÓNY 63
ZAPNUTIE / VYPNUTIE NAPÁJANIA 63
ZMENA TEPLOTY 63
VOĽBA OPTIMÁLNEJ TEPLOTY 64
OSVETLENIE VNÚTRA 64
VLHKOSŤ VO VNÚTRI 64
DISPLEJ TEPLOTY 64
TICHÝ REŽIM 64
REŽIM DYNAMICKÉHO CHLADENIA 64
VÍKENDOVÝ REŽIM 65
ALARM TEPLOTY 65
ČISTENIE A ÚDRŽBA 66
VYBERANIE POLÍC 66
ČISTENIE 66
RIEŠENIE PROBLÉMOV 66
AK ZARIADENIE NEFUNGUJE 66
AK ZARIADENIE SÍCE FUNGUJE, ALE NEFUNGUJE PRÍLIŠ DOBRE, SKONTROLUJTE 67
AK JE ZARIADENIE PRÍLIŠ HLUČNÉ 67
AK NEFUNGUJE OSVETLENIE 67
AK DVERE NIE SÚ ZATVORENÉ SPRÁVNE, SKONTROLUJTE 67
AK NA DISPLEJI SVIETI “E1” ALEBO “E2” 67
EPREL 67
ZÁRUKA, POPREDAJNÝ SERVIS 68
ZÁRUKA 68

- 7 -
FR- Table des matières
CONSIGNES DE SECURITÉ D’UTILISATION 70
INSTALLATION ET CONDITIONS DE FONCTIONNEMENT DE L’APPAREIL 73
CLASSE CLIMATIQUE 74
CONSEILS PRATIQUES 74
DÉBALLAGE 76
ÉLIMINATION DES APPAREILS USAGÉS 77
ELÉMENTS DE COMMANDE 78
ÉLÉMENTS DE COMMANDE – UNE ET DEUX ZONES 78
ALLUMER / ÉTEINDRE L’ALIMENTATION 78
MODIFICATION DE LA TEMPÉRATURE 78
CHOIX DE LA TEMPÉRATURE OPTIMALE 79
ECLAIRAGE INTÉRIEUR 79
HUMIDITÉ INTÉRIEURE 79
AFFICHAGE DE LA TEMPÉRATURE 79
MODE SILENCIEUX 79
MODE DE REFROIDISSEMENT DYNAMIQUE 79
MODE WEEK-END 80
ALARME DE LA TEMPÉRATURE 80
NETTOYAGE ET ENTRETIEN 81
RETRAIT DES CLAYETTES 81
NETTOYAGE 81
RÉSOLUTION DES PROBLÈMES 81
SI L’APPAREIL NE FONCTIONNE PAS, VÉRIFIER 81
SI L’APPAREIL FONCTIONNE, MAIS D’UNE MANIÈRE PAS TOUT À FAIT EFFICACE,
VÉRIFIER 82
SI L’APPAREIL FAIT DU BRUIT, VÉRIFIER 82
SI L’ÉCLAIRAGE NE FONCTIONNE PAS, VÉRIFIER 82
SI LA PORTE N’EST PAS FERMÉE CORRECTEMENT, VÉRIFIER 82
SI L’AFFICHEUR AFFICHE « E1 » OU « E2 » 82
EPREL 82
GARANTIE, SERVICE APRÈS-VENTE 83
GARANTIE 83

- 8 -
PL- Spis treści
WSKAZÓWKI DOTYCZĄCE BEZPIECZEŃSTWA 85
INSTALACJA I WARUNKI PRACY URZĄDZENIA 88
KLASA KLIMATYCZNA 89
PRAKTYCZNE PORADY 89
ROZPAKOWANIE 91
USUWANIE ZUŻYTYCH URZĄ DZEŃ 92
ELEMENTY STEROWANIA 93
ELEMENTY STEROWANIA- JEDNA I DWIE STREFY 93
WŁĄCZENIE / WYŁĄCZENIE ZASILANIA 93
ZMIANA TEMPERATURY 93
WYBÓR OPTYMALNEJ TEMPERATURY 94
OŚWIETLENIE WEWNĄTRZ 94
WILGOTNOŚĆ WEWNĄTRZ 94
WYŚWIETLACZ TEMPERATURY 94
SILENT MODE (TRYB CICHY) 94
TRYB DYNAMICZNEGO CHŁODZENIA 94
TRYB WEEKENDOWY 95
ALARM TEMPERATURY 95
CZYSZCZENIE I KONSERWACJA 96
WYJMOWANIE PÓŁEK 96
CZYSZCZENIE 96
ROZWIĄZYWANIE PROBLEMÓW 96
JEŚLI URZĄDZENIE NIE DZIAŁA, NALEŻY SPRAWDZIĆ 96
JEŚLI URZĄDZENIE DZIAŁA, ALE NIEZBYT DOBRZE, NALEŻY SPRAWDZIĆ 97
JEŚLI URZĄDZENIE HAŁASUJE, NALEŻY SPRAWDZIĆ 97
JEŚLI NIE DZIAŁA OŚWIETLENIE, NALEŻY SPRAWDZIĆ 97
JEŚLI DRZWI NIE SĄ ZAMKNIĘTE PRAWIDŁOWO, NALEŻY SPRAWDZIĆ 97
JEŚLI NA WYŚWIETLACZU ŚWIECI SIĘ “E1” LUB “E2” 97
EPREL 97
GWARANCJA, OBSŁUGA POSPRZEDAŻOWA 98
GWARANCJA 98

- 9 -
ES- Tabla de contenidos
IMPORTANTES INSTRUCCIONES DE SEGURIDAD 100
INSTALACIÓN Y CONDICIONES DE TRABAJO DEL APARATO 103
CLASE CLIMÁTICA 104
CONSEJOS PRÁCTICOS 104
DESEMBALAJE 106
ELIMINACIÓN DE APARATOS USADOS 107
ELEMENTOS DE CONTROL 108
ELEMENTOS DE CONTROL - UNA Y DOS ZONAS 108
ACTIVACIÓN / DESACTIVACIÓN DE ALIMENTACIÓN 108
CAMBIO DE TEMPERATURA 108
SELECCIÓN DE TEMPERATURA ÓPTIMA 109
ILUMINACIÓN DEL INTERIOR 109
HUMEDAD EN EL INTERIOR 109
VISUALIZADOR DE TEMPERATURA 109
MODO DE INSONORIZACIÓN 109
MODO DE REFRIGERACIÓN DINÁMICA 109
MODO FIN DE SEMANA 110
ALARMA DE TEMPERATURA 110
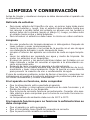
LIMPIEZA Y CONSERVACIÓN 111
RETIRADA DE ESTANTES 111
LIMPIEZA 111
SI EL APARATO NO FUNCIONA, DEBE COMPROBAR 111
SI EL APARATO FUNCIONA PERO NO FUNCIONA LO SUFICIENTE BIEN SE DEBE
COMPROBAR 111
SI EL APARATO HACE RUIDO, SE DEBE COMPROBAR 112
SI LA ILUMINACIÓN NO FUNCIONA, SE DEBE COMPROBAR 112
SI LA PUERTA NO ESTÁ CERRADA CORRECTAMENTE, SE DEBE COMPROBAR 112
SI EN EL VISUALIZADOR ILUMINA “E1” O “E2” 112
EPREL 112
GARANTÍA, ATENCIÓN DE POST VENTA 113
GARANTÍA 113

- 10 -
NAVODILA ZA ZAGOTAVLJANJE VARNOSTI UPORABE 115
MONTAŽA IN POGOJI DELOVANJA NAPRAVE 117
KLIMATSKI RAZRED 118
PRAKTIČNI NASVETI 119
RAZPAKIRANJE 120
ODSTRANJEVANJE IZRABLJENIH NAPRAV 121
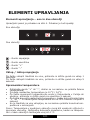
ELEMENTI UPRAVLJANJA 122
ELEMENTI UPRAVLJANJA – ENO IN DVE OBMOČJI 122
VKLOP / IZKLOP NAPAJANJA 122
SPREMEMBA TEMPERATURE 122
IZBOR OPTIMALNE TEMPERATURE 123
NOTRANJA OSVETLITEV 123
VLAGA V NOTRANJOSTI 123
EKRAN ZA TEMPERATURO 123
SILENT MODE (TIHI NAČIN) 123
NAČIN DINAMIČNEGA HLAJENJA 123
VIKEND NAČIN 124
TEMPERATURNI ALARM 124
ČIŠČENJE IN VZDRŽEVANJE 125
ODSTRANJEVANJE POLIC 125
ČIŠČENJE 125
REŠEVANJE PROBLEMOV 125
ČE NAPRAVA NE DELUJE, JE POTREBNO PREVERITI 125
ČE NAPRAVA DELUJE, VENDAR NE NAJBOLJŠE, PREVERITE 126
ČE JE NAPRAVA GLASNA, JE TREBA PREVERITI 126
ČE NE DELUJE OSVETLITEV, JE TREBA PREVERITI 126
ČE VRATA NISO PRAVILNO ZAPRTA, JE POTREBNO PREVERITI 126
ALI NA EKRANU SVETI “E1” ALI “E2” 126
EPREL 126
GARANCIJA, POPRODAJNE STORITVE 127
GARANCIJA 127
SL- Sadržaj

- 11 -
Dear customer,
From now on, your daily housework will be easier
than ever before. Your appliance is excepon-
ally easy to use and extremely ecient. Aer reading
these Operang Instrucons, operang the appliance
will be easy.
Before being packaged and leaving the manufacturer,
the appliance was thoroughly checked with regard to
safety and funconality.
Before using the appliance, please carefully read
these Operang Instrucons. By following these
instrucons carefully you will be able to avoid any
problems in using the appliance. It is important to
keep these Operang Instrucons and store them in a
safe place so that they can be consulted at any me.
Follow these instrucons carefully in order to avoid
possible accidents.
Sincerely,

- 12 -
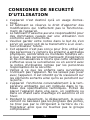
GUIDELINES CONCERNING
THE SAFETY OF USE
• The appliance is intended for household use only.
• The manufacturer reserves the right to introduce
changes which do not aect the operation of the
appliance.
• The Manufacturer shall not be held liable for
damage arising from the failure to observe the
instructions contained in this manual.
• Keep this manual for future reference, or to pass
it over to the next user.
• This appliance is not intended for use by persons
(including children) with limited physical or men-
tal capabilities and persons who lack experience
or familiarity with the appliance.
• Do not allow children to use the appliance. Do
not allow them to play with the appliance. They
must not climb inside the drawers and swing on
the doors.
• The appliance operates properly at the ambient
temperature (see product che). Do not use it in
the cellar, unheated summer cottage during au-
tumn and winter.
• When placing, moving, lifting the appliance, do
not hold the door handles, do not pull the con-
denser at the rear part of the refrigerator and do
not touch the compressor unit.
• Pull the plug out from the mains socket before
each maintenance activity. Do not pull on the
cord, but hold the body of the plug instead.
• The “cracking” sound, which the appliance may
emit is caused by the expansion and contraction
of parts as a result of temperature variations.
• For safety reasons do not repair the appliance
yourself. Repairs carried out by persons who do
not have the required qualications may result in
serious danger for the user of the appliance.

- 13 -
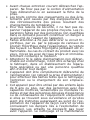
• Make sure you do not damage the cooling sys-
tem, by puncturing the refrigerant pipes in the
evaporator or breaking the pipes. The refrigerant
is ammable. If the refrigerant makes contact
with the eyes, rinse them with clean water and
call for medical assistance immediately.
• Important! If the power cord is damaged, it should
be replaced by the manufacturer or specialist re-
pair centre or a qualied person in order to avoid
danger.
• When performing activities, such as cleaning,
maintenance or moving, the appliance must be
completely disconnected from power supply (by
pulling the plug out from the socket)
• This appliance can be used by children aged 8
years and older or by persons with physical, men-
tal or sensory handicaps, or by those who are
inexperienced or unfamiliar with the appliance,
provided they are supervised or have been in-
structed how to safely use the appliance and are
familiar with risks associated with the use of the
appliance. Ensure that children do not play with
the appliance. Cleaning and maintenance of the
appliance should not be performed by children
unless they are 8 years or older and are super-
vised by a competent person.
• Do not clean the appliance with steam
• Keep the appliance and its power cord away from
children under 8 years old.
• Do not immerse the power cord or plug in water.
• Keep cord away from heated surfaces.
• Do not allow the connection cord hanging over
the edge of a table or counter.
• Do not use any electrical appliances inside the
chamber
• Do not use any tools to speed up the defrosting
process
• Regularly clean the ventilation openings (in case
of built-in appliances or those installed under the
worktop)

- 14 -
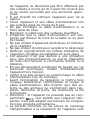
• This appliance is not designed to be controlled
by electronic timers or other devices that cut o
power directly or remotely.
• In case of accidental spillage of liquids on electri-
cal components, immediately unplug your appli-
ance from the power supply.
• Make sure that the power cord is not crushed or
damaged during installation.
• Disable the appliance before disposing of it. Un-
plug the appliance from the power supply and cut
o the power cord. To prevent children or animals
from being trapped in the appliance, remove the
doors, hinges and locks.
• Note: If the appliance does not have a freezer
compartment (
!
), it is not suitable for freez-
ing foodstus.
• Pursuant to Commission Regulation (EU)
2019/2019, the minimum availability period for
spare parts necessary to repair the appliance is 7
or 10 years depending on the type and purpose
of the spare part.
• The list of spare parts and the ordering procedure
are available on the websites of the manufactur-
er, importer or an authorized representative.
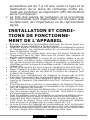
INSTALLATION AND OPER-
ATING CONDITIONS OF THE
APPLIANCE
• Connect the appliance to the power supply 24 hours after unpacking
and setting in the nal location.
• Take the product out of the package, remove the scotch tape protect-
ing the door and the equipment. Any remaining adhesive stains may
be removed with a mild washing agent.
• Clean the interior surface of the cooler and the elements of the equip-
ment with a washing agent dissolved in lukewarm water, then wipe
it dry.
• Place the cooler on an even, at and stable surface, in dry, aired and
shaded room, far from the heat sources such as: oven, hob, central
heating radiators, central heating pipes, hot water installation, etc.
• On the exterior surface of the product may be a protective foil, this
foils should be removed.
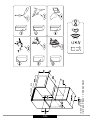
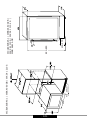
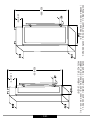
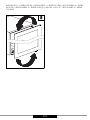
• Make sure the appliance is placed in a horizontal position by screwing

- 15 -
in the 2 adjustable front legs (g. 1)
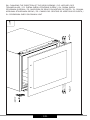
• Keep free space on the sides and rear of the appliance (see installa-
tion drawing)
• When you install your wine cooler inside a furniture cabinet, make
sure that the ventilation grille located in the bottom of the appliance
is not blocked.
• Odours may be released when you rst start your appliance. It will
dissipate when the interior of the appliance cools down
• When you rst start your wine cooler, the compressor will run contin-
uously until the desired temperature is reached inside the chamber
• When you unplug your appliance from the power supply, it is recom-
mended to wait 5 minutes before you plug it back in. This will reduce
the risk of damage to the compressor.
• On selected models, the correct temperature will be shown on the
display only a few hours after the wine cooler has been put into op-
eration
• This appliance should be connected to AC 220-240V 50Hz supply
socket. The socket must be tted properly, and must be supplied with
an earthing conduit and a 10A fuse.
• It is a legal requirement that the appliance is properly earthed. The
manufacturer will not be held liable for any damage or injury which
may result from the failure to full this requirement.
• Do not use adapters, multiple sockets and two-wire extension leads.
If it is necessary to use the extension lead, it must be equipped with
a protection ring and a single socket and must have a VDE/GS safety
certicate.
• If an extension lead is used (with a protection ring and safety certif-
icate), its socket must be located at a safe distance, away from the
sinks, and must not be in a place where it could be ooded by water
or waste water.
• Make sure the appliance can be easily disconnected from the mains,
either by pulling the plug out of the mains socket, or by switching the
two-pole switch o.
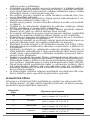
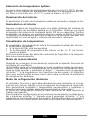
Climate range
The information about the climate range of the appliance is provided
on the rated plate. It indicates at which ambient temperature (that is,
room temperature, in which the appliance is working) the operation of
the appliance is optimal (proper).
Climate class Allowable ambient temperature
SN
Extended
Temperate
This refrigeration appliance is intended for use at an
ambient temperature ranging between 10°C and 32°C
N Temperate
This refrigeration appliance is intended for use at an
ambient temperature ranging between 16 °C and 32°C
ST Subtropical
This refrigeration appliance is intended for use at an
ambient temperature ranging between 16 °C and 38 °C
T Tropical
This refrigeration appliance is intended for use at an
ambient temperature ranging between 16 °C and 43 °C

- 16 -
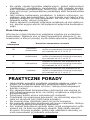
PRACTICAL EVERYDAY TIPS
• If the light inside the appliance remains turned on, keep in mind that
the temperature inside the appliance will be higher
• Temperature inside the appliance depends on the amount and type
of stored wine bottles
• To ensure user safety and high quality of stored wine, do not install
the appliance in damp rooms
• Store wine bottles in designated spaces
• Your wine cooler has a limited capacity. Do not place more bottles in
your wine cooler than recommended in specication
• Do not open the wine cooler door if it is not necessary
• Do not cover the shelves with aluminium foil or other material. This
blocks the air circulation inside the appliance
• To avoid damage to the door seal, make sure that the door is com-
pletely open before pulling out the shelf. The shelves should be in-
serted as far as possible, otherwise the shelf may deform and dam-
age the door seal.
• Do not extend the loaded shelves beyond the extension limit (about
1/3 of the shelf length)
• This appliance is designed for storing bottles of wine. Do not use it
for any other purpose.
• Temperature stability is very important when storing wine.
• Exposing your wine cooler to sunlight, signicant temperature uctu-
ations, high humidity and vibrations may cause the wine to go bad.
• In periods of high humidity, condensed water vapour may appear on
the outer surfaces of the glass door. To prevent this, install the appli-
ance in a dry, adequately ventilated room.
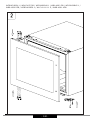
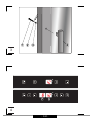
• Selected models have an external handle. You need to install it on
your own. Do not use electric tools for this purpose (g. 3*). To do
this, pull the door seal slightly to the side and place the screws on
the inside of the door. Align the handle with the holes on the outside
of the door and tighten the screws with a screwdriver. Reinstall the
door seal.
• The maximum capacity of the appliance is given in the product sheet
enclosed with the wine cooler. This capacity applies to standard 0.75
litre bottles of Bordeaux.
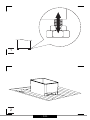
• Selected models have an Anti-tip kit. Install it according to the en-
closed diagram (g. 6*).
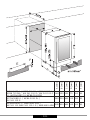
• This refrigeration appliance is intended for use as a built-in appliance.
• To achieve the most eective food preservation for the longest pos-
sible time and to avoid wasting any food, position the products as
shown in Figure 12. In addition, this gure illustrates the layout of
drawers, baskets and shelves, which allows the most ecient use of
energy.
• Optimal temperature and storage conditions will extend product shelf
life and optimize electricity consumption. Optimal storage tempera-
ture range should be stated on the food product packaging.
*According to the model

- 17 -
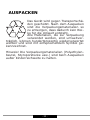
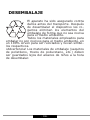
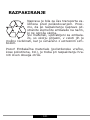
UNPACKING
During transportation, protective
packaging was used to protect the
appliance against any damage. Af-
ter unpacking, please dispose of all
elements of packaging in a way that
will not cause damage to the environ-
ment.
All materials used for packaging the appliance are
environmentally friendly; they are 100% recyclable
and are marked with the appropriate symbol.
Important! Packaging materials (bags, polyethyl-
ene, polystyrene, etc.) should be kept away from
children during unpacking.

- 18 -
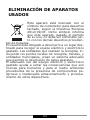
DISPOSAL OF OLD
APPLIANCE
In accordance with European Directive
2012/19/EU and local legislation re-
garding used electrical and electronic
goods, this appliance is marked with
the symbol of the crossed-out waste
container. This marking indicates that
the appliance must not be disposed
of together with other household waste after it has
been used.
The user is obliged to hand it over to waste collec-
tion centre collecting used electrical and electron-
ic goods. The collectors, including local collection
points, shops and local authority departments pro-
vide recycling schemes.
Proper handling of used electrical and electronic
goods helps avoid environmental and health haz-
ards resulting from the presence of dangerous com-
ponents and the inappropriate storage and process-
ing of such goods.

- 19 -
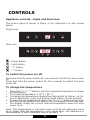
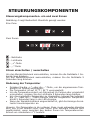
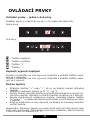
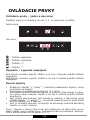
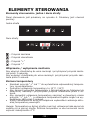
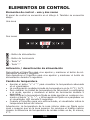
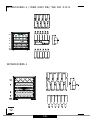
CONTROLS
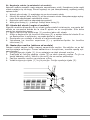
Appliance controls- single and dual zone
The control panel is shown in gure 4. For reference it is also shown
below:
Single zone
Dual zone
– Power button
– Light button
– “+” button
– “-” button
To switch the power on/o
Press and hold the power button for one second to switch the wine cooler
on.
Press and hold the power button for ve seconds to switch the wine
cooler o.
To change the temperature
• Press the “+” or “-” buttons until the required temperature is shown
on the display.
• The Preset temperature is 12˚C / 54˚ F.
• To change the temperature display from Fahrenheit to Celsius, or Cel-
sius to Fahrenheit, press and hold the light button for ve seconds.
• To view the set temperature, touch the “+” or “-” button at any time
and the set temperature will ash in the LED display for ve seconds.
• The display shows the current internal temperature when the wine
cooler is on.
Note: The temperature in the lower zone must be set either the same
as or higher than the temperature in the upper zone. The dierence in
temperatures in both chambers cannot exceed 4˚C.

- 20 -
Optimal temperature selection
Whilst wine is best stored at temperatures between 13 and 15˚ C, your
wine can also be stored at drinking temperature. For red wine this is be-
tween 15 and 17˚C, and for white wine between 12 and 13˚C.
To use the internal light
Press the light button to switch the light on or o.
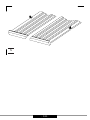
Internal Humidity
According to the model wine coolers are equipped with a humidity sys-
tem to maintain optimal humidity within the wine cooler. Fill the humidity
reservoir approximately 3/4 full with water. Place the reservoir on the
runners on the top shelf as shown in g. 2. Ensure it is located correctly
to prevent water spillage. Check the water level regularly and rell if
required.
Temperature display
The temperature display will show the current internal temperature.
The display ashes:
• When a dierent temperature is being set
• If the internal temperature is +/- 5˚ away from the set temperature.
This serves as a warning to prevent damage to the contents of the appli-
ance should the temperature be too high.
Silent mode
Once the required temperature is reached, the appliance will run without
the fan. The wine cooler is factory set to silent mode. To change to dy-
namic cooling mode, touch and hold the “-” button for approximately ve
seconds (left hand “-” button on 2-Zone coolers). The wine cooler will
beep ve times to conrm dynamic cooling is on.
Dynamic cooling mode
The fan cycles on and o to circulate the air even after the required tem-
perature is reached. This ensures consistent humidity and temperature
distribution in the wine cooler, creating perfect conditions for long term
storage.
Using the dynamic mode increases the level of noise in operation.
To change to silent mode, touch and hold the “+” button for approxi-
mately ve seconds (left hand “+” button on 2-Zone coolers). The wine
cooler will beep three times to conrm silent mode is on.
Strona się ładuje...
Strona się ładuje...
Strona się ładuje...
Strona się ładuje...
Strona się ładuje...
Strona się ładuje...
Strona się ładuje...
Strona się ładuje...
Strona się ładuje...
Strona się ładuje...
Strona się ładuje...
Strona się ładuje...
Strona się ładuje...
Strona się ładuje...
Strona się ładuje...
Strona się ładuje...
Strona się ładuje...
Strona się ładuje...
Strona się ładuje...
Strona się ładuje...
Strona się ładuje...
Strona się ładuje...
Strona się ładuje...
Strona się ładuje...
Strona się ładuje...
Strona się ładuje...
Strona się ładuje...
Strona się ładuje...
Strona się ładuje...
Strona się ładuje...
Strona się ładuje...
Strona się ładuje...
Strona się ładuje...
Strona się ładuje...
Strona się ładuje...
Strona się ładuje...
Strona się ładuje...
Strona się ładuje...
Strona się ładuje...
Strona się ładuje...
Strona się ładuje...
Strona się ładuje...
Strona się ładuje...
Strona się ładuje...
Strona się ładuje...
Strona się ładuje...
Strona się ładuje...
Strona się ładuje...
Strona się ładuje...
Strona się ładuje...
Strona się ładuje...
Strona się ładuje...
Strona się ładuje...
Strona się ładuje...
Strona się ładuje...
Strona się ładuje...
Strona się ładuje...
Strona się ładuje...
Strona się ładuje...
Strona się ładuje...
Strona się ładuje...
Strona się ładuje...
Strona się ładuje...
Strona się ładuje...
Strona się ładuje...
Strona się ładuje...
Strona się ładuje...
Strona się ładuje...
Strona się ładuje...
Strona się ładuje...
Strona się ładuje...
Strona się ładuje...
Strona się ładuje...
Strona się ładuje...
Strona się ładuje...
Strona się ładuje...
Strona się ładuje...
Strona się ładuje...
Strona się ładuje...
Strona się ładuje...
Strona się ładuje...
Strona się ładuje...
Strona się ładuje...
Strona się ładuje...
Strona się ładuje...
Strona się ładuje...
Strona się ładuje...
Strona się ładuje...
Strona się ładuje...
Strona się ładuje...
Strona się ładuje...
Strona się ładuje...
Strona się ładuje...
Strona się ładuje...
Strona się ładuje...
Strona się ładuje...
Strona się ładuje...
Strona się ładuje...
Strona się ładuje...
Strona się ładuje...
Strona się ładuje...
Strona się ładuje...
Strona się ładuje...
Strona się ładuje...
Strona się ładuje...
Strona się ładuje...
Strona się ładuje...
Strona się ładuje...
Strona się ładuje...
Strona się ładuje...
Strona się ładuje...
Strona się ładuje...
Strona się ładuje...
Strona się ładuje...
Strona się ładuje...
Strona się ładuje...
Strona się ładuje...
Strona się ładuje...
Strona się ładuje...
Strona się ładuje...
Strona się ładuje...
Strona się ładuje...
Strona się ładuje...
Strona się ładuje...
Strona się ładuje...
Strona się ładuje...
Strona się ładuje...
Strona się ładuje...
-
 1
1
-
 2
2
-
 3
3
-
 4
4
-
 5
5
-
 6
6
-
 7
7
-
 8
8
-
 9
9
-
 10
10
-
 11
11
-
 12
12
-
 13
13
-
 14
14
-
 15
15
-
 16
16
-
 17
17
-
 18
18
-
 19
19
-
 20
20
-
 21
21
-
 22
22
-
 23
23
-
 24
24
-
 25
25
-
 26
26
-
 27
27
-
 28
28
-
 29
29
-
 30
30
-
 31
31
-
 32
32
-
 33
33
-
 34
34
-
 35
35
-
 36
36
-
 37
37
-
 38
38
-
 39
39
-
 40
40
-
 41
41
-
 42
42
-
 43
43
-
 44
44
-
 45
45
-
 46
46
-
 47
47
-
 48
48
-
 49
49
-
 50
50
-
 51
51
-
 52
52
-
 53
53
-
 54
54
-
 55
55
-
 56
56
-
 57
57
-
 58
58
-
 59
59
-
 60
60
-
 61
61
-
 62
62
-
 63
63
-
 64
64
-
 65
65
-
 66
66
-
 67
67
-
 68
68
-
 69
69
-
 70
70
-
 71
71
-
 72
72
-
 73
73
-
 74
74
-
 75
75
-
 76
76
-
 77
77
-
 78
78
-
 79
79
-
 80
80
-
 81
81
-
 82
82
-
 83
83
-
 84
84
-
 85
85
-
 86
86
-
 87
87
-
 88
88
-
 89
89
-
 90
90
-
 91
91
-
 92
92
-
 93
93
-
 94
94
-
 95
95
-
 96
96
-
 97
97
-
 98
98
-
 99
99
-
 100
100
-
 101
101
-
 102
102
-
 103
103
-
 104
104
-
 105
105
-
 106
106
-
 107
107
-
 108
108
-
 109
109
-
 110
110
-
 111
111
-
 112
112
-
 113
113
-
 114
114
-
 115
115
-
 116
116
-
 117
117
-
 118
118
-
 119
119
-
 120
120
-
 121
121
-
 122
122
-
 123
123
-
 124
124
-
 125
125
-
 126
126
-
 127
127
-
 128
128
-
 129
129
-
 130
130
-
 131
131
-
 132
132
-
 133
133
-
 134
134
-
 135
135
-
 136
136
-
 137
137
-
 138
138
-
 139
139
-
 140
140
-
 141
141
-
 142
142
-
 143
143
-
 144
144
-
 145
145
-
 146
146
-
 147
147
-
 148
148


Amica WCF1K15B7.1 Instrukcja obsługi
- Kategoria
- Chłodziarki do wina
- Typ
- Instrukcja obsługi
- Niniejsza instrukcja jest również odpowiednia dla
w innych językach
- español: Amica WCF1K15B7.1 Manual de usuario
- Deutsch: Amica WCF1K15B7.1 Benutzerhandbuch
- slovenčina: Amica WCF1K15B7.1 Používateľská príručka
- français: Amica WCF1K15B7.1 Manuel utilisateur
Powiązane artykuły
Inne dokumenty
-
eta 953390010F Instrukcja obsługi
-
-
-
Candy RWCB 60D/N Instrukcja obsługi
-
Hoover RWCB 45/1 Instrukcja obsługi
-
Candy BWC305SS/3 Instrukcja obsługi
-
KitchenAid HA6 WC711 0 instrukcja
-
Candy CCVB 60D UK/N Instrukcja obsługi
-
Whirlpool ARC 227 instrukcja
-
Koenic KFK 45412 E NF Instrukcja obsługi