GVision P10PS Series Instrukcja obsługi
- Kategoria
- Telewizory
- Typ
- Instrukcja obsługi

P10PS
SERIES
USER’S MANUAL (10.4”
)
POS TOUCHSCREEN MONITOR
GVISION U
SA, INC
30398 Esperanza, Rancho Santa Margarita CA 92688 / 949.586.3338 / info@gvision-usa.com
WWW.GVISION-USA.COM

WWW.GVISION-USA.COM
30398 Esperanza Rancho Santa Margarita CA 92688 / Tel. 949-586-3338 / Fax. 949-272-4594 / Email. info@gvision-usa.com
2
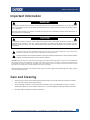
Important Information
Care and Cleaning
WARNING
TO PREVENT FIRE OR SHOCK HAZARDS, DO NOT EXPOSE THIS UNIT TO RAIN OR MOISTURE. ALSO, DO NOT USE THIS
UNIT’S POLARIZED PLUG WITH AN EXTENSION CORD RECEPTACLE OR OTHER OUTLETS UNLESS THE PRONGS CAN BE
FULLY INSERTED.
REFRAIN FROM OPENING THE CABINET AS THERE ARE HIGH VOLTAGE COMPONENTS INSIDE. REFER SERVICING TO
QUALIFIED SERVICE PERSONNEL.
CAUTION
TO REDUCE THE RISK OF ELECTRIC SHOCK, MAKE SURE POWER CORD IS UNPLUGGED FROM WALL SOCKET. TO FULLY
DISENGAGE THE POWER TO THE UNIT, PLEASE DISCONNECT THE POWER CORD FROM THE AC OUTLET. DO NOT
REMOVE COVER (OR BACK). NO USER SERVICEABLE PARTS INSIDE. REFER SERVICING TO QUALIFIED SERVICE
PERSONNEL.
This symbol warns user that uninsulated voltage within the unit may have sufficient magnitude to cause electric shock.
Therefore, it is dangerous to make any kind of contact with any part inside this unit.
This symbol alerts the user that important literature concerning the operation and maintenance of this unit has been included.
Therefore, it should be read carefully in order to avoid any problems.
CAUTION: Please use the power cord provided with this display in accordance with the table below. If a power cord is not supplied with
this equipment, please contact GVISION. For all other cases, please use the power cord with the plug style that matches the power
socket where the monitor is located. The compatible power cord corresponds to the AC voltage of the power outlet and has been
approved by, and complies with, the safety standards in the country of purchase.
*When operating this monitor with its AC 125-240V power supply, use a power supply cord that matches the power supply voltage of
the AC power outlet being used.
• Always unplug your monitor from the wall outlet before cleaning. Clean the LCD monitor surface with a lint-free, non-abrasive
cloth. Avoid using any liquid, aerosol or glass cleaners.
• Slots and openings on the back or top of the cabinet are for ventilation. They must not be blocked or covered. Your monitor
should never be placed near or over a radiator or heat source, or in a built-in installation unless proper ventilation is provided.
• Never push objects or spill liquid of any kind into this product.

WWW.GVISION-USA.COM
30398 Esperanza Rancho Santa Margarita CA 92688 / Tel. 949-586-3338 / Fax. 949-272-4594 / Email. info@gvision-usa.com
3
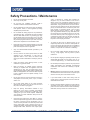
Safety Precautions / Maintenance
Do not use this apparatus near water.
Clean only with dry cloth.
Do not block any ventilation openings. Install in
accordance with the manufacturer’s instructions.
Do not install near any heat sources such as radiators,
heat registers, stoves, or other apparatus (including
amplifiers) that produce heat.
Do not defeat the safety purpose of the polarized or
grounding-type plug. A polarized plug has two blades
with one wider than the other. A grounding type plug
has two blades and a third grounding prong. The wide
blade or the third prong are provided for your safety. If
the provided plug does not fit into your outlet, consult an
electrician for replacement of the obsolete outlet.
Protect the power cord from being walked on or pinched
particularly at plugs, convenience receptacles, and the
point where they exit from the apparatus.
Only use attachments/accessories specified by the
manufacturer.
Use only with the cart, stand, tripod, bracket, or table
specified by the manufacturer, or sold with the
apparatus. When a cart is used, use caution when
moving the monitor combination to avoid injury from tip-
over.
Unplug the monitor during lightning storms or when
unused for long periods of time.
Refer all servicing to qualified service personnel.
Servicing is required when the apparatus has been
damaged in any way, such as power-supply cord or
plug is damaged, liquid has been spilled or objects have
fallen into the apparatus, the monitor has been exposed
to rain or moisture, does not operate normally, or has
been dropped.
Do not press strongly upon the panel with a hand or a
sharp object such as a nail, pencil, or pen, or make a
scratch on it.
Do not stick metal objects or any other conductive
material into the power cord. Do not touch the end of
the power cord while it is plugged in.
Keep the packing anti-moisture material or vinyl
packing out of the reach of children. Anti-moisture
material is harmful if swallowed. If swallowed, induce
vomiting and go to the nearest hospital. Additionally,
vinyl packing can cause suffocation. Keep it out of the
reach of children.
Concerning the Power Cord (Can differ by country):
Check the specification page of this owner’s manual to
be certain concerning current requirements. Do not
connect too many devices to the same AC power outlet
as this could result in fire or electric shock. Do not
overload wall outlets. Overloaded wall outlets, loose or
damaged wall outlets, extension cords, frayed power
cords, or damaged or cracked wire insulation are
dangerous. Any of these conditions could result in
electric shock or fire. Periodically examine the cord of
your device, and if its appearance indicates damage or
deterioration, unplug it, discontinue use of the device,
and have the cord replaced with an exact replacement
part by an authorized servicer. Protect the power cord
from physical or mechanical abuse, such as being
twisted, kinked, pinched, closed in a door, or walked
upon. Pay particular attention to plugs, wall outlets, and
the point where the cord exits the device. Do not move
the monitor with the power cord plugged in. Do not use
a damaged or loose power cord. Be sure do grasp the
plug when unplugging the power cord. Do not pull on
the power cord to unplug the monitor.
To reduce the risk of fire or electrical shock, do not
expose this product to rain, moisture or other liquids. Do
not touch the screen with wet hands. Do not install this
product near flammable objects such as gasoline or
candles, or expose the TV to direct air conditioning.
Do not use high voltage electrical equipment near the
TV (e.g., a bug zapper). This may result in product
malfunction.
Do not expose to dripping or splashing and do not place
objects filled with liquids, such as vases, cups, etc. on
or over the apparatus (e.g., on shelves above the unit).
Do not attempt to modify this product in any way without
written authorization from GVISION. Unauthorized
modification could void the user’s authority to operate
this product.
Moving: Make sure the product is turned off, unplugged,
and all cables have been removed. Do not press or put
stress on the front panel of the monitor screen.
If you smell smoke or other odors coming from the
monitor screen, unplug the power cord and contact an
authorized service center.
If water or another substance enters the product (like an
AC adapter, power cord, or display unit), disconnect the
power cord and contact the service center immediately.
Otherwise, this may result in fire or electric shock.

WWW.GVISION-USA.COM
30398 Esperanza Rancho Santa Margarita CA 92688 / Tel. 949-586-3338 / Fax. 949-272-4594 / Email. info@gvision-usa.com
4
Table of Contents
1. VESA Mounting Installation…………………………………………………………………………………………..5
1.1 10.4” Monitor VESA Mounting…………………………………………………………………………………5
2. FCC Statement…………………………………………………………………………………………………………..6
3. WEEE Statement…………………………………………………………………………………..…………...…........7
4. Japan RoHS Statement…………………………………………………………………………………..…………....9
5. Introduction…………………………………………………………………………………..…………...…...............10
6. Monitor Controls…………………………………………………………………………………..…………...….......11
6.1 Key Function……………………………………………………………………………………………………..11
6.2 Quick Adjustment Function…………………………………………………………………………………...11
6.3 I/O Port…………………………………………………………………………………………………………….12
6.4 OSD Control Options…………………………………………………………………………………………...12
7. Screen Adjustment…………………………………………………………………………………..…………...…...14
8. Touch Installation…………………………………………………………………………………..…………...….....15
9. Power Management…………………………………………………………………………………..…………...…..16
10. Trouble Shooting…………………………………………………………………………………..…………...…......17
11. Display Modes…………………………………………………………………………………..…………...…...........18
12. Specification…………………………………………………………………………………..…………...…..............20

WWW.GVISION-USA.COM
30398 Esperanza Rancho Santa Margarita CA 92688 / Tel. 949-586-3338 / Fax. 949-272-4594 / Email. info@gvision-usa.com
5
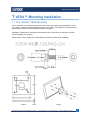
1 VESA™ Mounting Installation
1.1 10.4” Monitor VESA Mounting
Fix UL listed wall mount bracket on the back of the monitor with screws, the specification of screw
(ref. image 1) to prevent electric damage to ensure user’s safety. The dimension of interface pad of
wall mount bracket has to follow VESA standard (ref. Image 2).
Installation: Please aim UL listed wall mount bracket at the 4 screw holes on the back of monitor
and screw tightly (ref. Image 3).
Please refer to user’s manual of UL listed wall mount bracket for wall mount installation.
Image 1
Image 3 Image 2

WWW.GVISION-USA.COM
30398 Esperanza Rancho Santa Margarita CA 92688 / Tel. 949-586-3338 / Fax. 949-272-4594 / Email. info@gvision-usa.com
6
2 FCC Statement
This equipment has been tested and found to comply with the limits for a Class B digital device,
pursuant to Part 15 of the FCC Rules. These limits are designed to provide reasonable protection
against harmful interference in a residential installation. This equipment generates, uses and can
radiate radio frequency energy and, if not installed and used in accordance with the instructions, may
cause harmful interference to radio communications. However, there is no guarantee that interference
will not occur in a particular installation. If this equipment does cause harmful interference to radio or
television reception, which can be determined by turning the equipment off and on, the user is
encouraged to try to correct the interference by one or more the following measures:
Reorient / Relocate the receiving antenna.
Increase the separation between the equipment and receiver.
Connect the equipment into an outlet on a circuit different from that to which the receiver is
connected.
Consult the dealer or an experienced radio/TV technician for help
This device complies with Part 15 of the FCC Rules. Operation is subject to the following two
conditions: (1) This device may cause harmful interference, and (2) this device must accept any
interference received, including interference that may cause undesired operation.
Notice:
The use of non-shielded interface with this equipment is prohibited. If necessary, the user should
consult the dealer or an experienced radio / television technician for additional suggestions. The user
may find the following booklet prepared by the Federal Communications Commission helpful. This
booklet is available from the U.S. Government Printing Office Washington DC, 20402, Stock No.
004-000-00345-4.
The manufacture is not responsible for any radio or TV interference caused by unauthorized
modification of this equipment. It is the responsibility of the user to correct such interference.
Caution: To meet FCC limits for a Class B computing device, a shielded signal cable
should be used.
Canadian Department Of Communications
Compliance Statement
This equipment does not exceed Class B limits per radio noise emissions for a digital apparatus, set
out in the Radio Interference Regulation of the Canadian Department of Communications. Operation
in a residential area may cause unacceptable interference to radio and TV reception requiring the
owner or operator to take whatever steps necessary to correct the interference.
Département Canadien des Communications
Rapport De Conformité
Cet équipement ne dépasse pas les limites de classe B pour des émissions de bruit radio pour des
appareils numériques comme présenté au règlement d'interférence radio du département canadien
des communications. L'utilisation dans une zone résidentielle risqué de générer des interférences
inacceptables à la réception radio et TV, auquel cas l'utilisateur se verrait dans l'obligation de
prendre toutes mesures nécessaires pour corriger les interférences.

WWW.GVISION-USA.COM
30398 Esperanza Rancho Santa Margarita CA 92688 / Tel. 949-586-3338 / Fax. 949-272-4594 / Email. info@gvision-usa.com
7
3 WEEE Statement
Important Information for Recycling
This warning sign of the trash bin indicates that the objects are not allowed to be
disposed of as general refuse. Please follow the local Act and carry out further disposal
with refuse recycling and collecting system in your Country or District. For more
information on recycling, please contact a locally authorized recycling center or place
of purchase. Your recycling behavior will bring a better future for the Earth and create
a living environment with excellent quality for the descendant.
Informations importantes relatives au recyclage
Cet avertissement sur un récipient à ordures indique qu'il est interdit d'y déverser des ordures
ménagères. Veuillez à l'avenir respecter les réglementations locales et rester en conformité avec le
système de collecte et de recyclage des ordures de votre circonscription ou district. Pour plus
d'informations sur le recyclage, veuillez contacter votre centre de recyclage agréé local ou le lieu
d'achat. Votre attitude quant au recyclage améliorera l'avenir de la planète et créera un
environnement de vie de qualité pour les générations futures.
Wichtige Hinweise zum Recycling
Dieses Mülleimer-Warnsymbol gibt an, dass die Objekte nicht mit dem regulären Hausmüll entsorgt
werden dürfen. Bitte halten Sie sich an die örtlichen Bestimmungen und entsorgen Sie die Objekte
über Recycling- und Sammelstellen in Ihrer Nähe. Detaillierte Informationen zum Recycling erhalten
Sie von Ihrer örtlichen, offiziellen Recycling-Sammelstelle oder beim Händler, bei dem Sie die
Objekte erworben haben. Ihre Mitarbeit trägt dazu bei, unsere Umwelt zu schützen und sorgt dafür,
dass unsere Erde auch für nachfolgende Generationen ein Ort bleibt, an dem es sich zu leben lohnt.
Información importante de reciclado
Este letrero de aviso de cubo de basura indica que los objetos no pueden desecharse como residuos
generales. Cumpla la normativa local y realice la eliminación según el sistema de reciclado y
recogida de su país o región. Para obtener más información sobre el reciclado, póngase en contacto
con su centro de reciclado autorizado local o su lugar de compra. Su conducta de reciclado supondrá
un mejor futuro para la Tierra y crea un entorno de vida de calidad para las futuras generaciones.
Informazioni importanti sul riciclaggio
Questo simbolo del bidone dell’immondizia sta ad indicare che è vietato smaltire il prodotto insieme ai
rifiuti domestici generici. Attenersi alle normative ed alle procedure di raccolta e riciclaggio dei rifiuti
speciali in vigore nella propria città o regione. Per altre informazioni sul riciclaggio, mettersi in
contatto con i centri autorizzati di raccolta e riciclaggio, oppure con negozio dove è stato fatto
l’acquisto. Le vostre azioni garantiranno il miglioramento futuro della Terra e creeranno un ambiente
ed una qualità di vita che tutti preferiscono sia per sé sia per le generazioni future.
Důležité informace pro recyklaci
Tato značka na kontejneru znamená, že do něj není dovoleno vhazovat určité předměty. Dodržujte
prosím místní předpisy a likvidujte odpad podle systému recyklace a sběru odpadu ve vaší zemi nebo
okresu. Pro další informace o recyklaci kontaktujte místní recyklační středisko nebo místo nákupu
výrobku. Svým postojem k recyklaci přispějete k lepší budoucnosti na Zemi a ke kvalitnějším životním
podmínkám pro budoucí generace.

WWW.GVISION-USA.COM
30398 Esperanza Rancho Santa Margarita CA 92688 / Tel. 949-586-3338 / Fax. 949-272-4594 / Email. info@gvision-usa.com
8
Ważna informacja dotycząca recyklingu
Symbol przedstawiający pojemnik na odpadki informuje, że oznaczone nim obiekty nie mogą być
usuwane razem z ogólnymi odpadami. Należy stosować się do lokalnego prawa i wykonywać
zalecenia dotyczące dalszego przetwarzania takich odpadów poprzez umieszczanie ich punktach
gromadzenia odpadów w danym kraju lub okręgu. Dalsze informacje dotyczące recyklingu można
uzyskać, po skontaktowaniu się z punktem przetwarzania odpadów autoryzowanym przez władze
lokalne lub w miejscu zakupu. Stosowanie się do zaleceń w sprawie przetwarzania odpadów,
przyczyni się do zmniejszenia zanieczyszczenia Ziemi i zachowania czystości środowiska dla
przyszłych pokoleń.
Важная информация о переработке отходов
Такое изображение мусорного ящика обозначает, что данный предмет не разрешается
выбрасывать вместе с общими отходами. Пожалуйста, придерживайтесь местных
законов и выбрасывайте данный предмет в соответствии с системой переработки
отходов вашей страны или области. Для более детальной информацией о переработке
отходов обращайтесь к местным авторизированным центрам переработки отходов или
к продавцу данного изделия. Ваши действия по утилизации мусора повлияют на лучшее
будущее Земли и повысят чистоту окружающей среды для будущих поколений.
回收重要資訊
這個垃圾桶警告標識,表示不能依一般廢棄物處理,請依照當地法律,利用貴國或貴地區的廢品回收及收
集系統加以處理,欲取得更多的回收資訊,請聯絡當地授權的回收中心或產品購買地點 ◦
你的回收行為,將為地球帶來更美好的將來,為後代子孫創造更優質的生活環境 ◦
回收重要信息
这个垃圾桶警告标识,表示不能依一般废弃物处理,请依照当地法律,利用贵国或贵地区的废品回收
及 收集系统加以处理,欲取得更多的回收信息,请联络当地授权的回收中心或产品购买地点 ◦
你的回收行为,将为地球带来更美好的将来,为后代子孙创造更优质的生活环境 ◦
リサイクルに関する重要な情報
このごみ入れの警告標示は、物体を一般廃棄物として廃棄できないことを示しています。地方自治
体の規制に従い、居住する国または地域の廃棄物リサイクルおよび収集システムに従って廃棄を実
行してください。リサイクルの詳細については、地域の認可されたリサイクルセンターまたは購入
店にお問い合わせください。
お客様のリサイクルに対する態度は地球の未来、また後の世代の生活環境の向上をもたらすものと
な
るはずです。
Green MarkはJ-Mossに合致したと表す(JIS C 0950電,
電子の機械の特定的な化学の物質 は含有して方法を表す) 。 J-
Mossの特定的な化学の物質の(鉛 水銀, カドミウム, 六つの値段クロム
PBB, PBDE), その含有量きわめてになる低い

WWW.GVISION-USA.COM
30398 Esperanza Rancho Santa Margarita CA 92688 / Tel. 949-586-3338 / Fax. 949-272-4594 / Email. info@gvision-usa.com
9
JIS C 0950: 2021 in Japan:
X : 免除した
部 品 名 称
毒がある有害物質あるいは要素でした
鉛
(Pb)
水銀
(Hg)
カドミ
ウム
(Cd)
六値段
クロム
(Cr6+)
たくさんの臭
素のジフェニ
ルでした
(PBB)
たくさんの臭
素のジフェニ
ルオキサイド
(PBDE)
電線のケ
-
ブル
のモジュ-ル Ο Ο Ο Ο Ο Ο
プラスチック
の部品 Ο Ο Ο Ο Ο Ο
メタルの部品
Ο
Ο
Ο
Ο
Ο
Ο
電気回路のモ
ジュ-ル X Ο Ο Ο Ο Ο
液状結晶のデ
スク X X Ο Ο Ο Ο
ぶつかってモ
ジュ-ルを訴え
た
X Ο Ο Ο Ο Ο
1. 「Ο」は計算されたこういう物質のパ-セントの内容が參考のパ-セントの内容を越え
たなかったと表明したと気を配りました。
2. が「免除し」たことを注意して計算されたことを表すこういう物質のパ-セントは合
致して項目を免除します。
4 Japan RoHS Declaration
Green Mark
は
J-Moss
に合致したと表す
(JIS C 0950
電気,電
子の機械の特定的な化学の物質は含有して方法を表す)。
J-Mossの特定的な化学の物質の(鉛 水銀,カドミウム,六
つの値段クロム PBB,PBDE),その含有量きわめてになる低い
設備名前
: LCD
ウォッチドッグ
類型は指定しました
:
全部の模型

WWW.GVISION-USA.COM
30398 Esperanza Rancho Santa Margarita CA 92688 / Tel. 949-586-3338 / Fax. 949-272-4594 / Email. info@gvision-usa.com
10
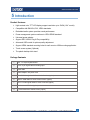
Product Features:
High contrast color TFT LCD display support resolution up to SVGA (10.4” model)
Compatible with IBM VGA, DVI, VESA standards.
Embedded audio system provides sound performance.
Power management system conforms to VESA DPMS standard.
Universal power adapter.
Support DDC1/2B for Plug & Play compatibility.
Advanced OSD control for picture quality adjustment.
Support VESA standard mounting holes for wall mount or ARM mounting application.
Touch screen system (Optional)
The plastic desktop kick stand
Package Contents:
1 10.4” TFT liquid crystal monitor
2 D-sub 15 pin signal cable for analog input
3 Audio cable
4 Power adapter / AC power cord
5 RCA / S-Video signal cable for video-in function (option)
6 RS232 / USB cable for touch screen function (option)
7 RCA / S-Video signal cable for video-in function (option)
8 Touch screen CD driver (option)
9 4 pieces M4x10mm washer screws (option)
5 Introduction

WWW.GVISION-USA.COM
30398 Esperanza Rancho Santa Margarita CA 92688 / Tel. 949-586-3338 / Fax. 949-272-4594 / Email. info@gvision-usa.com
11
Pressing “▲” button once pops up the OSD Function Main Menu.
Pressing “▼” button once pops up the small Brightness icon. Use “+” or “-” button to
adjust the Brightness level.
Pressing “+” button once pops up the small Volume icon. Use “+” or “-” button to
adjust the Volume level.
Pressing “-” button once pops up the small Input Select icon. Press “-” button again
to switch to the digital interface. (Only for the model with digital input)
Pressing “+” button once and then press both “+” and “-” buttons at one time, the
audio will be mute. Pressing “+” button again, the audio come back.
NOTE:
Key lock function:
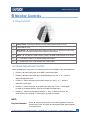
1 Power Switch: Pressing this button turns the display system power on or off
2 Power LED on or off
3 Menu/Select: “▲” Pressing this button opens the OSD menu on the screen, and is used
to select (“Up” direction) the OSD control options on the screen
4 Select: “▼” This button is used to select (“Down”) the OSD control options on the screen
5 “+”: Increase the value of the selected OSD control option
6 “-”: Decrease the valve of the selected OSD control option
6 Monitor Controls
6.1 Key Function
6.2 Quick Adjustment Function
When the OSD Menu is not active, the following functions are available for the quick adjustment.
Press “▼” button and then press Power switch together to freeze all
function keys. Press “▼” button and then press Power switch together
to unlock the keys.

WWW.GVISION-USA.COM
30398 Esperanza Rancho Santa Margarita CA 92688 / Tel. 949-586-3338 / Fax. 949-272-4594 / Email. info@gvision-usa.com
12
Pressing “-” button once opens the small Input Select icon.
PC ANALOG
VIDEO (Optional)
S-VIDEO (Optional)
EXIT
6.3 I/O Port
10.4”
WARNING: Be sure to hold the connector instead of the wire when you disconnect the cord/cable.
6.4 OSD Control Options
DC-In
VGA
S-Video
Audio In
Video In
Touch

WWW.GVISION-USA.COM
30398 Esperanza Rancho Santa Margarita CA 92688 / Tel. 949-586-3338 / Fax. 949-272-4594 / Email. info@gvision-usa.com
13
CONTRAST Adjust the contrast using “+” and “-” buttons
BRIGHTNESS Adjust the brightness using “+” and “-” buttons
VOLUME Adjust the speaker volume using “+” and “-” buttons
AUTO TUNE Press “+” or “-” buttons to make LCD monitor adjust the related parameters
automatically for optimal display status
H-POSITION Pressing “+” moves the display image to the right; Pressing “-” moves the display image
to the left
V-POSITION Pressing “+” moves the display image upward; Pressing “-” moves the display image
downward
LANGUAGE This item is used to select OSD languages
FREQUENCY
This item is used to decrease the vertical interference.
1) Select one display pattern from your computer.
2) Use “+” and “-” buttons on the LCD monitor to decrease the vertical
interference to get the optimal display
PHASE
This item is used to decrease the horizontal interference.
1) Select one display pattern from your computer.
2) Use “+” and “-” buttons on the LCD monitor to decrease the horizontal
interference to get the optimal display
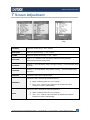
7 Screen Adjustment
PC Analog Mode
S-Video/Video
Mode

WWW.GVISION-USA.COM
30398 Esperanza Rancho Santa Margarita CA 92688 / Tel. 949-586-3338 / Fax. 949-272-4594 / Email. info@gvision-usa.com
14
RED / GREEN / BLUE Adjust the value of color gain (Red, Green, Blue) using “+” and “-” buttons
COLOR TEMP.
This section is for “Color Temperature” adjustment. You can select the Warm, Cool, or
Normal in this section, and then press “+” and “-” buttons to set up. The color
temperature will be recalled as factory preset value.
RECALL Press “+” or “-” buttons to recall factory preset values
HUE (For the model with Video input only)
Adjust the video image hue using + or - buttons to set up
SHARPNESS (For the model with Video input only)
Adjust the sharpness using + or - buttons to set up
SATURATION (For the model with Video input only)
Adjust the video image color saturation using + or - buttons to set up

WWW.GVISION-USA.COM
30398 Esperanza Rancho Santa Margarita CA 92688 / Tel. 949-586-3338 / Fax. 949-272-4594 / Email. info@gvision-usa.com
15
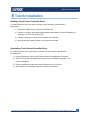
Installing Touch Screen Controller Driver
To install the driver of the touch screen controller to your computer, please follow the
steps below:
1) Insert the CD-ROM in your computer’s CD-ROM drive.
2) If autorun is enabled, the setup program appears automatically. If autorun is disabled, run
setup.exe from the root directory of CD.
3) Follow the directions on the screen to complete the installation.
4) After finishing the installing, restart the computer as instructed.
Uninstalling Touch Screen Controller Driver
To uninstall the driver of the touch screen controller from your computer, please follow
the steps below:
1) Click the Start button, click Control Panel, and then click Add/Remove Programs.
2) Select Touch Screen Controller Driver from the list of not installable programs on the
Install / Uninstall tab.
3) Click the Add/Remove button then follow the directions on your screen.
4) After finishing the uninstalling, restart the computer as instructed.
8 Touch Installation

WWW.GVISION-USA.COM
30398 Esperanza Rancho Santa Margarita CA 92688 / Tel. 949-586-3338 / Fax. 949-272-4594 / Email. info@gvision-usa.com
16
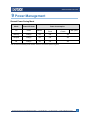
General Power Saving Mode
Mode
Power LED Color
Power Consumption
On
Green
Monitor
Monitor+
Touch
Monitor + Video
+Touch
36W (max.)
Stand by
Orange
1W
2W
4W
Suspend
Orange
1W
2W
4W
Off
Orange
1W
2W
4W
* We recommend switching off the monitor when it is not used for quite a long time.
9 Power Management

WWW.GVISION-USA.COM
30398 Esperanza Rancho Santa Margarita CA 92688 / Tel. 949-586-3338 / Fax. 949-272-4594 / Email. info@gvision-usa.com
17
Symptoms Solutions
The monitor does not respond after
you turn on the system.
• Check if the Power Switch of monitor is turned on.
• Turn off the power and check the monitor’s power cord
and signal cable for proper connection.
The characters on the screen are
dim.
• Refer to the Controls and Adjustments section to adjust
the brightness.
The screen is blank.
• During operation, the monitor screen may
automatically turn off as a result of Power Saving
feature. Press any key to see if the screen comes
back.
• Refer to the Controls and Adjustments section to adjust
the brightness.
The screen flashes when it’s
initialized. • Turn off the monitor and turn it on again.
Cleaning
• Gently wipe the screen with a clean camel hair lens brush, or a soft, clean, lint-free cloth.
(This removes dust and other particles that can scratch the screen)
• Do not apply pressure to the screen surface when wiping it clean.
• Do not pour or spray any liquid directly onto the screen or case of the LCD monitor. Chemical
cleaners have been reported to damage the screen or case of the LCD monitor.
WARNING: Do not disassemble the monitor. Contact your dealer if needed.
10 Trouble Shooting

WWW.GVISION-USA.COM
30398 Esperanza Rancho Santa Margarita CA 92688 / Tel. 949-586-3338 / Fax. 949-272-4594 / Email. info@gvision-usa.com
18
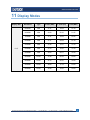
Display Size Resolution Type H. Scan (KHz) V. Scan (Hz) Pixel (MHz)
10.4”
640X350 VGA 31.47 70.09 25.18
640X400 VGA 24.83 56.42 21.05
720X400 VGA 31.47 70.09 28.32
640X480 VGA 31.47 59.94 25.18
640X480 VGA 37.86 72.81 31.50
640X480 VGA 37.50 75.00 31.50
640X480 VGA 35.00 66.67 30.24
800X600 SVGA 37.88 60.32 40.00
800X600 SVGA 35.16 56.25 36.00
800X600 SVGA 48.08 72.19 50.00
800X600 SVGA 46.88 75.00 49.50
11 Display Modes

WWW.GVISION-USA.COM
30398 Esperanza Rancho Santa Margarita CA 92688 / Tel. 949-586-3338 / Fax. 949-272-4594 / Email. info@gvision-usa.com
19
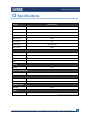
MODEL P10PS Series
Screen Size 10.4-inch
Resolution 866 x 600
Refresh 60Hz
Brightness 230cd/m² ~ 250cd/m²
Response Time 15ms
Aspect Ratio 4:3
Viewing Angle 160°(H)/150°(V)
Display Color 264K
INTERFACE
VGA 1
USB-A 1 (P10PS-OA-153G / P10PS-JA-453G)
RS232 1 (P10PS-JA-452G)
Audio 1
AUDIO
Speaker 1Wx2
TOUCH TECHNOLOGY
Color/Material 5-Wire Resistive
POWER
Consumption Typical 36W
Electrical Rating 12V DC / 3A
TEMPERATURE
Operating 0~40°C
VESA™
Mount Size 75x75mm
Specifications subject to change without any notice
12 Specifications

WWW.GVISION-USA.COM
30398 Esperanza Rancho Santa Margarita CA 92688 / Tel. 949-586-3338 / Fax. 949-272-4594 / Email. info@gvision-usa.com
20
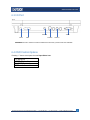
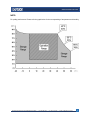
NOTE:
For quality performance. Please refer the graph below for the corresponding of temperature and humidity.
-
 1
1
-
 2
2
-
 3
3
-
 4
4
-
 5
5
-
 6
6
-
 7
7
-
 8
8
-
 9
9
-
 10
10
-
 11
11
-
 12
12
-
 13
13
-
 14
14
-
 15
15
-
 16
16
-
 17
17
-
 18
18
-
 19
19
-
 20
20


GVision P10PS Series Instrukcja obsługi
- Kategoria
- Telewizory
- Typ
- Instrukcja obsługi
w innych językach
- italiano: GVision P10PS Series Manuale utente
- français: GVision P10PS Series Manuel utilisateur
- English: GVision P10PS Series User manual
Inne dokumenty
-
Philips 160EL1SB/00 Instrukcja obsługi
-
Samsung 173P Instrukcja obsługi
-
-
-
-
Samsung 913V Instrukcja obsługi
-
-
-
-