Amica OKC6541S Instrukcja obsługi
- Kategoria
- Okapy kuchenne
- Typ
- Instrukcja obsługi

IO-HOO-0612/1
(01.2018)
Kitchen extractor hood / Campana extractora de
cocina / okap nadkuchenny / kuchyňského odsavače
/ kuchynského odsávača / Hotă de bucătărie /
tűzhely feletti páraelszívó / кухненски аспиратор /
Kuhinjska napa / Kuhinjska napa
OKC6541S
OPERATING INSTRUCTIONS EN
MANUAL DE INSTRUCCIONES ES
INSTRUKCJA OBSŁUGI PL
NÁVOD K OBSLUZE CS
NÁVOD NA OBSLUHU SK
INSTRUCŢIUNE DE DESERVIRE RO
HASZNÁLATI UTASÍTÁS HU
ИНСТРУКЦИЯ ЗА ОБСЛУЖВАНЕ BG
UPUTE ZA UPORABU HR
NAVODILA ZA UPORABO SL


- 3 -
NOTES ON SAFETY 8
UNPACKING 11
DISPOSAL OF OLD APPLIANCE 11
OPERATION 12
KITCHEN HOOD CONTROLS 12
CONTROL PANEL 12
OFF TIMER 12
OTHER IMPORTANT INFORMATION CONCERNING THE OPERATION OF THE HOOD 13
CLEANING AND MAINTENANCE 14
MAINTENANCE 14
GREASE FILTER 14
ACTIVATED CHARCOAL FILTER 14
LIGHT 14
WARRANTY AND AFTER SALES SERVICE 15
WARRANTY 15
INDICACIONES RELACIONADAS CON SEGURIDAD 17
DESEMBALAJE 21
ELIMINACIÓN DE APARATOS USADOS 21
USO 22
CONTROL DE CAMPANA 22
PANEL DE CONTROL 22
TEMPORIZADOR (RETRASO DE LA DESACTIVACIÓN DE LA CAMPANA) 22
OTRA INFORMACIÓN IMPORTANTE RELATIVA AL USO DE LA CAMPANA 23
LIMPIEZA Y CONSERVACIÓN 24
MANTENIMIENTO 24
FILTRO DE GRASA 24
FILTRO DE CARBÓN 24
ILUMINACIÓN 24
GARANTÍA, ATENCIÓN DE POST VENTA 25
GARANTÍA 25
EN- Table of contents
ES- TABLA DE CONTENIDOS
WSKAZÓWKI DOTYCZĄCE BEZPIECZEŃSTWA 27
ROZPAKOWANIE 31
USUWANIE ZUŻYTYCH URZĄ DZEŃ 31
OBSŁUGA 32
STEROWANIE OKAPEM 32
PANEL STEROWANIA 32
TIMER (OPÓŹNIONE WYŁĄCZENIE OKAPU) 32
INNE WAŻNE INFORMACJE DOTYCZĄCE OBSŁUGI OKAPU 33
CZYSZCZENIE I KONSERWACJA 34
KONSERWACJA 34
FILTR PRZECIWTŁUSZCZOWY 34
FILTR WĘGLOWY 34
OŚWIETLENIE 34
GWARANCJA, OBSŁUGA POSPRZEDAŻOWA 35
GWARANCJA 35
PL- Spis treści

- 4 -
BEZPEČNOSTNÍ POKYNY 37
VYBALENÍ 40
LIKVIDACE OPOTŘEBOVANÝCH ZAŘÍZENÍ 40
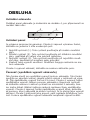
OBSLUHA 41
OVLÁDÁNÍ ODSAVAČE 41
OVLÁDACÍ PANEL 41
ČASOVAČ (OPOŽDĚNÉ VYPNUTÍ ODSAVAČE) 41
JINÉ DŮLEŽITÉ INFORMACE O OBSLUZE ODSAVAČE 42
ČIŠTĚNÍ A ÚDRŽBA 43
ÚDRŽBA 43
PROTITUKOVÝ FILTR 43
UHLÍKOVÝ FILTR 43
OSVĚTLENÍ 43
ZÁRUKA, POPRODEJNÍ SERVIS 44
ZÁRUKA 44
BEZPEČNOSTNÉ POKYNY POUŽÍVANIA 46
ROZBALENIE 50
LIKVIDÁCIA ZARIADENÍ 50
OBSLUHA 51
OVLÁDANIE ODSÁVAČA 51
OVLÁDACÍ PANEL 51
ČASOVAČ (ONESKORENÉ VYPNUTIE ODSÁVANIA) 51
INÉ DÔLEŽITÉ INFORMÁCIE TÝKAJÚCE SA POUŽÍVANIA ODSÁVAČA 52
ČISTENIE A ÚDRŽBA 53
KONZERVÁCIA 53
PROTITUKOVÝ FILTER 53
UHLÍKOVÝ FILTER 53
OSVETLENIE 53
ZÁRUKA, POPREDAJNÝ SERVIS 54
ZÁRUKA 54
INDICAȚII PRIVIND SIGURANȚA 56
DESPACHETARE 60
ÎNDEPĂRTAREA DISPOZITIVELOR UZATE 60
OPERARE 61
CONTROL HOTĂ 61
PANOU DE COMANDĂ 61
TIMER (ÎNTÂRZIE OPRIREA HOTEI) 61
ALTE INFORMAȚII IMPORTANTE PENTRU OPERAREA HOTEI 62
CURĂŢAREA ŞI ÎNTREŢINEREA 63
ÎNTREŢINERE 63
FILTRUL ÎMPOTRIVA GRĂSIMILOR 63
FILTRUL DE CARBON 63
SISTEM DE ILUMINARE 63
GARANŢIE, SERVICII POSTVÂNZARE 64
GARANŢIA 64
CS- Obsah
SK- Obsah
RO - Cuprins

- 5 -
HU - Tartalomjegyzék
BG - Съдържание
BIZTONSÁGI UTASÍTÁSOK 66
KICSOMAGOLÁS 70
A HASZNÁLT KÉSZÜLÉKEK ELTÁVOLÍTÁSA 70
HASZNÁLAT 71
PÁRAELSZÍVÓ VEZÉRLÉSE 71
IRÁNYÍTÓPANEL 71
TIMER (A PÁRAELSZÍVÓ KÉSLELTETETT KIKAPCSOLÁSA) 71
A PÁRAELSZÍVÓ MŰKÖDÉSÉVEL KAPCSOLATOS EGYÉB FONTOS INFORMÁCIÓK 72
TISZTÍTÁS ÉS KARBANTARTÁS 73
KARBANTARTÁS 73
ZSÍRSZŰRŐ 73
SZÉNSZŰRŐ 73
VILÁGÍTÁS 73
GARANCIA ÉS VÁSÁRLÁS UTÁNI SZERVIZ 74
GARANCIA 74
ПРЕПОРЪКИ ОТНОСНО БЕЗОПАСНОСТТА 76
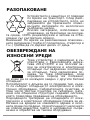
РАЗОПАКОВАНЕ 80
ОБЕЗВРЕЖДАНЕ НА ИЗНОСЕНИ УРЕДИ 80
ОБСЛУЖВАНЕ 81
УПРАВЛЕНИЕ НА АБСОРБАТОРА 81
ПАНЕЛ ЗА УПРАВЛЕНИЕ 81
ТАЙМЕР (ИЗКЛЮЧВАНЕ НА АБСОРБАТОРА СЪС ЗАКЪСНЕНИЕ) 81
ДРУГИ ВАЖНИ ИНФОРМАЦИИ ЗА ОБСЛУЖВАНЕТО НА АБСОРБАТОРА 82
ПОЧИСТВАНЕ И ПОДДРЪЖКА 83
ПОДДРЪЖКА 83
ФИЛТЪР ЗА МАЗНИНИ 83
ВЪГЛЕН ФИЛТЪР 83
ОСВЕТЛЕНИЕ 83
ГАРАНЦИЯ, СЛЕД ПРОДАЖБЕНО ОБСЛУЖВАНЕ 84
ГАРАНЦИЯ 84
HR - Kazalo
SIGURNOSNE NAPOMENE 86
UKLANJANJE PAKIRANJA 89
ZBRINJAVANJE POTROŠENIH UREĐAJA 89
UPORABA 90
UPRAVLJANJE NAPOM 90
UPRAVLJAČKA PLOČA 90
TIMER (ODGODA ISKLJUČENJA NAPE) 90
OSTALE VAŽNE INFORMACIJE O UPORABI NAPE 91
ČIŠĆENJE I ODRŽAVANJE 92
ODRŽAVANJE 92
FILTER PROTIV MASNOĆE 92
UGLJENI FILTER 92
RASVJETA 92
JAMSTVO, POSLIJEPRODAJNE AKTIVNOSTI 93
JAMSTVO 93

- 6 -
SL - Sadržaj
NAVODILA ZA ZAGOTAVLJANJE VARNOSTI UPORABE 95
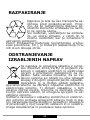
RAZPAKIRANJE 98
ODSTRANJEVANJE IZRABLJENIH NAPRAV 98
UPORABA 99
UPRAVLJANJE S KUHINJSKO NAPO 99
PANEL ZA UPRAVLJANJE 99
ŠTOPARICA (ZAKASNJENA IZKLJUČITEV NAPE) 99
DRUGE POMEMBNE INFORMACIJE GLEDE NAVODIL ZA UPORABO NAPE 100
ČIŠČENJE IN VZDRŽEVANJE 101
VZDRŽEVANJE 101
MAŠČOBNI FILTER 101
OGLENI FILTER 101
OSVETLITEV 101
GARANCIJA, POPRODAJNE STORITVE 102
GARANCIJA 102

- 7 -
Dear customer,
From now on, your daily housework will be easier
than ever before. Your appliance is excepon-
ally easy to use and extremely ecient. Aer reading
these Operang Instrucons, operang the appliance
will be easy.
Before being packaged and leaving the manufacturer,
the appliance was thoroughly checked with regard to
safety and funconality.
Before using the appliance, please carefully read
these Operang Instrucons. By following these
instrucons carefully you will be able to avoid any
problems in using the appliance. It is important to
keep these Operang Instrucons and store them in a
safe place so that they can be consulted at any me.
Follow these instrucons carefully in order to avoid
possible accidents.
Sincerely,

- 8 -
NOTES ON SAFETY
• Before using the appliance, please carefully read
this manual!
• The appliance is designed for household use only.
• The manufacturer reserves the right to introduce
changes, which do not aect operation of the ap-
pliance.
• The manufacturer shall not be liable for any dam-
age or re caused by the appliance resulting from
failure to follow instructions in this manual.
• Cooker hood is designed to remove cooking
odours. Do not use cooker hood for other pur-
poses.
• Connect the cooker hood operating in extraction
mode to a suitable ventilation duct (do NOT con-
nect the cooker to smoke or ue gas ducts, which
are in use). It requires installation of the air ex-
traction duct to the outside. The length of the
duct (usually a pipe of Ø 120 or 150 mm) should
not be longer than 4-5 m. An air extraction duct
is also required for telescopic and furniture hoods
in absorption mode.
• Cooker hood operating in air recirculation mode
requires the installation of an activated charcoal
lter. In this case, installing an extractor duct is
not required, however it is recommended to in-
stall an air guide vane (Mainly in chimney cooker
hoods).
• The cooker hood features independent lighting
and exhaust fan that can be operated at one of
several speeds.
• Depending on the type, the hood is designed to
be permanently attached to a vertical wall over
a gas or electric stove (chimney and universal
hoods); on the ceiling over a gas or electric stove
(island hoods); on the vertical built in furniture

- 9 -
over a gas or electric stove (telescopic and built-
in hoods). Before installing, make sure that the
wall/ceiling structure is strong enough to suspend
the hood. Some hoods are very heavy.
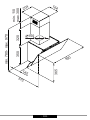
• For details of the installation distance above an
electric hob please refer to product technical
sheet If the installation instructions of the gas
cooker specify a greater distance, this must be
taken into account (Fig. 1).
• Do not leave an open ame under the hood.
When the pots are removed from the burner, set
the minimum ame. Always make sure that the
ame does not extend outside the pot, because it
causes unwanted loss of energy and a dangerous
concentration of heat.
• When cooking on fat, supervise the pans con-
stantly, because overheated fat can ignite.
• Unplug the appliance before any cleaning, replac-
ing the lter or repair work.
• Cooker hood grease lter should be cleaned at
least once a month, because the lter saturated
with fat is ammable.
• Ensure adequate ventilation (air ow) if other
equipment such as liquid fuel stoves or heaters
are operated in the room in addition the cooker
hood. When the cooker hood is simultaneously
operated with burning appliances requiring ade-
quate fresh air from the room to work properly,
their safe operation is possible if under pressure
around these appliances is a maximum of 0.004
mbar (this does not apply when the cooker hood
is used as an odour lter)
• Do not lean on the hood.
• The hood should be cleaned regularly both inside
and out (AT LEAST ONCE A MONTH, following the
indications concerning maintenance provided in
this manual)..Failure to adhere to the rules con-
cerning cleaning the hood and replacing lters

- 10 -
results in a re risk.
• If the power cord is damaged it should be re-
placed by a specialised service centre.
• Ensure that it is possible to disconnect the ap-
pliance from the mains by removing the plug or
switching o the bi-polar switch.
• This appliance is not intended for use by persons
(including children) with physical, mental or sen-
sory handicaps, or by persons inexperienced or
unfamiliar with the appliance, unless under su-
pervision or in accordance with the instructions
as communicated to them by persons responsible
for their safety.
• Particular attention should be paid not to allow
unaccompanied children to use the appliance.
• Make sure voltage indicated on the nameplate
corresponds to the local mains supply voltage.
• Before use, extend and straighten the power cord.
• Packaging materials (bags, polyethylene, poly-
styrene, etc.) should be kept away from children
during unpacking.
• Before connecting the hood to the mains power
supply always check that the power cord is prop-
erly installed and is not trapped by the appliance.
Do not connect the appliance to the mains until
assembly is complete.
• Do not operate your kitchen hood without the al-
uminium grease lters.
• It is strictly forbidden to cook dishes under on an
open ame (ambé) under your kitchen hood.
• Always strictly adhere to regulations issued by the
competent local authorities regarding the techni-
cal and safety requirements for fume extraction.
• Failing to tighten bolts and fasteners in accord-
ance with these instructions may endanger life
and health.
• Hanging kitchen hoods operate only in air circu-
lation / odour absorber mode

- 11 -
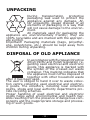
UNPACKING
During transportation, protective
packaging was used to protect the
appliance against any damage. Af-
ter unpacking, please dispose of all
elements of packaging in a way that
will not cause damage to the environ-
ment.
All materials used for packaging the
appliance are environmentally friendly; they are
100% recyclable and are marked with the appropri-
ate symbol.
Important! Packaging materials (bags, polyethyl-
ene, polystyrene, etc.) should be kept away from
children during unpacking.
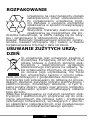
DISPOSAL OF OLD APPLIANCE
In accordance with European Directive
2012/19/EU and Polish legislation re-
garding used electrical and electronic
goods, this appliance is marked with
the symbol of the crossed-out waste
container. This marking indicates that
the appliance must not be disposed of
together with other household waste
after it has been used.
The user is obliged to hand it over to waste collec-
tion centre collecting used electrical and electron-
ic goods. The collectors, including local collection
points, shops and local authority departments pro-
vide recycling schemes.
Proper handling of used electrical and electronic
goods helps avoid environmental and health haz-
ards resulting from the presence of dangerous com-
ponents and the inappropriate storage and process-
ing of such goods.

- 12 -
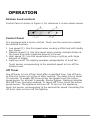
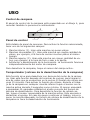
OPERATION
Kitchen hood controls
Control Panel is shown in Figure 4, for reference it is also shown below:
3
2
1
4
Control Panel
It is equipped with a touch controls. Touch one the sensors to enable
the desired function:
1 Low speed (1). Use this speed when cooking a little food with hardly
any fumes.
2 Medium speed (2). Use this speed when cooking multiple dishes at
the same time with moderate amount of fumes.
3 High speed (3). Use this speed when frying or grilling, with large
amount of fumes.
4 Lighting on/o The lighting operates independently of hood fan.
Touch sensor corresponding to the selected speed to turn o the
kitchen hood.
O Timer
Use o timer to turn o the hood after a specied time. Use o timer
to lter the fumes out of the air after cooking. The delay time is about
15 minutes. To enable O-Timer at any fan speed touch the active
speed sensor for at least 3 seconds. Sensor ashes. Flashing indicates
that O-Timer has been enabled. To cancel O-Timer touch the active
speed sensor. The appliance will turn o. To turn on the appliance,
touch the sensor corresponding to the desired fan speed. Cancelling the
o-timer does not turn o the lighting.

- 13 -
Other important information concerning the operation of
the hood
Operation in air circulation / odour lter mode. In this mode, the ltered
air returns to the room through the outlets. Install activated charcoal
lter in this setting. It is recommended to install the air guide (available
depending on the model, mainly in chimney cooker hoods).
Air extraction operation: When cooker hood operates in extraction mode,
air is discharged outside through an extraction duct. Remove activated
charcoal lter in this setting. The cooker hood is connected to the air
outlet opening using a rigid or exible extraction duct with a diameter of
150 or 120 mm, and the appropriate clamps, which must be purchased
at a hardware store. The appliance should be installed by a qualied
installer.
Fan speed: Lowest and medium fan speed is used in normal conditions
and less intense odours, while the highest speed is used only when cook-
ing odours are very intense, such as during frying or grilling.
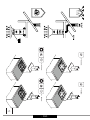
Note (applies to universal hoods only): Due to the design of universal
hoods you need to manually change the mode of operation. See Figure
8 for instructions on how to change the mode.
Note (only applies to telescopic and in-built kitchen hoods): Furniture
and telescopic cooker hoods operating in air recirculation mode require
installation of the exhaust duct. The other end of the duct should be di-
rected to the room as it will discharge ltered air.
Note: Hanging kitchen hoods operate only in air circulation / odour ab-
sorber mode

- 14 -
CLEANING AND
MAINTENANCE
Maintenance
Regular maintenance and cleaning of the appliance will ensure trou-
ble-free operation of the cooker hood and extend its life. Especially make
sure that the grease lter and activated charcoal lter are replaced ac-
cording to manufacturer's recommendations.
• Do not use a soaked cloth, sponge, or water jet.
• Do not use solvents or alcohol, as they may tarnish lacquered sur-
faces.
• Do not use caustic substances, especially for cleaning stainless steel.
• Do not use a rough or abrasive cloth.
• It is recommend to use a damp cloth and a neutral detergent.
Note: After several washes in the dishwasher, the colour of the alumini-
um lter may change. The change of colour does not indicate improprie-
ties or the necessity to change it.
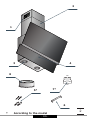
Grease lter
For normal hood operation, aluminium grease lter should be cleaned
every month in the dishwasher or by hand using a mild detergent or
liquid soap.
Dismantling of aluminium grease lter is shown on Figure 5.
Acrylic lter is used in some models. This lter should be replaced at
least once every two months or more frequently if the appliance is used
intensively.
Activated charcoal lter
Charcoal lter is used only when the cooker hood is not connected to
the ventilation duct. Activated charcoal lter can absorb odours until
saturated. Charcoal lter is not suitable for washing or regeneration and
should be replaced at least once every two months or more frequently if
the appliance is used intensively.
Dismantling of charcoal lter is shown on Figure 6.
Light
Use incandescent / halogen / LED modules of the same specication as
those factory-installed in the appliance. See Figure 7 for details how to
replace lights. If there is no such gure in this manual, please contact
authorised service to replace the lighting module.

- 15 -
WARRANTY AND AFTER
SALES SERVICE
Warranty
Warranty service as stated on the warranty card. The manufacturer shall
not be held liable for any damage caused by improper use of the product.
The manufacturer recommends that all repairs and adjust-
ments be carried out by the Factory Service Technician or the
Manufacturer's Authorized Service Point. Repairs should be
carried out by a qualied technician only.
Manufacturer’s Declaration
The manufacturer hereby declares that this product meets the re-
quirements of the following European directives:
• Low Voltage Directive 2014/35/EC
• Electromagnetic Compatibility (EMC) Directive 2014/30/EC
• ErP Directive 2009/125/EC
• Directive RoHS 2011/65/EC
and has thus been marked with the symbol and been issued with
a declaration of compliance made available to market regulators.

- 16 -
Esmado
Cliente
A parr de hoy tus deberes serán más fáciles que
nunca. El aparato de la marca Amica es ex-
cepcionalmente fácil de usar y perfectamente ecaz.
Después de leer el manual, el uso no será ningún
problema.
El equipo, antes de abandonar la fábrica y ser emba-
lado, fue minuciosamente comprobado que funciona
seguramente en los puestos de control de calidad.
Les rogamos lean con atención este manual de la
primera puesta en marcha de este aparato. Seguir las
instrucciones incluidas en el presente manual les pro-
tegerá del uso inadecuado. Guardar este manual para
tenerlo siempre accesible.
Seguir estrictamente las instrucciones de uso para
evitar siniestros.
Atentamente

- 17 -
INDICACIONES RELACIONA-
DAS CON SEGURIDAD
• ¡Lea detenidamente este manual antes de usar el
aparato!
• El aparato está destinado solamente para usar en
casa.
• El fabricante se reserva el derecho a realizar
cambios que no inuyan en la forma de funciona-
miento del aparato.
• El fabricante no se responsabiliza de eventuales
daños o incendios ocasionados por el equipo que
resulten de la falta de observancia de recomen-
daciones del presente manual.
• La campana de cocina sirve para evacuar los va-
hos de cocina. No se debe usarla para otros ob-
jetivos.
• La campana que funciona en modo de extractor
debe estar conectada a respectivo canal de ven-
tilación (no conectar a canales de chimenea, de
humo o de gases de escape que se encuentren
en uso). La campana requiere instalación de con-
ducto de evacuación de aire hacia fuera. El largo
de conducto (muchas veces es tubo de Ø 120
mm ó 150 mm) no debe ser más largo que 4-5
m. El conducto de evacuación de aire también
es requerido en las campanas telescópicas y de
muebles en modo de absorbedor.
• La campana que funciona en modo de absorbe-
dor requiere instalación de ltro con carbón ac-
tivo. En este caso no se requiere instalación de
conducto de evacuación de aire hacia fuera, pero
se recomienda el montaje de volante de soplado
de aire (solamente campanas de chimenea).

- 18 -
• La campana tiene iluminación independiente y
ventilador de extracción dotado de posibilidad de
jar una de las velocidades de giro.
• En función de la versión de equipo la campana
está destinada para jar de manera permanente
en una pared vertical por encima de la cocina de
gas o eléctrica (campanas de chimenea y univer-
sales); en el techo por encima de la cocina de
gas y eléctrica (campanas de isla); en la pared
de los muebles que se encuentran por encima de
la cocina de gas o eléctrica (campanas telescópi-
cas y para empotrar). Antes del montaje se debe
asegurar que la estructura de la pared / techo
es adecuada para soportar la campana. Algunos
modelos de campanas pesan mucho.
• La altura de montaje de aparato por encima de la
placa eléctrica se encuentra en la tarjeta de pro-
ducto (especicación técnica de aparato). Si en
el manual de instalación de aparatos a gas se da
una distancia mayor, se debe tenerlo en cuenta
(Fig 1).
• Por debajo de la campana de cocina no se puede
dejar fuego abierto a la hora de quitar los va-
sos del quemador, se debe dejar fuego mínimo.
Siempre se debe comprobar que la llama no sale
fuera del vaso ya que esto hace pérdida indesea-
da de energía y concentración peligrosa de calor.
• Los platos preparados en grasa debe estar vigi-
lados permanentemente ya que la grasa puede
encenderse.
• Antes de cada operación de limpieza, cambio de
ltro o antes de empezar la reparación se debe
sacar el enchufe de aparato de contacto.
• El ltro de grasa para la campana se debe limpiar
al menos una vez al mes, ya que si saturado de
grasa es peligroso.

- 19 -
• Si en el cuarto, además de la campana, se usan
otros aparatos de alimentación no eléctrica (por
ejemplo, hornos a combustibles líquidos, calen-
tadores de ujo, escalfadores), se debe cuidar de
ventilación suciente (admisión de aire). Una ex-
plotación segura es posible con el trabajo simul-
táneo de campana y aparatos quemadores, de-
pendientes del aire que existe en el cuarto, en el
lugar donde se encuentran estos aparatos existe
hipertensión por encima de 0,004 milibar (este
punto no se debe tener en cuenta cuando la cam-
pana es usada como absorbedor de olores).
• La campana no debe servir como supercie de
soporte para las personas que se encuentran en
la cocina.
• La campana debe limpiarse muy frecuentemente
tanto fuera como pro dentro (AL MENOS UNA VEZ
AL MES, manteniendo las indicaciones relativas al
mantenimiento del presente manual). En caso de
no seguir los principios relativos a la limpieza de
la campana y cambio de ltros puede surgir ame-
naza de incendio.
• Cuando el cable de alimentación esté dañado, de-
berá ser reemplazado en un taller especializado
de reparación.
• Hay que garantizar la posibilidad de desconectar
el aparato de la red eléctrica, por medio de la
desconexión del interruptor bipolar.
• El presente aparato no debe ser usado por perso-
nas (incluyendo niños) con capacidad física, sen-
sual y psíquica limitada y por las personas que no
tengan experiencia o conocimientos del empleo
del aparato con tal de que se encuentren bajo vi-
gilancia o sigan las instrucciones de uso del apa-
rato por la persona responsable de su seguridad.
• Hay que jarse en que los niños sin tutela no
usen ni jueguen con el aparato.

- 20 -
• Comprobar que el voltaje de la tabla nominal
equivale a los parámetros locales de alimenta-
ción.
• Antes montar desarrollar y enderezar el cable
eléctrico.
• Los materiales de embalaje (saquitos de polieti-
leno, trozos de poliuretano, etc.) deben ser guar-
dados lejos del alcance de niños a la hora de des-
embalar.
• Antes de conectar la campana a la red eléctrica
siempre se debe controlar que el cable eléctrico
fue instalado correctamente y NO fue aplastado
por la campana durante el montaje. No conectar
el aparato a la red eléctrica antes de terminar el
montaje.
• Está prohibido usar la campana sin montar los
ltros de grasa de aluminio.
• Está absolutamente prohibido preparar platos a
fuego abierto (ambeado).
• En cuanto a los medios de seguridad y técnicos
relativos a la evacuación de gases de combustión
se debe seguir absolutamente las leyes emitidas
por las autoridades locales.
• No enroscar tornillos o elementos de jación de
conformidad con el presente manual puede ame-
nazar la salud y la vida.
• Las campanas colgantes funcionan solament en
el modo de absorbedor de olores
Strona się ładuje...
Strona się ładuje...
Strona się ładuje...
Strona się ładuje...
Strona się ładuje...
Strona się ładuje...
Strona się ładuje...
Strona się ładuje...
Strona się ładuje...
Strona się ładuje...
Strona się ładuje...
Strona się ładuje...
Strona się ładuje...
Strona się ładuje...
Strona się ładuje...
Strona się ładuje...
Strona się ładuje...
Strona się ładuje...
Strona się ładuje...
Strona się ładuje...
Strona się ładuje...
Strona się ładuje...
Strona się ładuje...
Strona się ładuje...
Strona się ładuje...
Strona się ładuje...
Strona się ładuje...
Strona się ładuje...
Strona się ładuje...
Strona się ładuje...
Strona się ładuje...
Strona się ładuje...
Strona się ładuje...
Strona się ładuje...
Strona się ładuje...
Strona się ładuje...
Strona się ładuje...
Strona się ładuje...
Strona się ładuje...
Strona się ładuje...
Strona się ładuje...
Strona się ładuje...
Strona się ładuje...
Strona się ładuje...
Strona się ładuje...
Strona się ładuje...
Strona się ładuje...
Strona się ładuje...
Strona się ładuje...
Strona się ładuje...
Strona się ładuje...
Strona się ładuje...
Strona się ładuje...
Strona się ładuje...
Strona się ładuje...
Strona się ładuje...
Strona się ładuje...
Strona się ładuje...
Strona się ładuje...
Strona się ładuje...
Strona się ładuje...
Strona się ładuje...
Strona się ładuje...
Strona się ładuje...
Strona się ładuje...
Strona się ładuje...
Strona się ładuje...
Strona się ładuje...
Strona się ładuje...
Strona się ładuje...
Strona się ładuje...
Strona się ładuje...
Strona się ładuje...
Strona się ładuje...
Strona się ładuje...
Strona się ładuje...
Strona się ładuje...
Strona się ładuje...
Strona się ładuje...
Strona się ładuje...
Strona się ładuje...
Strona się ładuje...
Strona się ładuje...
Strona się ładuje...
Strona się ładuje...
Strona się ładuje...
Strona się ładuje...
Strona się ładuje...
Strona się ładuje...
Strona się ładuje...
Strona się ładuje...
Strona się ładuje...
-
 1
1
-
 2
2
-
 3
3
-
 4
4
-
 5
5
-
 6
6
-
 7
7
-
 8
8
-
 9
9
-
 10
10
-
 11
11
-
 12
12
-
 13
13
-
 14
14
-
 15
15
-
 16
16
-
 17
17
-
 18
18
-
 19
19
-
 20
20
-
 21
21
-
 22
22
-
 23
23
-
 24
24
-
 25
25
-
 26
26
-
 27
27
-
 28
28
-
 29
29
-
 30
30
-
 31
31
-
 32
32
-
 33
33
-
 34
34
-
 35
35
-
 36
36
-
 37
37
-
 38
38
-
 39
39
-
 40
40
-
 41
41
-
 42
42
-
 43
43
-
 44
44
-
 45
45
-
 46
46
-
 47
47
-
 48
48
-
 49
49
-
 50
50
-
 51
51
-
 52
52
-
 53
53
-
 54
54
-
 55
55
-
 56
56
-
 57
57
-
 58
58
-
 59
59
-
 60
60
-
 61
61
-
 62
62
-
 63
63
-
 64
64
-
 65
65
-
 66
66
-
 67
67
-
 68
68
-
 69
69
-
 70
70
-
 71
71
-
 72
72
-
 73
73
-
 74
74
-
 75
75
-
 76
76
-
 77
77
-
 78
78
-
 79
79
-
 80
80
-
 81
81
-
 82
82
-
 83
83
-
 84
84
-
 85
85
-
 86
86
-
 87
87
-
 88
88
-
 89
89
-
 90
90
-
 91
91
-
 92
92
-
 93
93
-
 94
94
-
 95
95
-
 96
96
-
 97
97
-
 98
98
-
 99
99
-
 100
100
-
 101
101
-
 102
102
-
 103
103
-
 104
104
-
 105
105
-
 106
106
-
 107
107
-
 108
108
-
 109
109
-
 110
110
-
 111
111
-
 112
112


Amica OKC6541S Instrukcja obsługi
- Kategoria
- Okapy kuchenne
- Typ
- Instrukcja obsługi
w innych językach
- español: Amica OKC6541S Manual de usuario
- slovenčina: Amica OKC6541S Používateľská príručka
- română: Amica OKC6541S Manual de utilizare
Powiązane artykuły
-
Amica OKS6541S Instrukcja obsługi
-
Amica OTP6651BG Instrukcja obsługi
-
Amica OKP6651S Instrukcja obsługi
-
Amica OMP6552BG Instrukcja obsługi
-
Amica OMP6441B Instrukcja obsługi
-
Amica SIO 655 X Instrukcja obsługi
-
Amica OKP6547SW Instrukcja obsługi
-
Amica OTS6446I Instrukcja obsługi
-
Amica OMP6241BI Instrukcja obsługi
-