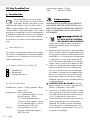
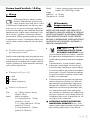
Crivit 311271 Operation and Safety Notes
- Kategoria
- Fitness, gimnastyka
- Typ
- Operation and Safety Notes

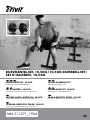
KURZHANTEL-SET, 10,5 KG / 10.5 KG DUMBBELL SET /
SET D’HALTÈRES, 10,5 KG
IAN 311271_1904
KURZHANTEL-SET, 10,5 KG
Bedienungs- und Sicherheitshinweise
10.5 KG DUMBBELL SET
Operation and safety notes
SET D’HALTÈRES, 10,5 KG
Instructions d‘utilisation et consignes de sécurité
HANDHAL TER-SET, 10,5 KG
Bedienings- en veiligheidsinstructies
SÚPRAVA KRÁTKYCH ČINIEK, 10,5 KG
Pokyny pre obsluhu a bezpečnostné pokyny
SADA KRÁTKÝCH ČINEK, 10,5 KG
Pokyny pro obsluhu a bezpečnostní pokyny
ZESTAW HANTLI KRÓTKICH, 10,5 KG
Wskazówki dotyczące obsługi i bezpieczeństwa

KURZHANTEL-SET, 10,5 KG / 10.5 KG DUMBBELL SET /
SET D’HALTÈRES, 10,5 KG
DE / AT / CH Bedienungs- und Sicherheitshinweise Seite 5
GB / IE Operation and safety notes Page 11
FR / BE Instructions d‘utilisation et consignes de sécurité Page 16
NL / BE Bedienings- en veiligheidsinstructies Pagina 22
PL Wskazówki dotyczące obsługi i bezpieczeństwa Strona 28
CZ Pokyny pro obsluhu a bezpečnostní pokyny Strana 34
SK Pokyny pre obsluhu a bezpečnostné pokyny Strana 39

A
B
C D
3
2
21
1
1 2 3

E
G
F
H

5 DE/AT/CH
Einleitung ......................................................................................................................................... Seite 6
Bestimmungsgemäße Verwendung ....................................................................................................Seite 6
Lieferumfang ........................................................................................................................................ Seite 6
Technische Daten ................................................................................................................................Seite 6
Sicherheitshinweise ................................................................................................................Seite 6
Montage ...........................................................................................................................................Seite 7
Trainingshinweise .................................................................................................................... Seite 7
Allgemeine Trainingshinweise ............................................................................................................Seite 7
Übungshinweise ..................................................................................................................................Seite 8
Übungen .............................................................................................................................................. Seite 8
Reinigung und Pflege ............................................................................................................Seite 9
Entsorgung .....................................................................................................................................Seite 9
Garantie ........................................................................................................................................... Seite 9
Abwicklung im Garantiefall ................................................................................................................Seite 10
Service .................................................................................................................................................Seite 10

6 DE/AT/CH
Kurzhantel-Set, 10,5 kg
Einleitung
Wir beglückwünschen Sie zum Kauf Ihres
neuen Produkts. Sie haben sich damit für
ein hochwertiges Produkt entschieden.
Machen Sie sich vor der ersten Inbetriebnahme mit
dem Produkt vertraut. Lesen Sie hierzu aufmerksam
die nachfolgende Bedienungsanleitung und die
Sicherheitshinweise. Benutzen Sie das Produkt nur
wie beschrieben und für die angegebenen Einsatz-
bereiche. Bewahren Sie diese Anleitung an einem
sicheren Ort auf. Händigen Sie alle Unterlagen bei
Weitergabe des Produktes an Dritte mit aus.
Bestimmungsgemäße
Verwendung
Dieses Produkt ist als Sportgerät konzipiert und nicht
für den gewerblichen, therapeutischen oder medizi-
nischen Gebrauch bestimmt. Dieses Produkt darf nur
in Innenräumen und von Erwachsenen verwendet
werden.
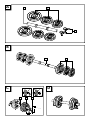
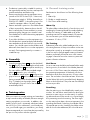
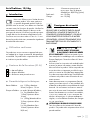
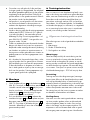
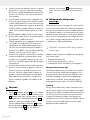
Lieferumfang (Abb. A)
1
1 x Hantelstange
2
6 x Hantelscheibe
3
2 x Federklemmverschluss
Technische Daten
Hantelstange: ca. 1,95
kg, Durchmesser:
30
mm, Länge: 35
cm
Hantelscheiben: Insgesamt 6 Hantelscheiben;
2 x 1 kg (Durchmesser ca. 119 mm,
Dicke ca. 18
mm)
2 x 1,25 kg (Durchmesser
ca. 125
mm, Dicke ca. 19
mm)
2 x 2
kg (Durchmesser ca.
154
mm, Dicke ca. 20,5
mm)
Verschlüsse: 2 Federklemmverschlüsse zur
Befestigung der Hantelscheiben
(ca. 0,0275 kg / Stück)
Gesamtgewicht: ca. 10,5 kg
Belastung: ca. 10,5
kg
Sicherheitshinweise
VOR GEBRAUCH BITTE DIE BEDIENUNGSAN-
LEITUNG LESEN! BEDIENUNGSANLEITUNG
SORGFÄLTIG AUFBEWAHREN! HÄNDIGEN
SIE ALLE UNTERLAGEN BEI WEITERGABE DES
PRODUKTES AN DRITTE EBENFALLS MIT AUS.
LEBENS-
UND UNFALLGEFAHR FÜR
KLEINKINDER UND KINDER!
Lassen Sie Kinder niemals unbeaufsichtigt mit dem
Verpackungsmaterial. Es besteht Erstickungsge-
fahr. Halten Sie Kinder vom Produkt fern.
Lesen und befolgen Sie die Bedienungsanleitung
und alle anderen Informationen, bevor Sie das
Produkt zusammenbauen und verwenden. Ein
sicherer Gebrauch des Produkts ist nur dann
möglich, wenn es ordnungsgemäß montiert und
verwendet wird. Es liegt in Ihrer Verantwortung,
dass alle Benutzer des Produkts über die War-
nungen informiert sind.
Suchen Sie immer Ihren Arzt auf, um mögliche
Gesundheitsrisiken zu erkennen und zu verhin-
dern, bevor Sie mit einem Trainingsprogramm
beginnen. Falsche oder übermäßige Bewegung
kann Ihre Gesundheit schädigen. Unterbrechen
Sie das Training sofort und konsultieren Sie Ihren
Arzt, wenn Sie sich jemals unwohl fühlen, Schmer-
zen,
Engegefühl in der Brust, unregelmäßigen
Herzschlag, extreme Atemnot haben, Schwindel
oder Benommenheit fühlen.
VORSICHT! VERLETZUNGSGEFAHR!
Kinder und Haustiere von dem Produkt fernhal-
ten! Dieses Produkt darf nur von Erwachsenen
verwendet werden.
Verwenden Sie das Produkt auf einer stabilen,
ebenen und waagerechten Fläche mit einem
Schutzbelag für den Boden oder den Teppich.

7 DE/AT/CH
Der Sicherheitsabstand sollte mindestens 1,5 m
betragen. Gleichen Sie Bodenunebenheiten aus.
Überprüfen Sie vor jedem Gebrauch, ob alle
Federklemmverschlüsse fest angezogen sind. Die
Sicherheit kann nur aufrechterhalten werden,
wenn das Produkt regelmäßig überprüft wird.
Verwenden Sie dieses Produkt nur in gutem Zu-
stand. Verwenden
Sie das Produkt nicht, wenn
es beschädigt ist.
Das Produkt eignet sich besonders zum Training
der Oberkörper- und Armmuskulatur und verbes-
sert die allgemeine Ausdauer und Fettverbrennung.
Bitte beachten Sie, dass dieses Trainingsgerät
der EN 957-2 Klasse H (H = Heimgebrauch)
entspricht. Das Maximalgewicht beträgt 10,5 kg.
Dieses Trainingsgerät ist nach DIN EN ISO
20957-1 nicht für Jugendliche unter 14 Jahren
geeignet.
Eltern und andere Aufsichtspersonen sollten sich
Ihrer Verantwortung bewusst sein, da Kinder
aufgrund ihres natürlichen Spieltriebs und ihrer
Experimentierfreude in Situationen geraten und
Verhaltensweisen zeigen können, für die das
Trainingsgerät nicht geeignet ist.
Wenn Sie Kindern erlauben, das Produkt zu ver-
wenden, sollten Sie ihre geistige und körperliche
Entwicklung und vor allem ihre Lebhaftigkeit
berücksichtigen. Sie sollten die Kinder beauf-
sichtigen und ihnen vor allem den richtigen
Umgang mit dem Produkt zeigen. Trainingsge-
räte sind keinesfalls als Spielzeug geeignet.
Montage
Stecken Sie die Hantelscheiben
2
auf die
Hantelstange
1
(Abb. B). Stellen Sie sicher,
dass die Gewichte an beiden Enden der Han-
telstange
1
gleich sind, um Verletzungen zu
vermeiden. Sie können die mitgelieferten Han-
telscheiben
2
Ihren eigenen Fähigkeiten ent-
sprechend hinzufügen oder entfernen.
Drücken Sie zum Sichern der Hantelscheiben
2
die Federklemmverschlüsse
3
zusammen und
stecken Sie diese (mit den Griffen nach außen
zeigend) auf die Hantelstange
1
(Abb. C).
Stellen Sie sicher, dass die Hantelscheiben
2
fest sitzen. Abbildung D zeigt das fertig mon-
tierte Produkt.
Trainingshinweise
Mit Ihrem Interesse an Krafttraining haben Sie einen
Schritt in Richtung Mobilität und Gesundheit getan,
denn Krafttraining stärkt Ihre Muskulatur. Zudem
wird auch die Beweglichkeit Ihrer Gelenke erhöht,
was das Verletzungsrisiko verringern kann. Ihr Cho-
lesterinspiegel, Ihr Blutdruck, Ihr Blutzuckerspiegel,
Ihre Motivation, Ihr Körperfettanteil und Ihre Stimmung
können durch den Sport in Verbindung mit der rich-
tigen Ernährung verbessert werden.
Allgemeine Trainingshinweise
Jede Übung sollte aus den folgenden drei Teilen
bestehen:
1. Warm-up
2. Kardio- oder Krafttraining
3. Cool-down und Dehnen
Warm-up
Diese Phase hilft, das Risiko von Muskelverletzungen
und Krämpfen zu verringern, indem es den Blutfluß
erhöht und die Muskeln so auf das Training vorberei-
tet. Es wird empfohlen, jede Dehnübung etwa 30
Sekunden lang durchzuführen. Überanstrengen Sie
Ihre Muskeln nicht und vermeiden Sie ruckartige
Bewegungen- wenn es weh tut, STOPPEN Sie.
Das Training
Ausdauer- (wegen der positiven Auswirkungen auf
das Herz-Kreislauf-System oft auc
h als Herz-Kreislauf-
oder Kardiotraining bezeichnet) bzw. Kraft- oder
Muskeltraining ist der erste Schritt
im Kampf gegen
viele Zivilisationskrankheiten insbesondere solche,
die mit zunehmendem Alter auftreten. Es kann auch
das Immunsystem stärken und so Infektionskrank-
heiten vorbeugen.

8 DE/AT/CH
Cool-down
So wie vor jeder Trainingseinheit ein Warm-up durch-
geführt werden sollte, sollte nach einer Einheit eine
Cool-down-Phase stattfinden. Ein Cool-down startet
die Entspannungsphase. Die Betriebstemperatur des
Körpers sinkt wieder und zeigt den Übergang der
Spannungsrelaxation. Das Abkühlen (Cool-down)
sollte mindestens 10 Minuten dauern (wie die Auf-
wärmphase (Warm-up)) und wird so gesteuert, dass
sie langsam auf die niedrigste Stufe abfällt. Die
Pulsfrequenz sollte so niedrig wie möglich sein.
Dehnen
Nach dem Training sollten Sie Ihre Muskeln dehnen.
Um die Muskeln leicht aufzuwärmen, können Sie
sich
auch während des Trainings dehnen. Durch ab-
schließende Dehnübungen wird der Muskel wieder
in seine ursprüngliche Länge gebracht und somit
eine Muskelverkürzung verhindert. Je intensiver das
Training war, desto wichtiger ist das anschließende
Dehnen. Das Dehnen sollte pro Muskel 20 bis 30
Sekunden dauern. Die Dehnung sollte für den an
ge-
sprochenen Muskel spürbar sein, aber nicht weh tun.
Übungshinweise
Beginnen Sie Ihr Training mit ca. 7‒8 Wiederholungen
pro Übungssatz. Erhöhen Sie die Anzahl der Wie-
derholungen nach Ihren individuellen Wünschen
langsam auf 11‒12 Wiederholungen pro Satz. Wenn
Sie bemerken, dass Ihre Muskeln müde sind, redu-
zieren Sie den Umfang Ihres Trainings. Trainieren
Sie idealerweise 3
‒
4 mal pro Woche. Achten Sie
jedoch darauf, dass Ihre Muskeln und Ihr Körper
genügend Zeit haben, sich zwischen den einzelnen
Übungen zu erholen. Es wird empfohlen, einen
Ruhetag einzulegen.
Führen Sie alle Übungen mit einem stabilen Körper-
mittelpunkt durch. Die Wirbelsäule (insbesondere die
Lendenwirbelsäule) muss gerade gehalten werden,
damit die einzelnen Wirbel in der biomechanisch
korrekten Position gehalten werden, um die Band-
scheiben vor einer falschen Belastung zu schützen.
Führen Sie alle Übungen gleichmäßig und kontrol-
liert durch. Trainieren Sie nicht mit Schwung und /
oder ruckartig. Beachten Sie, dass bei unsachge-
mäßem oder übermäßigem Training negative
Auswirkungen auf Ihre Gesundheit möglich sind.
Übungen
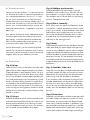
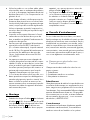
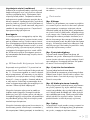
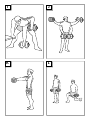
(Abb. E) Bizeps
Stellen Sie sich wie gezeigt mit etwa schulterbreit
auseinander stehenden Füßen und gestrecktem
Rücken mit angespannten Rumpfmuskeln auf. Nehmen
Sie in jede Hand eine Kurzhantel wie abgebildet.
Heben Sie eine Kurzhantel an, während Sie die
andere im selben Zug entlasten. Die Kurzhantel sollte
zu Beginn der Übung parallel zu Ihrem Körper ge-
halten werden, d. h. mit den Handflächen nach innen
gerichtet. Während des Anhebens wird sie so gedreht,
dass die Handfläche am Ende nach oben zeigt.
Während der Absenkphase ist es umgekehrt. Wäh-
rend der Trainingsphase sollte der Ellbogen nahe
am Körper gehalten werden, damit der Bizeps isoliert
trainiert wird.
(Abb. F) Trizeps
Halten Sie die Kurzhantel wie gezeigt mit beiden
Händen an den Enden hinter dem Kopf. Alternativ
kann diese Übung auch im Sitzen durchgeführt
werden. Heben Sie die Hände über den Kopf und
strecken Sie die Arme. Die Schultern sind nicht an-
gehoben. Senken Sie die Kurzhantel wieder ab.
(Abb. G) Schräge Rumpfmuskulatur
Halten Sie die Kurzhantel mit beiden Händen.
Senken Sie die Kurzhantel an der Außenseite Ihres
linken Knies ab. Heben Sie Ihre Arme zur Seite und
drehen Sie Ihren Körper nach rechts. Die Schultern
sind nicht angehoben. Kehren Sie in die Aus
gangs-
position zurück. Wechseln Sie die Körperseite.
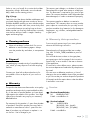
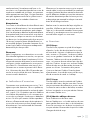
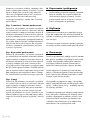
(Abb. H) Brust - Schmetterling
Legen Sie sich wie abgebildet mit dem Rücken auf
eine flache Bank (stellen Sie sicher, dass diese stabil
ist) und stellen Sie Ihre Füße für mehr Stabilität auf
dem Boden ab. Nehmen Sie eine Kurzhantel in jede
Hand und halten Sie Ihre Arme leicht über Ihre
Brust

9 DE/AT/CH
gebeugt. Bewegen Sie nun die Kurzhanteln
seitlich
nach unten auf etwa Schulterhöhe. Heben Sie die
Kurzhanteln wieder an und kehren Sie in die Ausgangs-
position
zurück.
(Abb. I) Rücken
Beugen Sie sich im Stehen vor und stellen Sie die
Füße schulterbreit auseinander. Strecken Sie Ihren
Rücken wie gezeigt mit angespannten Rumpfmuskeln.
Beginnen Sie diese Übung mit geringen Gewichten.
Stützen Sie sich mit einer Hand auf einer Bank oder
einem Stuhl ab. Halten Sie die Kurzhantel in der
anderen Hand und lassen Sie den Arm locker hängen.
Ziehen Sie die Kurzhantel langsam und kontrolliert
in Richtung Brust, während der Rücken gerade und
der Körper angespannt bleibt. Senken Sie die Kurz-
hantel wieder ab.
(Abb. J) Schulter – Seitliches Heben
Stellen Sie sich mit etwa schulterbreit auseinander
stehenden Füßen und gestrecktem Rücken mit ange-
spannten Rumpfmuskeln wie abgebildet auf. Alterna-
tiv kann diese Übung auch im Sitzen durchgeführt
werden. Nehmen Sie die Kurzhantel oder die Kurz-
hanteln, wenn Sie beide Seiten gleichzeitig trainie-
ren möchten, und ziehen Sie die Schulterblät
ter mit
leicht gebeugten Ellbogen nach hinten. Heben Sie den
Arm oder die Arme dann ungefähr auf Schulterhöhe
an, heben Sie jedoch nicht die Schultern an. Bringen
Sie danach die Kurzhantel(n) wieder in die Aus-
gangsposition.
(Abb. K) Frontales Heben
Stellen Sie sich mit etwa schulterbreit auseinander
stehenden Füßen und gestrecktem Rücken mit ange-
spannten Rumpfmuskeln wie abgebildet auf. Alter-
nativ kann diese Übung auch im Sitzen durchgeführt
werden. Nehmen Sie die Kurzhantel oder die Kurz-
hanteln, wenn Sie beide Seiten gleichzeitig
trainieren
möchten, und ziehen Sie die Schulterblätter
mit leicht
gebeugten Ellbogen nach hinten. Heben Sie den
Arm oder die Arme dann ungefähr auf
Schulterhöhe
an (gehen Sie optional weiter über den
Kopf), heben
Sie die Schultern jedoch nicht an. Bringen Sie danach
die Kurzhantel(n) wieder in die Ausgangsposition.
(Abb. L) Beine
Stellen Sie sich mit etwa schulterbreit auseinander
stehenden Füßen und gestrecktem Rücken mit ange-
spannten Rumpfmuskeln wie abgebildet auf. Halten
Sie die Kurzhanteln und lassen Sie Ihre Arme mit den
Gewichten locker auf beiden Seiten hängen. Machen
Sie nun langsam einen Ausfallschritt, wie gezeigt.
Stellen Sie sicher, dass das Knie Ihres Vor
derbeins
ständig über dem Fuß bleibt und Ihr Rücken
gerade
ist. Gehen Sie wieder in die Ausgangsposition und
wechseln Sie die Beine.
Reinigung und Pflege
Wischen Sie das Produkt mit einem feuchten,
fusselfreien Tuch ab. Verwenden Sie keine
scheuernden oder ätzenden Reinigungsmittel.
Lagern Sie das Produkt immer trocken und
sauber bei Raumtemperatur.
Entsorgung
Die Verpackung besteht aus umweltfreundlichen
Materialien, die Sie über die örtlichen Recycling-
stellen entsorgen können.
Möglichkeiten zur Entsorgung des ausgedienten
Produkts erfahren Sie bei Ihrer Gemeinde- oder
Stadtverwaltung.
Garantie
Das Produkt wurde nach strengen Qualitätsrichtlinien
sorgfältig produziert und vor Anlieferung gewissen-
haft geprüft. Im Falle von Mängeln dieses Produkts
stehen Ihnen gegen den Verkäufer des Produkts
gesetzliche Rechte zu. Diese gesetzlichen Rechte
werden durch unsere im Folgenden dargestellte
Garantie nicht eingeschränkt.

10 DE/AT/CH
Sie erhalten auf dieses Produkt 3 Jahre Garantie ab
Kaufdatum. Die Garantiefrist beginnt mit dem Kauf-
datum. Bitte bewahren Sie den Original-Kassenbon
gut auf. Diese Unterlage wird als Nachweis für den
Kauf benötigt.
Tritt innerhalb von 3 Jahren ab dem Kaufdatum
dieses Produkts ein Material- oder Fabrikationsfehler
auf, wird das Produkt von uns – nach unserer Wahl
– für Sie kostenlos repariert oder ersetzt. Diese
Garantie verfällt, wenn das Produkt beschädigt,
nicht sachgemäß benutzt oder gewartet wurde.
Die Garantieleistung gilt für Material- oder Fabrika-
tionsfehler. Diese Garantie erstreckt sich nicht auf
Produktteile, die normaler Abnutzung ausgesetzt
sind (z. B. Batterien) und daher als Verschleißteile
angesehen werden können oder Beschädigungen
an zerbrechlichen Teilen, z. B. Schalter, Akkus oder
die aus Glas gefertigt sind.
Abwicklung im Garantiefall
Um eine schnelle Bearbeitung Ihres Anliegens zu
gewährleisten, folgen Sie bitte den folgenden
Hinweisen:
Bitte halten Sie für alle Anfragen den Kassenbon
und die Artikelnummer (z. B. IAN 123456_7890)
als Nachweis für den Kauf bereit.
Die Artikelnummer entnehmen Sie bitte dem Typen-
schild, einer Gravur, auf dem Titelblatt Ihrer Anlei-
tung (unten links) oder als Aufkleber auf der Rück-
oder Unterseite.
Sollten Funktionsfehler oder sonstige Mängel auf-
treten, kontaktieren Sie zunächst die nachfolgend
benannte Serviceabteilung telefonisch oder per E-Mail.
Ein als defekt erfasstes Produkt können Sie dann
unter Beifügung des Kaufbelegs (Kassenbon) und
der Angabe, worin der Mangel besteht und wann
er aufgetreten ist, für Sie portofrei an die Ihnen mit-
geteilte Service-Anschrift übersenden.
Service
Service Deutschland
Tel.: 0800 5435 111
(kostenfrei aus dem dt.
Festnetz / Mobilfunknetz)
E-Mail: [email protected]
Service Österreich
Tel.: 0820 201 222 (0,15 EUR / Min.)
E-Mail: [email protected]
Service Schweiz
Tel.: 0842 665566
(0,08 CHF / Min.,
Mobilfunk max. 0,40 CHF / Min.)
E-Mail: [email protected]

11 GB/IE
Introduction ................................................................................................................................... Page 12
Intended use ........................................................................................................................................ Page 12
Scope of delivery ................................................................................................................................Page 12
Technical data ..................................................................................................................................... Page 12
Safety notices ..............................................................................................................................Page 12
Assembly .........................................................................................................................................Page 13
Training notes .............................................................................................................................. Page 13
General training notes ........................................................................................................................ Page 13
Exercise notes ......................................................................................................................................Page 14
Exercises ..............................................................................................................................................Page 14
Cleaning and care .................................................................................................................... Page 15
Disposal ............................................................................................................................................Page 15
Warranty ......................................................................................................................................... Page 15
Warranty claim procedure ................................................................................................................. Page 15
Service .................................................................................................................................................Page 15

12 GB/IE
10.5 kg Dumbbell set
Introduction
We congratulate you on the purchase
of your new product. You have chosen a
high quality product. Familiarise yourself
with the product before using it for the first time. In
addition, please carefully refer to the operating in-
structions and the safety advice below. Only use the
product as instructed and only for the indicated field
of application. Keep these instructions in a safe pl
ace.
If you pass the product on to anyone else, please
ensure that you also pass on all the documentation
with it.
Intended use
This product is designed as a piece of sports equip-
ment and is not intended for commercial, therapeutic
or medicinal use. This product must only be used
indoors and by adults.
Scope of delivery (Fig. A)
1
1 x Dumbbell bar
2
6 x Weight plate
3
2 x Spring clamp closure
Technical data
Dumbbell bar: approx. 1.95 kg, diameter: 30 mm,
length: 35 cm
Weight plates: total 6 weight plates;
2 x 1 kg
(diameter approx. 119 mm,
thickness
approx. 18 mm)
2 x 1.25 kg (diameter approx.
125 mm, thickness approx. 19 mm)
2 x 2
kg (diameter approx. 154 mm,
thickness approx. 20.5 mm)
Closures: 2 spring clamp closures for
fixing the weight plates (approx.
0.0275 kg / pc)
Overall weight: approx. 10.5 kg
Load: maximum 10.5 kg
Safety notices
PLEASE READ THE INSTRUCTIONS PRIOR TO
USE! PLEASE KEEP THE INSTRUCTIONS IN A
SAFE PLACE! WHEN PASSING THIS PRODUCT
ON TO A THIRD PARTY, ALSO INCLUDE ALL
DOCUMENTS.
DANGER TO
LIFE AND RISK OF ACCIDENT
FOR INFANTS AND CHILDREN!
Never leave children unsupervised with the
packaging materials. There is a danger of
suffocation.
Read and follow the instruction manual and any
other information before assembling and using
the equipment. A safe use of the product can be
achieved only if it was properly assembled and
used properly. It is your responsibility that all
users of the product are aware of the warnings.
Always seek your physician to detect possible
health risks and prevent before beginning any
exercise program. Notice your body signals.
Incorrect or excessive exercise can damage
your health. Stop exercising immediately and
consult your physician if you ever feel unwell,
exercise pain, tightness in the chest, irregular
heartbeat, extreme shortness of breath, dizziness
or light-headedness.
CAUTION! RISK OF INJURY! Keep kids
and pets away from the sports equipment! This
device is intended for use by adults.
Use the set on a stable, flat, horizontal surface
with a protective covering for the floor or carpet.
The safety distance around should be at least
1.5 m. Compensate for uneven floors.
Check and make sure before each time of use
that all spring clamp closures are properly
tightened. The reliability can be maintained
only if the product is checked regularly. Only
use this product in good condition. Do not use
this product if damaged.

13 GB/IE
The device is particularly suitable for training
the upper body and arm muscles, and improves
overall endurance and fat burning.
Please note that the training equipment corre-
sponds to EN 957-2 class H (H = Home use).
The maximum weight is 10.5 kg. According to
DIN EN ISO 20957-1, the training item is not
suited for teenagers below 14 years of age.
Parents and other supervisors should be aware
of their responsibility, because due to the chil-
dren’s natural play instinct and their joy at ex-
perimenting they may get into situations and
show behaviour for which the training equipm
ent
is not suitable.
If you allow children to use the equipment you
should take their mental and physical develop-
ment and above all their liveliness into consid-
eration. You should supervise the children and
above all show them how to use the equipment
correctly. Training equipment by no means is
suitable as toy.
Assembly
Insert the weight plates
2
onto the dumbbell
bar
1
(Fig. B). Ensure the weights at both ends
of the dumbbell bar
1
are equal to avoid injury.
You can add or remove the provided weight
plates
2
based on your own ability.
For secure the weight plates
2
, compress the
grips of closure
3
and insert it (with the grips
facing outwards) onto the dumbbell bar
1
(Fig, C). Make sure the weight plates
2
are
secured tightly. Figure D shows the complete
assembled product.
Training notes
With your interest in strength training you have taken
a step towards mobility and health, because strength
training strengthens your muscles. In addition, the
mobility of your joints is increased, which can reduce
the risk of injury. Your cholesterol, your blood pres-
sure, your blood sugar, your motivation, your body
fat percentage and your mood can be improved by
the sport in conjunction with the right diet.
General training notes
Each exercise should consist of the following three
parts:
1. Warm Up
2. Cardio or weight exercise
3. Cool Down and stretching
Warm Up
This phase helps reduce the risk of muscle injury and
cramping by increasing blood flow and preparing
muscles for training. It is advisable to do a few
stretching exercises for approximately 30 seconds.
Do not overstrain your muscles and avoid jerky
movements. If it hurts, STOP.
The Training
Endurance (often also called cardiovas
cular or car-
dio training because of the positive effects
on the car-
diovascular system) or a strength or muscle training
is the first step in the fight against many civilization
diseases, especially those that occur with increas-
ing age. It can also boost the immune system and
prevent infectious diseases.
Cool Down
Just as a warm-up should be performed before each
training session, a cool-down should take place af-
ter a unit. A Cool Down starts the relaxation phase;
the operating temperature of the body will come
back down and shows the transition of stress relax-
ation. The cool-down should last at least 10 minutes
(as the Warm Up) and is controlled slowly dropping
down to the lowest level. The pulse rate should drop
as low as possible.
Stretching
After the training you should definitely stretch your
muscles. You can either stretch before or during the
exercise to warm up your muscles easily. A stretch-
ing afterwards returns the muscle to its original length,
thus preventing muscle shortening. The more vigor-
ous the training has been, the more important is the
stretching afterwards. Stretching should take 20 to
30 seconds per muscle. Stretching should be notice-
able for the muscle addressed, but it should never
hurt.

14 GB/IE
Exercise notes
Start your training with about 7‒8 reps per exercise
set. Increase the number of repetitions according to
your individual preferences slowly to 11‒12 reps
per set. If you notice that your muscles are tired,
reduce the scope of your training. Ideally train 3‒4
times a week. However, be sure to provide sufficient
time for your muscles and the body to recover be-
tween individual exercises, suggested to insert one
day of rest.
Also, perform all exercises with a stable body centre.
The spine (particularly the lumbar spine) must be
kept straight, so that the individual vertebrae are
held in the biomechanically correct position, e.g.
to protect the disc against faulty loads.
Perform all exercises in a smooth and controlled
manner. Do not train with momentum and / or jerkily.
Note that in case of improper or excessive training
negative effects on your health are possible.
Exercises
(Fig. E) Biceps
Stand as shown with your feet about shoulder width
apart and your back straight with tight core muscles.
Grab a dumbbell in each hand as shown. Lift up a
dumbbell while you let the other down in the same
course. The dumbbell should be held in parallel with
your body at the beginning of the exercise, in other
words, with palms facing inward. During the lifting
it is rotated so that the palm facing upward at the
end. During the lowering phase it is the other way
round. During the training phase, the elbow should
be kept close to the body so that the biceps will be
trained in isolation.
(Fig. F) Triceps
Hold the dumbbell as shown with both hands at the
ends behind the head. Alternatively, this exercise can
also be performed while sitting. Raise your hands
over your head and stretch your arms. The shoulders
are not raised. Let the dumbbell down again.
(Fig. G) Oblique trunk muscles
Hold the dumbbell with both hands. Lower the
dumbbell on the outside of your left knee. Lift your
arms sideways, turning your body to the right side.
The shoulders are not raised. Return to the starting
position. Change the body side.
(Fig. H) Chest - Butterfly
Lie as shown with your back on a flat bench (make
sure that this is stable) and place your feet on each
side for more stability. Grab a dumbbell in each hand
and hold your arms slightly bent over your chest.
Now move the dumbbells laterally down to about
shoulder level. Lift the dumbbells back up again
and return to the starting position.
(Fig. I) Back
Stand leaning forward with your feet about shoulder
width apart and your back straight with tight core
muscles as shown. Begin this exercise with low weights.
Support yourself with one hand on a bench or a chair.
Hold the dumbbell in the other hand and let the arm
hang down loosely. Pull the dumbbell slowly and
controlled towards the chest while the back remains
straight and the body tense. Let the dumbbell slowly
back down.
(Fig. J) Shoulder - Side raise
Stand with your feet about shoulder width apart and
your back straight with tight core muscles as shown.
Alternatively, this exercise can also be performed
while sitting. Grab the dumbbell or dumbbells
if you train both sides simultaneously and pull your
shoulder blades back with the elbows slightly bent.
Lift the arm or arms then to about shoulder height,
do not raise the shoulders themselves, though. After-
wards, return the dumbbell(s) back into the starting
position.
(Fig. K) Front raise
Stand with your feet about shoulder width apart and
your back straight with tight core muscles as shown.
Alternatively, this exercise can also be performed
while sitting. Grab the dumbbell or dumbbells if you
train both sides simultaneously and pull your shoulder
blades back with the elbows slightly bent. Lift the arm
or arms then to about shoulder height
(optionally go

15 GB/IE
further to over your head), do not raise
the shoulders
themselves, though. Afterwards, return the dumb-
bell(s) back into the starting position.
(Fig. L) Legs
Stand with your feet about shoulder width apart and
your back straight with tight core muscles as shown.
Hold the dumbbells and let your arms with the weights
hang loosely on either side. Now, move slowly and
in a controlled manner into a big lunge
as shown.
Make sure that your front leg’s knee remains
constantly
over the foot and your back is straight. Stand up
again and change legs.
Cleaning and care
Wipe with a damp, lint-free cloth. Do not use
abrasive or caustic cleaning agents. Always
store the product dry and clean, in a temperate
room.
Disposal
The packaging is made entirely of recyclable mate-
rials, which you may dispose of at local recycling
facilities.
Contact your local refuse disposal authority for
more details of how to dispose of your worn-out
product.
Warranty
The product has been manufactured to strict quality
guidelines and meticulously examined before deliv-
ery. In the event of product defects you have legal
rights against the retailer of this product. Your legal
rights are not limited in any way by our warranty
detailed below.
The warranty for this product is 3 years from the date
of purchase. Should this product show any fault in
materials or manufacture within 3 years from the
date of purchase, we will repair or replace it – at
our choice – free of charge to you.
The warranty period begins on the date of purchase.
Please keep the original sales receipt in a safe loca-
tion. This document is required as your proof of
pur-
chase. This warranty becomes void if the product
has
been damaged, or used or maintained improperly.
The warranty applies to defects in material or
manufacture. This warranty does not cover product
parts subject to normal wear, thus possibly consid-
ered consumables (e.g. batteries) or for damage to
fragile parts, e.g. switches, rechargeable batteries
or glass parts.
Warranty claim procedure
To ensure quick processing of your case, please
observe the following instructions:
Please have the till receipt and the item number
(e.g. IAN 123456_7890) available as proof of
purchase.
You will find the item number on the type plate,
an engraving on the front page of the instructions
(bottom left), or as a sticker on the rear or bottom
of the appliance.
If functional or other defects occur, please contact
the service department listed either by telephone or
by e-mail.
You can return a defective product to us free of
charge to the service address that will be provided
to you. Ensure that you enclose the proof of purchase
(till receipt) and information about what the defect
is and when it occurred.
Service
Service Great Britain
Tel.: 0800 404 7657
E-Mail: [email protected]
Service Ireland
Tel.: 1890 930 034
(0,08 EUR / Min., (peak))
(0,06 EUR / Min., (off peak))
E-Mail: [email protected]

16 FR/BE
Introduction ................................................................................................................................... Page 17
Utilisation conforme ............................................................................................................................Page 17
Contenu de la livraison .......................................................................................................................Page 17
Caractéristiques techniques ................................................................................................................Page 17
Consignes de sécurité ...........................................................................................................Page 17
Montage ...........................................................................................................................................Page 18
Conseils d‘entraînement.....................................................................................................Page 18
Remarques générales sur l‘entraînement ...........................................................................................Page 18
Indications d‘exercices .......................................................................................................................Page 19
Exercices .............................................................................................................................................. Page 19
Nettoyage et entretien ........................................................................................................ Page 20
Mise au rebut ............................................................................................................................... Page 20
Garantie ........................................................................................................................................... Page 20
Faire valoir sa garantie .......................................................................................................................Page 21
Service après-vente .............................................................................................................................Page 21

17 FR/BE
Set d’haltères, 10,5 kg
Introduction
Nous vous félicitons pour l‘achat de votre
nouveau produit. Vous avez opté pour
un produit de grande qualité. Avant la
première mise en service, vous devez vous familiari-
ser avec toutes les fonctions du produit. Veuillez lire
attentivement le mode d’emploi ci-dessous et les
consignes de sécurité. N’utilisez le produit que pour
l’usage décrit et les domaines d’application cités.
Conserver ces instructions dans un lieu sûr. Si vous
donnez le produit à des tiers, remettez-leur également
la totalité des documents.
Utilisation conforme
Ce produit est conçu comme un appareil de sport,
non adapté à un usage commercial, thérapeutique
ou médical. Ce produit doit uniquement être utilisé
en intérieur et par des adultes.
Contenu de la livraison (ill. A)
1
1 x barre d‘haltère
2
6 x disques d‘haltère
3
2 x fermetures avec pince à ressort
Caractéristiques techniques
Barre d‘haltère : env. 1,95 kg, diamètre :
30 mm, longueur : 35 cm
Disques d‘haltère : au total 6 disques d‘haltère ;
2 x 1 kg (diamètre d‘env.
119 mm, épaisseur d‘env.
18 mm)
2 x 1,25 kg (diamètre d‘env.
125 mm, épaisseur d‘env.
19 mm)
2 x 2 kg (diamètre d‘env.
154 mm, épaisseur d‘env.
20,5 mm)
Fermetures : 2 fermetures avec pince à
ressort pour fixer les disques
d‘haltère (env. 0,0275 kg / pièce)
Poids total : env. 10,5 kg
Charge : env. 10,5 kg
Consignes de sécurité
VEUILLEZ LIRE LE MODE D‘EMPLOI AVANT
UTILISATION! LE MODE D‘EMPLOI EST À
CONSERVER SOIGNEUSEMENT! LORSQUE
VOUS REMETTEZ LE PRODUIT À D‘AUTRES
UTILISATEURS, VEUILLEZ ÉGALEMENT LEUR
TRANSMETTRE TOUS LES DOCUMENTS S‘Y
RAPPORTANT.
DAN-
GER DE MORT ET RISQUE
D‘ACCIDENT POUR LES BÉBÉS
ET LES ENFANTS! Ne laissez jamais les en-
fants manipuler les emballages sans surveillance.
Risque d‘asphyxie. Tenez les enfants à l‘écart
du produit.
Lisez et suivez les instructions du mode d‘emploi
et toutes les autres informations, avant d‘assem-
bler et d‘utiliser le produit. Utiliser ce produit en
toute sécurité est uniquement possible lorsque
celui-ci est monté et utilisé de façon appropriée.
Il est de votre responsabilité que l‘ensemble des
utilisateurs du produit soient informées de ces
avertissements.
Avant de commencer un programme d‘entraî-
nement, consultez toujours un avis médical, afin
d‘identifier et de prévenir tout problème de santé
éventuel. Un mouvement incorrect ou excessif
peut nuire à votre santé. Interrompez immédia-
tement l‘entraînement et consultez votre médecin,
si vous vous sentez mal, si vous ressentez des
douleurs à la poitrine, un rythme cardiaque ir-
régulier, un essoufflement extrême, des vertiges
ou une somnolence.
ATTENTION! RISQUE DE BLESSURES !
Tenir les enfants et les animaux à l‘écart du
produit ! Ce produit doit uniquement être utilisé
par des adultes.

18 FR/BE
Utilisez le produit sur une surface stable, plane
et horizontale, avec un revêtement de protection
sur le sol ou la moquette. La distance de sécurité
doit être d‘au moins 1,5 m. Compensez les irré-
gularités du sol.
Avant chaque utilisation, vérifiez que toutes les
fermetures avec pince à ressort sont bien fixées.
La sécurité du produit peut uniquement être ga-
rantie, lorsque le produit est vérifié régulièrement.
Utilisez uniquement ce produit lorsque celui-ci
est en bon état. N‘utilisez pas le produit lorsqu‘il
est endommagé.
Le produit convient particulièrement à l‘entraî-
nement des muscles du haut du corps et des
bras, et améliore en général l‘endurance et la
combustion des graisses.
Veuillez noter que cet appareil d‘entraînement
répond à la norme EN 957-2 de classe H
(H = utilisation domestique). Le poids maximal
est de 10,5 kg. Cet appareil d‘entraînement ne
convient pas aux adolescents de moins de
14 ans, conformément à la norme DIN EN
ISO 20957-1.
Les parents et autres personnes chargées de
surveiller doivent être conscients de leurs respon-
sabilités. En effet, en raison de leur instinct natu-
rel au jeu et de leur goût pour l‘expérimentation,
les enfants peuvent provoquer des situations et
présenter des comportements pour lesquels
l‘appareil d‘entraînement n‘est pas conçu.
Si vous laissez des enfants utiliser le produit, vous
devez prendre en compte leur développement
mental et physique ainsi que leur vivacité. Vous
devez surveiller les enfants et avant tout leur
montrer comment utiliser correctement le produit.
Ne jamais considérer les appareils d‘entraîne-
ment comme des jouets.
Montage
Emboîtez les disques d‘haltère
2
dans la barre
d‘haltère
1
(ill. B). Assurez-vous que les poids
sont répartis de façon identique des deux côtés
de la barre d‘haltère
1
, afin d‘éviter tout
risque de blessure. En fonction de vos propres
capacités, vous pouvez ajouter ou retirer des
disques d‘haltère
2
fournis.
Pour bloquer les disques d‘haltère
2
, appuyez
sur les fermetures avec pince à ressort
3
et
les emboîter sur la barre d‘haltère
1
(avec les
poignées orientées vers l‘extérieur) (ill. C). As-
surez-vous que les disques d‘haltère
2
sont
bien bloqués. L‘illustration D montre le produit
complètement monté.
Conseils d‘entraînement
En vous intéressant à la musculation, vous avez
franchi une étape vers la mobilité et la santé, car cette
discipline vise à renforcer votre musculature. De plus,
la mobilité de vos articulations est stimulée, ce qui
réduit le risque de blessures. Votre taux de choles-
térol, votre tension artérielle, votre taux de glycémie,
votre motivation, votre taux de graisse corporelle et
votre humeur peuvent être améliorés par le sport, si
vous suivez également une alimentation saine.
Remarques générales sur
l‘entraînement
Chaque exercice doit se dérouler selon les trois
parties suivantes:
1. Échauffement
2. Entraînement cardio ou musculation
3. Récupération et étirements
Échauffement
Cette phase permet de réduire le risque de blessures
musculaires et de crampes, en augmentant la circu-
lation sanguine et en préparant ainsi les muscles à
l‘entraînement. Il est recommandé d‘effectuer chaque
exercice d‘échauffement durant env. 30 secondes.
Ne surmenez pas vos muscles, et évitez d‘effectuer
des mouvements de secousses; si vous ressentez
des douleurs, ARRÊTEZ-VOUS.
L‘entraînement
L‘entraînement d‘endurance (également appelé
entraînement cardiovasculaire, ou entraînement
cardio en raison de ses bienfaits sur le système

19 FR/BE
cardiovasculaire), l‘entraînement de force ou la
musculation sont la première étape de lutte contre de
nombreuses maladies de civilisation, et notamment
celles apparaissant avec l‘âge. Ce type d‘entraîne-
ment peut également renforcer le système immuni-
taire et éviter ainsi les maladies infectieuses.
Récupération
Tout comme un échauffement doit être effectué avant
chaque unité d‘entraînement, il est recommandé de
prévoir une phase de récupération après chaque
unité. La récupération démarre la phase de détente.
La température de fonctionnement du corps baisse
de nouveau, et indique une transition vers la relaxa-
tion de tension. La récupération doit durer au moins
10 minutes (comme la phase d‘échauffement), et
est contrôlée de façon à retomber lentement vers le
niveau le plus faible. La fréquence cardiaque doit
descendre le plus bas possible.
Étirements
Après l‘entraînement, vous devez étirer vos muscles.
Pour échauffer légèrement vos muscles, vous pouvez
également vous étirer durant l‘entraînement. En finis-
sant par des exercices d‘étirement, le muscle retrouve
sa longueur initiale, empêchant ainsi toute tension
musculaire. Plus l‘entraînement a été intensif, plus
l‘étirement est un moment important à la fin de ce-
lui-ci. L‘étirement doit durer 20 à 30 secondes par
muscle. Le muscle sollicité doit sentir l‘étirement, sans
ressentir toutefois de douleur.
Indications d‘exercices
Commencez votre entraînement par environ 7 à 8
répétitions par série d‘exercices. Selon vos préférences,
augmentez ensuite doucement le nombre de répéti-
tions, jusqu‘à 11 à 12 répétitions par série. Réduisez
votre séance d‘entraînement si vous constatez que
vos muscles sont fatigués. Entraînez-vous idéalement
environ 3 à 4 fois par semaine. Veillez cependant
à laisser suffisamment de temps de récupération à
vos muscles et à votre corps entre chaque séance
d‘entraînement. Il est recommandé de s‘accorder
une journée de repos.
Effectuez tous les exercices avec un point corporel
central stable. La colonne vertébrale (et notamment
sa région lombaire) doit être maintenue droite afin
que les différentes vertèbres puissent être maintenues
de manière biomécanique dans la bonne position,
et de protéger par exemple les disques interverté-
braux d‘une charge incorrecte.
Réalisez toutes les exercices de façon régulière et
contrôlée. N‘effectuez pas les exercices avec de
l‘élan et / ou de manière saccadée. Tenez compte
du fait qu‘un entraînement erroné ou excessif peut
avoir des effets négatifs sur votre santé.
Exercices
(Ill. E) Biceps
Comme illustré, espacez vos pieds d‘une largeur
d‘épaules; le dos doit être étiré avec les muscles
du torse tendu. Saisissez un haltère court dans la
main, comme sur l‘illustration. Soulevez un haltère
court, tout en gardant l‘autre baissé. Au début de
l‘exercice, l‘haltère court doit rester parallèle au
corps; vos paumes de main doivent ainsi être diri-
gées vers l‘intérieur. Lorsque vous soulevez l‘haltère,
celle-ci doit-être tournée de manière à orienter la
paume vers le haut. L‘orientation de la paume
s‘inverse en baissant l‘haltère. Durant la phase
d‘entraînement, le coude doit rester près du corps,
afin de concentrer le travail sur le biceps.
(Ill. F) Triceps
Comme indiqué, tenez les extrémités de l‘haltère
court des deux mains, derrière votre tête. Cet exer-
cice peut autrement être effectué en position assise.
Soulevez les mains au-dessus de la tête, et tendez
les bras. Les épaules ne sont pas relevées. Baissez
de nouveau l‘haltère court.
(Ill. G) Muscles obliques du torse
Tenez l‘haltère court des deux mains.
Baissez l‘haltère court sur le côté extérieur de votre
genou gauche. Baissez vos bras sur le côté extérieur,
et tournez votre corps vers la droite. Les épaules ne
sont pas relevées. Revenez dans la position initiale.
Changez de côté du corps.

20 FR/BE
(Ill. H) Mouvements papillons du torse
Comme illustré, allongez-vous sur le dos, sur un banc
plat (assurez-vous que le banc est stable), et placez
vos pieds sur le sol pour plus de stabilité. Prenez un
haltère court dans chaque main, et levez vos bras
en les maintenant légèrement pliés au-dessus du
torse. À présent, déplacez latéralement les haltères
courts vers le bas, à hauteur d‘épaule environ. Sou-
levez de nouveau les haltères courts, et ramenez-les
dans la position initiale.
(Ill. I) Dos
En position debout, penchez-vous et gardez les pieds
écartés d‘une largeur d‘épaules. Comme illustré, éti-
rez votre dos avec les muscles du torse tendus. Com-
mencez cet exercice avec des poids faibles. Appuyez-
vous d‘une main sur un banc ou une chaise. Tenez
l‘haltère court dans l‘autre main, et laissez votre
bras pendre. De façon lente et contrôlée, ramenez
l‘haltère court vers votre torse, tandis que votre dos
est droit et que votre corps reste tendu. Baissez de
nouveau l‘haltère court.
(Ill. J) Élévations latérales des épaules
Comme illustré, espacez vos pieds d‘une largeur
d‘épaules et gardez le dos étiré avec les muscles
du torse tendu. Cet exercice peut autrement être
effectué en position assise. Prenez l‘haltère court,
ou les haltères courts si vous souhaitez entraîner les
deux côtés en même temps, et rentrez les omoplates
vers l‘arrière avec les coudes légèrement pliés. Sou-
levez ensuite le bras ou les bras à hauteur d‘épaules
environ, mais ne soulevez pas les épaules. Rame-
nez ensuite l‘haltère court ou les haltères courts en
position initiale.
(Ill. K) Charge frontale
Comme illustré, espacez vos pieds d‘une largeur
d‘épaules et gardez le dos étiré avec les muscles
du torse tendu. Cet exercice peut autrement être
effectué en position assise. Prenez l‘haltère court,
ou les haltères courts si vous souhaitez entraîner les
deux côtés en même temps, et rentrez les omoplates
vers l‘arrière avec les coudes légèrement pliés. Sou-
levez ensuite le bras ou les bras à hauteur d‘épaules
environ (vous pouvez également continuer le mou-
vement au-dessus de votre tête), mais ne soulevez
pas les épaules. Ramenez ensuite l‘haltère court ou
les haltères courts en position initiale.
(Ill. L) Jambes
Comme illustré, espacez vos pieds d‘une largeur
d‘épaules et gardez le dos étiré avec les muscles
du torse tendu. Tenez les haltères courts et laissez
vos bras pendre de chaque côté, en tenant les
poids de façon décontractée. À présent, faites len-
tement une fente avant. Assurez-vous que le genou
de la jambe avancée reste aligné au-dessus du ge-
nou, et que votre dos est droit. Revenez en position
initiale, et changez de jambe.
Nettoyage et entretien
Essuyez le produit avec un chiffon humide et
non pelucheux. Ne pas utiliser de produits net-
toyants irritants ou abrasifs. Toujours ranger le
produit à l‘état propre et sec, à température
ambiante.
Mise au rebut
L’emballage se compose de matières recyclables
pouvant être mises au rebut dans les déchetteries
locales.
Votre mairie ou votre municipalité vous renseigneront
sur les possibilités de mise au rebut des produits
usagés.
Garantie
Le produit a été fabriqué selon des critères de qua-
lité stricts et contrôlé consciencieusement avant sa
livraison. En cas de défaillance, vous êtes en droit
de retourner ce produit au vendeur. La présente ga-
rantie ne constitue pas une restriction de vos droits
légaux.
Ce produit bénéficie d‘une garantie de 3 ans à
compter de sa date d’achat. La durée de garantie
Strona jest ładowana ...
Strona jest ładowana ...
Strona jest ładowana ...
Strona jest ładowana ...
Strona jest ładowana ...
Strona jest ładowana ...
Strona jest ładowana ...
Strona jest ładowana ...
Strona jest ładowana ...
Strona jest ładowana ...
Strona jest ładowana ...
Strona jest ładowana ...
Strona jest ładowana ...
Strona jest ładowana ...
Strona jest ładowana ...
Strona jest ładowana ...
Strona jest ładowana ...
Strona jest ładowana ...
Strona jest ładowana ...
Strona jest ładowana ...
Strona jest ładowana ...
Strona jest ładowana ...
Strona jest ładowana ...
Strona jest ładowana ...
Strona jest ładowana ...
Strona jest ładowana ...
-
 1
1
-
 2
2
-
 3
3
-
 4
4
-
 5
5
-
 6
6
-
 7
7
-
 8
8
-
 9
9
-
 10
10
-
 11
11
-
 12
12
-
 13
13
-
 14
14
-
 15
15
-
 16
16
-
 17
17
-
 18
18
-
 19
19
-
 20
20
-
 21
21
-
 22
22
-
 23
23
-
 24
24
-
 25
25
-
 26
26
-
 27
27
-
 28
28
-
 29
29
-
 30
30
-
 31
31
-
 32
32
-
 33
33
-
 34
34
-
 35
35
-
 36
36
-
 37
37
-
 38
38
-
 39
39
-
 40
40
-
 41
41
-
 42
42
-
 43
43
-
 44
44
-
 45
45
-
 46
46


Crivit 311271 Operation and Safety Notes
- Kategoria
- Fitness, gimnastyka
- Typ
- Operation and Safety Notes
w innych językach
- čeština: Crivit 311271
- Deutsch: Crivit 311271
- slovenčina: Crivit 311271
- français: Crivit 311271
- English: Crivit 311271
- Nederlands: Crivit 311271
Powiązane dokumenty
-
Crivit 103761 Instructions For Use Manual
-
-
-
-
-
-
-
-
-
Inne dokumenty
-
LIVARNO 306855 Instrukcja obsługi
-
-
-
-
Spokey Crunch instrukcja
-
Silvercrest 321164 Assembly, Operating And Safety Instructions
-
 2M Solutions Hantelverschlüsse "Easy Click" Instrukcja obsługi
-
 DUVLAN Bench lavička Basic Instrukcja obsługi
-
 DUVLAN Bench lavička Lift Instrukcja obsługi
-
Parkside PTB 1 A1 Assembly, Operating And Safety Instructions


