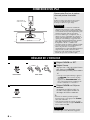
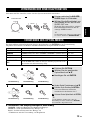
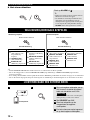
Yamaha TSX-112 Instrukcja obsługi
- Kategoria
- Odtwarzacze CD
- Typ
- Instrukcja obsługi

TSX-112
© 2011 Yamaha Corporation
Printed in Malaysia WY87360
G
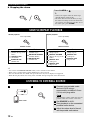
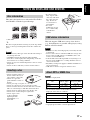
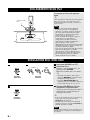
DESKTOP AUDIO SYSTEM
SYSTEME AUDIO DESKTOP
TSX-112
OWNER’S MANUAL
MODE D’EMPLOI
BEDIENUNGSANLEITUNG
BRUKSANVISNING
MANUALE DI ISTRUZIONI
MANUAL DE INSTRUCCIONES
GEBRUIKSAANWIJZING
ИНСТРУКЦИЯ ПО ЭКСПЛУАТАЦИИ

i En
1 To assure the finest performance, please read this
manual carefully. Keep it in a safe place for future
reference.
2 Install this unit in a well ventilated, cool, dry, clean
place - away from direct sunlight, heat sources,
vibration, dust, moisture and cold. For proper
ventilation, allow the following minimum clearances.
Top: 15 cm (6 in)
Rear: 10 cm (4 in)
Sides: 10 cm (4 in)
3 Locate this unit away from other electrical
appliances, motors, or transformers to avoid
humming sounds.
4 Do not expose this unit to sudden temperature
changes from cold to hot, and do not locate this unit
in an environment with high humidity (i.e. a room
with a humidifier) to prevent condensation inside this
unit, which may cause an electrical shock, fire,
damage to this unit, and/or personal injury.
5 Avoid installing this unit where foreign object may
fall onto this unit and/or this unit may be exposed to
liquid dripping or splashing. On the top of this unit,
do not place:
– Other components, as they may cause damage
and/or discoloration on the surface of this unit.
– Burning objects (i.e. candles), as they may cause
fire, damage to this unit, and/or personal injury.
– Containers with liquid in them, as they may fall
and liquid may cause electrical shock to the user
and/or damage to this unit.
6 Do not cover this unit with a newspaper, tablecloth,
curtain, etc. in order not to obstruct heat radiation. If
the temperature inside this unit rises, it may cause
fire, damage to this unit, and/or personal injury.
7 Do not plug in this unit to a wall outlet until all
connections are complete.
8 Do not operate this unit upside-down. It may
overheat, possibly causing damage.
9 Do not use force on switches, knobs and/or cords.
10 When disconnecting the power cable from the wall
outlet, grasp the plug; do not pull the cable.
11 Do not clean this unit with chemical solvents; this
might damage the finish. Use a clean, dry cloth.
12 Only voltage specified on this unit must be used.
Using this unit with a higher voltage than specified is
dangerous and may cause fire, damage to this unit,
and/or personal injury. Yamaha will not be held
responsible for any damage resulting from use of this
unit with a voltage other than specified.
13 To prevent damage by lightning, keep the power
cable disconnected from a wall outlet or this unit
during a lightning storm.
14 Do not attempt to modify or fix this unit. Contact
qualified Yamaha service personnel when any
service is needed. The cabinet should never be
opened for any reasons.
15 When not planning to use this unit for long periods of
time (i.e. vacation), disconnect the AC power plug
from the wall outlet.
16 Be sure to read the “TROUBLESHOOTING” section
on common operating errors before concluding that
this unit is faulty.
17 Before moving this unit, press to set the system to
off, and disconnect the AC power plug from the wall
outlet.
18 Condensation will form when the surrounding
temperature changes suddenly. Disconnect the power
cable from the outlet, then leave this unit alone.
19 When using this unit for a long time, this unit may
become warm. Turn the system off, then leave this
unit alone for cooling.
20 Install this unit near the wall outlet and where the AC
power plug can be reached easily.
21 The batteries shall not be exposed to excessive heat
such as sunshine, fire or the like. When you dispose
of batteries, follow your regional regulations.
22 Excessive sound pressure from earphones and
headphones can cause hearing loss.
CAUTION: READ THIS BEFORE OPERATING YOUR UNIT.
This unit is not disconnected from the AC power source
as long as it is connected to the wall outlet, even if this
unit itself is turned off by . In this state, this unit is
designed to consume a very small quantity of power.
WARNING
TO REDUCE THE RISK OF FIRE OR ELECTRIC
SHOCK, DO NOT EXPOSE THIS UNIT TO RAIN OR
MOISTURE.
CAUTION
Danger of explosion if battery is incorrectly replaced.
Replace only with the same or equivalent type.
There is a chance that placing this unit too close to a
CRT-based (Braun tube) TV set might impair picture
color. Should this happen, move this unit away from the
TV set.

1 En
English Français Deutsch Svenska Italiano Español Nederlands Русский
NAMES OF PARTS AND THEIR
FUNCTIONS...............................................2
CONNECTING AN iPod .............................6
ADJUSTING THE CLOCK..........................6
LISTENING TO iPod ..................................7
LISTENING TO CD AND USB DEVICE.....7
SWITCHING THE DISPLAY.......................8
LISTENING TO RADIO STATIONS ...........8
USING ALARM FUNCTION .....................10
SHUFFLE/REPEAT PLAYBACK ............. 12
LISTENING TO EXTERNAL SOURCE.... 12
USING SLEEP FUNCTION...................... 13
USING OPTION MENU ........................... 13
TROUBLESHOOTING............................. 14
NOTES ON DISCS AND
USB DEVICES......................................... 17
SPECIFICATIONS ................................... 18
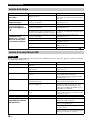
CONTENTS
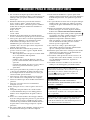
X Features
– iPod/iPhone, CD, USB device, radio and external device using AUX are playable.
– Providing comfortable wake-up by the music set with your preferred volume with alarm function.
Music, beep sound, or both can be set as alarm sound.
– Storing/calling your 30 favorite radio stations.
– Bass and treble can be controlled depending on your favorite.
X About this manual
• “iPod” described in this manual may also refer to “iPhone”.
• This manual describes how to operate this unit using buttons on the unit. Some of these operations are also
available using the remote control.
•The symbol “☞” with page number(s) indicates the corresponding reference page(s).
• Notes contain important information about safety and operating instructions.
y indicates a tip for your
operation.
• This manual is printed prior to production. Design and specifications are subject to change in part as a
result of improvements, etc. In case of differences between the manual and the product, the product has
priority.
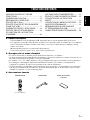
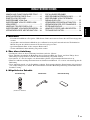
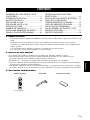
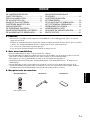
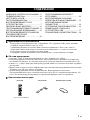
X Supplied accessories
SNOOZE
/
SLEEP
ALARM
CD
RADIO
OPTION
MENU
FOLDER
PRESET
ENTER
VOLUME
USB
DISPLAY
MUTE
TUNING
MEMORY
iPod AUX
CLOCK
Remote control FM antenna
(With CR2032 battery)
Dock cover

2 En
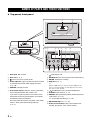
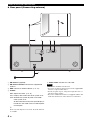
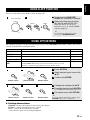
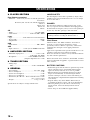
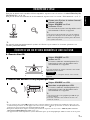
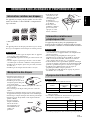
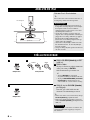
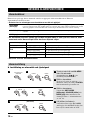
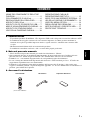
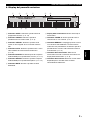
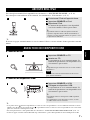
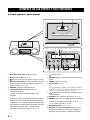
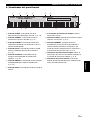
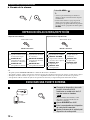
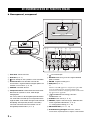
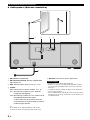
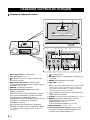
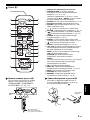
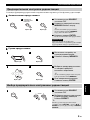
PREPARATION
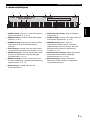
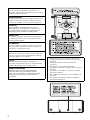
X Top panel, front panel
1 iPod dock: Set an iPod.
2 Disc slot (☞ P. 7)
3 : Press to turn the system on/off.
4 Alarm indicator: Lights up when the alarm function
is activated and flashes while setting the alarm.
(☞ P. 10)
5 SOURCE: Change sources.
6 Front panel display: Displays various information.
Time is displayed when the system is off.
If you set the system to power save mode, all the
information on the front panel display is turned off,
and reduce power consumption.
For more information how to set power save mode,
refer to “Rear panel (Connecting antenna)”.
(☞ P. 4)
7 : Ejecting the CD.
8 RETURN: Returns to the previous item while setting.
9 ENTER: Confirms the setting.
0 USB port (☞ P. 7)
y
When a USB device is connected to the USB port, the
device is charged. During system off/power save mode,
the device is not charged.
A (Headphones jack): Connect headphones.
B ALARM: Alarm on/off (☞ P. 11)
C PRESET (During receiving radios): Select the preset
radio station. (☞ P. 9)
– / +: Changes the setting (☞ P. 10)
D SNOOZE/SLEEP (☞ P. 11, 13)
E Audio control buttons: Skip, search backward/
forward, play/pause, stop, volume control
NAMES OF PARTS AND THEIR FUNCTIONS
SOURCE
RETURN
IPod/iPhone
ALARM
PRESET
SNOOZE
SLEEP
/
USB
ENTER
VOLUME
LABEL SIDE
SOURCE
RETURN
ALARM
PRESET
SNOOZE
SLEEP
/
USB
ENTER
VOLUME
IPod
/
iPhone
LABEL SIDE
1
3 4 5 6
2
7
0 A B E
8 9
D
C

NAMES OF PARTS AND THEIR FUNCTIONS
3 En
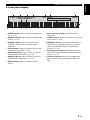
English
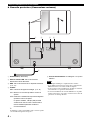
X Front panel display
1 SLEEP indicator: Lights up when the sleep timer is
on. (☞ P. 13)
2 PRESET indicator: Lights up when you preset radio
stations. (☞ P. 9)
3 STEREO indicator: Lights up when this unit is
receiving a strong signal from an FM stereo
broadcast.
4 AUTO indicator: Lights up when this unit is in the
Automatic Tuning mode. (☞ P. 8)
5 SHUFFLE indicator: Lights up when you set your
iPod/CD/USB to shuffle play. (☞ P. 12)
6 REPEAT indicator: Lights up when you set your
iPod/CD/USB to repeat play. (☞ P. 12)
7 MUTE indicator: Lights up when the sound is
muted.
8 Multi information display: Shows the various
information.
9 TUNED indicator: Lights up when this unit is tuned
into a station. (☞ P. 8)
0 MEMORY indicator: Flashes when searching for a
radio station by automatic preset tuning. Lights up
when you preset radio stations automatically or
manually. (☞ P. 9)
A Multi information indicators: Indicate the music
information currently displayed on Multi information
display. (☞ P. 8)
B Operation indicators: Shows the available menu
buttons for the currently selected OPTION menu
item.
SONGS
ALBUMS
ARTISTS
MEMORY
TUNED
SLEEP
STEREO
AUTO
SHUFFLE
REPEAT
MUTE
PRESET
1 234 756
9A
B
8
0

NAMES OF PARTS AND THEIR FUNCTIONS
4 En
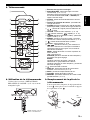
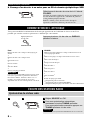
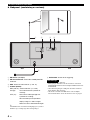
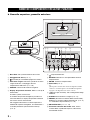
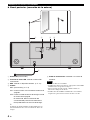
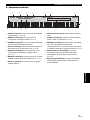
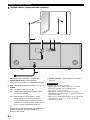
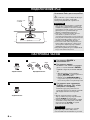
X Rear panel (Connecting antenna)
1 FM antenna (supplied)
2 FM antenna terminal: Connect the supplied FM
antenna.
3 AUX: Connect an external device. (☞ P. 12)
4 CLOCK
SET: Adjusts the clock. (☞ P. 6)
ON: Displays the current time when system is off.
OFF: Switches the system to power save mode
when system is off.
All the information on the front panel display is
turned off in this mode. This can reduce power
consumption.
y
Even in system off/power save mode, the alarm function
is available.
5 Power cable: Connect to a wall outlet.
• The antenna should be stretched out.
• If you use an outdoor antenna instead of the supplied FM
antenna, reception will be better.
• If radio reception is poor, change the height, direction, or
placement of the antenna.
• If you use an FM antenna that is not supplied with the unit,
make sure that the base of the antenna is not threaded.
OFFSET ON
2 3 4
1
5
Notes

NAMES OF PARTS AND THEIR FUNCTIONS
5 En
English
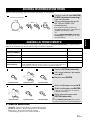
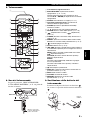
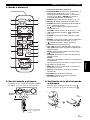
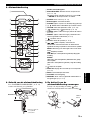
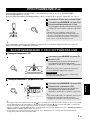
X Remote control
1 Infrared signal transmitter
2 SNOOZE/SLEEP: Snooze/sleep setting.
(☞ P. 11, 13)
Press and hold this button, then press Cursor T/S
J ENTER to set the sleep function.
3 ALARM: Alarm on/off (☞ P. 11)
4 Source buttons: Change sources.
5 FOLDER (during data CD/USB playback): Change
folder.
6 , : Scrolls through items on the iPod’s screen.
7 OPTION: Displays the option menu. (☞ P. 13)
8 (Shuffle), (Repeat) (☞ P. 12)
9 TUNING (during receiving radio): Tuning radio
(☞ P. 8)
0 PRESET (during receiving radio): Select the preset
radio station (☞ P. 9)
A : System on/off
B CLOCK: Displays the time (☞ P. 6)
C , (during playback): Skip backward and
forward/press and hold to rewind and fast-forward
MENU: Returns to the upper level in the iPod menu.
: Play/pause
S/T/W/X (During using the option menu): Changes
the setting
ENTER
(During using the iPod): Select group/start playback
(During using the option menu): Confirms the setting
D : Stop playback.
E DISPLAY: Switches the information shown on the
front panel. (☞ P. 8)
F MUTE: Mute/resume the sound.
G VOLUME: Volume control
H MEMORY: Memories preset radio stations. (☞ P. 9)
X Using the remote control
Be sure to read “BATTERY CAUTIONS”
(☞ P. 18) before using the battery.
X Replacing the battery in the
remote control
While pushing the release tab in direction ,
slide out the battery holder in direction .
SNOOZE
/
SLEEP
ALARM
CD
RADIO
OPTION
MENU
FOLDER
PRESET
ENTER
VOL UME
USB
DISPLAY
MUTE
TUNING
MEMORY
iPod AUX
CLOCK
2
3
7
8
4
6
9
0
1
5
C
A
D
E
F
G
H
B
SNOOZE
/
SLEEP
ALARM
CD
RADIO
OPTION
MENU
FOLDER
PRESET
ENTER
VOLUME
USB
DISPLAY
MUTE
TUNING
MEMORY
iPod AUX
CLOCK
SOURCE
RETURN
ALARM
PRESET
SNOOZE
SLEEP
/
USB
ENTER
VOLUME
Within 6 m
(20’)
Battery insulation
sheet: Remove
before using.
1
2
3
CR2032
battery

6 En
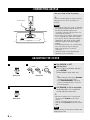
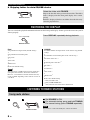
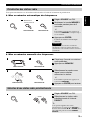
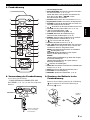
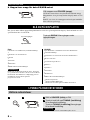
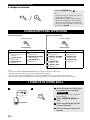
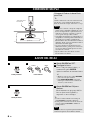
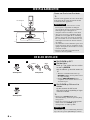
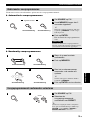
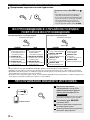
CONNECTING AN iPod
Set your iPod in the iPod dock.
y
An iPod is charged when set in the iPod dock.
During power save mode, the iPod is not
charged.
• To secure the connection, attach a compatible
Dock Adapter supplied with the iPod or an
iPod Universal Dock Adapter (sold
separately), and remove the protective case
covering from your iPod.
• If you do not use an adapter or if the adapter
is not compatible, the connection could be
loose or poor, which could cause damage or
malfunctions. For details on dock adaptor
information, please visit official Apple’s
website.
• If an iPod in protective case is connected by
force, the connector may be damaged.
Remove the protective case before
connection.
• Attach the dock cover to the iPod dock
whenever you are not using it.
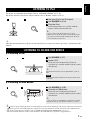
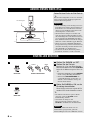
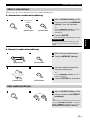
ADJUSTING THE CLOCK
1 Set CLOCK to SET.
2 Set the time.
Press – / + to set the hour and then
press ENTER.
Set the minutes in the same way.
y
• While setting the clock, press RETURN
to return to the previous setting.
• Press SNOOZE/SLEEP on the front
panel to switch between the 12 and 24
hour clock display.
3 Set CLOCK to ON to complete.
At the time ON is set, it will be 00
second and time count starts.
y
• The time is displayed for a certain period
when you press CLOCK on the remote
control.
• You can switch the system to power save
mode by setting CLOCK on the rear panel to
OFF.
The time settings are lost about 5 minutes after
unplugging the unit.
IPod/iPhone
LABEL SIDE
Dock Adaptor
Notes
1 2
Rear panel Front panel
PRESET
ENTER
3
Rear panel
Note

7 En
English
OPERATION
For details on compatible iPod models, refer to “SPECIFICATIONS” (☞ P. 18).
For details on how to operate the remote control, refer to “Remote control” (☞ P. 5).
y
This unit automatically turns off the system if the iPod is not connected and no operation is performed for 60
minutes.
X Listening to CD
X Listening to USB device
y
• If button is pressed during playback, next time playback starts from the beginning of the track you listened to last time. If
button is pressed again while playback is stopped, next time playback starts from the first track of the CD/USB device.
• For details on playable discs and files, refer to “NOTES ON DISCS AND USB DEVICES” (☞ P. 17).
• This unit automatically turns off the system 60 minutes after CD/USB device playback is stopped/paused.
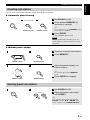
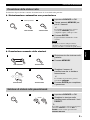
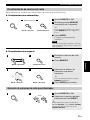
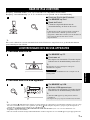
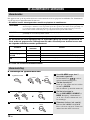
LISTENING TO iPod
1 Set your iPod in the iPod dock.
2 Set SOURCE to iPod.
3 Play the iPod.
Playback operations are available with the
remote control, iPod and this unit.
y
• You can remove the iPod whenever you want.
• When music in the iPod is played back, this unit turns
the system on automatically and plays back the iPod
even if the unit is system off.
SOURCE
1 2
LISTENING TO CD AND USB DEVICE
1 Set SOURCE to CD.
2 Insert a CD.
Playback starts automatically. Playback
operations are available with the remote control
and this unit.
y
Playback for Data Disc starts in alphanumeric order of
files.
Insert the CD with the label side facing toward the front
of the unit.
1 Set SOURCE to USB.
2 Connect a USB device.
Playback starts automatically. Playback
operations are available with the remote control
and this unit.
y
• You can remove your USB device whenever you want.
• Playback starts in order by date and time of creation.
IPod/iPhone
LABEL SIDE
SOURCE
1 2
Note
SOURCE
RETURN
ALARM
PRESET
SNOOZE
SLEEP
/
USB
ENTER
VOLUME
1 2
SOURCE

SWITCHING THE DISPLAY
8 En
X Skipping folder for data CD/USB device
You can switch the playback information shown on the front panel display. Some special characters may not be
shown properly.
Select the folder with FOLDER.
Skip to the first file in the previous/next folder. The folder
name is displayed on the front panel display for a certain
period.
ROOT is displayed for the root folder when the directory
contains playable files.
FOLDER
Remote control
SWITCHING THE DISPLAY
Press DISPLAY repeatedly during playback.
iPod
Song number and elapsed time (default setting)
L
Song number and remaining time
L
Song name
L
Artist name
L
Album name
L
Back to the default setting
This function is available for iPod classic, iPod nano
(2nd generation and later), iPod touch and iPhone.
However, even with these models, this function may
not be available depending on the software version of
your iPod.
CD/USB
Track/file number and elapsed time of the current song (default
setting)
L
Track number and remaining time of the current song
*1
L
Total time of the disc
*1
L
Remaining time of the disc
*1
L
File name
*2
L
Track name
*3
L
Artist name
*3
L
Album name
*3
L
Back to the default setting
*1
Only for Audio CDs
*2
Only for MP3/WMA files
*3
Only when the selected track has information
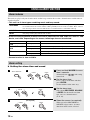
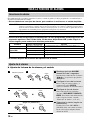
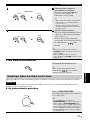
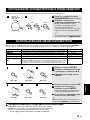
LISTENING TO RADIO STATIONS
Tuning radio stations
1 Set SOURCE to FM.
2 For automatic tuning, press and hold TUNING.
For manual tuning, press TUNING repeatedly.
If you tune to a station manually, the sound is monaural.
DISPLAY
Press repeatedly
Remote control
Note
SOURCE
TUNING
1 2
Remote control
Note

LISTENING TO RADIO STATIONS
9 En
English
You can store your favorite 30 radio stations with the preset function.
X Automatic preset tuning
X Manual preset tuning
Presetting radio stations
1 Set SOURCE to FM.
2 Press and hold MEMORY for
more than 2 seconds.
y
To cancel the preset, press MEMORY again
before step 3 is completed.
3 Press ENTER.
The automatic preset starts.
When you perform the automatic preset, all
stored stations are cleared and the new stations
are stored.
1 Tune into a favorite radio station.
2 Press MEMORY.
3 Select the preset number you
want to store to.
y
To cancel the preset, press MEMORY
again.
4 Press ENTER to complete.
Selecting preset radio stations
1 Set SOURCE to FM.
2 Select the preset radio station
with PRESET.
y
You can delete a preset station by pressing
OPTION J Cursor S/T J ENTER on the
remote control to select PRESET DELETE.
SOURCE
MEMORY
ENTER
1 2
3
Remote control Remote control
Press and hold
Note
TUNING
MEMORY
1 2
Remote controlRemote control
MENU
ENTER
ENTER
3 4
Remote controlRemote control
PRESET
1
SOURCE
2

10 En
This unit can play back your favorite music and/or beep sound at the set time. Alarm features on this unit are
described below.
• This unit has 3 alarm types combining music and beep sound:
• Alarm source played back at the set time can be selected from iPod, audio CD, data CD, USB
device, and radio. Depending on the source, followings also can be selected:
• Snooze function is also available.
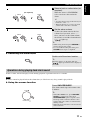
X Setting the alarm time and sound
USING ALARM FUNCTION
Alarm features
SRC+BEEP
Selected audio source and the beep sound are played at the set time. Source playback begins to fade
in 3 minutes before the set time and the volume gradually increases to the set volume. Then, at the set
time, the beep sound is activated. This mode is recommended for a comfortable wake-up.
SOURCE
Selected source plays at the set time. Fade-in volume gradually increases to the set volume.
BEEP
Only beep sound is played back at the set time.
SOURCE Selectable item Function
iPod
Resume play The track you listened to last time is resumed.
Audio CD/Data CD/
USB
Track The Selected track is played back repeatedly.
Resume play The track you listened to last time is played back.
FM
Preset The selected preset radio station is played.
Resume play The radio station you listened to last time is played.
Alarm setting
1 Press and hold ALARM for more
than 2 seconds.
Alarm indicator ( ) and setting
items flash.
2 Set the alarm time.
Press – / + to set the hour and then
press ENTER.
Set the minutes in the same way.
3 Set the alarm type.
Select from SRC+BEEP, SOURCE
or BEEP. For the details on alarm
type, refer to “Alarm features”
(☞ P. 10).
4 Select the source (as required).
When you select SRC+BEEP or
SOURCE, select source. A source
other than AUX can be selected.
PRESET
ALARM
ENTER
1 2
Press and hold
3
PRESET
ENTER
4
PRESET
ENTER
(As required)

USING ALARM FUNCTION
11 En
English
X Switching the alarm on/off
At the set time, alarm sound plays back. During playback, operations below are available.
If source cannot be played back at the alarm time (ex. iPod is not set), beep sound is played back.
X Using the snooze function
5 Select a track or radio station (as
required).
When the source is CD/USB/FM,
select a track or radio station for
alarm.
y
• To select the last song or radio station you
listened to, select “---”.
• When the iPod is set as source, the track
you listened to last time is resumed.
6 Set the alarm volume.
To have the alarm sound at the last
volume level you used, select “---”.
Once you have set the alarm volume,
the alarm is set and the alarm indicator
( ) lights up.
y
• While setting the alarm, press RETURN to
return to the previous setting.
• To cancel without setting the alarm, press
ALARM before step 6 is completed.
Switch on/off the alarm function.
y
When the alarm is on, the alarm indicator
( ) lights up and alarm time is displayed
for a while.
Operations during playing back alarm sound
Press SNOOZE/SLEEP.
The alarm sound stops and resumes after
5 minutes.
y
• When SRC+BEEP is set, press SNOOZE/
SLEEP to stop the beep sound. press
SNOOZE/SLEEP again to stop the source.
The beep sounds 5 minutes after the source
stopped. The source fades in 1 minute before
the beep sounds.
• When the snooze function is activated, alarm
indicator flashes.
5
PRESET
ENTER
(As required)
6
PRESET
ENTER
ALARM
Note
SNOOZE
SLEEP
/
VOLUME

SHUFFLE/REPEAT PLAYBACK
12 En
X Stopping the alarm
y
• You cannot set SHUFFLE ALBUMS when you use an iPod touch or iPhone.
• When source contains folders, folder shuffle/repeat can be selected.
• For some iPod models, the shuffle and repeat functions may not be displayed or supported.
• When iPod is played back, the setting order of shuffle and repeat depends on the iPod model.
Press ALARM or .
y
• Unless you stop the alarm, the alarm stops
after 60 minutes automatically.
• The alarm function turns off when you stop
the alarm, but settings such as the alarm time
are saved for convenient use next time. To set
the alarm again, press ALARM.
SHUFFLE/REPEAT PLAYBACK
ALARM
Shuffle playback
Press repeatedly
Remote control
CD/USB iPod
SHUFFLE FOLDER
(Shuffle all songs in the
folder)
SHUFFLE ALL
(All shuffle)
SHUFFLE OFF
(Shuffle Off)
SHUFFLE SONGS
(Shuffle songs)
SHUFFLE ALBUMS
(Shuffle albums)
SHUFFLE OFF
(Shuffle Off)
Repeat playback
Remote control
CD/USB iPod
REPEAT ONE
(Single repeat)
REPEAT FOLDER
(Repeat all songs in the
folder)
REPEAT ALL
(All repeat)
REPEAT OFF
(Repeat Off)
REPEAT ONE
(Single repeat)
REPEAT ALL
(All repeat)
REPEAT OFF
(Repeat Off)
Press repeatedly
LISTENING TO EXTERNAL SOURCE
1 Connect your portable audio
device to AUX using a
commercially available 3.5 mm
(1/8 in) mini plug cable.
Turn down the volume of this unit and your
portable audio device before connection.
2 Set SOURCE to AUX.
3 Start playback on the connected
portable audio device.
4
Adjust the volume level of the unit
and the portable audio device.
SOURCE
1 2
Rear Panel
Note

13 En
English
You can set the time to turn off the system automatically.
The option menu appears on the front panel display by pressing OPTION on the remote control. You can set
various useful functions with option menu.
X Setting dimmer/tone
DIMMER: Changes the brightness of the front panel display.
TREBLE*: Adjusts the high frequency response.
BASS*: Adjusts the low frequency response.
* Also effective when you are using headphones.
USING SLEEP FUNCTION
1 Press and hold SNOOZE/
SLEEP for more than 2 seconds.
2 Select the sleep time from 30,
60, 90,120 and SLEEP OFF.
When the time is set, the sleep
function is set to on, and the SLEEP
indicator lights up.
y
To exit without changing the current
setting, press SNOOZE/SLEEP.
USING OPTION MENU
Option menu Parameter or control range Reference page
PRESET DELETE
(Displays only when the input source is set to FM.) 9
DIMMER
DIMMER OFF (brightest)/DIMMER 1/DIMMER 2 (darkest) This page
TREBLE
-10 dB to +10 dB This page
BASS
-10 dB to +10 dB This page
AUTO POWER
OFF
TIME OFF/ TIME 8H/ TIME 4H
AUTO POWER OFF sets the system to system off or power save mode
whenever no operation is performed for a preset amount of time.
This page
1 Press OPTION.
2 Select desired option menu with
S/T.
3 Confirm with ENTER.
4 Change the settings with S/T.
5
Complete the setting with
ENTER
.
To set additional items, repeat steps 2 to 5.
6 Exit option menu with OPTION.
y
To cancel without changing the settings, press
OPTION before step 5 is completed.
SNOOZE
SLEEP
/
VOLUME
Press and hold
PRESET
ENTER
2
1
OPTION
MENU
ENTER
ENTER
1 2
3
Remote control Remote controlRemote control
MENU
ENTER
4 5
6
ENTER
OPTION
Remote control Remote controlRemote control

14 En
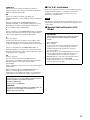
ADDITIONAL INFORMATION
In case of a problem with the unit, check the following list first. If you cannot solve your problem with the
suggested solutions or if your problem is not listed below, turn off and unplug the unit, and consult the nearest
authorized Yamaha dealer or service center.
TROUBLESHOOTING
General
Problem Cause Solution
The speakers make no
sound.
The volume may be set to the minimum level.
Adjust the volume level.
The source may be incorrect. Select the correct source.
Headphones are connected. Remove the headphones.
Sound is cracked/distorted
or there is abnormal noise.
Input source volume is excessive, or
volume of this unit is excessive
(especially Bass).
Adjust volume with VOLUME, or adjust
Bass with the option menu (☞ P. 13).
The unit does not operate
properly.
The unit may have received a strong
electrical shock such as lightning or
excessive static electricity, or power
supply may have dropped.
Set the system to off, and disconnect the
power cable. Wait about 30 seconds,
reconnect the power cable, and turn on the
system.
The system turns on but
immediately shuts off.
A digital or high-frequency
equipment produces noises.
The unit may be placed too close to the
digital or high-frequency equipment.
Place the unit farther away from the
equipment.
The clock setting has been
cleared.
The unit is left more than five minutes
after you disconnect the power cable
from the wall outlet.
Plug the power cable into the wall outlet
firmly, and set the clock again (☞ P. 6).
When it is time for the alarm
to sound, only a beep is
heard; no music is heard.
The alarm source you have selected is
not connected or inserted.
If you have selected iPod or USB, make
sure the device is connected. If you have
selected CD, make sure the CD is inserted.
The alarm type is set to BEEP. Set the alarm type to SRC+BEEP or
SOURCE (☞ P. 10).
Clock flashes and the unit
cannot be operated.
CLOCK on the rear panel is set to SET,
and this unit is in clock setting mode.
Set CLOCK on the rear panel to ON
(☞ P. 6).
The system is suddenly
turned off.
The automatic system off function turned
the unit off.
This unit automatically turns off the system
60 minutes after USB device or CD
playback is stopped.
The sleep (☞ P. 13) may be set.
Turn on the system and play the source again.
The AUTO POWER OFF function is
triggered.
Setting
AUTO POWER OFF
to TIME OFF
enables to play continuously (
☞
P. 13).
Radio reception
Problem Cause Solution
Too much noise during
stereo broadcast.
The antenna may be connected
improperly.
Make sure the antenna is connected
properly (☞ P. 4).
The radio station you selected may be far
from your area, or the radio wave
reception is weak in your area.
Try manual tuning to improve the signal
quality (☞ P. 8) or use a multi-channel
outdoor antenna.
Even with an outdoor antenna,
radio wave reception is weak.
(Sound is distorted.)
Multipath reflection or other radio
interferences may have occurred.
Change the height, direction, or placement
of the antenna.

TROUBLESHOOTING
15 En
English
In case of a transmission error without a status message appearing in the front panel of this unit, check the
connection to your iPod (☞ P. 6).
iPod
Status message Cause Remedy
iPod Connecting
iPod Charging
This unit is in the middle of recognizing
the connection with your iPod.
If the message continues to appear in the
front panel display and playback does not
start, connect the iPod again (☞ P. 6).
Unknown iPod
There is a problem with the signal path
from your iPod to this unit.
Connect the iPod again (☞ P. 6).
The iPod being used is not supported by
this unit.
Only iPod classic, iPod nano (2nd
generation and later), iPod touch and iPhone
are supported.
iPod
This unit has recognized your iPod;
however, it cannot obtain information
such as elapsed time.
iPod Unplugged
Your iPod was removed from the iPod dock. Station your iPod back in the iPod dock (
☞
P. 6).
Over Current
The iPod being used is not supported by
this unit.
Disconnect the iPod and then turn the
system off and on again. Then connect
supported iPod again (☞ P. 18).
The iPod is connected at an angle.
Problem Cause Solution
No sound
The iPod is not set in the iPod dock
firmly.
Set the iPod firmly.
Headphones are connected. Remove the headphones.
The iPod software version has not been
updated.
Download the latest iTunes software to
update the iPod software version to the
latest.
The iPod does not charge up.
The iPod is set in the iPod dock
improperly.
Remove the iPod from the unit, and then set
it in the iPod dock again (☞ P. 6).
The system is set to power save mode
(☞ P. 2).
Set CLOCK to ON on the rear panel to
cancel power save mode (☞ P. 4).
Suddenly the music being
played back is canceled and
another track starts playing
without performing any
operation.
The iPod’s Shake to Shuffle function is
turned on.
Turn off the Shake to Shuffle function in
the iPod’s settings.
Remote control
Problem Cause Solution
The remote control does not
work properly.
The remote control may be operated
outside its operation range.
For information on the remote control
operation range, refer to “Using the remote
control” (☞ P. 5).
The remote control sensor on the unit
may be exposed to direct sunlight or
lighting (inverted fluorescent lamps).
Change the lighting or orientation of the
unit.
The battery may be worn out. Replace the battery with a new one.
There are obstacles between the sensor
of the unit and the remote control.
Remove the obstacles.
Note

TROUBLESHOOTING
16 En
In case of a transmission error without a status message appearing in the front panel of this unit, check the
connection to the USB device (☞ P. 7).
Disc playback
Problem Cause Solution
Disc cannot be inserted.
The system is set to power save mode (
☞
P. 2).
Set CLOCK to ON on the rear panel to
cancel power save mode (☞ P. 4).
Some button operations
do not work.
The disc loaded into the unit may not be
compatible.
Use a disc supported by the unit (☞ P. 17).
Playback does not start
immediately after
pressing .
The disc may be dirty. Wipe the disc clean.
The disc loaded into the unit may not be
compatible.
Use a disc supported by the unit (☞ P. 17).
If the unit was moved from a cold to warm
place, condensation may have formed on the
disc reading lens.
Wait for an hour or two until the unit adjusts
to the room temperature, and try again.
“No Disc” or “Unknown
Disc” is displayed in the
front panel display after
loading a disc.
The disc loaded into the unit may not be
compatible.
Use a disc supported by the unit (☞ P. 17).
The disc may be dirty. Wipe the disc clean.
The disc is loaded back to front. Insert a disc facing the label side to near side.
The disc does not contain playable files. Use a disc contains playable files (☞ P. 17).
An error occurs in the unit. Unload the disc with .
USB device playback
Status message Cause Remedy
USB Unplugged
The USB device is not connected firmly. Connect the USB device again (☞ P. 7).
Unknown USB
The connected USB device is not playable on
this unit.
Connect playable USB device (☞ P. 17).
The file name is too long. The file name should be no more than 250
characters.
Over Current
The USB device is connected at an angle. Disconnect the USB device and then turn the
system off and on again. Then connect
playable USB device again (☞ P. 17).
No Files
The USB device does not contain playable
files.
Use a USB device contains playable files
(☞ P. 17).
An incompatible USB device is connected to
the unit.
Turn off the system and reconnect the USB
device to the unit. If it does not resolve the
problem, the USB device is not playable on
the unit.
USB Time Out
The number of files/folders exceeds the
limit.
Reduce the number of files/folders; refer to
the limitations noted in this manual (☞ P. 17).
Problem Cause Solution
MP3/WMA file in the USB
device does not play.
The USB device is not recognized. Turn off the system and reconnect the USB
device to the unit.
Connect an AC adapter if supplied with the device.
Format the USB device and copy the files again.
If the solutions above do not resolve the problem,
the USB device is not playable on the unit.
Note

17 En
English
This unit is designed for use with audio CD, CD-R
*1
,
and CD-RW
*1
with the logos followings.
*1
ISO 9660
y
This unit can play back discs bearing any of the logo marks
above. A disc logo mark is printed on the disc and the disc
jacket.
• Do not load any other type of disc into this unit. Doing so
may damage this unit.
• CD-R/RW cannot be played back unless finalized.
• Some discs cannot be played back depending on the disc
characteristics or recording conditions.
• Do not use any non-standard shaped discs such as a heart-
shaped disc.
• Do not use discs with many scratches on their surface.
• Do not touch the surface of
the disc. Hold a disc by its
edge (and the center hole).
• Do not use a pencil or
pointed marker to write on
the disc.
• Do not put a tape, seal, glue, etc., on a disc.
• Do not use a protective cover to prevent scratches.
• Do not load more than one disc into this unit at one time.
This can cause damage to both this unit and the discs.
• Do not insert any foreign objects into the disc slot.
• Do not load a cracked, warped, or glued disc.
• Do not expose a disc
to direct sunlight,
high temperature,
high humidity, or a
lot of dust.
• If a disc becomes
dirty, wipe it with a
clean, dry cloth from
the center out to the
edge. Do not use
record cleaner or
paint thinner.
• To avoid
malfunction, do not
use a commercially
available lens
cleaner.
This unit supports USB mass storage class devices
(e.g., flash memories or portable audio players) using
FAT16 or FAT32 format.
• Some devices may not work properly even if they meet the
requirements.
• Do not connect devices other than USB mass storage class
devices (such as USB chargers or USB hubs), PCs, card
readers, an external HDD, etc.
• Yamaha will not be held responsible for any damage to or
data loss on the USB device occurring while the device is
connected to this unit.
• Playability of and power supply to all kind of USB devices
are not guaranteed.
• USB devices that use encryption cannot be used.
• The unit can play back:
*2
Both constant and variable bitrates are supported.
• The maximum numbers of files/folders that can be
displayed on the unit are as follows.
*3
The root is counted as one of the folders.
• Copyright-protected files cannot be played back.
NOTES ON DISCS AND USB DEVICES
Disc information
Handling a disc
Notes
Caution
USB device information
About MP3 or WMA files
File Bitrate (kbps)
Sampling
frequency (kHz)
MP3
8 - 320
*2
16 - 48
WMA
16 - 320
*2
22.05 - 48
Data CD USB
Maximum total number of file
*3
512 9999
Maximum folder number
*3
255 999
Maximum file number per folder
511 255
Notes
Notes

18 En
X PLAYER SECTION
iPod (Digital connection)
• Made for ......iPod touch (1st, 2nd, 3rd, and 4th generation)
iPod classic
iPod nano (2nd, 3rd, 4th, 5th, and 6th generation)
iPhone 4
iPhone 3GS
iPhone 3G
iPhone
CD
• Media........................................................... CD, CD-R/RW
• Audio format ................................. Audio CD, MP3, WMA
Laser
• Type.............................Semiconductor laser GaAs/GaAlAs
• Wave length .............................................................790 nm
• Output Power .............................................................7 mW
USB
• Audio format ....................................................MP3, WMA
AUX
• Input connector........... 3.5 mm (1/8 in) STEREO mini Jack
X AMPLIFIER SECTION
• Maximum output power .................................15 W + 15 W
(6 Ω 1 kHz, 10% THD)
• Headphones ............................3.5 mm STEREO mini Jack
(Adaptive Impedance 16 to 32 Ω)
X TUNER SECTION
• Tuning range
FM .................................................. 87.50 to 108.00 MHz
X GENERAL
• Power Supply............................................AC 230 V, 50 Hz
• Power consumption ..................................................... 23 W
• System off consumption............................................. 2.7 W
• Power save consumption ............................................0.2 W
• Dimensions (W × H × D) ... W457 × H180.5 × D173.5 mm
(18 × 7 1/8 × 6 7/8 in)
• Weight ...................................................... 5.1 kg (11.2 lbs.)
Specifications are subject to change without notice.
LASER SAFETY
This unit employs a laser. Due to possible eye injury, only a
qualified service person should remove the cover or attempt
to service this device.
DANGER
This unit emits visible laser radiation when open. Avoid
direct eye exposure to beam. When this unit is plugged into
the wall outlet, do not place your eyes close to the opening of
the disc tray and other openings to look into inside.
iPod, iPhone
“Made for iPod,” and “Made for iPhone” mean that an
electronic accessory has been designed to connect
specifically to iPod, or iPhone, respectively, and has been
certified by the developer to meet Apple performance
standards.
Apple is not responsible for the operation of this device or its
compliance with safety and regulatory standards.
Please note that the use of this accessory with iPod or iPhone
may affect wireless performance.
iPhone, iPod, iPod classic, iPod nano, iPod shuffle, and iPod
touch are trademarks of Apple Inc., registered in the U.S. and
other countries.
BATTERY CAUTIONS
• If the battery grows old, the effective operation range of the
remote control decreases considerably. If this happens,
replace the battery with new one as soon as possible.
• Exhausted battery may leak. If the battery have leaked,
dispose of it immediately. Avoid touching the leaked
material or letting it come into contact with clothing, etc.
Clean the battery compartment thoroughly before installing
a new battery.
• Keep the battery away from children. If the battery is
accidentally swallowed, contact your doctor immediately.
• When not planning to use the remote control for long
periods of time, remove the battery from the remote
control.
• Do not charge or disassemble the supplied battery.
SPECIFICATIONS
The laser component in this product is capable of
emitting radiation exceeding the limit for Class 1.
Strona się ładuje...
Strona się ładuje...
Strona się ładuje...
Strona się ładuje...
Strona się ładuje...
Strona się ładuje...
Strona się ładuje...
Strona się ładuje...
Strona się ładuje...
Strona się ładuje...
Strona się ładuje...
Strona się ładuje...
Strona się ładuje...
Strona się ładuje...
Strona się ładuje...
Strona się ładuje...
Strona się ładuje...
Strona się ładuje...
Strona się ładuje...
Strona się ładuje...
Strona się ładuje...
Strona się ładuje...
Strona się ładuje...
Strona się ładuje...
Strona się ładuje...
Strona się ładuje...
Strona się ładuje...
Strona się ładuje...
Strona się ładuje...
Strona się ładuje...
Strona się ładuje...
Strona się ładuje...
Strona się ładuje...
Strona się ładuje...
Strona się ładuje...
Strona się ładuje...
Strona się ładuje...
Strona się ładuje...
Strona się ładuje...
Strona się ładuje...
Strona się ładuje...
Strona się ładuje...
Strona się ładuje...
Strona się ładuje...
Strona się ładuje...
Strona się ładuje...
Strona się ładuje...
Strona się ładuje...
Strona się ładuje...
Strona się ładuje...
Strona się ładuje...
Strona się ładuje...
Strona się ładuje...
Strona się ładuje...
Strona się ładuje...
Strona się ładuje...
Strona się ładuje...
Strona się ładuje...
Strona się ładuje...
Strona się ładuje...
Strona się ładuje...
Strona się ładuje...
Strona się ładuje...
Strona się ładuje...
Strona się ładuje...
Strona się ładuje...
Strona się ładuje...
Strona się ładuje...
Strona się ładuje...
Strona się ładuje...
Strona się ładuje...
Strona się ładuje...
Strona się ładuje...
Strona się ładuje...
Strona się ładuje...
Strona się ładuje...
Strona się ładuje...
Strona się ładuje...
Strona się ładuje...
Strona się ładuje...
Strona się ładuje...
Strona się ładuje...
Strona się ładuje...
Strona się ładuje...
Strona się ładuje...
Strona się ładuje...
Strona się ładuje...
Strona się ładuje...
Strona się ładuje...
Strona się ładuje...
Strona się ładuje...
Strona się ładuje...
Strona się ładuje...
Strona się ładuje...
Strona się ładuje...
Strona się ładuje...
Strona się ładuje...
Strona się ładuje...
Strona się ładuje...
Strona się ładuje...
Strona się ładuje...
Strona się ładuje...
Strona się ładuje...
Strona się ładuje...
Strona się ładuje...
Strona się ładuje...
Strona się ładuje...
Strona się ładuje...
Strona się ładuje...
Strona się ładuje...
Strona się ładuje...
Strona się ładuje...
Strona się ładuje...
Strona się ładuje...
Strona się ładuje...
Strona się ładuje...
Strona się ładuje...
Strona się ładuje...
Strona się ładuje...
Strona się ładuje...
Strona się ładuje...
Strona się ładuje...
Strona się ładuje...
Strona się ładuje...
Strona się ładuje...
Strona się ładuje...
Strona się ładuje...
Strona się ładuje...
Strona się ładuje...
Strona się ładuje...
Strona się ładuje...
Strona się ładuje...
Strona się ładuje...
Strona się ładuje...
Strona się ładuje...
Strona się ładuje...
Strona się ładuje...
Strona się ładuje...
Strona się ładuje...
Strona się ładuje...
Strona się ładuje...
Strona się ładuje...
Strona się ładuje...
Strona się ładuje...
-
 1
1
-
 2
2
-
 3
3
-
 4
4
-
 5
5
-
 6
6
-
 7
7
-
 8
8
-
 9
9
-
 10
10
-
 11
11
-
 12
12
-
 13
13
-
 14
14
-
 15
15
-
 16
16
-
 17
17
-
 18
18
-
 19
19
-
 20
20
-
 21
21
-
 22
22
-
 23
23
-
 24
24
-
 25
25
-
 26
26
-
 27
27
-
 28
28
-
 29
29
-
 30
30
-
 31
31
-
 32
32
-
 33
33
-
 34
34
-
 35
35
-
 36
36
-
 37
37
-
 38
38
-
 39
39
-
 40
40
-
 41
41
-
 42
42
-
 43
43
-
 44
44
-
 45
45
-
 46
46
-
 47
47
-
 48
48
-
 49
49
-
 50
50
-
 51
51
-
 52
52
-
 53
53
-
 54
54
-
 55
55
-
 56
56
-
 57
57
-
 58
58
-
 59
59
-
 60
60
-
 61
61
-
 62
62
-
 63
63
-
 64
64
-
 65
65
-
 66
66
-
 67
67
-
 68
68
-
 69
69
-
 70
70
-
 71
71
-
 72
72
-
 73
73
-
 74
74
-
 75
75
-
 76
76
-
 77
77
-
 78
78
-
 79
79
-
 80
80
-
 81
81
-
 82
82
-
 83
83
-
 84
84
-
 85
85
-
 86
86
-
 87
87
-
 88
88
-
 89
89
-
 90
90
-
 91
91
-
 92
92
-
 93
93
-
 94
94
-
 95
95
-
 96
96
-
 97
97
-
 98
98
-
 99
99
-
 100
100
-
 101
101
-
 102
102
-
 103
103
-
 104
104
-
 105
105
-
 106
106
-
 107
107
-
 108
108
-
 109
109
-
 110
110
-
 111
111
-
 112
112
-
 113
113
-
 114
114
-
 115
115
-
 116
116
-
 117
117
-
 118
118
-
 119
119
-
 120
120
-
 121
121
-
 122
122
-
 123
123
-
 124
124
-
 125
125
-
 126
126
-
 127
127
-
 128
128
-
 129
129
-
 130
130
-
 131
131
-
 132
132
-
 133
133
-
 134
134
-
 135
135
-
 136
136
-
 137
137
-
 138
138
-
 139
139
-
 140
140
-
 141
141
-
 142
142
-
 143
143
-
 144
144
-
 145
145
-
 146
146
-
 147
147
-
 148
148
-
 149
149
-
 150
150
-
 151
151
-
 152
152
-
 153
153
-
 154
154
-
 155
155
-
 156
156
-
 157
157
-
 158
158
-
 159
159
-
 160
160
-
 161
161
-
 162
162
-
 163
163
-
 164
164


Yamaha TSX-112 Instrukcja obsługi
- Kategoria
- Odtwarzacze CD
- Typ
- Instrukcja obsługi
w innych językach
- čeština: Yamaha TSX-112 Návod k obsluze
- español: Yamaha TSX-112 El manual del propietario
- italiano: Yamaha TSX-112 Manuale del proprietario
- Deutsch: Yamaha TSX-112 Bedienungsanleitung
- svenska: Yamaha TSX-112 Bruksanvisning
- français: Yamaha TSX-112 Le manuel du propriétaire
- Türkçe: Yamaha TSX-112 El kitabı
- English: Yamaha TSX-112 Owner's manual
- dansk: Yamaha TSX-112 Brugervejledning
- русский: Yamaha TSX-112 Инструкция по применению
- suomi: Yamaha TSX-112 Omistajan opas
- Nederlands: Yamaha TSX-112 de handleiding
- română: Yamaha TSX-112 Manualul proprietarului
Powiązane artykuły
Inne dokumenty
-
Sony MHC-EC719IP Instrukcja obsługi
-
 argon audio Stream 2 Instrukcja obsługi
-
Sony MHC-EC619iP Instrukcja obsługi
-
Hyundai MS 908 DUIP3 Instrukcja obsługi
-
Panasonic mw 10 Instrukcja obsługi
-
-
AudioSonic CL-1460 Instrukcja obsługi
-
Trust 15134 Karta katalogowa
-
Philips SJM3141 Instrukcja obsługi
-
Braun Photo Technik 60022 Karta katalogowa
