Yard Force CloudHawk App Instrukcja obsługi
- Typ
- Instrukcja obsługi

CLOUDHAWK

2
GB Read this manual carefully prior to operating the
robotic lawnmower. Keep this manual in a safe
place and have it ready for future reference.

3
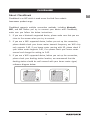
About CloudHawk
CloudHawk is an APP which is used across the Yard Force robotic
lawnmower product range.
CloudHawk supports multiple connection methods, including bluetooth,
WIFI, and 4G. Before you try to connect your device with CloudHawk,
make sure you follow the below instructions:
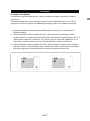
1. If you use a bluetooth supported device, please make sure that you are
close to the mower when you try to connect.
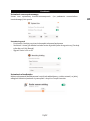
2. If you use a WiFi supported device, before you set up the connection,
please double check your house router transmit frequency, our WiFi chip
only supports 2.4G, if you house router running with 5G, please check if
your house router supports 2.4G, if so please check your house router
manual and change the setting to 2.4G.
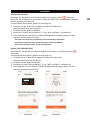
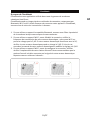
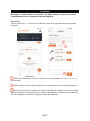
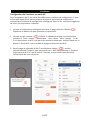
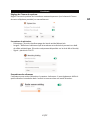
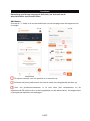
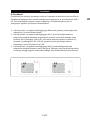
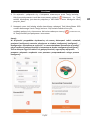
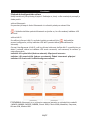
3. If you use a WiFi supported device, before you set up the connection,
please check your docking station location, we recommend that the
docking station should be well covered with your house router signal,
reference diagram below:
CLOUDHAWK
GB

4
CLOUDHAWK
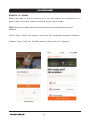
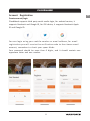
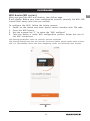
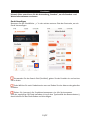
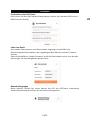
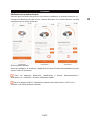
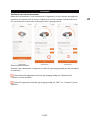
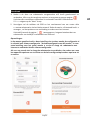
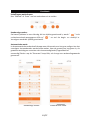
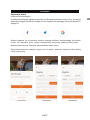
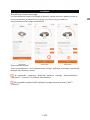
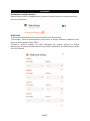
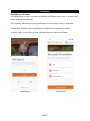
Explore as Guest
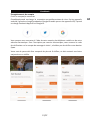
Before you sign in to your account, you can also explore our application as a
guest, there are three options available within guest mode:
FAQ: Select the model you purchased and view the related questions and
answers.
Online store: Select the country and view the connected products available.
Product video: Find the YouTube tuition video from this segment.

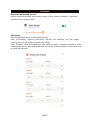
5
CLOUDHAWK
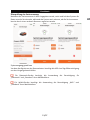
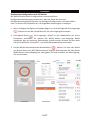
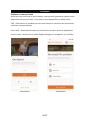
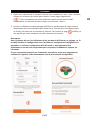
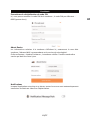
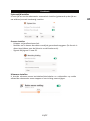
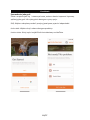
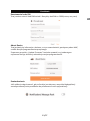
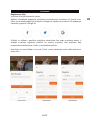
You can login using your mobile number or email address, for email
registration you will receive the verification code to the chosen email
account, remember to check your spam folder.
Your password should be more than 6 digits, and it should contain one
Account Registration
Create account/login
CloudHawk supports third party social media login, for android version, it
supports Facebook and Google ID, for iOS device, it supports Facebook Apple
ID and Google ID.
uppercase letter and one number.
GB

6
CLOUDHAWK
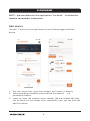
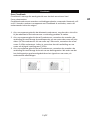
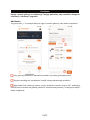
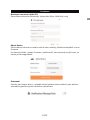
NOTE: please au thorize th e applicat ion "location" , to a ll ow the
location and weather information.
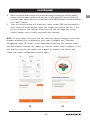
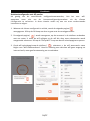
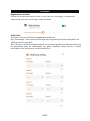
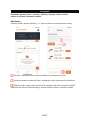
Add device
Use the”+” button at the right lower corner of homepage to add the
device.
1. Use the search box, input the product and search it directly.
2. Select according to product series and find the name of the
purchased product.
3. Input (or scan) the product series number (SN and related QR code
can be found on the mower main nameplate), then you can find and
add the device.

7
CLOUDHAWK
GB
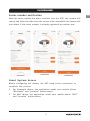
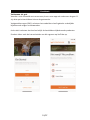
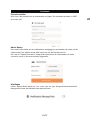
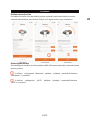
Series number verification
After the series number has been installed into the APP, the system will
search and fetch the data from the service side, meanwhile the system will
also detect if the series number is already registered by another user.
Grant System Access
Before configuring the mower, the APP need access permission to
complete the process.
1. For bluetooth device, the application needs your mobile phone
“Bluetooth” and “Location” authorization.
2. For WiFi device, the application needs your mobile phone “WiFi”
and “Location” authorization.

8
CLOUDHAWK
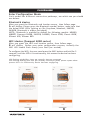
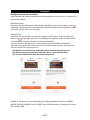
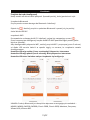
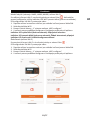
Enter Configuration Mode
Each model has different connection pathways, see which one you should
use below:
Bluetooth device
After you grant the Bluetooth and location access, then follow page:
Awill display. Please press the Bluetooth symbol button, make sure that
the below BLUE LEDis lighting on (for Easymow, Mowbest, SA650B,
SA900B, Bluetooth is always activated).
NOTE Bluetooth is enabled by default for following models: MB400,
MB800, Compact 300RB, SA650B, SA900B, Classic 500B, Classic 600B,
XPower 400, XPower 800.
WiFi device (Compact 400R series)
After you grant the WiFi and location access, then follow page:
Bwill display. Before your enter configuration process, normally the
WiFi LED should flash slowly (one flash per second).
To configure the WiFi, the user need press the WiFi button and hold for 5
seconds, until the LED is lit continuously, this means the device has been
configuring.
LED flashing quickly(four times per second): Internet connected.
LED flashing slowing (one time per second): Connection failed, please repeat above
process LED is lit continuously: Device has been configuring.
AB

9
CLOUDHAWK
GB
WiFi device(NX series)
After you grant the WiFi and location, then follow page:
Cwill display. Before your enter configuration process, normally the WiFi LED
should flash slowly (one time per second).
To configure the WiFi, follow the below process:
1. Power on the device and enter device control interface with PIN code.
2. Press the WiFi button.
3. Use the numeral key “1” to select the “WiFi configure”.
4. Then the device is under WiFi configuration process, follow the rest of
the APP instructions.
LED flashing quickly(four times per second): Internet connected.
LED flashing slowing (one time per second): Connection failed, please repeat above process.
LED is lit continuously: Device has been configuring mode, not connected with internet.
C

10
CLOUDHAWK
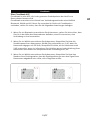
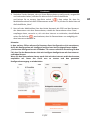
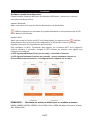
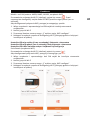
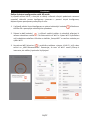
Assistant configuration with AP mode
For WiFi devices, due to the different configuration conditions, sometimes the
device may fail to complete the internet configuration process within smart
configure, for this situation we suggest to follow our below instructions:
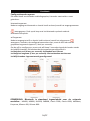
1. When the smart configure has failed, the upcmoing page will show up (D),
click OK button to proceed on the follow process.
2. The following page (E) will display, currently the mobile phone is connected
to your house router, you need change the WiFi and select the WiFi which
created by our robotic mower, please click “Setup WiFi” button to enter the
WiFi select page.
3. In the mobile phone WiFi Selection page (F), please select the WiFi whose
name is start with “WIFI-SNxxxxxxxxxxx”, please kind in mind that this
WiFi does not have internet access but please give the authorization to
connect.
D E F

11
CLOUDHAWK
GB
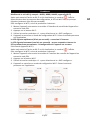
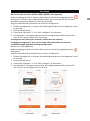
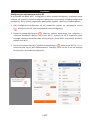
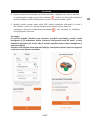
4. After you select and connect to the hotspot which created by robotic mower,
please click the return button and back to our APP page (G), you will find that
currently your mobile phone is connected to WIFISNxxxxxxxxxx, and then please
click "Next" button.
5. Then the mobile phone will share your house router SSID and password to
your mower by local network, once the mower can receive this file, it will
try to connect to the internet, finally you will see the page (H), means
robotic mower now is finally connected with internet.
NOTE: in most cases, the users will not need any further setting as you have
already completed the configuration with smart configure and "Assistant
configuration with AP mode" is our additional setting for the situation when
you are failed to connect the mower to internet within smart configure. If you
still failed to connect the mower, we suggest to repower the device and
repeat the whole configuration process again.
G H

12
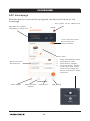
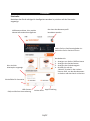
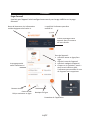
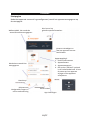
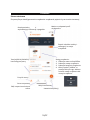
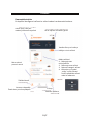
APP Homepage
After the device is successfully configured, the device will show on t he
homepage.
CLOUDHAWK
Welcome bar, weather
information is listed here
User profile can be edited here
I n vi t e a n d s h a r e y o u r
device with your
fa m ily numbers
Wo r k s c h e d u l e
will show here
Home button FAQ and online
support
Online store APP setting
Device area:
1. Show online/offline status
2. Show device name
3. Show device category
4. Click the “pencil” symbol
at the right lower corner,
the user can change the
device nickname or delete
the device.

13
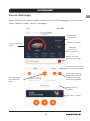
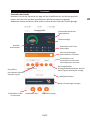
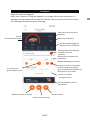
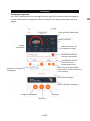
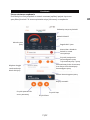
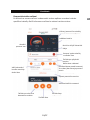
Device Mainpage
After clicking the robot mower photo on the APP homepage, the user can
enter robotic mower device mainpage.
CLOUDHAWK
GB
Current working
status
Mower total
working time
Battery indicator
Today and
tomorrow
climate data
Mower real time
operating message
Schedule switch button
Auto and manual mode
the orange coloured
background indicates
a selected working
day cutting schedule
The highlighted
circle indicates
today
Modify working
schedule
View more settings

14
CLOUDHAWK
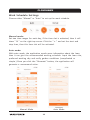
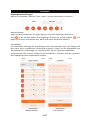
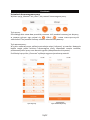
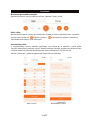
Work Schedule Settings
Choose either "Manual" or "Auto" to set up the work schedule.
Manual mode:
Set two time ranges for each day, if the time slot is activated, then it will
show " X" on the right top corner. Click the " +" and set the start and
stop time, then this time slot will be activated.
Auto mode:
With auto mode, the application needs more information about the lawn,
then it can give the recommended working schedule. Input the lawn size,
preferred working day and verify garden conditions (complicated or
simple.) Once you click the “Generate” button, the application will
generate a recommend value.
Manual Mode Auto Mode

15
CLOUDHAWK
GB
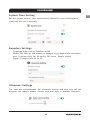
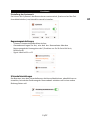
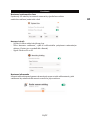
System Time Setting
Set the mower system time automatically (based on your mobilephone
time) and also set it manually
Boundary Settings
- Trimming: edge cutting function on/off
- Width: Set how far the mower is allowed to go beyond the perimeter
wire. (Function only for SA series, NX series, Revola series)
- Signal: Change from S1 to S2
Ultrasonic Settings
The user can active/disable the ultrasonic sensor and also c an set the
distance the robotic mower should stop and turn in another direction.

16
CLOUDHAWK
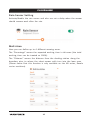
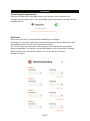
Rain Sensor Setting
Activate/disable the rain sensor and also can set a delay when the mower
should resume work after the rain.
Multi-Area
Here you can define up to 4 different mowing areas.
The “Percentage” means the expected working time in this area (the total
working time can be treated as 100%).
The “Distance” means the distance from the docking station along the
boundary wire, to where the robot mower with turn into the lawn area.
(Please notice that this function is only available on the NX series, Revola
series machines).

17
CLOUDHAWK
PIN Code Reset Setting
Here you ca n change the mower PIN code, the default PIN code is: 0000
(four times zero)
About Device
Mower information will show here, including the mower name, related
MAC address and also the firmware version.
Via the “Update Firmware” button, the mower will check if there is a latest
version which need be upgraded.
Notifications
When active, if the APP crashes all APP errors, are automatically
forwarded to the manufacturer for optimization purposes.
GB

Lesen Sie diese Anleitung sorgfältig durch, bevor Sie den Rasenroboter in
Betrieb nehmen. Bewahren Sie diese Anleitung an einem sicheren Ort auf
und halten Sie sie für künftiges Nachschlagen bereit.
DE
18/97

DE
CloudHawk
Über CloudHawk APP
CloudHawk ist eine APP, die in der gesamten Produktpalette der Yard Force
Rasenroboter benutzt wird.
CloudHawk unterstützt eine Vielzahl von Verbindungsmethoden einschließlich
Bluetooth, WLAN und 4G. Bevor Sie versuchen Ihr Gerät mit CloudHawk zu
verbinden, stellen Sie sicher, dass Sie die folgenden Anweisungen befolgen:
1. Wenn Sie ein Bluetooth-unterstütztes Gerät benutzen, stellen Sie bitte sicher, dass
Sie sich in der Nähe des Rasenroboters befinden, wenn Sie versuchen, eine
Verbindung zu ihm herzustellen.
2. Wenn Sie ein WLAN-unterstütztes Gerät benutzen, überprüfen Sie bitte die
Sendefrequenz Ihres Hausrouters; WLAN-Chip unterstützt nur 2,4G, wenn Ihr
Hausrouter dagegen mit 5G läuft, überprüfen Sie bitte, ob Ihr Hausrouter auch
2,4G unterstützt, wenn ja, informieren Sie sich bitte genau in der Anleitung Ihres
Hausrouters und ändern Sie entsprechend die Einstellung auf 2,4G.
3. Wenn Sie ein WLAN-unterstütztes Gerät benutzen, überprüfen Sie bitte den
Standort Ihrer Dockingstation, dass die Dockingstation gut von dem Signal Ihres
Hausrouters abgedeckt sein sollte, siehe Diagramm unten:
19/97

CloudHawk
Als Gast erkunden
Bevor Sie sich bei Ihrem Konto anmelden, können Sie unsere Anwendung auch als Gast
erkunden, hierzu stehen Ihnen im Gastmodus drei Optionen zur Verfügung:
Häufig gestellte Fragen (FAQs): Wählen Sie das Modell, das Sie gekauft haben und sehen
Sie sich die zugehörigen Fragen und Antworten an.
Online Shop: Wählen Sie ein Land aus und sehen Sie sich die verfügbaren Produkte an.
Produkt Video: Finden Sie in das entsprechende YouTube-Lehrvideo in diesem Bereich.
20/97
Strona się ładuje...
Strona się ładuje...
Strona się ładuje...
Strona się ładuje...
Strona się ładuje...
Strona się ładuje...
Strona się ładuje...
Strona się ładuje...
Strona się ładuje...
Strona się ładuje...
Strona się ładuje...
Strona się ładuje...
Strona się ładuje...
Strona się ładuje...
Strona się ładuje...
Strona się ładuje...
Strona się ładuje...
Strona się ładuje...
Strona się ładuje...
Strona się ładuje...
Strona się ładuje...
Strona się ładuje...
Strona się ładuje...
Strona się ładuje...
Strona się ładuje...
Strona się ładuje...
Strona się ładuje...
Strona się ładuje...
Strona się ładuje...
Strona się ładuje...
Strona się ładuje...
Strona się ładuje...
Strona się ładuje...
Strona się ładuje...
Strona się ładuje...
Strona się ładuje...
Strona się ładuje...
Strona się ładuje...
Strona się ładuje...
Strona się ładuje...
Strona się ładuje...
Strona się ładuje...
Strona się ładuje...
Strona się ładuje...
Strona się ładuje...
Strona się ładuje...
Strona się ładuje...
Strona się ładuje...
Strona się ładuje...
Strona się ładuje...
Strona się ładuje...
Strona się ładuje...
Strona się ładuje...
Strona się ładuje...
Strona się ładuje...
Strona się ładuje...
Strona się ładuje...
Strona się ładuje...
Strona się ładuje...
Strona się ładuje...
Strona się ładuje...
Strona się ładuje...
Strona się ładuje...
Strona się ładuje...
Strona się ładuje...
Strona się ładuje...
Strona się ładuje...
Strona się ładuje...
Strona się ładuje...
Strona się ładuje...
Strona się ładuje...
Strona się ładuje...
Strona się ładuje...
Strona się ładuje...
Strona się ładuje...
Strona się ładuje...
Strona się ładuje...
-
 1
1
-
 2
2
-
 3
3
-
 4
4
-
 5
5
-
 6
6
-
 7
7
-
 8
8
-
 9
9
-
 10
10
-
 11
11
-
 12
12
-
 13
13
-
 14
14
-
 15
15
-
 16
16
-
 17
17
-
 18
18
-
 19
19
-
 20
20
-
 21
21
-
 22
22
-
 23
23
-
 24
24
-
 25
25
-
 26
26
-
 27
27
-
 28
28
-
 29
29
-
 30
30
-
 31
31
-
 32
32
-
 33
33
-
 34
34
-
 35
35
-
 36
36
-
 37
37
-
 38
38
-
 39
39
-
 40
40
-
 41
41
-
 42
42
-
 43
43
-
 44
44
-
 45
45
-
 46
46
-
 47
47
-
 48
48
-
 49
49
-
 50
50
-
 51
51
-
 52
52
-
 53
53
-
 54
54
-
 55
55
-
 56
56
-
 57
57
-
 58
58
-
 59
59
-
 60
60
-
 61
61
-
 62
62
-
 63
63
-
 64
64
-
 65
65
-
 66
66
-
 67
67
-
 68
68
-
 69
69
-
 70
70
-
 71
71
-
 72
72
-
 73
73
-
 74
74
-
 75
75
-
 76
76
-
 77
77
-
 78
78
-
 79
79
-
 80
80
-
 81
81
-
 82
82
-
 83
83
-
 84
84
-
 85
85
-
 86
86
-
 87
87
-
 88
88
-
 89
89
-
 90
90
-
 91
91
-
 92
92
-
 93
93
-
 94
94
-
 95
95
-
 96
96
-
 97
97


Yard Force CloudHawk App Instrukcja obsługi
- Typ
- Instrukcja obsługi
w innych językach
- Deutsch: Yard Force CloudHawk App Benutzerhandbuch
- slovenčina: Yard Force CloudHawk App Používateľská príručka
- français: Yard Force CloudHawk App Manuel utilisateur
- Nederlands: Yard Force CloudHawk App Handleiding