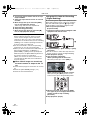
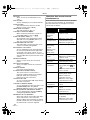
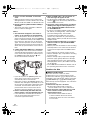
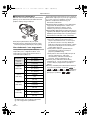
Panasonic nv-gs500 Instrukcja obsługi
- Kategoria
- Kamery
- Typ
- Instrukcja obsługi
Ten podręcznik jest również odpowiedni dla

EP
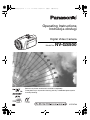
Operating Instructions
Instrukcja obsługi
Digital Video Camera
Model No. NV-GS500
Before use, please read these instructions completely.
Przed pierwszym włączeniem kamery prosimy o dokładne przeczytanie
instrukcji obsługi.
VQT0T39
VQT0T39_EP_eng.book 1 ページ 2005年12月26日 月曜日 午後8時7分

2
VQT0T39
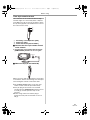
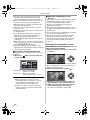
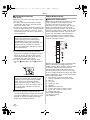
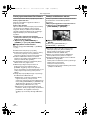
Information for your safety
ª Carefully read the Operating
Instructions and use the Movie
Camera correctly
≥Injury or material damage resulting from any
kind of use that is not in accordance with the
operating procedures explained in these
Operating Instructions are the sole
responsibility of the user.
Try out the Movie Camera.
Be sure to try out the Movie Camera before
recording your first important event and check
that it records properly and functions correctly.
The manufacturer is not liable for loss of
recorded contents.
The manufacturer shall in no event be liable for
the loss of recordings due to malfunction or defect
of this Movie Camera, its accessories or
cassettes.
Carefully observe copyright laws.
Recording of pre-recorded tapes or discs or other
published or broadcast material for purposes
other than your own private use may infringe
copyright laws. Even for the purpose of private
use, recording of certain material may be
restricted.
≥The Movie Camera uses copyright-protected
technologies and is protected by the patented
technologies and intellectual properties of
Japan and the U.S. To use these copyright-
protected technologies, authorization of the
Macrovision Company is required. It is
prohibited to disassemble or modify the Movie
Camera.
≥SD Logo is a trademark.
≥Leica is a registered trademark of Leica
Microsystems IR GmbH and Dicomar is a
registered trademark of Leica Camera AG.
≥All other company and product names in the
operating instructions are trademarks or
registered trademarks of their respective
corporations.
Files recorded on SD Memory Card
It may not be possible to play back the files on
this Movie Camera recorded on and created by
other equipment or vice versa. For this reason,
check the compatibility of the equipment in
advance.
≥Keep the Memory Card out of reach of children
to prevent swallowing.
Pages for reference
Pages for reference are indicated by dashes
either side of a number, for example:
-00-
The menu operation flow is indicated by >> in the
description.
ª Warning
To prevent electric shock, do not remove the
cover (or back); there are no user serviceable
parts inside.
Refer servicing to qualified service personnel.
ª EMC Electric and magnetic
compatibility
This symbol (CE) is located on the rating
plate.
Use only the recommended accessories.
≥Do not use any other Multi cables and USB
cables except the supplied one.
≥When you use the cable which are sold
separately, please make sure to use the one
whose length is less than 3 metres.
As this equipment gets hot during use,
operate it in a well-ventilated place; do
not install this equipment in a confined
space such as a bookcase or similar unit.
To reduce the risk of fire, electric shock
or product damage, do not expose this
equipment to rain, moisture, dripping or
splashing and ensure that no objects
filled with liquids, such as vases, shall be
placed on the equipment.
AC Adaptor
≥The rating plate is on the underside of
the AC Adaptor.
VQT0T39_EP_eng.book 2 ページ 2005年12月26日 月曜日 午後8時7分

3
VQT0T39
Information on Disposal for Users of
Waste Electrical & Electronic Equipment
(private households)
This symbol on the
products and/or
accompanying
documents means
that used electrical
and electronic
products should not
be mixed with
general household
waste.
For proper
treatment, recovery
and recycling, please take these products to
designated collection points, where they will
be accepted on a free of charge basis.
Alternatively, in some countries you may be
able to return your products to your local
retailer upon the purchase of an equivalent
new product.
Disposing of this product correctly will help to
save valuable resources and prevent any
potential negative effects on human health
and the environment which could otherwise
arise from inappropriate waste handling.
Please contact your local authority for further
details of your nearest designated collection
point.
Penalties may be applicable for incorrect
disposal of this waste, in accordance with
national legislation.
For business users in the European
Union
If you wish to discard electrical and
electronic equipment, please contact your
dealer or supplier for further information.
Information on Disposal in other
Countries outside the European Union
This symbol is only valid in the European
Union.
If you wish to discard this product, please
contact your local authorities or dealer and
ask for the correct method of disposal.
ENGLISH
VQT0T39_EP_eng.book 3 ページ 2005年12月26日 月曜日 午後8時7分

4
VQT0T39
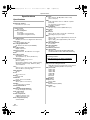
Contents
Information for your safety ................................... 2
Before using
Accessories.......................................................... 5
Optional................................................................ 5
Parts identification and handling .......................... 5
Fitting the lens cap............................................... 8
The one-touch free-style grip belt ........................ 8
Power supply ....................................................... 9
Charging time and recordable time .................... 10
Turning the movie camera on ............................ 10
Setting date and time ......................................... 11
Using the LCD monitor....................................... 12
Using the viewfinder........................................... 12
Quick Start ......................................................... 13
Inserting/removing a cassette ............................ 14
Inserting/removing a card .................................. 15
Selecting a mode ............................................... 16
How to use the joystick ...................................... 16
Help mode.......................................................... 18
Switching the language...................................... 18
Using the menu screen ...................................... 18
Adjusting LCD monitor/viewfinder...................... 20
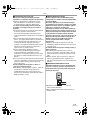
Using the remote control.................................... 21
Free style remote control ................................... 23
Record mode
Check before recording...................................... 24
Recording on a tape........................................... 25
Recording check ................................................ 26
Blank search function......................................... 26
Recording still pictures on a card
while recording image onto a tape .................. 26
Recording still pictures onto a card
(Photoshot)...................................................... 27
Zoom in/out function .......................................... 29
Recording yourself ............................................. 30
Backlight compensation function ....................... 30
Colour night view functions ................................ 30
Soft skin mode ................................................... 31
Tele macro function ........................................... 31
Fade in/fade out function ................................... 31
Wind noise reduction function............................ 32
Adjusting the Microphone Sensitivity Level........ 32
Anti-Ground-Shooting (AGS) ............................. 33
Using the built-in video flash .............................. 33
Self-timer recording............................................ 35
Wide/Pro-Cinema Function ................................ 35
Image stabilizer function .................................... 36
Continuous Photoshot........................................ 36
Recording in various situations
(Scene mode).................................................. 37
Recording in natural colours
(White balance) ............................................... 38
Manual focus adjustment ................................... 39
Manual shutter speed/aperture adjustment........ 39
Playback mode
Playing back tape............................................... 41
Slow-motion playback/
frame-by-frame playback................................. 42
Variable-speed search function.......................... 42
Playback on TV .................................................. 43
Playing back card............................................... 43
Deleting files recorded on a card ....................... 44
Formatting a card............................................... 45
Protecting files on a card.................................... 46
Writing the printing data on a card
(DPOF setting) ................................................ 46
Edit mode
Recording from a tape onto a card..................... 47
Copying onto a DVD recorder or a VCR
(Dubbing)......................................................... 47
Using the DV Cable for Recording
(Digital Dubbing)............................................. 48
Audio dubbing .................................................... 49
Printing pictures by directly connecting
to the printer (PictBridge) ................................ 50
Menu
Menu list............................................................. 52
Menus related to recording ................................ 54
Menus related to playback ................................. 55
Other menus ...................................................... 55
Others
Indications.......................................................... 56
Warning/alarm indications.................................. 57
Functions that cannot be used
simultaneously................................................. 58
Before requesting repair
(Problems and solutions)................................. 59
Cautions for Use ................................................ 62
Explanation of terms .......................................... 66
Specifications
Specifications..................................................... 68
VQT0T39_EP_eng.book 4 ページ 2005年12月26日 月曜日 午後8時7分

Before using
5
VQT0T39
Before using
Accessories
The followings are the accessories supplied with
this product.
1) AC adaptor, DC input lead, AC mains lead
-9-
2) Battery pack -9-
3) Remote control, button-type battery -21-
4) Free style remote control -23-
5) Lens cap -8-
6) Multi cable -47-
7) Shoulder strap -7-
8) USB cable and CD-ROM -50-
Optional
1) AC adaptor (VW-AD11E)
2) Battery pack (lithium/CGR-DU06/640mAh)
3) Battery pack (lithium/CGA-DU07/680mAh)
4) Battery pack (lithium/CGA-DU12/1150mAh)
5) Battery pack (lithium/CGA-DU14/1360mAh)
6) Battery pack (lithium/CGA-DU21/2040mAh)
7) Wide conversion lens (VW-LW4307ME)
8) Tele conversion lens (VW-LT4314NE)
9) Filter kit (VW-LF43WE)
10) Video DC light (VW-LDC10E)
11) Video DC light (VW-LDH3E)
12) Light bulb for video DC light (VZ-LL10E)
13) Light bulb for video DC light (VW-LL3E)
14) Stereo zoom microphone (VW-VMH3E)
15) Stereo microphone (VW-VMS2E)
16) Video flash (VW-FLH3E)
17) Tripod (VW-CT45E)
18) DV cable (VW-CD1E)
19) Jacket pouch (VW-SJ05E)
≥Some optional accessories may not be
available in some countries.
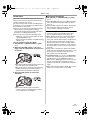
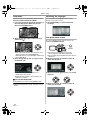
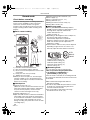
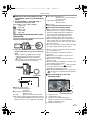
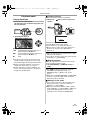
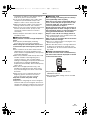
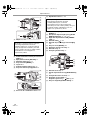
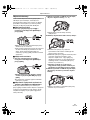
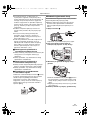
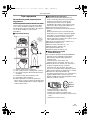
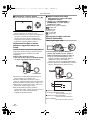
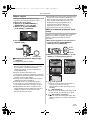
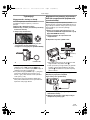
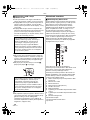
Parts identification and handling
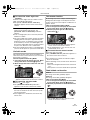
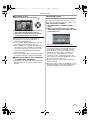
ª Camera
(1) Built-in video flash -33-
(2)
White balance sensor -38-
Remote control sensor -22-
(3)
Recording lamp -54-
(4)
Grip belt
(One-touch free-style grip belt)
-8-
(5)
Lens (LEICA DICOMAR)
(6) Microphone (built-in, stereo) -29-, -32-
(7)
Speaker -41-
(8)
Audio-video/S-Video output terminal
[A/V]
-47-
≥Use the supplied Multi cable only, otherwise
audio may not be played back normally.
(9) Terminal for free style remote control
[REMOTE]
-23-
Microphone terminal [MIC]
≥A compatible plug-in powered microphone
can be used as an external microphone.
≥When the movie camera is connected with
AC adaptor, sometimes noise may be heard
depending on microphone type. In that
case, please switch to battery for power
supply and noise will stop.
K2GJ2DZ00018
1)
2)
6)
7)
VFC3506-1A
3)
VYF2992
5)
4)
8)
CR2025
N2QAEC000017
K2KZ9CB00001
N2QCAD000007
VFA0453
K2CQ2CA00006
VSK0651B
(4)
(1)
(2)
(3)
(5)
(6)
A/V
REMOTE/MIC
(7)
(8)
(9)
VQT0T39_EP_eng.book 5 ページ 2005年12月26日 月曜日 午後8時7分

Before using
6
VQT0T39
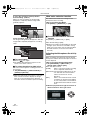
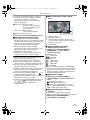
(10) Viewfinder -12-, -66-
(11)
Battery holder -9-
(12)
Battery release lever [BATT] -9-
(13)
Power switch [OFF/ON] -10-
(14)
Status indicator -10-
(15)
Menu button [MENU] -18-
(16)
Joystick -16-
(17)
Mode dial -16-
(18)
Recording start/stop button -25-
(19)
Focus ring -39-
(20)
LCD monitor -12-, -66-
(21) LCD monitor open part [OPEN] -12-
(22)
Mode select switch [AUTO/MANUAL/
FOCUS]
-24-, -37-, -39-
(23)
Power LCD button [POWER LCD] -20-
(24)
USB terminal [ ] -50-
(25)
DV input/output terminal [DV] -48-
(26)
Reset button [RESET] -62-
(27)
Card access lamp -15-
(28)
Card slot -15-
(29)
Card slot cover -15-
(30)
Cassette holder -14-
(31)
Cassette eject lever [OPEN/EJECT] -14-
(32)
Cassette cover -14-
(33)
Zoom lever [W/T] -29-
Volume lever [s /VOLr] -41-
(34)
Photoshot button [PHOTO SHOT] -26-
Due to limitations in LCD production
technology, there may be some tiny bright or
dark spots on the Viewfinder screen.
However, this is not a malfunction and does
not affect the recorded picture.
BATT
(10)
(11)
(12)
(13)
(14)
(15)
(16)
(17)
(18)
Due to limitations in LCD production
technology, there may be some tiny bright or
dark spots on the LCD monitor screen.
However, this is not a malfunction and does
not affect the recorded picture.
(19)
(20)
(21)
(22)
(23)
(24)
(25)
(26)
(27)
(28)
(29)
(30)
(31)
(32)
(33)
(34)
VQT0T39_EP_eng.book 6 ページ 2005年12月26日 月曜日 午後8時7分

Before using
7
VQT0T39
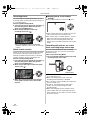
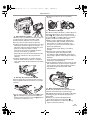
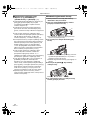
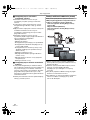
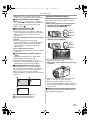
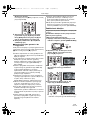
(35) Tripod receptacle
This is a hole for attaching the camera to optional
tripod/VW-CT45E. (Please carefully read the
operating instructions for how to attach the tripod
to the camera.)
≥When the tripod is used, operate the camera
from the free style remote control for
convenience. (When not using the remote
control, attach the clip to the grip belt for
convenience. When you move with remote
control attached to a pocket, etc., take care to
avoid falling of the tripod.)
≥You cannot open the card slot cover when the
tripod is used. Insert the card first and then
attach the tripod.
(36) Shoulder strap fixture
This is a fixture for attaching the shoulder strap to
hang the camera from your neck or shoulder.
≥Put the strap through the fixture 1 and through
the stopper 2 so it will not come off. Extend
part 3 by at least 2 cm.
≥Fit the other end of the belt similarly.
(37) Lens hood
In order to remove the lens hood, rotate it
counterclockwise 1. In order to fit it, put into slot
2, and then rotate it clockwise.
≥Fit the MC protector or the ND filter of the Filter
Kit (VW-LF43WE; optional) in front of the lens
hood. Do not fit the other accessories on the
hood. (Except for the lens cap)
(Refer to the operating instructions for the Filter
Kit.)
≥When fitting the tele conversion lens
(VW-LT4314NE; optional) or the wide
conversion lens (VW-LW4307ME; optional), first
remove the lens hood.
(Refer to the operating instructions for the tele
conversion lens or the wide conversion lens.)
≥When 2 lens accessories, such as the ND filter
and tele conversion lens, are fitted and the
[W/T] lever is pressed toward the [W] side, the 4
corners of an image will be darkened.
(Vignetting)
(38) Smart accessory shoe
The stereo zoom microphone /VW-VMH3E
(optional) or the video DC light/VW-LDH3E
(optional) should be mounted here.
≥When mounting or removing the accessory,
extend the viewfinder (1).
≥When using an accessory for the smart
accessory shoe, the power is supplied from this
product.
(35)
(36)
2
3
1
1 2
(37)
1
(38)
VQT0T39_EP_eng.book 7 ページ 2005年12月26日 月曜日 午後8時7分

Before using
8
VQT0T39
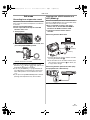
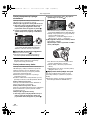
Fitting the lens cap
Fit the lens cap to protect the surface of the lens.
1 Push the string through the belt. Push the
lens cap through the loop in the string.
≥To fit or remove the lens cap, hold both sides of
the lens cap with the tips of your first 2 fingers.
≥The lens cap removed can be hung on the lens
cap fixture. (It cannot be hung if the grip belt is
used as a hand strap.)
The one-touch free-style grip belt
ª To use as a grip belt
Adjust the belt length so it fits your hand.
1 Adjust the belt length and the pad position.
1 Flip the belt.
2 Adjust the length.
3 Fix the belt.
ª
To use as a hand strap
If you use the grip belt as a hand strap, then you
can carry or handle this camera more easily.
1 Flip the belt.
1 Flip the belt.
2 Adjust the length.
2 Put your hand through the strap.
≥Use the free style remote control for more
convenience.
≥Hold the movie camera in a way that the
microphones or sensors are not covered with
your hands.
1
3
2
1
2
VQT0T39_EP_eng.book 8 ページ 2005年12月26日 月曜日 午後8時7分

Before using
9
VQT0T39
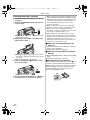
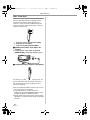
Power supply
ª Charging the battery
When this product is purchased, the battery is not
charged. Charge the battery before using this
product.
≥Battery charging time (
-10-)
≥We recommend using Panasonic batteries.
≥If you use other batteries, we cannot guarantee
the quality of this product.
≥If the DC input lead is connected to the AC
adaptor, then the battery will not get charged.
Remove the DC input lead from the AC adaptor.
1 Connect the AC mains lead to the AC
adaptor and the AC mains socket.
2 Put the battery on the battery mount by
aligning the mark, and then securely plug it
in.
ª
Charging lamp
Lights up:Charging
Goes off: Charging completed
Flashing: The battery is over discharged
(discharged excessively). In a while,
the lamp will light up and normal
charging will start.
When the battery temperature is
excessively high or low, the [CHARGE]
lamp flashes and the charging time will
be longer than normal.
ª
Connecting to the AC outlet
1 Connect the AC mains lead to the AC
adaptor and the AC mains socket.
2 Connect the DC input lead to the AC
adaptor.
3 Connect the DC input lead to this product.
≥The output plug of the AC mains lead is not
completely connected to the AC adaptor
socket. As shown in 1, there is a gap.
≥Do not use the power cord for other
equipment since the power cord is exclusively
designed for the movie camera. Or do not use
the power cord of other equipment for the
movie camera.
ª
Fitting the battery
Push the battery against the battery holder and
slide it until it clicks.
ª
Removing the battery
While sliding the [BATT] lever, slide the battery
(or the DC input lead) to remove it.
≥Hold the battery with your hand so it does not
fall.
≥Before removing the battery, be sure to set the
[OFF/ON] switch to [OFF].
1
BATT
VQT0T39_EP_eng.book 9 ページ 2005年12月26日 月曜日 午後8時7分

Before using
10
VQT0T39
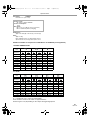
Charging time and recordable time
The times shown in the tables below are for when
the temperature is 25 oC and the humidity is 60%.
If the temperature is higher or lower than 25 oC,
the charging time will become longer.
A Charging time
B Maximum continuously recordable time
C Intermittent recordable time
(The intermittent recordable time refers to
recordable time when the recording and stopping
operations are repeated.)
“1 h 5 min” indicates 1 hour 5 minutes.
≥The battery CGA-DU14 is supplied.
≥The charging time and recordable time shown in
the table are approximations. The times indicate
the recordable times when the viewfinder is
used. The times in parentheses indicate the
recordable times when the LCD monitor is used.
≥We recommend the Battery Pack CGA-DU14
and CGA-DU21 for long time recording (2 hours
or more for continuous recording, 1 hour or
more for intermittent recording).
≥The recordable time will become shorter in the
following cases:
≥When you use both the viewfinder and the
LCD monitor simultaneously while rotating
the LCD monitor frontward to record yourself,
using the 0 lux colour night view function, etc.
≥When you use this camera with the LCD
monitor lit up by pressing the [POWER LCD]
button.
≥When you use accessories fitted on the
camera’s smart accessory shoe such as the
stereo zoom microphone and video DC light,
etc.
≥The batteries heat up after use or charging. The
main unit of the movie camera being used will
also heat up. This is normal.
≥Along with the reduction of the battery capacity,
the display will change: # #
# # . If the battery
discharges, then ( ) will flash.
Turning the movie camera on
When the movie camera is turned on with the lens
cap fitted, the automatic white balance
adjustment (
-66-) may not function properly.
Please turn the movie camera on after removing
the lens cap.
ª
How to turn on the power
1 While pressing the button 1, set the
[OFF/ON] switch to [ON].
≥The Status indicator lights red and the power
turns on.
≥In Tape Recording Mode or Card Recording
Mode, if the [OFF/ON] switch is set to [ON]
while the LCD monitor is closed and the
viewfinder is retracted, the power turns off.
ª
How to turn off the power
1 While pressing the button 1, set the
[OFF/ON] switch to [OFF].
Supplied
battery/
CGA-DU14
(7.2 V/
1360 mAh)
A 2 h 45 min
B 2 h 10 min
(2 h 10 min)
C 1 h 5 min
(1 h 5 min)
CGA-DU21
(7.2 V/
2040 mAh)
A 3 h 55 min
B 3 h 15 min
(3 h 15 min)
C 1 h 40 min
(1 h 40 min)
CGR-DU06
(7.2 V/
640 mAh)
A 1 h 40 min
B 1 h 5 min
(1 h)
C 35 min
(30 min)
CGA-DU07
(7.2 V/
680 mAh)
A 1 h 30 min
B 1 h 5 min
(1 h 5 min)
C 35 min
(30 min)
CGA-DU12
(7.2 V/
1150 mAh)
A 2 h 25 min
B 1 h 55 min
(1 h 50 min)
C 1 h
(55 min)
OFF
ON
1
OFF
ON
1
VQT0T39_EP_eng.book 10 ページ 2005年12月26日 月曜日 午後8時7分

Before using
11
VQT0T39
≥Set the [OFF/ON] switch to [OFF] when not
using the movie camera.
≥The Status indicator goes off when the power
turns off.
ª
How to turn the power on and off with
the LCD monitor/viewfinder
When the power switch is set to [ON], the power
can be turned on and off with the LCD monitor
and the viewfinder when the unit is in Tape
Recording Mode or Card Recording Mode.
1 Open the LCD monitor out or extend the
viewfinder to use. (
-12-)
≥The LCD monitor or viewfinder will be
activated.
2 Close the LCD monitor and retract the
viewfinder.
≥The power will not turn off unless the LCD
monitor is closed and the viewfinder is
retracted.
≥The Status indicator automatically goes off
and the power turns off. (If quick start is set to
[ON] (
-13-), the unit goes into quick start
standby mode and the Status indicator lights
green.)
≥The power does not turn off even if the
LCD monitor is closed and the viewfinder
is retracted while recording on a tape.
3 Open the LCD monitor or extend the
viewfinder to turn the power on and use the
movie camera again.
≥The Status indicator lights red and the power
turns on.
Setting date and time
When the movie camera is turned on for the first
time, [SET DATE AND TIME] will appear.
≥Select [YES] and press the centre of the
joystick. Do steps 2 and 3 below to set the date/
time.
If the screen shows the incorrect date/time, then
adjust it.
≥Set to Tape Recording Mode or Card
Recording Mode.
1 Set [BASIC] >> [CLOCK SET] >> [YES].
(
-18-)
2 Move the joystick left or right in order to
select the item to be set. Then move the
joystick up or down to set the desired value.
≥The year will change as follows:
2000, 2001, ..., 2089, 2000, ...
≥The 24-hour clock is used.
3 Press the joystick to determine the setting.
≥The clock function starts at [00] seconds.
OFF
ON
OFF
ON
OFF
ON
VQT0T39_EP_eng.book 11 ページ 2005年12月26日 月曜日 午後8時7分

Before using
12
VQT0T39
ª About date/time
≥The date and time function are driven by a built-
in lithium battery.
≥Make sure to check the time before recording
because the built-in clock is not very accurate.
ª
Recharging the built-in lithium battery
≥If [0] or [--] appears when the camera is
turning on, then the built-in lithium battery has
run down. Use the steps below to charge the
battery. When turn on the power for the first time
after charging, [SET DATE AND TIME] will
appear. Select [YES] and set the date and time.
Connect the AC adaptor to the camera or attach
the battery to the camera, and the built-in lithium
battery will be recharged. Leave the camera as
is for approx. 24 hours, and the battery will drive
the date and time for approx. 6 months. (Even if
the [OFF/ON] switch is set to [OFF], the battery
is still being recharged.)
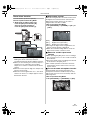
Using the LCD monitor
You can record the image while viewing it on the
opened LCD monitor.
1 Place your finger on OPEN and pull the LCD
monitor out in the direction of the arrow.
≥It can open up to 90o.
2 Adjust the angle of the LCD monitor as you
prefer.
≥It can rotate up to 180o 1 towards the lens or
90o 2 towards the viewfinder.
≥The brightness and colour level of the LCD
monitor can be adjusted from the menu.
≥If it is forcibly opened or rotated, the camera
may be damaged or fail.
≥If the LCD monitor is rotated by 180o towards
the lens and the viewfinder is extended (when
recording yourself), the LCD monitor and the
viewfinder simultaneously light.
Using the viewfinder
ª Extending the viewfinder
1 Pull out the viewfinder and extend it by
pinching the extension knob.
≥The viewfinder will be activated. (If the LCD
monitor is opened, the viewfinder will be
deactivated.)
ª
Lifting up the viewfinder
1 Lift it up by pinching the viewfinder
extension knob.
ª
Adjusting the field of view
1 Adjust the focus by sliding the eyepiece
corrector knob.
≥You can adjust the brightness of the viewfinder
from the menu.
OPEN
2 90o1 180o
12:30:4512:30:45
1. 4. 2006
12:30:45
1. 4. 2006 1. 4. 2006
12:30:45
1. 4. 2006
VQT0T39_EP_eng.book 12 ページ 2005年12月26日 月曜日 午後8時7分

Before using
13
VQT0T39
Quick Start
When quick start is ON the battery power is still
being consumed, even when the LCD monitor
and the viewfinder are closed.
The movie camera will resume recording/pause
mode about 1.7 seconds after the LCD monitor or
the viewfinder is reopended.
≥Please note in quick start mode approximately
half the pause recording power is being
consumed. Using quick start mode will reduce
the battery recording/playback time.
≥This is only activated in the following cases.
≥A tape or a card is inserted, while the Tape
Recording Mode is set.
≥A card is inserted, while the Card Recording
Mode is set.
≥Set to Tape/Card Recording Mode.
1 Set [SETUP] >> [QUICK START] >> [ON].
(
-18-)
2 While the [OFF/ON] switch is still set to
[ON], close the LCD monitor and retract the
viewfinder.
≥The Status indicator lights green and the unit
goes into quick start standby mode.
≥The movie camera will not go into quick start
standby mode unless the LCD monitor is
closed and the viewfinder is retracted.
3 Open the LCD monitor or extend the
Viewfinder.
≥The Status indicator lights red and the
camera is put into recording pause approx.
1.7 seconds after it is turned on.
ª
To cancel Quick Start
1 Set [SETUP] >> [QUICK START] >> [OFF].
(
-18-)
≥If the [OFF/ON] switch is set to [OFF] while the
unit is in quick start standby mode, the power
turns off.
≥If the standby continues for approx. 30 minutes,
then the Status indicator will go off and the
camera will be completely turned off.
≥If the Mode dial is moved or the battery is
removed in quick start standby mode, quick
start is cancelled and the power turns off.
≥When the movie camera is quick-started with
the white balance on automatic, it may take
some time until the white balance is adjusted if
the scene being recorded has a light source
different from the scene last recorded. (When
the colour night view function is used, however,
the white balance of the scene last recorded is
retained.)
≥If the power is turned on in quick start standby
mode, the zoom magnification becomes 1k and
the picture size may differ from what it was
before quick start standby mode.
≥If [POWER SAVE] (
-54-) is set to [5 MINUTES]
and the unit automatically goes into quick start
standby mode, set the [OFF/ON] switch to
[OFF], then to [ON] again. Also, close the LCD
monitor and retract the viewfinder and then
open the LCD monitor or extend the viewfinder
again.
≥When using the AC adaptor, Quick Start can be
used even if a tape/card is not inserted.
OFF
ON
OFF
ON
VQT0T39_EP_eng.book 13 ページ 2005年12月26日 月曜日 午後8時7分

Before using
14
VQT0T39
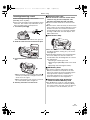
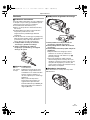
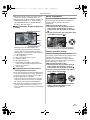
Inserting/removing a cassette
1 Fit the AC adaptor or the battery and turn on
the power.
2 Slide the [OPEN/EJECT] lever and open the
cassette cover.
≥When the cover is fully opened, the cassette
holder will come out.
3 After the cassette holder is opened, insert/
remove the cassette.
≥When inserting a cassette, orient it as shown
in the figure, and then securely insert it as far
as it goes.
≥When removing, pull it straight out.
4 Push the [PUSH] mark 1 in order to close
the cassette holder.
≥The cassette holder is housed.
5 Only after the cassette holder is completely
housed, close the cassette cover tightly.
≥When inserting a previously recorded cassette,
use the blank search function to find the position
where you want to continue recording. If you are
overwriting a previously recorded cassette, be
sure to find the position where you want to
continue recording.
≥When closing the cassette cover, do not get
anything, such as a cable, caught in the cover.
≥After use, be sure to rewind the cassette
completely, remove it and put it in a case. Store
the case in an upright position. (
-65-)
≥If the indicator of the condensation does not
display on the LCD monitor and/or viewfinder
and you notice condensation on the lens or the
main unit, do not open the cassette cover
otherwise condensation may be formed on the
heads or the cassette tape. (
-62-)
ª
When the cassette holder does not
come out
≥Close the cassette cover completely, and then
open it again completely.
≥Check if the battery has run down.
ª
When the cassette holder cannot be
housed
≥Set the [OFF/ON] switch to [OFF], then to [ON]
again.
≥Check if the battery has run down.
ª
Accidental erasure prevention
If the accidental erasure prevention slider 1 of a
cassette is opened (slide in the direction of the
[SAVE] arrow), the cassette cannot be recorded.
When recording, close the accidental erasure
prevention slider of the cassette (slide in the
direction of the [REC] arrow).
OPEN
/
EJEC
T
PUSH
1
R E C
SAVE
1
VQT0T39_EP_eng.book 14 ページ 2005年12月26日 月曜日 午後8時7分

Before using
15
VQT0T39
Inserting/removing a card
Before inserting/removing a card, set the
[OFF/ON] switch to [OFF].
≥If the card is inserted or removed with the power
turned on, this camera may malfunction or the
data recorded on the card may be lost.
1 Turn off the power 1.
≥Check that the Status indicator has gone off.
2 Slide the card slot cover outwards to open.
3 Insert/remove the card into/from the card
slot.
≥When inserting a card, face the label side 1
towards you and push it straight in with one
stroke as far as it goes.
≥When removing the card, press the centre of
the card and then pull it straight out.
4 Securely close the card slot cover.
ª
Concerning the card
≥Do not format the card with another movie
camera or any personal computer. This
operation may make the card unusable.
≥Do not touch the terminals on the back of the
card.
≥Electrical noise, static electricity, or failure of the
movie camera or the card may damage or erase
the data stored on the card. We recommend
saving important data on a personal computer
by using a USB cable, PC card adaptor, and
USB reader/writer.
ª
Card access lamp
≥When the camera accesses the card (reading,
recording, playback, erasing, etc.), the access
lamp lights up.
≥If the following operations are performed when
the access lamp is lit, then the card or the
recorded data may be damaged or the camera
may malfunction.
≥Inserting or removing the card.
≥Operating the [OFF/ON] switch or the mode
dial.
≥Attaching and removing the battery.
ª
SD Memory Card
≥The memory capacity indicated on the SD
Memory Card label corresponds to the total
amount of capacity to protect and manage the
copyright and the capacity available as
conventional memory for a movie camera,
personal computer or other equipment.
ª
Concerning the write protection
switch on the SD Memory Card
≥The SD Memory Card has a write protection
switch on it. If the switch is moved to [LOCK],
you cannot write to the card, erase the data on
it, or format it. If it is moved back, you can.
OFF
ON
1
1
2
1
VQT0T39_EP_eng.book 15 ページ 2005年12月26日 月曜日 午後8時7分

Before using
16
VQT0T39
Selecting a mode
Rotate the mode dial to select the desired mode.
1 Rotate the mode dial.
≥Set your desired mode to 1.
: TAPE RECORDING MODE
Use this when you record the image on a tape.
(Also, you can simultaneously record still pictures
on a card while recording images on a tape.)
: TAPE PLAYBACK MODE
Use this to play back a tape.
: CARD RECORDING MODE
Use this to record still pictures on a card.
: CARD PLAYBACK MODE
Use this to play back the still pictures recorded on
a card.
: PC CONNECTION MODE
You can view or edit the images recorded on a
card on your personal computer.
(Refer to the operating instructions for PC
connection.)
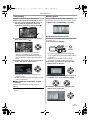
How to use the joystick
ª Basic joystick operations
Operations on the menu screen and selection
of files to be played back on the multi-image
display
Move the joystick up, down, left, or right to select
an item or file, and then push in the centre to set
it.
ª
Joystick and screen display
Push the centre of the joystick, and icons will be
displayed on the screen. Each time the joystick is
moved down, the indication changes.
(In the Tape playback mode or the Card Playback
Mode, the icons will be automatically displayed on
the screen.)
1) Tape recording mode
([AUTO/MANUAL/FOCUS] switch is set to
[AUTO])
≥1 is displayed while recording on a tape.
1 Select by moving up.
2 Select by moving down.
3 Select by moving left.
4 Select by moving right.
5 Determine by pushing the centre.
1
PC
PC
1
3
2
4
5
1/4
2 Fade
-31-
3 Backlight compensation -30-
1 Help mode -18-
2/4
2 Soft skin mode
-31-
1 Tele macro -31-
3/4
3 Colour night view/
0 lux colour night view
-30-
4/4
2 Recording check
-26-
1 Blank search -26-
1
VQT0T39_EP_eng.book 16 ページ 2005年12月26日 月曜日 午後8時7分

Before using
17
VQT0T39
2) Tape recording mode
([AUTO/MANUAL/FOCUS] switch is set to
[MANUAL])
≥1 is displayed while recording on a tape.
3) Tape playback mode
4) Card recording mode
([AUTO/MANUAL/FOCUS] switch is set to
[AUTO])
5) Card recording mode
([AUTO/MANUAL/FOCUS] switch is set to
[MANUAL])
6) Card Playback Mode
5/5
2 Iris or gain value
-39-
3 White balance -38-
1 Shutter speed -39-
3 Playback/pause
-41-
4 Stop -41-
2 Rewind (review playback) -41-
1 Fast forward (cue playback) -41-
1
1/2
2 Self-timer recording
-35-
3 Backlight compensation -30-
1 Help mode -18-
2/2
2 Soft skin mode
-31-
1 Tele macro -31-
3/3
2 Iris or gain value
-39-
3 White balance -38-
1 Shutter speed -39-
3 Slide show start/pause
-43-
4 Delete -44-
2 Playback previous picture -43-
1 Playback next picture -43-
VQT0T39_EP_eng.book 17 ページ 2005年12月26日 月曜日 午後8時7分

Before using
18
VQT0T39
Help mode
Select an icon for an explanation of the function.
≥Set to Tape/Card Recording Mode.
1 Press the joystick to display the icon during
the recording pause. Move the joystick
down until icon 1 appears.
2 Move the joystick right to select the Help
mode icon [ ].
≥The help mode explains the operation icons
displayed when the [AUTO/MANUAL/
FOCUS] switch is set to [AUTO] in Tape/Card
Recording Mode.
3 Move the joystick up, left, or right to select
the desired icon.
≥An explanation of the selected icon is
displayed on the screen.
≥Each time the joystick is moved down, the
indication changes.
ª
To exit the Help mode
Select [EXIT] icon or press the [MENU] button.
≥When the Help mode is used, functions cannot
be set.
Switching the language
You can switch the language on the screen
display or the menu screen.
1 Set [LANGUAGE] >> select the desired
language.
Using the menu screen
For each individual menu, please refer to -52-.
1 Press the [MENU] button.
≥The menu corresponding to the mode
selected by the mode dial is displayed.
≥Do not switch the mode dial when the menu is
displayed.
2 Move the joystick up or down in order to
select the top menu.
3 Move the joystick right or press it to set the
selection.
4 Move the joystick up or down in order to
select the sub-menu.
1
MENU
VQT0T39_EP_eng.book 18 ページ 2005年12月26日 月曜日 午後8時7分

Before using
19
VQT0T39
5 Move the joystick right or press it to set the
selection.
6 Move the joystick up or down in order to
select the item to be set.
7 Press the joystick to determine the setting.
ª
To exit the menu screen
Press the [MENU] button.
ª
To get back to the previous screen
Move the joystick left.
ª
About the menu setting
≥The menu is not displayed while recording on a
tape or a card. Also, you cannot record on a
tape or a card while the menu is displayed.
ª
Operating with remote control
The menu screen transition is the same as when
the buttons on the main unit are used.
1 Press the [MENU] button.
2 Select a menu item.
≥Use the direction buttons (3, 2, 1, 4) and
[ENTER] button in place of the joystick on the
main unit.
3 Press the [MENU] button to exit the menu
screen.
VQT0T39_EP_eng.book 19 ページ 2005年12月26日 月曜日 午後8時7分

Before using
20
VQT0T39
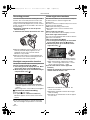
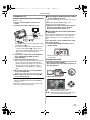
Adjusting LCD monitor/viewfinder
ª Adjusting the brightness and colour
level
1
Set [SETUP] >> [LCD SET] or [EVF SET] >>
[YES].
2 Move the joystick up or down in order to
select the item to be adjusted.
[LCD SET]
:Brightness of the LCD monitor
:Colour level of the LCD monitor
[EVF SET]
:Brightness of the viewfinder
3 Move the joystick left or right to move the
bar indication representing the brightness.
4 Press the [MENU] button or the joystick to
complete the settings.
≥When the LCD monitor is rotated by 180°
towards the lens, the brightness of the LCD
monitor cannot be adjusted.
≥To adjust the brightness of the viewfinder, close
the LCD monitor and extend the viewfinder to
activate it.
≥These settings will not affect the images actually
recorded.
ª
In order to increase the brightness of
the entire LCD monitor
1
Press the [POWER LCD] button.
≥The [ ] indication appears on the LCD
monitor.
≥If the [POWER LCD] button is pressed, the
entire LCD monitor will become approx. twice
as bright as the normal.
≥When the [POWER LCD] button is pressed
again, the [ ] indication disappears and the
original brightness is restored.
≥This will not affect the images to be recorded.
≥If you turn on the camera when the AC adaptor
is used, the [POWER LCD] function will
automatically be activated.
≥You cannot use this function in PC Connection
Mode.
ª
Changing the picture quality on the
LCD monitor
1
Set [SETUP] >> [LCD AI] >> [DYNAMIC] or
[NORMAL].
[DYNAMIC]: The image on the LCD monitor
becomes clear and vivid. Optimum
contrast and brightness are set
depending on the scenes recorded.
Clear and brilliant images are
presented.
[NORMAL]: Switches to the standard picture
quality.
≥The effect will vary depending on the scene
recorded.
≥The picture quality on the viewfinder will not be
affected.
≥This function is automatically set to [DYNAMIC]
when the brightness of the LCD monitor is
increased (the [ ] indication appears on the
LCD monitor) and cannot be set to [NORMAL]
independently.
≥This will not affect the images to be recorded.
≥When the LCD monitor is rotated by 180°
towards the lens, the picture quality of the LCD
monitor is temporarily adjusted as if the
[LCD AI] is set to [NORMAL].
EVF
POWER
LCD
VQT0T39_EP_eng.book 20 ページ 2005年12月26日 月曜日 午後8時7分
Strona jest ładowana ...
Strona jest ładowana ...
Strona jest ładowana ...
Strona jest ładowana ...
Strona jest ładowana ...
Strona jest ładowana ...
Strona jest ładowana ...
Strona jest ładowana ...
Strona jest ładowana ...
Strona jest ładowana ...
Strona jest ładowana ...
Strona jest ładowana ...
Strona jest ładowana ...
Strona jest ładowana ...
Strona jest ładowana ...
Strona jest ładowana ...
Strona jest ładowana ...
Strona jest ładowana ...
Strona jest ładowana ...
Strona jest ładowana ...
Strona jest ładowana ...
Strona jest ładowana ...
Strona jest ładowana ...
Strona jest ładowana ...
Strona jest ładowana ...
Strona jest ładowana ...
Strona jest ładowana ...
Strona jest ładowana ...
Strona jest ładowana ...
Strona jest ładowana ...
Strona jest ładowana ...
Strona jest ładowana ...
Strona jest ładowana ...
Strona jest ładowana ...
Strona jest ładowana ...
Strona jest ładowana ...
Strona jest ładowana ...
Strona jest ładowana ...
Strona jest ładowana ...
Strona jest ładowana ...
Strona jest ładowana ...
Strona jest ładowana ...
Strona jest ładowana ...
Strona jest ładowana ...
Strona jest ładowana ...
Strona jest ładowana ...
Strona jest ładowana ...
Strona jest ładowana ...
Strona jest ładowana ...
Strona jest ładowana ...
Strona jest ładowana ...
Strona jest ładowana ...
Strona jest ładowana ...
Strona jest ładowana ...
Strona jest ładowana ...
Strona jest ładowana ...
Strona jest ładowana ...
Strona jest ładowana ...
Strona jest ładowana ...
Strona jest ładowana ...
Strona jest ładowana ...
Strona jest ładowana ...
Strona jest ładowana ...
Strona jest ładowana ...
Strona jest ładowana ...
Strona jest ładowana ...
Strona jest ładowana ...
Strona jest ładowana ...
Strona jest ładowana ...
Strona jest ładowana ...
Strona jest ładowana ...
Strona jest ładowana ...
Strona jest ładowana ...
Strona jest ładowana ...
Strona jest ładowana ...
Strona jest ładowana ...
Strona jest ładowana ...
Strona jest ładowana ...
Strona jest ładowana ...
Strona jest ładowana ...
Strona jest ładowana ...
Strona jest ładowana ...
Strona jest ładowana ...
Strona jest ładowana ...
Strona jest ładowana ...
Strona jest ładowana ...
Strona jest ładowana ...
Strona jest ładowana ...
Strona jest ładowana ...
Strona jest ładowana ...
Strona jest ładowana ...
Strona jest ładowana ...
Strona jest ładowana ...
Strona jest ładowana ...
Strona jest ładowana ...
Strona jest ładowana ...
Strona jest ładowana ...
Strona jest ładowana ...
Strona jest ładowana ...
Strona jest ładowana ...
Strona jest ładowana ...
Strona jest ładowana ...
Strona jest ładowana ...
Strona jest ładowana ...
Strona jest ładowana ...
Strona jest ładowana ...
Strona jest ładowana ...
Strona jest ładowana ...
Strona jest ładowana ...
Strona jest ładowana ...
Strona jest ładowana ...
Strona jest ładowana ...
Strona jest ładowana ...
Strona jest ładowana ...
Strona jest ładowana ...
Strona jest ładowana ...
Strona jest ładowana ...
Strona jest ładowana ...
Strona jest ładowana ...
Strona jest ładowana ...
Strona jest ładowana ...
Strona jest ładowana ...
Strona jest ładowana ...
Strona jest ładowana ...
-
 1
1
-
 2
2
-
 3
3
-
 4
4
-
 5
5
-
 6
6
-
 7
7
-
 8
8
-
 9
9
-
 10
10
-
 11
11
-
 12
12
-
 13
13
-
 14
14
-
 15
15
-
 16
16
-
 17
17
-
 18
18
-
 19
19
-
 20
20
-
 21
21
-
 22
22
-
 23
23
-
 24
24
-
 25
25
-
 26
26
-
 27
27
-
 28
28
-
 29
29
-
 30
30
-
 31
31
-
 32
32
-
 33
33
-
 34
34
-
 35
35
-
 36
36
-
 37
37
-
 38
38
-
 39
39
-
 40
40
-
 41
41
-
 42
42
-
 43
43
-
 44
44
-
 45
45
-
 46
46
-
 47
47
-
 48
48
-
 49
49
-
 50
50
-
 51
51
-
 52
52
-
 53
53
-
 54
54
-
 55
55
-
 56
56
-
 57
57
-
 58
58
-
 59
59
-
 60
60
-
 61
61
-
 62
62
-
 63
63
-
 64
64
-
 65
65
-
 66
66
-
 67
67
-
 68
68
-
 69
69
-
 70
70
-
 71
71
-
 72
72
-
 73
73
-
 74
74
-
 75
75
-
 76
76
-
 77
77
-
 78
78
-
 79
79
-
 80
80
-
 81
81
-
 82
82
-
 83
83
-
 84
84
-
 85
85
-
 86
86
-
 87
87
-
 88
88
-
 89
89
-
 90
90
-
 91
91
-
 92
92
-
 93
93
-
 94
94
-
 95
95
-
 96
96
-
 97
97
-
 98
98
-
 99
99
-
 100
100
-
 101
101
-
 102
102
-
 103
103
-
 104
104
-
 105
105
-
 106
106
-
 107
107
-
 108
108
-
 109
109
-
 110
110
-
 111
111
-
 112
112
-
 113
113
-
 114
114
-
 115
115
-
 116
116
-
 117
117
-
 118
118
-
 119
119
-
 120
120
-
 121
121
-
 122
122
-
 123
123
-
 124
124
-
 125
125
-
 126
126
-
 127
127
-
 128
128
-
 129
129
-
 130
130
-
 131
131
-
 132
132
-
 133
133
-
 134
134
-
 135
135
-
 136
136
-
 137
137
-
 138
138
-
 139
139
-
 140
140
-
 141
141
-
 142
142
-
 143
143
-
 144
144


Panasonic nv-gs500 Instrukcja obsługi
- Kategoria
- Kamery
- Typ
- Instrukcja obsługi
- Ten podręcznik jest również odpowiedni dla
w innych językach
- English: Panasonic nv-gs500 Owner's manual
Powiązane dokumenty
-
Panasonic NVGS180EP Instrukcja obsługi
-
-
Panasonic NVGS37EP Instrukcja obsługi
-
-
-
-
-
-
-
Panasonic VDRD220EP Instrukcja obsługi