Foster 7330/241 Use And Maintenance Instructions
- Typ
- Use And Maintenance Instructions

IT
ITALIANO
model: 7330/241
ITALIANO
IT
DEUTSCH
DE
ENGLISH
GB
ESPAÑOL
ES
FRANÇAIS
FR
IT
GB
DE
ES
FR
PL
PIANO INDUZIONE - Istruzioni d’uso e manutenzione
INDUCTION GLASS COOKTOP - Use and maintenance instructions
ELEKTRO GRASKERAMIK INDUKTIONS KOCHFELD - Bedienungs und Wartungsanleitung
PLANO INDUCCION - Instrucciones de uso y mantenimiento
TABLE INDUCTION - Instructions pour l’utilisation et manutention
PLYTA INDUKCYJNA - Eksploatacji i konserwacji
PL
POLSKA

2
Fig.1
I T A L I A N O
IT
E N GL I S H
GB
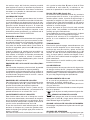
ABE
C
FG
[ON_OFF_KEY][KEYLOCK_KEY]
[STOP_GO_KEY]
[+TIMER_KEY][-TIMER_KEY] [POWER_SLIDER]
[HEATER_n_KEY] [HEATER_n_KEY] [HEATER_n_KEY]
DDD
[DISPLAY_TIMER]
H
[HEATER_DISPLAY]
I
[HEATER_DISPLAY]
I
[HEATER_DISPLAY]
I
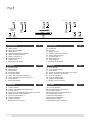
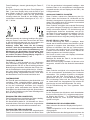
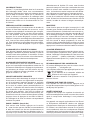
A - Tasto On/Off
B - Tasto blocco tastiera
C - Tasto pausa
D - Tasti di selezione zona cottura
E - Slider selezione potenza
F - Tasto incremento “+”
G - Tasto decremento “-”
H - Display timer
I - Display zone di cottura
A - On/Off Key
B - Key lock
C - Stop & Go key
D - Cooking zone selection keys
E - Power slider selection
F - Increment Key “+”
G - Decrement Key “-”
H - Timer Display
I - Cooking zones display
DEUTSCH
DE
ESPANOL
ES
A - Ein/Aus-Taste
B - Tastensperre
C - Pause-Taste
D - Kochzone-Tasten
E - Kochstufe-Slider
F - Taste - Erhörung der Kochstufe “+”
G - Taste - Erniedrigung der Kochstufe “-”
H - Timer-Display
I - Kochzone-Display
A - Tecla On/Off
B - Tecla bloque teclado
C - Tecla pausa
D - Teclas de selección de la zona de cocción
E - Slider selección de potencia
F - Tecla de aumento “+”
G - Tecla de disminución “-”
H - Display temporizador
I - Display zona de cocción
FRANCAIS
FR
POLSKA
PL
A - Touche On/Off
B - Touche verrouillage des commandes
C - Touche pause
D - Touches pour la sélection des zones de cuisson
E - Slider sélection de la puissance
F - Touche augmentation “+”
G - Touche diminution “-”
H - Display minuterie
I - Display zones de cuisson
A - Przycisk ON/OFF
B - Przycisk blokujący klawiaturę
C - Przycisk przerwy
D - Przyciski wyboru strefy gotowania
E- Suwak wyboru mocy
F- Przycisk zwiększania “+”
G- Przycisk zmniejszania “-”
H- Wyświetlacz timera
I- Wyświetlacz stref gotowania

3
840 mm
810 mm
330 mm
510 mm
350 mm
60 mm
min. 50 mm
min. 50 mm
60
mm
20 mm
~ 2 mm
2
3
30 mm
A
40 mm
B
Fig. 4 Fig. 3
Fig. 2
min. 50 mm
min. 50 mm

4
AC 220-240 V
2 1
L2 L1
L1
2 1
2 Ph + N
4 x 1.5 mm²
H 05 V2V2 - F
1 Ph + N
3 x 2.5 mm²
H 05 V2V2 - F
5
4
2
3
1
7 15
open
5
4
2
3
1
7 15
open
34
N
5
34
N
5
N
L1
N
L1
L2
AC 380-415 V
Fig.7
Fig.6
Fig.5

5
I T A L I A N O
IT
GENERALITÀ
Leggere attentamente il contenuto del presente
libretto in quanto fornisce importanti indicazioni ri-
guardanti la sicurezza di installazione, d’uso e di ma-
nutenzione. Conservare il libretto per ogni ulteriore
consultazione. Tutte le operazioni relative all’instal-
lazione (connessioni elettriche) devono essere effet-
tuate da personale specializzato in conformità delle
norme vigenti.
Separare i vari materiali di scarto provenienti dall’im-
ballo e consegnarli al più vicino centro di raccolta
differenziata.
AVVERTENZE PER LA SICUREZZA
- Questo elettrodomestico è progettato esclusi-
vamente per la cottura di cibo, con l’espressa
esclusione di ogni altro uso domestico, com-
merciale o industriale.
- Evitare le fuoriuscite di liquido, pertanto per
bollire o riscaldare liquidi, ridurre l’alimentazio-
ne di calore.
- Prestare attenzione alle cotture che utilizzano
grasso o olio: potrebbero incendiarsi con facili-
tà.
- Gli oggetti metallici quali coltelli, forchette, cuc-
chiai e coperchi non devono essere appoggiati
sull’apparecchio perchè potrebbero diventare
incandescenti.
- Non lasciare gli elementi riscaldanti accesi sen-
za recipienti o con recipienti vuoti.
- Una volta terminato di cucinare, spegnere la re-
lativa resistenza tramite il comando indicato in
seguito.
- Questo apparecchio non è destinato all’uso
da parte di persone (inclusi i bambini) con ca-
pacità fisiche, sensoriali o mentali ridotte, o
con mancanza di esperienza e conoscenza, a
meno che non siano controllati o istruiti all’uso
dell’apparecchio da una persona responsabile
della loro sicurezza.
- Sorvegliare i bambini per assicurarsi che non
giochino con l’apparecchio.
- Se la superficie del piano è incrinata, spegnere
l’apparecchio e disconnettere dalla rete elettri-
ca per evitare l’eventualità di scosse elettriche.
Si consigliano recipienti a fondo piatto dal diametro
uguale o leggermente superiore a quello dell’area
riscaldata (Fig.5).
Non utilizzare recipienti con base ruvida, per evitare
di graffiare la superficie termica del piano. Questo
apparecchio non è adatto per l’uso da parte di bam-
bini o persone che necessitano di supervisione.
h ATTENZIONE h
Se la supercie del piano è incrinata, spegnere
l’apparecchio e disconnettere dalla rete elettrica
per evitare l’eventualità di scosse elettriche.
ISTRUZIONI PER L’INSTALLAZIONE
Le presenti istruzioni sono rivolte ad un installatore
specializzato e fungono da guida per l’installazione,
la regolazione e la manutenzione in conformità delle
leggi e delle norme vigenti. Se un forno da incasso
o qualsiasi altra apparecchiatura che genera calo-
re deve essere montato direttamente sotto il piano
di cottura in vetroceramica, È NECESSARIO CHE
TALE APPARECCHIATURA (forno) E IL PIANO
DI COTTURA IN VETROCERAMICA SIANO ADE-
GUATAMENTE ISOLATI. Il mancato rispetto di tale
precauzione potrebbe determinare l’errato funziona-
mento del sistema TOUCH CONTROL.
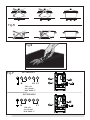
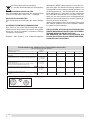
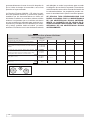
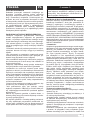
• Posizionamento:
L’elettrodomestico è realizzato per essere incassa-
to in un piano di lavoro, come illustrato nella figura
(Fig.2). Predisporre materiale sigillante lungo l’intero
perimetro - Fig.4 (dimensioni del taglio Fig.2). Questa
operazione è necessaria per evitare che eventuali li-
quidi penetrino all’interno del piano, in quanto non è
possibile garantire la planarità del top e del vetro e il
loro accoppiamento. Bloccare l’elettrodomestico sul
piano di lavoro mediante i 4 sostegni, tenendo pre-
sente lo spessore del piano di lavoro (Fig.2). Se la
parte inferiore dell’apparecchio, dopo l’installazione,
è accessibile dalla parte inferiore del mobile è ne-
cessario montare un pannello separatore rispettando
le distanze indicate (Fig.3), è necessario uno spazio
libero sotto la cassetta dell’apparecchio, onde per-
mettere una corretta aerazione dell’apparecchio. Se
si installa sotto un forno questo non è necessario.
L’apparecchio non è destinato ad essere gestito per
mezzo di un timer esterno o di un sistema di coman-
do a distanza separato. La distanza di sicurezza tra
l’apparecchio ed una eventuale cappa di aspirazione
sovrastante deve essere quella prevista dal fabbri-
cante della cappa.
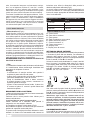
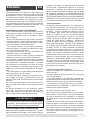
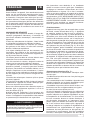
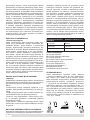
• Connessioni elettriche (Fig.7):
Prima di effettuare le connessioni elettriche assicu-
rarsi che:
- il cavo elettrico della terra deve essere di 2 cm più
lungo rispetto agli altri cavi;
- le caratteristiche dell’impianto siano tali da soddi-
sfare le indicazioni sulla targhetta identificativa ap-
plicata sulla parte inferiore del piano di lavoro;
- l’impianto sia dotato di una messa a terra efficiente
conforme alle norme e alle disposizioni di legge in
vigore.
La messa a terra è obbligatoria per legge.
Nel caso in cui l’elettrodomestico non sia dotato di
cavo e/o della relativa spina, utilizzare materiale
adatto per l’assorbimento indicato nella targhetta
identificativa e per la temperatura di funzionamento.
Se si desidera una connessione diretta alla linea elet-

6
trica, è necessario interporre un interruttore omnipo-
lare, con un’apertura minima di 3 mm fra i contatti,
appropriato al carico indicato nella targhetta e con-
forme alle norme vigenti (il conduttore di terra giallo/
verde non deve essere interrotto dal commutatore).
Terminata l’installazione dell’apparecchiatura, l’inter-
ruttore omnipolare deve essere facilmente raggiun-
gibile. Il cavo di alimentazione, dopo l’installazione
dell’apparecchio non deve essere soggetto a solleci-
tazioni meccaniche ( es. schiacciamento a causa del
movimento di cassetti) e non deve venire a contatto
con alcuna delle parti calde del piano.
USO E MANUTENZIONE
• Manutenzione (Fig.6):
Prima di pulire il piano di cottura aspettare che si raf-
freddi. Rimuovere eventuali residui di cibo e gocce di
unto dalla superficie di cottura utilizzando lo speciale
raschietto fornito su richiesta. Pulire l’area riscaldata
nel miglior modo possibile utilizzando prodotti idonei
ed un panno-carta, quindi sciacquare con acqua e
asciugare con un panno pulito. Mediante lo specia-
le raschietto (opzionale) rimuovere immediatamente
dall’area riscaldata di cottura frammenti di fogli di al-
luminio e materiale plastico scioltisi inavvertitamente
o residui di zucchero o di cibi ad elevato contenuto di
zucchero. In questo modo si evita ogni possibile dan-
no alla superficie del piano. In nessun caso si devono
utilizzare spugnette abrasive o detergenti chimici irri-
tanti quali spray per forno o smacchiatori.
ATTENZIONE: NON DEVE ESSERE UTILIZZATO UN
PULITORE A VAPORE.
• Uso:
La caratteristica fondamentale del sistema ad induzione
è il trasferimento diretto dell’energia riscaldante dal
generatore al recipiente di cottura.
Vantaggi:
- Il trasferimento di energia avviene solo quando il
recipiente è posto sulla zona di cottura.
- Il calore viene generato solo sul fondo del recipiente e
trasmesso direttamente al cibo da cuocere.
- Tempi di riscaldamento ridotti e basso consumo
di energia durante l’inizio cottura, consentono un
risparmio globale di energia.
- Il piano in vetroceramica rimane freddo. Il calore che
si avverte sul piano di cottura è quello riesso dal
fondo del recipiente.
RECIPIENTI PER LA COTTURA
L’utilizzo di recipienti appropriati è un fattore essenziale
per la cottura ad induzione.
Vericate che le vostre pentole siano idonee per il
sistema ad induzione.
I recipienti devono quindi contenere ferro.
Potete vericare se il materiale della pentola è
magnetico con una semplice calamita.
Si consigliano recipienti a fondo piatto (Fig.5).
Non utilizzare recipienti con base ruvida, per evitare di
grafare la supercie termica del piano.
In questo modo l’energia può essere utilizzata in modo
ottimale. Un fattore non trascurabile nella cottura ad
induzione sono inne le dimensioni della pentola in
relazione alla piastra utilizzata (Fig.5).
Le zone di cottura consentono l’utilizzo di recipienti con
fondi di vari diametri. E’ comunque preferibile utilizzare
la zona di cottura appropriata al diametro della pentola
che si vuole utilizzare.
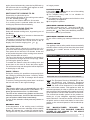
DIAMETRO ZONA COT-
TURA
DIAMETRO MINIMO PEN-
TOLA
Ø 145 mm 80 mm
Ø 210 mm 130 mm
Ø 240 mm 160 mm
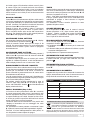
FUNZIONAMENTO (Fig.1)
A - Tasto On/Off
B - Tasto blocco tastiera
C - Tasto pausa
D - Tasti di selezione zona cottura
E - Slider selezione potenza
F - Tasto incremento “+”
G - Tasto decremento “-”
H - Display timer
I - Display zone di cottura
SETTAGGIO DELLE POTENZE
Prima di iniziare le operazione è necessario disconnettere
e riconnette il piano alla rete elettrica. Per effettuare il
settaggio delle potenze rimuovere il blocco comandi
premendo il tasto B, poi premere contemporaneamente
il tasto il tasto F, il tasto G e il tasto A.
Sul touch control verrà visualizzato Po, sopra i tasti del
timer, il numero 7 (sul display della zona sx), il numero
2 (sul display della zona di dx) e il led del tasto chiave
lampeggia. Per variare il livello di potenza premere il
tasto B, sui display appariranno n. 4 livelli impostabili
possibili : 2,8 - 3,5 - 6,0 - 7,20 kw.
ABE
C
FG
DDDH I I I
Una volta scelto il proprio livello di potenza desiderato
premere contemporaneamente i tasti F e G del timer e il
tasto A, il piano si spegnerà e ritornerà all’impostazione
iniziale con la chiave inserita.
Attenzione, ogni volta che l’utente tenta di au-
mentare la potenza, il livello di potenza totale del
piano di cottura viene calcolato. Se questo livello
di potenza totale è maggiore del limite di potenza
piano di cottura, l’aumento di potenza non è con-
sentito. Un allarme acustico e il display di riscal-
damento mostra una ‘r’ per 3 secondi.
CALIBRAZIONE TOUCH
L’errore F / L può essere generato entro 3s circa della
accensione iniziale. Si consiglia l’utente spegnere le

7
luci della cappa e l’illuminazione diretta verso il piano
di cottura. Dopo che il controllo del touch ha condotto
il processo di calibrazione iniziale, (circa 3s) qualsiasi
cappa o altra illuminazione possono essere normal-
mente accese e non inuirà più sul funzionamento del
touch control.
BLOCCO COMANDI
Il tasto B blocca il funzionamento del piano nello stato in
cui si trova, impedendo ogni operazione non intenzionale
(es. da parte di bambini). In questo stato nessuna azione
sui tasti ha effetto. Per attivare la funzione di sicurezza
premere il tasto B no all’accensione della spia.
Quando il blocco dei comandi è attivo è comunque
possibile spegnere il piano di cottura. In questo caso il
blocco comandi rimane attivo anche alla riaccensione
del piano. Per disattivare il blocco dei comandi premere
il tasto B no allo spegnimento della spia.
ACCENSIONE PIANO COTTURA
Per accendere l’apparecchio premere il tasto A , i display
si accenderanno in posizione standby .
L’unità di controllo rimarrà attiva per un tempo di 10
secondi. Se entro questo termine non verrà selezionata
nessuna zona di cottura il piano cottura si spegnerà
automaticamente.
ACCENSIONE ZONE COTTURA
Per selezionare la zona di cottura desiderata premere il
relativo tasto D
e premere entro 10 secondi lo slider E
per regolarne la potenza.
La potenza della singola zona di cottura può essere
regolata in 9 differenti posizioni, e sarà visualizzata nel
relativo display luminoso con un numero da “1 a 9”.
RISCALDAMENTO VELOCE / BOOSTER
Questa funzione riduce ulteriormente il tempo di cottura
di una data zona portando la temperatura alla massima
potenza per un intervallo di 10 minuti. Al termine di
questo intervallo la potenza della zona di cottura torna
automaticamente al livello 9.
L’uso di questa funzione è indicato per il riscaldamento
in tempi brevissimi di grandi quantità di liquidi (es. acqua
per la cottura della pasta) o pietanze.
Per attivare questa funzione selezionare la zona di
cottura e agire sullo slider E no al livello 9. Agire di
nuovo sullo slider E, il simbolo sarà visualizzato nel
display relativo alla zona.
PAUSA / RICHIAMO (Stop & Go)
La funzione si attiva premendo il tasto C e consente
la pausa temporanea della cottura, permettendo agli
utenti di rispondere alla porta o al telefono senza pre-
occuparsi delll’acqua che bolle. Questa funzione è uti-
le anche per pulire la supercie dell’interfaccia utente
senza modicare la cottura impostata.
L’evidenza dell’avvenuta interruzione si ha perchè tutti
i displays si accendono con un messaggio che ruota
continuamente.
Per ripristinare la cottura premere nuovamente il tasto
C,
il piano di cottura tornerà alle impostazioni originali.
Trascorsi 10 minuti dall’impostazione della pausa, se
non si ripristina la cottura il piano si spegne.
TIMER
Questa funzione permette di spegnere automaticamente
una zona di cottura dopo un certo tempo. Selezionare
una zona di cottura poi premere uno dei due tasti
G
o
F
del timer e impostare da 1 a 99
minuti . Il led della zona selezionata lampeggia e parte
il tempo, quando questo arriva a zero il led della zona
selezionata si spegne e viene emesso un segnale
acustico, intermittente.
Per disattivare il suono acustico premere un tasto
qualsiasi del piano cottura.
CALORE RESIDUO
Se la temperatura di una zona di cottura è ancora
elevata (superiore a 50°) dopo essere stata spenta,
il display relativo a quella zona mostra il simbolo
(calore residuo). L’indicazione scompare solo quando
non vi è più alcun rischio di ustioni.
RICONOSCIMENTO PENTOLE
Se su uno dei display di una zona di cottura, dovesse
comparire il simbolo , signica che:
1) il recipiente utilizzato non è idoneo per la cottura ad
induzione.
2) il diametro della pentola utilizzata è inferiore a quello
consentito dall’apparecchio.
3) sulla piastra non è presente nessuna pentola.
SPEGNIMENTO ZONE COTTURA
Per spegnere una zona di cottura selezionarla premendo
il relativo tasto D poi agire sullo slider E no alla
posizione .
SPEGNIMENTO PIANO COTTURA
Per spegnere completamente il piano di cottura premere
il tasto A .
SPEGNIMENTO DI SICUREZZA
L’apparecchio è provvisto di un sistema di sicurezza che
spegne automaticamente la zona di cottura trascorso il
tempo limite di accensione ad una data potenza.
POTENZA TEMPO LIMITE ACCENSIONE (ore)
1 10
2 - 3 5
4 4
5 3
6 - 8 2
9 1
DISMISSIONE DEGLI ELETTRODOMESTICI
La direttiva Europea 2002/96/CE sui rifiuti di ap-
parecchiature elettriche ed elettroniche (RAEE),
prevede che gli elettrodomestici non debbano
essere smaltiti nel normale flusso dei rifiuti solidi
urbani. Gli apparecchi dismessi devono essere raccolti
separatamente per ottimizzare il tasso di recupero e rici-

8
claggio dei materiali che li compongono ed impedire po-
tenziali danni per la salute e l’ambiente. Il simbolo del
cestino barrato è riportato su tutti i prodotti per ricordare
gli obblighi di raccolta separata. Per ulteriori informazio-
ni, sulla corretta dismissione degli elettrodomestici, i de-
tentori potranno rivolgersi al servizio pubblico preposto o
ai rivenditori.
SI DECLINA OGNI RESPONSABILITA’ PER
EVENTUALI DANNI PROVOCATI DALLA
INOSSERVANZA DELLE SUDDETTE AVVERTENZE.
LA GARANZIA NON E’ VALIDA NEL CASO DI
DANNI PROVOCATI DALL’INOSSERVANZA DELLE
SUDDETTE AVVERTENZE.
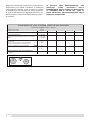
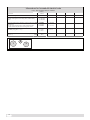
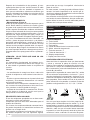
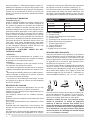
Identificativo del modello
Tipologia di piano cottura incassato
Numero di zone e/o aree di cottura 3
1. = Induzione
2. = Induzione
3. = Induzione
1. = 230x390
2. = Ø 140-280
3. = 230x390
mm
Wh/kg 1. = 193,6
2. = 173,2
3. = 193,6
Consumo energetico del piano cottura calcolato per kg
(EC
electric hob
)
Wh/kg 186,8
Informazioni sui piani di cottura elettrici a uso domestico
ai sensi del regolamento (UE) n. 66/2014
1. = 230x390
2. = Ø 140-280
3. = 230x390
1. = 193,6
2. = 173,2
3. = 193,6
186,8
1. = Ø 240
2. = Ø 145
3. = Ø 210
mm
1. = 183,6
2. = 176,9
3. = 181,0
Consumo energetico del piano cottura calcolato per kg
(EC
electric hob
)
Wh/kg 180,5
Tecnologia di riscaldamento
Zone di cottura e aree di cottura a induzione, zone di cottura
radianti.
Wh/kg
Consumo energetico per zona o area di cottura
calcolato al kg (EC
electric cooking
)
Per le zone di cottura elettriche circolari: diametro della
superficie utile.
Per zone o aree di cottura non circolari: lunghezza/
larghezza della superficie/zona di cottura utile L/W.
1
2
3
7330241

9
E N G L I S H
GB
GENERAL INFORMATION
Carefully read this use and maintenance manual,
where important information about installation, use
and maintenance safety is provided. Keep this ma-
nual for future reference. Any installation operation
(electric connections) shall be performed by spe-
cialized personnel, in compliance with all standards
and regulations in force. Separate the various waste
materials from packaging and delivery to the nearest
recycling center
SAFETY WARNING
-This appliance is designed exclusively for co-
oking food, with the express exclusion of any
other domestic, commercial or industrial.
- Pay attention to cooking using grease or oil, can
ignite easily.
- Metal objects such as knives, forks, spoons and
lids should not be placed on the device because
it may become very hot.
- Avoid the overflow of liquids by reducing the
heat supply when boiling or warming liquids.
- Do not leave any heating element switched on,
if there are no pots, or if the pots are empty.
- Once cooking is completed, turn the concerned
heating element off, by using the control shown
below.
- This appliance is not intended for use by people
(children included) with limited physical, senso-
rial or mental abilities, or lacking of experience
and knowledge, unless they are supervised or
well instructed about the use of the appliance,
by a person who is responsible for their safety.
- Children should be supervised to assure that
they do not play with the appliance.
- If the hob surface is cracked, turn the
appliance off and disconnect it from the
electric network , so as to avoid the pos-
sibility of electric shock.
The use of flat-bottomed pots, with a diameter equal
to or slightly bigger than the heated area, is recom-
mended. (Fig.5).
Do not use pots that have a rough base, in order to
prevent the hob thermal surface from being scra-
tched. This appliance is not intended for use by chil-
dren or infirm people without supervision.
h WARNING h
If the surface of the hob is cracked, turn off the
appliance and disconnect from the electrical main
in order to avoid any possible electric shocks.
INSTALLATION INSTRUCTIONS
These installation instructions are intended for a
specialized installer and are meant as guidelines for
the hob installation, adjustment and maintenance,
in compliance with any regulations and standards
in force. If a built-in oven or any other appliance
generating heat is to be mounted directly under the
vitro-ceramic hob, IT IS NECESSARY THAT SUCH
AN APPLIANCE (the oven) AND THE VITRO-CE-
RAMIC HOB ARE PROPERLY INSULATED. Failure
to comply with this precaution might result in the in-
correct operation of the TOUCH CONTROL system.
• Positioning:
This household appliance has been designed for built
–in installation onto a worktop, as shown in the figure
(Fig.2). Use sealing material along the whole perime-
ter - Fig.4 (Cut dimensions- Fig.2). This operation is
necessary in order to prevent any liquid from entering
inside the hob, being that the flatness of the top, the
glass and their coupling cannot be assured. Fix the
appliance on the worktop by using the 4 supports,
taking the work top thickness into account (Fig.2). If,
after installation, the lower part of the appliance is
accessible from the lower part of the cabinet, it will be
necessary to mount a spacing panel at the distances
given (Fig.3). If the appliance is installed under an
oven, this step will not be necessary. The appliance
is not intended to be operated by an external timer or
a separate remote control system.
It’s necassry a free space below the cassette of the
device, in order to allow proper ventilation of the ap-
pliance.
The safety distance between the unit and an optional
exhaust hood must be above that provided by the
manufacturer of the hood.
• Electric connections (Fig.7):
Before carrying out any electric connections, please
make sure that:
- the ground electric cable is 2 cm. longer than the
other cables;
- the electrical system meets any requirement men-
tioned in the rating label found on the underside of
the work top;
- the electrical system is equipped with an efficient
grounding system and compliant with any stan-
dards and law directives in force.
The grounding system is required by law.
In the case the appliance is not equipped with a
power cord and/or the related plug, please use a ma-
terial suitable for the power absorption value mentio-
ned in the rating label and for the operating tempera-
ture. If a direct connection to the electric network is
required, you need to use an omnipolar power switch
with a switch-contact gap of at least 3 mm, suitable
for the value mentioned in the label, and compliant
with the related standards in force (the yellow/gre-
en ground connection shall not be interrupted by the
change-over switch).
Once the appliance installation is completed, the om-
nipolar switch shall be easily accessible.
The power cord, after installation of the appliance,
must not be subjected to mechanical stresses (such

10
as crushing due to the movement of the drawers) and
should not come into contact with any hot parts of
the plan.
USE AND MAINTENANCE
• Maintenance (Fig.6):
Before cleaning the cooktop to wait for it to cool.
Remove any food residue and grease drops from the
cooking surface, by using the special scraper provi-
ded on request.
Clean the heated area in the best way possible, using
suitable products and a paper towel, then rinse with
water and wipe away with a clean cloth.
Through the use of the special scraper (optional),
promptly remove any pieces of aluminum foil and pla-
stic material, which might have accidentally melted,
or sugar or food remains, and/or remains of sugary
foods, from the heated surface. In this way, any pos-
sible damage to the surface is prevented.
The use of abrasive sponges or irritating chemical
cleaners, such as sprays for ovens or cleaning agen-
ts is not allowed under any circumstance.
• Use:
- The transference of power takes place only when the
recipient is placed on the cooking zone.
- The heat is generated only at the base of the
recipient and transferred directly to the food to be
cooked.
- Reduced heating time and low consumption of
power during the beginning of cooking, allowing a
global saving of power.
- The breglass top remains cold, the heat felt on the
cooking top is that reected from the base of the
recipient.
COOKING RECIPIENTS
The use of appropriate recipients is an essential
factor for induction cooking. Check that your pots
are suitable for the induction system. The recipients
must contain iron. You can check whether the
material of the pot is magnetic with a simple magnet
(Fig.6).
We advise recipients having a at base (Fig.5).
This way you can use the power optimally.
Do not use recipients with a rough base to avoid
scratching the thermal surface of the top.
A very important factor in induction cooking is the
dimension of the pot compared to the plate used
(Fig.5).
The cooking zones allow the use of recipients with
bases of various diameters. It is, however, preferable
to use the appropriate cooking zone for the dimension
of the pot.
COOKING ZONE DIAM-
ETER
MINIMUM PAN DIAMETER
Ø 145 mm 80 mm
Ø 210 mm 130 mm
Ø 240 mm 160 mm
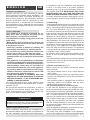
FUNCTIONING (Fig.1)
A - On/Off key
B - Cooking zone selection key
C - Increment Key “+”
D - Decrement Key “
-
”
E - Timer display “ ”
F - Cooking zone display
POWER SETTING
Before starting the operation you need to
disconnect and reconnect the plan to the mains.
To make the setting of the power to remove the
locking feature by pressing the key button, then
simultaneously press the -, +, and On / Off.
Will appear on the touch control Po, above the
keys of the timer, the number 7 (the display area
on the left), the number 2 (the display area of the
right) and the key LED key flashes. To vary the
power livetto press the key, the display will show
n. 4 adjustable levels possible: 2.8 to 3.5 - 6.0 to
7.20 kw.
ABE
C
FG
DDDH I I I
Once you have chosen your desired power level
simultaneously press the + and - timer and the On
/ Off button, the plan will go off and return to the
initial setting with the key inserted.
CONTROL LOCK
Switch on the hob by pressing key A.
Controls can be locked in order to prevent any risk of
unintentional changes to the setting ( children, cle-
aning operations , etc.); this function can only be
activated with all the cooking zones off . Press
the key within 10” from the hob switching on ,
then simultaneously press the B key found on the left
lower side; the symbol will appear on the F displays
to conrm your selection.
When the control lock is activated you can switch the
hob off. In this case, the control lock is still activated,
even when the hob is switched on again.
To unlock the hob permanently , press the key

11
again, then simultaneously press the key B found on
the left lower side; the symbol will appear on the F
displays to conrm your selection.
SWITCHING THE COOKING TO ON
Press A key to switch the top on.
All the displays F relative to the cooking zones switch
on in the standby position .
The control unit remains active for 20 seconds.
If no cooking zone is selected within this time, the
ccoking top switches off automatically.
SWITCHING COOKING ZONE ON
Press key A to switch the hob on.
Select the desired cooking zone, by pressing one of
the B keys.
Press the or keys to increase or decrease the
power of the cooking zone .
The power of each single cooking zone can be set
in 9 different positions and will be shown in the F
display with a number ranging from to .
BOOSTER FUNCTION
This feature further reduces the cooking time of a
given area while raising the temperature at the maxi-
mum power for an interval of 10 minutes. At the end
of this period the power of the cooking zone automa-
tically switches back to level 9.
The use of this function is indicated for the heating in
very short times of large amounts of liquid (eg. Water
for cooking the pasta) or dishes.
To enable this feature select the cooking zone and
press down to the level 9. Press the button again.
You will hear a beep and the symbol will be displayed
in the display on the area.
PAUSE / RECALL
During the cooking it is possible to temporarily block
the cooking by pressing the pause / recall key. All the
displays will light up with a message which rotates
continuously.
To resume cooking press the pause tatso / recall and
the hob will return to the original settings.
TIMER
This function allows you to automatically turn off a
cooking zone after a certain time. Press either + or -
button and set the timer from 1 to 99 minutes.
The LED of the selected zone ashes and the time,
when this reaches zero, the LED of the selected zone
turns off and an audible beep intermittently.
To turn off the acoustic sound press any button on
the stove.
RESIDUAL HEAT
If the temperature of the cooking zone is still high
(over 50°) after it has been switched off, the relative
display will indicate the symbol (residual heat).
The symbol will only switch off when the burn risk in
no longer present.
POT DETECTION
If the symbol
should appear on one of the cooking
area displays, it means that:
1) The recipient being used is not suitable for
induction cooking.
2) The diameter of the recipient used is inferior to that
allowed by the appliance.
3) No recipient is present.
SWITCHING COOKING ZONES OFF
To switch a cooking zone off , press the key B rela-
ted to this zone , bring the power level back to by
pressing the key, then press the B key related to
this zone to conrm your selection.
SWITCHING COOKING TOP OFF
To turn off the cooking top entirely hold down the A
key.
SAFETY SWITCH
The appliance has a safety switch that automatically
switches off the cooking zones when they have been
operating for a certain amount of time at a given
power level.
POWER LEVEL OPERATING TIME LIMIT (hours)
1 10
2 - 3 5
4 4
5 3
6 - 8 2
9 1
DISPOSAL OF OLD HOUSEHOLD APPLIANCES
The European Directive 2002/96/EC on Wa-
ste Electrical and Electronic Equipment
(WEEE), requires that old household applian-
ces shall not be disposed of in the standard
urban solid waste stream. Old appliances shall be
collected separately in order to optimize the recovery
and recycling of the materials they contain and redu-
ce the impact on human health and the environment.
The crossed-out dustbin symbol on the product re-
minds you of your obligation regarding separated
waste collection. Consumers should contact their lo-
cal public service or their local dealer for more infor-
mation on the correct disposal of old household ap-
pliances.
THE MANUFACTURER DECLINES ALL
RESPONSIBILITY FOR POSSIBLE DAMAGES
CAUSED BY NOT ABIDING TO THE ABOVE
MENTIONED WARNINGS.

12
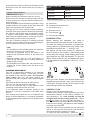
Model name / identifier
built-in
3
1. = Induction
2. = Induction
3. = Induction
1. = 230x390
2. = Ø 140-280
3. = 230x390
mm
Wh/kg 1. = 193,6
2. = 173,2
3. = 193,6
Wh/kg 186,8
1. = 230x390
2. = Ø 140-280
3. = 230x390
1. = 193,6
2. = 173,2
3. = 193,6
186,8
180,5
mm
Wh/kg
Wh/kg
Type of hob
Number of cooking zones and/or areas
Heating technology
Induction cooking zones and cooking areas, radiant cooking
zones.
For circular cooking zones: diameter of useful surface area/
cooking zone
For non-circular cooking zones or areas: length and width
of useful surface area per electric cooking zone or area
Energy consumption per cooking zone or area
calculated per kg (EC
electric cooking
Energy consumption for the hob calculated per kg
(EC
electric hob
)
)
1. = Ø 240
2. = Ø 145
3. = Ø 210
1. = 183,6
2. = 176,9
3. = 181,0
Information for household electric hobs
In acc. with regulation (EU) No. 66/2014
1
2
3
7330241

13
DEUTSCH
DE
ALLGEMEINE INFORMATIONEN
Das vorliegende Handbuch liefert dem Kunden alle
erforderlichen Informationen für die Installation, die
Wartung und den Betrieb. Bewahren Sie diese Ge-
brauchsanleitung für weitere Benutzung auf. Die
Installation (elektrische Verbindungen) darf nur von
qualifiziertem Personal gemäß den örtlichen Bestim-
mungen ausgeführt werden.
Trennen Sie das verschiedene Verpackungsmaterial
und bringen Sie es zur nächsten Entsorgungsstelle.
SICHERHEITSHINWEISE
- Dieses Gerät ist ausschließlich zur Zubereitung
von Nahrungsmitteln für private Haushalte kon-
zipiert und darf nicht zu kommerziellen oder in-
dustriellen Zwecken verwendet werden.
- Das Verschütten von Flüssigkeiten vermeiden;
die Flüssigkeiten auf kleiner Flamme aufwärm-
en oder zum Kochen bringen.
- Heißes Fett und Öl sind leicht entzündlich.
Achten Sie hierauf, wenn Sie Speisen mit viel
Fett oder Öl zubereiten.
- Keine Metallgegenstände wie Messer, Gabeln,
Löffel oder Deckel auf das Kochfeld legen, da
diese heiß werden können.
- Die Kochzonen nicht mit leerem oder ohne Ko-
chgeschirr benutzen.
- Nach jedem Gebrauch die Kochzonen immer
mit dem entsprechenden Schalter ausschalten.
- Dieses Gerät darf nicht von Personen (ein-
schließlich Kindern) mit eingeschränkten phy-
sischen, sensorischen oder geistigen Fähig-
keiten sowie von Personen bedient werden,
denen es an Erfahrung und notwendigem
Wissen fehlt, sofern diese Personen nicht von
einer verantwortlichen Person beaufsichtigt
und nachhaltig hinsichtlich der Bedienung des
Gerätes unterwiesen wurden.
- Kinder sollten grundsätzlich beaufsichtigt wer-
den, damit sie nicht mit dem Gerät spielen.
- Sollte die Oberfläche des Kochfeldes springen,
das Gerät ausschalten und den Stecker herau-
sziehen, um einen elektrischen Schlag zu ver-
meiden.
Wir empfehlen Kochgeschirr mit einem flachen Bo-
den, das den gleichen oder einen etwas größeren
Durchmesser als die jeweilige Kochzone aufweist
(Abb. 5). Vermeiden Sie Kochgeschirr mit rauen
Böden, damit die Oberfläche nicht verkratzt. Das
Gerät ist nicht zur Benutzung durch Personen (ein-
schließlich Kindern) vorgesehen, die über reduzierte
körperliche Eignung, Wahrnehmung oder geistige
Fähigkeiten verfügen.
h WICHTIG h
Sollte die Oberäche des Kochfeldes springen, das
Gerät ausschalten und den Stecker herausziehen, um
einen elektrischen Schlag zu vermeiden
MONTAGEHINWEISE
Alle Arbeiten für die Installation, Regelung und War-
tung müssen von einem qualifizierten Fachmann
und nach den geltenden Vorschriften durchgeführt
werden. Falls ein Einbauherd bzw. ein Gerät, das
Wärme erzeugt, direkt unter dem Glaskeramik-Koch-
feld installiert wird, IST ES NOTWENDIG, DASS
DAS GERÄT (Backofen) UND DAS GLASKERA-
MIK-KOCHFELD KORREKT ISOLIERT WERDEN.
Die Nichtbeachtung dieser Vorsichtsmaßnahme
kann zu einer Fehlfunktion der TOUCH-CON-
TROL-Bedienung führen.
• Einbau :
Das Gerät ist für den Einbau in einer Arbeitsplatte er-
stellt worden, wie in Abb. 2 dargestellt. Dichtungsmit-
tel entlang des gesamten Randes aufbringen - Abb.
4 (Einbaumaße Abb. 2): Diese Abdichtung verhin-
dert, dass Flüssigkeit in das Kochfeld eindringen
kann, da die Ebenheit der Oberseite und des Glases
nicht gewährleistet ist. Das Gerät an der Arbeitsplat-
te mit den 4 Stützen befestigen, je nach der Dicke
der Arbeitsplatte (Abb. 2). Falls die untere Seite des
Geräts nach dem Einbau von unten frei zugänglich
bleibt, muss eine Trennplatte nach den angezei-
gten Massen angebracht werden (Abb. 3), da ein
Zwischenraum unter dem Gerätkasten eine ausrei-
chende Belüftung ermöglicht. Wird das Gerät direkt
über einen Backofen eingebaut, ist dies nicht nötig.
Das Gerät ist nicht für eine externe Schaltuhr oder
ein Fernbedienungssystem vorgesehen. Beachten
Sie den vom Hersteller angegebenen Sicherheit-
sabstand zwischen dem Gerät und einer eventuelle
darüberliegende Dunstabzugshaube
• Elektroanschluss (Abb. 7):
Vor dem Stromanschluss versichern Sie sich, dass:
- Das Stromkabel 2 cm länger als die anderen Kabel
ist;
- Die Spannungsangabe auf dem Typenschild, das
sich auf der unteren Seite des Kochfelds befindet,
mit der Netzspannung übereinstimmt;
- Die Elektroanlage mit einer Erdung gemäß den gel-
tenden Richtlinien versehen ist.
Die Erdung ist gesetzlich vorgeschrieben.
Falls das Gerät nicht mit einem Stromkabel und/
oder Stecker ausgestattet ist, geeignetes Material für
die Absorption und die Betriebstemperatur, die am
Typenschild angegeben sind, verwenden.
Falls ein direkter Stromanschluss benötigt wird, muss
ein allpoliger Trennschalter mit einer Kontaktöffnung
von mindestens 3 mm nach der am Typenschild an-
gegebenen Belastung und gemäß den geltenden
Richtlinien vorgesehen werden (das gelb/grüne Er-

14
dungskabel darf nicht vom Schalter unterbrochen
werden).
Nach dem Einbau des Geräts muss der allpolige
Schalter leicht erreichbar sein. Nach Einbau des
Gerätes darf das Stromkabel nicht durch mechani-
sche Belastung beschädigt werden (z.B. Druckscha-
den beim Ausziehen der Schubladen) und nicht mit
den heißen Teilen des Kochfeldes in Berührung kom-
men.
• Elektroanschluss (Abb. 7):
Vor dem Stromanschluss versichern Sie sich, dass:
- Das Stromkabel 2 cm länger als die anderen Kabel
ist;
- Die Spannungsangabe auf dem Typenschild, das
sich auf der unteren Seite des Kochfelds befindet,
mit der Netzspannung übereinstimmt;
- Die Elektroanlage mit einer Erdung gemäß den gel-
tenden Richtlinien versehen ist.
Die Erdung ist gesetzlich vorgeschrieben.
Falls das Gerät nicht mit einem Stromkabel und/
oder Stecker ausgestattet ist, geeignetes Material für
die Absorption und die Betriebstemperatur, die am
Typenschild angegeben sind, verwenden.
Falls ein direkter Stromanschluss benötigt wird,
muss ein allpoliger Trennschalter mit einer Konta-
ktöffnung von mindestens 3 mm nach der am Typen-
schild angegebenen Belastung und gemäß den
geltenden Richtlinien vorgesehen werden (das gelb/
grüne Erdungskabel darf nicht vom Schalter unter-
brochen werden).
Nach dem Einbau des Geräts muss der allpolige
Schalter leicht erreichbar sein. Nach Einbau des
Gerätes darf das Stromkabel nicht durch mecha-
nische Belastung beschädigt werden (z.B. Druck-
schaden beim Ausziehen der Schubladen) und nicht
mit den heißen Teilen des Kochfeldes in Berührung
kommen.
BEDIENUNG UND WARTUNG
• Wartung (Abb. 6):
Vor dem Reinigen das Kochfeld abkühlen lassen.
Eventuelle Speisereste oder Fetttropfen am Kochfeld
mit dem Schaber (auf Anfrage erhältlich) beseitigen.
Die erhitzte Fläche bestmöglich mit geeigneten Pro-
dukten und Papiertuch reinigen, danach mit Wasser
nachwischen und mit einem sauberen Tuch trock-
nen. Alufolie und Plastik müssen sofort vom erhitzen
Kochfeld mit dem speziellem Schaber (optional) be-
seitigt werden, ebenso Zucker oder Lebensmittel mit
hohem Zuckergehalt. Auf diese Weise werden even-
tuelle Schäden am Kochfeld vermieden. Keinesfalls
kratzende Schwämme oder Scheuermittel verwen-
den wie Backofenspray oder Fleckentferner.
ACHTUNG: VERWENDEN SIE KEINESFALLS EI-
NEN DAMPFREINIGER.
• Bedienung:
Die Haupteigenschaft des Induktionssystems ist die
direkte Übertragung der Energie zum Erhitzen der
Speisen von der Induktionsquelle auf das Kochge-
schirr.
Vorteile:
- Die Energieübertragung geschieht nur dann, wenn
ein Topf auf der Kochfläche steht.
- Die Wärme wird nur am Topfboden erzeugt und di-
rekt auf die zu garenden Speisen übertragen.
- Kürzere Erwärmungszeiten und geringerer Strom-
verbrauch zu Beginn der Garzeit erlauben insgesamt
eine Energieeinsparung.
- Die Glaskeramikfläche bleibt kalt. Auf dem Kochfeld
wird nur die Wärme übertragen, die vom Boden des
Topfes reflektiert wird.
KOCHGESCHIRR
Das Kochgeschirr für Induktionsherde hat beim Ko-
chen entscheidenden Einfluss auf das Kochergebnis.
Vergewissern Sie sich bitte, ob Ihr Kochgeschirr für
das Induktionsherd geeignet ist.
Das Kochgeschirr muss aus ferromagnetischem Ma-
terial bestehen.
Ob das Material Ihres Kochgeschirrs ferromagneti-
sch ist, können Sie ganz einfach mit einem Magne-
ten feststellen.
Wir empfehlen Kochgeschirr mit einem flachen Bo-
den (Abb. 5).
Vermeiden Sie Kochgeschirr mit rauen Böden, damit
die Oberfläche nicht verkratzt.
Auf diese Weise wird die Energie am besten genutzt.
Für das Kochen mit Induktion ist es wichtig, dass sich
Kochgeschirr und Kochzone optimal aneinander an-
passen (Abb. 5).
Die Kochzonen erlauben Kochgeschirr mit verschie-
denen Durchmessern. Wir empfehlen trotzdem die
Wahl einer Kochzone, die sich der Größe des Koch-
geschirrs anpasst.
MESSER KOCHZONE MINDESTDURCHMESSER
POT
Ø 145 mm 80 mm
Ø 210 mm 130 mm
Ø 240 mm 160 mm
BEDIENUNG
A - Ein/Aus-Taste
B - Tastensperre
C - Pause-Taste
D - Kochzone-Tasten
E - Kochstufe-Slider
F - Taste - Erhörung der Kochstufe “+”
G - Taste - Erniedrigung der Kochstufe “-”
H - Timer-Display
I - Kochzone-Display
EINSTELLUNG DER LEISTUNGEN
Vor jedem Eingriff den Strom erst aus-, dann wieder
anschalten. Für die Einstellung der Leistungen muss
der Steuerungssatz entfernt werden, indem Sie die

15
Taste B betätigen; danach gleichzeitig die Tasten F,
G und A.
Der Touch-Control zeigt über dem Timer-Display die
Zahl 7 (auf dem Display links) und die Zahl 2 (auf
dem Display rechts) an, und der Schlüssel-Anzeig-
er fängt an zu blinken. Stellen Sie die gewünschte
Leistung mittels der Taste B ein; der Display zeigt 4
verschiedene einstellbare Leistungen an: 2,8 - 3,5 -
6,0 - 7,20 kw.
ABE
C
FG
DDDH I I I
Nach der Auswahl der Leistung betätigen Sie gleich-
zeitig die Tasten F und G des Timers sowie die Taste
A; das Kochfeld schaltet sich aus und schaltet sich
wieder mit eingefügtem Schlüssel wieder ein.
Achtung! Jedes Mal, wenn Sie die Leistung
erhöhen, wird die Gesamtleistung des Kochfel-
des berechnet. Falls diese Gesamtleistung den
Höchstwert des Kochfeldes überschreitet, wird
die Leistungserhöhung nicht erlaubt. Ein Signal-
ton ertönt und das Leistung-Display zeigt für 3
Sekunden den Buchstaben „r“ an.
TOUCH-KALIBRATION
Der Fehler F / L wird innerhalb von ca. 3 Sekunden
nach Einschaltung angezeigt. Die Lichter der Dun-
stabzugshaube und die an das Kochfeld gerichtete
Beleuchtung ausschalten. Nachdem das Touch-Con-
trol die Erstkalibration durchgeführt hat (ca. 3 Sekun-
den), kann jede Dunstabzugshaube oder andere Be-
leuchtung wieder eingeschaltet werden, ohne dass
der Betrieb des Touch-Controls beeinflusst wird.
TASTENSPERRE
Die Taste B sperrt die Bedienung des Kochfelds und
verhindert jeden unbeaufsichtigten Vorgang (z.B.
von Kindern). Für die Sperrung die Taste B betätig-
en bis die Led-Anzeige erleuchtet; kein Vorgang
ist möglich, außer ausschalten des Gerätes. Beim
Einschalten des Kochfeldes bleibt die Sperrfunktion
aktiv. Für die Deaktivierung die Taste B betätigen bis
die Led-Anzeige erlischt.
EINSCHALTEN DES KOCHFELDES
Zum Einschalten des Kochfeldes die Taste A betätig-
en; die Displays erleuchten auf Stand-by.
Die Steuereinheit bleibt für 10 Sekunden an. Wenn
innerhalb dieser Zeit keine Kochzone eingeschaltet
wird, schaltet sich das Kochfeld automatisch aus.
EINSCHALTEN DER KOCHZONEN
Zum Einschalten einer Kochzone die entsprechende
Taste D und innerhalb 10 Sekunden die Slider-Taste
E für die gewünschte Leitungsstufe betätigen. Jede
Kochzone kann in 9 verschiedenen Leistungsstufen
eingestellt werden, die am Display mit der Zahl „1 bis
9“ dargestellt wird.
ANKOCHAUTOMATIK / BOOSTER
Diese Funktion erlaubt eine Reduzierung der Ko-
chzeit, indem die Kochzone für 10 Minuten auf die
höchste Leistungsstufe eingestellt wird; nach Ablauf
dieser Zeit schaltet sich die Kochzone automatisch
auf die Leistungsstufe 9 zurück.
Diese Funktion ermöglicht eine schnelle Erwärmung
von großen Mengen Flüssigkeit (z.B. Wasser für die
Pasta) oder andere Speisen. Für die Aktivierung die
entsprechende Kochzone einschalten und die Sli-
der-Taste E bis Leistungsstufe 9 betätigen. Die Sli-
der-Taste E wieder betätigen: das Display der ent-
sprechende Kochzone zeigt das jeweilige Symbol an.
PAUSE / RECALL (Stop & Go)
Für die Aktivierung die Taste C betätigen; diese
erlaubt das Kochfeld während des Betriebs vorüb-
ergehend zu stoppen ohne Verschütten von Flüss-
igkeiten zu befürchten, falls Sie am Telefon antwor-
ten müssen oder jemand an der Tür klingelt. Diese
Funktion ist auch nützlich, wenn Sie die Fläche der
Bedienungstasten am Kochfeld reinigen.
Die Pause ist aktiv, wenn alle Displays erleuchten
und ein Lauftext darstellen.
Betätigen Sie wieder die Taste C, um den Kochvor-
gang wieder herzustellen.
Wird der Kochvorgang innerhalb 10 Minuten nicht
hergestellt, schaltet sich das Kochfeld automatisch
aus.
TIMER
Diese Funktion ermöglicht, eine entsprechende Zeit
für die automatische Ausschaltung der Kochzone
einzustellen. Die gewählte Kochzone einschalten
und mit einer der zwei Timer-Tasten G oder F die
gewünschte Zeit (von 1 bis 99 Minuten) eingeben.
Die Led-Anzeige blinkt und der Countdown fängt
an. Nach Ablauf der eingegebenen Zeit erlischt die
Led-Anzeige und ein intermittierender Ton ertönt.
Für die Desaktivierung des Tons irgendeine Taste
betätigen.
RESTWÄRME
Ist die Temperatur der Kochzone nach Ausschalten
immer noch hoch (über 50°), zeigt das entsprechen-
de Display das Symbol … an (Restwärme). Diese
Anzeige erlischt nur, wenn es keine Verbrennung-
sgefahr mehr gibt.
ERKENNUNG DES KOCHGESCHIRRS
Wenn eines der Kochzonen-Displays das Symbol …
anzeigt:
1) Das Kochgeschirr ist für das Induktionskochfeld
nicht geeignet.
2) Der Durchmesser des Kochgeschirrs ist kleiner als

16
der für die Kochzone vorgesehene.
3) Auf dem Kochfeld steht kein Kochgeschirr.
KOCHZONE AUSSCHALTEN
Zum Ausschalten der Kochzone, die entsprechende
Taste D und die Slider-Taste E bis … betätigen.
KOCHFELD AUSSCHALTEN
Zum Ausschalten des Kochfeldes die Taste A betätig-
en.
SICHERHEITSTEMPERATURBEGRENZER
Das Gerät ist mit einem Sicherheitssystem ausge-
stattet, das die Kochzonen automatisch ausschaltet,
wenn eine vorher eingestellte, höchstens zulässige
Temperatur erreicht wird.
Richtlinie über Elektro- und Elektronik-Altgeräte
2002/96/EC (WEEE) weist darauf hin, dass das Pro-
dukt nicht über den Hausmüll entsorgt werden darf.
Die Altgeräte müssen getrennt entsorgt werden, um
die Rückgewinnungs- und Recyclingrate der enthal-
tenen Materialien zu optimieren und die Auswirkung
auf Gesundheit und Umwelt zu verringern. Alle Pro-
dukte, die mit dem Symbol einer durchgestrichenen
Mülltonne gekennzeichnet sind, müssen separat ge-
sammelt und recycelt werden.
Weitere Informationen über die korrekte Entsorgung
des Gerätes erhalten Sie bei der Örtlichen Verwal-
tung oder bei Ihrem Händler.
FÜR SCHÄDEN, DIE DURCH NICHTBEACHTUNG
DIESER BEDIENUNGSANLEITUNG ENTSTEHEN,
ÜBERNEHMEN WIR KEINE HAFTUNG.
DIE GARANTIE GILT NICHT FÜR SCHÄDEN, DIE
DURCH NICHTBEACHTUNG DIESER BEDIENUN-
GSANLEITUNG ENTSTEHEN.
Modellname / -kennzeichen
Art der Kochmulde Einbau
Anzahl der Kochzonen und/oder Kochflächen 3
1. = Induktion
2. = Induktion
3. = Induktion
1. = 230x390
2. = Ø 140-280
3. = 230x390
mm
Wh/kg 1. = 193,6
2. = 173,2
3. = 193,6
Energieverbrauch der Kochmulde je kg
(EC
electric hob
)
Wh/kg 186,8
Informationen zu elektrischen Haushaltskochmulden
nach Verordnung (EU) Nr. 66/2014
1. = 230x390
2. = Ø 140-280
3. = 230x390
1. = 193,6
2. = 173,2
3. = 193,6
186,8
1. = Ø 240
2. = Ø 145
3. = Ø 210
mm
1. = 183,6
2. = 176,9
3. = 181,0
(EC
electric hob
)
Wh/kg 180,5
Heiztechnik
Induktionskochzonen und -kochflächen, Strahlungskochzonen.
Wh/kg
Energieverbrauch je Kochzone oder -fläche je kg
(EC
electric cooking
)
Bei kreisförmigen Kochzonen: Durchmesser der nutzbaren
Oberfläche/Kochzone.
Bei nicht kreisförmigen Kochzonen oder -flächen: Länge /
Breite der nutzbaren Oberfläche/Kochzone L/W.
1
2
3
7330241

17
ESPANOL
ES
GENERALIDADES
Lea atentamente el contenido de este manual ya
que da informaciones importantes para la seguridad
de instalación, de uso y de mantenimiento. Guarde
el manual para cualquier consulta adicional. Todas
las operaciones relativas a la instalación (conexio-
nes eléctricas) tienen que ser realizadas por perso-
nal capacitado de acuerdo con las normas vigentes.
Separar los diferentes materiales de desecho y lle-
varlos al punto de recogida más cercano.
ADVERTENCIAS PARA LA SEGURIDAD
- Este electrodoméstico está proyectado exclusiva-
mente para la cocción de alimentos, con la expresa
exclusión de cualquier otro uso doméstico, comer-
cial o industrial.
- Evitar el derrame de líquido, por lo tanto, para hervir
o calentar líquidos, reducir la alimentación de calor.
- Preste atención cuando cocine con grasa o aceite,
ya que se pueden incendiar fácilmente.
- Los objetos metálicos como cuchillos, tenedores,
cucharas y tapas no se tienen que apoyar en el apa-
rato, ya que pueden calentarse.
- No deje los elementos de calor encendidos con
recipientes vacíos o sin recipientes.
- Cuando termine de cocinar, apague la resistencia
mediante el control que se indica a continuación.
- Este aparato no está proyectado para ser utilizado
por personas (incluidos niños) con capacidades fís-
icas, sensoriales o mentales reducidas, o con falta
de experiencia y conocimiento, a menos que hayan
sido supervisados o instruidos acerca del uso del
aparato por una persona encargada de su seguri-
dad.
- Los niños deben ser supervisados para asegurarse
de que no jueguen con el aparato.
- Si está quebrada la superficie de la placa de coc-
ción, apagar el aparato y desconectarlo de la red
eléctrica para evitar la posibilidad de una descarga
eléctrica.
Se recomiendan recipientes con fondo plano con un
diámetro igual o poco mayor del de la zona de calor
(Fig.5).
No utilizar recipientes con una superficie rugosa,
para evitar que se raye la superficie térmica de la
placa. Este aparato no es apto para ser usado por
niños o personas que requieran supervisión.
h ADVERTENCIA h
SI la supercie de la placa está quebrada, apagar
el aparato y desconectarlo de la red eléctrica para
evitar la posibilidad de una descarga eléctrica.
INSTRUCCIONES PARA LA INSTALACIÓN
Estas instrucciones están hechas para que un insta-
lador especializado las siga y son una guía para la
instalación, el ajuste y el mantenimiento de acuerdo
con las leyes y reglamentos vigentes. Si un horno
empotrado o cualquier otro aparato generador de
calor se instala directamente debajo de una placa
de cocción en vitrocerámica, ES NECESARIO QUE
EL APARATO (HORNO) Y LA PLACA DE COCCIÓN
EN VITROCERÁMICA ESTÉN CORRECTAMENTE
AISLADOS. El no hacerlo podría dar lugar a un mal
funcionamiento del sistema di TOUCH CONTROL.
. Posicionamiento:
El aparato está proyectado para ser empotrado en
una superficie de trabajo, como se muestra (Fig.2).
Predisponer material sellante a lo largo de todo el
perímetro - Figura 4 (tamaño del corte Fig.2). Esto
es necesario para evitar que los líquidos entren
dentro de la placa, ya que no es posible asegurar
la planitud de la mesada y del vidrio y su acopla-
miento. Bloquear el aparato sobre la superficie de
trabajo por medio de los 4 soportes , teniendo en
cuenta el espesor del plano de trabajo (Fig.2). Si la
parte inferior del aparato, después de la instalación,
es accesible desde la parte inferior del mueble es
necesario montar un panel separador respetando
las distancias indicadas (Figura 3), se necesita un
espacio libre por debajo de la caja del aparato, para
permitir una correcta ventilación del aparato. Si se
instala debajo de un horno esto no es necesario. El
aparato no está proyectado para ser manejado por
medio de un temporizador externo o por un sistema
de control remoto. La distancia de seguridad entre
el aparato y la campana de extracción puesta sobre
el mismo tiene que ser aquella proporcionada por el
fabricante de la campana.
• Conexiones eléctricas (Figura 7):
Antes de realizar las conexiones eléctricas ase-
gúrese de que:
- El cable eléctrico de tierra sea de 2 cm más largo
que los otros cables;
- Las características de la instalación cumplan con
las indicaciones de la etiqueta de identificación apli-
cada en la parte inferior de la superficie de trabajo;
- La instalación esté equipada con una conexión a
tierra eficiente de conformidad con las normas y las
disposiciones legales vigentes.
La puesta a tierra es requerida por la ley.
En el caso de que el electodoméstico no esté provi-
sto de cable y / o de enchufe, usar material adecua-
do para la absorción como indicado en la etiqueta
de identificación y para la temperatura de funciona-
miento.
Si se desea una conexión directa a la línea eléctrica,
tiene que utilizar un interruptor bipolar con una aper-
tura mínima de 3 mm entre los contactos, apropiada
a la carga indicada en la etiqueta y tiene que cum-
plir con la normativa vigente (el conductor de tier-
ra amarillo /verde no tiene que interrumpirse con el
conmutador).

18
Después de la instalación de los aparatos, el inter-
ruptor bipolar tiene que ser de fácil acceso. El cable
de alimentación, una vez instalado el aparato no
tiene que ser sometido a esfuerzos mecánicos (por
ejemplo. Aplastamiento debido al movimiento de los
cajones) y no tiene que entrar en contacto con las
partes calientes de la placa.
USO Y MANTENIMIENTO
• Mantenimiento (Figura 6):
Antes de limpiar la placa de cocción esperar a que se
enfríe. Retire todos los residuos de comida y gotas
de grasa de la superficie de cocción utilizando el ra-
scador especial suministrado mediante solicitación.
Limpie el área calentada de la mejor manera posible
mediante el uso de productos adecuados y con un
papel de tela, luego enjuague con agua y seque con
un paño limpio. Usando la espátula especial (opcio-
nal), retire inmediatamente del área calentada de
cocción piezas de papel de aluminio y de plástico
derretidas inadvertidamente o residuos de azúcar o
alimentos con un alto contenido de azúcar. De esta
manera se evita cualquier posible daño a la superfi-
cie de la placa. Bajo ninguna circunstancia se tienen
que usar esponjas abrasivas o detergentes químicos
irritantes tales como sprays para hornos o quitaman-
chas.
ATENCIÓN: NO SE TIENE QUE USAR UN LIM-
PIADOR A VAPOR.
Uso:
La característica fundamental del sistema de in-
ducción es la transferencia directa de energía con
el calor desde el generador hacia el recipiente de
cocción.
Ventajas:
- La transferencia de energía se lleva a cabo sólo
cuando el recipiente se coloca sobre la zona de coc-
ción.
- El calor se genera solamente en la parte inferior del
recipiente y se transmite directamente a la comida
que se está cocinando.
- Reducción de los tiempos de calentamiento y me-
nor consumo de energía durante el inicio de la coc-
ción, permiten un ahorro global de energía.
- La placa de vitrocerámica se mantiene fría. El calor
que se siente en la placa de cocción es el que se
refleja desde el fondo del recipiente.
RECIPIENTES PARA COCINAR
El uso de recipientes apropiados es un factor esen-
cial para la cocción por inducción.
Compruebe que sus ollas sean adecuadas para el
sistema de inducción.
Por lo tanto, los recipientes deberán contener hierro.
Se puede comprobar si el material de la olla es ma-
gnético con un simple imán.
Se aconsejan recipientes con fondo plano (Figura 5).
No utilizar recipientes con una superficie rugosa,
para evitar que se raye la superficie térmica de la
placa de cocción.
De esta manera, la energía puede utilizarse óptim-
amente. Un factor importante en la cocción por in-
ducción es sobretodo el tamaño de la olla en relación
con la placa utilizada (Fig.5).
Las zonas de cocción permiten el uso de recipientes
con fondos de varios diámetros. Aunque resulta pre-
ferible utilizar la zona de cocción adecuada para el
diámetro de la olla que desea utilizar.
DIAMETRO AREA DE
COCINAR
POT DIAMETRO MINIMO
Ø 145 mm 80 mm
Ø 210 mm 130 mm
Ø 240 mm 160 mm
FUNCIONAMIENTO
A - Tecla On/Off
B - Tecla bloque teclado
C - Tecla pausa
D - Teclas de selección de la zona de cocción
E - Slider selección de potencia
F - Tecla de aumento “+”
G - Tecla de disminución “-”
H - Display temporizador
I - Display zona de cocción
CONFIGURACIÓN DE POTENCIAS
Antes de iniciar la operación tiene que desconectar
y volver a conectar la placa de cocción a la red
eléctrica. Para realizar la configuración de las poten-
cias sacar el bloque de comando pulsando la tecla
B, a continuación, pulse simultáneamente la tecla F,
la tecla G y la tecla A
Aparecerá en la pantalla de control táctil “Po”, arriba
de las teclas del temporizador, el número 7 (en el
área de visualización a la izquierda), el número 2 (en
el área de visualización derecha) y el LED de la tecla
llave parpadea. Para cambiar el nivel de la potencia
pulse el botón B, en la pantalla se verán 4 niveles de
posibles confuguraciones: 2,8 - 3,5 - 6,0 - 7,20 kw.
ABE
C
FG
DDDH I I I
Una vez que haya elegido el nivel de potencia de-
seado pulsar simultáneamente las teclas F y G del
temporizador y la tecla A, la placa se apagará y vol-
verá a la configuración inicial con la llave introducida.
Atención, cada vez que el usuario intente aumentar
la potencia, el nivel de potencia total de la placa de
cocción se vuelve a calcular. Si este nivel de poten-

19
cia total es mayor del límite de potencia permitido
para la placa de cocción, el aumento de potencia no
se tendrá en consideración. Una alarma acústica se
escuchará y la pantalla de calentamiento mostrará
una “r” durante 3 segundos.
CALIBRACIÓN TOUCH
El error F / L se puede generar dentro de 3s más o
menos después de haberla encendido inicialmente.
Le recomendamos que apague las luces de la cam-
pana y la iluminación directa hacia la superficie de la
placa de cocción. Después de que el el control del
Touch haya llevado a cabo el proceso de calibración
inicial, (má o menos 3s) cualquier campana u otra
iluminación puede encenderse y no afectará más el
funcionamiento del TOUCH CONTROL.
BLOQUEO de MANDOS
La tecla B bloquea el funcionamiento de la placa de
cocción en el estado en el que se encuentra, evitan-
do cualquier operación no intencional (por ejemplo.
La de los los niños). En esta situación ninguna ac-
ción sobre las teclas tendrá efecto. Para activar la
función de seguridad, pulse la tecla B hasta que se
encienda la luz.
Cuando el bloqueo de mandos esté encendido, se
puede igualmente apagar la placa de cocción. De
esta manera, el bloqueo de mandos permanecerá
activado incluso cuando se volverá a encender la
placa de cocción. Para desbloquearlo, pulse la tecla
B hasta que se apague la luz.
ENCENDIDO DE LA PLACA DE COCCIÓN (ENCI-
MERA)
Para encender el aparato, pulse la tecla A, la pantalla
se encenderá en posición de espera (standby).
La unidad de control permanecerá activa durante un
tiempo de 10 segundos. Si dentro de este periodo no
se seleccionará ninguna zona de cocción esta se
apagará automáticamente.
ENCENDIDO DE LA ZONA DE COCCIÓN
Para seleccionar la zona de cocción deseada, pulse
la correspondiente tecla D y pulse dentro de10 se-
gundos la tecla slider para ajustar la potencia.
La potencia de la zona de cocción puede ser aju-
stada en 9 posiciones diferentes, y se mostrará en la
pantalla luminosa con un número de “1 a 9”.
CALENTAMIENTO VELOZ / BOOSTER
Esta función reduce aún más el tiempo de cocción
de una zona determinada, aumentando la tempera-
tura a la potencia máxima por un periodo de 10 mi-
nutos. Al final de este período, el poder de la zona de
cocción vuelve automáticamente al nivel 9.
El uso de esta función está indicada para el calen-
tamiento en tiempos muy cortos de grandes canti-
dades de líquido (por ejemplo agua para cocinar. La
pasta) o comidas.
Para activar esta función, seleccione la zona de coc-
ción y pulse la tecla slider E hasta el nivel 9. Pulse
nuevamente la tecla slider E y el símbolo se mo-
strará en la pantalla en la zona correspondiente.
PAUSA / RECLAMO (Stop & Go)
La función se activa pulsando la tecla C y permite la
pausa temporal de la cocción, lo que permite a los
usuarios poder ir hacia la puerta si alguien llega o
responder al teléfono sin tener que preocuparse si
el agua hierve. Esta función también es útil para la
limpieza de la superficie de la interfaz del usuario sin
cambiar la cocción elegida.
Uno se da cuenta de que la función està activada
porque todas las pantallas se iluminarán con un
mensaje que gira continuamente.
Para restablecer la cocción, pulse la tecla C, la placa
de cocción volverá a la configuración original.
Después de10 minutos de la configuración de la
pausa, si no se restablece la cocción la placa se
apagará.
TEMPORIZADOR
Esta función permite apagar automáticamente una
zona de cocción después de un cierto tiempo. Se-
leccionar una zona de cocción y pulsar una de las
teclas G o F y configurar el temporizador de 1 a 99
minutos. El LED de la zona seleccionada parpade-
ará y el tiempo partirá, cuando este llegará a cero,
el LED de la zona seleccionada se apagará con un
pitido intermitente.
Para desactivar el sonido acústico pulse cualquier
tecla de la encimera.
CALOR RESIDUAL
Si la temperatura de una zona de cocción sigue sien-
do alta (por encima de 50 °) después de haber sido
apagada, la pantalla de esa zona muestra el símbolo
(calor residual). La indicación desaparece sólo cuan-
do ya no hay ningún riesgo de quemaduras.
RECONOCIMIENTO DE OLLAS
Si en una de las pantallas de una zona de cocción
apareciera el símbolo, significa que:
1) el recipiente utilizado no es adecuado para la coc-
ción por inducción.
2) el diámetro de la olla utilizada es menor del permi-
tido por el aparato.
3) en la placa no está presente ninguna olla.
APAGAR LA ZONA DE COCCIÓN
Para apagar una zona de cocción seleccio-
narla pulse la tecla D y luego actuar sobre la tecla
slider E hasta llegar a la posición.
APAGAR LA PLACA DE COCCIÓN O ENCIMERA
Para apagar completamente la placa de cocción pul-
se la tecla A.
APAGADO DE SEGURIDAD
El aparato tiene un sistema de seguridad que apa-

20
ga automáticamente la zona de cocción después de
que el límite de tiempo de encendido a una cierta
potencia se haya terminado
La Directiva Europea 2002/96 / CE sobre los resi-
duos de aparatos eléctricos y electrónicos (RAEE)
establece que los electrodomésticos no deben ser
eliminados mediante los normales residuos sólidos
urbanos. Los Aparatos que no se utilizan más tienen
que ser recogidos por separado para optimizar la re-
cuperación y reciclado de los materiales que contie-
nen y reducir posibles daños a la salud y al medio
ambiente. El símbolo con el cesto de basura tachada
Identificador del modelo
3
1. = Inducción
2. = Inducción
3. = Inducción
1. = 230x390
2. = Ø 140-280
3. = 230x390
mm
Wh/kg 1. = 193,6
2. = 173,2
3. = 193,6
(EC )
Wh/kg 186,8
Información sobre placas eléctricas
según reglamento (UE) nº 66/2014
1. = 230x390
2. = Ø 140-280
3. = 230x390
1. = 193,6
2. = 173,2
3. = 193,6
186,8
1. = Ø 240
2. = Ø 145
3. = Ø 210
mm
1. = 183,6
2. = 176,9
3. = 181,0
(EC
Wh/kg 180,5
Wh/kg
por kg (EC
cocción eléctrica
)
1
2
3
Tipo de placa de cocina doméstica incorporado
Número de selectorse de los focos y/o zonas de cocción
Tecnología de calentamiento
Focos y zonas de cocción por inducción, focos de cocción por
radiación.
Para zonas de coción circulares: diámetro de la superficie
útil/zona de cocción.
Para focos o zonas de cocción no circulares: ancho y largo
de la superficie útil de cada foco o zona de cocción.
Consumo de energía por zona de cocción, calculado
Consumo de energía de la placa, calculado por kg
placa eléctrica
7330241
està dibujado en todos los productos para recordar
la obligación de recolección separada. Para obtener
más información acerca de la correcta eliminación de
los electrodomésticos, los propietarios pueden con-
tactar la autoridad local o quien le vendió el aparato.
SE DECLINA TODA RESPONSABILIDAD POR
DAÑOS CAUSADOS POR LA INOBSERVANCIA
DE LAS ADVERTENCIAS DICHAS ANTERIOR-
MENTE. LA GARANTÍA NO ES VÁLIDA EN EL
CASO DE DAÑOS PROVOCADOS POR LA INOB-
SERVANCIA DE LAS ADVERTENCIAS DICHAS
ANTERIORMENTE.
Strona się ładuje...
Strona się ładuje...
Strona się ładuje...
Strona się ładuje...
Strona się ładuje...
Strona się ładuje...
Strona się ładuje...
Strona się ładuje...
Strona się ładuje...
Strona się ładuje...
Strona się ładuje...
Strona się ładuje...
-
 1
1
-
 2
2
-
 3
3
-
 4
4
-
 5
5
-
 6
6
-
 7
7
-
 8
8
-
 9
9
-
 10
10
-
 11
11
-
 12
12
-
 13
13
-
 14
14
-
 15
15
-
 16
16
-
 17
17
-
 18
18
-
 19
19
-
 20
20
-
 21
21
-
 22
22
-
 23
23
-
 24
24
-
 25
25
-
 26
26
-
 27
27
-
 28
28
-
 29
29
-
 30
30
-
 31
31
-
 32
32


Foster 7330/241 Use And Maintenance Instructions
- Typ
- Use And Maintenance Instructions
w innych językach
- español: Foster 7330/241
- italiano: Foster 7330/241
- Deutsch: Foster 7330/241
- français: Foster 7330/241
- English: Foster 7330/241
Powiązane artykuły
Inne dokumenty
-
Bauknecht ESPIF 8950 IN Instrukcja obsługi
-
Electrolux EHL6740IOK Instrukcja obsługi
-
-
Falmec Quantum Pro Easy Instrukcja obsługi
-
Whirlpool AKS 369/NE instrukcja
-
-
Haier HAIDSJ63MC Instrukcja obsługi
-
Haier HAISJ64MC Instrukcja obsługi
-
Candy CIES55MCTT Instrukcja obsługi
-
Hoover HI642MC Instrukcja obsługi