Indesit IWC 8128 B (EU) instrukcja
- Kategoria
- Pralki
- Typ
- instrukcja

GB
1
Contents
Installation, 2-3
Unpacking and levelling
Connecting the electricity and water supplies
The first wash cycle
Technical data
Description of the washing machine
and starting a wash cycle, 4-5
Control panel
Indicator lights
Starting a wash cycle
Wash cycles, 6
Table of wash cycles
Personalisation, 7
Setting the temperature
Setting the spin speed
Functions
Detergents and laundry, 8
Detergent dispenser drawer
Bleach cycle
Preparing the laundry
Garments requiring special care
Load balancing system
Precautions and tips, 9
General safety
Disposal
Care and maintenance, 10
Cutting off the water or electricity supply
Cleaning the washing machine
Cleaning the detergent dispenser drawer
Caring for the door and drum of your appliance
Cleaning the pump
Checking the water inlet hose
Troubleshooting, 11
Service, 12
IWC 8128
Instructions for use
WASHING MACHINE
English,1
GB
Polski,13
PL

2
GB
Installation
This instruction manual should be kept in a safe
place for future reference. If the washing machine is
sold, transferred or moved, make sure that the
instruction manual remains with the machine so that
the new owner is able to familiarise himself/herself
with its operation and features.
Read these instructions carefully: they contain vital
information relating to the safe installation and
operation of the appliance.
Unpacking and levelling
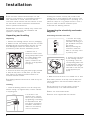
Unpacking
1. Remove the washing machine from its packaging.
2. Make sure that the washing machine has not been
damaged during the transportation process. If it has
been damaged, contact the retailer and do not
proceed any further with the installation process.
3. Remove the 4
protective screws (used
during transportation) and
the rubber washer with
the corresponding
spacer, located on the
rear part of the appliance
(see figure).
4. Close off the holes using the plastic plugs provided.
5. Keep all the parts in a safe place: you will need
them again if the washing machine needs to be
moved to another location.
Packaging materials should not be used as toys for
children.
Levelling
1. Install the washing machine on a flat sturdy floor,
without resting it up against walls, furniture cabinets
or anything else.
2. If the floor is not
perfectly level, compen-
sate for any unevenness
by tightening or loosening
the adjustable front feet
(see figure); the angle of
inclination, measured in
relation to the worktop,
must not exceed 2°.
Levelling the machine correctly will provide it with
stability, help to avoid vibrations and excessive noise
and prevent it from shifting while it is operating. If it is
placed on carpet or a rug, adjust the feet in such a
way as to allow a sufficient ventilation space
underneath the washing machine.
Connecting the electricity and water
supplies
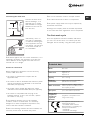
Connecting the water inlet hose
1. Connect the supply
pipe by screwing it to a
cold water tab using a ¾
gas threaded connection
(see figure).
Before performing the
connection, allow the
water to run freely until it
is perfectly clear.
2. Connect the inlet hose
to the washing machine
by screwing it onto the
corresponding water inlet
of the appliance, which is
situated on the top right-
hand side of the rear part
of the appliance (see
figure).
3. Make sure that the hose is not folded over or bent.
The water pressure at the tap must fall within the
values indicated in the Technical details table (see
next page).
If the inlet hose is not long enough, contact a
specialised shop or an authorised technician.
Never use second-hand hoses.
Use the ones supplied with the machine.

GB
3
Technical data
Model
IWC 8128
Dimensions
width 59.5 cm
height 85 cm
depth 60 cm
Capacity
from 1 to 8 kg
Electrical
connections
please refer to the technical data
plate fixed to the machine
Water connections
maximum pressure 1 MPa (10 bar)
minimum pressure 0.05 MPa (0.5 bar)
drum capacity 62 litres
Spin speed
up to 1200 rotations per minute
Energy rated
programmes
according to
regulation
EN 60456
programme 2; temperature 60°C;
using a load of 8 kg.
This appliance conforms to the
following EC Directives:
- 89/336/EEC dated 03/05/89
(Electromagnetic Compatibility) and
subsequent modifications
- 2002/96/EC
- 2006/95/EC Low Voltage)
65 - 100 cm
Connecting the drain hose
Connect the drain hose,
without bending it, to a
drainage duct or a wall
drain located at a height
between 65 and 100 cm
from the floor;
alternatively, rest it on
the side of a washbasin
or bathtub, fastening the
duct supplied to the tap
(see figure). The free end
of the hose should not
be underwater.
We advise against the use of hose extensions; if it is
absolutely necessary, the extension must have the
same diameter as the original hose and must not
exceed 150 cm in length.
Electrical connections
Before plugging the appliance into the electricity
socket, make sure that:
the socket is earthed and complies with all
applicable laws;
the socket is able to withstand the maximum power
load of the appliance as indicated in the Technical
data table (see opposite);
the power supply voltage falls within the values
indicated in the Technical data table (see opposite);
the socket is compatible with the plug of the
washing machine. If this is not the case, replace
the socket or the plug.
The washing machine must not be installed
outdoors, even in covered areas. It is extremely
dangerous to leave the appliance exposed to rain,
storms and other weather conditions.
When the washing machine has been installed, the
electricity socket must be within easy reach.
Do not use extension cords or multiple sockets.
The cable should not be bent or compressed.
The power supply cable must only be replaced by
authorised technicians.
Warning! The company shall not be held responsible
in the event that these regulations are not respected.
The first wash cycle
Once the appliance has been installed, and before
you use it for the first time, run a wash cycle with
detergent and no laundry, using the wash cycle 2.

4
GB
Detergent dispenser drawer: used to dispense
detergents and washing additives (see Detergents
and laundry).
ON/OFF button: switches the washing machine on
and off.
WASH CYCLE knob: programmes the wash cycles.
During the wash cycle, the knob does not move.
FUNCTION buttons with indicator light: used to
select the available functions. The indicator light
corresponding to the selected function will remain lit.
TEMPERATURE knob: sets the temperature or the
cold wash cycle (see Personalisation).
SPIN SPEED knob: sets the spin speed or exclude
the spin cycle completely (see Personalisation).
WASH CYCLE PROGRESS/DELAY TIMER
indicator light
s: used to monitor the progress of the
wash cycle.
The illuminated indicator light shows which phase is in
progress.
If the Delay Timer function has been set, the time
remaining until the wash cycle starts will be indicated
(see next page).
DOOR LOCKED indicator light: indicates whether
the door may be opened or not (see next page).
START/PAUSE button with indicator light: starts or
temporarily interrupts the wash cycles.
N.B. To pause the wash cycle in progress, press this
button; the corresponding indicator light will flash
orange, while the indicator light for the current wash
cycle phase will remain lit in a fixed manner. If the
DOOR LOCKED
indicator light is switched off, the
door may be opened.
To start the wash cycle from the point at which it was
interrupted, press this button again.
Standby mode
This washing machine, in compliance with new
energy saving regulations, is fitted with an automatic
standby system which is enabled after a few minutes
if no activity is detected. Press the ON-OFF button
briefly and wait for the machine to start up again.
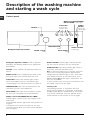
Description of the washing machine
and starting a wash cycle
WASH CYCLE PROGRESS/
DELAY TIMER
indicator lights
DOOR LOCKED
indicator light
START/
PAUSE
button with
indicator light
Control panel
Detergent dispenser drawer
ON/OFF
button
WASH CYCLE
knob
TEMPERATURE
knob
FUNCTION
buttons with
indicator lights
SPIN SPEED
knob

GB
5
Indicator lights
The indicator lights provide important information.
This is what they can tell you:
Delayed start
If the DELAY TIMER function has been activated (see
Personalisation), after the wash cycle has been
started the indicator light corresponding to the
selected delay period will begin to flash:
As time passes, the remaining delay will be displayed
and the corresponding indicator light will flash:
The set programme will start once the selected time
delay has expired.
Wash cycle phase indicator lights
Once the desired wash cycle has been selected and has
begun, the indicator lights switch on one by one to
indicate which phase of the cycle is currently in progress.
Function buttons and corresponding indicator lights
When a function is selected, the corresponding
indicator light will illuminate.
If the selected function is not compatible with the
programmed wash cycle, the corresponding indicator
light will flash and the function will not be activated.
If the selected function is not compatible with another
function which has been selected previously, the
indicator light corresponding to the first function
selected will flash and only the second function will be
activated; the indicator light corresponding to the
enabled option will remain lit.
Door locked indicator light
When the indicator light is on, the porthole door is
locked to prevent it from being opened; make sure
the indicator light is off before opening the door (wait
approximately 3 minutes). To open the door during a
running wash cycle, press the START/PAUSE button;
the door may be opened once the DOOR LOCKED
indicator light turns off.
Fast flashing of the "programme phases" and DOOR
LOCKED indicator lights indicate an anomaly (see
Troubleshooting).
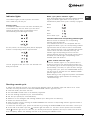
Starting a wash cycle
1. Switch the washing machine on by pressing the ON/OFF button. All indicator lights will switch on for a few
seconds, then they will switch off and the START/PAUSE indicator light will pulse.
2. Load the laundry and close the door.
3. Set the WASH CYCLE knob to the desired programme.
4. Set the washing temperature (see Personalisation).
5. Set the spin speed (see Personalisation).
6. Measure out the detergent and washing additives (see Detergents and laundry).
7. Select the desired functions.
8. Start the wash cycle by pressing the START/PAUSE button and the corresponding indicator light will remain lit
in a fixed manner, in green.
To cancel the set wash cycle, pause the machine by pressing the START/PAUSE button and select a new cycle.
9. At the end of the wash cycle the
indicator light will switch on. The door can be opened once the DOOR
LOCK
indicator light turns off. Take out your laundry and leave the appliance door ajar to make sure the drum
dries completely. Switch the washing machine off by pressing the ON/OFF button.
Wash
Rinse
Spin
Drain
End of wash cycle

6
GB
Specials wash cycles
Express (wash cycle 9) this wash cycle was designed to wash lightly soiled garments quickly: it lasts just 15 minutes and
therefore saves both energy and time. By selecting this wash cycle (9 at 30°C), it is possible to wash different fabrics
together (except for wool and silk items), with a maximum load of 1.5 kg.
Outwear (
wash cycle
10) is studied for washing water-repellent fabrics and winter jackets (e.g. Gore-Tex, polyester,
nylon); for best results, use a liquid detergent and dosage suitable for a half-load; pre-treat necks, cuffs and stains
if necessary; do not use softeners or detergents containing softeners. Stuffed duvets cannot be washed with this
programme.
Sport Intensive (
wash cycle
11) is for washing heavily soiled sports clothing fabrics (tracksuits, shorts, etc.);
for best results, we recommend not exceeding the maximum load indicated in the "Table of wash cycles".
Sport Light (
wash cycle
12) is for washing lightly soiled sports clothing fabrics (tracksuits, shorts, etc.); for
best results, we recommend not exceeding the maximum load indicated in the "Table of wash cycles". We
recommend using a liquid detergent and dosage suitable for a half-load.
Sport Shoes (
wash cycle
13) is for washing sports shoes; for best results, do not wash more than 2 pairs
simultaneously.
Wash cycles
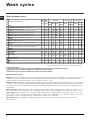
The information contained in the table is intended as a guide only.
For all Test Institutes:
1) Test wash cycle in compliance with regulation EN 60456: set wash cycle 2 with a temperature of 60°C.
2) Long wash cycle for cottons: set wash cycle 2 with a temperature of 40°C.
3) Short wash cycle for cottons: set wash cycle 4 with a temperature of 40°C.
Wash cycles
Table of wash cycles
Description of the wash cycle
Max
.
temp.
(°C)
Max.
speed
(rpm)
Detergents Max. load (kg) Cycle duration
Pre-
wash
Wash Bleach
Fabric
softener
Normal
Mini
load
Eco
Time
Normal
Mini
load
Eco
Time
Daily
1
Cotton with prewash:
extremely soiled whites.
90° 1200
ll
-
l
84
-
183 133
-
2
Cotton:
extremely soiled whites.
90° 1200
-
ll l
84
-
164 122
-
2
Cotton (1):
heavily soiled whites and resistant colours.
60° 1200
-
ll l
84
-
180 124
-
2
Cotton (2):
heavily soiled whites and delicate colours.
40° 1200
-
ll l
84
-
147 97
-
3
Cotton:
heavily soiled whites and resistant colours.
60° 1200
-
ll l
8 4 4 144 124 115
4
Coloured Cottons (3):
lightly soiled whites and delicate colours.
40° 1200
-
ll l
844967175
5
Synthetics:
lightly soiled resistant colours.
60° 800
-
ll l
3,5 1,5 2,5 85 65 60
Special
6
Wool:
for wool, cashmere, etc.
40° 600
-
l
-
l
21
-
55 51
-
7
Silk/Curtains:
for garments in silk and viscose, lingerie.
30° 0
-
l
-
l
21
-
55 51
-
8
Jeans
40° 800
-
l
-
l
4
-
-
80
-
-
9
Express:
to refresh lightly soiled garments quickly (not suitable
for wool, silk and clothes which require washing by hand).
30° 800
-
l
-
l
1,5
-
-
15
-
-
10
Outwear
30° 400
-
l
- -
2,5
-
-
46
-
-
Sport
11
Sport Intensive
30° 600
-
l
-
l
4
- -
80
- -
12
Sport Light
30° 600
-
l
-
l
4
- -
70
- -
13
Sport Shoes
30° 600
-
l
-
l
Max. 2
pairs
-
-
50
-
-
Partial wash cycles
Rinse
-
1200
- -
ll
84
-
36 32
-
Spin
-
1200
- - - -
8
-
-
16
-
-
Drain
-
0
- - - -
8
-
-
2
-
-

GB
7
Setting the temperature
Turn the TEMPERATURE knob to set the wash temperature (see Table of wash cycles).
The temperature may be lowered, or even set to a cold wash
.
The washing machine will automatically prevent you from selecting a temperature which is higher than the
maximum value set for each wash cycle.
Setting the spin speed
Turn the SPIN SPEED knob to set the spin speed for the selected wash cycle.
The maximum spin speeds available for each wash cycle are as follows:
Wash cycles Maximum spin speed
Cottons 1200 rpm
Synthetics 800 rpm
Wool 600 rpm
Silk drain only
The spin speed may be lowered, or the spin cycle can be excluded altogether by selecting the symbol
.
The washing machine will automatically prevent you from selecting a spin speed which is higher than the
maximum speed set for each wash cycle.
Functions
The various wash functions available with this washing machine will help to achieve the desired results, every time.
To activate the functions:
1. Press the button corresponding to the desired function;
2. the function is enabled when the corresponding indicator light is illuminated.
Note: If the indicator light flashes rapidly, this signals that this particular function may not be selected in
conjunction with the selected wash cycle.
Selecting this option enables you to suitably adjust drum rotation, temperature and water to a reduced load of
lightly soiled cotton and synthetic fabrics (refer to the
"Table of wash cycles"
). enables you to wash in less
time thereby saving water and electricity. We suggest using a liquid detergent suitably measured out to the load
quantity.
This function may not be used in conjunction with wash cycles 1, 2, 6, 7, 8, 9, 10, 11, 12, 13, , , .
Stain removal
Bleaching cycle designed to remove the toughest stains. Please remember to pour the bleach into extra
compartment 4 (see Bleach cycle).
This function may not be used in conjunction with wash cycles 1, 6, 7, 8, 9, 10, 11, 12, 13, , .
Mini load
This option is recommended for when the load of laundry is equal to half, or less than half, of the maximum
recommended load (see Table of wash cycles).
This function may not be used in conjunction with wash cycles 8, 9, 10, 11, 12, 13, , .
Delay timer
This timer delays the start time of the wash cycle by up to 12 hours.
Press the button repeatedly until the indicator light corresponding to the desired delay time switches on. The fifth time
the button is pressed, the function will be disabled.
N.B. Once the START/PAUSE button has been pressed, the delay time can only be modified by decreasing it until launching
the set programme.
This option is enabled with all programmes.
Personalisation

8
GB
Detergents and laundry
Detergent dispenser drawer
Good washing results also depend on the correct
dose of detergent: adding too much detergent will not
necessarily result in a more efficient wash, and may in
fact cause build up on the inside of your appliance
and contribute to environmental pollution.
Do not use hand washing detergents because these
create too much foam.
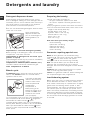
Open the detergent
dispenser drawer and
pour in the detergent or
washing additive, as
follows.
ompartment 1: Pre-wash detergent (powder)
Before pouring in the detergent, make sure that extra
compartment 4 has been removed.
compartment 2: Detergent for the wash cycle
(powder or liquid)
Liquid detergent should only be poured in immediately
prior to the start of the wash cycle.
compartment 3: Additives (fabric softeners, etc.)
The fabric softener should not overflow the grid.
extra compartment 4: Bleach
Bleach cycle
Traditional bleach should be used on sturdy white
fabrics, and delicate bleach for coloured fabrics,
synthetics and for wool.
This option is particularly
useful for the removal of
stubborn stains. Place
extra compartment 4
(supplied) into
compartment 1.
When pouring in the
bleach, be careful not to
exceed the "max" level
marked on the central
pivot (see figure).
To run the bleach cycle on its own, pour the bleach into
extra compartment 4, set the "Rinse"
programme
and activate the "Stain removal"
option.
To bleach during a wash cycle, pour in the detergent
and any fabric softener you wish to use, set the desired
wash cycle and enable the "Stain removal"
option.
The use of extra compartment 4 excludes the Pre-
wash option.
1
2
3
4
Preparing the laundry
Divide the laundry according to:
- the type of fabric/the symbol on the label
- the colours: separate coloured garments from
whites.
Empty all garment pockets and check the buttons.
Do not exceed the listed values, which refer to the
weight of the laundry when dry:
Durable fabrics: max. 8 kg
Synthetic fabrics: max. 3,5 kg
Delicate fabrics: max. 2 kg
Wool: max. 2 kg
Silk: max. 2 kg
How much does your laundry weigh?
1 sheet 400-500 g
1 pillow case 150-200 g
1 tablecloth 400-500 g
1 bathrobe 900-1200 g
1 towel 150-250 g
Garments requiring special care
Wool: all wool garments can be washed using
programme 6, even those carrying the "hand-wash
only"
label. For best results, use special
detergents and do not exceed 2 kg of laundry.
Silk: use special wash cycle 7 to wash all silk
garments. We recommend the use of special
detergent which has been designed to wash delicate
clothes.
Curtains: fold curtains and place them in a pillow
case or mesh bag. Use wash cycle 7.
Jeans: Turn garments inside-out before washing and
use a liquid detergent. Use programme 8.
Load balancing system
Before every spin cycle, to avoid excessive vibrations
and to distribute the load in a uniform manner, the
drum rotates continuously at a speed which is slightly
greater than the washing rotation speed. If, after
several attempts, the load is not balanced correctly,
the machine spins at a reduced spin speed. If the
load is excessively unbalanced, the washing machine
performs the distribution process instead of spinning.
To encourage improved load distribution and balance,
we recommend small and large garments are mixed
in the load.

GB
9
Precautions and tips
This washing machine was designed and
constructed in accordance with international safety
regulations. The following information is provided for
safety reasons and must therefore be read carefully.
General safety
This appliance was designed for domestic use only.
The washing machine must only be used by adults, in
accordance with the instructions provided in this manual.
Do not touch the machine when barefoot or with
wet or damp hands or feet.
Do not pull on the power supply cable when
unplugging the appliance from the electricity
socket. Hold the plug and pull.
Do not open the detergent dispenser drawer while
the machine is in operation.
Do not touch the drained water as it may reach
extremely high temperatures.
Never force the porthole door. This could damage
the safety lock mechanism designed to prevent
accidental opening.
If the appliance breaks down, do not under any
circumstances access the internal mechanisms in
an attempt to repair it yourself.
Always keep children well away from the appliance
while it is operating.
The door can become quite hot during the wash cycle.
If the appliance has to be moved, work in a group
of two or three people and handle it with the utmost
care. Never try to do this alone, because the
appliance is very heavy.
Before loading laundry into the washing machine,
make sure the drum is empty.
Disposal
Disposing of the packaging materials: observe local
regulations so that the packaging may be re-used.
The European Directive 2002/96/EC on Waste
Electrical and Electronic Equipment, requires that
old household electrical appliances must not be
disposed of in the normal unsorted municipal waste
stream. Old appliances must be collected
separately in order to optimise the recovery and
recycling of the materials they contain and reduce
the impact on human health and the environment.
The crossed out "wheeled bin" symbol on the
product reminds you of your obligation, that when
you dispose of the appliance it must be separately
collected.
Consumers should contact their local authority or
retailer for information concerning the correct
disposal of their old appliance.

10
GB
Care and maintenance
Cutting off the water and electricity
supplies
Turn off the water tap after every wash cycle. This
will limit wear on the hydraulic system inside the
washing machine and help to prevent leaks.
Unplug the washing machine when cleaning it and
during all maintenance work.
Cleaning the washing machine
The outer parts and rubber components of the
appliance can be cleaned using a soft cloth soaked
in lukewarm soapy water. Do not use solvents or
abrasives.
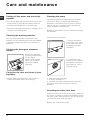
Cleaning the detergent dispenser
drawer
Remove the dispenser
by raising it and pulling it
out (see figure).
Wash it under running
water; this operation
should be repeated
frequently.
Caring for the door and drum of your
appliance
Always leave the porthole door ajar in order to
prevent unpleasant odours from forming.
Cleaning the pump
The washing machine is fitted with a self-cleaning
pump which does not require any maintenance.
Sometimes, small items (such as coins or buttons)
may fall into the pre-chamber which protects the
pump, situated in its bottom part.
Make sure the wash cycle has finished and unplug
the appliance.
To access the pre-chamber:
1. using a screwdriver,
remove the cover panel
on the lower front part of
the washing machine
(see figure);
2. unscrew the lid by
rotating it anti-clockwise
(see figure): a little water
may trickle out. This is
perfectly normal;
3. clean the inside thoroughly;
4. screw the lid back on;
5. reposition the panel, making sure the hooks are
securely in place before you push it onto the
appliance.
Checking the water inlet hose
Check the inlet hose at least once a year. If there are
any cracks, it should be replaced immediately: during
the wash cycles, water pressure is very strong and a
cracked hose could easily split open.
Never use second-hand hoses.

GB
11
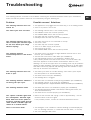
Troubleshooting
Your washing machine could fail to work. Before contacting the Technical Assistance Centre (see Assistance),
make sure that the problem cannot be not solved easily using the following list.
Problem:
The washing machine does not
switch on.
The wash cycle does not start.
The washing machine does not
take in water (the indicator light
for the first wash cycle stage
flashes rapidly).
The washing machine
continuously takes in and drains
water.
The washing machine does not
drain or spin.
The washing machine vibrates a
lot during the spin cycle.
The washing machine leaks.
The "option" indicator lights and
the "start/pause" indicator light
flash, while one of the "phase in
progress" indicator lights and the
"door locked" indicator light will
remain lit in a fixed manner.
There is too much foam.
Possible causes / Solutions:
The appliance is not plugged into the socket fully, or is not making contact.
There is no power in the house.
The washing machine door is not closed properly.
The ON/OFF button has not been pressed.
The START/PAUSE button has not been pressed.
The water tap has not been opened.
A delayed start has been set (see Personalisation).
The water inlet hose is not connected to the tap.
The hose is bent.
The water tap has not been opened.
There is no water supply in the house.
The pressure is too low.
The START/PAUSE button has not been pressed.
The drain hose is not fitted at a height between 65 and 100 cm from
the floor (see Installation).
The free end of the hose is under water (see Installation).
The wall drainage system is not fitted with a breather pipe.
If the problem persists even after these checks, turn off the water tap,
switch the appliance off and contact the Assistance Service. If the
dwelling is on one of the upper floors of a building, there may be problems
relating to water drainage, causing the washing machine to fill with water
and drain continuously. Special anti-draining valves are available in shops
and help to avoid this inconvenience.
The wash cycle does not include draining: some wash cycles require
the drain phase to be started manually.
The drain hose is bent (see Installation).
The drainage duct is clogged.
The drum was not unlocked correctly during installation (see Installation).
The washing machine is not level (see Installation).
The washing machine is trapped between cabinets and walls (see Installation).
The water inlet hose is not screwed on properly (see Installation).
The detergent dispenser drawer is blocked (for cleaning instructions, see
Care and maintenance).
The drain hose is not fixed properly (see Installation).
Switch off the machine and unplug it, wait for approximately 1 minute
and then switch it back on again.
If the problem persists, contact the Technical Assistance Service.
The detergent is not suitable for machine washing (it should display the
text for washing machines or hand and machine wash, or the like).
Too much detergent was used.

12
GB
Service
Before calling for Assistance:
Check whether you can solve the problem alone (see Troubleshooting);
Restart the programme to check whether the problem has been solved;
If this is not the case, contact an authorised Technical Assistance Centre using the telephone number
provided on the guarantee certificate.
Always request the assistance of authorised technicians.
Have the following information to hand:
the type of problem;
the appliance model (Mod.);
the serial number (S/N).
This information can be found on the data plate applied to the rear of the washing machine, and can also
be found on the front of the appliance by opening the door.

!
PL
Polski
Spis treci
Instalacja, 14-15
Rozpakowanie i wypoziomowanie
Pod³¹czenia hydrauliczne i elektryczne
Pierwszy cykl prania
Dane techniczne
Opis pralki i uruchamianie programu, 16-17
Panel sterowania
Kontrolki
Uruchamianie programu
Programy, 18
Tabela programów
Personalizacja, 19
Ustawianie temperatury
Ustawianie wirowania
Funkcje
rodki pior¹ce i bielizna, 20
Szufladka na rodki pior¹ce
Cykl wybielania
Przygotowanie bielizny
Tkaniny wymagaj¹ce szczególnego traktowania
System równowa¿enia ³adunku
Zalecenia i rodki ostro¿noci, 21
Ogólne zasady bezpieczeñstwa
Utylizacja
Utrzymanie i konserwacja, 22
Od³¹czenie wody i pr¹du elektrycznego
Czyszczenie pralki
Czyszczenie szufladki na rodki pior¹ce
Konserwacja okr¹g³ych drzwiczek i bêbna
Czyszczenie pompy
Kontrola przewodu doprowadzaj¹cego wodê
Nieprawid³owoci w dzia³aniu i sposoby
ich usuwania, 23
Serwis Techniczny, 24
PL
IWC 8128
Instrukcja obs³ugi
PRALKA

"
PL
Instalacja
Nale¿y zachowaæ niniejsz¹ ksi¹¿eczkê, aby móc z
niej skorzystaæ w ka¿dej chwili. W przypadku
sprzeda¿y, odst¹pienia lub przeniesienia pralki w inne
miejsce nale¿y zadbaæ o przekazanie instrukcji wraz z
maszyn¹, aby nowy w³aciciel móg³ zapoznaæ siê z
dzia³aniem urz¹dzenia i z dotycz¹cymi go
ostrze¿eniami.
Nale¿y uwa¿nie przeczytaæ instrukcjê obs³ugi:
zawiera ona wa¿ne informacje dotycz¹ce instalacji oraz
w³aciwego i bezpiecznego u¿ytkowania pralki.
Rozpakowanie i wypoziomowanie
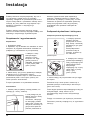
Rozpakowanie
1. Rozpakowaæ pralkê.
2. Sprawdziæ, czy nie dozna³a ona uszkodzeñ w czasie
transportu. W przypadku stwierdzenia uszkodzeñ nie
pod³¹czaæ jej i skontaktowaæ siê ze sprzedawc¹.
3. Odkrêciæ 4 ruby
zabezpieczaj¹ce
maszynê na czas
transportu oraz zdj¹æ
gumowy element z
podk³adk¹, znajduj¹cy siê
w tylnej czêci pralki
(patrz rysunek).
4. Zatkaæ otwory przy pomocy plastikowych zalepek,
znajduj¹cych siê w wyposa¿eniu maszyny.
5. Zachowaæ wszystkie czêci: w razie koniecznoci
przewiezienia pralki w inne miejsce, powinny one
zostaæ ponownie zamontowane.
Czêci opakowania nie s¹ zabawkami dla dzieci.
Poziomowanie
1. Ustawiæ pralkê na p³askiej i twardej pod³odze, nie
opieraj¹c jej o ciany, meble itp.
2. Jeli pod³oga nie jest
idealnie pozioma, nale¿y
skompensowaæ
nierównoci, odkrêcaj¹c
lub dokrêcaj¹c przednie
nó¿ki (patrz rysunek); k¹t
nachylenia, zmierzony na
górnym blacie pralki nie
powinien przekraczaæ 2°.
Staranne wypoziomowanie pralki zapewnia jej
stabilnoæ i zapobiega wibracjom, ha³asowi oraz
przesuwaniu siê maszyny w czasie pracy. W razie
ustawienia na dywanie lub wyk³adzinie dywanowej
nale¿y tak wyregulowaæ nó¿ki, aby pod pralk¹
pozostawa³a wolna przestrzeñ niezbêdna dla
wentylacji.
Pod³¹czenia hydrauliczne i elektryczne
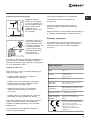
Pod³¹czenie przewodu doprowadzaj¹cego wodê
1. Podùàczyã przewód
zasilajàcy poprzez
przykræcenie do zaworu
wody zimnej z koñcówkà
gwintowanà ¾ gas (patrz
rysunek).
Przed pod³¹czeniem
spuszczaæ wodê do
momentu, a¿ stanie siê
ona ca³kowicie
przezroczysta.
2. Pod³¹czyæ do maszyny
przewód doprowadzaj¹cy
wodê, przykrêcaj¹c go do
odpowiedniego otworu
dop³ywowego,
znajduj¹cego siê w tylnej
czêci pralki, z prawej
strony u góry
(patrz rysunek).
3. Zwróciæ uwagê, aby na przewodzie nie by³o zagiêæ
ani zwê¿eñ.
Cinienie wody w kurku powinno mieciæ siê w
przedziale podanym w tabeli Danych technicznych
(patrz strona obok).
Jeli d³ugoæ przewodu doprowadzaj¹cego wodê jest
niewystarczaj¹ca, nale¿y zwróciæ siê do
specjalistycznego sklepu lub do autoryzowanego
technika.
Nigdy nie instalowaæ ju¿ u¿ywanych przewodów.
Stosowaæ przewody znajduj¹ce siê w wyposa¿eniu
maszyny.

#
PL
65 - 100 cm
Pod³¹czenie przewodu odp³ywowego
Pod³¹czyæ przewód
odp³ywowy, nie zginaj¹c
go, do rury ciekowej lub
do otworu odp³ywowego w
cianie, które powinny
znajdowaæ siê na
wysokoci od 65 do 100
cm od pod³ogi;
ewentualnie oprzeæ go na
brzegu zlewu lub wanny,
przymocowuj¹c do kranu
prowadnik, znajduj¹cy siê
w wyposa¿eniu (patrz
rysunek). Wolny koniec
przewodu odp³ywowego
nie powinien byæ
zanurzony w wodzie.
Odradza siê stosowanie przewodów przed³u¿aj¹cych;
jeli to konieczne, przewód przed³u¿aj¹cy powinien
mieæ tak¹ sam¹ rednicê jak oryginalny, a jego d³ugoæ
nie mo¿e przekraczaæ 150 cm.
Pod³¹czenie elektryczne
Przed w³o¿eniem wtyczki do gniazdka elektrycznego
nale¿y siê upewniæ, czy:
gniazdko posiada uziemienie i jest zgodne z
obowi¹zuj¹cymi przepisami;
gniazdko jest w stanie wytrzymaæ maksymalne
obci¹¿enie mocy maszyny, wskazane w tabeli
Danych technicznych (patrz obok);
napiêcie zasilania mieci siê w wartociach
wskazanych w tabeli Danych technicznych
(patrz obok);
gniazdko pasuje do wtyczki pralki. W przeciwnym
razie nale¿y wymieniæ gniazdko lub wtyczkê.
Nie nale¿y instalowaæ pralki na otwartym powietrzu,
nawet w os³oniêtym miejscu, gdy¿ wystawienie
urz¹dzenia na dzia³anie deszczu i burz jest bardzo
niebezpieczne.
Po zainstalowaniu pralki gniazdko elektryczne
powinno byæ ³atwo dostêpne.
Nie u¿ywaæ przed³u¿aczy ani rozga³êników.
Przewód nie powinien byæ pozginany ani
przygnieciony.
Przewód zasilania elektrycznego mo¿e byæ
wymieniany wy³¹cznie przez autoryzowanych
techników.
Uwaga! Producent nie ponosi ¿adnej odpowiedzialnoci
w przypadku nieprzestrzegania powy¿szych zasad.
Pierwszy cykl prania
Po zainstalowaniu pralki, przed przyst¹pieniem do jej
u¿ytkowania, nale¿y wykonaæ jeden cykl prania ze
rodkiem pior¹cym, ale bez wsadu, nastawiaj¹c
program 2.
Dane techniczne
Model
IWC 8128
Wymiary
szerokoæ cm 59,5
wysokoæ cm 85
g³êbokoæ cm 60
Pojemnoæ
od 1 do 8 kg
Dane pr¹du
elektrycznego
dane techniczne umieszczone s¹ na
tabliczce na maszynie
Dane sieci
wodoci¹gowej
Maksymalne cinienie 1 MPa (10 barów)
cinienie minimalne 0,05 MPa (0,5 barów)
pojemnoæ bêbna 62 litrów
Szybkoæ wirowania
do 1200 obrotów na minutê
Programy kontrolne
zgodnie z przepisami
EN 60456
program 2; temperatura 60°C;
wykonane przy 8 kg za³adowanej
bielizny.
Urz¹dzenie to zosta³o wyprodukowane
zgodnie z nastêpuj¹cymi przepisami EWG:
- 89/336/CEE z dn. 03/05/89
(o Kompatybilnoci Elektromagnetycznej)
wraz z kolejnymi zmianami
- 2006/95/CE (o Niskim Napiêciu)
- 2002/96/CE

$
PL
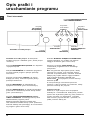
Szufladka na rodki pior¹ce: do dozowania
rodków pior¹cych i dodatków (patrz rodki pior¹ce
i bielizna).
Przycisk W£¥CZANIA/WY£¥CZANIA: do w³¹czania
i wy³¹czania pralki.
Pokrêt³o PROGRAMÓW: do ustawiania programów.
W czasie trwania programu pokrêt³o pozostaje
nieruchome.
Przyciski z kontrolkami FUNKCJI: do wyboru
dostêpnych funkcji. Kontrolka wybranej funkcji
pozostaje zawiecona.
Pokrêt³o WIROWANIA: do nastawienia lub
wy³¹czenia wirowania (patrz Personalizacja).
Pokrêt³o TEMPERATURY: do regulacji temperatury
prania lub do nastawienia prania w zimnej wodzie
(patrz Personalizacja).
Kontrolki STANU ZAAWANSOWANIA CYKLU/
TIMER OPÓNIENIA: umo¿liwiaj¹ kontrolê stanu
zaawansowania programu prania.
Zapalona kontrolka wskazuje bie¿¹c¹ fazê.
Jeli nastawiona zosta³a funkcja Timer opónienia,
kontrolki wska¿¹ czas pozostaj¹cy do uruchomienia
siê programu (patrz strona obok).
Kontrolka BLOKADY OKR¥G£YCH DRZWICZEK:
pozwala sprawdziæ czy mo¿liwe jest otwarcie
okr¹g³ych drzwiczek (patrz strona obok).
Przycisk z kontrolk¹ START/PAUZA: do
uruchamiania programów lub ich chwilowego
przerywania.
N.B.: aby przerwaæ wykonywane pranie, nale¿y
nacisn¹æ ten przycisk, jego kontrolka zacznie
pulsowaæ na pomarañczowo, natomiast kontrolka
bie¿¹cej fazy bêdzie wieciæ ci¹g³ym wiat³em.
Jeli kontrolka BLOKADY OKR¥G£YCH
DRZWICZEK
jest wy³¹czona, mo¿na otworzyæ
drzwiczki pralki.
W celu ponownego uruchomienia prania od
momentu, w którym zosta³o ono przerwane, nale¿y
ponownie nacisn¹æ ten przycisk.
Funkcja stand by
Pralka ta, w mysl nowych norm europejskich
zwiazanych z oszczednoscia elektryczna, posiada
system auto wylaczenia (stand by), który wlacza sie
po kilku minutach nie uzytkowania. Ponownie
lekko wcisnac przycisk ON-OFF i poczekac, az
pralka ponownie wlaczy sie.
Opis pralki i
uruchamianie programu
Kontrolki
STANU ZAAWANSOWANIA
CYKLU/TIMER OPÓNIENIA
Kontrolka
BLOKADY OKR¥G£YCH
DRZWICZEK
Przycisk z
kontrolk¹
START/PAUZA
Panel sterowania
Szufladka na rodki pior¹ce
Pokrêt³o
PROGRAMÓW
Przycisk
W£¥CZANIA/
WY£¥CZANIA
Pokrêt³o
TEMPERATURY
Pokrêt³o
WIROWANIA
Przyciski z
kontrolkami
FUNKCJI

%
PL
Kontrolki
Kontrolki dostarczaj¹ wa¿nych informacji.
Oto co sygnalizuj¹:
Timer opónienia
Jeli zosta³a w³¹czona funkcja Timer opónienia
(patrz Personalizacja), po uruchomieniu programu
zacznie pulsowaæ kontrolka wybranegoopónienia:
Stopniowo wskazywany bêdzie, poprzez pulsowanie
odpowiedniej kontrolki, czas pozostaj¹cy do
rozpoczêcia cyklu prania.
Po up³ywie wybranego czasu opónienia rozpocznie
siê ustawiony program.
Kontrolki bie¿¹cej fazy prania:
Po wybraniu i uruchomieniu ¿¹danego cyklu prania
kontrolki bêd¹ siê kolejno zapalaæ, wskazuj¹c stan
zaawansowania programu:
Przyciski funkcyjne i ich kontrolki
Po dokonaniu wyboru funkcji jej kontrolka zawieci siê.
W przypadku wyboru funkcji niezgodnej z ustawionym
programem jej kontrolka zacznie pulsowaæ i funkcja nie
w³¹czy siê.
Jeli wybrana funkcja nie jest zgodna z inn¹, ustawion¹
uprzednio, kontrolka odpowiadaj¹ca pierwszej funkcji
bêdzie pulsowa³a i uruchomiona zostanie jedynie druga
funkcja a kontrolka uruchomionej funkcji zawieci siê.
Kontrolka blokady okr¹g³ych drzwiczek
W³¹czona kontrolka wskazuje, ¿e drzwiczki zosta³y
zablokowane w celu uniemo¿liwienia ich otwarcia; aby
mo¿na by³o otworzyæ drzwiczki, kontrolka musi byæ
wy³¹czona; (odczekaæ oko³o 3 minuty). Aby otworzyæ
drzwiczki w trakcie wykonywania cyklu nale¿y
nacisn¹æ przycisk START/PAUZA; jeli kontrolka
BLOKADY OKR¥G£YCH DRZWICZEK jest wy³¹czona,
mo¿na otworzyæ drzwiczki.
Szybkie pulsowanie kontrolek faz prania oraz
kontrolki BLOKADY OKR¥G£YCH DRZWICZEK
sygnalizuje wyst¹pienie nieprawid³owoci (patrz
Nieprawid³owoci w dzia³aniu i sposoby ich usuwania).
Uruchamianie programu
1. W³¹czyæ pralkê, naciskaj¹c przycisk W£¥CZANIE / WY£¥CZANIE . Wszystkie kontrolki zapal¹ siê na kilka
sekund, nastêpnie wy³¹cz¹ siê i zacznie pulsowaæ kontrolka START/PAUZA.
2. Za³adowaæ bieliznê i zamkn¹æ drzwiczki pralki.
3. Ustawiæ ¿¹dany program przy pomocy pokrêt³a PROGRAMÓW.
4. Ustawiæ temperaturê prania (patrz Personalizacja).
5. Ustawiæ szybkoæ wirowania (patrz Personalizacja).
6. Wsypaæ rodek pior¹cy i dodatki (patrz rodki pior¹ce i bielizna).
7. Wybraæ ¿¹dane funkcje.
8. Uruchomiæ program naciskaj¹c przycisk START/PAUZA, kontrolka programu bêdzie wieciæ ci¹g³ym wiat³em w
kolorze zielonym. Aby anulowaæ ustawiony cykl, nale¿y chwilowo zatrzymaæ urz¹dzenie, naciskaj¹c przycisk
START/PAUZA, i wybraæ nowy cykl.
9. Po zakoñczeniu programu zapali siê kontrolka
. Po zganiêciu kontrolki BLOKADY OKR¥G£YCH DRZWICZEK
mo¿na otworzyæ drzwiczki. Wyj¹æ bieliznê i pozostawiæ drzwiczki pralki uchylone, aby bêben móg³ wyschn¹æ.
Wy³¹czyæ pralkê, naciskaj¹c przycisk W£¥CZANIE/WY£¥CZANIE.
Pranie
P³ukanie
Wirowanie
Wydalanie wody
Koniec prania

&
PL
Opis programu
Temp.
max
(°C)
Predko-
sc max
(obrotó-
w na
minute)
Srodki piorace Ladunek max (kg) Czas trwania cyklu
Pranie
Wstep-
ne
Pranie
Wybi-
elacz
Srodek
zmiekc-
zajacy
Nor-
malny
Wsad
mini-
malny
Eco
Time
Nor-
malny
Wsad
mini-
malny
Eco
Time
Programy codzienne (Daily)
1
BAWELNA PRANIE WSTEPNE:
bielizna biala silnie
zabrudzona.
90° 1200
ll
-
l
84- 183 133 -
2BAWELNA
: bielizna biala silnie zabrudzona.
90° 1200 -
ll l
84- 164 122 -
2
BAWELNA (1):
tkaniny biale i kolorowe, wytrzymale,
mocno zabrudzone.
60° 1200 -
ll l
84- 180 124 -
2
BAWELNA (2):
tkaniny biale i kolorowe, delikatne,
mocno zabrudzone.
40° 1200 -
ll l
8 4 - 147 97 -
3
BAWELNA:
tkaniny biale i kolorowe, wytrzymale,
mocno zabrudzone.
60° 1200 -
ll l
8 4 4 144 124 115
4
BAWELNA KOLOROWE (3):
tkaniny biale lekko
zabrudzone i delikatne kolorowe.
40° 1200 -
ll l
844967175
5
SYNTETYCZNE:
tkaniny kolorowe, wytrzymale,
mocno zabrudzone.
60° 800 -
ll l
3,5 1,5 2,5 85 65 60
Programy specjalne (Special)
6WELNA:
do welny, kaszmiru, itp.
40° 600 -
l
-
l
21-5551-
7 JEDWAB/FIRANY:
do jedwabiu, wiskozy, bielizny.
30° 0 -
l
-
l
21-5551-
8JEANS
40° 800 -
l
-
l
4--80--
9
EXPRESS:
w celu szybkiego odswiezenia lekko
zabrudzonych tkanin (niewskazany dla welny, jedwabiu
i tkanin przeznaczonych do prania recznego).
30° 800 -
l
-
l
1,5 - - 15 - -
10 OUTWEAR
30° 400 -
l
- - 2,5 - - 46 - -
Sport
11 Sport Intensive
30° 600 -
l
-
l
4-- 80 - -
12 Sport Light
30° 600 -
l
-
l
4-- 70 - -
13 Sport Shoes
30° 600 -
l
-
l
Maks.
2 pary.
--50- -
Programy czesciowe
Plukanie
- 1200 - -
ll
84-3632-
Wirowanie
- 1200 - - - - 8--16--
Wydalanie wody
- 0 - - - - 8--2--
Programy specjalne
Express (program 9) to program przeznaczony do prania lekko zabrudzonej bielizny w krótkim czasie: trwa on tylko
15 minut i pozwala dziêki temu na zaoszczêdzenie energii i czasu. Ustawiaj¹c program (9 w temperaturze 30°C)
mo¿na razem wypraæ ró¿nego rodzaju tkaniny (z wyj¹tkiem we³ny i jedwabiu), przy maksymalnym ³adunku 1,5 kg.
Outwear (program 10) zosta³ opracowany do prania tkanin hydrofobowych i wiatrówek (z takich materia³ów jak
np. goretex, poliester, nylon); w celu uzyskania jak najlepszych rezultatów nale¿y u¿ywaæ tylko p³ynnych
rodków do prania, w takiej iloci jak na po³owê zwyk³ego wsadu; wczeniej zapraæ mankiety, ko³nierzyki i
plamy; nie stosowaæ p³ynu zmiêkczaj¹cego ani rodków do prania zawieraj¹cych p³yn zmiêkczaj¹cy. Nie
mo¿na u¿ywaæ tego programu do prania kurtek puchowych.
Sport Intensive (program 11) zosta³ opracowany do prania tkanin u¿ywanych do produkcji odzie¿y sportowej
(dresów, krótkich spodenek itp.) o du¿ym stopniu zabrudzenia; dla uzyskania najlepszych rezultatów prania
zaleca siê nie przekraczaæ maksymalnego wsadu okrelonego w Tabela programów.
Sport Light (program 12) zosta³ opracowany do prania tkanin u¿ywanych do produkcji odzie¿y sportowej
(dresów, krótkich spodenek itp.) o niewielkim stopniu zabrudzenia; dla uzyskania najlepszych rezultatów prania
zaleca siê nie przekraczaæ maksymalnego wsadu okrelonego w Tabela programów. Zaleca siê stosowanie
p³ynnych rodków do prania, w iloci jak dla po³owy wsadu.
Sport Shoes (program 13) zosta³ opracowany do prania obuwia sportowego; dla uzyskania najlepszych
rezultatów nie nale¿y praæ jednoczenie wiêcej ni¿ 2 par obuwia.
Programy
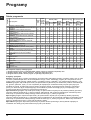
Podane w tabeli dane maj¹ charakter orientacyjny.
Dla wszystkich Instytucji homologacyjnych:
1) Program kontrolny zgodny z norm¹ EN 60456: ustawiæ program 2, wybieraj¹c temperaturê 60°C.
2) Program bawe³na, d³ugi: ustawiæ program 2, wybieraj¹c temperaturê 40°C.
3) Program bawe³na, krótki: ustawiæ program 4, wybieraj¹c temperaturê 40°C.
Tabela programów
Programy
³
³
³
³
³
³
³
³
³
£
ê
ê
ê
¹
¹
£
£
£
£
£
£
ê

'
PL
Ustawianie temperatury
Obracaj¹c pokrêt³em TEMPERATURA ustawia siê temperaturê prania (patrz Tabela programów).
Temperaturê mo¿na zmniejszaæ, a¿ do prania w zimnej wodzie
.
Pralka automatycznie uniemo¿liwi ustawienie temperatury wy¿szej od maksymalnej temperatury przewidzianej
dla danego programu.
Ustawianie wirowania
Obracaj¹c pokrêt³em WIROWANIE ustawia siê prêdkoæ wirowania dla wybranego programu.
Maksymalne prêdkoci przewidziane dla poszczególnych programów s¹ nastêpuj¹ce:
Programy Prêdkoæ maksymalna
Bawe³na 1200 obrotów na minutê
Tkaniny syntetyczne 800 obrotów na minutê
We³na 600 obrotów na minutê
Jedwab tylko odprowadzenie wody
Prêdkoæ wirowania mo¿e zostaæ zmniejszona, mo¿na te¿ ca³kowicie wy³¹czyæ wirowanie, wybieraj¹c symbol
.
Pralka automatycznie uniemo¿liwi wykonanie wirowania z prêdkoci¹ wiêksz¹ ni¿ maksymalna prêdkoæ
wirowania przewidziana dla danego programu.
Funkcje
Ró¿ne funkcje, w jakie wyposa¿ona jest pralka, pozwalaj¹ na uzyskanie oczekiwanej czystoci i bieli prania.
Aby w³¹czyæ poszczególne funkcje, nale¿y:
1. nacisn¹æ przycisk odpowiadaj¹cy ¿¹danej funkcji;
2. zapalenie siê jego kontrolki sygnalizuje, ¿e funkcja jest w³¹czona.
Uwaga: Szybkie pulsowanie kontrolki wskazuje, ¿e danej funkcji nie mo¿na ustawiæ dla wybranego programu.
W przypadku wyboru tej opcji ruchy bêbna, temperatura i woda s¹ dostosowywane do niedu¿ego wsadu tkanin
bawe³nianych i syntetycznych, o niewielkim stopniu zabrudzenia (patrz Tabela programów).
mo¿esz
praæ szybciej, oszczêdzaj¹c wodê i energiê. Zaleca siê stosowaæ p³ynny rodek do prania, dostosowuj¹c jego
iloæ do iloci wsadu.
Funkcji tej nie mo¿na w³¹czyæ w programach 1, 2, 6, 7, 8, 9, 10, 11, 12, 13, , , .
Odplamianie
Cykl wybielania pomocny przy usuwaniu wytrzyma³ych plam. Nale¿y pamiêtaæ o dodaniu wybielacza do
dodatkowego pojemnika 4 (patrz Cykl wybielania).
Funkcji tej nie mo¿na w³¹czyæ w programach 1, 6, 7, 8, 9, 10, 11, 12, 13, , .
Wsad minimalny
Zaleca siê wykorzystanie tej funkcji, jeli iloæ bielizny jest równa po³owie zalecanego wsadu maksymalnego
lub mniejsza (patrz Tabela programów).
Funkcji tej nie mo¿na w³¹czyæ w programach 8, 9, 10, 11, 12, 13, , .
Timer opónienia
Opónia uruchomienie urz¹dzenia a¿ do 12 godzin.
Nale¿y kilkakrotnie nacisn¹æ przycisk, a¿ do zawiecenia siê kontrolki odpowiadaj¹cej ¿¹danemu opónieniu.
Po pi¹tym naciniêciu przycisku funkcja wy³¹cza siê.
N.B.: po naciniêciu przycisku START/PAUZA mo¿na zmieniæ wartoæ opónienia tylko na mniejsz¹, a¿ do
uruchomienia ustawionego programu.
Jest aktywny ze wszystkimi programami.
Personalizacja

PL
rodki pior¹ce i bielizna
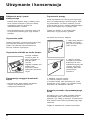
Szufladka na rodki pior¹ce
Dobry rezultat prania zale¿y równie¿ od prawid³owego
dozowania rodka pior¹cego: u¿ycie jego nadmiernej
iloci nie poprawia skutecznoci prania, lecz
przyczynia siê do powstawania nalotów na
wewnêtrznych czêciach pralki i do zanieczyszczania
rodowiska.
Nie stosowaæ rodków do prania rêcznego, poniewa¿
tworz¹ one za du¿o piany.
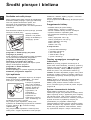
Wysun¹æ szufladkê i
umieciæ w niej rodek
pior¹cy lub dodatkowy w
nastêpuj¹cy sposób.
przegródka 1: rodek pior¹cy do prania
wstêpnego (w proszku)
Przed wsypaniem rodka pior¹cego nale¿y sprawdziæ,
czy nie jest w³o¿ona dodatkowa przegródka 4.
przegródka 2: rodek pior¹cy do prania
w³aciwego (w proszku lub w p³ynie)
P³ynny rodek do prania nale¿y wlaæ dopiero przed
samym uruchomieniem programu.
przegródka 3: rodki dodatkowe
(zmiêkczaj¹ce, itp.)
rodek zmiêkczaj¹cy nie powinien wyp³ywaæ poza kratkê.
dodatkowa przegródka 4: Wybielac
Cykl wybielania
Tradycyjnego wybielacza u¿ywa siê do bia³ych
tkanin wytrzyma³ych, delikatnego do tkanin
kolorowych, syntetycznych i do we³ny.
Funkcja ta przydatna
jest w celu usuwania
bardziej opornych plam.
Wstawiæ dodatkowy
pojemniczek 4, na
wyposa¿eniu, do
przegródki 1.
Przy dozowaniu
wybielacza nie
przekroczyæ poziomu
max wskazanego na
rodkowej oce (patrz rysunek).
Aby wykonaæ tylko wybielanie, nale¿y wlaæ
wybielacz do dodatkowego pojemnika 4 i nastawiæ
program P³ukanie
i uruchomiæ funkcjê
Odplamianie .
Aby przeprowadziæ wybielanie w trakcie prania,
nale¿y wlaæ i wsypaæ odpowiednie rodki pior¹ce i
1
2
3
4
dodatkowe, nastawiæ ¿¹dany program i uruchomiæ
funkcjê Odplamianie .
U¿ycie pojemniczka dodatkowego 4 wyklucza pranie
wstêpne.
Przygotowanie bielizny
Podzieliæ bieliznê do prania wed³ug:
- rodzaju tkaniny / symbolu na etykietce.
- kolorów: oddzieliæ tkaniny kolorowe od bia³ych.
Opró¿niæ kieszenie i sprawdziæ guziki.
Nie przekraczaæ wskazanego ciê¿aru suchej
bielizny:
Tkaniny wytrzyma³e: max 8 kg
Tkaniny syntetyczne: max 3,5 kg
Tkaniny delikatne: max 2 kg
We³na: max 2 kg
Jedwab: max 2 kg
Ile wa¿y bielizna?
1 przecierad³o 400-500 gr.
1 poszewka 150-200 gr.
1 obrus 400-500 gr.
1 szlafrok 900-1.200 gr.
1 rêcznik 150-250 gr.
Tkaniny wymagaj¹ce szczególnego
traktowania
We³na: za pomoc¹ programu 6 mo¿na praæ w
pralce tak¿e odzie¿ we³nian¹, równie¿ tê opatrzon¹
etykiet¹ tylko pranie rêczne
. Aby uzyskaæ jak
najlepsze rezultaty, nale¿y stosowaæ specjalny
rodek do prania i nie przekraczaæ wsadu 2 kg.
Jedwab: stosowaæ odpowiedni program 7 do prania
wszelkiego rodzaju wyrobów z jedwabiu. Zaleca siê
stosowanie specjalnego rodka pior¹cego do tkanin
delikatnych.
Firany: w³o¿yæ je z³o¿one do poszewki lub do
siatkowatego worka. Stosowaæ program 7.
Jeans: przed praniem odwrócic odziez na lewa
strone, stosowac plynny srodek do prania. Uzywac
programu 8.
System równowa¿enia ³adunku
Przed ka¿dym wirowaniem, aby unikn¹æ
nadmiernych drgañ oraz jednorodnie roz³o¿yæ wsad,
bêben wykonuje obroty z prêdkoci¹ nieco wiêksz¹
ni¿ podczas prania. Jeli pomimo kolejnych prób
wsad nie zostanie równomiernie roz³o¿ony, maszyna
wykona wirowanie z prêdkoci¹ mniejsz¹ od
przewidzianej. W przypadku nadmiernego
niezrównowa¿enia pralka wykona roz³o¿enie wsadu
zamiast wirowania. Aby zapewniæ lepsze roz³o¿enie
wsadu oraz jego w³aciwe zrównowa¿enie, zaleca
siê wymieszanie du¿ych i ma³ych sztuk bielizny.
Strona się ładuje...
Strona się ładuje...
Strona się ładuje...
Strona się ładuje...
-
 1
1
-
 2
2
-
 3
3
-
 4
4
-
 5
5
-
 6
6
-
 7
7
-
 8
8
-
 9
9
-
 10
10
-
 11
11
-
 12
12
-
 13
13
-
 14
14
-
 15
15
-
 16
16
-
 17
17
-
 18
18
-
 19
19
-
 20
20
-
 21
21
-
 22
22
-
 23
23
-
 24
24


Indesit IWC 8128 B (EU) instrukcja
- Kategoria
- Pralki
- Typ
- instrukcja
w innych językach
- English: Indesit IWC 8128 B (EU) User guide