
11
11
1
GB
Instruction booklet
WASHING MACHINE
Contents
Installation, 2-3
Unpacking
Removing the transit fixings
Levelling
Water connections
Drainage and electrical connections
Technical details
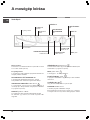
Description of the washing machine, 4-5
Control panel
LEDs
Starting and Programmes, 6
Briefly: how to start a programme
Programme table
Personalisation, 7
Setting the temperature
Setting the spin speed
Functions
Detergents and laundry, 8
Detergent dispenser
Preparing the laundry
Precautions and tips, 9
General safety
Disposal
Saving energy and respecting the environment
Care and maintenance, 10
Switching off the water or the electricity supply
Cleaning your appliance
Caring for the door and drum of the appliance
Checking the water inlet hose
Troubleshooting, 11
Service, 12
Before calling the Service Centre
Spare parts
AVXXL109
English 1
GB
Español 13
SP
Magyar 25
HU
Polski 37
PL

GB
2
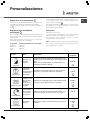
! Keep this instruction manual in a safe place for future
reference. Should the appliance be sold, transferred
or moved, make sure the instruction manual
accompanies the washing machine to inform the new
owner as to its operation and features.
! Please read this instruction manual carefully: it
contains important information regarding installation,
operation and safety.
Unpacking
1. Unpack the machine.
2. Check whether the machine has been damaged
during transportation. If this is the case, do not install
it and contact your retailer.
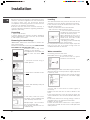
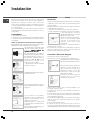
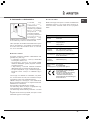
Removing the transit fixings
IMPORTANT: Follow these instructions to remove the
TWO transit fixings.
Situated on either side of the rear panel, BOTH transit
bolts MUST be removed before use.
! Failure to do so may cause
damage to your machine.
It is important the transit bolt and
spacer come out intact (
seesee
seesee
see
picpic
picpic
pic
).
1. Unscrew the bolt using a
13mm spanner.
2. STOP when 3 threads can be
seen.
3. Hold, slide sideways and pull
to remove.
4. For safety, insert one of the
the plastic covers (
supplied with
your machine
) over the hole.
! Repeat steps 1 to 4 to remove
the second transit bolt.
! Packaging materials are not
children’s toys.
Levelling
Your machine will be noisy if the two front feet are not
adjusted so that the machine stands firm and level.
! The machine should be levelled from side to side
and from front to back.
1. Move your machine into its final location.
- Take care not to trap or kink the hoses.
2. Turn one or both front feet anti-
clockwise by hand until the feet
cannot be turned any more.
When adjusting the feet, use a
spirit level to check the machine
stands level, from side to side
and from front to back.
- The spring on each foot will stop
them coming loose.
! If it is placed on a fitted or loose carpet, adjust the
feet in such a way as to allow enough room for
ventilation beneath the machine.
Water connection
Connecting the water inlet hose.
Remember that this is a cold-fill machine.
! Check that seal is in place
inside the hose end cap.
Before making the water connections to gas ¾ thread,
allow the water to run freely from the supply tap until it
is perfectly clear.
Screw the inlet end with the blue
cap onto the cold water supply
tap.
Turn the tap on and check for leaks: tighten if
necessary.
! Make sure that there are no kinks or bends in the
hose.
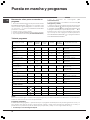
! The water pressure at the tap must be within the
values indicated in the Technical details table (next
page).
! If the water inlet hose is not long enough, contact a
specialist store or an authorised serviceman.
! Always use new hoses.
! Check the water hose at least once a year, replace
any that are cracked as worn hoses could split under
water pressure.
Installation

33
33
3
GB
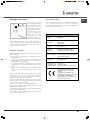
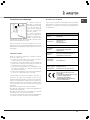
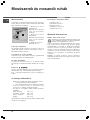
Drainage connections
A. Connect the drain
hose, without kinking it,
to a draining duct or a
wall drain fixed at a
height between 65 and
100cm from the floor.
B. Alternatively, place
it over the edge of a
basin, sink or tub,
fastening the hose
supplied to the tap.
The free end of the hose should not be under water.
! We advise against the use of hose extensions. In
case of absolute need, the extension must have the
same diameter as the original hose and must not
exceed 150 cm in length.
Electrical connection
Before plugging the appliance into the mains socket,
make sure that:
• the socket is earthed and in compliance with the
applicable law.
• the socket is able to sustain the appliance’s
maximum power load indicated in the Technical
Details table (on the right).
• the supply voltage is included within the values
indicated in the Technical Details table (on the
right).
• the socket is compatible with the machines plug.
If this is not the case, replace the socket or the
plug.
! The machine should not be installed in an outdoor
environment, not even when the area is sheltered,
because it may be very dangerous to leave it
exposed to rain and thunderstorms.
! When the machine is installed, the mains socket
must be within easy reach and should be connected
to a suitable electrical supply.
! Do not use extensions or multiple sockets.
! The power supply cable should never be bent or
dangerously compressed.
! The power supply cable must only be replaced by
an authorised serviceman.
! The company denies all liability if and when these
norms are not respected.
The first wash cycle
Once the appliance has been installed and before you
use it for the first time, run a wash cycle without
detergent and no laundry, setting the 90°C programme
without a pre-wash cycle.
B
A
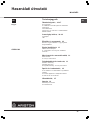
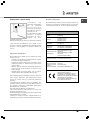
TECHNICAL DETAILS
Models
AVXXL109
Dimensions
width 59.5 cm
height 85 cm
depth 60 cm
Capacity
from 1 to 7 kg
Electrical
connections
voltage 220 - 240 Volts 50 Hz
absorbed power 1700 - 2100 W
Water connection
maximum pressure 1 MPa (10 bar)
minimum pressure 0.05 MPa (0.5 bar)
drum capacity 53 litres
Spin speed
up to 1000 r.p.m.
Test programmes
in compliance with
regulation IEC456
programme 4
temperature 60°C
performed with a load weighing 7 kg
This appliance conforms to the
following European Community
directives:
73/23/EEC dated 19/02/72 (Low
Voltage) and subsequent amendments
- 89/336/EEC dated 03.05.89
(Electromagnetic Compatibility) and
subsequent amendments

GB
4
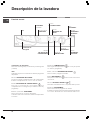
Detergent dispenser
drawer
Programme
Key
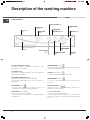
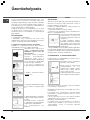
Control panel
Description of the washing machine
Detergent dispenser drawer:
To add detergent and fabric conditioner (
see
Detergents and Laundry
).
Programme Key:
To consult a straight forward chart of the different
programmes available.
PROGRESS INDICATOR LEDS:
To find out which wash cycle is under way.
The corresponding LED for the cycle in progress is
illuminated.
SPIN SPEED knob:
To set the spin speed or exclude the spin cycle
completely (
see Starting and Programmes
).
FUNCTION Buttons / LEDs:
To select the functions available.
When a function is selected, the corresponding LED
is illuminated.
TEMPERATURE knob:
To set the temperature or the cold wash cycle (
see
Starting and programmes
).
ON/OFF button / LED:
To turn the washing machine on and off.
START/RESET button:
To start the programme or cancel any incorrect
settings.
DOOR LOCKED LED:
Allows the user to see immediately whether it is
possible to open the door.
PROGRAMME knob:
To select the wash programmes.
The retractable control knob: press the centre of the
button for it to pop out. The knob stays still during the
cycle.
FUNCTION
buttons
FUNCTION
LEDs
DOOR LOCKED LED
PROGRESS
INDICATOR LEDS
START/RESET
button
ON/OFF LED
ON/OFF
button
PROGRAMME
knob
TEMPERATURE
knob
SPIN SPEED
knob

55
55
5
GB
LEDs
PROGRESS INDICATOR LEDS:
These light up to indicate the progress of the selected
programme. When the programme is started, the light
corresponding to the first cycle is lit and as the
programme progresses, successive lights will come
on until the programme finishes.
FUNCTION buttons / LEDs:
When a function is selected, the corresponding LED
is illuminated.
• If the function selected is incompatible with the
programme set, the button will flash and the function
will not be enabled.
• If you set a function that is incompatible with another
function you selected previously, only the last one
selected will be enabled.
DOOR LOCKED LED:
If this LED is on, the appliance door is locked to
prevent it from being opened accidentally; to avoid
any damage. Wait for the LED to go out before
attempting to open the door.
! If the
LED flashes rapidly, together with at least
one of the other LEDs, there has been an error in the
operation of the appliance. If this occurs, call
Assistance.

GB
6
Briefly: how to start a programme
1. Switch the washing machine on by pressing the
ON/OFF
button for at least 2 seconds. All the LEDs
will light up for a few seconds, after which the ON/OFF
LED will remain lit.
2. Load your laundry into the washing machine and
shut the appliance door.
3. Turn the PROGRAMME knob to the programme
required.
4. Set the wash temperature (
see Personalisationsee Personalisation
see Personalisationsee Personalisation
see Personalisation
).
5. Set the spin speed (
see Personalisationsee Personalisation
see Personalisationsee Personalisation
see Personalisation
).
Starting and Programmes
Notes
For the anti-crease function: see Easy-iron (
next pagenext page
next pagenext page
next page
). The information contained in the table is purely indicative.
All cycle length times are approximate.
Special programmes
Daily 30' (programme 11 for Synthetics) is designed to wash lightly soiled garments in a short amount of time: it
only lasts 30 minutes and allows you to save on both time and energy. By setting this programme (11 at 30°C), you
can wash different fabrics together (except for woollens and silk items), with a maximum load of 3 kg.
•
We recommend the use of liquid detergent.We recommend the use of liquid detergent.
We recommend the use of liquid detergent.We recommend the use of liquid detergent.
We recommend the use of liquid detergent.
6. Add the detergent and any fabric conditioner (
seesee
seesee
see
Detergents and LaundryDetergents and Laundry
Detergents and LaundryDetergents and Laundry
Detergents and Laundry
).
7. Start the programme by pressing the START/RESET
button for at least 2 seconds.
8. When the programme has finished, the DOOR
LOCKED
LED will go out to indicate that the door
may be opened.
Take out your laundry and leave the appliance door
ajar to allow the drum to dry thoroughly. Turn the
washing machine off by pressing the ON/OFF
button; the ON/OFF LED will go out.
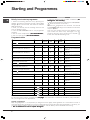
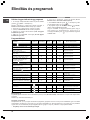
Programme table
Type of fabric and degree of soil Programmes
Wash
temperature
Detergent
wash
Fabric
softener
Cycle
length
(minutes)
Description of washing cycle
Cottons
Pre-wash 1
20 Pre-wash only.
Extremely soiled whites (sheets, tablecloths, etc.) 2 90°
150
Wash cycle, rinse cycles, intermediate and
final spin cycles.
Extremely soiled whites (sheets, tablecloths, etc.) 3 60°
140
Wash cycle, rinse cycles, intermediate and
final spin cycles.
Heavily soiled whites and fast colours 4 60°
140
Wash cycle, rinse cycles, intermediate and
final spin cycles.
Slightly soiled whites and fast colours (shirts, jumpers, etc.) 5 60°
60
Wash cycle, rinse cycles, intermediate and
final spin cycles.
Heavily soiled whites and non-fast colours 6 40°
105
Wash cycle, rinse cycles, intermediate and
final spin cycles.
Synthetics
Heavily soiled fast colours (baby linen, etc.) 7 60°
70
Wash cycle, rinse cycles, anti-crease or
delicate spin cycle.
Fast colours (all types of lightly-soiled germents) 8 40°
65
Wash cycle, rinse cycles, anti-crease or
delicate spin cycle.
Delicates
Wool 9 40°
45
Wash cycle, rinse cycle and delicate spin
cycle.
Very delicate fabrics (silk, viscose, etcc.) 10 30°
53
Wash cycle, rinse cycle and delicate spin
cycle.
Slightly soiled whites and delicate colours (shirts, jumpers,
etc.)
11 30°
30
Wash cycle, rinse cycles, intermediate and
final spin cycles.
Hand wash (handwash label) 12 25°
50
Wash cycle, rinse cycle and delicate spin
cycle.
PARTIAL PROGRAMMES
Rinse
30 Rinse cycles and spin cycle.
Spin cycle 15 Draining and heavy duty spin cycle.
Delicate spin cycle 13 Draining and delicate spin cycle.
Draining 2 Draining

77
77
7
GB
Setting the temperature
Turn the TEMPERATURE knob to set the wash
temperature (
see Programme tablesee Programme table
see Programme tablesee Programme table
see Programme table
).
The temperature can be lowered or even set to cold wash
.
Setting the spin speed
Turn the SPIN SPEED knob to set the spin speed for
the programme selected.
The maximum spin speeds for each programme are
as follows:
Programmes Maximum spin speed
Cottons 1000 r.p.m.
Synthetics 800 r.p.m.
Wool 600 r.p.m.
Silk no
Personalisation
The spin speed may be lowered or the spin cycle can
be excluded altogether by selecting symbol
.
! The washing machine will automatically prevent you
from selecting a spin speed higher than the maximum
speed for each programme.
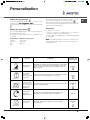
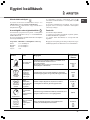
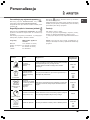
Functions
To activate a function:
1. Press the button corresponding to the desired
function, according to the table below.
2. The function is enabled when the corresponding LED
is illuminated.
NoteNote
NoteNote
Note: The rapid flashing of the button indicates that
the corresponding function cannot be selected for the
programme set.
Function
Result
Comments
Enabled with
programmes
Mini load
For washing a
smaller load.
In addition to reducing the actual washing time, this option
will reduce water and energy consumption by up to 50%.
Note: You can reduce the amount of detergent you use
with this wash.
2,4,5,7,8,
Easy iron
This function
reduces the
wash action and
spin speed
Reduces the amount of creases in the washing load at the
end of the cycle, making clothes easier to iron.
3,5,7,8,
Rinse Hold
Clothes will be
held in the final
rinse water, until
you are ready to
complete the
programme.
Complete the final spin by pressing the Rinse Hold button
when the light is flashing.
2,3,4,6,7,8,
10,
Rapid
Saves up to a
third on the
programme time.
In addition to reducing the actual washing time, this
programme also reduces energy consumption.
2,4,7,8
Extra rinse
Adds an extra
rinse cycle.
For large washing loads and items for people with
sensitive skin.
2,3,4,5,6,7,
8,

GB
8
Detergents and laundry
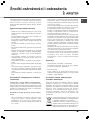
Detergent dispenser drawer
! Do not put any items into the draw, other than
detergents designed to be released from the drawer,
as they may cause damage or blockage.
1. Pre-wash detergent
compartment.
Maximum 200 ml powder
or 100 ml liquid.
2. Main wash detergent
compartment.
Maximum 400 ml powder
or 200 ml liquid.
3. Fabric conditioner
compartment.
Maximum 120 ml.
Dispensing powder detergent
To achieve the best wash results the manufacturer’s
recommended amount of detergent should be
measured and added to the main detergent
compartment.
Dispensing liquid detergent
We recommend the use of a detergent dosing ball, as
provided by your detergent manufacturer.
Adding fabric conditioner
Pour the recommended amount of fabric conditioner
into the compartment. Do not exceed the maximum fill
line.
Pre-wash (
Programme 1
)
When selecting programme 1 add detergent to both
the pre-wash and the main wash compartment.
! Do not use in drum dosing devices with pre-wash
programme 1.
Preparing your laundry
• Divide your laundry according to:
- the type of fabric/the symbol on the label.
- the colours: separate coloured garments from
whites.
• Empty all pockets and check for loose buttons.
• Do not exceed the weight limits stated below which
refer to the weight when dry:
Sturdy fabrics : max. 7 kg
Synthetic fabrics: max. 3 kg
Delicate fabrics : max. 2 kg
Wool : max. 1 kg
! DO NOT overload the machine as this could result in
reduced performance.
How much does your laundry weigh?
1 sheet 400 - 500 g
1 pillowcase 150 - 200 g
1 tablecloth 400 - 500 g
1 bathrobe 900 - 1,200 g
1 towel 150 - 250 g
Woolmark Platinum Care
As gentle as washing by hand.
Ariston sets a new standard of superior
performance that has been endorsed by The
Woolmark Company with the prestigious
Woolmark Platinum Care brand.
Look for the Woolmark Platinum Care logo on the
washing machine to ensure you can safely and
effectively wash wool garments labelled as “hand
wash” (M.00221).
Set programme 12 for all “Hand Wash” garments using
the appropriate detergent.
Wool: For best results, use a specific detergent, taking
care not to exceed a load of 1 kg.
3
2
1

99
99
9
GB
Precautions and advice
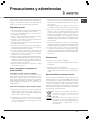
! The machine was designed and built in compliance
with the applicable international safety regulations.
The following information is provided for your safety
and should consequently be read carefully.
General safety
• The washing machine should only be used by
adults and in accordance with the instructions
provided in this manual.
• Never touch the machine when barefoot or with
wet or damp hands or feet.
• Do not pull on the power cable to unplug the
appliance from the electricity socket. Pull the plug
out.
• Do not open the detergent dispenser while the
appliance is in operation.
• Do not touch the drain water as it could reach very
high temperatures.
• Never force the washing machine door: this could
damage the safety lock mechanism designed to
prevent any accidental opening.
• In the event of a malfunction, do not under any
circumstances touch internal parts in order to
attempt repairs.
• Always keep children well away from the appliance
while in operation.
• The appliance door tends to get quite hot during
the wash cycle.
• Should it have to be moved, proceed with the help
of two or three people and handle it with the utmost
care. Never try to do this alone, because the
appliance is very heavy.
• Before loading your laundry into the washing
machine, make sure the drum is empty.
Saving energy and respecting the
environment
Environmentally-friendly technology
If you only see a little water through your appliance
door, this is because thanks to the latest Ariston
technology, your washing machine only needs less
than half the amount of water to get the best results:
an objective reached to respect the environment.
Saving on detergent, water, energy and time
• To avoid wasting resources, the washing machine
should always be used with a full load. A full load
instead of two half loads allows you to save up to
50% on energy.
• The pre-wash stage is only necessary on extremely
soiled garments. Avoiding it will save on detergent,
time, water and between 5 to 15% less energy.
• Treating stains with a stain remover or leaving them
to soak before washing will cut down the need to
wash them at high temperatures.
A programme at 60°C instead of 90°C, or one at
40°C instead of 60°C will save up to 50% on energy.
• Use the correct quantity of detergent, depending
on the water hardness, how soiled the garments are
and the amount of laundry you have, to avoid
wastage and to protect the environment: despite
being biodegradable, detergents do contain
ingredients that alter the natural balance of the
environment. In addition, avoid using fabric softener
as much as possible.
• If you use your washing machine between late in
the afternoon and in the early hours of the morning,
you will help reduce the electricity board’s peak load.
• If your laundry has to be dried in a tumble dryer,
select a high spin speed. Having the least water
possible in your laundry will save you time and
energy in the drying process.
Disposal
• Disposing of the packaging material:
observe local legislations, so the packaging can be
re-used.
• Disposing of an old machine:
before scrapping your appliance, cut the power
supply cable and remove the appliance door.
Disposal of old electrical appliances
The European Directive 2002/96/EC on Waste Electrical
and Electronic Equipment (WEEE), requires that that
old household electrical appliances must not be
disposed of in the normal unsorted municipal waste
stream. Old appliances must be collected separately
in order to optimise the recovery and recycling of the
materials they contain and reduce the impact on human
health and the environment.
The crossed-out “wheeled bin” symbol on
the product reminds you of your obligation,
that when you dispose of the appliance in
must be separately collected.
Consumers should contact their local
authority or retailer for information c

GB
10
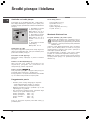
Switching off the water or electricity
supply
• Turn off the water tap after every wash. This will
limit the wear of the appliance’s water system and
also prevent leaks.
• Unplug your appliance when cleaning it and during
all maintenance operations.
Cleaning your appliance
Cleaning the exterior
Use a damp cloth or silicon polish to clean the exterior
surfaces of the appliance.
Cleaning the door bowl
Clean the internal surface of the door bowl regularly
with a soft cloth. A build-up of soap powder and water
hardness residue may result in water leaking from the
door.
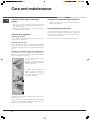
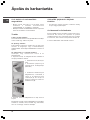
Cleaning the dispenser drawer and compartments
It is advisable to clean the dispenser drawer regularly.
! Do not try to clean any part of the dispenser drawer
while the machine is running.
1. Pull out the drawer until it
reaches its stop.
2. Press the drawer release
button to remove the dispenser
drawer (see figure).
3. Clean and dry the dispenser
drawer, syphons, grate and
fabric conditioner exit channel
(A). Also regularly clean the
outlet pipe area (B).
4. Relocate the dispenser drawer and push it firmly
back into place.
! Do not clean any part of the machine with abrasive
cleaners, scouring agents, acids, any bleach or metal
polish as they may cause damage.
Caring for your appliance door and drum
• Always leave the door ajar to prevent unpleasant
odours from forming.
Checking the water inlet hose
Check the water inlet hose at least once a year. If you
see any cracks, replace it immediately. During the
wash cycles, high water pressure could cause a
cracked hose to split open.
! Never use hoses that have already been used.
Care and maintenance
B
A

1111
1111
11
GB
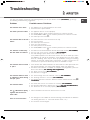
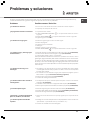
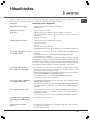
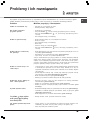
Troubleshooting
One day your machine seems not to be working. Before you call your Service Centre (
see Servicesee Service
see Servicesee Service
see Service
), go through
the following troubleshooting suggestions:
Possible causes / Solutions:
• The appliance is not fully plugged into the socket.
• There has been a power failure.
• The appliance door is not shut properly.
• The ON/OFF button
has not been pressed, for at least 2 seconds.
• The START/RESET button
has not been pressed, for at least 2 seconds.
• The water tap is not turned on.
• The water inlet hose is not connected to the tap.
• The hose is kinked.
• The water tap is not turned on.
• There is a water shortage.
• The water pressure is insufficient.
• The START/RESET button
has not been pressed, for at least 2 seconds.
• The drain hose is not fitted between 65 and 100cm from the floor (
see Installationsee Installation
see Installationsee Installation
see Installation
).
• The free end of the hose is underwater (
see Installationsee Installation
see Installationsee Installation
see Installation
).
• The wall drainage system doesn’t have a breather pipe.
If the problem persists even after these checks, turn off the water tap, switch
the appliance off and call for assistance. If the dwelling is on one of the upper
floors of a building, there may be drain tap problems causing the washing
machine to load and unload water continuously. In order to avoid such an
inconvenience, special anti-drain trap valves are available in shops.
• If the machine was unable to balance the load it will use a slow spin rather than
risk machine damage; the clothes might appear wetter than expected.
• The Rinse Hold function is enabled: to complete the programme, press the
Rinse Hold button (
see Starting and Programmessee Starting and Programmes
see Starting and Programmessee Starting and Programmes
see Starting and Programmes
).
• The drain hose is bent (
see Installationsee Installation
see Installationsee Installation
see Installation
).
• The drain duct is clogged.
• The transit fixings were not removed correctly (
see Installationsee Installation
see Installationsee Installation
see Installation
).
• The washing machine is not level (
see Installationsee Installation
see Installationsee Installation
see Installation
).
• The washing machine is closed in, between furniture cabinets and the wall (
seesee
seesee
see
InstallationInstallation
InstallationInstallation
Installation
).
• The water inlet hose is not screwed on correctly (
see Installationsee Installation
see Installationsee Installation
see Installation
).
• The detergent dispenser is obstructed; clean it (
see Care and Maintenancesee Care and Maintenance
see Care and Maintenancesee Care and Maintenance
see Care and Maintenance
).
• The drain hose is not secured properly (
see Installationsee Installation
see Installationsee Installation
see Installation
).
• Call for Assistance because this means there is an error.
• The detergent is not suitable for machine washing (it should bear the definition
“for washing machines” or “hand and machine wash”, etc.).
• You used too much detergent.
Problem:
The machine won’t start?
The wash cycle won’t start?
The machine fails to fill with
water?
The machine continuously
fills with water and drains?
The machine does not drain
or spin?
The machine makes a noise
or vibrates too much during
the spin cycle?
The machine leaks?
The
LED flashes rapidly,
together with at least one
other LED?
There is too much foam?

GB
12
Service
Before calling the Service Centre:
• Use the troubleshooting guide to see if you can
solve the problem yourself (
see Troubleshootingsee Troubleshooting
see Troubleshootingsee Troubleshooting
see Troubleshooting
).
• If not, turn the machine off and call the Service
Centre closest to you.
What to tell the Service Centre:
• Name, address and postcode.
• telephone number.
• the type of problem.
• the date of purchase.
• the appliance model (Mod.).
• the serial number (S/N).
This information can be found on the data label inside
the door of the machine.
Spare parts
This appliance is a complex machine. Repairing it
yourself or having a non-authorised person try to repair
it could cause harm to one or more persons, could
damage the machine and could invalidate the spare
parts warranty.
Call an authorised technician if you experience
problems while using the machine.
The spare parts have been designed exclusively for
this appliance and not for other uses.

SP
13
Manual de instrucciones
LAVADORA
AVXXL109
Índice
Instalación, 14-15
Desembalaje
Quitar los dispositivos de fijación para el transporte
Nivelación
Conexiones hídricas
Descarga y conexiones eléctricas
Características técnicas
Descripción de la lavadora, 16-17
Panel de control
PILOTO
Puesta en marcha y programas, 18
Brevemente: cómo poner en marcha un programa
Tabla de programas
Personalizaciones, 19
Regulación de la temperatura
Regulación de la velocidad de centrifugado
Funciones
Detergentes y lavado, 20
Contenedor de detergente
Preparación de la ropa para lavar
Precauciones y advertencias, 21
Seguridad general
Eliminaciones
Ahorro energético y respeto por el medio ambiente
Cuidados y mantenimiento, 22
Cierre del agua e interrupción de la alimentación eléctrica
Limpieza del aparato
Cuidados de la puerta y del cesto de la máquina
Control del tubo de carga de agua
Problemas y soluciones, 23
Asistencia, 24
Antes de llamar al Servicio de Asistencia Técnica
Repuestos
Español
SP

SP
14
! Conserve este manual de instrucciones en un lugar seguro
para futuras consultas. En el caso de venta, mudanza o
traslado de la máquina, controle que el manual de
instrucciones acompañe siempre a la lavadora, para que
el nuevo propietario pueda aprender su funcionamiento y
sus características.
! Lea atentamente estas instrucciones porque contienen
indicaciones muy importantes sobre la instalación, el uso y
la seguridad.
Desembalaje
1. Desembale la lavadora.
2. Verifique que la lavadora no haya sido dañada durante
el transporte. Si estuviera dañada no la instale y llame al
revendedor.
Quitar los dispositivos de fijación para el transporte
IMPORTANTE: Siga estas instrucciones para quitar los DOS
dispositivos de fijación utilizados para el transporte.
Los pernos para el transporte están
ubicados a ambos lados del panel
posterior,
AMBOS DEBEN serAMBOS DEBEN ser
AMBOS DEBEN serAMBOS DEBEN ser
AMBOS DEBEN ser
quitados antes del usoquitados antes del uso
quitados antes del usoquitados antes del uso
quitados antes del uso.
! Si esta operación no se realiza, la
máquina podría sufrir graves daños.
Es fundamental que el perno y el
distanciador utilizados para el
transporte (
ver la fig.
) estén
perfectamente íntegros en el
momento en que se quitan.
1. Desenrosque el perno utilizando
una llave de 13 mm.
2.
DETENGA la operación cuando se
observan 3 roscas.
3. Para quitar el dispositivo, sujete el
perno, hágalo deslizar de costado y
luego tire.
4. Por razones de seguridad,
introduzca uno de los tapones de
plástico (
suministrados con la
máquina
) en el orificio.
! Repita los pasos 1 – 4 para quitar
el segundo perno utilizado para el
transporte.
! Los materiales del embalaje no son
juguetes para los niños.
Nivelación
Regule las dos patas delanteras para nivelar y estabilizar
la máquina. Si esto no se realiza, el funcionamiento puede
resultar ruidoso.
! Regule primero la inclinación lateral y luego la inclinación
desde adelante hacia atrás.
1. Desplace la lavadora hasta su ubicación definitiva.
- Tenga cuidado de no empotrar o enroscar los flexibles.
2. Gire manualmente una sola o
ambas patas delanteras en sentido
antihorario hasta el tope.
Durante la regulación de las patas,
utilice un nivel de burbuja para
controlar la nivelación de la
máquina, tanto lateral como
longitudinal.
- El resorte que se encuentra en cada pata impide el
aflojamiento de la misma.
! Si la máquina se coloca sobre una alfombra o moqueta,
regule las patas dejando el espacio suficiente para una
buena aireación debajo de la lavadora.
Conexión a las tomas de agua
Conexión del tubo de carga de agua.
Recuerde que esta es una máquina de llenado en frío.
! Controle que en el interior del tapón
del extremo del tubo haya una junta.
Antes de efectuar las conexiones
hídricas a la boca roscada de ¾
gas, permita que el agua fluya
libremente desde el grifo de
alimentación hasta que salga
perfectamente limpia.
Enrosque el extremo de carga con
el tapón azul en el grifo de
alimentación de agua fría.
Abra el grifo y verifique que no existan pérdidas: si es
necesario, apriete la unión.
! Controle que el tubo no esté sometido a pliegues ni
compresiones.
! La presión de agua en el grifo debe estar comprendida
entre los valores indicados en la tabla de características
técnicas (página siguiente).
! Si el tubo de carga de agua no es suficientemente largo,
llame a un técnico cualificado o diríjase a un negocio
especializado.
! Utilice siempre tubos nuevos.
! Controle el tubo de agua al menos una vez al año y
sustitúyalo cuando detecte grietas o rajaduras ya que los
tubos desgastados pueden partirse bajo la presión del agua.
Instalación

SP
15
Conexiones de la descarga
A. Conecte el tubo de
descarga, sin enroscarlo,
a una tubería de descarga
o a una descarga de
pared fijada a una altura
del piso comprendida
entre 65 y 100 cm.
B. Como alternativa,
apóyelo en el borde de un
fregadero, lavamanos o
bañera, fijando el tubo
suministrado, al grifo. El extremo libre del tubo nunca
debe quedar sumergido en agua.
! No se aconseja recurrir a prolongaciones. Si no se
puede evitar su uso, la prolongación debe tener el mismo
diámetro del tubo original y no debe superar los 150 cm
de longitud.
Conexión eléctrica
Antes de conectar la máquina a la toma de corriente
eléctrica, verifique que:
• la toma de corriente posea una eficaz conexión a
tierra conforme con las normas legales.
• la toma sea capaz de soportar la carga máxima de
potencia de la máquina indicada en la tabla de
características técnicas (a la derecha).
• la tensión de alimentación esté comprendida entre
los valores contenidos en la tabla de características
técnicas (a la derecha).
• la toma sea compatible con el enchufe de la lavadora.
Si no es así, sustituya la toma o el enchufe.
! La lavadora no debe ser instalada al aire libre, ni
siquiera si el lugar está protegido ya que es muy
peligroso dejarla expuesta a la lluvia o a las tormentas.
! Una vez completada la instalación de la máquina, la
toma de corriente debe ser fácilmente accesible y debe
estar conectada a una red de alimentación eléctrica
adecuada.
! No utilice prolongaciones o tomas múltiples.
! El cable de alimentación no debe sufrir dobladuras ni
compresiones peligrosas.
! El cable de alimentación eléctrica debe ser sustituido
únicamente por un técnico especializado.
! La empresa fabricante declina toda responsabilidad
en caso de que estas normas no sean respetadas.
El primer ciclo de lavado
Una vez que la máquina fue instalada y antes de utilizarla
por primera vez, ponga en marcha un ciclo de lavado sin
detergente y sin ropa, seleccionando el programa 90ºC
sin prelavado.
B
A
PLACA DE CARACTERÍSTICAS
Modelos AVXXL109
Dimensiones
anchura 59,5 cm.
altura 85 cm
profundidad 60 cm.
Capacidad de 1 a 7 kg.
Conexiones
eléctricas
Voltaje de 220/240 voltios 50 Hz
potencia máxima absorbida
1700-2100 W
Conexiones
hídricas
presión máxima 1 MPa (10 bar)
presión mínima 0,05 MPa (0,5 bar)
capacidad del cesto 53 litros
Velocidad de
centrifugado
hasta 1000 r.p.m.
Programas de
control según la
norma IEC456
programa 4
temperatura 60ºC
efectuado con una carga de 7 kg.
Esta máquina cumple con lo establecido
por las siguientes Directivas de la
Comunidad:
73/23/CEE del 19/02/72 (Baja Tensión)
y sucesivas modificaciones
- 89/336/CEE del 03/05/89
(Compatibilidad Electromagnética) y
sucesivas modificaciones

SP
16
Contenedor de
detergente
Atril
Panel de control
Descripción de la lavadora
Contenedor de detergente:
Para verter el detergente y el suavizante (
ver Detergentes
y lavado
).
Atril:
Tabla práctica para la consulta de los distintos programas
disponibles.
PILOTO PROGRAMA EN CURSO:
Su función es seguir el estado de avance del ciclo de lavado.
El Piloto correspondiente al ciclo en curso se ilumina.
Mando VELOCIDAD DE CENTRIFUGADO:
Para fijar la velocidad de centrifugado o excluir
completamente la centrifugación (
ver Puesta en marcha y
programas
).
Botones / PILOTOS FUNCIONES:
Para seleccionar las funciones disponibles.
Cuando se selecciona una función, el Piloto correspondiente
se ilumina.
Mando de TEMPERATURA:
Para regular la temperatura de lavado en frío (
Ver puesta
en marcha y programas
).
Botón / PILOTO ENCENDIDO/APAGADO:
Para encender y apagar la lavadora.
Botón INICIO/RESET:
Para poner en marcha el programa o anular selecciones
incorrectas.
PILOTO BLOQUEO PUERTA:
Para saber inmediatamente si si es posible abrir la puerta.
Mando de PROGRAMAS:
Para seleccionar los programas de lavado.
El mando es retráctil: para extraerlo presiónelo ligeramente
en el centro. El mando no se mueve durante todo el ciclo.
FUNCIONES
con botón
PILOTOS de las
FUNCIONES
PILOTO
BLOQUEO PUERTA
PILOTO
PROGRAMA EN
CURSO
Botón
INICIO/RESET
PILOTO
ENCENDIDO/
APAGADO
Botón
ENCENDIDO/
APAGADO
Mando de
PROGRAMAS
Mando de
TEMPERATURA
Mando
VELOCIDAD DE
CENTRIFUGADO

SP
17
PILOTO
PILOTO PROGRAMA EN CURSO:
Estos pilotos indican el estado de avance del programa
seleccionado. Una vez puesto en marcha el programa, se
ilumina el piloto correspondiente al primer ciclo y, a
medida que el programa avanza, se encienden
secuencialmente otros pilotos, hasta que finaliza el
programa.
Botones / PILOTOS FUNCIONES:
Cuando se selecciona una función, el Piloto correspondiente
se ilumina.
• Si la función seleccionada no es compatible con el
programa elegido, el botón comenzará a centellear y
la función no se activará.
• Si se elige una función incompatible con otra función
seleccionada precedentemente, quedará activada
solamente la última función seleccionada.
PILOTO BLOQUEO PUERTA:
Si este Piloto está encendido, indica que la puerta está
bloqueada para impedir su apertura accidental y evitar
daños. Para poder abrir la puerta espere hasta que el Piloto
se apague.
! El Piloto centelleante con frecuencia rápida, junto
con al menos otro Piloto centelleante, indica que se ha
producido un error. En ese caso, llame al servicio de
asistencia técnica.

SP
18
Brevemente: cómo poner en marcha un
programa
1. Encienda la lavadora manteniendo presionado el botón
ENCENDIDO/APAGADO durante 2 segundos como
mínimo. Durante algunos segundos se encienden todos
los PILOTOS y el Piloto ENCENDIDO/APAGADO
permanece encendido.
2. Cargue la ropa y cierre la puerta.
3. Lleve el mando PROGRAMAS hasta el programa deseado.
4. Fije la temperatura de lavado (
ver Personalizaciones
).
Puesta en marcha y programas
5. Fije la velocidad de centrifugado (
ver
Personalizaciones
).
6. Vierta el detergente y eventualmente el suavizante (
ver
Detergentes y lavado
).
7. Ponga en marcha el programa manteniendo presionado
el botón INICIO/RESET
durante 2 segundos como mínimo.
8. Al finalizar el programa, el PILOTO BLOQUEO PUERTA
se apague indicando que se puede abrir la puerta.
Extraiga la ropa y deje la puerta semiabierta para permitir
que se seque el cesto. Apague la lavadora pulsando el
botón ENCENDIDO/APAGADO
; se apagará también el
Piloto ENCENDIDO/APAGADO.
Tipos de tejidos y de suciedad
Programas
Temperatura
de lavado
Detergente
Lavado
Suavizante
Duración del
ciclo (minutos)
Descripción del ciclo de lavado
Algodón
Prelavado 1
20 Sólo prelavado.
Blancos sumamente sucios (sábanas,
manteles, etc.)
2 90°
150
Lavado, aclarados, centrifugado
intermedio y final
Blancos sumamente sucios (sábanas,
manteles, etc.)
3 60°
140
Lavado, aclarados, centrifugado
intermedio y final
Blancos y colores resistentes muy
sucios
4 60°
140
Lavado, aclarados, centrifugado
intermedio y final
Blancos poco sucios y colores
resistentes (camisas, camisetas, etc.)
5 60°
60
Lavado, aclarados, centrifugado
intermedio y final
Blancos y colores no resistentes muy
sucios
6 40°
105
Lavado, aclarados, centrifugado
intermedio y final
Sintéticos
Colores resistentes muy sucios (ropa
para recién nacidos, etc.)
7 60°
70
Lavado, aclarados, antiarrugas o
centrifugado delicado
Colores resistentes (ropa de todo tipo
poco sucia).
8 40°
65
Lavado, aclarados, antiarrugas o
centrifugado delicado
Delicados
Lana 9 40°
45
Lavado, aclarados y centrifugación
delicada
Tejidos muy delicados (seda, viscosa,
etc.)
10 30°
53
Lavado, aclarados y centrifugación
delicada
Blancos poco sucios y colores
delicados (camisas, camisetas, etc.)
11 30°
30
Lavado, aclarados, centrifugado
intermedio y final
Lavado a mano (etiqueta “lavar a
mano”)
12 25°
50
Lavado, aclarados y centrifugación
delicada
PROGRAMAS PARCIALES
Aclarado
30 Aclarados y centrifugación.
Centrifugación 15 Descarga y centrifugación enérgica.
Centrifugado delicado 13 Descarga y centrifugación delicada.
Descarga 2 Descarga
Tabla de programas
Notas
Para la función antiarrugas: ver Plancha fácil (página siguiente). Los datos contenidos en la tabla tienen un valor indicativo.
Todas las duraciones de los ciclos son aproximadas.
Programas especiales
El lavado Diario 30' (programa 11 para Sintéticos) es un programa estudiado para lavar prendas ligeramente sucias y en
poco tiempo: dura sólo 30 minutos y permite ahorrar energía y tiempo. Seleccionando este programa (11 a 30ºC), es
posible lavar conjuntamente tejidos de distinto tipo (excepto lana y seda), con una carga máxima de 3 kg.
•
Se aconseja el uso de detergente líquido.

SP
19
Regula ción de la temperatura
Gire el mando de TEMPERATURA para seleccionar la
temperatura de lavado (ver la Tabla de programas).
La temperatura se puede disminuir o fijar en el lavado en
frío
.
Regulación de la velocidad de
centrifugado
Gire el mando de VELOCIDAD DE CENTRIFUGADO para
fijar la velocidad de centrifugado adecuada al programa
seleccionado.
Para cada programa están previstas las siguientes
velocidades máximas de centrifugado:
Programas Velocidad máxima de centrifugado
Algodón 1000 rpm.
Sintéticos 800 rpm.
Lana 600 rpm.
Seda no
Personalizaciones
La velocidad de centrifugado se puede disminuir o el
centrifugado puede ser excluido completamente
seleccionando el símbolo
.
! La lavadora impide automáticamente seleccionar una
velocidad de centrifugado superior al valor máximo
previsto para cada programa.
Funciones
Para activar una función:
1. pulse el botón correspondiente a la función deseada
siguiendo la tabla que se muestra a continuación.
2. la función está activada cuando el piloto
correspondiente está iluminado.
Nota: Si el botón centellea con frecuencia rápida significa
que la función correspondiente no se puede seleccionar
para el programa en cuestión.
Función
Efecto
Comentarios
Activa con los
programas
Carga mini
Para lavar una
carga más
pequeña.
Además de disminuir el tiempo de lavado efectivo, esta
opción reduce el consumo de agua y de energía hasta un
50%.
Nota: Con este lavado también es posible disminuir la
cantidad de detergente utilizada.
2,4,5,7,8,
Plancha fácil
Esta opción
disminuye la
acción lavadora y
la velocidad de
centrifugado.
Al finalizar el ciclo permite obtener las prendas menos
arrugadas y, por lo tanto, más fáciles de planchar.
3,5,7,8,
Parada con agua
Las prendas se
mantienen en el
agua del último
aclarado
esperando que
se complete el
programa.
Complete el centrifugado final pulsando el botón Parada
con agua cuando el piloto comienza a centellear.
2,3,4,6,7,
8,10,
Lavado Rápido
Permite ahorrar
hasta un tercio
de la duración
del programa
Además de disminuir el tiempo de lavado efectivo, este
programa reduce el consumo de agua y de energía.
2,4,7,8
Aclarado Extra
Agrega otro
aclarado.
Para grandes cargas y prendas para personas con piel
delicada.
2,3,4,5,6,
7, 8,

SP
20
Los detergentes y la ropa
Contenedor de detergente
! Vierta en este contenedor exclusivamente los detergentes
específicos; otros productos podrían causar daños o
bloqueos.
1. Compartimento de
detergente para prelavado.
Valores máximos: 200 ml en
polvo o 100 ml líquido
2. Compartimento de
detergente para el lavado
principal.
Máximo 400 ml en polvo o
200 ml líquido
3. Compartimento de
suavizante.
Valor máximo: 120 ml
Dosificación del detergente en polvo
Para obtener resultados óptimos de lavado, mida la
cantidad de detergente indicada por los fabricantes y
viértala en el compartimento principal de detergente.
Dosificación del detergente líquido
Se aconseja el uso de la esfera dosificadora de detergente
suministrada por el fabricante del detergente.
Agregado de suavizante
Vierta la cantidad aconsejada de suavizante en el
compartimento correspondiente. No supere la línea de
llenado máximo.
Prelavado (
Programa 1
)
Cuando se selecciona el programa 1, vierta el detergente
tanto en el compartimento de prelavado como en el de
lavado principal.
! Con el programa de prelavado 1, no utilice dosificadores
que se introducen directamente en el cesto.
Preparación de la ropa para lavar
• Subdivida la ropa según los siguientes criterios:
- tipo de tejido / símbolo en la etiqueta.
- colores: separe las prendas de color y las blancas.
• Vacíe todos los bolsillos y controle que no hayan
botones que se puedan desprender.
• No supere los límites de peso indicados que se refieren
a la carga de ropa seca:
Tejidos resistentes: máx. 7 kg
Tejidos sintéticos: máx. 3 kg
Tejidos delicados: máx. 2 kg
Lana: máx. 1 kg
! Para evitar una disminución de las prestaciones de la
máquina, NO la sobrecargue.
Pero ¿Cuánto pesa la ropa?
1 sábana 400-500 gr
1 funda 150-200 g.
1 mantel 400-500 g.
1 albornoz 900-1200 g.
1 toalla 150-250 g.
Woolmark Platinum Care
Delicado como el lavado a mano.
Ariston introdujo un nuevo estándar de prestaciones
superiores reconocido por The Woolmark Company
con la prestigiosa marca Woolmark Platinum Care.
Busque el logo Woolmark Platinum Care en su lavadora
para estar seguro de que podrá lavar las prendas de lana
que posean la etiqueta “lavar a mano” (M.00221),
tranquilamente y con resultados excelentes:
Seleccione el programa 12 para todas las prendas con la
etiqueta “lavar a mano” y utilice el detergente adecuado.
Lana: Para obtener los mejores resultados, utilice un
detergente específico y no supere 1 kg. de carga.
3
2
1
Strona jest ładowana ...
Strona jest ładowana ...
Strona jest ładowana ...
Strona jest ładowana ...
Strona jest ładowana ...
Strona jest ładowana ...
Strona jest ładowana ...
Strona jest ładowana ...
Strona jest ładowana ...
Strona jest ładowana ...
Strona jest ładowana ...
Strona jest ładowana ...
Strona jest ładowana ...
Strona jest ładowana ...
Strona jest ładowana ...
Strona jest ładowana ...
Strona jest ładowana ...
Strona jest ładowana ...
Strona jest ładowana ...
Strona jest ładowana ...
Strona jest ładowana ...
Strona jest ładowana ...
Strona jest ładowana ...
Strona jest ładowana ...
Strona jest ładowana ...
Strona jest ładowana ...
Strona jest ładowana ...
Strona jest ładowana ...
-
 1
1
-
 2
2
-
 3
3
-
 4
4
-
 5
5
-
 6
6
-
 7
7
-
 8
8
-
 9
9
-
 10
10
-
 11
11
-
 12
12
-
 13
13
-
 14
14
-
 15
15
-
 16
16
-
 17
17
-
 18
18
-
 19
19
-
 20
20
-
 21
21
-
 22
22
-
 23
23
-
 24
24
-
 25
25
-
 26
26
-
 27
27
-
 28
28
-
 29
29
-
 30
30
-
 31
31
-
 32
32
-
 33
33
-
 34
34
-
 35
35
-
 36
36
-
 37
37
-
 38
38
-
 39
39
-
 40
40
-
 41
41
-
 42
42
-
 43
43
-
 44
44
-
 45
45
-
 46
46
-
 47
47
-
 48
48


w innych językach
- español: Ariston AVXXL109 (EX) Guía del usuario
- English: Ariston AVXXL109 (EX) User guide