Indesit WIDXL 126 S (EX) instrukcja
- Kategoria
- Pralki
- Typ
- instrukcja

1
GB
English,1
Contents
Installation, 2-3
Unpacking and levelling
Electric and water connections
The first wash cycle
Technical details
Washer-dryer description, 4-5
Control panel
Leds
Starting and Programmes, 6
Briefly: how to start a programme
Programme table
Personalisations, 7
Setting the temperature
Setting the drying cycle
Functions
Detergents and laundry, 8
Detergent dispenser
Preparing your laundry
Special items
Precautions and advice, 9
General safety
Disposal
Saving energy and respecting the environment
Care and maintenance, 10
Cutting off the water or electricity supply
Cleaning your appliance
Cleaning the detergent dispenser
Caring for your appliance door and drum
Cleaning the pump
Checking the water inlet hose
Troubleshooting, 11
Service, 12
Before calling for Assistance
WASHER-DRYER
WIDXL 126 S
Instructions for use
GB
Polski,25
PL
Hrvatski,13
HR

2
GB
Keep this instruction manual in a safe place for
future reference. Should the appliance be sold,
transferred or moved, make sure the instruction
manual accompanies the Washer-dryer to inform the
new owner as to its operation and features.
Read these instructions carefully: they contain vital
information on installation, use and safety.
Unpacking and levelling
Unpacking
1. Unpack the Washer-dryer.
2. Check whether the Washer-dryer has been
damaged during transport. If this is the case, do not
install it and contact your retailer.
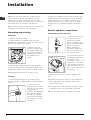
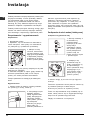
3. Remove the four
protective screws and
the rubber washer with
the respective spacer,
situated on the rear of
the appliance (see
figure).
4. Seal the gaps using the plastic plugs provided.
5. Keep all the parts: you will need them again if the
Washer-dryer needs to be moved to another location.
Packaging materials are not children's toys.
Levelling
1. Install the Washer-dryer on a flat sturdy floor,
without resting it up against walls, furniture cabinets
or other.
2. If the floor is not
perfectly level, compen-
sate for any unevenness
by tightening or
loosening the adjustable
front feet (see figure);
the angle of inclination,
measured according to
the worktop, must not
exceed 2°.
Levelling your appliance correctly will provide it with
stability and avoid any vibrations, noise and shifting
during operation. If it is placed on a fitted or loose
carpet, adjust the feet in such a way as to allow
enough room for ventilation beneath the Washer-
dryer.
Electric and water connections
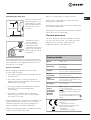
Connecting the water inlet hose
1. Insert seal A into the
end of the inlet hose
and screw the latter
onto a cold water tap
with a 3/4 gas threaded
mouth (see figure).
Before making the
connection, allow the
water to run freely until
it is perfectly clear.
2. Connect the other end
of the water inlet hose to
the Washer-dryer,
screwing it onto the
appliance's cold water
inlet, situated on the top
right-hand side on the
rear of the appliance
(see figure).
3. Make sure there are no kinks or bends in the
hose.
The water pressure at the tap must be within the
values indicated in the Technical details table
(on the next page).
If the water inlet hose is not long enough, contact
a specialist store or an authorised serviceman.
Never use hoses that have already been used.
Installation
A

GB
Technical details
Model
WIDXL 126 S
Dimensions
59.5 cm wide
85 cm high
53.5 cm deep
Capacity
from 1 to 6 kg for the wash programme;
from 1 to 5 kg for the drying programme
Electric
connections
please refer to the technical data plate
fixed to the machine
Wate r
connections
maximum pressure 1 MPa (10 bar)
minimum pressure 0.05 MPa (0.5 bar)
drum capacity 52 litres
Spin speed
up to 1200 rpm
Control
programmes
according to
EN 50229
directive
Wash: programme 2; temperature 60°C;
run with a load of 6 kg.
Drying: first drying cycle performed with
a 1 kg load, by selecting a drying time
of 60 min;
Second drying cycle performed with a 5
kg load and the DRYING knob on the
setting.
This appliance is compliant with the
following European Community
Directives:
- 89/336/CEE of 03/05/89
(Electromagnetic Compatibility) and
subsequent amendments
- 2002/96/CE
- 2006/95/CE (Low Voltage)
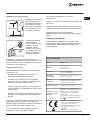
Connecting the drain hose
Connect the drain hose,
without bending it, to a
draining duct or a wall
drain situated between
65 and 100 cm from
the floor;
alternatively, place it
over the edge of a
basin, sink or tub,
fastening the duct
supplied to the tap (see
figure). The free end of
the hose should not be
underwater.
We advise against the use of hose extensions; in
case of absolute need, the extension must have the
same diameter as the original hose and must not
exceed 150 cm in length.
Electric connection
Before plugging the appliance into the mains
socket, make sure that:
the socket is earthed and in compliance with the
applicable law;
the socket is able to sustain the appliance's
maximum power load indicated in the Technical
details table (on the right);
the supply voltage is included within the values i
ndicated on the Technical details table
(on the right);
the socket is compatible with the washing
machine's plug. If this is not the case, replace
the socket or the plug.
The washing machine should not be installed in an
outdoor environment, not even when the area is
sheltered, because it may be very dangerous to
leave it exposed to rain and thunderstorms.
When the washing machine is installed, the mains
socket must be within easy reach.
Do not use extensions or multiple sockets.
The power supply cable must never be bent or
dangerously compressed.
The power supply cable must only be replaced by
an authorised serviceman.
Warning! The company denies all liability if and when
these norms are not respected.
The first wash cycle
Once the appliance has been installed, and before
you use it for the first time, run a wash cycle with
detergent and no laundry, setting the 90°C
programme without a pre-wash cycle.
65 - 100 cm

4
GB
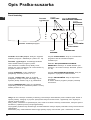
Washer-dryer description
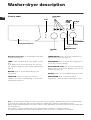
Control panel
Detergent dispenser
ON-OFF
Button
START/RESET
Button
TEMPERATURE
Knob
PROGRAMME
Knob
Leds
FUNCTION
Buttons
ON-OFF/
DOOR
LOCK
Led
Detergent dispenser: to add detergent and fabric
softener (see page 8).
LEDS: to find out which wash cycle phase is under
way.
If the Delay Timer function has been set, the time
left until the programme starts will be indicated (see
page 5).
DRYING knob: to set the desired drying cycle
(see page 7).
FUNCTION buttons: to select the functions
available. The button corresponding to the function
selected will remain on.
TEMPERATURE knob: to set the temperature or
the cold wash cycle (see page 7).
START/RESET button: to start the programmes or
cancel any incorrect settings.
ON-OFF/DOOR LOCK Led: to find out whether the
Washer-dryer is on and if the appliance door can be
opened (see page 5).
ON/OFF button: to turn the Washer-dryer on and off.
PROGRAMME knob: to select the wash
programmes. The knob stays still during the cycle.
DRYING
Knob
Note: to avoid excessive vibrations, before every spin cycle the machine distributes the load in a uniform manner
by continuously rotating the drum at a speed which is slightly faster than the normal washing speed.
When, despite repeated attempts, the load is still not evenly distributed, the machine spins at a lower speed than
the set frequency.
If the load is excessively unbalanced, the machine attempts to distribute it instead of spinning.
The balancing attempts may extend the total duration of the cycle, up to a maximum of 10 minutes.

GB
ON-OFF/DOOR LOCK led
If this LED is on, the appliance door is locked to prevent it from being opened accidentally; to avoid any
damages, wait for the LED to flash before you open the appliance door.
The rapid flashing of the ON-OFF/DOOR LOCK Led together with the flashing of at least one other LED
indicates there is an abnormality (see page 11).
Cycle phase under way:
During the wash cycle, the LEDs gradually illumina-
te on to indicate the cycle phase under way:
Prewash / Wash
Rinse
Spin cycle
Drying
Note:
- during draining, the LED corresponding to the
Spin cycle phase will be turned on.
- when the drying cycle is complete, the indicator
light relative to phase
will flash, to indicate that
the DRYING knob needs to be set back to the 0
setting.
Function buttons
The FUNCTION BUTTONS also act like LEDS.
When a function is selected, the corresponding
button is illuminated.
If the function selected is incompatible with the
programme set, the button will flash and the
function will not be enabled.
If you set a function that is incompatible with
another function you selected previously, only the
last one selected will be enabled.
Leds
The LEDS provide important information.
This is what they can tell you:
Delay set:
If the Delay Timer function has been enabled (see
page. 7), once you have started the programme,
the LED corresponding to the delay set will begin to
flash:
As time passes, the remaining delay will be
displayed, and the corresponding LED will flash:
Once the set delay is complete, the flashing LED will
turn off and the programme set will start.

6
GB
Starting and Programmes
Programme table
Briefly: starting a programme
1. Switch the Washer-dryer on by pressing button .
All the LEDS will light up for a few seconds and
the ON-OFF/DOOR LOCK Led will begin to flash.
2. Load your laundry into the washing machine and
shut the appliance door.
3. Set the PROGRAMME knob to the programme
required.
4. Set the wash temperature (see page 7).
5. Set the drying cycle if necessary (see page 7).
6. Add the detergent and any fabric softener (see page 8).
7. Start he programme by pressing the START/RESET
button.
To cancel it, keep the START/RESET button pressed
for at least 2 seconds.
8. When the programme is finished, the ON-OFF/
DOOR LOCK Led will flash to indicate that the
appliance door can be opened. Take out your
laundry and leave the appliance door ajar to allow
the drum to dry thoroughly. Turn the Washer-dryer
off by pressing button
.
Notes
-For programme 9, we advise against exceeding a wash load of 3.5 kg.
-For programme 13 we advise against exceeding a wash load of 2 kg.
-For the anti-crease function: see Easy iron, opposite page. The information contained in the table is purely indicative.
Special programme
Daily (programme 11 for Synthetics) is designed to wash lightly soiled garments in a short amount of time: it only lasts
30 minutes and allows you to save on both time and energy. By setting this programme (11 at 30°C), you can wash
different fabrics together (except for woollen and silk items), with a maximum load of 3 kg.
We recommend the use of liquid detergent.
Type of fabric and
degree of soil
Prog. Temp.
Drying
Cycle
Detergent
Fabric
softener
Cycle
length
(minutes)
Description of wash cycle
pre-wash wash
Standard
Extremely soiled whites (sheets,
tablecloths, etc.)
1
90°C
155
Pre-wash, wash cycle, rinse cycles,
intermediate and final spin cycles
Extremely soiled whites (sheets,
tablecloths, etc.)
2
90°C
150
Wash cycle, rinse cycles, intermediate
and final spin cycles
Heavily soiled whites and fast colours
2
60°C
140
Wash cycle, rinse cycles, intermediate
and final spin cycles
Heavily soiled whites and delicate colours
2
40°C
125
Wash cycle, rinse cycles, intermediate
and final spin cycles
Slightly soiled whites and delicate colours
(shirts, jumpers, etc.)
3
40°C
85
Wash cycle, rinse cycles, intermediate
and final spin cycles
Heavily soiled fast colours (baby linen, etc.)
4
6
0°C
83
Wash cycle, rinse cycles, anti-
crease or delicate spin cycle
Heavily soiled fast colours (baby linen, etc.)
4
40°C
70
Wash cycle, rinse cycles, anti-
crease or delicate spin cycle
Wool
5
40°C
50
Wash cycle, rinse cycles, delicate
spin cycle
Very delicate fabrics (curtains, silk,
viscose, etc.)
6
30°C
45
Wash cycle, rinse cycles, anti-
crease or draining cycle
Drying cotton
7
Drying delicates
8
Time 4 you
Heavily soiled whites and fast colours
9
60°C
60
Wash cycle, rinse cycles, intermediate
and final spin cycles
Delicate colours (all types of slightly soiled
garments)
10
40
°C
40
Wash cycle, rinse cycles, delicate
spin cycle
Delicate colours (all types of slightly soiled
garments)
11
30°C 30
Wash cycle, rinse cycles and
delicate spin cycle
Sport
Sports shoes
(MAX. 2 pairs)
12
30
°C
50
Cold wash (without detergents),
wash cycle, rinse cycles, and delicate
spin cycle
Fabrics for sportswear
(Tracksuits, shorts, etc.)
13
30°C 60
Wash cycle, rinse cycles, intermediate
and final spin cycles
PARTIAL PROGRAMMES
Rinse Rinse cycles and spin cycle
Spin cycle Draining and spin cycle
Drain Drain

GB
Personalisations
C
Setting the temperature
Turn the TEMPERATURE knob to set the wash temperature (see Programme table on page 6).
The temperature can be lowered, or even set to a cold wash (
).
Set the drying cycle
Turn the DRYING knob to set the desired drying type.
Two options are available:
A - Based on time: From 40 minutes to 180.
B - Based on the damp level of the dry clothes:
Iron
: slightly damp clothes, easy to iron.
Hanger
: dry clothes to put away.
Cupboard
: very dry clothes, recommended for towelling
and bathrobes.
A cooling stage is foreseen at the end of the drying cycle.
If your laundry load to wash and dry is exceptionally in excess
of the maximum load foreseen (see table opposite), perform
the wash cycle, and when the programme is complete, divide up the garments and put part of them back in the
drum. Now follow the instructions provided for a dry only cycle. Repeat this procedure for the remainder of the load.
Dry only
Turn the PROGRAMME knob to one of the drying settings (7-8) depending on the type of fabric, then select the
desired drying type using the DRYING knob.
Important: - A spin cycle is carried out during the drying if you have set a cotton programme and a level of
dryness (Cupboard
, Hanger , Iron ).
- For cotton loads of less than 1 Kg, use the drying programme designed for delicate fabrics.
Functions
To enable a function:
1. press the button corresponding to the desired function, according to the table below;
2. the function is enabled when the corresponding button is illuminated.
Note: The rapid flashing of the button indicates that the corresponding function cannot be selected for the
programme set.
Fabric
type
Load type Max.
load
(kg) Cup-
board
Hanger Iron
Cotton,
Linen
Clothing of different sizes
5 180 170 140
Cotton Terry towels
5 180 170 140
Terit al,
Cotton
Sheets, Shirts
2,5 140 120 100
Acrylics Pyjamas, socks, etc.
170 6560
Nylon Slips, tights, stockings, etc.
170 6560
Table of drying times
The data contained in the
table are purely indicative.
Function Effect Comments
Enabled with
programmes:
Delay
Timer
Delays the start
of the wash by
up to 9 hours.
Press the button repeatedly until the LED corresponding to the
desired delay is turned on.
The fifth time the button is pressed, the function will be disabled.
N.B.: Once you have pressed the Start/Reset button, the delay
can only be decreased if you wish to modify it.
All
Easy iron
This option
reduces the
amount of
creasing on
fabrics, making
them easier to
iron.
When this function is set, programmes 4, 6 will end with the
laundry left to soak (Anti-crease) and the Rinse cycle phase
LED will flash.
- to conclude the cycle, press the START/RESET button;
- to run the draining cycle alone, set the knob to the relative
symbol and press the START/RESET button.
This function is incompatible with the STAIN REMOVAL function.
3, 4, 6,
9, 10,
Rinse cycle.
Extra
Rinse
Increases the
efficiency of the
rinse.
Recommended when the appliance has a full load or with large
quantities of detergent.
1, 2, 3, 4, 9,
10, 12, 13,
Rinse cycle.
1200-600
Reduces the
spin speed.
All
programmes
except for 6
and draining.

8
GB
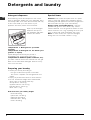
Detergent dispenser
Good washing results also depend on the correct
dose of detergent: adding too much detergent won't
necessarily make for a more efficient wash, and may
in fact cause build up on the interior of your
appliance and even pollute the environment.
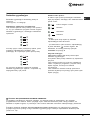
Open up the detergent
dispenser and pour in
the detergent and fabric
softener, as follows.
compartment 1: Detergent for pre-wash
(powder)
compartment 2: Detergent for the wash cycle
(powder or liquid)
Liquid detergent should only be poured in
immediately prior to the wash cycle start.
compartment 3: Additives (fabric softeners, etc.)
The fabric softener should not overflow from the grid.
Do not use hand wash detergent because it may
form too much foam.
Preparing your laundry
Divide your laundry according to:
- the type of fabric/the symbol on the label.
- the colours: separate coloured garments from
whites.
Empty all pockets and check for loose buttons.
Do not exceed the weight limits stated below,
which refer to the weight when dry:
Sturdy fabrics: max 6 kg
Synthetic fabrics: max 2.5 kg
Delicate fabrics: max 2 kg
Wool: max 1,5 kg
How much does your laundry weigh?
1 sheet 400-500 g
1 pillow case 150-200 g
1 tablecloth 400-500 g
1 bathrobe 900-1,200 g
1 towel 150-250 g
Special items
Curtains: fold curtains and place them in a pillow
case or mesh bag. Wash them separately without
exceeding half the appliance load. Use programme 6
which excludes the spin cycle automatically.
Quilted coats and windbreakers: if they are
padded with goose or duck down, they can be
machine-washed. Turn the garments inside out and
load a maximum of 2-3 kg, repeating the rinse cycle
once or twice and using the delicate spin cycle.
Wool: for best results, use a specific detergent,
taking care not to exceed a load of 1,5 kg.
Detergents and laundry
1
2
3

9
GB
Precautions and advice
The Washer-dryer was designed and built in
compliance with the applicable international safety
regulations. The following information is provided for
your safety and should consequently be read carefully.
General safety
This appliance has been designed for non-
professional, household use and its functions must
not be changed.
This washing machine should only be used by
adults and in accordance with the instructions
provided in this manual.
Never touch the washing machine when barefoot
or with wet or damp hands or feet.
Do not pull on the power supply cable to unplug
the appliance from the electricity socket. Pull the
plug out yourself.
Do not open the detergent dispenser while the
appliance is in operation.
Do not touch the drain water as it could reach
very high temperatures.
Never force the washing machine door: this could
damage the safety lock mechanism designed to
prevent any accidental openings.
In the event of a malfunction, do not under any
circumstances touch internal parts in order to
attempt repairs.
Always keep children well away from the
appliance while in operation.
The appliance door tends to get quite hot during
the wash cycle.
Should it have to be moved, proceed with the
help of two or three people and handle it with the
utmost care. Never try to do this alone, because
the appliance is very heavy.
Before loading your laundry into the washing
machine, make sure the drum is empty.
During the drying phase, the door tends to get
quite hot.
Do not use the appliance to dry clothes that have
been washed with flammable solvents (e.g.
trichlorethylene).
Do not use the appliance to dry foam rubber or
similar elastomers.
Make sure that the water tap is turned on during
the drying cycles.
This washer-dryer can only be used to dry clothes
which have been pre-washed in water.
Disposal
Disposing of the packaging material:
observe local regulations, so the packaging can
be re-used.
The European Directive 2002/96/EC on Waste
Electrical and Electronic Equipment, requires that
old household electrical appliances must not be
disposed of in the normal unsorted municipal waste
stream. Old appliances must be collected
separately in order to optimise the recovery and
recycling of the materials they contain and reduce
the impact on human health and the environment.
The crossed out "wheeled bin" symbol on the
product reminds you of your obligation, that when
you dispose of the appliance it must be separately
collected.
Consumers should contact their local authority or
retailer for information concerning the correct
disposal of their old appliance.
Saving energy and respecting the
environment
Environmentally-friendly technology
If you only see a little water through your appliance
door, this is because thanks to the latest Indesit
technology, your washing machine only needs less
than half the amount of water to get the best results:
an objective reached to respect the environment.
Saving on detergent, water, energy and time
To avoid wasting resources, the Washer-dryer
should be used with a full load. A full load instead
of two half loads allows you to save up to 50% on
energy.
The pre-wash cycle is only necessary on
extremely soiled garments. Avoiding it will save on
detergent, time, water and between 5 and 15%
energy.
Treating stains with a stain remover or leaving
them to soak before washing will cut down the
need to wash them at high temperatures. A
programme at 60°C instead of 90°C or one at
40°C instead of 60°C will save up to 50% on
energy.
Use the correct quantity of detergent depending
on the water hardness, how soiled the garments
are and the amount of laundry you have, to avoid
wastage and to protect the environment: despite
being biodegradable, detergents do contain
ingredients that alter the natural balance of the
environment. In addition, avoid using fabric
softener as much as possible.
If you use your washing machine from late in the
afternoon until the early hours of the morning, you
will help reduce the electricity board's peak load.
The Delay Timer option (see page 7) helps to
organise your wash cycles accordingly.
If your laundry has to be dried in a tumble dryer,
select a high spin speed. Having the least water
possible in your laundry will save you time and
energy in the drying process.

10
GB
Care and maintenance
Cutting off the water or electricity
supply
Turn off the water tap after every wash. This will
limit the wear of your appliance's water system
and also prevent leaks.
Unplug your appliance when cleaning it and
during all maintenance operations.
Cleaning your appliance
The exterior and rubber parts of your appliance can
be cleaned with a soft cloth soaked in lukewarm
soapy water. Do not use solvents or abrasives.
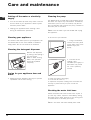
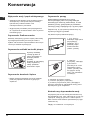
Cleaning the detergent dispenser
Remove the dispenser
by raising it and pulling it
out (see figure).
Wash it under running
water; this operation
should be repeated
frequently.
Caring for your appliance door and
drum
Always leave the appliance door ajar to prevent
unpleasant odours from forming.
Cleaning the pump
The Washer-dryer is fitted with a self-cleaning pump
that does not require any maintenance. Sometimes,
small items (such as coins or buttons) may fall into
the pre-chamber that protects the pump, situated in
the lower part of the same.
Make sure the wash cycle has ended and unplug
the appliance.
To access the pre-chamber:
1. using a screwdriver,
remove the cover panel
on the lower front of the
Washer-dryer (see
figure);
2. unscrew the lid
rotating it anti-
clockwise (see figure): a
little water may trickle
out. This is perfectly
normal;
3. clean the interior thoroughly;
4. screw the lid back on;
5. reposition the panel, making sure the hooks are
securely in place before you push it onto the
appliance.
Checking the water inlet hose
Check the water inlet hose at least once a year. If
you see any cracks, replace it immediately: during
the wash cycles, water pressure is very strong and
a cracked hose could easily split open.
Never use hoses that have already been used.

11
GB
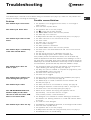
Troubleshooting
Your Washer-dryer could fail to work. Before calling for Assistance (see page 12), make sure the problem can't
easily be solved by consulting the following list.
Problem
The washer-dryer won't start.
The wash cycle won't start.
The washer-dryer fails to load
water.
The washer-dryer continuously
loads and unloads water.
The washer-dryer does not
drain or spin.
The washer-dryer vibrates too
much during the spin cycle.
The washer-dryer leaks.
The ON-OFF/DOOR LOCK Led
flashes rapidly at the same
time as at least one other LED.
There is too much foam.
The washer-dryer does not dry.
Possible causes/Solution:
The appliance is not plugged into the socket, or not enough to
make contact.
There has been a power failure.
The appliance door is not shut properly.
The
button has not been pressed.
The START/RESET button has not been pressed.
The water tap is not turned on.
A delayed start has been set (using the Delay Timer, see page 7).
The water inlet hose is not connected to the tap.
The hose is bent.
The water tap is not turned on.
There is a water shortage.
The water pressure is insufficient.
The START/RESET button has not been pressed.
The drain hose is not fitted between 65 and 100 cm from the floor
(see page 3).
The free end of the hose is underwater (see page 3).
The wall drainage system doesn't have a breather pipe.
If the problem persists even after these checks, turn off the water tap,
switch the appliance off and call for Assistance. If the dwelling is on one of
the upper floors of a building, there may be drain trap problems causing the
Washer-dryer to load and unload water continuously. In order to avoid such
an inconvenience, special anti-drain trap valves are available in shops.
The programme does not foresee the draining: some programmes
require enabling the draining manually (see page 6).
The Easy iron option is enabled: to complete the programme, press
the START/RESET button (see page 7).
The drain hose is bent (see page 3).
The drain duct is clogged.
The drum was not unblocked correctly during installation (see page 2).
The Washer-dryer is not level (see page 2).
The Washer-dryer is closed in between furniture cabinets and
the wall (see page 2).
The water inlet hose is not screwed on correctly (see page 2).
The detergent dispenser is obstructed (to clean it, see page 10).
The drain hose is not secured properly (see page 3).
Switch off the machine and unplug the appliance; wait for
approximately 1 minute then switch it on again.
If the problem persists, contact Assistance.
The detergent is not suitable for machine washing (it should bear
the definition "for washing machines" or "hand and machine wash",
or the like).
You used too much detergent.
The appliance is not plugged into the socket, or not enough to make contact.
There has been a power failure.
The appliance door is not shut properly.
A delayed start has been set (using the Delay Timer, see page 7).
the DRYING knob is on the 0 setting.

12
GB
Before calling for Assistance:
Check whether you can solve the problem on your own (see page 11);
Restart the programme to check whether the problem has been solved;
If this is not the case, contact an authorised Technical Service Centre on the telephone number
provided on the guarantee certificate.
Always request the assistance of authorised servicemen.
Notify the operator of:
the type of problem;
the appliance model (Mod.);
the serial number (S/N).
This information can be found on the data plate situated on the rear of the washer-dryer.
Service

13
HR
Hrvatski
Pregled
Postavljanje, 14-15
Raspakiravanje i izravnavanje
Hidraulièni i elektrièni prikljuèci
Prvi ciklus pranja
Tehnièki podaci
Opis Perilica-suilica, 16-17
Kontrolna ploèa
Kontrolna svjetla
Pokretanje i programi, 18
Ukratko: pokrenuti program
Tablica programa
Osobni izbor, 19
Postavljanje temperature
Postavljanje suenja
Funkcije
Deterdent i rublje, 20
Pretinac za deterdent
Pripremanje rublja
Posebno rublje
Mjere predostronosti i savjeti, 21
Opæa sigurnost
Uklanjanje
Uteda i potivanje okoline
Odravanje i oèuvanje, 22
Zatvaranje vode i iskljuèivanje elektriène struje
Èiæenje Perilica-suilica
Èiæenje pretinca za deterdent
Oèuvanje vrata i bubnja
Èiæenje crpke
Provjera cijevi za dovod vode
Nepravilnosti i rjeenja, 23
Servisna sluba, 24
Prije pozivanja Servisne slube
HR
PERILICA-SUILICA
WIDXL 126 S
Upute za uporabu

14
HR
Vano je saèuvati ove upute kako bi ste ih mogli
prouèiti u svakom trenutku. U sluèaju prodaje,
ustupanja ili seljenja, provjeriti da se nalaze zajedno
s Perilica-suilica kako bi se novog vlasnika
obavijestilo o funkcioniranju stroja i o upozorenjima
koja se na njega odnose.
Pozorno proèitajte upute: one sadre vane
obavijesti o postavljanju, uporabi i sigurnosti.
Raspakiravanje i izravnavanje
Raspakiravanje
1. Raspakirajte Perilica-suilica.
2. Provjerite da Perilica-suilica nije oteæena u
prijevozu. Ako je oteæena, nemojte je prikljuèivati i
obratite se prodavaèu.
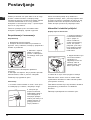
3. Otklonite 4 vijka za
zatitu u prijevozu i
gumicu s odstojnikom
na stranjoj strani (vidi
sliku).
4. Zatvorite otvore dostavljenim plastiènim
èepovima.
5. Saèuvajte sve dijelove: ako je potrebno prevoziti
Perilica-suilica, treba ih ponovno namjestiti.
Pakiranje nije igraèka za djecu.
Izravnavanje
1. Postavite Perilica-suilica na èvrst i ravan pod i
ne naslanjajte je na zidove, namjetaj ili drugo.
2. Ako pod nije
potpuno vodoravan,
nadoknadite razliku u
visini odvijanjem ili
navijanjem prednjih
noica (vidi sliku); kut
nagiba izmjeren na
gornjoj povrini ne
smije prelaziti 2°.
Pomno izravnavanje daje stroju stabilnost i
sprijeèava vibracije, buku i pomicanja tijekom rada.
U sluèaju da perilicu postavljate na tepison ili sag,
podesite noice tako da ispod Perilica-suilica
ostane dovoljno prostora za protjecanje zraka.
Hidraulièni i elektrièni prikljuèci
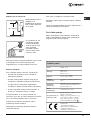
Spajanje cijevi za dovod vode
1. Umetnite zaptivaè A
na zavretak dovodne
cijevi i spojite na
slavinu s hladnom
vodom 3/4 narezanog
otvora, kao plinski
prikljuèak (vidi sliku).
Prije spajanja pustite
vodu da teèe dok ne
bude bistra.
2. Spojite dovodnu cijev
na Perilica-suilica
navijanjem na
odgovarajuæi otvor za
uzimanje vode na
stranjoj strani gore
desno (vidi sliku).
3. Pazite da na cijevi nema pregiba ni suenja.
Pritisak vode u slavini mora se nalaziti meðu
vrijednostima navedenim u tablici Tehnièki podaci
(vidi slijedeæu stranicu).
Ako duina dovodne cijevi nije dostatna, obratiti se
specijaliziranoj prodavaonici ili ovlatenom
tehnièaru.
Nemojte upotrebljavati veæ koritene cijevi.
Postavljanje
A

15
HR
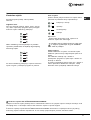
Spajanje cijevi za odvod vode
Spojite odvodnu cijev ne
savijajuæi je, na
kanalizaciju ili na odvod u
zidu, na visini od 65-100
cm od poda;
ili je naslonite na rub
umivaonika ili kade,
vezujuæi dostavljeni
vodiè za slavinu (vidi
sliku). Slobodni
zavretak odvodne
cijevi ne smije ostati
uronjen u vodu.
Ne preporuèuje se uporaba produne cijevi, no ako
je neophodna, mora imati isti promjer kao i
originalna cijev i ne smije biti dua od 150 cm.
Elektrièni prikljuèak
Prije umetanja utikaèa u utiènicu, provjerite da:
utiènica ima uzemljenje i da je u skladu sa
zakonskim propisima;
utiènica moe podnijeti najveæu snagu stroja
naznaèenu u Tehnièkim podacima (vidi tablicu);
se napon struje nalazi meðu vrijednostima
navedenim u tablici Tehnièki podaci (vidi tablicu);
utiènica odgovara utikaèu Perilica-suilica. U
protivnom, zamijenite utiènicu ili utikaè.
Perilica-suilica se ne smije instalirati na
otvorenom pa ni ako se radi o zatiæenom prostoru,
jer je vrlo opasno izloiti je kii i nevremenu.
Utiènica mora biti lako dohvatljiva i nakon
postavljanja Perilica-suilica.
Zabranjeno je koritenje produnih kabela i
viestrukih utiènica.
Ne smije se pregibati ili pritiskati kabel.
Elektrièni kabel smiju promijeniti jedino ovlateni
tehnièari.
Pozor! Proizvoðaè otklanja bilo kakvu odgovornost u
sluèaju nepotivanja ovih propisa.
Prvi ciklus pranja
Nakon postavljanja a prije uporabe, izvriti ciklus
pranja s deterdentom ali bez rublja, postavljajuæi
program na 90°C bez pretpranja.
65 - 100 cm
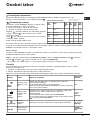
Tehnièki podaci
Model
WIDXL 126 S
Dimenzije
irina 59,5 cm
visina 85 cm
dubina 53,5 cm
Kapacitet
od 1 do 6 kg za pranje;
od 1 do 5 kg za suenje.
Elektrièno
prikljuèivanje
vidi ploèicu s tehnièkim osobinama na
stroju
Hidraulièno
prikljuèivanje
maksimalan pritisak: 1 MPa (10 bar)
minimalan pritisak: 0,05 MPa (0,5 bar)
kapacitet bubnja: 52 l
Brzina
centrifugiranja
do 1200 okretaja u minuti
Programi kontrole po
propisu EN 50229
pranje:
program 2; temperatura 60°C;
izvreno s 6 kg rublja.
suenje
: prvo suenje izvreno s 1 kg
robe, odabirom vremena od 60 min;
drugo suenje izvreno s 5 kg robe i
gumbom SUENJE na polozaju .
Ovaj je ureðaj u skladu sa slijedeæim
Uredbama EU:
- 89/336/CEE od 03/05/89
(Elektromagnetska kompatibilnost)
i naknadnim izmjenama
- 2006/95/CE (Nizak pritisak)

16
HR
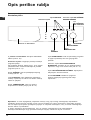
Kontrolna ploèa
Opis perilice rublja
Pretinac za deterdent
Tipka
UKLJUÈENJE/
ISKLJUÈENJE
Tipka
START/RESET
U pretinac za deterdent: stavljamo deterdent i
aditive (vidi str. 20).
Kontrolna svjetla: omoguæuju praæenje izvrenja
programa pranja.
Ako postavite funkciju Delay Timer, ta æe svjetla
pokazivati koliko vremena nedostaje do poèetka
programa (vidi str. 17).
Gumb SUENJE: slui za postavljanje eljenog
suenja (vidi str. 19).
Tipke FUNKCIJE: njima odabiremo raspoloive
funkcije. Tipka koja se odnosi na dotiènu funkciju
ostati æe upaljena.
Gumb TEMPERATURA: njime se regulira
temperatura ili hladno pranje (vidi str. 19).
Tipka START/RESET: slui za pokretanje programa
ili njegovo ponitenje ako smo ga pogreno
postavili.
Kontrolno svjetlo UKLJUCENJE/VRATA
BLOKIRANA: pokazuje da li je Perilica-suilica
ukljucena i mogu li se otvoriti vrata (vidi str. 17).
Tipka UKLJUÈENJE/ISKLJUÈENJE: ukljuèujemo i
iskljuèujemo Perilica-suilica.
Gumb PROGRAM: odabiremo programe.
Tijekom odvijanja programa gumb ostaje
nepomièan.
Gumb
PROGRAM
Kontrolna svjetla
Tipke FUNKCIJA
Kontrolno svjetlo UKLJUÈENJE/
VRATA BLOKIRANA
Gumb
TEMPERATURA
Gumb
SUENJE
Napomene: U svrhu izbjegavanja pretjeranih vibracija, stroj prije svakog centrifugiranja neprekidnim
okretanjem bubnja brzinom donekle veæom od one koritene pri pranju ravnomjerno rasporeðuje punjenje.
Ako se usprkos ponovljenim pokuajima punjenje ne rasporedi ravnomjerno, stroj æe izvriti centrifugiranje
brzinom niom od predviðene.
U sluèaju pretjerane neuravnoteenosti, stroj æe umijesto centrifugiranja vriti rasporeðivanje.
Pokuaji uravnoteivanja mogu produiti sveukupno trajanje ciklusa do najvie 10 minuta.

17
HR
Faza u tijeku:
Tjekom ciklusa pranja kontrolna se svjetla redom
pale kako bi pokazala stanje napredovanja:
Pretpranje / Pranje
Ispiranje
Centrifugiranje
Suenje
Napomena:
- tijekom faze izbacivanja vode, upalit æe se
kontrolno svjetlo faze Centrifuga.
- Po zavretku ciklusa suenja kontrolno svjetlo faze
æe treptjeti, signalizirajuæi da gumb SUENJE
treba vratiti na poloaj 0.
Tipke funkcija
TIPKE FUNKCIJA su ujedno i kontrolna svjetla.
Odabirom jedne funkcije odgovarajuæa tipka æe se
upaliti.
Ako odabrana funkcija nije u skladu s
postavljenim programom, tipka trepti i dotièna se
funkcija ne aktivira.
U sluèaju postavljanja funkcije koja nije u skladu s
nekom prethodno odabranom funkcijom, ostaje
aktivirana samo posljednja odabrana funkcija.
Kontrolna svjetla
Kontrolna svjetla pruaju vane podatke,
odnosno:
Odgoðen start:
Ako smo aktivirali funkciju Delay Timer (vidi str.
19), nakon upuæivanja programa poèinje treptjeti
kontrolno svjetlo odabranog kanjenja:
Nakon odreðenog vremena prikazuje se preostalo
vrijeme do poèetka rada, uz treptanje odgovarajuæeg
kontrolnog svjetla:
Po isteku odabranog kanjenja, trepæuæe kontrolno
svjetlo se gasi i postavljeni program se pokreæe.
Kontrolno svjetlo UKLJUÈENJE/VRATA BLOKIRANA
Upaljeno kontrolno svjetlo pokazuje da su vrata blokirana kako bi se sprijeèilo njihovo sluèajno otvaranje; da bi
ste izbjegli kvar, ne otvarajte vrata sve dok kontrolno svjetlo ne poène treptjeti.
Ubrzano treptanje svjetla UKLJUÈENJE/VRATA BLOKIRANA istovremeno s treptanjem barem jo jednog
kontrolnog svjetla oznaèava nepravilnost. U tom sluèaju preporuèujemo pozovite Tehnièku slubu.

18
HR
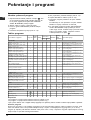
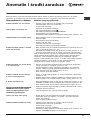
Vrsta tkanine i uprljanost Programi
Tempe-
ratura
Suenje
Deterd¡zent
Omekivaè
Trajanje
ciklusa
(u minutama)
Opis ciklusa pranja
Pretpr. Pranje
Standardno
Pamuk:
Vrlo prljavo bijelo rublje
(plahte, stolnjaci, itd.)
1
90
°C
155
Pretpranje, pranje, ispiranja,
centrifugiranja i zavrno centrifugiranje
Pamuk:
Vrlo prljavo bijelo rublje
(plahte, stolnjaci, itd.)
2
90
°C
150
Pranje, ispiranja, centrifugiranja i zavr
no centrifugiranje
Pamuk:
Vrlo prljavo bijelo i
obojeno rublje postojanih boja
2
60
°C
140
Pranje, ispiranja, centrifugiranja i zavr
no centrifugiranje
Pamuk:
Vrlo prljavo bijelo i
obojeno rublje postojanih boja
2
40
°C
125
Pranje, ispiranja, centrifugiranja i zavr
no centrifugiranje
Pamuk:
Malo prljavo bijelo rublje i rublje
osjetljivih boja (koulje, majice, itd.)
3
40
°C
85
Pranje, ispiranja, centrifugiranja i zavr
no centrifugiranje
Sintetika:
Vrlo prljavo rublje otpornih
boja (bijelo rublje novoroðenèadi, itd.)
4
60
°C
83
Pranje, ispiranja, "protiv nabora" ili
lagano centrifugiranje
Sintetika:
Vrlo prljavo rublje otpornih
boja (bijelo rublje novoroðenèadi, itd.)
4
40
°C
70
Pranje, ispiranja, "protiv nabora" ili
lagano centrifugiranje
Vuna
5
40
°C
50
Pranje, ispiranja
,
lagano centrifugiranje
Vrlo osjetljive tkanine
(zavjese, svila, viskosa, itd.)
6
30
°C
45
Pranje, ispiranja, "protiv nabora" ili
izbacivanje vode
Suenje pamuènih tkanina
7
Suenje osjetljivih tkanina
8
"Time 4 you"
Pamuk:
Vrlo prljavo bijelo i
obojeno rublje postojanih boja
9
60
°C
60
Pranje, ispiranja, centrifugiranja i zavr
no centrifugiranje
Sintetika:
Osjetljive boje (donekle
prljavo bijelo rublje svih vrsta)
10
40°C
40
Pranje, ispiranja i lagano centrifugiranje
Sintetika:
Osjetljive boje (donekle
prljavo bijelo rublje svih vrsta)
11
30
°C
30 Pranje, ispiranja i lagano centrifugiranje
port
portska obuæa
(MAKS. 2 para.)
12
30°C
50
Hladno pranje (bez deterd¡zenta), pranje,
ispiranja i lagano centrifugiranje
Tkanine za portsku odjeæu
(trenerke, hlaèice, itd.)
13
30
°C
60
Pranje, ispiranja, centrifugiranja i zavr
no centrifugiranje
DJELOMIÈNI PROGRAMI
Ispiranje Ispiranja i centrifugiranje
Centrifugiranje Izbacivanje vode i centrifugiranje
Izbacivanje vode Izbacivanje vode
Pokretanje i programi
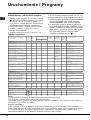
Tablica programa
Napomene
-Za programe 9 preporuèena kolièina robe ne prelazi 3,5 kg.
-Za program 13 preporuèena kolièina robe ne prelazi 2 kg.
-Opis protiv nabora vidi u odjeljku Manje peglanja na slijedeæoj stranici. Podaci u tablici imaju priblinu vrijednost.
Posebni program
Dnevni 30' (program 11 za sintetiku) prouèavan je za pranje donekle prljavog rublja u kratkom vremenu: traje
samo 30 minuta i tako nam pomae utedjeti struju i vrijeme. Postavljanjem ovog programa (11 na 30°C)
moguæe je zajedno prati tkanine razlièitih vrsta (osim vune i svile) s najveæim moguæim optereæenjem od 3 kg.
Preporuèuje se uporaba tekuæeg deterdenta.
Ukratko: pokrenuti program
1. Ukljuèiti Perilica-suilica pritiskom na tipku . Sva
æe se kontrolna svjetla upaliti nekoliko sekundi, da
bi se potom ugasila, dok svjetlo UKLJUÈENJE/
VRATA BLOKIRANA poèinje treptjeti.
2. Stavite rublje u perilicu i zatvorite vrata.
3. Pomoæu gumba PROGRAM postavite eljeni
program.
4. Postavite temperaturu pranja (vidi str. 19).
5. Ako je potrebno, postavite suenje (vidi str. 19).
6. Uspite deterdent i aditive (vidi str. 20).
7. Pokrenite program pritiskom na tipku START/
RESET.
Ponitavanje se vri pritiskom na tipku START/
RESET u trajanju od barem 2 sekunde.
8. Po zavretku programa svjetlo UKLJUÈENJE/
VRATA BLOKIRANA trepti pokazujuæi da se
vrata mogu otvoriti. Izvadite rublje i pritvorite vrata
kako bi se bubanj osuio. Iskljuèite Perilica-
suilicapritiskom na tipku
.

19
HR
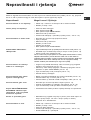
Funkcije Uèinak Napomene za uporabu
Aktivan uz
program:
"Delay
Timer"
Pokretanje stroja
odgaða se i do 9
sata.
Pritisnuti vie puta tipku dok se ne upali kontrolno svjetlo koje
oznaèava Zeljeno kanjenje.
Na peti pritisak tipka funkcije vie nije aktivirana.
Opaska: kad jednom pritisnemo tipku Start/Reset, vrijednost odgoðenog
starta se mo±ze jedino smanjiti.
Svi
"Manje
peglanja"
Smanjuje nabore
na tkanini olak
avajuæi
peglanje.
Postavljanjem ove funkcije programi 4, 6 se prekidaju, a rublje ostaje
namoèeno (Protiv nabora), dok kontrolno svjetlo faze
Ispiranja trepti.
- da bi ste zavrili ciklus pritisnite tipku START/RESET;
- da bi ste samo izbacili vodu, namjestite gumb na odgovarajuæi simbol
i pritisnite tipku START/RESET.
3, 4, 6,
9, 10,
ispiranja.
Naj-ispiranje
Poveæava
uèinkovitost
ispiranja.
Preporuèuje se kod pune perilice ili kod velikih kolièina deterd±zenta.
1, 2, 3, 4, 9,
10, 12, 13,
ispiranja.
1200-600
Smanjuje brzinu
centrifugiranja.
Svi osim
6, izbacivanje
vode.
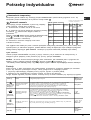
Osobni izbor
C
Postavljanje temperature
Temperatura pranja postavlja se okretanjem gumba TEMPERATURA (vidi Tablicu programa na str. 18).
Moguæe je sniziti temperaturu sve do hladnog pranja (
).
Postavljanje suenja
Okretanjem gumba SUENJE postavlja se eljeni naèin
suenja. Predviðene su dvije moguænosti:
) - obzirom na vrijeme - od 40 do 180 minuta;
* - obzirom na stupanj vlanosti suene robe:
Peglanje
: donekle ovlaena roba radi lakeg peglanja.
Osuite i objesite
: suha roba koju æemo odmah
spremiti na mjesto.
Ormar
: vrlo osuena roba (preporuèuje se za suenje
ruènika i kupaæih ogrtaèa).
Nakon suenja slijedi hlaðenje robe.
Ako teina robe za pranje i suenje sluèajno prelazi najveæu predviðenu kolièinu (vidi tablicu sa strane), izvrite
pranje te po zavretku programa podijelite robu na dva dijela i jedan dio vratite u bubanj. Slijedite upute za samo
suenje. Isti postupak ponovite i s preostalom robom.
Samo suenje
Okrenite gumb PROGRAM na jedan od poloaja za suenje (7-8) obzirom na vrstu tkanine pa pomoæu gumba
SUENJE odaberite eljeni naèin suenja.
Vano: - Ako ste postavili jedan od programa za pamuk i jedan od naèina suenja (Ormar
, Osuite i
objesite
, Peglanje ), tijekom suenja vri se i jedno centrifugiranje.
- Za pamuènu robu teine manje od 1 kg koristite program suenja za osjetljivih tkanine.
Funkcije
Perilica-suilica raznim funkcijama pranja koje posjeduje omoguæuje postizanje eljene èistoæe i bjeline.
Aktiviranje funkcija se vri:
1. pritiskom na odgovarajuæu tipku funkcije po dolje prikazanoj tablici;
2. paljenje odgovarajuæe tipke oznaèava da je funkcija aktivirana.
Napomena: ubrzano treptanje tipke pokazuje da za postavljeni program nije moguæe odabrati dotiènu funkciju.
Vrs ta
tkanine
Pun jenje Ma k s.
punjenj e
(kg)
Or mar Osušite i
objesite
Peg lan je
Pamuk, lan Bijelo rublje razlièitih
dimenzija
5 180 170 140
Pamuk Frotirski ruènici 5 180 170 140
Te r it a l,
pamuk
Plahte, košulj e
2,5 140 120 100
Ak r i l P i d ¡zame, èarape, itd. 1 70 65 60
Najlon Podsuknje, hulahopke, itd. 1 70 65 60
Tablica vremena suenja
Podaci u tablici imaju
priblinu vrijednost.

20
HR
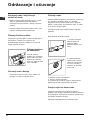
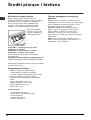
Pretinac za deterdent
Dobar ishod pranja ovisi i o ispravnom odmjeravanju
kolièine deterdenta: pretjeranim kolièinama ne
pospjeujemo uèinak pranja veæ pomaemo
stvaranje naslaga na unutarnjim dijelovima Perilica-
suilica i zagaðujemo okolinu.
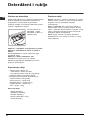
Izvucite pretinac za
deterdent i uspite
deterdent ili aditiv na
slijedeæi naèin.
Zdjelica 1: deterdent za pretpranje (u prahu)
Zdjelica 2: deterdent za pranje (u prahu ili
tekuæi)
Tekuæi deterdent se ulijeva neposredno prije
pokretanja stroja.
Zdjelica 3: aditivi (omekivaè, itd.)
Omekivaè ne smije izaæi kroz reetku.
Nemojte upotrebljavati deterdente za ruèno
pranje jer previe pjene.
Pripremanje rublja
Odvojite rublje obzirom na:
- vrstu tkanine / simbol na etiketi;
- boje (odvojite rublje u boji od onog bijelog).
Ispraznite depove i provjerite dugma.
Nemojte prijeæi naznaèene kolièine koje se
odnose na teinu suhog rublja:
otporne tkanine - najvie 6 kg
sintetièke tkanine - najvie 2,5 kg
osjetljive tkanine - najvie 2 kg
vuna - najvie 1,5 kg
Koliko tei rublje?
1 plahta 400-500 g
1 jastuènica 150-200 g
1 stolnjak 400-500 g
1 kupaæi ogrtaè 900-1.200 g
1 ruènik 150-250 g
Posebno rublje
Zavjese: savijte ih i stavite u jastuènicu ili mreicu.
Perite ih same, u kolièini ne veæoj od pola punjenja,
programom 6 koji automatski iskljuèuje
centrifugiranje.
Perine i vjetrovke: ako su punjene guèjim ili
paèjim perjem, moe ih se prati u perilici. Izvrnite
odjeæu i opteretite Perilica-suilica s najvie 2-3 kg
rublja, ponavljajuæi ispiranje jednom ili dva pute i
obavljajuæi lagano centrifugiranje.
Vuna: najbolji rezultati se postiu uporabom
deterdenta za vunu i pranjem ne vie od 1,5 kg
rublja odjednom.
Deterdent i rublje
1
2
3
Strona się ładuje...
Strona się ładuje...
Strona się ładuje...
Strona się ładuje...
Strona się ładuje...
Strona się ładuje...
Strona się ładuje...
Strona się ładuje...
Strona się ładuje...
Strona się ładuje...
Strona się ładuje...
Strona się ładuje...
Strona się ładuje...
Strona się ładuje...
Strona się ładuje...
Strona się ładuje...
-
 1
1
-
 2
2
-
 3
3
-
 4
4
-
 5
5
-
 6
6
-
 7
7
-
 8
8
-
 9
9
-
 10
10
-
 11
11
-
 12
12
-
 13
13
-
 14
14
-
 15
15
-
 16
16
-
 17
17
-
 18
18
-
 19
19
-
 20
20
-
 21
21
-
 22
22
-
 23
23
-
 24
24
-
 25
25
-
 26
26
-
 27
27
-
 28
28
-
 29
29
-
 30
30
-
 31
31
-
 32
32
-
 33
33
-
 34
34
-
 35
35
-
 36
36


Indesit WIDXL 126 S (EX) instrukcja
- Kategoria
- Pralki
- Typ
- instrukcja
w innych językach
- English: Indesit WIDXL 126 S (EX) User guide
Powiązane artykuły
-
HOTPOINT/ARISTON RDSG 86207 S EU instrukcja
-
-
-
-
-
Indesit ARMXXF 149 (EU) instrukcja
-
-
-
-
Inne dokumenty
-
Whirlpool AVSF 109 (EU) instrukcja
-
Whirlpool AVSF 109 (EU) (V) instrukcja
-
-
-
-
Hotpoint-Ariston aml 129 Instrukcja obsługi
-
-
Amana LW8201W instrukcja
-
Haier HWM50TLF Instrukcja obsługi