Warwick ROCKBOARD STEP UP Skrócona instrukcja obsługi
- Typ
- Skrócona instrukcja obsługi

Die RockBoard Step Up Serie erleichtert den Zugriff auf Pedale, die sich in den oberen Reihen
des RockBoards befinden. Das RockBoard Step Up wird einfach an der gewünschten Position
fixiert und die Pedale darauf befestigt.
Bitte folgen Sie diesen Schritten, um das RockBoard Step Up auf Ihrem RockBoard Pedalboard
einzurichten:
MACHEN SIE IHR NEUES ROCKBOARD
STEP UP EINSATZBEREIT
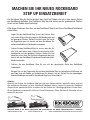
Legen Sie das RockBoard Step Up mit der flachen Seite
nach unten. Kleben Sie die schmalen Klettbandstreifen auf
die gezeigten Flächen. Stellen Sie sicher, dass Sie hierfür
die Gegenseite des sich bereits auf dem RockBoard Pe-
dalboard befindlichen Klettbands verwenden.
Drehen Sie das RockBoard Step Up so um, dass die fla-
che Seite nach oben zeigt. Kleben Sie die breiten Klett-
bandstreifen auf die gezeigten Flächen. Stellen Sie hier
ebenfalls sicher, dass Sie hierfür die Gegenseite des sich
bereits auf dem RockBoard Pedalboard befindlichen Klett-
bands verwenden.
Drücken Sie das RockBoard Step Up nun auf die gewünschte Stelle des RockBoard
Pedalboards.
Bringen Sie nun die Gegenseite des auf dem RockBoard Step Up befindlichen Klettbands auf
das Pedal bzw. die Pedale auf und drücken Sie diese(s) fest an. Stellen Sie die notwendigen
Kabelverbindungen her und Ihr RockBoard Step Up ist einsatzbereit.
•
•
•
•
Hinweis:
Wenn Sie die Position des RockBoard Step Ups nicht mehr ändern möchten, können Sie dieses auch mit
den beiligenden Schrauben auf dem RockBoard Pedalboard fixieren. Legen Sie hierzu das RockBoard
Stepup auf die gewünschte Stelle, markieren Sie die Position der 4 Befestigungslöcher auf dem Rock-
Board Pedalboard und bohren Sie Löcher mit 3 mm Durchmesser. Setzen Sie dann die Schrauben ein und
drehen Sie diese fest.
Warwick GmbH & Co. Music Equipment KG, Gewerbepark 46, 08258 Markneukirchen / Germany
[email protected] I www.rockboard.de I www.facebook.de/warwickmusicdistribution

The RockBoard Step Up Series gives you easier access to pedals in the upper rows of the Rock-
Board. Simply attach the RockBoard Step Up to the preferred location and put the pedals on it.
Please proceed with the following steps to set up your RockBoard Step Up together with your
RockBoard Pedalboard:
HOW TO SET UP YOUR NEW
ROCKBOARD STEP UP
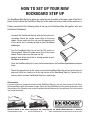
Lay down the RockBoard Step Up with the flat surface fa-
cing down. Attach the narrow velcro strips to the areas
shown. Please make sure that you use the opposite side
of the velcro that is already located on your RockBoard
pedalboard.
Turn the RockBoard Step Up so that the flat surface is
facing upward. Attach the wide velcro strips to the areas
shown. Please make sure that you use the
opposite side of the velcro that is already located on your
RockBoard pedalboard.
Place the RockBoard Step Up in your preferred location on the RockBoard pedalboard and press
firmly.
Attach the opposite side of the Velcro used on the RockBoard Step Up surface to the device(s)
and push firmly but carefully on to the top surface of the RockBoard Step Up. Connect all ne-
cessary cables and your RockBoard Step Up is ready to go.
•
•
•
•
Please notice:
If you do not plan to change the location of the RockBoard Step Up, you can firmly fasten it to the Rock-
Board pedalboard with the included screws. Please put the RockBoard into the preferred location, mark
the position of the 4 fixation holes on the RockBoard and drill holes with 3 mm diameter. Put in the screws
and screw them tight.
Warwick GmbH & Co. Music Equipment KG, Gewerbepark 46, 08258 Markneukirchen / Germany
[email protected] I www.rockboard.de I www.facebook.de/warwickmusicdistribution
-
 1
1
-
 2
2

