
Max
Quick Start Guide
Guide de démarrage rapide
Anweisung für einen schnellen Start
Snel Start Gids
Guía de instalación rápida
Guida Rapida
Краткое руководство
Короткий посібник
Skrócona instrukcja Szybki Start
English ● Français ● Deutsch ● Nederlands ● Español ● Italiano ● Русский ● Українська ● Polski
Manufactured under license from Dolby Laboratories.
Dolby and the double-D symbol are trademarks of Dolby Laboratories.


3
4
12
20
28
36
44
52
60
68
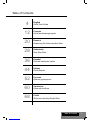
Table of Contents
Table of Contents
English
Quick Start Guide
Français
Guide de démarrage rapide
Deutsch
Anweisung für einen schnellen Start
Nederlands
Snel Start Gids
Español
Guía de instalación rápida
Italiano
Guida Rapida
Русский
Краткое руководство
Українська
Короткий посібник
Polski
Skrócona instrukcja Szybki Start

4Dune HD Max Quick Start Guide
Dune HD Max is an all-in-one solution for up to Full HD (1080p) video playback, combining a universal
high definition media player and a modern Blu-ray disc player in one device
Key Features
● The newest Sigma Designs 8642 media processor: enjoy excellent playback and performance of
interactive features.
● Blu-ray and DVD player: play Blu-rays and DVDs (plus Audio CD and data discs with video/music/
photo files).
● HDD player: connect an HDD to the player and play content directly from the HDD.
● Network player: connect the player to a local network and play content directly from PC or NAS (UPnP,
SMB, NFS).
● MKV player: play HD and SD video in a popular MKV format and other modern video file formats,
including top quality HD video with very high bitrate.
● RealD: watch 3D video in this ultra modern format used in cinema for the latest movies.
● HD audio: enjoy top-quality audio tracks (Dolby TrueHD, DTS HD Master Audio, LPCM, FLAC).
● 3 USB ports: conveniently connect HDDs, USB flash drives, USB card readers and other USB storage
devices.
● HDD rack with hot swap function: easily and quickly insert and exchange internal 3.5’’ SATA HDD.
● SD card slot: easily play media files on SD memory cards from your camera or other devices, or use an
SD memory card as a local or system storage (required for BD Live function).
● HDMI 1.3: ensure the best possible quality of HD video and HD audio.
● A rich set of standard A/V connectors: use S/PDIF optical audio, stereo audio, component video,
composite video outputs to easily connect any A/V equipment.
● Extended support for Dolby TrueHD and DTS HD Master Audio: output bitstream (up to 7.1 channels)
or decode to LPCM (up to 7.1 channels) for maximum flexibility when connecting audio equipment, and
for extended support of advanced playback features (such as Picture-in-Picture).
● Video output flexibility: output video in any resolution and format (from SD to 1080p, 24p/PAL/NTSC).
● Upscaling: high quality upscaling of DVD and any other SD video content to Full HD (1080p) or other
HD resolution.
● File browser: convenient file browser with powerful file management (copy, move, delete, rename,
organize, sort).
Introduction

5
Extra Functions
● High-quality music playback: play very high-quality (up to 192 Khz / 24-bit) music files in various
formats (FLAC, Monkey’s Audio APE, WAV/PCM, DTS, etc).
● Playlists: build playlists from your folders, use your own playlists, use repeat and shuffle functions.
● NAS function: access files on storage devices (HDD, optical drive, etc) attached to the player from the
local network (using SMB or FTP).
● BitTorrent: use built-in BitTorrent client to download files from P2P networks.
● Customizable user interface: work with media collections using cover art and icon browsing (with Full
HD graphics).
● Flash applications: extend the player functionality with FlashLite applications.
● Internet radio: playback and record various Internet radio stations (HTTP/MP3).
● IPTV: playback and record IPTV streams (multicast UDP/RTP) from your Internet provider*.
● Digital TV option: playback and record Digital TV channels using an optional Digital TV USB dongle**.
● Internet browsing: view Internet Web sites on your TV using the built-in Web browser***.
* Check availability of multicast UDP/RTP streams with your Internet provider.
** Digital TV USB dongle is not included; this option can be purchased separately.
*** Built-in Web browser has limitations and may not allow to view some Internet Web sites.
English

6Dune HD Max Quick Start Guide
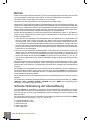
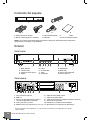
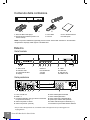
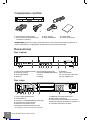
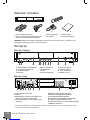
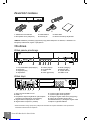
Package Contents
1. Dune HD Max media player
2. Remote control (batteries may not be included)
1
4
NOTE: Additional items (optional) may be included into the package, depending on player configuration,
region, and distributor.
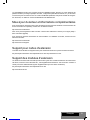
Exterior
Front view
Rear view
1. On/off button
2. LED indicator
3. Optical drive
4. Display
5. EJECT
6. PLAY/PAUSE
7. STOP
8. PREV
9. NEXT
10. HDD rack
11. SD card slot
12. USB 2.0 host
1. LAN and 2xUSB 2.0 host
2. HDMI 1.3
3. Dedicated bus connector (I2C) (for future
connecting external devices)*
4. Composite video and S-Video output
5. Component (Y/Pb/Pr) video output
* Not for headphones or other A/V devices; connecting headphones or other A/V devices may damage your
equipment
6. Coaxial digital audio output
7. Optical digital audio output
8. Analog stereo (left/right) audio output
9. Openings for optional Wi-Fi antennas
10. Multichannel (7.1) analog audio output
11. AC power and power switch
3. Power supply cord
4. AV cable
5. HDMI cable
6. Quick start guide
12 3 456789 10 11 12
12345678 9 10 11
2
356

7
English
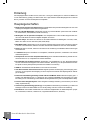
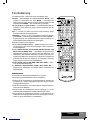
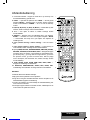
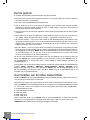
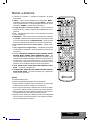
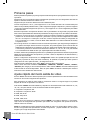
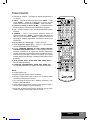
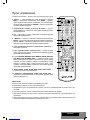
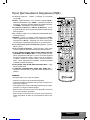
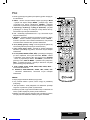
1. Command indicator — fl ashes in response to RC button pressing.
2. EJECT — open/close the optical drive tray. MUTE — turn the
sound on/off. MODE — switch the video output mode; control
some other player functions. POWER — toggle the standby mode.
3. A (Red), B (Green), C (Yellow), D (Blue) — access Blu-ray disc
features; control some other player functions.
4. 0–9 — enter numbers and text; control some other player func-
tions.
5. SEARCH — jump to a specifi ed playback position. ZOOM —
change the zoom factor for the video content being played. SET-
UP — enter/leave the setup menu; adjust playback settings dur-
ing playback.
6. V+/V- (volume up / volume down) — adjust the volume.
7. P+/P- (page up / page down) — scroll up and down in various
lists; control some other player functions.
8. Arrows (LEFT, RIGHT, DOWN, UP), ENTER, RETURN, TOP
MENU, POP UP MENU, INFO — main buttons for controlling
the player (navigate across the items on the screen, open/use
the currently selected item, go back to the previous screen, go
to main menu, show popup menu with actions, show information,
control some other player functions).
9. PLAY, PAUSE, STOP, SLOW, REW, FWD, PREV, NEXT — con-
trol the playback.
10. SUBTITLE, ANGLE/ROTATE, AUDIO, REC, DUNE, URL —
control the playback and some other player functions.
NOTES:
● Use alkaline AAA batteries.
● Observe polarity when inserting batteries.
● Direct the remote control to the player. There must be no obstacles
between the RC and the player.
● If RC functions only at short distances or stops functioning, make
sure to replace the batteries.
● Some RC buttons may have several functions depending on the
current player mode.
● Some RC buttons may be available only in certain player modes or
only during playback of a certain content.
Remote Control
1
2
3
4
5
6
7
8
10
9

8Dune HD Max Quick Start Guide
Getting Started
Remove the transparent protecting film from the front panel of the player to ensure good look of the player.
Ensure there is enough space around the player for proper cooling. The space at each side should be not
less than 10 cm.
Ensure the RC has batteries installed.
Connect the player to your TV and to other A/V equipment in an appropriate way. Use HDMI connection
to get the best possible quality of video and audio. Make sure to switch off the player and all relevant A/V
equipment before connecting them. Ensure your TV and other A/V equipment are configured to use proper
inputs.
Switch on the player. The player will perform its initial loading procedure, which may take up to about 1
minute. During the loading procedure, "DUNE" logo is shown on the TV.
● If you do not see "DUNE" logo on the TV when you switch on the player, it may mean some problem with
the connection between the player and the TV or that a wrong video input is chosen in the TV or A/V
receiver/switch. In such a case, recheck the cables and the settings of the TV or A/V receiver/switch, or
try to use different cables or a different way of connecting the player to the TV.
● If you see "DUNE" logo on the TV when you switch on the player, but then the picture disappears and
no other picture appears during at least 10 seconds, it may mean that a wrong video output mode is
configured in the player. In such a case, press the "MODE" RC button, and then press one of the RC
buttons "1", "2", "3", "4" or "5" to switch to a different video output mode (see "Quick Setting of Video
Output Mode").
Finally, you should see the main screen of the player menu. The main screen shows items allowing to
use different player functions and access all storage devices and network drives connected to the player.
Adjust the player settings as needed using "SETUP" item on the main screen of the player menu (or by
pressing the "SETUP" RC button). In particular, you may want to adjust video settings, audio settings, and
network settings.
To choose the language of the player menu, use “Setup / General / Interface language” setting.
Use the RC buttons "LEFT", "RIGHT", "UP", "DOWN", "ENTER", "RETURN" to navigate through the
player menu. Use the "MENU" RC button to show the list of available commands. Use the "INFO" RC
button to show the information about the selected item.
Quick Setting of Video Output Mode
The “MODE” RC button allows quick setting of video output mode without entering the player setup menu.
This way of video output confi guration may be required if you see no picture on the screen after connect-
ing your player to a TV.
Press the “MODE” RC button and then one of the RC buttons “1”, “2”, “3”, “4”, or “5” to switch to one
of the following video output modes respectively:
1. Composite/Component, PAL
2. Composite/Component, NTSC
3. HDMI, 480i, 60 Hz
4. HDMI, 720p, 60 Hz
5. HDMI, 1080i, 60 Hz
After you see a picture on the TV, press the “ENTER” RC button, and then go to the player setup menu to
perform a more precise confi guration of the video output mode if needed.
NOTE: The procedure of quick setting of video output mode can not be used during playback. To ensure this procedure can
be used, switch the player off, then switch the player on, and the wait about 1 minute to ensure the player loading is fi nished.

9
English
Playing Optical Discs
To play an optical disc, ensure you are on the main screen of the player menu and insert the optical disc
into the optical drive of the player. The player will recognize the optical disc, and will enable the item cor-
responding to the optical drive. Depending on the player settings, the player may also automatically start
the playback of the disc or request a confi rmation to play the disc.
Connecting USB Drives
To connect a USB drive, ensure you are on the main screen of the player menu and connect the USB drive
to an USB port of the player. The player will recognize the USB drive, and will show an item corresponding
to the USB drive on the main screen.
When connecting a USB drive requiring signifi cant power (such as USB HDD), use an external power
supply for the USB drive. Power provided by the USB ports of the player may not be enough for correct
functioning of the USB drive.
Do not disconnect or switch off the USB drive when some write operation is in progress.
Using Internal HDD
To insert the internal 3.5” SATA HDD, ensure you are on the main screen of the player menu, open the
HDD rack door, insert the HDD into the HDD rack and close the HDD rack door. The player will recognize
the internal HDD, and will show an item corresponding to the internal HDD on the main screen of the
player menu.
Do not eject the internal HDD when some write operation is in progress.
It is recommended to use “green” HDD models with small RPM value, small heat emission, and small
power consumption; for more information, please see here:
http://dune-hd.com/support/hw_compat/
Using SD Memory Cards
To insert an SD memory card, ensure you are on the main screen of the player menu and insert the memo-
ry card into the SD card slot of the player. The player will recognize the memory card, and will show an item
corresponding to the memory card on the main screen. Some SD memory cards may not be recognized by
the player or may work incorrectly; in such a case, use other models of SD memory cards.
Do not eject the SD memory card when some write operation is in progress.
Accessing Network Drives
To connect a network drive using SMB or NFS protocol, ensure you are on the main screen of the player menu,
press the "MENU" RC button, and choose "Create Network Folder", then fi ll the parameters of the network drive
as needed. The player will show an item corresponding to the confi gured network drive on the main screen.
To browse the list of network resources accessible via SMB or UPnP protocols, use "Network Browser"
item on the main screen of the player menu. NOTE: If some network resources are not shown by the
player, you may need to wait some minutes and then retry (or press the "MENU" RC button and choose
"Refresh" command).

10 Dune HD Max Quick Start Guide
Formatting HDD
To format a HDD attached to the player, select the drive item on the main screen of the player menu, press
the "INFO" RC button and choose "Format Disk" (to format the entire disk) or "Format Partition" (or to for-
mat an already existing disk partition only). The player will format the disk using "EXT2" fi lesystem. NOTE:
To use disks formatted by the player on a Windows PC, you may need to install additional software on the
PC, such as "EXT2FSD" (http://www.ext2fsd.com/).
Switching the Player On and Off
To switch on the player, ensure the power switch on the rear panel is in “on” state, and press the “POWER”
RC button or the “on/off” button on the front panel.
To put the player into the standby mode, press the “POWER” RC button or the “on/off” button on the front
panel. To exit the standby mode, press any of these buttons again.
Depending on the player settings (see the player setup menu), the “hardware standby” or “software stand-
by” mode may be used. In the “hardware standby” mode, almost complete power-off takes place and
the player consumes almost no power. In the “software standby” mode, the player produces no signal
on the video output, but is still functioning. For example, if you have some storage devices connected to
the player, you may still access them from network (“NAS” function of the player). Exiting the “software
standby” mode takes just a few seconds. When the player is in the “software standby” mode, it still con-
sumes significant power. It is not recommended to keep the player in the “software standby” mode for a
while if you do not need it.
To switch off the player completely, toggle the power switch on the rear panel. Do not do it if some drive is
connected to the player and some write operation is in progress.
NOTE: After switching off the player or putting the player into the “hardware standby” mode, it is recom-
mended to wait about 1 minute before switching it on again.
NAS (Network Attached Storage)
You can access storage devices connected to the player from the local network using FTP and SMB pro-
tocols. On a Windows PC, just type "ftp://ip_address" or "\\ip_address" in the Windows explorer, where
"ip_address" is the IP address of the player.
WiFi
You can use a USB WiFi adapter to connect the player to the local network via WiFi.
Please see here for the information on supported USB WiFi adapters:
http://dune-hd.com/support/hw_compat/
Limitations
Compatibility of the player with a particular hardware (A/V equipment, network equipment, disk drives, etc)
may depend on various factors (particular hardware model, specifi cs of hardware installation and usage,
confi guration of the player and the hardware, etc). If the player does not correctly work with a particular
hardware, try to adjust the confi guration of the player or hardware, try to use the hardware in a different
way, or try to use some other hardware.
Compatibility of the player with a particular media content (fi les, discs, etc) may depend on various factors
(specifi cs of media content encoding, specifi cs of the confi guration of the player, etc). If the player does not
play correctly a particular media content, try to adjust the confi guration of the player, or try to use media
content encoded in a different way.

11
English
Updating Your Player and Getting More Information
Please check here for updated versions of player fi rmware (which may improve player functioning and
extend player possibilities):
http://dune-hd.com/fi rmware/
(Note: You can also connect the player to Internet and use the online fi rmware upgrade function, see
Setup / Misc / Firmware Upgrade.)
Please check here for more detailed and up-to-date documentation and information on player usage:
http://dune-hd.com/manuals/
http://dune-hd.com/support/
Support for Extension Boards
The Dune HD Max player is equipped with two extension slots located at the rear panel of the player.
Additional information is available on the Internet site http://www.dune-hd.com
Support for Extension Modules
The functions of Dune HD Max player can be extended with Extension Modules of Dune HD Smart product
line, such as Dune HD Smart HE (one more SATA 3.5” HDD with hot swap feature) and Dune HD Smart
ME (two more slots for extension boards). Additional information is available on the Internet site
http://www.dune-hd.com

12 Dune HD Max Quick Start Guide
Introduction
La Dune Max est une solution tout-en-un combinant un lecteur multimédia haute définition et un Blu-ray
dernière génération en un seul lecteur de résolution FULL HD (1080p).
Caractéristiques principales
● Nouvelle puce media Sigma Designs 8642: pour une excellente lecture des contenus interactifs.
● Lecteur Blu-ray et DVD: lecture des Blu-ray et DVD (ainsi que les CD audio et disques de données
vidéo/musique/photo).
● Lecteur Disque Dur: connectez un Disque Dur au lecteur et lisez directement son contenu.
● Lecteur réseau: Connectez le lecteur à un réseau local et lisez vos fichiers depuis un PC ou un NAS
(UPnP, SMB, NFS).
● Lecteur MKV: lecture de fichiers au format MKV en HD ou SD et autres formats vidéos, incluant une
qualité d’image HD exceptionnelle à très haut débit.
● RealD: Regardez de la vidéo en 3D comme au cinéma pour les derniers films.
● Audio HD: Profitez des dernières bandes sons HD (Dolby TrueHD, DTS HD Master Audio, LPCM,
FLAC).
● 3 ports USB: Connectez facilement disques durs, clés USB, lecteurs de cartes USB et autres périphé-
riques de stockage USB.
● Trappe pour Disque Dur avec fonction “insertion à chaud“: changez et insérez facilement un Disque
Dur interne eSATA 3.5’’.
● Port Carte Mémoire SD: Regardez facilement du contenu multimédia sur les cartes mémoires SD ou
utilisez cette carte mémoire comme périphérique de stockage (nécessaire pour la fonction BD Live).
● HDMI 1.3: pour une qualité HD audio et vidéo optimale.
● Une multitude de connecteurs Audio/Vidéo: Sortie optique, analogique, composante et composite
pour faciliter le branchement de n’importe quel matériel.
● Compatibilité avec les nouveaux formats sonores Dolby TrueHD et DTS HD Master Audio: Sortie
directe du signal (jusqu’en 7.1) pour tout amplificateur compatible ou décodage en LPCM (stéréo down-
mix) pour tout type d’équipement audio.
● Sorties vidéo et résolution multiples: depuis la résolution SD jusqu’au 1080p (24p/PAL/NTSC).
● Scaler: Mise à l’échelle de haute qualité de DVD (ou autre source SD) jusqu’au 1080p FULL HD.
● Gestionnaire de fichiers avancé: grande facilité de gestion de contenu (copier, déplacer, effacer,
renommer, organiser, trier)

13
Fonctions supplémentaires
● Lecture musicale de haute qualité: lecture de fichiers musicaux (jusqu’en 192Khz /24-bit) sous divers
formats (FLAC, Monkey’s Audio APE, WAV/PCM, DTS, etc).
● Listes de lecture: Créez des listes de lecture depuis vos dossiers, jouez vos propres listes de lecture,
avec fonctions répéter et aléatoire.
● Fonction NAS: accédez aux fichiers présents sur périphériques de stockage externes (Disque Dur,
disque optique, etc) depuis votre réseau local (en utilisant les protocoles SMB ou FTP).
● Fonction BitTorrent: client BitTorrent pour télécharger des fichiers sur les réseaux P2P.
● Interface personnalisable: Fonctionne avec les bibliothèques media utilisant un système de recherche
par jaquettes.
● Applications Flash: augmentez les fonctionnalités du lecteur grâce aux applications FlashLite.
● Radio Internet: Lecture et enregistrement de nombreuses stations de radio Internet (HTTP/MP3).
● IPTV: Lecture et enregistrement de flux IPTV (multicast UDP/RTP) depuis votre accès Internet*.
● TNT HD: Lecture et enregistrement de chaînes TV numérique grâce au tuner TNT HD sur clef USB
optionnelle**.
● Navigateur Internet: Surfez sur internet sur votre TV en utilisant le navigateur intégré***.
* Sous réserve de disponibilité des flux UDP/RTP de votre fournisseur d’accès.
** Tuner TNT HD sur clef USB non inclus et vendu séparément.
*** Le navigateur Internet intégré est limité et peut ne pas fonctionner sur certains sites.
Français

14 Dune HD Max Quick Start Guide
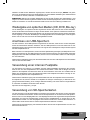
Contenu de la boîte
1. Platine multimédia Dune HD Max
2. Télécommande (Piles non incluses)
1
4
NOTE: Des accessoires supplémentaires (optionnels) peuvent être inclus dans la boîte en fonction du
pays, du distributeur et de la configuration du lecteur.
Vues extérieures
Face avant
Panneau arrière
1. Bouton Marche/Arrêt
2. Indicateur LED
3. Lecteur optique
4. Afficheur
5. Ouverture/fermeture
6. Lecture/Pause
7. Stop
8. Précédent
9. Suivant
10. Rack DD
11. Port carte mémoire SD
12. Port USB 2.0
1. Port LAN et 2 ports USB 2.0
2. HDMI 1.3
3. Bus dédié (I2C) (pour la connexion de futurs
appareils externes) *
4. Sortie vidéo composite et S-Vidéo
5. Sortie vidéo composante (Y/Pb/Pr)
* Non compatible avec des écouteurs ou autres appareils A/V ; Brancher des écouteurs ou tout autre appareil A/V peut
endommager votre équipement.
6. Sortie numérique coaxiale
7. Sortie numérique optique
8. Sortie stéréo analogique
9. Ouvertures pour antennes Wi-Fi optionnelles
10. Sortie multicanal analogique (7.1)
11. Interrupteur Marche/Arrêt
3. Cordon d’alimentation
4. Cordon A/V
5. Cordon HDMI
6. Guide de démarrage rapide
12 3 456789 10 11 12
12345678 9 10 11
2
356

15
Français
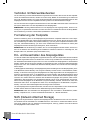
Télécommande
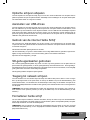
1. Indicateur de commande — clignote en réponse à la pression de
touches sur la télécommande.
2. EJECT — ouverture/fermeture du tiroir du lecteur optique. MUTE
— Mise en sourdine du son. MODE — Changement de sortie vidéo;
peut s’appliquer à d’autres fonctions du lecteur. POWER— mise en
veille du lecteur.
3. A (rouge), B (Vert), C (Jaune), D (Bleu) — accès aux fonctions
des disques Blu-ray ; peut s’appliquer à d’autres fonctions du lec-
teur.
4. 0-9 — clavier numérique et alphabétique ; peut s’appliquer à
d’autres fonctions du lecteur.
5. SEARCH— permet l’accès à une position défi nie durant la lecture.
ZOOM— permet de modifi er le ratio d’agrandissement de l’image
durant la lecture. SETUP— permet l’entrée/sortie au menu régla-
ges ainsi que la modifi cation d’options en cours de lecture.
6. V+/V- (volume plus/ volume moins) — contrôle du volume.
7. P+/P- (page plus / page moins) — défi lement haut /bas dans di-
verses listes, peut s’appliquer à d’autres fonctions du lecteur.
8. Flèches (Gauche, Droite, Bas, Haut), ENTER, RETOUR, TOP
MENU, POP UP MENU, INFO — touches principales de contrôle
du lecteur (navigation entre les options à l’écran, validation de l’op-
tion sélectionnée, retour à l’écran précédent, aller au menu prin-
cipal, affi chage du menu popup et de ses options, affi chage des
informations ; peut s’appliquer à d’autres fonctions du lecteur.
9. LECTURE, PAUSE, STOP, RALENTI, RETOUR ARRIERE, AVAN-
CE RAPIDE, PRECEDENT, SUIVANT — Contrôle de lecture
10. SOUSTITRES, ANGLE/ROTATION, AUDIO, ENR, DUNE, URL—
Contrôle de lecture ainsi que d’autres fonctions du lecteur.
NOTES:
● Utilisez des piles alkaline AAA
● Respectez la polarité des piles.
● Dirigez bien la télécommande vers le lecteur. Aucun obstacle ne doit
se trouver entre la télécommande et le lecteur.
● Si la télécommande ne fonctionne que sur une courte distance ou ne
fonctionne pas du tout, assurez vous de remplacer les piles.
● Certaines touches de la télécommande peuvent avoir plusieurs
fonctions selon le mode de lecture.
● Certaines touches de la télécommande ne sont disponibles que
dans certains modes ou pendant la lecture de certains contenus.
1
2
3
4
5
6
7
8
10
9

16 Dune HD Max Quick Start Guide
Démarrage
Retirez le film transparent protecteur de la façade avant du lecteur.
Pour la bonne marche du lecteur, assurez-vous d’avoir au moins 10cm d’espace libre de chaque coté du
lecteur.
Assurez-vous que les piles sont installées dans la télécommande.
Connectez le lecteur à votre téléviseur ou à tout autre équipement A/V de manière appropriée. Préférez
l’utilisation de la connexion HDMI pour une qualité d’image et de son optimale. Assurez-vous d’éteindre le
lecteur ainsi que tous les équipements A/V avant d’effectuer les branchements. Assurez-vous que votre
téléviseur et vos différents appareils A/V soient bien configurés au niveau des entrées.
Allumez le lecteur. Le lecteur effectue sa procédure d’initialisation, qui peut prendre jusqu’à une minute.
Durant le démarrage, le logo
“
DUNE” s’affiche à l’écran.
● Si le logo
“
DUNE” n’apparait pas lors du démarrage du lecteur, cela vient peut-être d’un problème de
connexion entre le lecteur et votre diffuseur ou bien d’une mauvaise sélection d’entrée vidéo. Si tel est le
cas, vérifiez vos câbles ainsi que les réglages vidéo de votre diffuseur, remplacez les câbles si néces-
saire ou choisissez une autre manière de connecter le lecteur au diffuseur.
● Si vous voyez le logo
“
DUNE” sur votre écran lorsque vous allumez le lecteur et qu’il disparaît sans
qu’aucune image n’apparaisse pendant au moins 10 secondes, cela veut dire qu’il y a un problème de
sortie vidéo du lecteur. Dans ce cas veuillez appuyer sur la touche
“
MODE” de la télécommande et
utilisez les touches
“
1” ,
“
2” ,
“
3” ,
“
4” ou
“
5” pour changer de résolution vidéo (cf. Réglage rapide de
sortie vidéo).
Finalement, vous devriez voir apparaitre le menu principal du lecteur. L’écran principal se compose d’élé-
ments permettant à l’utilisateur d’accéder aux différents périphériques (internes ou externes) ou réseaux
et d’accéder aux paramètres du lecteur.
Vous pouvez accédez aux réglages du lecteur en sélectionnant l’icone
“
SETUP” sur l’écran principal du
lecteur ou tout simplement en appuyant sur la touche
“
SETUP” de la télécommande. Vous pouvez égale-
ment régler les paramètres vidéo, audio et réseau.
Pour choisir la langue du lecteur, veuillez sélectionner “Setup / General / Interface language”.
Utilisez les touches
“
LEFT”,
“
RIGHT”,
“
UP”,
“
DOWN”,
“
ENTER”,
“
RETURN” de la télécommande pour
naviguer à travers les menus du lecteur. Utilisez la touche
“
MENU” de la télécommande pour afficher la
liste des commandes disponibles. Utilisez la touche
“
INFO” de la télécommande pour afficher les infor-
mations disponibles sur l’élément sélectionné.
Réglage rapide de sortie vidéo
La touche “MODE” de la télécommande permet de régler de façon rapide les modes de sorties vidéo sans
passer par le menu setup du lecteur ; ce qui peut être utile si aucune image n’apparaît après allumage du
lecteur.
Appuyez sur la touche “MODE” de la télécommande puis sur l’une des touches “1”, “2”, “3”, “4”, ou “5”
afi n de commuter entre les différents modes de sortie vidéo suivants:
1. Composite/Composante, PAL
2. Composite/Composante, NTSC
3. HDMI, 480i, 60 Hz
4. HDMI, 720p, 60 Hz
5. HDMI, 1080i, 60 Hz
Après affi chage de l’image à l’écran, appuyez sur la touche “ENTER” de la télécommande, allez ensuite dans
le menu setup du lecteur afi n d’effectuer des réglages de sortie vidéo plus précis si nécessaire.
NOTE : La procédure de réglage rapide de sortie vidéo ne peut être utilisée en mode lecture. Pour assurer le
bon déroulement de la procédure, éteignez le lecteur puis rallumez-le et patientez environ 1 minute afi n que
le lecteur puisse achever son démarrage.

17
Lecture de disques optiques (DVD/Blu-ray/CD,etc…)
Pour lire un disque optique, assurez-vous d’être sur le menu principal du lecteur et insérez le disque dans
le lecteur optique. Le lecteur va reconnaitre le type de disque et va permettre sa lecture. Suivant la confi -
guration du lecteur, la lecture peut démarrer automatiquement ou demander une confi rmation de lecture.
Connexion de périphériques USB
Pour brancher un périphérique USB, assurez-vous d’être sur le menu principal du lecteur et de le con-
necter sur l’un des ports USB. Le lecteur va reconnaitre le périphérique USB qui sera symbolisé par une
icône sur le menu principal.
Lorsqu’un périphérique USB nécessite une alimentation conséquente (comme un disque dur externe
USB), il est préférable d’utiliser une alimentation externe. Le courant fournit par les ports USB peut ne pas
être suffi sant pour faire fonctionner correctement le périphérique USB.
Ne jamais débrancher ou déconnecter un périphérique USB lorsqu’une opération d’écriture est en cours.
Utilisation d’un disque dur interne
Avant d’insérer le disque dur interne 3.5” eSATA, assurez-vous d’être sur le menu principal du lecteur,
ouvrez la trappe, insérez le disque dur puis refermez la trappe. Le lecteur va reconnaitre le Disque Dur
interne qui sera symbolisé par une icône sur l’écran principal.
Ne jamais éjecter le DD interne lorsqu’une opération d’écriture est en cours.
Il est recommandé d’utiliser des modèles de DD
“
vert” à moins de 7200 Tr/min, à faible émission de
chaleur et à faible consommation électrique ; pour plus d’informations, veuillez vous rendre à l’adresse
suivante:
http://dune-hd.com/support/hw_compat/
Utilisation de carte mémoire SD
Pour insérer une carte mémoire SD, assurez-vous d’être sur le menu principal du lecteur, puis insérez
la carte mémoire SD dans l’emplacement prévu à cet effet. Le lecteur va reconnaître automatiquement
la carte mémoire qui sera symbolisé par une icône sur l’écran principal. Certaines cartes mémoires SD
peuvent ne pas être reconnues par le lecteur ou ne pas fonctionner correctement ; dans ce cas, veuillez
utiliser un autre type de carte mémoire SD.
Ne pas éjecter la carte mémoire SD lorsqu’une opération d’écriture est en cours.
Accéder aux périphériques réseau
Pour connecter un périphérique réseau utilisant les protocoles SMB ou NFS, assurez-vous d’être sur le menu
principal du lecteur, ensuite pressez la touche “MENU” de la télécommande, puis sélectionnez “Nouveau Dos-
sier Réseau” et renseignez les paramètres du périphérique réseau tels qu’ils vous sont demandés. Le lecteur
affi chera alors une icône correspondant au périphérique réseau confi guré sur l’écran principal.
Pour naviguer dans la liste des ressources réseau accessibles via les protocoles SMB ou UPnP, cliquez sur
l’icône ‘’Navigateur Réseau’’ située sur l’écran principal du menu du lecteur. NOTE : Si certaines ressources
réseau ne sont pas affi chées par le lecteur, il se peut que vous soyez amenés à patienter quelques minutes,
voire à réessayer (ou pressez la touche ‘’MENU’’ de la télécommande et sélectionnez ‘’Rafraîchir’’).
Français

18 Dune HD Max Quick Start Guide
Formatage disque dur
Pour formater un disque dur rattaché au lecteur, sélectionnez l’icône correspondante au périphérique sur
l’écran principal du menu du lecteur, pressez la touche ‘’INFO’’ sur le télécommande et choisissez ‘’For-
mater Disque’’ (pour formater complètement le disque) ou ‘’Formater Partition’’ (pour formater une partition
déjà existante uniquement). Le lecteur va formater le disque en utilisant le système ‘’EXT2’’.
NOTE: Pour utiliser les disques formatés par le lecteur sur un PC Windows, vous pouvez être amené à
installer un logiciel tiers tel que ‘’EXT2FSD’’ (http://www.ext2fsd.com/).
Allumage et extinction du lecteur
Pour allumer le lecteur, assurez-vous que l’interrupteur situé sur le panneau arrière est sur la position
‘’ON’’ et appuyez sur la touche ‘’POWER’’ sur la télécommande ou le bouton ‘’ON/OFF’’ situé sur la face
avant du lecteur.
Pour mettre le lecteur en veille, appuyez sur la touche ‘’POWER’’ de la télécommande ou le bouton ‘’ON/
OFF’’ situé sur la face avant du lecteur. Pour sortir du mode veille, appuyez de nouveau sur l’une de ces
touches.
En fonction des réglages du lecteur (voir menu setup du lecteur), la mise en veille ‘’matérielle’’ ou la mise
en veille ‘’simple’’ peuvent être utilisées. Dans le mode mise en veille ‘’matérielle’’, l’extinction complète du
lecteur ne fait quasiment consommer aucune énergie. Dans le mode mise en veille ‘’simple’’, le lecteur ne
produit plus aucun signal vidéo mais reste actif. Par exemple, si vous avez des périphériques de stockage
connectés au lecteur, vous pouvez toujours y avoir accès (fonction ‘’NAS’’ du lecteur). Sortir de la mise en
veille ‘’simple’’ ne prend que quelques secondes. Quand le lecteur est en mode veille ‘’simple’’, il continue
de consommer de l’énergie de manière significative. Il n’est pas recommandé de laisser le lecteur en
mode veille ‘’simple’’ durant trop longtemps si vous n’en avez pas l’utilité.
Pour éteindre complètement le lecteur, appuyez sur l’interrupteur situé sur le panneau arrière du lecteur.
Veillez à ne pas effectuer cette opération si vous avez des périphériques connectés au lecteur ou si une
opération d’écriture est en cours.
NOTE: Après l’extinction complète ou mise en veille ‘’matérielle’’ du lecteur, il est recommandé d’attendre
environ 1 minute avant de rallumer le lecteur.
NAS (Périphérique de Stockage Réseau)
Vous pouvez accéder aux périphériques de stockage connectés au lecteur depuis le réseau local par
l’intermédiaire des protocoles FTP et SMB. Sur un PC Windows, tapez ‘’ftp://adresse_ip’’ ou ‘’adresse_ip’’
dans l’explorateur Windows ; ‘’adresse_ip’’ étant l’adresse réseau du lecteur.
WiFi
Vous pouvez utiliser un adaptateur USB WiFi pour connecter le lecteur au réseau local via WiFi.
Pour plus d’informations concernant la compatibilité des adaptateurs USB WiFi, veuillez vous rendre à
l’adresse suivante :
http://dune-hd.com/support/hw_compat/
Restrictions
La compatibilité du lecteur avec certains matériels (amplifi cateurs A/V, matériels réseau, disques durs,
etc.) peut dépendre de plusieurs facteurs (modèle particulier, installation et usage spécifi que, confi gura-
tion du lecteur avec le matériel, etc.). Si le lecteur ne fonctionne pas correctement avec un matériel parti-
culier, essayez de modifi er la confi guration du lecteur et du matériel, d’utiliser le matériel différemment ou
d’utiliser un autre matériel.

19
La compatibilité du lecteur avec certains contenus multimédia (fi chiers, disques, etc.) peut dépendre de
plusieurs facteurs (encodage spécifi que de fi chier, confi guration particulière du lecteur, etc.). Si le lecteur
ne fonctionne pas correctement avec un contenu multimédia particulier, essayez de modifi er la confi gura-
tion du lecteur, ou utilisez un contenu multimédia encodé différemment.
Mise à jour du lecteur et informations complémentaires
Pour rechercher les dernières mises à jour firmware du lecteur (pouvant améliorer le fonctionnement du
lecteur et étendre ses capacités), rendez-vous à l’adresse suivante:
http://dune-hd.com/firmware/.
Note: Vous pouvez également relier le lecteur à Internet afin d’effectuer la mise à jour en ligne (Setup /
Misc / Firmware Upgrade)
Pour obtenir les dernières informations et documentations sur l’utilisation du lecteur, rendez-vous aux
adresses suivantes:
http://dune-hd.com/manuals/
http://dune-hd.com/support/
Support pour cartes d’extension
Le lecteur Dune HD Max est équipé de deux ports d’extension situés sur le panneau arrière du lecteur.
De plus amples informations sont disponibles sur le site: http://www.dune-hd.com
Support des modules d’extension
Les fonctions du lecteur Dune HD Max peuvent évoluer grâce aux modules d’extension de la série Dune
HD Smart, comme le Dune HD Smart HE ( 1 DD supplémentaire eSATA 3.5” avec la fonction “insertion à
chaud”) et le Dune HD Smart ME (2 ports supplémentaires pour les cartes d’extension).
De plus amples informations sont disponibles sur le site:
http://www.dune-hd.com
Français

20 Dune HD Max Quick Start Guide
Einleitung
Das Abspielgerät Dune HD Max ist eine „All-in-One“ Lösung zur Wiedergabe von Videos und Bildern bis
zu Full HD Auflösung (1080p) und bietet neben dem High Definition Media-Abspielgerät ein modernes
Blu-ray Laufwerk und einen Einbauplatz für Festplatten.
Haupteigenschaften
● Modernster Sigma Designs 8642 Prozessor: Gewährleistet eine perfekte Wiedergabe und eine hohe
Arbeitsgeschwindigkeit mit interaktiven Möglichkeiten.
● Blu-ray und DVD Wiedergabe: Wiedergabe von Blu-ray und DVD Medien (sowie Audio CD und Medi-
en mit den Daten, Videos, Bildern, Musik und Photos).
● Wiedergabe von der optionalen Festplatte: Eine Festplatte kann in den HD Max eingeschoben wer-
den um Inhalte direkt von dieser Festplatte abspielen zu können.
● Netzwerk Player: Anschluss des HD Max an das lokale Netzwerk und Wiedergabe von Video, Audio,
Bilder usw. direkt vom PC oder NAS (UPnP, SMB, NFS).
● MKV Wiedergabe: Wiedergabe von HD und SD im populären MKV Format sowie in anderen modernen
Formaten von Videodateien, inklusive HD-Video der höchsten Qualität mit einer sehr hohen Bit-Rate.
● RealD: 3D-Video im Format, welches in den Kinos für die Vorführung der aktuellsten Neuerscheinungen
verwendet wird.
● 3 USB Ports: Bequemer Anschluss von Festplatten, USB-Flash Speichern, Cardreadern und anderen
USB-Datenspeichern.
● Steckplatz für eine schnelle Festplattenaufrüstung: Eine Schnellwechselhalterung erlaubt den ein-
fache Wechsel von 3,5“ Festplatten mit SATA-Schnittstelle.
● Einschub/Slot für SD-Speicherkarten: Wiedergabe von Mediadateien von den SD-Speicherkarten
aus der Videokamera/Fotoapparat oder anderen Geräten, Benutzung von SD-Speicherkarten als loka-
ler Speicher oder Systemspeicher (Erforderlich für die BD Live Funktion).
● HDMI1.3: Gewährleistet beste Qualität von HD-Video und HD-Audio.
● Alle üblichen Audio und Video Anschlüsse: Digitaler optischer Audioausgang, Stereoausgang, Kom-
ponenten- und Komposite-Videoausgang für einen bequemen Anschluss des Abspielgeräts an beliebi-
ge A/V Anlagen.
● Erweiterte Unterstützung für Dolby TrueHD und DTS HD Master Audio: Bitsream-Ausgang (bis 7.1
Kanäle) oder Dekodierung (bis 7.1 Kanäle) für eine maximale Flexibilität beim Anschluss von Audio-
Einrichtungen mit Unterstützung fortschrittlicher Wiedergabefunktionen (wie zum Beispiel Bild-im-Bild).
● Flexibles Video-Ausgabe System: Video-Ausgabe in beliebiger Auflösung und Formaten (von SD bis
1080p, 24p/PAL/NTSC).
● Verbesserung der Auflösung (Upscaling): Hochqualitative Verbesserung der Auflösung von DVD und
beliebigen anderen SD-Video-Bilder bis zu Full-HD (1080p) oder einer anderen HD-Auflösung.
● Dateibrowser: Universeller Dateibrowser mit erweiterten Möglichkeiten der Dateimanipuation (Kopie-
ren, Verschieben, Entfernen, Umbenennen, Organisieren/Strukturieren, Sortieren).
Strona się ładuje...
Strona się ładuje...
Strona się ładuje...
Strona się ładuje...
Strona się ładuje...
Strona się ładuje...
Strona się ładuje...
Strona się ładuje...
Strona się ładuje...
Strona się ładuje...
Strona się ładuje...
Strona się ładuje...
Strona się ładuje...
Strona się ładuje...
Strona się ładuje...
Strona się ładuje...
Strona się ładuje...
Strona się ładuje...
Strona się ładuje...
Strona się ładuje...
Strona się ładuje...
Strona się ładuje...
Strona się ładuje...
Strona się ładuje...
Strona się ładuje...
Strona się ładuje...
Strona się ładuje...
Strona się ładuje...
Strona się ładuje...
Strona się ładuje...
Strona się ładuje...
Strona się ładuje...
Strona się ładuje...
Strona się ładuje...
Strona się ładuje...
Strona się ładuje...
Strona się ładuje...
Strona się ładuje...
Strona się ładuje...
Strona się ładuje...
Strona się ładuje...
Strona się ładuje...
Strona się ładuje...
Strona się ładuje...
Strona się ładuje...
Strona się ładuje...
Strona się ładuje...
Strona się ładuje...
Strona się ładuje...
Strona się ładuje...
Strona się ładuje...
Strona się ładuje...
Strona się ładuje...
Strona się ładuje...
Strona się ładuje...
Strona się ładuje...
-
 1
1
-
 2
2
-
 3
3
-
 4
4
-
 5
5
-
 6
6
-
 7
7
-
 8
8
-
 9
9
-
 10
10
-
 11
11
-
 12
12
-
 13
13
-
 14
14
-
 15
15
-
 16
16
-
 17
17
-
 18
18
-
 19
19
-
 20
20
-
 21
21
-
 22
22
-
 23
23
-
 24
24
-
 25
25
-
 26
26
-
 27
27
-
 28
28
-
 29
29
-
 30
30
-
 31
31
-
 32
32
-
 33
33
-
 34
34
-
 35
35
-
 36
36
-
 37
37
-
 38
38
-
 39
39
-
 40
40
-
 41
41
-
 42
42
-
 43
43
-
 44
44
-
 45
45
-
 46
46
-
 47
47
-
 48
48
-
 49
49
-
 50
50
-
 51
51
-
 52
52
-
 53
53
-
 54
54
-
 55
55
-
 56
56
-
 57
57
-
 58
58
-
 59
59
-
 60
60
-
 61
61
-
 62
62
-
 63
63
-
 64
64
-
 65
65
-
 66
66
-
 67
67
-
 68
68
-
 69
69
-
 70
70
-
 71
71
-
 72
72
-
 73
73
-
 74
74
-
 75
75
-
 76
76


HDI Dune MAX Instrukcja obsługi
- Kategoria
- Cyfrowe odtwarzacze multimedialne
- Typ
- Instrukcja obsługi
w innych językach
- español: HDI Dune MAX Manual de usuario
- italiano: HDI Dune MAX Manuale utente
- Deutsch: HDI Dune MAX Benutzerhandbuch
- français: HDI Dune MAX Manuel utilisateur
- Nederlands: HDI Dune MAX Handleiding