Archos 55 Helium 4 Seasons Instrukcja obsługi
- Kategoria
- Smartfony
- Typ
- Instrukcja obsługi

1
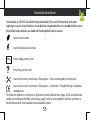
Help & assistance
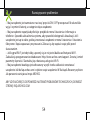
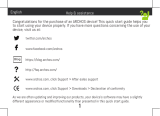
Congratulations for the purchase of an ARCHOS device! This quick start guide helps you
to start using your device properly. If you have more questions concerning the use of your
device, visit us at:
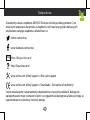
twitter.com/archos
www.facebook.com/archos
Blog
https://blog.archos.com/
http://faq.archos.com/
www.archos.com, click Support > After-sales support
www.archos.com, click Support > Downloads > Declaration of conformity
As we are often updating and improving our products, your device’s software may have a slightly
different appearance or modified functionality than presented in this quick start guide.

2
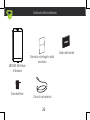
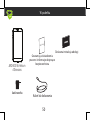
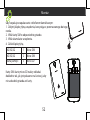
Warranty
Unboxing
ARCHOS 55 Helium 4
Seasons
Quick start guide
Warranty, legal and safety notice
Charging cable
Charger adapter

3
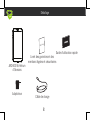
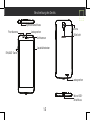
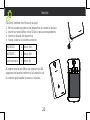
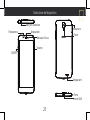
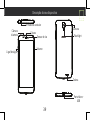
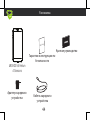
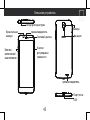
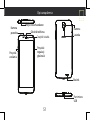
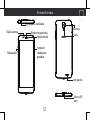
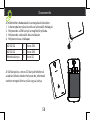
Describing your device
Front camera
Phone speaker
Headphone jack
Back camera
Flash light
ON/OFF
Volume
Loudspeaker
Micro-USB
port
Light sensor

4
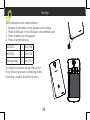
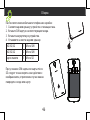
Picture to show how to remove the bottom casing
Picture to show the cards position
Picture to show how to remove the bottom casing
Picture to show the cards position
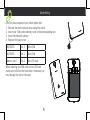
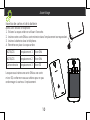
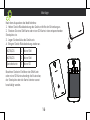
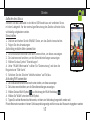
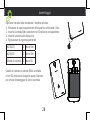
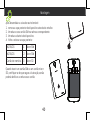
After you have unpacked your mobile phone box:
1. Remove the device’s back cover using the notch.
2. Insert your SIM card or Memory card in the corresponding slot.
3. Insert the device’s battery.
4. Replace the back cover.
4G/3G/2G slot 1 Micro-SIM
4G/3G/2G slot 2 Micro-SIM
Memory card slot 3 Micro-SD card
When inserting your SIM card or micro-SD card,
make sure to follow the illustration, otherwise you
may damage the slot or the card.
Assembling

5
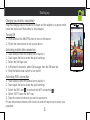
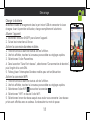
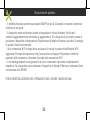
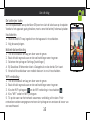
Charging your battery completely
Plug the charging cable in the Micro-USB port and the adapter in a power outlet.
Leave the device until the battery is fully charged.
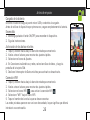
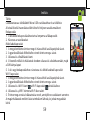
Turning ON
1. Press and hold the ON/OFF button to turn on the device.
2. Follow the instructions to set up your device.
Activating mobile date connection
1. Touch and pull down the status bar to display it.
2. Touch again the bar to reveal the quick settings.
3. Select the Settings icon.
4. In Wireless & networks, select Data usage, then the SIM card tab.
5. Slide the Mobile data switch to turn on/off.
Activating WiFi connection
1. Touch and pull down the status bar to display it.
2. Touch again the bar to reveal the quick settings.
3. Select the WiFi icon
to activate the WiFi connection .
4. Select “WiFi” below the WiFi icon.
5. Touch the name of network you want to connect to.
Private networks are shown with a lock icon and will require you to enter your
password.
Starting up

6
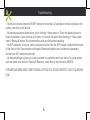
- My device is frozen: press the ON/OFF button for more than 10 seconds or remove and replace the
battery, then turn on the device.
- My device encounters dysfunctions: go to Settings > About phone > Check for update system to
check for updates. If your device is up-to-date, try to reset the device from Settings > Factory data
reset > Backup & restore. We recommend to save your files before resetting.
- My WiFi reception is too low: make sure you are not far from the WiFi hotspot. Update the firmware
of the device: http://www.archos.com/support. Reset and redefine your connection parameters.
Contact your WiFi connection provider.
- My device bootlogo is playing in a loop: you need to completely reset your device. Go to faq.archos.
com and select your device. In Backup & Recovery, select How to reinitialize my ARCHOS.
FOR MORE ANSWERS ABOUT YOUR TECHNICAL DIFFICULTIES, DO NOT HESITATE TO VISIT: FAQ.ARCHOS.
COM
Troubleshooting

7
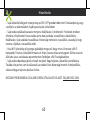
Félicitations! Vous venez d’acquérir un appareil ARCHOS! Ce guide de démarrage rapide vous aide à
bien débuter l’usage de votre appareil. Si vous avez d’autres questions sur l’usage de votre appareil,
visitez nos liens ci-dessous :
twitter.com/archos
www.facebook.com/archos
Blog
https://blog.archos.com/
http://faq.archos.com/
www.archos.com, click Support > After-sales support
www.archos.com, cliquez Support > Téléchargements > Déclaration de conformité
Comme nous mettons à jour et améliorons régulièrement nos produits, le logiciel de votre appareil
peut présenter une interface ou des fonctionnalités légèrement différentes de celles décrites dans
ce guide.
Contactez-nous

8
Warranty
Déballage
ARCHOS 55 Helium
4 Seasons
Guide d’utilisation rapide
Livret des garanties et des
mentions légales et sécuritaires
Câble de charge
Adaptateur

9
Description de l’appareil
Caméra avant
Combiné
Prise jack
Caméra arrière
Flash
Haut-parleur
Port
micro-USB
Capteur de luminosité
ON/OFF
Volume

10
Picture to show how to remove the bottom casing
Picture to show the cards position
Picture to show how to remove the bottom casing
Picture to show the cards position
Insertion de cartes et de la batterie
Après avoir déballé le téléphone :
1. Enlevez la coque arrière en utilisant l’encoche.
2. Insérez votre carte SIM ou carte mémoire dans l’emplacement correspondant.
3. Insérez la batterie dans le téléphone.
4. Remettez en place la coque arrière.
4G/3G/2G emplacement 1 Micro-SIM
4G/3G/2G emplacement 2 Micro-SIM
Carte mémoire emplacement 3 Micro-SD
Lorsque vous insérez une carte SIM ou une carte
micro-SD, conformez-vous au schéma pour ne pas
endommager la carte ou l’emplacement.
Assemblage

11
Charger la batterie
Branchez le câble de chargement dans le port micro-USB et connectez-le à son
chargeur. Avant la première utilisation, chargez complètement la batterie.
Allumer l’appareil
1. Maintenez le bouton ON/OFF pour allumer l’appareil.
2. Suivez les instructions à l’écran.
Activer la connexion données mobiles
1. Tirez vers le bas la barre de statuts afin de l’afficher.
2. Une fois affichée, touchez-la à nouveau pour accéder aux réglages rapides.
3. Sélectionnez l’icône Paramètres.
4. Dans la section “Sans fil et réseaux”, sélectionnez “Consommation de données”,
puis l’onglet de la carte SIM.
5. Faites glisser l’interrupteur Données mobiles pour activer/désactiver.
Activer la connexion WiFi
1. Tirez vers le bas la barre de statuts afin de l’afficher.
2. Une fois affichée, touchez-la à nouveau pour accéder aux réglages rapides.
3. Sélectionnez l’icône WiFi
pour activer la connexion .
4. Sélectionnez “WiFi” en bas de l’icône WiFi.
5. Sélectionnez le nom du réseau auquel vous voulez vous connecter. Les réseaux
privés sont affichés avec un cadenas. Ils nécessitent un mot de passe.
Démarrage

12
- Mon téléphone ne répond pas: appuyez 10 secondes sur le bouton ON/OFF ou enlevez la batterie et
remettez-la en place, puis rallumez l’appareil.
- Mon téléphone rencontre des problèmes : allez dans paramètres > A propos du téléphone > mise
à jour pour voir si aucune mise à jour n’est disponible. Si votre appareil est à jour, procédez donc à
une réinitialisation complète à partir de paramètres > sauvegarde et réinitialisation. N’oubliez pas de
sauvegarder vos fichiers avant la réinitialisation complète.
- Votre connexion WiFi est très faible : assurez-vous de ne pas être trop loin de la borne WiFi. Veuillez
mettre à jour votre produit si nécessaire. Paramétrez à nouveau votre connexion. Contactez votre
fournisseur d’accès.
- Le logo de démarrage tourne en boucle : vous devez réinitialiser complètement votre appareil. Allez
sur faq.archos.com et sélectionnez votre appareil. Dans Sauvegarde & réinitialisation, sélectionnez
Comment réinitialiser mon ARCHOS.
POUR PLUS DE RENSEIGNEMENTS SUR VOS PROBLÈMES TECHNIQUES, N’HÉSITEZ PAS À CONSULTER
LA PAGE : FAQ.ARCHOS.COM
Dépannage

13
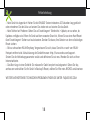
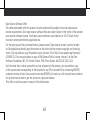
Vielen Dank, dass Sie sich für ein ARCHOS-Gerät entschieden haben! Diese Schnellstartanleitung wird
Sie bei der ordnungsgemäßen Bedienung Ihres Geräts unterstützen. Falls Sie bezüglich der Bedienung
Ihres Geräts weitere Fragen haben, besuchen Sie uns unter:
twitter.com/archos
www.facebook.com/archos
Blog
https://blog.archos.com/
http://faq.archos.com/
www.archos.com, klicken Sie auf Support > After-Sales-Support
www.archos.com, klicken Sie auf Support > Downloads > Konformitätserklärung
Da unsere Produkte kontinuierlich aktualisiert und weiterentwickelt werden, kann die Software Ihres
Geräts in Erscheinung und Funktionalität geringfügige Abweichungen zu den Darstellungen in dieser
Schnellstartanleitung aufweisen.
Willkommen

14
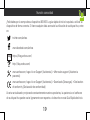
Warranty
Verpackungsinhalt
ARCHOS 55 Helium
4 Seasons
Benutzerhandbuch
Garantie, Impressum und
Sicherheitshinweise
Ladekabel
Lade-/Netzgerät

15
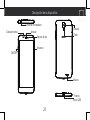
Beschreibung des Geräts
Frontkamera Lautsprecher
Kopfhöreranschluss
Kamera
Bliztlicht
EIN/AUS-Taste
Lautstärketasten
Lautsprecher
Micro-USB-
Anschluss
Lichtsensor

Picture to show how to remove the bottom casing
Picture to show the cards position
16
Nach dem Auspacken des Mobiltelefons:
1. Heben Sie die Rückabdeckung des Geräts mithilfe der Einkerbung an.
2. Stecken Sie eine SIM-Karte oder micro-SD-Karte in den entsprechenden
Steckplatz ein.
3. Legen Sie den Akku des Geräts ein.
4. Bringen Sie die Rückabdeckung wieder an.
4G/3G/2G 1 Micro-SIM
4G/3G/2G 2 Micro-SIM
Speicherkarte 3 Micro-SD
Beachten Sie beim Einführen der SIM-Karte
oder micro-SD-Karte unbedingt die Illustration,
der Steckplatz oder die Karte könnten sonst
beschädigt werden.
Montage
Picture to show how to remove the bottom casing
Picture to show the cards position

17
Starten
Aufladen des Akkus
Stecken Sie das Ladekabel in den Micro-USB-Anschluss und verbinden Sie es
mit dem Ladegerät. Vor der erstmaligen Benutzung des Geräts sollte der Akku
vollständig aufgeladen werden.
Einschalten
1. Drücken und halten Sie die EIN/AUS-Taste, um das Gerät einzuschalten.
2. Folgen Sie den Anweisungen.
Activating mobile date connection
1. Die Statusleiste berühren und nach unten ziehen, um diese anzuzeigen.
2. Die Leiste erneut berühren, um die Schnelleinstellungen anzuzeigen.
3. Wählen Sie das Symbol “Einstellungen”.
4. Unter “WLAN & Netzwerke” wählen Sie “Datennutzung” und dann die
Registerkarte “SIM-Karte”.
5. Schieben Sie den Schalter “Mobilfunkdaten” auf Ein/Aus.
Activating WiFi connection
1. Die Statusleiste berühren und nach unten ziehen, um diese anzuzeigen.
2. Die Leiste erneut berühren, um die Schnelleinstellungen anzuzeigen.
3. Wählen Sie das WLAN-Symbol
zur Aktivierung der WLAN-Verbindung .
4. Wählen Sie “WLAN” unter dem WLAN-Symbol.
5. Tippen Sie auf den Namen des Netzwerks, mit dem eine Verbindung hergestellt werden soll.
Private Netzwerke werden mit einem Schlosssymbol angezeigt und hier muss das Passwort eingegeben werden

18
- Mein Gerät ist abgestürzt: Halten Sie die EIN/AUS-Taste mindestens 10 Sekunden lang gedrückt
oder entnehmen Sie den Akku und setzen Sie wieder ein und starten Sie das Gerät.
- Mein Telefon hat Probleme: Gehen Sie zu Einstellungen> Telefoninfo > Update, um zu sehen, ob
Updates verfügbar sind. Wenn Ihr Gerät auf dem neuesten Stand ist, führen Sie so einen Hard-Reset
über Einstellungen> Sichern und zurücksetzen. Denken Sie daran, Ihre Dateien vor dem vollständigen
Reset sichern.
- Bei zu schwachem WLAN-Empfang: Vergewissern Sie sich, dass Sie nicht zu weit vom WLAN-
Hotspot entfernt sind. Aktualisierung der Gerätefirmware: http://www.archos.com/support.
Setzen Sie die Verbindungsparameter zurück und definieren Sie sie neu. Wenden Sie sich an Ihren
Internetanbieter.
- Das Boot-Logo in einer Schleife: Sie müssen Ihr Gerät komplett zurückgesetzt. Gehen Sie faq.
archos.com und wählen Sie Ihr Gerät. In Backup & Reset, wählen Sie Wie mein ARCHOS zurücksetzen.
WEITERE ANTWORTEN BEI TECHNISCHEN PROBLEMEN FINDEN SIE UNTER: FAQ.ARCHOS.COM
Fehlerbehebung

19
¡Felicidades por la compra de su dispositivo ARCHOS! La guía rápida de inicio le ayudará a utilizar su
dispositivo de forma correcta. Si tiene cualquier duda acerca de la utilización de su dispositivo, entre
en:
twitter.com/archos
www.facebook.com/archos
Blog
https://blog.archos.com/
http://faq.archos.com/
www.archos.com, haga clic en Support (Asistencia) > After-sales support (Asistencia
posventa)
www.archos.com, haga clic en Support (Asistencia) > Downloads (Descargas) > Declaration
of conformity (Declaración de conformidad)
Al estar actualizando y mejorando constantemente nuestros productos, la apariencia o el software
de su dispositivo pueden variar ligeramente con respecto a lo descrito en esta Guía Rápida de Inicio.
Nuestra comunidad

20
Warranty
Contenido de la caja
ARCHOS 55 Helium
4 Seasons
Guía de usuario
Avisos de garantía, legales y de
seguridad
Cable de carga
Adaptador/cargador
Strona się ładuje...
Strona się ładuje...
Strona się ładuje...
Strona się ładuje...
Strona się ładuje...
Strona się ładuje...
Strona się ładuje...
Strona się ładuje...
Strona się ładuje...
Strona się ładuje...
Strona się ładuje...
Strona się ładuje...
Strona się ładuje...
Strona się ładuje...
Strona się ładuje...
Strona się ładuje...
Strona się ładuje...
Strona się ładuje...
Strona się ładuje...
Strona się ładuje...
Strona się ładuje...
Strona się ładuje...
Strona się ładuje...
Strona się ładuje...
Strona się ładuje...
Strona się ładuje...
Strona się ładuje...
Strona się ładuje...
Strona się ładuje...
Strona się ładuje...
Strona się ładuje...
Strona się ładuje...
Strona się ładuje...
Strona się ładuje...
Strona się ładuje...
Strona się ładuje...
Strona się ładuje...
Strona się ładuje...
Strona się ładuje...
Strona się ładuje...
Strona się ładuje...
Strona się ładuje...
Strona się ładuje...
-
 1
1
-
 2
2
-
 3
3
-
 4
4
-
 5
5
-
 6
6
-
 7
7
-
 8
8
-
 9
9
-
 10
10
-
 11
11
-
 12
12
-
 13
13
-
 14
14
-
 15
15
-
 16
16
-
 17
17
-
 18
18
-
 19
19
-
 20
20
-
 21
21
-
 22
22
-
 23
23
-
 24
24
-
 25
25
-
 26
26
-
 27
27
-
 28
28
-
 29
29
-
 30
30
-
 31
31
-
 32
32
-
 33
33
-
 34
34
-
 35
35
-
 36
36
-
 37
37
-
 38
38
-
 39
39
-
 40
40
-
 41
41
-
 42
42
-
 43
43
-
 44
44
-
 45
45
-
 46
46
-
 47
47
-
 48
48
-
 49
49
-
 50
50
-
 51
51
-
 52
52
-
 53
53
-
 54
54
-
 55
55
-
 56
56
-
 57
57
-
 58
58
-
 59
59
-
 60
60
-
 61
61
-
 62
62
-
 63
63


Archos 55 Helium 4 Seasons Instrukcja obsługi
- Kategoria
- Smartfony
- Typ
- Instrukcja obsługi
w innych językach
- español: Archos 55 Helium 4 Seasons El manual del propietario
- italiano: Archos 55 Helium 4 Seasons Manuale del proprietario
- Deutsch: Archos 55 Helium 4 Seasons Bedienungsanleitung
- português: Archos 55 Helium 4 Seasons Manual do proprietário
- français: Archos 55 Helium 4 Seasons Le manuel du propriétaire
Powiązane artykuły
-
 Mode d'Emploi 55 Helium Ultra Instrukcja obsługi
-
 Mode d'Emploi 60 Platinum Instrukcja obsługi
-
Mode d'Emploi 55b Platinum Instrukcja obsługi
-
Mode d'Emploi 50f Neon Instrukcja obsługi
-
 Mode d'Emploi 55 Helium Instrukcja obsługi
-
 Mode d'Emploi 50f Helium Lite Skrócona instrukcja obsługi
-
 Mode d'Emploi Diamond 2 Plus Instrukcja obsługi
-
Archos Diamond 55 Diamond Selfie Instrukcja obsługi


