Yamaha PF-1000 Instrukcja obsługi
- Kategoria
- Pianina cyfrowe
- Typ
- Instrukcja obsługi
Niniejsza instrukcja jest również odpowiednia dla

DIC 338
Yamaha Web Site (English only)
www.yamahasynth.com
Yamaha Manual Library
http://www2.yamaha.co.jp/manual/english/
M.D.G., Pro Audio & Digital Musical Instrument Division, Yamaha Corporation
C
2002 Yamaha Corporation
V939640 205APAP1.3-01A0 Printed in Japan
This document is printed on recycled chlorine free (ECF) paper with soy ink.
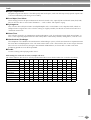
IMPORTANT
Check your power supply
Make sure that your local AC mains voltage matches the voltage specified on the name plate
on the bottom panel. In some areas a voltage selector may be provided on the bottom panel of
the main keyboard unit. Make sure that the voltage selector is set for the voltage in your area. The
voltage selector is set at 240V when the unit is initially shipped. To change the setting use a
"minus" screwdriver to rotate the selector dial so that the correct voltage appears next to the
pointer on the panel.
Before using the PF-1000, be sure to read “Precautions„ on pages 3-4.
Owner's Manual

PF-1000
2
SPECIAL MESSAGE SECTION
PRODUCT SAFETY MARKINGS:
Yamaha electronic
products may have either labels similar to the graphics
shown below or molded/stamped facsimiles of these
graphics on the enclosure. The explanation of these
graphics appears on this page. Please observe all cautions
indicated on this page and those indicated in the safety
instruction section.
See bottom of Keyboard enclosure for graphic symbol markings.
The exclamation point within the
equilateral triangle is intended to alert
the user to the presence of important
operating and maintenance (servic-
ing) instructions in the literature
accompanying the product.
The lightning flash with arrowhead
symbol, within the equilateral trian-
gle, is intended to alert the user to the
presence of uninsulated “dangerous
voltage” within the product’s enclo-
sure that may be of sufficient magni-
tude to constitute a risk of electrical
shock.
IIMPORTANT NOTICE:
All Yamaha electronic prod-
ucts are tested and approved by an independent safety
testing laboratory in order that you may be sure that when
it is properly installed and used in its normal and custom-
ary manner, all foreseeable risks have been eliminated.
DO NOT modify this unit or commission others to do so
unless specifically authorized by Yamaha. Product perfor-
mance and/or safety standards may be diminished.
Claims filed under the expressed warranty may be denied
if the unit is/has been modified. Implied warranties may
also be affected.
SPECIFICATIONS SUBJECT TO CHANGE:
The
information contained in this manual is believed to be
correct at the time of printing. However, Yamaha reserves
the right to change or modify any of the specifications
without notice or obligation to update existing units.
ENVIRONMENTAL ISSUES:
Yamaha strives to pro-
duce products that are both user safe and environmentally
friendly. We sincerely believe that our products and the
production methods used to produce them, meet these
goals. In keeping with both the letter and the spirit of the
law, we want you to be aware of the following:
Battery Notice:
This product MAY contain a small non-
rechargable battery which (if applicable) is soldered in
place. The average life span of this type of battery is
approximately five years. When replacement becomes
necessary, contact a qualified service representative to
perform the replacement.
Warning:
Do not attempt to recharge, disassemble, or
incinerate this type of battery. Keep all batteries away
from children. Dispose of used batteries promptly and as
regulated by applicable laws. Note: In some areas, the
servicer is required by law to return the defective parts.
However, you do have the option of having the servicer
dispose of these parts for you.
Disposal Notice:
Should this product become damaged
beyond repair, or for some reason its useful life is consid-
ered to be at an end, please observe all local, state, and
federal regulations that relate to the disposal of products
that contain lead, batteries, plastics, etc.
NOTICE:
Service charges incurred due to lack of knowl-
edge relating to how a function or effect works (when the
unit is operating as designed) are not covered by the man-
ufacturer’s warranty, and are therefore the owners respon-
sibility. Please study this manual carefully and consult
your dealer before requesting service.
NAME PLATE LOCATION:
The graphic below indi-
cates the location of the name plate. The model number,
serial number, power requirements, etc., are located on
this plate. You should record the model number, serial
number, and the date of purchase in the spaces provided
below and retain this manual as a permanent record of
your purchase.
CAUTION
RISK OF ELECTRIC SHOCK
DO NOT OPEN
CAUTION: TO REDUCE THE RISK OF ELECTRIC SHOCK.
DO NOT REMOVE COVER (OR BACK).
NO USER-SERVICEABLE PARTS INSIDE.
REFER SERVICING TO QUALIFIED SERVICE PERSONNEL.
PF-1000
Model
Serial No.
Purchase Date
Introduction
92-469
1

3
PF-1000
PRECAUTIONS
PLEASE READ CAREFULLY BEFORE PROCEEDING
* Please keep this manual in a safe place for future reference.
WARNING
Always follow the basic precautions listed below to avoid the possibility of serious injury or even
death from electrical shock, short-circuiting, damages, fire or other hazards. These precautions
include, but are not limited to, the following:
•
Only use the voltage specified as correct for the instrument. The
required voltage is printed on the name plate of the instrument.
•
Check the electric plug periodically and remove any dirt or dust
which may have accumulated on it.
•
Use only the supplied power cord/plug.
•
Do not place the power cord near heat sources such as heaters
or radiators, and do not excessively bend or otherwise damage
the cord, place heavy objects on it, or place it in a position where
anyone could walk on, trip over, or roll anything over it.
•
Do not open the instrument or attempt to disassemble the inter-
nal parts or modify them in any way. The instrument contains no
user-serviceable parts. If it should appear to be malfunctioning,
discontinue use immediately and have it inspected by qualified
Yamaha service personnel.
•
Do not expose the instrument to rain, use it near water or in
damp or wet conditions, or place containers on it containing liq-
uids which might spill into any openings.
•
Never insert or remove an electric plug with wet hands.
•
Do not put burning items, such as candles, on the unit.
A burning item may fall over and cause a fire.
•
If the power cord or plug becomes frayed or damaged, or if there
is a sudden loss of sound during use of the instrument, or if any
unusual smells or smoke should appear to be caused by it,
immediately turn off the power switch, disconnect the electric
plug from the outlet, and have the instrument inspected by quali-
fied Yamaha service personnel.
CAUTION
Always follow the basic precautions listed below to avoid the possibility of physical injury to you or
others, or damage to the instrument or other property. These precautions include, but are not limited
to, the following:
•
When removing the electric plug from the instrument or an outlet,
always hold the plug itself and not the cord. Pulling by the cord
can damage it.
•
Remove the electric plug from the outlet when the instrument is
not to be used for extended periods of time, or during electrical
storms.
•
Do not connect the instrument to an electrical outlet using a mul-
tiple-connector.
Doing so can result in lower sound quality, or possibly cause
overheating in the outlet.
•
Read carefully this manual or the attached documentation
explaining the assembly process.
Failure to assemble the stand in the proper sequence might
result in damage to the instrument or even injury.
•
Do not expose the instrument to excessive dust or vibrations, or
extreme cold or heat (such as in direct sunlight, near a heater, or
in a car during the day) to prevent the possibility of panel disfigu-
ration or damage to the internal components.
•
Do not use the instrument in the vicinity of a TV, radio, stereo
equipment, mobile phone, or other electric devices. Otherwise,
the instrument, TV, or radio may generate noise.
•
Do not place the instrument in an unstable position where it
might accidentally fall over.
•
Before moving the instrument, remove all connected cables.
•
Do not place objects in front of the instrument’s air vent, since
this may prevent adequate ventilation of the internal compo-
nents, and possibly result in the instrument overheating.
Power supply/Power cord
Do not open
Water warning
Fire warning
If you notice any abnormality
Power supply/Power cord
Assembling the keyboard stand
Location
(1)B-7
1/2

PF-1000
4
•
Before connecting the instrument to other electronic compo-
nents, turn off the power for all components. Before turning the
power on or off for all components, set all volume levels to mini-
mum. Also, be sure to set the volumes of all components at their
minimum levels and gradually raise the volume controls while
playing the instrument to set the desired listening level.
•
When cleaning the instrument, use a soft, dry or slightly damp
cloth. Do not use paint thinners, solvents, cleaning fluids, or
chemical-impregnated wiping cloths.
•
Never insert or drop paper, metallic, or other objects into the
gaps on the panel or keyboard. If this happens, turn off the
power immediately and unplug the power cord from the AC out-
let. Then have the instrument inspected by qualified Yamaha ser-
vice personnel.
•
Do not place vinyl, plastic or rubber objects on the instrument,
since this might discolor the panel or keyboard.
•
Do not rest your weight on, or place heavy objects on the instru-
ment, and do not use excessive force on the buttons, switches or
connectors.
•
Do not operate the instrument for a long period of time at a high
or uncomfortable volume level, since this can cause permanent
hearing loss. If you experience any hearing loss or ringing in the
ears, consult a physician.
•
Do not place the bench in an unstable position where it might
accidentally fall over.
•
Do not play carelessly with or stand on the bench. Using it as a
tool or step-ladder or for any other purpose might result in acci-
dent or injury.
•
Only one person should sit on the bench at a time, in order to
prevent the possibility of accident or injury.
•
If the bench screws become loose due to extensive long-term
use, tighten them periodically using the included tool.
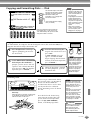
Saving and backing up your data
•
Current memory data (see page 39) is lost when you turn off the
power to the instrument. Save the data to a floppy disk/the User
Drive (see page 39).
Saved data may be lost due to malfunction or incorrect opera-
tion. Save important data to a floppy disk.
Backing up the floppy disk
•
To protect against data loss through media damage, we recom-
mend that you save your important data onto two floppy disks.
Always turn the power off when the instrument is not in use.
Connections
Maintenance
Handling caution
Using the bench (If included)
Saving data
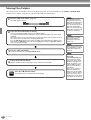
When you change settings in a display page and then exit
from that page, System Setup data (listed in the Parameter
Chart of the separate Data List booklet) is automatically
stored. However, this edited data is lost if you turn off the
power without properly exiting from the relevant display.
Yamaha cannot be held responsible for damage caused by improper use or modifications to the instrument, or data that is lost or destroyed.
(1)B-7
2/2

5
PF-1000
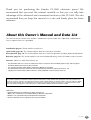
Thank you for purchasing the Yamaha PF-1000 electronic piano! We
recommend that you read this manual carefully so that you can fully take
advantage of the advanced and convenient functions of the PF-1000. We also
recommend that you keep this manual in a safe and handy place for future
reference.
About this Owner’s Manual and Data List
This manual consists of four main sections: Introduction, Quick Guide, Basic Operation, and Reference.
Also, a separate Data List is provided.
Introduction (page 2):
Please read this section first.
Quick Guide (page 20):
This section explains how to use the basic functions.
Basic Operation (page 38):
This section explains how to use the basic operations including display-based controls.
Reference (page 52):
This section explains how to make detailed settings for the PF-1000’s various functions.
Data List :
Voice List, MIDI Data Format, etc.
* The illustrations and LCD screens as shown in this owner’s manual are for instructional purposes only, and may appear
somewhat different from those on your instrument.
* The example Operation Guide displays shown in this Manual are in English.
* The bitmap fonts used in this instrument have been provided by and are the property of Ricoh co., Ltd.
* Copying of the commercially available software is strictly prohibited except for your personal use.
Trademarks:
• Apple and Macintosh are trademarks of Apple Computer, Inc.
• IBM-PC/AT is a trademark of International Business Machines Corporation.
• Windows is the registered trademark of Microsoft® Corporation.
• All other trademarks are the property of their respective holders.
COPYRIGHT NOTICE
This product incorporates and bundles computer programs and contents in which Yamaha owns copyrights or with respect to which it has
license to use others’ copyrights. Such copyrighted materials include, without limitation, all computer software, styles files, MIDI files, WAVE
data and sound recordings. Any unauthorized use of such programs and contents outside of personal use is not permitted under relevant
laws. Any violation of copyright has legal consequences. DON’T MAKE, DISTRIBUTE OR USE ILLEGAL COPIES.

PF-1000
6
Accessories
■
“50 greats for the Piano” Disk (and Music Book)
■
Recording disk
■
Owner’s Manual
■
Data List
■
Pedal Unit
■
Bench (included or optional depending on locale)
■
Dust Cover
■
Music Rest
■
Keyboard Stand
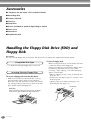
Handling the Floppy Disk Drive (FDD) and
Floppy Disk
Precautions
Be sure to handle floppy disks and treat the disk drive with care. Follow the important precautions below.
• 3.5" 2DD and 2HD type floppy disks can be used.
To insert a floppy disk into the disk drive:
• Hold the disk so that the label of the disk is facing
upward and the sliding shutter is facing forward,
towards the disk slot. Carefully insert the disk into the
slot, slowly pushing it all the way in until it clicks into
place and the eject button pops out.
To eject a floppy disk:
Before ejecting the disk, be sure to confirm that data
is not being written to the floppy disk.
If data is currently being written to the floppy disk in
the following operations, the messages “Now
executing,” “Now copying,” and “Now formatting”
appears in the display.
• Moving, copying, pasting, saving, or deleting data
(page 42 - 44).
• Naming files and folders (page 41); creating a new
folder (page 44).
• Copying a disk to an another disk (page 139);
formatting the disk (page 139).
Compatible Disk Type
Inserting/Ejecting Floppy Disks
Drive lamp
When the power is turned on, the drive lamp (at the bottom
left of the drive) lights to indicate the drive can be used.
Eject button

7
PF-1000
• Never attempt to remove the disk or turn the power off
when the data is being written to the floppy disk.
Doing so can damage the disk and possibly the disk
drive. Press the eject button slowly as far as it will go;
the disk will automatically pop out. When the disk is
fully ejected, carefully remove it by hand.
• If the eject button is pressed too quickly, or if it is not
pressed in as far as it will go, the disk may not eject
properly. The eject button may become stuck in a half-
pressed position with the disk extending from the
drive slot by only a few millimeters. If this happens, do
not attempt to pull out the partially ejected disk, since
using force in this situation can damage the disk drive
mechanism or the floppy disk. To remove a partially
ejected disk, try pressing the eject button once again,
or push the disk back into the slot and then repeat the
eject procedure.
• Be sure to remove the floppy disk from the disk drive
before turning off the power. A floppy disk left in the
drive for extended periods can easily pick up dust and
dirt that can cause data read and write errors.
• Clean the read/write head regularly. This instrument
employs a precision magnetic read/write head which,
after an extended period of use, will pick up a layer of
magnetic particles from the disks used that will
eventually cause read and write errors.
• To maintain the disk drive in optimum working order
Yamaha recommends that you use a commercially-
available dry-type head cleaning disk to clean the
head about once a month. Ask your Yamaha dealer
about the availability of proper head-cleaning disks.
• Never insert anything but floppy disks into the disk
drive. Other objects may cause damage to the disk
drive or floppy disks.
To handle floppy disks with care:
• Do not place heavy objects on a disk or bend or apply
pressure to the disk in any way. Always keep floppy
disks in their protective cases when they are not in
use.
• Do not expose the disk to direct sunlight, extremely
high or low temperatures, or excessive humidity, dust
or liquids.
• Do not open the sliding shutter and touch the exposed
surface of the floppy disk inside.
• Do not expose the disk to magnetic fields, such as
those produced by televisions, speakers, motors, etc.,
since magnetic fields can partially or completely erase
data on the disk, rendering it unreadable.
• Never use a floppy disk with a deformed shutter or
housing.
• Do not attach anything other than the provided labels
to a floppy disk. Also make sure that labels are
attached in the proper location.
To protect your data (Write-protect Tab):
• To prevent accidental erasure of important data, slide
the disk’s write-protect tab to the “protect” position
(tab open).
Data backup
• For maximum data security Yamaha recommends that
you keep two copies of important data on separate
floppy disks. This gives you a backup if one disk is lost
or damaged. To make a backup disk use the Disk to
Disk function on page 139.
Cleaning the Disk Drive Read/Write Head
About the Floppy Disks
write-protect tab open
(protect position)

PF-1000
8
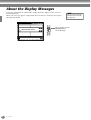
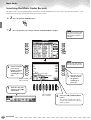
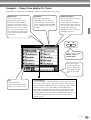
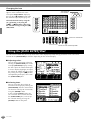
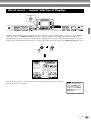
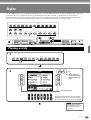
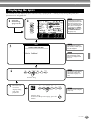
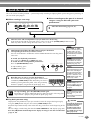
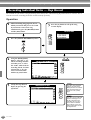
About the Display Messages
A message (information or confirmation dialog) sometimes appears on the screen to
facilitate operation.
When such messages appear, simply follow the instructions as shown by pressing the
corresponding button.
You can select the desired
language from the Help dis-
play (page 49).
J
I
H
G
F
For this example, press the
[G] (YES) button to
execute formatting.

9
PF-1000
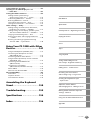
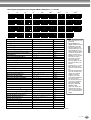
Table of Contents
Introduction
SPECIAL MESSAGE SECTION ................................... 2
PRECAUTIONS.......................................................... 3
About this Owner’s Manual and Data List .............. 5
Accessories ............................................................... 6
Handling the Floppy Disk Drive (FDD)
and Floppy Disk..................................................... 6
About the Display Messages.................................... 8
Application Index................................................... 12
What can you do with the PF-1000?...................... 14
Setting Up the PF-1000.......................................... 16
About the pedal unit............................................................... 16
About the music rest............................................................... 16
Turning the Power On and Off................................................ 16
Using headphones .................................................................. 17
Panel Controls and Terminals................................ 18
Quick Guide
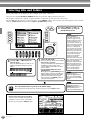
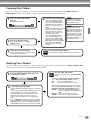
Playing the Demos ................................................. 20
Song Playback ........................................................ 21
Playback of Songs ....................................................21
Playing Voices ........................................................ 25
Playing a Voice ........................................................25
Playing Two Voices Simultaneously ..........................26
Playing Different Voices with the Left
and Right Hands...................................................27
Playing Styles ......................................................... 28
Playing a style..........................................................28
Style Sections...........................................................30
One Touch Setting...................................................32
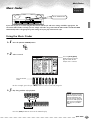
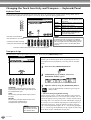
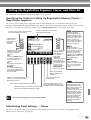
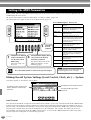
Music Finder........................................................... 33
Using the Music Finder ............................................33
Searching the Music Finder Records.........................34
Saving and Recalling Music Finder Data...................35
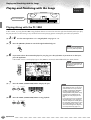
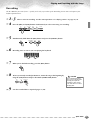
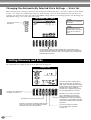
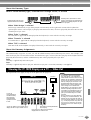
Playing and Practicing with the Songs.................. 36
Playing Along with the PF-1000 ...............................36
Recording ................................................................37
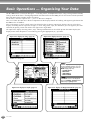
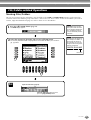
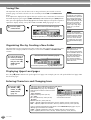
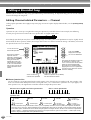
Basic Operations
— Organizing Your Data ....... 38
Selecting Files and Folders..................................... 40
File/Folder-related Operations .............................. 41
Naming Files/Folders ...............................................41
Moving Files/Folders ................................................42
Copying Files/Folders...............................................43
Deleting Files/Folders...............................................43
Saving Files ..............................................................44
Organizing Files by Creating a New Folder ..............44
Displaying Upper Level pages ..................................44
Entering Characters and Changing Icons .................44
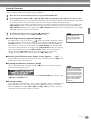
Using the [DATA ENTRY] Dial................................ 46
Direct Access — Instant Selection of Displays....... 47
Help Messages........................................................ 49
Using the Metronome............................................ 50
Adjusting the Tempo ............................................. 50
Tap Tempo ............................................................. 51
Reference
Playing the Demos.................52
Voices.....................................54
Selecting a Voice .................................................... 54
One-touch Piano Play.............................................. 55
Layer/Left — Playing Several Sounds
Simultaneously .................................................... 56
Layer — Layering Two Different Voices ................... 56
Left — Setting Separate Voices for the Left
and Right Sections of the Keyboard ..................... 57
Applying Voice Effects ........................................... 57
Using the Pedals..................................................... 58
Styles......................................59
Playing a style ........................................................ 59
Playing a Style’s Rhythm Channels only .................. 61
Adjusting the Volume Balance/Channel Muting ...... 61
Chord Fingerings.................................................... 62
Arranging the Style Pattern
(SECTIONS:
MAIN A/B/C/D, INTRO, ENDING, BREAK) ...................64
Stopping the Style Playback While Releasing Keys
(SYNC. STOP) ...................................................... 65
Selecting Intro and Ending Types
(INTRO/ENDING) ................................................ 66
Playing Fill-in patterns automatically when changing
accompaniment sections — Auto Fill In................ 66
Appropriate Panel Setting for the Selected
Style
(ONE TOUCH SETTING)......................................67
Automatically Changing One Touch Settings
with the Sections — OTS Link .............................. 68
Registering the Panel Controls in One Touch
Setting (ONE TOUCH SETTING)........................... 68
Calling Up Ideal Setups for Your Music
— Music Finder.................................................... 69
Searching the Ideal Setups — Music Finder Search
.... 70
Editing Records — Music Finder Record Edit ........... 71

PF-1000
10
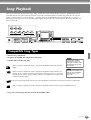
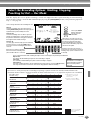
Song Playback ....................... 73
Compatible Song Types......................................... 73
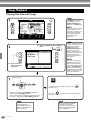
Song Playback ........................................................ 74
Playing the Internal Songs........................................74
Playing Back Songs on Disk......................................76
Other Playback-related Operations...........................76
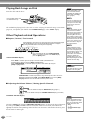
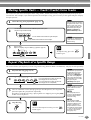
Muting Specific Parts
— Track1/Track2/Extra Tracks............................ 77
Repeat Playback of a Specific Range ..................... 77
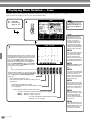
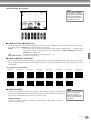
Displaying Music Notation — Score ...................... 78
Displaying the Lyrics .............................................. 81
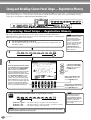
Saving and Recalling Custom
Panel Setups
— Registration Memory ....... 82
Registering Panel Setups
— Registration Memory...................................... 82
Saving Your Registration Memory Setups.................83
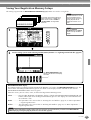
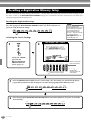
Recalling a Registration Memory Setup ................ 84
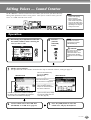
Editing Voices
— Sound Creator ................... 85
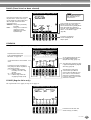
Operation ............................................................... 85
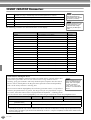
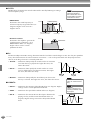
SOUND CREATOR Parameters ............................... 86
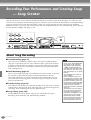
Recording Your Performances
and Creating Songs
— Song Creator ..................... 90
About Song Recording........................................... 90
Quick Recording..................................................... 91
Multi Recording ..................................................... 92
Recording Individual Notes — Step Record .......... 94
Operation ................................................................94
Recording Melodies — Step Record (Note) ..............96
Recording Chord Changes for the Auto Accompani-
ment — Step Record (Chord) ...............................97
Select the Recording Options: Starting, Stopping,
Punching In/Out — Rec Mode............................ 99
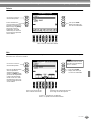
Editing a Recorded Song ..................................... 100
Editing Channel-related Parameters — Channel.....100
Editing Note Events — 1 - 16.................................103
Editing Chord Events — CHD.................................104
Editing System Events
— SYS/EX. (System Exclusive) .............................104
Inputting and Editing Lyrics ...................................105
Customizing the Event List — Filter........................105
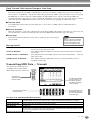
Creating Accompaniment
Styles — Style Creator .........106
About Creating Accompaniment Styles............... 106
Style File Format................................................... 107
Operation ............................................................. 107
Realtime Recording — Basic ................................ 108
Step Recording..................................................... 109
Assembling an Accompaniment Style —Assembly
.. 110
Edit the Created Accompaniment Style .............. 111
Change the Rhythmic Feel
— Groove and Dynamics ................................... 111
Editing the Channel Data...................................... 113
Making Style File Format Settings —Parameter ..... 114
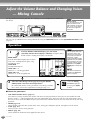
Adjust the Volume Balance
and Changing Voices
— Mixing Console ................116
Operation ............................................................. 116
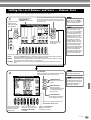
Setting the Level Balance and Voice
— Volume/Voice ............................................... 117
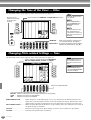
Changing the Tone of the Voice — Filter............ 118
Changing Pitch-related Settings — Tune ............ 118
Adjusting the Effects ............................................ 119
Effect Structure ..................................................... 121
Making Global and Other
Important Settings
— Function...........................122
Operation ............................................................. 122
Fine Tuning the Pitch/Selecting a Scale
— Master Tune/Scale Tune............................... 124
Tuning the Overall Pitch — Master Tune............... 124
Selecting a Scale — Scale Tune ............................. 124
Setting Song-related Parameters
— Song Settings................................................ 126
Setting Auto Accompaniment-related
Parameters — Style Setting, Split Point,
and Chord Fingering......................................... 127
Setting Auto Accompaniment-related Parameters
— Style Setting and Split Point .......................... 127
Setting the Fingering Method — Chord Fingering
... 128
Making Settings for the Pedals and Keyboard
— Controller...................................................... 128
Making Settings for the Pedals .............................. 128
Changing the Touch Sensitivity and Transpose
— Keyboard/Panel............................................. 130
Setting the Registration Sequence, Freeze,
and Voice Set..................................................... 131
Specifying the Order for Calling Up Registration
Memory Presets — Registration Sequence.......... 131
Maintaining Panel Settings — Freeze .................... 131
Changing the Automatically Selected Voice
Settings — Voice Set.......................................... 132

11
PF-1000
Introduction
Quick Guide
Basic Operations - Organizing Your Data
Playing the Demos
Voices
Styles
Song Playback
Saving and Recalling Custom
Panel Setups - Registration Memory
Editing Voices - Sound Creator
Recording Your Performances
and Creating Songs - Song Creator
Creating Accompaniment Styles
- Style Creator
Adjust the Volume Balance
and Changing Voices - Mixing Console
Making Global and Other Important
Settings - Function
Using Your PF-1000 with Other Devices
Appendix
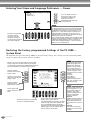
Setting Harmony and Echo.................................. 132
Showing the PF-1000 Display on a TV
— Video Out...................................................... 133
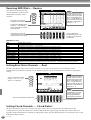
Setting the MIDI Parameters............................... 134
Making Overall System Settings
(Local Control, Clock, etc.) — System.................134
Transmitting MIDI Data — Transmit ......................135
Receiving MIDI Data — Receive .............................136
Setting Root Note Channels — Root ......................136
Setting Chord Channels — Chord Detect ..............136
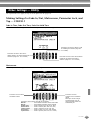
Other Settings — Utility ...................................... 137
Making Settings for Fade In/Out, Metronome,
Parameter Lock, and Tap — CONFIG 1...............137
Making Settings for the Display, Speaker System,
and Voice Number Indication — CONFIG 2........138
Copying and Formatting Disks — Disk...................139
Entering Your Name and Language Preference
— Owner............................................................140
Restoring the Factory-programmed Settings
of the PF-1000 — System Reset ..........................140
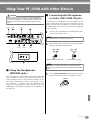
Using Your PF-1000 with Other
Devices................................. 141
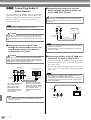
Using the Headphones (PHONES jacks)..................141
Connecting the Microphone or Guitar
(MIC/LINE IN jack)..............................................141
Connecting Audio & Video Devices .......................142
Using the Pedal (footswitch) or Foot Controller
(AUX PEDAL jack) ...............................................143
Connecting external MIDI devices
(MIDI terminals) .................................................143
Connecting to a Computer
(MIDI terminals/TO HOST terminal)....................143
What’s MIDI?.........................................................145
What You Can Do With MIDI.................................147
Data Compatibility............................................... 148
Disk format ............................................................148
Sequence Format...................................................148
Voice Allocation Format .........................................149
Assembling the Keyboard
Stand ................................... 150
Troubleshooting.................. 152
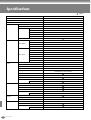
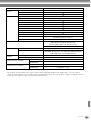
Specifications ...................... 154
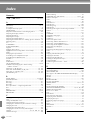
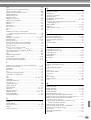
Index ................................... 156

PF-1000
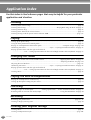
12
Application Index
Use this index to find reference pages that may be helpful for your particular
application and situation.
Listening
Listening to the internal songs................................................................................................................ page 74
Listening to disk songs ....................................................................... “Playing Back Songs on Disk” on page 76
Listening to demo songs......................................................................................................................... page 52
Listening to the demo of the selected voices .......................................................................................... page 54
Listening to songs with the special voices of the PF-1000..................................................................... page 117
Playing
Calling up the piano setting ................................................................................................................... page 55
Using the three performance control pedals........................................................................................... page 58
Playing an accompaniment that matches pitch..................................................“Transpose Assign” on page 130
Combining two voices ...................................................... “Layer — Layering Two Different Voices” on page 56
Playing separate voices with the right and left hands
...........................“Left — Setting Separate Voices for the Left and Right Sections of the Keyboard” on page 57
Changing the sound
Enhancing the sound with reverb and other effects .....................................“Applying Voice Effects” on page 57
.................................................................................................................“Adjusting the Effects” on page 119
Adjusting the Level Balance................................................................................................................. page 117
Combining two voices ...................................................... “Layer — Layering Two Different Voices” on page 56
Playing separate voices with the right and left hands
...........................“Left — Setting Separate Voices for the Left and Right Sections of the Keyboard” on page 57
Creating voices ...................................................................................................................................... page 85
Playing the auto accompaniment
Playing the accompaniment automatically............................................................................................. page 59
Calling up ideal panel settings for your music........................................................................................ page 69
Practicing
Muting the right- or left-hand part...................“Muting Specific Parts — Track1/Track2/Extra Tracks” on page 77
Practicing with an accurate and steady tempo............................................. “Using the Metronome” on page 50
Recording
Recording your performance...........................................................................................................pages 91, 92
Creating a song by entering notes .......................................................................................................... page 94
Creating your original settings
Creating voices ...................................................................................................................................... page 85
Creating accompaniment styles............................................................................................................ page 106

13
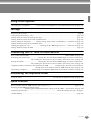
PF-1000
Using a microphone
Connecting the microphone............... ”Connecting the Microphone or Guitar (MIC/LINE IN jack)” on page 141
Settings
Registering Panel Setups......................................................................................................................... page 82
Tuning the pitch/Selecting a scale ........................................................................................................ page 124
Making detailed settings for playing back songs ................................................................................... page 122
Making detailed settings for the auto accompaniment.......................................................................... page 127
Making settings for the pedals...........“Making Settings for the Pedals and Keyboard — Controller” on page 128
Making detailed settings for the keyboard voices ................................................................................. page 130
Showing the display on a TV .......................“Showing the PF-1000 Display on a TV — Video Out” on page 133
Making detailed settings for MIDI ........................................................................................................ page 134
Connecting the PF-1000 to other devices
Basic information on MIDI..................................................................................... “What’s MIDI?” on page 145
Recording your performance...................”Playing the sounds of the PF-1000 through an external audio system,
and recording the sounds to an external recorder (AUX OUT jacks)” on page 142
Raising the volume .................................”Playing the sounds of the PF-1000 through an external audio system,
and recording the sounds to an external recorder (AUX OUT jacks)” on page 142
Outputting another instrument’s sound from the PF-1000 .............. ”Outputting the sound of an external device
through the built in speakers of the PF-1000 (AUX IN jacks)” on page 142
Connecting a computer........... .”Connecting to a Computer (MIDI terminals/TO HOST terminals)” on page 143
Assembling the keyboard stand
Using the stand.......................................................................... “Assembling the Keyboard Stand” on page 150
Quick solution
Basic functions of the PF-1000 and how you can best use it ...........................................................pages 12, 14
Resetting the PF-1000 to the default setting
............................ “Restoring the Factory-programmed Settings of the PF-1000 — System Reset” on page 140
Displaying the Messages ......................................................................“About the Display Messages” on page 8
Troubleshooting ................................................................................................................................... page 152

PF-1000
14
MASTER VOLUME
MIN MAX
METRONOME
STYLE CONTROL
START/STOP
FADE IN/OUT POP & ROCK
BREAK INTRO
ENDING/rit.
SYNC.STOP SYNC.START
TOPREC
NEW SONG
SYNC.START
EXTRA TRACKS TRACK2
STYLE L
TRACK1
R
START/STOP
START/STOP
REW
FF
REPEAT
DEMO
HELP
FUNCTION
E
D
C
B
A
SOUND
CREATOR
DIGITAL
RECORDING
DIRECT
ACCESS
BALANCE
CHANNEL
ON/OFF
PAR T
PAR T
MIXING
CONSOLE
LCD
CONTRAST
A
ACMP
AUTO FILL IN
OTS LINK
B
MAIN
C
TAP TEMPO
RESET RESET
POP BALLADS
DANCE
SWING & JAZZ
R & B COUNTRY
LATIN WALTZ BALLROOM PIANIST
USER
MARCH &
WORLD
TEMPO
TRANSPOSE
STYLE
SONG
MENU
DIGITAL
STUDIO
2 31 5
6
4
D
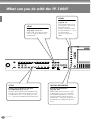
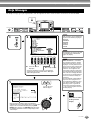
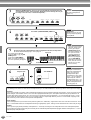
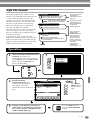
What can you do with the PF-1000?
SONG
Playback previously recorded
songs (page 21, 36, 73)
Enjoy a wide variety of preset songs
as well as songs on commercially
available disks.
DEMO
Explore the Demos
(page 20, 52)
These not only showcase the
stunning voices and styles of
the instrument, they
introduce you to the various
functions and features — and
give you hands-on
experience using the PF-
1000!
STYLE
Back up your performance with Auto
Accompaniment (page 28, 59)
Playing a chord with your left hand automatically
plays the auto accompaniment backing. Select an
accompaniment style — such as pop, jazz, Latin,
etc. — and let the PF-1000 be your backing band!
DIGITAL RECORDING
Record your performances
(page 90, 106)
With the powerful and easy-to-use song
recording features, you can record your
own keyboard performances, and create
your own complete, fully orchestrated
compositions — which you can then save to
the USER drive or a floppy disk for future
recall.

15
PF-1000
J
I
H
G
F
EXIT
DATA ENTRY
ENTER
ON/OFF
LAYER
BACK
LEFT
NEXT
MUSIC
FINDER
4321
4321FREEZEUSERXGSYNTH.
CHOIR & PAD
BRASS WOODWIND STRINGS
LEFT HOLDMONOECHO
HARMONY/
REVERB
PIANO & ORGAN &
DSP VARIATION
BASSGUITAR
PERCUSSION
HARPSI. E.PIANO
ACCORDION
8 MEMORY765
5
6 7 8
VOICE
PART
PIANO
VOICE REGISTRATION MEMORY
VOICE EFFECT ONE TOUCH SETTING
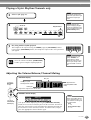
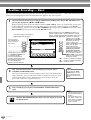
LCD
The large LCD (together
with the various panel
buttons) provides
comprehensive and easy-
to-understand control of
the PF-1000’s operations.
MUSIC FINDER
Call up the perfect accompaniment
style (page 33, 69)
If you know what song you want to play,
but you don’t know which style or voice
would be right for it, let the Music Finder
help you. Just select the song title, and
the PF-1000 automatically calls up the
most appropriate style and voice.
TO HOST terminal
Make music with a computer — quickly and easily (page 143)
Dive in and take advantage of the wide world of computer music
software. Connections and setup are exceptionally easy, and you can
play back your computer recorded parts with different instrument
sounds — all from a single PF-1000!
PIANO
Set up the piano —
instantly (page 55)
You can call up all the
optimum piano settings for
the PF-1000 with just a single
button press — then play the
extraordinarily realistic grand
piano voice.
VOICE
Enjoy a huge variety of
realistic voices (page 25, 54)
The PF-1000 features a wealth of
exceptionally authentic and
dynamic voices (more than 800)
— including piano, strings,
woodwinds, and more!
PEDAL AUX PEDALAC INLET
VIDEO OUT AUX IN
MIDI TO HOSTHOST SELECT
IN
R
L/L+R
RL R
L/L+R
THRU
ON OFF
MIDI PC-2 MacPC-1
OUT
AUX OUT PHONES POWER
LEVEL FIXED
MIN MAX
INPUT
VOLUME MIC
/
LINE IN MIC LINE

PF-1000
16
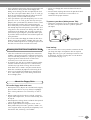
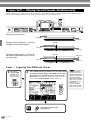
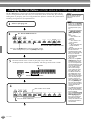
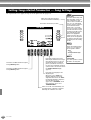
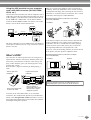
Setting Up the PF-1000
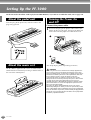
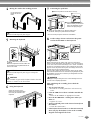
You do not need to install the stand to play the PF-1000. However, if you wish to assemble the stand, refer to page 150.
Insert the plug of the pedal unit, with the arrow in the
plug facing upward.
The PF-1000 is supplied with a music rest that can be
attached to the instrument by inserting it into the holes at
the rear of the control panel.
Connect the power cable.
1
First insert the plug of the power cable into the [AC
INLET] on the left side panel, then plug the other end
of the cable into the proper AC outlet on the wall.
(The shape of plug differs depending on locale.)
WARNING
Make sure your PF-1000 is rated for the AC voltage supplied in the
area in which it is to be used (voltage rating appears on the name
plate on the bottom panel). In some areas, a voltage selector may be
provided on the bottom panel of the main keyboard unit. Make sure
that the voltage selector is set for the voltage in your area.
Connecting the unit to the wrong AC supply can cause serious
damage to the internal circuitry and may even pose a shock hazard!
Use only the AC power cord supplied with the PF-1000. If the
supplied cord is lost or damaged and needs to be replaced, contact
your Yamaha dealer. The use of an inappropriate replacement can
pose a fire and shock hazard!
The type of AC power cord provided with the PF-1000 may be
different depending on the country in which it is purchased. (In some
areas a plug adaptor may be provided to match the pin configuration
of the AC wall outlets in your area.) DO NOT modify the plug provided
with the PF-1000. If the plug will not fit the outlet, have a proper outlet
installed by a qualified electrician.
About the pedal unit
P
E
D
A
L
A
U
X
P
E
D
A
L
A
C
I
N
L
E
T
V
I
D
E
O
O
U
T
A
U
X
I
N
M
I
D
I
T
O
H
O
S
TH
O
S
T
S
E
L
E
C
T
I
N
R
L
/
L
+
R
R
L
R
L
/
L
+
R
T
H
R
U
O
N
O
F
F
M
I
D
I
P
C
-
2
M
a
c
P
C
-
1
O
U
T
A
U
X
O
U
T
P
H
O
N
E
S
P
O
W
E
R
L
E
V
E
L
F
I
X
E
D
P
E
D
A
L
About the music rest
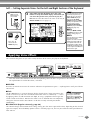
Turning the Power On
and Off
P
E
D
A
L
A
U
X
P
E
D
A
L
A
C
I
N
L
E
T
V
I
D
E
O
O
U
T
A
U
X
I
N
M
I
D
I
T
O
H
O
S
TH
O
S
T
S
E
L
E
C
T
I
N
R
L
/
L
+
R
R
L
R
L
/
L
+
R
T
H
R
U
O
N
O
F
F
M
I
D
I
P
C
-
2
M
a
c
P
C
-
1
O
U
T
A
U
X
O
U
T
P
H
O
N
E
S
P
O
W
E
R
L
E
VE
L
FI
XE
D
A
C
I
N
L
E
T
1
1
0
V
1
3
0
V
2
2
0
V
240V
VOLTAGE SELECTOR

17
PF-1000
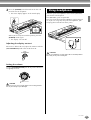
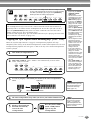
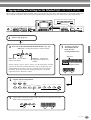
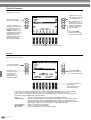
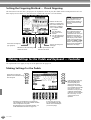
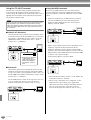
2
Press the [POWER] switch located on the left side
panel to turn on the power.
→ The main display appears in the LCD display.
When you’re ready to turn off the power, press the
[POWER] switch again.
→ The display will turn off.
Adjusting the display contrast
If the LCD is difficult to read, adjust the contrast with the
[LCD CONTRAST] knob at the left of the LCD.
Setting the volume
Use the [MASTER VOLUME] dial to adjust the volume to
an appropriate level.
CAUTION
Do not use the PF-1000 at a high volume level for a long period of
time, or your hearing may be damaged.
Connect a pair of headphones to one of the [PHONES]
jacks on the left side panel.
Two [PHONES] jacks are provided.
Two sets of standard stereo headphones can be plugged
in. (If you are using only one pair of headphones, you
can plug them into either of these jacks.)
CAUTION
Do not use headphones at a high volume for an extended period of
time. Doing so may cause hearing loss.
P
E
D
A
L
A
U
X
P
E
D
A
L
A
C
I
N
L
E
T
V
I
D
E
O
O
U
T
A
U
X
I
N
M
I
D
I
T
O
H
O
S
T
H
O
S
T
S
E
L
E
C
T
I
N
R
L
/
L
+
R
R
L
R
L
/
L
+
R
T
H
R
U
O
N
O
F
F
M
I
D
I
P
C
-
2
M
a
c
P
C
-
1
O
U
T
A
U
X
O
U
T
P
H
O
N
E
S
P
O
W
E
R
L
E
V
E
L
F
I
X
E
D
E
D
C
B
A
J
I
H
G
F
ON OFF
POWER
LCD
CONTRAST
MASTER VOLUME
MIN MAX
Using headphones
P
E
D
A
L
A
U
X
P
E
D
A
L
A
C
I
N
L
E
T
V
I
D
E
O
O
U
T
A
U
X
I
N
M
I
D
I
T
O
H
O
S
T
H
O
S
T
S
E
L
E
C
T
I
N
R
L
/
L
+
R
R
L
R
L
/
L
+
R
T
H
R
U
O
N
O
F
F
M
I
D
I
P
C
-
2
M
a
c
P
C
-
1
O
U
T
A
U
X
O
U
T
P
H
O
N
E
S
P
O
W
E
R
L
E
V
E
L
F
I
X
E
D
PHONES

PF-1000
18
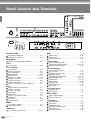
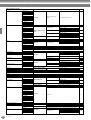
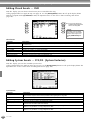
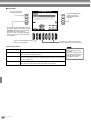
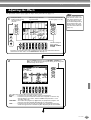
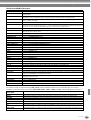
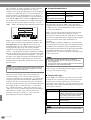
Panel Controls and Terminals
MASTER VOLUME
[MASTER VOLUME] dial ................................................P. 17
[FADE IN / OUT] button ..................................................P. 65
METRONOME
[START / STOP] button (METRONOME)........................P. 50
STYLE
STYLE buttons ...............................................................P. 59
STYLE CONTROL
[ACMP] button ................................................................P. 60
[AUTO FILLIN] button .....................................................P. 66
[OTS LINK] button ..........................................................P. 68
[BREAK] button ..............................................................P. 64
[INTRO] button .........................................................P. 31, 66
MAIN [A] – [D] buttons....................................................P. 64
[ENDING / rit.] button................................................P. 31, 66
[SYNC.STOP] button ......................................................P. 65
[SYNC.START] button ....................................................P. 60
[START / STOP] button (STYLE CONTROL) .................P. 60
SONG
[EXTRA TRACKS (STYLE)] button ................................P. 77
[TRACK 2 (L)] button ......................................................P. 77
[TRACK 1 (R)] button .....................................................P. 77
[REC] button...................................................................P. 90
[TOP] button ...................................................................P. 76
[START / STOP] button (SONG).....................................P. 74
[REW] button ..................................................................P. 76
[FF] button ......................................................................P. 76
[REPEAT] button.............................................................P. 77
TEMPO
[–] [+] buttons (TEMPO) .................................................P. 50
[TAP TEMPO] button ......................................................P. 51
TRANSPOSE
[–] [+] buttons (TRANSPOSE) ......................................P. 130
MENU
[DEMO] button................................................................P. 52
[HELP] button .................................................................P. 49
[FUNCTION] button......................................................P. 122
DIGITAL STUDIO
[SOUND CREATOR] button............................................P. 85
[DIGITAL RECORDING] button ..............................P. 90, 106
[MIXING CONSOLE] button .........................................P. 116
DISPLAY CONTROL
[LCD CONTRAST] knob.................................................P. 17
[A] - [J] buttons ...............................................................P. 40
[DIRECT ACCESS] button .............................................P. 47
[BALANCE] button..........................................................P. 61
[CHANNEL ON / OFF] button...................................P. 61, 76
[1
▲▼] - [8▲▼] buttons ............................................P. 38 - 45
[BACK] button...........................................................P. 40, 46
[NEXT] button...........................................................P. 40, 46
[ENTER] button ..............................................................P. 46
[DATA ENTRY] dial .........................................................P. 46
[EXIT] button...................................................................P. 40
VOICE PART ON/OFF
[LAYER] button ...............................................................P. 56
[LEFT] button..................................................................P. 56
MUSIC FINDER
[MUSIC FINDER] button.................................................P. 69
Floppy disk drive (3.5”) .....................................................P. 6
VOICE EFFECT
[REVERB] button............................................................P. 57
[DSP] button ...................................................................P. 57
[VARIATION] button........................................................P. 57
[HARMONY / ECHO] button...........................................P. 58
[MONO] button ...............................................................P. 58
[LEFT HOLD] button.......................................................P. 58
MASTER VOLUME
MIN MAX
METRONOME
STYLE CONTROL
START/STOP
FADE IN/OUT POP & ROCK
BREAK INTRO
ENDING/rit.
SYNC.STOP SYNC.START
TOPREC
NEW SONG
SYNC.START
EXTRA TRACKS TRACK2
STYLE L
TRACK1
R
START/STOP
START/STOP
REW
FF
REPEAT
DEMO
HELP
FUNCTION
E
D
C
B
A
SOUND
CREATOR
DIGITAL
RECORDING
DIRECT
ACCESS
BALANCE
CHANNEL
ON/OFF
PAR T
PAR T
MIXING
CONSOLE
LCD
CONTRAST
A
ACMP
AUTO FILL IN
OTS LINK
B
MAIN
C
TAP TEMPO
RESET RESET
POP BALLADS
DANCE
SWING & JAZZ
R & B COUNTRY
LATIN WALTZ BALLROOM PIANIST
USER
MARCH &
WORLD
TEMPO
TRANSPOSE
STYLE
SONG
MENU
DIGITAL
STUDIO
2 31 54
D
PEDAL AUX PEDALAC INLET
VIDEO OUT AUX IN
MIDI TO HOSTHOST SELECT
IN
R
L/L+R
RL R
L/L+R
THRU
ON OFF
MIDI PC-2 MacPC-1
OUT
AUX OUT PHONES POWER
LEVEL FIXED
MIN MAX
INPUT
VOLUME MIC
/
LINE IN MIC LINE
1
2
3
4
5 76
8 9
11
12
13 14
15 17
18 19 20 21 22 23
24 25 26
27
28
29
30
31
32
33
34
35
36
37
38
7372
71
16
62 63
65
66
67 69 70
74
646160
68
75
76
77
10
1
2
3
4
5
6
7
8
9
10
11
12
13
14
15
16
17
18
19
20
21
22
23
24
25
26
27
28
29
30
31
32
33
34
35
36
37
38
39
40
41
42
43
44
45
46
47
48
49
50
51
52
53

19
PF-1000
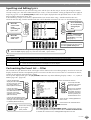
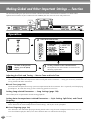
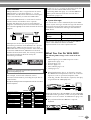
VOICE
VOICE buttons................................................................P. 54
ONE TOUCH SETTING
[1] - [4] buttons (ONE TOUCH SETTING) ......................P. 67
PIANO Setting
[PIANO] button ...............................................................P. 55
REGISTRATION MEMORY
[FREEZE] button ............................................................P. 84
[1] – [8] buttons (REGISTRATION MEMORY)................P. 82
[MEMORY] button...........................................................P. 82
Connectors
[VIDEO OUT] jack ........................................................P. 142
AUX IN [L / L+R] [R] jacks ............................................P. 142
AUX OUT [L / L+R] [R] jacks ........................................P. 142
AUX OUT (LEVEL FIXED) [L] [R] jacks........................P. 142
[PHONES] jacks ...........................................................P. 141
[AC INLET] .....................................................................P. 16
[PEDAL] jack...................................................................P. 16
[AUX PEDAL] jack ........................................................P. 143
MIDI [THRU] [OUT] [IN] terminals ................................P. 143
[HOST SELECT] switch................................................P. 143
[TO HOST] terminal......................................................P. 144
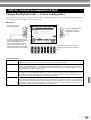
POWER
[ON / OFF] button (POWER) ..........................................P. 17
Microphone Connectors
[INPUT VOLUME] knob ................................................P. 141
[MIC / LINE IN] jack......................................................P. 141
[MIC LINE] switch.........................................................P. 141
Pedals
Left pedal........................................................................P. 58
Sostenuto pedal..............................................................P. 58
Damper pedal.................................................................P. 58
The Panel Logos
The logos printed on the PF-1000 panel indicate standards/
formats it supports and special features it includes.
GM System Level 1
“GM System Level 1” is an addition to the MIDI standard which
guarantees that any data conforming to the standard will play
accurately on any GM-compatible tone generator or synthesizer
from any manufacturer.
XG Format
XG is a new Yamaha MIDI specification which significantly
expands and improves on the “GM System Level 1” standard with
greater voice handling capacity, expressive control, and effect
capability while retaining full compatibility with GM. By using the
PF-1000’s XG voices, it is possible to record XG-compatible song
files.
XF Format
The Yamaha XF format enhances the SMF (Standard MIDI File)
standard with greater functionality and open-ended expandability
for the future. The PF-1000 is capable of displaying lyrics when an
XF file containing lyric data is played. (SMF is the most common
format used for MIDI sequence files. The PF-1000 is compatible
with SMF Formats 0 and 1, and records “song” data using SMF
Format 0.)
Disk Orchestra Collection
The DOC voice allocation format provides data playback
compatibility with a wide range of Yamaha instruments and MIDI
devices.
Style File Format
The Style File Format (SFF) is Yamaha’s original style file format,
which uses a unique conversion system to provide high-quality
automatic accompaniment based on a wide range of chord types.
The PF-1000 uses the SFF internally, reads optional SFF style disks,
and creates SFF styles using the Style Creator feature.
J
I
H
G
F
EXIT
DATA ENTRY
ENTER
ON/OFF
LAYER
BACK
LEFT
NEXT
MUSIC
FINDER
4321
4321FREEZEUSERXGSYNTH.
CHOIR & PAD
BRASS WOODWIND STRINGS
LEFT HOLDMONOECHO
HARMONY/
REVERB
PIANO & ORGAN &
DSP VARIATION
BASSGUITAR
PERCUSSION
HARPSI. E.PIANO
ACCORDION
8 MEMORY765
5 6 7 8
VOICE
PART
PIANO
VOICE REGISTRATION MEMORY
VOICE EFFECT ONE TOUCH SETTING
46
34
40
41
42
43
48
54
55
56
57 58 59
47
49 50 52 53
51
44
39
45
38
54
55
56
57
58
59
60
61
62
63
64
65
66
67
68
69
70
71
72
73
74
75
76
77

Quick Guide
20
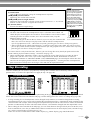
Quick Guide . . . . . . . . . . . . . . . . . . . . . . . . .
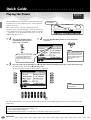
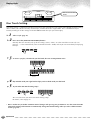
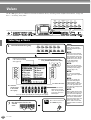
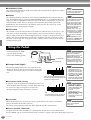
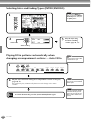
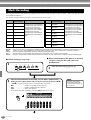
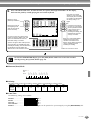
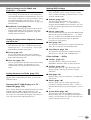
Playing the Demos
The PF-1000 features an extensive variety of Demo songs,
that showcase its rich, authentic voices and its dynamic
rhythms and styles.
What’s more, there’s a special selection of Demo
functions. These take you through a hands-on journey of
all the important features and functions of the instrument
— letting you see firsthand how to effectively use the PF-
1000 in your own music.
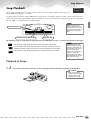
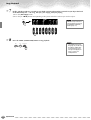
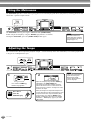
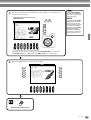
Press the [EXIT] button to exit from the demo mode and return to the MAIN display when you’ve finished playing the
demo songs.
When you’re done with the Demos, you can get to know your PF-1000 even better with these functions:
• Preset Song (Song Book) playback (page 21)
• Disk Song Playback (page 21)
• Short demo playback of the selected voice (in the Voice Open display; page 26).
Reference
on page 52
Demo button
DEMO
HELP
FUNCTION
MENU
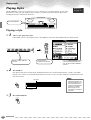
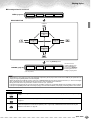
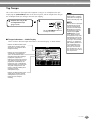
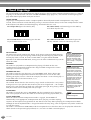
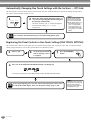
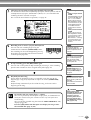
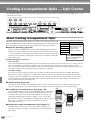
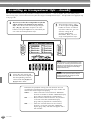
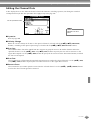
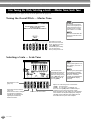
2 Press the [BACK]/[NEXT] button to select the Demo
categories.
BACK NEXT
Voice Demos showcase the
voices of the PF-1000. Style
Demos introduce you to the
rhythms and accompaniment
styles of the PF-1000
(page 52).
For this example, FUNCTION
is selected. Function Demos
demonstrate many of the
different functions on the PF-
1000.
1 Pressing the [DEMO] button
automatically plays back the
Demo songs at random.
3
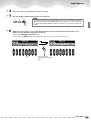
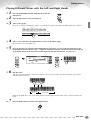
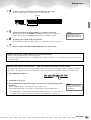
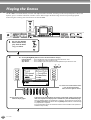
Press any of the [A] to [J] buttons or [8▼] (AUTO) button (FUNCTION page only) to select the Demo songs.
For this example, press the [8▼] (AUTO) button.
All of the function demos are played back in sequence.
E
D
C
B
A
J
I
H
G
F
2 31 5 6 7 84
For details about the Demos,
refer to page 52.
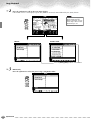
Strona się ładuje...
Strona się ładuje...
Strona się ładuje...
Strona się ładuje...
Strona się ładuje...
Strona się ładuje...
Strona się ładuje...
Strona się ładuje...
Strona się ładuje...
Strona się ładuje...
Strona się ładuje...
Strona się ładuje...
Strona się ładuje...
Strona się ładuje...
Strona się ładuje...
Strona się ładuje...
Strona się ładuje...
Strona się ładuje...
Strona się ładuje...
Strona się ładuje...
Strona się ładuje...
Strona się ładuje...
Strona się ładuje...
Strona się ładuje...
Strona się ładuje...
Strona się ładuje...
Strona się ładuje...
Strona się ładuje...
Strona się ładuje...
Strona się ładuje...
Strona się ładuje...
Strona się ładuje...
Strona się ładuje...
Strona się ładuje...
Strona się ładuje...
Strona się ładuje...
Strona się ładuje...
Strona się ładuje...
Strona się ładuje...
Strona się ładuje...
Strona się ładuje...
Strona się ładuje...
Strona się ładuje...
Strona się ładuje...
Strona się ładuje...
Strona się ładuje...
Strona się ładuje...
Strona się ładuje...
Strona się ładuje...
Strona się ładuje...
Strona się ładuje...
Strona się ładuje...
Strona się ładuje...
Strona się ładuje...
Strona się ładuje...
Strona się ładuje...
Strona się ładuje...
Strona się ładuje...
Strona się ładuje...
Strona się ładuje...
Strona się ładuje...
Strona się ładuje...
Strona się ładuje...
Strona się ładuje...
Strona się ładuje...
Strona się ładuje...
Strona się ładuje...
Strona się ładuje...
Strona się ładuje...
Strona się ładuje...
Strona się ładuje...
Strona się ładuje...
Strona się ładuje...
Strona się ładuje...
Strona się ładuje...
Strona się ładuje...
Strona się ładuje...
Strona się ładuje...
Strona się ładuje...
Strona się ładuje...
Strona się ładuje...
Strona się ładuje...
Strona się ładuje...
Strona się ładuje...
Strona się ładuje...
Strona się ładuje...
Strona się ładuje...
Strona się ładuje...
Strona się ładuje...
Strona się ładuje...
Strona się ładuje...
Strona się ładuje...
Strona się ładuje...
Strona się ładuje...
Strona się ładuje...
Strona się ładuje...
Strona się ładuje...
Strona się ładuje...
Strona się ładuje...
Strona się ładuje...
Strona się ładuje...
Strona się ładuje...
Strona się ładuje...
Strona się ładuje...
Strona się ładuje...
Strona się ładuje...
Strona się ładuje...
Strona się ładuje...
Strona się ładuje...
Strona się ładuje...
Strona się ładuje...
Strona się ładuje...
Strona się ładuje...
Strona się ładuje...
Strona się ładuje...
Strona się ładuje...
Strona się ładuje...
Strona się ładuje...
Strona się ładuje...
Strona się ładuje...
Strona się ładuje...
Strona się ładuje...
Strona się ładuje...
Strona się ładuje...
Strona się ładuje...
Strona się ładuje...
Strona się ładuje...
Strona się ładuje...
Strona się ładuje...
Strona się ładuje...
Strona się ładuje...
Strona się ładuje...
Strona się ładuje...
Strona się ładuje...
Strona się ładuje...
Strona się ładuje...
Strona się ładuje...
Strona się ładuje...
Strona się ładuje...
Strona się ładuje...
Strona się ładuje...
Strona się ładuje...
Strona się ładuje...
Strona się ładuje...
-
 1
1
-
 2
2
-
 3
3
-
 4
4
-
 5
5
-
 6
6
-
 7
7
-
 8
8
-
 9
9
-
 10
10
-
 11
11
-
 12
12
-
 13
13
-
 14
14
-
 15
15
-
 16
16
-
 17
17
-
 18
18
-
 19
19
-
 20
20
-
 21
21
-
 22
22
-
 23
23
-
 24
24
-
 25
25
-
 26
26
-
 27
27
-
 28
28
-
 29
29
-
 30
30
-
 31
31
-
 32
32
-
 33
33
-
 34
34
-
 35
35
-
 36
36
-
 37
37
-
 38
38
-
 39
39
-
 40
40
-
 41
41
-
 42
42
-
 43
43
-
 44
44
-
 45
45
-
 46
46
-
 47
47
-
 48
48
-
 49
49
-
 50
50
-
 51
51
-
 52
52
-
 53
53
-
 54
54
-
 55
55
-
 56
56
-
 57
57
-
 58
58
-
 59
59
-
 60
60
-
 61
61
-
 62
62
-
 63
63
-
 64
64
-
 65
65
-
 66
66
-
 67
67
-
 68
68
-
 69
69
-
 70
70
-
 71
71
-
 72
72
-
 73
73
-
 74
74
-
 75
75
-
 76
76
-
 77
77
-
 78
78
-
 79
79
-
 80
80
-
 81
81
-
 82
82
-
 83
83
-
 84
84
-
 85
85
-
 86
86
-
 87
87
-
 88
88
-
 89
89
-
 90
90
-
 91
91
-
 92
92
-
 93
93
-
 94
94
-
 95
95
-
 96
96
-
 97
97
-
 98
98
-
 99
99
-
 100
100
-
 101
101
-
 102
102
-
 103
103
-
 104
104
-
 105
105
-
 106
106
-
 107
107
-
 108
108
-
 109
109
-
 110
110
-
 111
111
-
 112
112
-
 113
113
-
 114
114
-
 115
115
-
 116
116
-
 117
117
-
 118
118
-
 119
119
-
 120
120
-
 121
121
-
 122
122
-
 123
123
-
 124
124
-
 125
125
-
 126
126
-
 127
127
-
 128
128
-
 129
129
-
 130
130
-
 131
131
-
 132
132
-
 133
133
-
 134
134
-
 135
135
-
 136
136
-
 137
137
-
 138
138
-
 139
139
-
 140
140
-
 141
141
-
 142
142
-
 143
143
-
 144
144
-
 145
145
-
 146
146
-
 147
147
-
 148
148
-
 149
149
-
 150
150
-
 151
151
-
 152
152
-
 153
153
-
 154
154
-
 155
155
-
 156
156
-
 157
157
-
 158
158
-
 159
159
-
 160
160
-
 161
161
-
 162
162
-
 163
163
-
 164
164


Yamaha PF-1000 Instrukcja obsługi
- Kategoria
- Pianina cyfrowe
- Typ
- Instrukcja obsługi
- Niniejsza instrukcja jest również odpowiednia dla
w innych językach
- čeština: Yamaha PF-1000 Návod k obsluze
- español: Yamaha PF-1000 El manual del propietario
- italiano: Yamaha PF-1000 Manuale del proprietario
- Deutsch: Yamaha PF-1000 Bedienungsanleitung
- svenska: Yamaha PF-1000 Bruksanvisning
- português: Yamaha PF-1000 Manual do proprietário
- français: Yamaha PF-1000 Le manuel du propriétaire
- Türkçe: Yamaha PF-1000 El kitabı
- English: Yamaha PF-1000 Owner's manual
- dansk: Yamaha PF-1000 Brugervejledning
- русский: Yamaha PF-1000 Инструкция по применению
- Nederlands: Yamaha PF-1000 de handleiding
- română: Yamaha PF-1000 Manualul proprietarului
Powiązane artykuły
-
Yamaha CVP-900 Instrukcja obsługi
-
-
-
-
-
-
-
-
-
Yamaha V2 Instrukcja obsługi
