Indesit PWSE 61070 W (EU) instrukcja
- Kategoria
- Pralki
- Typ
- instrukcja

1
GB
WASHING MACHINE
Instructions for use
Contents
Installation, 2-3
Unpacking and levelling
Connecting the electricity and water supplies
The first wash cycle
Technical data
Care and maintenance, 4
Cutting off the water and electricity supplies
Cleaning the washing machine
Cleaning the detergent dispenser drawer
Caring for the door and drum of your appliance
Cleaning the pump
Checking the water inlet hose
Precautions and advice, 5
General safety
Disposal
Description of the washing machine, 6-7
Control panel
Display
Running a wash cycle, 8
Wash cycles and options, 9
Table of wash cycles
Wash options
Detergents and laundry, 10
Detergent dispenser drawer
Preparing the laundry
Special wash cycles
Troubleshooting, 11
Service, 12
English, 1
GB
PWSE 61070 W
PL
Polski,25
SK
Slovensky,13
Česky,37
CZ UK
Українська,49

2
GB
! This instruction manual should be kept in a safe
place for future reference. If the washing machine
is sold, transferred or moved, make sure that the
instruction manual remains with the machine so
that the new owner is able to familiarise himself/
herself with its operation and features.
! Read these instructions carefully: they contain
vital information relating to the safe installation
and operation of the appliance.
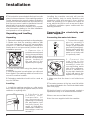
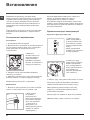
Unpacking and levelling
Unpacking
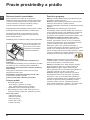
1. Remove the washing machine from its packaging.
2. Make sure that the washing machine has
not been damaged during the transportation
process. If it has been damaged, contact the
retailer and do not proceed any further with the
installation process.
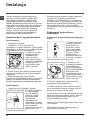
3 . R e m o v e t h e 4
protective screws (used
during transportation)
and the rubber washer
with the corresponding
spacer, located on
the rear part of the
appliance (see figure).
4. Close off the holes using the plastic plugs
provided.
5. Keep all the parts in a safe place: you will need
them again if the washing machine needs to be
moved to another location.
! Packaging materials should not be used as
toys for children.
Levelling
1. Install the washing machine on a flat sturdy
floor, without resting it up against walls, furniture
cabinets or anything else.
2. If the floor is not
p e r f e c t l y l e v e l ,
c o m p e n s a t e f o r
any unevenness by
tightening or loosening
the adjustable front
feet (see figure); the
angle of inclination,
measured in relation to
the worktop, must not
exceed 2°.
Levelling the machine correctly will provide
it with stability, help to avoid vibrations and
excessive noise and prevent it from shifting
while it is operating. If it is placed on carpet or
a rug, adjust the feet in such a way as to allow
a sufficient ventilation space underneath the
washing machine.
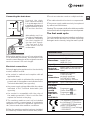
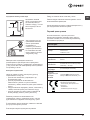
Connecting the electricity and
water supplies
Connecting the water inlet hose
1. Connect the supply
pipe by screwing it
to a cold water tap
using a ¾ gas threaded
connection (see figure).
Before performing the
connection, allow the
water to run freely until
it is perfectly clear.
2 . C o n n e c t t h e
i n l e t h o s e t o t h e
washing machine by
screwing it onto the
corresponding water
inlet of the appliance,
which is situated on
the top right-hand side
of the rear part of the
appliance (see figure).
3. Make sure that the hose is not folded over
or bent.
! The water pressure at the tap must fall within
the values indicated in the Technical details table
(see next page).
! If the inlet hose is not long enough, contact a
specialised shop or an authorised technician.
! Never use second-hand hoses.
! Use the ones supplied with the machine.
Installation

3
GB
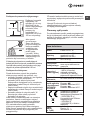
Connecting the drain hose
Connect the drain
hose, without bending
it, to a drainage duct or
a wall drain located at a
height between 65 and
100 cm from the floor;
alternatively, rest it on
the side of a washbasin
or bathtub, fastening
the duct supplied to
the tap (see figure).
The free end of the
hose should not be
underwater.
! We advise against the use of hose extensions;
if it is absolutely necessary, the extension must
have the same diameter as the original hose and
must not exceed 150 cm in length.
Electrical connections
Before plugging the appliance into the electricity
socket, make sure that:
• the socket is earthed and complies with all
applicable laws;
• the socket is able to withstand the maximum
power load of the appliance as indicated in the
Technical data table (see opposite);
• the power supply voltage falls within the values
indicated in the Technical data table (see
opposite);
• the socket is compatible with the plug of
the washing machine. If this is not the case,
replace the socket or the plug.
! The washing machine must not be installed
outdoors, even in covered areas. It is extremely
dangerous to leave the appliance exposed to
rain, storms and other weather conditions.
! When the washing machine has been installed,
the electricity socket must be within easy reach.
! Do not use extension cords or multiple sockets.
! The cable should not be bent or compressed.
! The power supply cable must only be replaced
by authorised technicians.
Warning! The company shall not be held responsible
in the event that these regulations are not respected.
The first wash cycle
Once the appliance has been installed, and before
you use it for the first time, run a wash cycle with
detergent and no laundry, using the wash cycle 2.
65 - 100 cm
Technical data
Model
PWSE 61070 W
Dimensions
width 59.5 cm
height 85 cm
depth 44,5 cm
Capacity
from 1 to 6 kg
Electrical
connections
please refer to the technical
data plate fixed to the ma-
chine
Water
connections
maximum pressure
1 MPa (10 bar)
minimum pressure
0.05 MPa (0.5 bar)
drum capacity 40 litres
Spin speed
up to 1000 rotations per minute
Test wash
cycles in
accordan-
ce with
directives
1061/2010
and
1015/2010.
Programme
:
Cotton Standard 60°.
Programme :
Cotton Standard 40°.
This appliance conforms to
the following EC Directives:
- 2004/108/EC (Electroma-
gnetic Compatibility)
- 2006/95/EC (Low Voltage)
- 2002/96/EC

4
GB
Care and maintenance
2. Unscrew the lid
by rotating it anti-
clockwise (see figure):
a little water may trickle
out. This is perfectly
normal.
3. Clean the inside thoroughly.
4. Screw the lid back on.
5. Reposition the panel, making sure the hooks
are securely in place before you push it onto the
appliance.
Checking the water inlet hose
Check the inlet hose at least once a year. If
there are any cracks, it should be replaced
immediately: during the wash cycles, water
pressure is very strong and a cracked hose could
easily split open.
! Never use second-hand hoses.
Cutting off the water and electricity
supplies
• Turn off the water tap after every wash cycle.
This will limit wear on the hydraulic system inside
the washing machine and help to prevent leaks.
• Unplug the washing machine when cleaning it
and during all maintenance work.
Cleaning the washing machine
The outer parts and rubber components of the
appliance can be cleaned using a soft cloth
soaked in lukewarm soapy water. Do not use
solvents or abrasives.
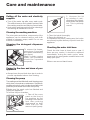
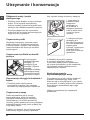
Cleaning the detergent dispenser
drawer
To remove the drawer,
press lever (1) and pull
the drawer outwards (2)
(see figure).
Wash it under running
water; this procedure
should be repeated
frequently.
Caring for the door and drum of your
appliance
• Always leave the porthole door ajar in order to
prevent unpleasant odours from forming.
Cleaning the pump
The washing machine is fitted with a self-cleaning pump
which does not require any maintenance. Sometimes,
small items (such as coins or buttons) may fall into the
protective pre-chamber at the base of the pump.
! Make sure the wash cycle has finished and
unplug the appliance.
To access the pre-chamber:
1. Take off the cover
panel on the front of
the machine by first
pressing it in the centre
and then pu shin g
downwards on both
sides until you can
remove it (see figures).
2
1
1
2
3

5
GB
Precautions and tips
! This washing machine was designed and constructed
in accordance with international safety regulations. The
following information is provided for safety reasons and
must therefore be read carefully.
General safety
• This appliance was designed for domestic use only.
• This appliance can be used by children aged
from 8 years and above and persons with
reduced physical, sensory or mental capabilities
or lack of experience and knowledge if they
have been given supervision or instruction
concerning use of the appliance in a safe way
and understand the hazards involved. Children
shall not play with the appliance. Cleaning
and user maintenance shall not be made by
children without supervision.
• The washing machine must only be used by adults, in
accordance with the instructions provided in this manual.
• Do not touch the machine when barefoot or with wet or
damp hands or feet.
• Do not pull on the power supply cable when unplugging
the appliance from the electricity socket. Hold the plug
and pull.
• Do not open the detergent dispenser drawer while the
machine is in operation.
• Do not touch the drained water as it may reach
extremely high temperatures.
• Never force the porthole door. This could damage the
safety lock mechanism designed to prevent accidental
opening.
• If the appliance breaks down, do not under any
circumstances access the internal mechanisms in an
attempt to repair it yourself.
• Always keep children well away from the appliance while
it is operating.
• The door can become quite hot during the wash cycle.
• If the appliance has to be moved, work in a group of two
or three people and handle it with the utmost care. Never
try to do this alone, because the appliance is very heavy.
• Before loading laundry into the washing machine, make
sure the drum is empty.
Disposal
• Disposing of the packaging materials: observe local
regulations so that the packaging may be re-used.
• The European Directive 2002/96/EC on Waste
Electrical and Electronic Equipment, requires that
old household electrical appliances must not be
disposed of in the normal unsorted municipal waste
stream. Old appliances must be collected
separately in order to optimise the recovery and
recycling of the materials they contain and reduce
the impact on human health and the environment.
The crossed out “wheeled bin” symbol on the
product reminds you of your obligation, that when
you dispose of the appliance it must be separately
collected.
Consumers should contact their local authority or
retailer for information concerning the correct
disposal of their old appliance.

6
GB
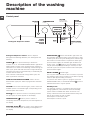
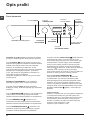
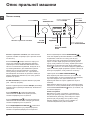
Description of the washing
machine
Control panel
TEMPERATURE
button
WASH
CYCLE
SELECTOR
KNOB
Detergent dispenser drawer
ON/OFF
button
SPIN
button
START/PAUSE
button and indicator
light
DISPLAY
DELAYED
START
button
OPTION
buttons and
indicator lights
DOOR
LOCKED
indicator light
Detergent dispenser drawer: used to dispense
detergents and washing additives ( see “Detergents and
laundry”).
ON/OFF button: press this briefly to switch the
machine on or off. The START/PAUSE indicator light which
flashes slowly in a blue colour shows that the machine is
switched on. To switch off the washing machine during the
wash cycle, press and hold the button for approximately 3
seconds; if the button is pressed briefly or accidentally the
machine will not switch off.
If the machine is switched off during a wash cycle, this
wash cycle will be cancelled.
WASH CYCLE SELECTOR KNOB: used to set the
desired wash cycle (see “Table of programmes and wash
cycles”).
OPTION buttons and indicator lights: press to select the
available options. The indicator light corresponding to the
selected option will remain lit.
SPIN button: press to reduce or completely exclude
the spin cycle; the value appears on the display.
TEMPERATURE button: press to reduce or
completely exclude the temperature; the value appears on
the display.
DELAYED START button: press to set a delayed start
for the selected wash cycle; the delay period appears on
the display.
START/PAUSE button and indicator light: when the
blue indicator light flashes slowly, press the button to start
a wash cycle. Once the cycle has begun the indicator light
will remain lit in a fixed manner. To pause the wash cycle,
press the button again; the indicator light will flash in an
amber colour. If the symbol is not illuminated, the door
may be opened (wait approximately 3 minutes). To start
the wash cycle from the point at which it was interrupted,
press the button again.
DOOR LOCKED indicator light:
The lit symbol indicates that the door is locked. To prevent
any damage, wait until the symbol turns off before opening
the door (wait approximately 3 minutes).
To open the door while a cycle is in progress, press the
START/PAUSE button; if the DOOR LOCKED symbol is
switched off the door may be opened.
Standby mode
This washing machine, in compliance with new energy
saving regulations, is fitted with an automatic standby
system which is enabled after about 30 minutes if no
activity is detected. Press the ON-OFF button briefly and
wait for the machine to start up again.
Consumption in off-mode: 0,5 W
Consumption in Left-on: 0,5 W

7
GB
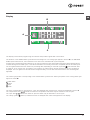
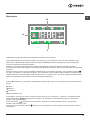
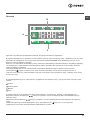
Display
B
C
A
The display is useful when programming the machine and provides a great deal of information.
The duration of the available wash cycles and the remaining time of a running cycle appear in section A; if the DELAYED
START option has been set, the countdown to the start of the selected wash cycle will appear.
Pressing the corresponding button allows you to view the maximum spin speed and temperature values attained by the
machine during the set wash cycle, or the values selected most recently, if these are compatible with the set wash cycle.
The hour-glass flashes while the machine is processing data, depending on the wash cycle and level selected. After
a maximum of 10 minutes, the “hour-glass” icon remains lit in a fixed manner and the final amount of time remaining is
displayed. The hour-glass icon will then switch off approximately 1 minute after the final amount of time remaining has
appeared.
The “wash cycle phases” corresponding to the selected wash cycle and the “wash cycle phase” of the running wash cycle
appear in section B:
Main wash
Rinse
Spin
Drain
The icons corresponding to “temperature”, “spin” and “delayed start” (working from the left) are displayed in section C.
The “temperature” bars indicate the maximum temperature level which may be selected for the set cycle.
The “spin” bars indicate the maximum spin level which may be selected for the set cycle.
The “delay” symbol , when lit, indicates that the set “delayed start” value has appeared on the display.

8
GB
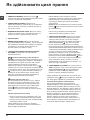
Running a wash cycle
1. SWITCH THE MACHINE ON. Press the button;
the START/PAUSE indicator light will flash slowly in a
blue colour.
2. LOAD THE LAUNDRY. Open the porthole door.
Load the laundry, making sure you do not exceed
the maximum load value indicated in the table of
programmes and wash cycles on the following page.
3. MEASURE OUT THE DETERGENT. Pull out the
detergent dispenser drawer and pour the detergent into
the relevant compartments as described in “Detergents
and laundry”.
4. CLOSE THE DOOR.
5. SELECT THE WASH CYCLE. Use the WASH CYCLE
SELECTOR knob to select the desired wash cycle. A
temperature and spin speed is set for each wash cycle;
these values may be adjusted. The duration of the cycle
will appear on the display.
6. CUSTOMISE THE WASH CYCLE. Use the relevant
buttons:
Modify the temperature and/or spin
speed. The machine automatically displays the
maximum temperature and spin speed values set for
the selected cycle, or the most recently-used settings
if they are compatible with the selected cycle. The
temperature can be decreased by pressing the
button, until the cold wash “OFF” setting is reached.
The spin speed may be progressively reduced by
pressing the button, until it is completely excluded
(the “OFF” setting). If these buttons are pressed again,
the maximum values are restored.
Setting a delayed start.
To set a delayed start for the selected cycle, press the
corresponding button repeatedly until the required delay
period has been reached. When this option has been
activated, the symbol lights up on the display. To
remove the delayed start setting, press the button until
the text “OFF” appears on the display.
Modify the cycle settings.
• Press the button to enable the option; the indicator
light corresponding to the button will switch on.
• Press the button again to disable the option; the
indicator light will switch off.
! If the selected option is not compatible with the set
wash cycle, the indicator light will flash and the option
will not be activated.
! If the selected option is not compatible with
a previously selected one, the indicator light
corresponding to the first function selected will flash and
only the second option will be activated; the indicator
light for the option which has been activated will be
illuminated.
Note: if the option has been selected, none of the
incompatible options may be activated.
! The options may affect the recommended load value
and/or the duration of the cycle.
7. START THE WASH CYCLE. Press the START/
PAUSE button. The corresponding indicator light will
turn blue, remaining lit in a fixed manner, and the door
will be locked (the DOOR LOCKED symbol will be lit).
To change a wash cycle while it is in progress, pause
the washing machine using the START/PAUSE button
(the START/PAUSE indicator light will flash slowly in an
amber colour); then select the desired cycle and press
the START/PAUSE button again.
To open the door while a cycle is in progress, press
the START/PAUSE button; if the DOOR LOCKED
symbol is switched off the door may be opened (wait
approximately 3 minutes). Press the START/PAUSE
button again to restart the wash cycle from the point at
which it was interrupted.
8. THE END OF THE WASH CYCLE. This will be
indicated by the text “END” on the display; when the
DOOR LOCKED symbol switches off the door may be
opened (wait approximately 3 minutes). Open the door,
unload the laundry and switch off the machine.
! If you wish to cancel a cycle which has already begun,
press and hold the button. The cycle will be stopped
and the machine will switch off.
Load balancing system
Before every spin cycle, to avoid excessive vibrations
before every spin and to distribute the load in a uniform
manner, the drum rotates continuously at a speed which
is slightly greater than the washing rotation speed. If,
after several attempts, the load is not balanced correctly,
the machine spins at a reduced spin speed. If the load is
excessively unbalanced, the washing machine performs
the distribution process instead of spinning. To encourage
improved load distribution and balance, we recommend
small and large garments are mixed in the load.

9
GB
Wash cycles and options
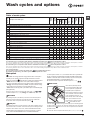
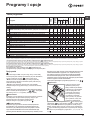
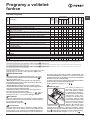
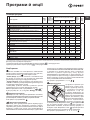
Table of wash cycles
Wash options
The “PRIME” technology optimises energy, water and time consumption
according to the quantity of garments actually inserted in the machine.
Moreover, pressing the button allows for selecting the following options:
- Water: allows for reducing water consumption without having to
renounce impeccable results (recommended for heavily soiled garments).
- Energy: automatically selected by “PRIME”, this option reduces energy
consumption (recommended for normally soiled garments).
- Time: allows for reducing wash cycle duration (recommended for lightly
soiled garments).
! This may only be used in conjunction with wash cycles 1, 2, , , 5,
6 (all three levels) and 7, 8, 9, 10 (- Energy and - Time levels).
Extra Rinse
By selecting this option, the efficiency of the rinse is increased and optimal
detergent removal is guaranteed. It is particularly useful for sensitive skin.
! It cannot be used in conjunction with wash cycles 9, .
Easy iron
By selecting this function, the wash and spin cycles will be modified in order to
reduce the formation of creases. At the end of the cycle the washing machine
will perform slow rotations of the drum, while the EASY IRON and START/
PAUSE indicator lights will flash (blue and orange respectively). To end the
cycle, press the START/PAUSE button or the EASY IRON button.
For wash cycles number 12-14, the machine will end the cycle while the
laundry is soaking; the EASY IRON and START/PAUSE indicator lights
will flash. To drain the water so that the laundry may be removed, press
the START/PAUSE button or the EASY IRON button.
! It cannot be used in conjunction with wash cycles 9, 11, 13, , .
Stain removal
This function is particularly useful for
the removal of stubborn stains. Insert
extra compartment 4 (supplied with
the appliance) into compartment 1.
When pouring in the bleach, be careful
not to exceed the “max” level marked
on the central pivot (see figure). To
bleach laundry with no other washing
action, pour the bleach into extra
compartment 4, select the “Rinse”
cycle and activate the “Stain
removal” option . To bleach during a wash cycle, pour in the detergent and
any fabric softener you wish to use, select the desired wash cycle and enable
the “Stain removal” option. The use of extra compartment 4 excludes the
pre-wash function.
! It cannot be used in conjunction with wash cycles 1, 7, 9, 11, 12, 13, 14, .
4
2
3
1
4
2
1
3
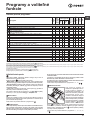
The length of cycle shown on the display or in this booklet is an estimation only and is calculated assuming standard working conditions. The actual duration can vary accor-
ding to factors such as water temperature and pressure, the amount of detergent used, the amount and type of load inserted, load balancing and any wash options selected.
Wash cycles
Description of the wash cycle
Max.
temp.
(°C)
Max.
speed
(rpm)
Detergents
Max. load (kg)
Residual
dampness %
Energy
consumption
kWh
Total water lt
Cycle duration
Prewash
Wash
Bleach
Fabric
softener
Daily Programs
1
Cottons with Pre-wash: extremely soiled whites. 90° 1000
-
6 62 1,81 65 150’
2
White Cottons: extremely soiled whites. 90° 1000 -
6 62 1,80 58 140’
Standard Cotton 60° (1): heavily soiled whites and resistant colours. 60° 1000 -
6 62 1,10 50 190’
Standard Cotton 40° (2): lightly soiled whites and delicate colours. 40° 1000 -
6 2 1,09 92 175’
5
Synthetics: heavily soiled resistant colours. 60° 800 -
3 44 0,70 40 105’
5
Synthetics (3): lightly soiled resistant colours. 40° 800 -
3 44 0,47 38 95’
6
Synthetics: lightly soiled delicate colours. 40° 800 -
3 - - - 75’
7 Jeans
40° 800 -
-
2,5 - - - 70’
8 Shirts
40° 600 -
2 - - - 65’
9
Mix-Cool 30’: to refresh lightly soiled garments quickly (not suitable for wool, silk and
clothes which require washing by hand).
Cold
water
800 -
-
3 71 0,04 32 30’
10
Standard Cotton 20°: lightly soiled whites and delicate colours. 20° 1000 -
6 - - - 170’
Special
11
Wool: for wool, cashmere, etc. 40° 800 -
-
1 - - - 55’
12
Silk/Curtains: for garments in silk and viscose, lingerie. 30° 0 -
-
1 - - - 55’
13 Sport Shoes
30° 600 -
-
Max.2
paires
- - - 55’
14 Outwear
30° 400 -
- - 1,5 - - - 50’
Partials
Rinse - 1000 - -
6 - - - 36’
Spin + Drain - 1000 - - - - 6 - - - 16’
1) Test wash cycle in compliance with directive 1061/2010: set wash cycle with a temperature of 60°C.
This cycle is designed for cotton loads with a normal soil level and is the most efficient in terms of both electricity and water consumption; it should
be used for garments which can be washed at 60°C. The actual washing temperature may differ from the indicated value.
2) Test wash cycle in compliance with directive 1061/2010: set wash cycle with a temperature of 40°C.
This cycle is designed for cotton loads with a normal soil level and is the most efficient in terms of both electricity and water consumption; it should
be used for garments which can be washed at 40°C. The actual washing temperature may differ from the indicated value.
For all Test Institutes:
2) Long wash cycle for cottons: set wash cycle
with a temperature of 40°C.
3) Synthetic program along: set wash cycle 5 with a temperature of 40°C.

10
GB
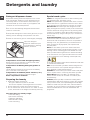
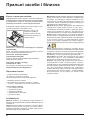
Detergents and laundry
Detergent dispenser drawer
Successful washing results also depend on the correct
dose of detergent: adding too much detergent will not
necessarily result in a more efficient wash, and may in
fact cause build up on the inside of your appliance and
contribute to environmental pollution.
! Do not use hand washing detergents because these
create too much foam.
! Use powder detergent for white cotton garments, for pre-
washing, and for washing at temperatures over 60°C.
! Follow the instructions given on the detergent packaging.
Open the detergent
dispenser drawer and pour
in the detergent or washing
additive, as follows.
Compartment 1: Pre-wash detergent (powder)
Before pouring in the detergent, make sure that extra
compartment 4 has been removed.
Compartment 2: Washing detergent (powder or
liquid)
Liquid detergent should only be poured in immediately
prior to the start of the wash cycle.
Compartment 3: Additives (fabric softeners, etc.)
The fabric softener should not overflow the grid.
Extra compartment 4: Bleach
Preparing the laundry
• Divide the laundry according to:
- the type of fabric/the symbol on the label
- the colours: separate coloured garments from whites.
• Empty all garment pockets and check the buttons.
• Do not exceed the values listed in the “Table of wash
cycles”, which refer to the weight of the laundry when dry.
How much does your laundry weigh?
1 sheet 400-500 g
1 pillow case 150-200 g
1 tablecloth 400-500 g
1 bathrobe 900-1.200 g
1 towel 150-250 g
Special wash cycles
Jeans: turn the garments inside out before washing and
use liquid detergent. Use wash cycle 7.
Shirts: use special wash cycle 8 to wash shirts in various
fabrics and colours. It guarantees maximum care is taken
of the garments and minimises the formation of creases.
Mix-Cool 30’: this wash cycle was designed to wash
lightly soiled garments quickly: it lasts just 30 minutes and
therefore saves both energy and time. By selecting wash
cycle 9, it is possible to wash different fabrics (except for
wool and silk items) using a cold cycle, up to a maximum
load of 3 kg.
Cotton Standard 20° (wash cycle 10) ideal for heavily
soiled cotton loads. The effective performance levels
achieved at cold temperatures, which are comparable to
washing at 40°, are guaranteed by a mechanical action
which operates at varying speed, with repeated and
frequent peaks.
Wool: the wool wash cycle of this machine has been
tested and approved by The Woolmark Company for the
washing of wool containing garments labelled as “hand
wash” provided that the garments are washed according
to the instructions on the garment label and those issued
by the manufacturer of this washing machine. (M1128)
In UK, Eire, Hong Kong and India the Woolmark trade mark
is a Certification trade mark.
Silk: use special wash cycle 12 to wash all silk garments.
We recommend the use of special detergent which has
been designed to wash delicate clothes.
Curtains: we recommend you fold the curtains and place
them in a pillow case or mesh bag. Use wash cycle 12.
Sport Shoes (wash cycle 13): is for washing sports
shoes; for best results, do not wash more than 2 pairs
simultaneously
Outwear (wash cycle 14): is studied for washing water-
repellent fabrics and winter jackets (e.g. Gore-Tex, polyester,
nylon); for best results, use a liquid detergent and dosage
suitable for a half-load; pre-treat necks, cuffs and stains if
necessary; do not use softeners or detergents containing
softeners. Stuffed duvets cannot be washed with this
programme..
4
2
3
1
4
2
1
3

11
GB
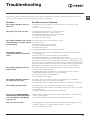
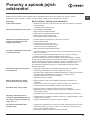
Troubleshooting
Your washing machine could occasionally fail to work. Before contacting the Technical Assistance Service (see “ Service”),
make sure that the problem cannot be solved easily using the following list.
Problem:
The washing machine does not
switch on.
The wash cycle does not start.
The washing machine does not fill
with water (the text “H2O” flashes
on the display).
The washing machine
continuously takes in and drains
water.
The washing machine does not
drain or spin.
The washing machine vibrates a
lot during the spin cycle.
The washing machine leaks.
The “option” and START/PAUSE
indicator lights flash rapidly and an
error code appears on the display
(e.g.: F-01, F-..).
There is too much foam.
Possible causes / Solutions:
• The appliance is not plugged into the socket fully, or not enough to make
contact.
• There is no power in the house.
• The washing machine door is not closed properly.
• The ON/OFF button has not been pressed.
• The START/PAUSE button has not been pressed.
• The water tap has not been opened.
• A delayed start has been set.
• The water inlet hose is not connected to the tap.
• The hose is bent.
• The water tap has not been opened.
• There is no water supply in the house.
• The pressure is too low.
• The START/PAUSE button has not been pressed.
• The drain hose is not fitted at a height between 65 and 100 cm from the floor
(see “Installation”).
• The free end of the hose is under water (see “Installation”).
• The wall drainage system is not fitted with a breather pipe.
If the problem persists even after these checks, turn off the water tap, switch the
appliance off and contact the Technical Assistance Service. If the dwelling is on one
of the upper floors of a building, there may be problems relating to water drainage,
causing the washing machine to fill with water and drain continuously. Special anti-
draining valves are available in shops and help to prevent this inconvenience.
• The wash cycle does not include draining: some cycles require the draining
process to be enabled manually.
• The EASY IRON option is enabled: To complete the wash cycle, press the
START/PAUSE button (see “Wash cycles and options”).
• The drain hose is bent (see “Installation”).
• The drainage duct is clogged.
• The drum was not unlocked correctly during installation (see “Installation”).
• The washing machine is not level (see “Installation”).
• The washing machine is trapped between cabinets and walls (see “Installation”).
• The water inlet hose is not screwed on properly (see “Installation”).
• The detergent dispenser drawer is blocked (for cleaning instructions, see “Care
and maintenance”).
• The drain hose is not fixed properly (see “Installation”).
• Switch off the machine and unplug it, wait for approximately 1 minute and then
switch it back on again.
If the problem persists, contact the Technical Assistance Service.
• The detergent is not suitable for machine washing (it should display the text “for
washing machines” or “hand and machine wash”, or the like).
• Too much detergent was used.

12
GB
Service
Before contacting the Technical Assistance Service:
• Check whether you can solve the problem alone (see “Troubleshooting”).
• Restart the wash cycle to check whether the problem has been solved.
• If this is not the case, contact an authorised Technical Assistance Centre.
! Always request the assistance of authorised technicians.
Have the following information to hand:
• the type of problem;
• the appliance model (Mod.);
• the serial number (S/N).
This information can be found on the data plate applied to the rear of the washing machine, and can also be found on the
front of the appliance by opening the door.

13
SK
Slovensky
SK
PRÁČKA
Obsah
Inštalácia, 14-15
Rozbalenie a vyrovnanie do vodorovnej polohy
Pripojenie k elektrickej a k vodovodnej sieti
Prvý prací cyklus
Technické údaje
Údržba a starostlivosť, 16
Uzavretie prívodu vody a vypnutie elektrického napájania
Čistenie práčky
Čistenie dávkovača pracích prostriedkov
Starostlivosť o dvierka a bubon
Čistenie čerpadla
Kontrola prítokovej hadice na vodu
Opatrenia a rady, 17
Základné bezpečnostné pokyny
Likvidácia
Popis práčky, 18-19
Ovládací panel
Displej
Ako vykonať prací cyklus, 20
Programy a voliteľné funkcie, 21
Tabuľka pracích programov
Voliteľné funkcie prania
Pracie prostriedky a prádlo, 22
Dávkovač pracích prostriedkov
Príprava prádla
Špeciálne programy
Poruchy a spôsob ich odstránenia, 23
Servisná služba, 24
PWSE 61070 W
Návod na použitie

14
SK
Inštalácia
Dokonalé vyrovnanie do vodorovnej polohy
zabezpečí stabilitu zariadenia a zamedzí
vzniku vibrácií a hluku počas činnosti.
V prípade inštalácie na podlahovú krytinu
alebo na koberec, nastavte nožičky tak, aby
pod práčkou zostal dostatočný voľný priestor
na ventiláciu.
Pripojenie k elektrickej
a k vodovodnej sieti
Pripojenie prítokovej hadice vody
1. Pripojte
prívodnú hadicu jej
zaskrutkovaním ku
kohútiku so studenou
vodou, s hrdlom so
závitom 3/4” (viď
obrázok).
Pred pripojením
hadice nechajte
vodu odtiecť, až kým
nebude číra.
2. Pripojte prítokovú
hadicu k pračke, jej
zaskrutkovaním k
príslušnej prípojke na
vodu, umiestnenej
vpravo hore (viď
obrázok).
3. Zabezpečte, aby hadica nebola príliš
ohnutá alebo stlačená.
! Tlak v rozvode vody sa musí pohybovať
v rozmedzí hodnôt uvedených v tabuľke s
technickými údajmi (viď vedľajšia strana).
! V prípade, že dĺžka prítokovej hadice
nebude dostatočná, obráťte sa na
špecializovanú predajňu alebo na
autorizovaný technický personál.
! Nikdy nepoužívajte už použité hadice.
! Používajte hadice z príslušenstva
zariadenia.
! Je veľmi dôležité uschovať tento návod
kvôli prípadnému ďalšiemu použitiu.
V prípade predaja, darovania alebo
presťahovania práčky sa uistite, že zostane
uložený v jej blízkosti, aby mohol poslúžiť
novému majiteľovi pri oboznámení sa
s činnosťou a s príslušnými upozorneniami.
! Pozorne si prečítajte uvedené pokyny:
obsahujú dôležité informácie, týkajúce sa
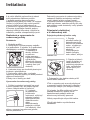
inštalácie, použitia a bezpečnosti pri práci.
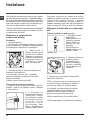
Rozbalenie a vyrovnanie do
vodorovnej polohy
Rozbalenie
1. Rozbaľte práčku.
2. Skontrolujte, či počas prepravy nedošlo
k jej poškodeniu. V prípade, že je poškodená,
nezapájajte ju a obráťte sa na predajcu.
3. Odstráňte 4
skrutky slúžiace
na ochranu
počas prepravy
a gumovú podložku
s príslušným
dištančným členom,
ktoré sa nachádzajú
v zadnej časti (viď
obrázok).
4. Uzatvorte otvory po skrutkách plastovými
krytkami z príslušenstva.
5. Uschovajte všetky diely: v prípade
opätovnej prepravy práčky ich bude potrebné
opätovne namontovať.
! Obaly nie sú hračky pre deti!
Vyrovnanie do vodorovnej polohy
1. Práčku je potrebné umiestniť na rovnú
a pevnú podlahu tak, aby nebola opretá
o stenu, nábytok alebo o niečo iné.
2. V prípade,
že podlaha nie
je dokonale
vodorovná, môžu byť
prípadné rozdiely
vykompenzované
odskrutkovaním
alebo
zaskrutkovaním
predných nožičiek
(viď obrázok); Uhol
sklonu, nameraný na pracovnej ploche,
nesmie presiahnuť 2°.

15
SK
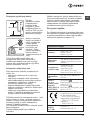
Pripojenie vypúšťacej hadice
Pripojte
vypúšťaciu hadicu
k odpadovému
potrubiu alebo
k odpadu v stene,
nachádzajúcom sa
od 65 do 100 cm nad
zemou; jednoznačne
zamedzte jej ohybu.
alebo ju uchyťte k
okraju umývadla či
vane, a pripevnite
vodiaci držiak
z príslušenstva
ku kohútu (viď
obrázok). Voľný
koniec vypúšťacej
hadice nesmie
zostať ponorený do
vody.
! Použitie predlžovacích hadíc sa
neodporúča; ak je však nevyhnutné,
predlžovacia hadica musí mať rovnaký
priemer ako originálna hadica a jej dĺžka
nesmie presiahnuť 150 cm.
Pripojenie k elektrickej sieti
Pred zasunutím zástrčky do zásuvky sa
uistite, že:
• zásuvka je uzemnená a že vyhovuje
normám;
• zásuvka je schopná uniesť maximálnu
záťaž odpovedajúcu menovitému príkonu
zariadenia, uvedenému v tabuľke s
technickými údajmi (viď vedľa);
• hodnota napájacieho napätia odpovedá
údajom uvedeným v tabuľke s technickými
údajmi (viď vedľa);
• zásuvka je kompatibilná so zástrčkou
práčky. V opačnom prípade je potrebné
vymeniť zásuvku alebo zástrčku.
! Práčka nesmie byť umiestnená vonku – pod
holým nebom, a to ani v prípade, keby sa
jednalo o miesto chránené pred nepriazňou
počasia, pretože je veľmi nebezpečné
vystaviť ju dažďu a búrkam.
! Po ukončení inštalácie musí zásuvka zostať
ľahko prístupná.
! Nepoužívajte predlžovacie káble a
rozvodky.
65 - 100 cm
! Kábel nesmie byť ohnutý alebo pritlačený.
! Výmena kábla musí byť zverená výhradne
autorizovanému technickému personálu.
Upozornenie! Výrobca neponesie žiadnu
zodpovednosť za následky spôsobené
nerešpektovaním týchto pokynov.
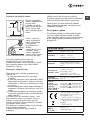
Prvý prací cyklus
Po inštalácii zariadenia je potrebné ešte pred
jeho použitím vykonať jeden skúšobný cyklus
s pracím prostriedkom a bez náplne prádla,
nastavením pracieho programu 2.
Technické údaje
Model PWSE 61070 W
Rozmery
šírka 59,5 cm
výška 85 cm
håbka 44,5 cm
Kapacita od 1 do 6 kg
Elektrické
zapojeni
Vid štítok s technickými
údajmi, aplikovaný na za-
riadení.
Pripojenie k
rozvodu vody
maximálny tlak
1 MPa (10 bar)
maximálny tlak
0,05 MPa (0.5 bar)
kapacita bubna 40 litrov
Rýchlos±z
odstreïova-
nia
a±z do 1000 otáèok za
minútu
Kontro-
lné pro-
gramy podľa
smerníc
1061/2010 a
1015/2010
program
;
štandardné programy pre
bavlnu 60°C.
program ;
štandardné programy pre
bavlnu 40°C.
Toto zariadenie je v zhode
s nasledujúcimi smernica-
mi Európskej únie:
- 2004/108/CE (Elektro-
magnetická kompatibilita)
- 2006/95/CE (Nízke
napätie)
- 2002/96/CE
Hluènost¡
(dB(A)
re 1 pW
Pranie: 51
Odstreïovanie: 71

16
SK
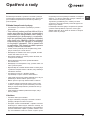
Údržba a starostlivosť
Uzavretie prívodu vody a vypnutie
elektrického napájania
• Po každom praní uzatvorte prívod vody.
Týmto spôsobom sa znižuje opotrebenie
rozvodu vody zariadenia a znižuje sa
nebezpečenstvo úniku vody.
• Pred zahájením čistenia práčky a počas
údržby je potrebné vytiahnuť zástrčku
prívodného kábla zo zásuvky.
Čistenie práčky
Vonkajšie časti a časti z gumy môžu byť
čistené utierkou navlhčenou vo vlažnej vode
a saponáte. Nepoužívajte rozpúšťadlá alebo
abrazívne prostriedky.
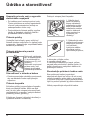
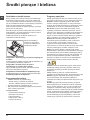
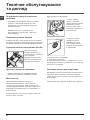
Čistenie dávkovača pracích
prostriedkov
Dávkovač vytiahnete
tak, že stlačíte páčku
(1) a potiahnete ho
smerom von (2) (viď
obrázok).
Dávkovač umyte pod
prúdom vody; toto
čistenie je potrebné
vykonávať pravidelne.
Starostlivosť o dvierka a bubon
• Dvierka ponechajte zakaždým pootvorené,
aby sa zabránilo tvorbe nepríjemných
zápachov.
Čistenie čerpadla
Súčasťou práčky je samočistiace čerpadlo,
ktoré nevyžaduje údržbu. Môže sa však
stať, že sa v jeho vstupnej ochrannej časti,
nachádzajúcej na spodku, zachytia drobné
predmety (mince, gombíky).
! Uistite sa, že prací cyklus bol ukončený a
vytiahnite zástrčku zo zásuvky.
2
1
1
2
3
Prístup k vstupnej časti čerpadla:
1. Odložte krycí
panel na prednej
strane zariadenia
zatlačením na jeho
stred a následným
zatlačením smerom
nadol z obidvoch
strán a potom ho
vytiahnite (viď
obrázky).
2. Odskrutkujte veko
otáčaním proti smeru
hodinových ručičiek
(viď obrázok):
vytečenie malého
množstva vody je
úplne bežným javom;
3. dokonale vyčistite vnútro;
4. nasaďte naspäť veko;
5. namontujte naspäť krycí panel, pričom
sa pred jeho prisunutím k práčke uistite, že
došlo k správnemu zachyteniu háčikov do
príslušných otvorov.
Skontrolujte prítokovú hadicu vodu
Stav prítokovej hadice je potrebné
skontrolovať aspoň raz ročne. Ak sú na nej
viditeľné praskliny alebo trhliny, je potrebné
ju vymeniť: silný tlak v hadici počas pracieho
cyklu by mohol spôsobiť jej náhle roztrhnutie.
! Nikdy nepoužívajte už použité hadice.

17
SK
Opatrenia a rady
! Práčka bola navrhnutá a vyrobená v súlade s platnými
medzinárodnými bezpečnostnými predpismi. Tieto
upozornenia sú uvádzané z bezpečnostných dôvodov a
je potrebné si ich pozorne prečítať.
Základné bezpečnostné pokyny
• Toto zariadenie bolo navrhnuté výhradne na použitie
ako spotrebič.
• Toto zariadenie smú používať deti od 8
rokov, osoby náležite vyškolené ohľadne
bezpečného použitia zariadenia, ktoré
si uvedomujú súvisiace nebezpečenstvo
a v prípade dozoru aj osoby so
zníženými fyzickými, senzorickými alebo
duševnými schopnosťami alebo osoby
s nedostatočnými skúsenosťami a
znalosťami. Deti sa so zariadením nesmú
hrať. Operácie údržby a čistenia nesmú
vykonávať deti bez dohľadu.
• Práčku môžu používať len dospelé osoby, podľa
pokynov uvedených v tomto návode.
• Nedotýkajte sa zariadenia bosí, alebo v prípade, keď
máte mokré ruky alebo nohy.
• Nevyťahujte zástrčku zo zásuvky ťahaním za kábel,
ale uchopením za zástrčku.
• Neotvárajte dávkovač pracích prostriedkov počas
činnosti zariadenia.
• Nedotýkajte sa odčerpávanej vody, pretože môže mať
veľmi vysokú teplotu.
• V žiadnom prípade sa nepokúšajte o násilné otvorenie
dvierok: mohlo by dôjsť k poškodeniu bezpečnostného
uzáveru, ktorý zabraňuje náhodnému otvoreniu.
• Pri výskyte poruchy sa v žiadnom prípade nepokúšajte
o opravu vnútorných častí zariadenia.
• Vždy majte pod kontrolou deti a zabráňte tomu, aby sa
približovali k zariadeniu počas pracieho cyklu.
• Počas pracieho cyklu majú dvierka tendenciu
zohrievať sa.
• Ak je potrebné ju presunúť, je dobré poveriť dve alebo
tri osoby a vykonať to s maximálnou pozornosťou.
Nikdy sa nepokúšajte zariadenie premiestňovať sami,
pretože je veľmi ťažké.
• Pred zahájením vkladania prádla skontrolujte, či je
bubon prázdny.
Likvidácia
• Likvidácia obalových materiálov:
pri ich odstránení postupujte v súlade s miestnymi
predpismi a dbajte na možnú recykláciu.
• Európska smernica 2002/96/ES o odpade tvorenom
elektrickými a elektronickými zariadeniami
predpokladá, že elektrospotrebiče nesmú byť
likvidované v rámci bežného pevného komunálneho
odpadu. Vyradené zariadenia musia byť zozbierané
osobitne za účelom zvýšenia počtu recyklovaných
a znovu použitých materiálov, z ktorých sa skladajú
a zabráneniu možných ublížení na zdraví a škôd na
životnom prostredí.
Symbolom je preškrtnutý kôš uvedený na všetkých
výrobkoch, s cieľom pripomenúť povinnosti spojené so
separovaným zberom.
Podrobnejšie informácie týkajúce sa správneho
spôsobu vyradenia elektrospotrebičov z prevádzky
môžu ich držitelia získať od poverenej verejnej
inštitúcie alebo na predajcu.

18
SK
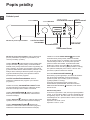
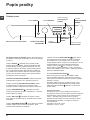
Popis práčky
Ovládací panel
Tlačidlo TEPLOTA
OTOČNÝ OVLÁDAČ
PROGRAMOV
Dávkovač pracích prostriedkov
Tlačidlo ON/OFF
Tlačidlo
ODSTREĎOVANIE
Tlačidlo a kontrolka
START/PAUSE
DISPLEJ
Tlačidlo
ONESKORENÝ ŠTART
Tlačidlá a kontrolky
VOLITEĽNÝCH FUNKCIÍ
Kontrolka
ZABLOKOVANÉ
DVIERKA
Dávkovač pracích prostriedkov: slúži na dávkovanie
pracích prostriedkov a prídavných prostriedkov (viď
“Pracie prostriedky a prádlo”).
Tlačidlo ON/OFF : krátke stlačenie tohto tlačidla slúži
na zapnutie alebo vypnutie práčky. Kontrolka START/
PAUSE, ktorá pomaly bliká modrou farbou signalizuje, že
stroj je zapnutý. Ak chcete vypnúť práčku počas prania,
je potrebné držať tlačidlo stlačené dlhšie, približne 3 sek.;
krátkym alebo náhodným stlačením práčku nevypnete.
Vypnutie zariadenia počas prania spôsobí zrušenie
prebiehajúceho pracieho programu.
OTOČNÝ OVLÁDAČ PROGRAMOV: Slúži na
nastavenie požadovaného programu (viď “Tabuľka
programov”).
Tlačidlá a kontrolky VOLITEĽNÝCH FUNKCIÍ: Slúžia
na voľbu jednotlivých ponúknutých voliteľných funkcií.
Kontrolka zvolenej funkcie zostane rozsvietená.
Tlačidlo ODSTREĎOVANIE : Stlačte pre zníženie
alebo úplné vyradenie odstreďovania; hodnota bude
uvedená na displeji.
Tlačidlo TEPLOTA : Stlačte pre zníženie alebo úplné
vyradenie ohrevu; hodnota bude uvedená na displeji.
Tlačidlo ONESKORENÝ ŠTART : Stlačte kvôli
nastaveniu oneskoreného štartu zvoleného programu;
nastavené oneskorenie bude zobrazené na displeji.
Tlačidlo a kontrolka START/PAUSE : Keď modrá
kontrolka začne pomaly blikať, stlačte toto tlačidlo,
aby ste spustili pranie. Po zahájení cyklu sa kontrolka
rozsvieti stálym svetlom. Ak chcete pranie prerušiť,
opätovne stlačte toto tlačidlo; kontrolka bude blikať
jantárovým svetlom. Ak symbol nie je rozsvietený,
bude možné otvoriť dvierka (vyčkajte približne 3 minúty).
Pre opätovné zahájenie prania z bodu, v ktorom bolo
prerušené, opätovne stlačte toto tlačidlo.
Kontrolka ZABLOKOVANÉ DVIERKA :
Rozsvietený symbol signalizuje, že dvierka sú zaistené.
Aby sa dvierka nepoškodili, pred ich otvorením je
potrebné vyčkať, kým uvedený symbolu nezhasne
(vyčkajte približne 3 minúty).
Ak chcete otvoriť dvierka počas pracieho cyklu,
stlačte tlačidlo START/PAUSE; keď bude kontrolka
ZABLOKOVANÉ DVIERKA zhasnutá, bude možné
dvierka otvoriť.
Pohotovostný režim
Po skoncení cyklu alebo v case, ked nie je spustený žiaden
cyklus, po 30 minútach dôjde k vypnutiu zariadenia kvôli
energetickej úspore. Na obnovenie cinnosti zariadenia,
nachádzajúceho sa v pohotovostnom režime, stací stlacit
tlacidlo ON/OFF.
Spotreba v off-mode: 0,5 W
Spotreba v Left-on: 0,5 W

19
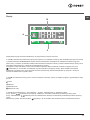
SK
Displej
B
C
A
Displej slúži na programovanie zariadenia a na poskytovanie mnohých informácií.
V časti A je zobrazovaná doba trvania rôznych programov a po zahájení činnosti aj doby zostávajúcej do jeho ukončenia;
v prípade nastavenia ONESKORENÝ ŠTART bude zobrazená doba zostávajúca do zahájenia zvoleného programu.
Okrem toho, pri stlačení príslušného tlačidla budú zobrazené maximálne hodnoty rýchlosti odstreďovania a teploty, ktoré
zariadenie môže dosiahnuť, v závislosti od nastaveného programu.
Presýpacie hodiny budú blikať vo fáze, keď zariadenie spracúva údaje na základe zvoleného programu a úrovne
. Maximálne po 10 minútach od zahájenia programu prestanú “presýpacie hodiny” blikať a dôjde k zobrazeniu
denitívneho zvyšného času. Ikona presýpacích hodín prestane byť zobrazovaná približne po uplynutí 1 minúty od
zobrazenia denitívneho zvyšného času.
V časti B sú zobrazované “fázy prania”, ktoré sú súčasťou zvoleného cyklu a po zahájení programu aj prebiehajúce “fázy
prania”:
Pranie
Plákanie
Odstreďovanie
Odčerpanie vody
V časti C sa nachádzajú ikony – zľava doprava – “teplota”, “odstreďovanie” a “Oneskorený štart”.
Pruhy “teplota” znázorňujú úroveň teploty vzhľadom k maximálnej nastaviteľnej hodnote pre daný cyklus.
Pruhy “odstreďovanie” znázorňujú úroveň odstreďovania vzhľadom k maximálnej nastaviteľnej hodnote pre daný
cyklus.
Rozsvietený symbol “Oneskorený štart” signalizuje , že na zariadení bola zvolená funkcia “Oneskoreného štartu”.

20
SK
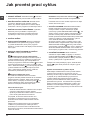
Ako vykonať prací cyklus
1. ZAPNUTIE ZARIADENIA. Stlačte tlačidlo ;
kontrolka START/PAUSE bude pomaly blikať modrým
svetlom.
2. NAPLŇTE PRÁČKU PRÁDLOM. Otvorte dvierka.
Naplňte práčku prádlom pričom dbajte, aby nedošlo
k prekročeniu množstva náplne, uvedeného v tabuľke
programov na nasledujúcej strane.
3. NAPLŇTE DÁVKOVAČ PRACÍCH PROSTRIEDKOV.
Vytiahnite dávkovač pracích prostriedkov a naplňte
prací prostriedok do príslušných priehradiek,
spôsobom vysvetleným v časti “Pracie prostriedky a
prádlo”.
4. ZATVORTE DVIERKA.
5. ZVOĽTE PRACÍ PROGRAM. Otočným ovládačom
PROGRAMOV zvoľte požadovaný program; teplotu
a rýchlosť odstreďovania pre zvolený je možné meniť.
Na displeji sa zobrazí doba trvania cyklu.
6. NASTAVTE PRACÍ PROGRAM PODĽA VAŠICH
POTRIEB. Použite príslušné tlačidlá:
Zmeňte teplotu a/alebo rýchlosť
odstreďovania. Zariadenie automaticky zobrazuje
maximálnu teplotu a rýchlosť odstreďovania pre
nastavený program alebo posledné zvolené hodnoty,
ak sú vhodné pre zvolený program. Stlačením tlačidla
je možné postupne znížiť teplotu prania až po
pranie v studenej vode “OFF”. Stlačením tlačidla je
možné postupne znížiť rýchlosť odstreďovania až po
jeho úplné vylúčenie “OFF”. Ďalšie stlačenie tlačidiel
obnoví nastavenie maximálnych prednastavených
hodnôt.
Nastavenie oneskoreného štartu.
Pre nastavenie oneskoreného štartu zvoleného
programu stláčajte príslušné tlačidlo, až kým
nenastavíte požadovanú dobu oneskorenia. Keď je
táto funkcia zvolená, na displeji sa rozsvieti symbol
. Na zrušenie oneskoreného štartu je potrebné stláčať
tlačidlo, až kým sa na displeji nezobrazí symbol
“OFF”.
Zmena vlastností cyklu.
• Stlačte tlačidlo za účelom aktivácie voliteľnej
funkcie; rozsvieti sa príslušná kontrolka.
• Opätovným stlačením môžete zvolenú voliteľnú
funkciu zrušiť; príslušná kontrolka zhasne.
! V prípade, že zvolená voliteľná funkcia nie je
kompatibilná s nastaveným pracím programom,
kontrolka začne blikať a voliteľná funkcia nebude
aktivovaná.
! Ak zvolená funkcia nie je kompatibilná s niektorou
už nastavenou voliteľnou funkciou, kontrolka prvej
zvolenej funkcie bude blikať a bude aktivovaná len
druhá; kontrolka zvolenejfunkcie sa rozsvieti.
Poznámka: Ak je zvolená funkcia , akákoľvek
ďalšia nekompatibilná funkcia nebude môcť byť
aktivovaná.
! Voliteľné funkcie môžu zmeniť uvedenú náplň a/
alebo dobu trvania daného cyklu.
7. SPUSŤTE PROGRAM. Stlačte tlačidlo START/
PAUSE. Príslušná kontrolka sa rozsvieti stálym
modrým svetlom a dôjde k zablokovaniu dvierok
(rozsvieti sa symbol ZABLOKOVANÉ DVIERKA ). Ak
chcete zmeniť program počas prebiehajúceho cyklu,
aktivujte prerušenie cyklu práčky stlačením tlačidla
START/PAUSE (kontrolka START/PAUSE bude
blikať jantárovým svetlom); potom zvoľte požadovaný
program a znovu stlačte tlačidlo START/PAUSE.
Ak chcete otvoriť dvierka počas pracieho cyklu,
stlačte tlačidlo START/PAUSE; keď bude kontrolka
ZABLOKOVANÉ DVIERKA zhasnutá, bude
možné otvoriť dvierka (vyčkajte približne 3 minúty).
Opätovným stlačením tlačidla START/PAUSE
opätovne uveďte do činnosti prací program z bodu, v
ktorom bol prerušený.
8. UKONČENIE PROGRAMU. Bude signalizované
zobrazením nápisu “END” na displeji a po zhasnutí
symbolu ZABLOKOVANÉ DVIERKA bude možné
otvoriť dvierka (vyčkajte približne 3 minúty). Otvorte
dvierka, vyložte prádlo a vypnite zariadenie.
! Ak si želáte zrušiť už zahájený cyklus, stlačte dlhšie
tlačidlo . Cyklus bude prerušený a dôjde k vypnutiu
zariadenia.
Systém automatického vyváženia náplne
Pred každým odstreďovaním bubon vykoná otáčanie
rýchlosťou o málo prevyšujúcou rýchlosť prania, aby
sa tak odstránili vibrácie a aby sa náplň rovnomerne
rozložila. V prípade, že po niekoľko násobných pokusoch
o vyváženie prádlo ešte nebude správne vyvážené,
zariadenie vykoná odstreďovanie nižšou rýchlosťou,
ako je prednastavená rýchlosť. Ak je práčka nadmerne
nevyvážená, vykoná namiesto odstreďovania vyváženie.
Za účelom dosiahnutia rovnomernejšieho rozloženia
náplne a jej správneho vyváženia, odporúča sa pomiešať
veľké a malé kusy prádla.
Strona się ładuje...
Strona się ładuje...
Strona się ładuje...
Strona się ładuje...
Strona się ładuje...
Strona się ładuje...
Strona się ładuje...
Strona się ładuje...
Strona się ładuje...
Strona się ładuje...
Strona się ładuje...
Strona się ładuje...
Strona się ładuje...
Strona się ładuje...
Strona się ładuje...
Strona się ładuje...
Strona się ładuje...
Strona się ładuje...
Strona się ładuje...
Strona się ładuje...
Strona się ładuje...
Strona się ładuje...
Strona się ładuje...
Strona się ładuje...
Strona się ładuje...
Strona się ładuje...
Strona się ładuje...
Strona się ładuje...
Strona się ładuje...
Strona się ładuje...
Strona się ładuje...
Strona się ładuje...
Strona się ładuje...
Strona się ładuje...
Strona się ładuje...
Strona się ładuje...
Strona się ładuje...
Strona się ładuje...
Strona się ładuje...
Strona się ładuje...
-
 1
1
-
 2
2
-
 3
3
-
 4
4
-
 5
5
-
 6
6
-
 7
7
-
 8
8
-
 9
9
-
 10
10
-
 11
11
-
 12
12
-
 13
13
-
 14
14
-
 15
15
-
 16
16
-
 17
17
-
 18
18
-
 19
19
-
 20
20
-
 21
21
-
 22
22
-
 23
23
-
 24
24
-
 25
25
-
 26
26
-
 27
27
-
 28
28
-
 29
29
-
 30
30
-
 31
31
-
 32
32
-
 33
33
-
 34
34
-
 35
35
-
 36
36
-
 37
37
-
 38
38
-
 39
39
-
 40
40
-
 41
41
-
 42
42
-
 43
43
-
 44
44
-
 45
45
-
 46
46
-
 47
47
-
 48
48
-
 49
49
-
 50
50
-
 51
51
-
 52
52
-
 53
53
-
 54
54
-
 55
55
-
 56
56
-
 57
57
-
 58
58
-
 59
59
-
 60
60


Indesit PWSE 61070 W (EU) instrukcja
- Kategoria
- Pralki
- Typ
- instrukcja
w innych językach
- slovenčina: Indesit PWSE 61070 W (EU) Užívateľská príručka