
Thiny Snake K
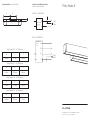
OTWORY MONTAŻOWE • MOUNTING HOLES
ON/OFF 22.21XX.JXX.XXX
DALI 22.21XX.TXX.XXX
CHORS
SCHEMATY PODŁĄCZEŃ ELEKTRYCZNYCH
ELECTRICAL WIRING DIAGRAMS
SOŁTYSOWICKA 19C | 51-168 WROCŁAW | POLAND
T: +48 71 323 14 00-01 | W: CHORS.PL
230 V
50 Hz
L
N
+
-
Zasilacz LED
LED Power
supply
D+
D-
L
N
D+
D-
230 V
50 Hz
L
N
L
N
+
-
Zasilacz LED
LED Power
supply
Thiny Snake K 60 22.2111.xxx.xxx
W
100 mm
X
97 mm
Y
187 mm
Thiny Snake K 90 22.2112.xxx.xxx
W
100 mm
X
250 mm
Y
490 mm
Thiny Snake K 120 22.2113.xxx.xxx
W
100 mm
X
250 mm
Y
490 mm
Thiny Snake K 150 22.2114.xxx.xxx
W
200 mm
X
350 mm
Y
790 mm
WX
5555 Y
20

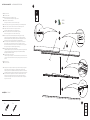
1. PL • Wyłącz zasilanie.
EN • Turn o the power.
2. PL • Wkręć kołki rozporowe i śruby (A) w ścianę
(schemat otworów montażowych na drugiej stronie).
EN • Attach the screws (A) and dowels
(mounting holes scheme on the other side of the page).
3. PL • Zamocuj lampę do ściany przy pomocy śrub (A). Użyj klucza oczkowego SW 5,5.
EN • Fasten the lamp to the wall with screws (A). Use the SW 5.5 ring wrench.
4. PL • Podłącz zasilanie 230V do zasilacza. Pamiętaj o uziemieniu
(schematy podłączeń elektrycznych na drugiej stronie).
EN • Connect the 230V power to the driver. Remember to ground
(electrical wiring diagrams on the other side of the page).
5. PL • Wciśnij listwę z modułem LED do obudowy. Zwróć uwagę, aby listwa była
umiejscowiona równolegle do obudowy. Uważaj, aby nie zgnieść diod. W celu
demontażu odbłyśnika należy podważyć listwę płaskim śrubokrętem w miejscu
frezowania opierając narzędzie o zabezpieczoną krawędź obudowy.
EN • Push the strip with the LED module into the housing. Make sure that the bar is
placed parallel to the housing. Be careful not to crush the LEDs. In order to
disassemble the reflector, lift the strip with a flat screwdriver at the milling point,
leaning the tool against the protected edge of the housing.
6. PL • Wmontuj przesłonę źródła światła do odbudowy:
1. W połowie długości lampy wcisnąć koniec przesłony do profilu, a następnie wsunąć.
2. Docisnąć drugi koniec przesłony. Aby wyciągnąć, należy delikatnie podważyć
plastikowym przedmiotem i wysunąć.
EN • Install the diffuser in the luminaire:
1. Half the length of the lamp press the end of the diffuser to profile, and then insert.
2. Press the other end of the diffuser To pull out, gently pry with a plastic object and
push out.
7. PL • Włącz zasilanie.
EN • Turn on the power.
* PL • Załączony zestaw narzędzi jest przeznaczony do materiałów pełnych (cegła pełna,
drewno, beton, gazobeton) i powierzchni z płyt gipsowo-kartonowych. Kołek
rozporowy powinien zostać odpowiednio dopasowany do powierzchni montażowej.
Prawidłowe użycie kołka wpływa na bezpieczeństwo oraz wytrzymałość konstrukcji.
EN • The enclosed tool kit is designed for solid materials (solid brick, wood, concrete,
aerated concrete) and gypsum board surfaces. The dowel should be properly
matched to the mounting surface. Proper use of the dowel aects the safety and
strength of the structure.
2x 2x
1
7
~230V
50Hz
4
2
3
4
6
5
AA
A
[klik!]
1.
2.
A
INSTRUKCJA MONTAŻU • ASSEMBLY INSTRUCTIONS
NARZĘDZIA • TOOLS
-
 1
1
-
 2
2

