Electrolux EC4200AOW1 Instrukcja obsługi
- Kategoria
- Zamrażarki
- Typ
- Instrukcja obsługi


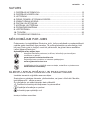
CONTENTS
1. SAFETY INFORMATION....................................................................................3
2. SAFETY INSTRUCTIONS..................................................................................4
3. OPERATION.......................................................................................................6
4. BEFORE FIRST USE......................................................................................... 7
5. DAILY USE.........................................................................................................7
6. HINTS AND TIPS............................................................................................... 8
7. CARE AND CLEANING......................................................................................8
8. TROUBLESHOOTING........................................................................................9
9. INSTALLATION................................................................................................ 12
10. NOISES.......................................................................................................... 13
11. TECHNICAL INFORMATION......................................................................... 14
WE’RE THINKING OF YOU
Thank you for purchasing an Electrolux appliance. You’ve chosen a product that
brings with it decades of professional experience and innovation. Ingenious and
stylish, it has been designed with you in mind. So whenever you use it, you can
be safe in the knowledge that you’ll get great results every time.
Welcome to Electrolux.
Visit our website for:
Get usage advice, brochures, trouble shooter, service information:
www.electrolux.com/webselfservice
Register your product for better service:
www.registerelectrolux.com
Buy Accessories, Consumables and Original spare parts for your appliance:
www.electrolux.com/shop
CUSTOMER CARE AND SERVICE
Always use original spare parts.
When contacting our Authorised Service Centre, ensure that you have the
following data available: Model, PNC, Serial Number.
The information can be found on the rating plate.
Warning / Caution-Safety information
General information and tips
Environmental information
Subject to change without notice.
www.electrolux.com2

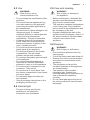
1. SAFETY INFORMATION
Before the installation and use of the appliance, carefully
read the supplied instructions. The manufacturer is not
responsible if an incorrect installation and use causes
injuries and damages. Always keep the instructions with
the appliance for future reference.
1.1 Children and vulnerable people safety
• This appliance can be used by children aged from 8
years and above and persons with reduced physical,
sensory or mental capabilities or lack of experience
and knowledge if they have been given supervision or
instruction concerning use of the appliance in a safe
way and understand the hazards involved.
• Do not let children play with the appliance.
• Cleaning and user maintenance shall not be made by
children without supervision.
• Keep all packaging away from children.
1.2 General Safety
• This appliance is intended to be used in household
and similar applications such as:
– Farm houses; staff kitchen areas in shops, offices
and other working environments
– By clients in hotels, motels, bed and breakfast and
other residential type environments
• Keep ventilation openings, in the appliance enclosure
or in the built-in structure, clear of obstruction.
• Do not use mechanical devices or other means to
accelerate the defrosting process, other than those
recommended by the manufacturer.
• Do not damage the refrigerant circuit.
• Do not use electrical appliances inside the food
storage compartments of the appliance, unless they
are of the type recommended by the manufacturer.
ENGLISH 3

• Do not use water spray and steam to clean the
appliance.
• Clean the appliance with a moist soft cloth. Only use
neutral detergents. Do not use abrasive products,
abrasive cleaning pads, solvents or metal objects.
• Do not store explosive substances such as aerosol
cans with a flammable propellant in this appliance.
• If the supply cord is damaged, it must be replaced by
the manufacturer, its service agent or similarly
qualified persons in order to avoid a hazard.
2. SAFETY INSTRUCTIONS
2.1 Installation
WARNING!
Only a qualified person must
install this appliance.
• Remove all the packaging.
• Do not install or use a damaged
appliance.
• Obey the installation instruction
supplied with the appliance.
• Always be careful when you move the
appliance because it is heavy. Always
wear safety gloves.
• Make sure the air can circulate
around the appliance.
• Wait at least 4 hours before
connecting the appliance to the power
supply. This is to allow the oil to flow
back in the compressor.
• Do not install the appliance close to
radiators or cookers, oven or hobs.
• The rear of the appliance must stand
against the wall.
• Do not install the appliance where
there is direct sunlight.
• Do not install this appliance in areas
that are too humid or too colds, such
as the construction appendices,
garages or wine cellars.
• When you move the appliance, lift it
by the front edge to avoid scratching
the floor.
2.2 Electrical connection
WARNING!
Risk of fire and electrical
shock.
• The appliance must be earthed.
• All electrical connections should be
made by a qualified electrician.
• Make sure that the electrical
information on the rating plate agrees
with the power supply. If not, contact
an electrician.
• Always use a correctly installed
shockproof socket.
• Do not use multi-plug adapters and
extension cables.
• Make sure not to cause damage to
the electrical components (e.g. mains
plug, mains cable, compressor).
Contact the Service or an electrician
to change the electrical components.
• The mains cable must stay below the
level of the mains plug.
• Connect the mains plug to the mains
socket only at the end of the
installation. Make sure that there is
access to the mains plug after the
installation.
• Do not pull the mains cable to
disconnect the appliance. Always pull
the mains plug.
www.electrolux.com4

2.3 Use
WARNING!
Risk of injury, burns,
electrical shock or fire.
• Do not change the specification of this
appliance.
• Do not put electrical appliances (e.g.
ice cream makers) in the appliance
unless they are stated applicable by
the manufacturer.
• Be careful not to cause damage to the
refrigerant circuit. It contains
isobutane (R600a), a natural gas with
a high level of environmental
compatibility. This gas is flammable.
• If damage occurs to the refrigerant
circuit, make sure that there are no
flames and sources of ignition in the
room. Ventilate the room.
• Do not let hot items to touch the
plastic parts of the appliance.
• Do not put soft drinks in the freezer
compartment. This will create
pressure on the drink container.
• Do not store flammable gas and liquid
in the appliance.
• Do not put flammable products or
items that are wet with flammable
products in, near or on the appliance.
• Do not touch the compressor or the
condenser. They are hot.
• Do not remove or touch items from
the freezer compartment if your hands
are wet or damp.
• Do not freeze again food that has
been thawed.
• Obey the storage instructions on the
packaging of frozen food.
2.4 Internal light
• The type of lamp used for this
appliance is not suitable for
household room illumination
2.5 Care and cleaning
WARNING!
Risk of injury or damage to
the appliance.
• Before maintenance, deactivate the
appliance and disconnect the mains
plug from the mains socket.
• This appliance contains hydrocarbons
in the cooling unit. Only a qualified
person must do the maintenance and
the recharging of the unit.
• Regularly examine the drain of the
appliance and if necessary, clean it. If
the drain is blocked, defrosted water
collects in the bottom of the
appliance.
2.6 Disposal
WARNING!
Risk of injury or suffocation.
• Disconnect the appliance from the
mains supply.
• Cut off the mains cable and discard it.
• Remove the door to prevent children
and pets to be closed inside of the
appliance.
• The refrigerant circuit and the
insulation materials of this appliance
are ozone-friendly.
• The insulation foam contains
flammable gas. Contact your
municipal authority for information on
how to discard the appliance
correctly.
• Do not cause damage to the part of
the cooling unit that is near the heat
exchanger.
ENGLISH 5

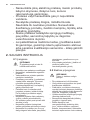
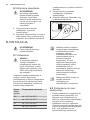
3. OPERATION
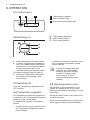
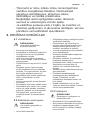
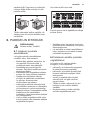
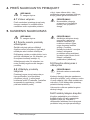
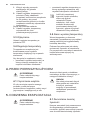
3.1 Control panel
21 3
1
Temperature regulator
2
Power indicator light
3
High temperature alarm light
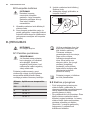
3.2 Switching on
B
C
A
A. Temperature Regulator
B. Half Loaded position
C. Full Loaded position
1. Insert the plug into the wall socket.
2. Turn the Temperature Regulator to
the Full Loaded position and let the
appliance run for 24 hours to allow
the correct temperature to be
reached before placing food inside.
The power indicator light will light up.
3. Adjust the Temperature Regulator
according to the quantity of the
stored foods.
3.3 Switching off
Turn the Temperature regulator to the
OFF position.
3.4 Temperature regulation
The temperature within the appliance is
controlled by the Temperature Regulator
situated on the control panel.
To operate the appliance, proceed as
follows:
• to obtain the minimum coldness, turn
the Temperature Regulator toward
lower settings.
• to obtain the maximum coldness. turn
the Temperature Regulator toward
higher settings.
In case of freezing less food
volumes, the Half Loaded
setting is the most suitable.
In case of freezing much
food volumes, the Full
Loaded setting is the most
suitable.
3.5 High temperature alarm
An increase in the temperature in the
freezer (for example due to an power
failure) is indicated by switching on of the
Alarm light
During the alarm phase, don't place food
inside the freezer.
When normal conditions are restored the
Alarm light will switch off automatically.
www.electrolux.com6

4. BEFORE FIRST USE
WARNING!
Refer to Safety chapters.
4.1 Cleaning the interior
Before using the appliance for the first
time, the interior and all internal
accessories should be washed with
lukewarm water and some neutral soap
to remove the typical smell of a brand-
new product, then dried thoroughly.
CAUTION!
Do not use detergents or
abrasive powders, as these
will damage the finish.
5. DAILY USE
WARNING!
Refer to Safety chapters.
5.1 Freezing fresh food
The freezer compartment is suitable for
freezing fresh food and storing frozen
and deep-frozen food for a long time.
The maximum amount of food that can
be frozen in 24 hours is specified on the
rating plate.
1)
The freezing process lasts 24 hours:
during this period do not add other food
to be frozen.
5.2 Storage of frozen food
When first starting-up or after a period
out of use, before putting the products in
the compartment let the appliance run at
least 24 hours Temperature Regulator to
the Full Loaded position.
CAUTION!
In the event of accidental
defrosting, for example due
to a power failure, if the
power has been off for
longer than the value shown
in the technical
characteristics chart under
"rising time", the defrosted
food must be consumed
quickly or cooked
immediately and then re-
frozen (after cooling).
5.3 Opening and closing the lid
CAUTION!
Never pull the handle with
immense force.
As the lid is equipped with a tightly
closing seal, it is not easy to reopen it
shortly after closing (due to the vacuum
formed inside). Wait for few minutes
before reopening the appliance.
The vacuum valve will help you to open
the lid.
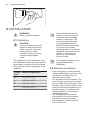
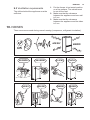
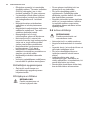
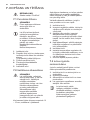
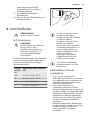
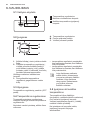
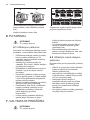
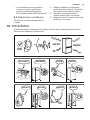
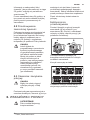
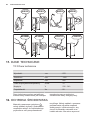
5.4 Storage baskets
Hang the baskets on the upper edge of
the freezer (A) or place them inside the
freezer (B). Turn and fix the handles for
these two positions as shown in the
picture.
A B
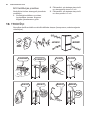
The following pictures show how many
baskets can be placed inside the various
freezer models.
The baskets will slide into each other.
1)
Refer to "Technical data"
ENGLISH 7

230
806606 946 1061
1201 1336 1611
You can purchase additional baskets
from your local Service Centre.
6. HINTS AND TIPS
WARNING!
Refer to Safety chapters.
6.1 Hints for freezing
To help you make the most of the
freezing process, here are some hints:
• The maximum quantity of food which
can be frozen in 24 hours is shown on
the rating plate.
• The freezing process takes 24 hours.
No further food to be frozen should be
added during this period.
• Freeze only top quality, fresh and
thoroughly cleaned foodstuffs.
• Prepare food in small portions to
enable it to be rapidly and completely
frozen and to make it possible
subsequently to thaw only the quantity
required.
• Wrap up the food in aluminium foil or
polythene and make sure that the
packages are airtight.
• Do not allow fresh, unfrozen food to
touch food which is already frozen,
thus avoiding a rise in temperature of
the latter.
• Lean foods store better and longer
than fatty ones; salt reduces the
storage life of food.
• Water ices, if consumed immediately
after removal from the freezer
compartment, can possibly cause the
skin to be freeze burnt.
• It is advisable to show the freezing in
date on each individual pack to
enable you to keep tab of the storage
time.
6.2 Hints for storage of frozen
food
To obtain the best performance from this
appliance, you should:
• make sure that the commercially
frozen foodstuffs were adequately
stored by the retailer;
• be sure that frozen foodstuffs are
transferred from the store to the
freezer in the shortest possible time;
• not open the lid frequently or leave it
open longer than absolutely
necessary.
• Once defrosted, food deteriorates
rapidly and cannot be refrozen.
• Do not exceed the storage period
indicated by the food manufacturer.
7. CARE AND CLEANING
WARNING!
Refer to Safety chapters.
7.1 Periodic cleaning
CAUTION!
Unplug the appliance before
carrying out any
maintenance operation.
www.electrolux.com8

Do not use detergents,
abrasive products, highly
perfumed cleaning products
or wax polishes to clean the
inner side of the appliance.
Prevent damage to the
cooling system.
There is no need to clean
the compressor area.
1. Switch off the appliance.
2. Regularly clean the appliance and
the accessories with warm water and
neutral soap.
Clean the lid seal carefully.
3. Fully dry the appliance.
4. Connect the mains plug to the mains
socket.
5. Switch on the appliance.
7.2 Defrosting the freezer
CAUTION!
Never use sharp metal tools
to scrape off frost as you
could damage the appliance.
Do not use a mechanical
device or any artificial
means to speed up the
thawing process other than
those recommended by the
manufacturer. A temperature
rise of the frozen food packs,
during defrosting, may
shorten their safe storage
life.
Defrost the freezer when the frost layer
reaches a thickness of about 10-15 mm.
The amount of frost on the walls of the
appliance will be increased by the high
level of the outer environment humidity
and if the frozen food is not wrapped
properly.
The best time to defrost the freezer when
it contains no or only a little food.
1. Switch off the appliance.
2. Remove any stored food, wrap it in
several layers of newspaper and put
it in a cool place.
3. Leave the lid open , remove the plug
from the defrost water drain and
collect all defrost water on a tray.
Use a scraper to remove ice quickly.
4. When defrosting is completed, dry
the interior thoroughly and refit the
plug.
5. Switch on the appliance.
6. Set the temperature regulator to
obtain the maximum coldness and
run the appliance for two or three
hours using this setting.
7. Reload the previously removed food
into the compartment.
7.3 Periods of non-operation
When the appliance is not in use for long
periods, take the following precautions:
1. Switch off the appliance and
disconnect the appliance from
electricity supply.
2. Remove all food
3. Defrost and clean the appliance and
all accessories.
4. Leave the lid open to prevent
unpleasant smells.
If the cabinet will be kept on,
ask somebody to check it
once in a while to prevent
the food inside from spoiling
in case of a power failure.
8. TROUBLESHOOTING
WARNING!
Refer to Safety chapters.
ENGLISH 9

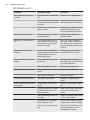
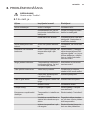
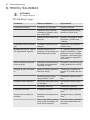
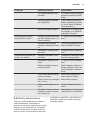
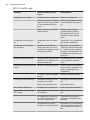
8.1 What to do if...
Problem Possible cause Solution
The appliance does not
operate.
The appliance is switched
off.
Switch on the appliance.
The mains plug is not con‐
nected to the mains socket
correctly.
Connect the mains plug to
the mains socket correctly.
There is no voltage in the
mains socket.
Connect to a different elec‐
trical mains socket. Con‐
tact a qualified electrician.
The appliance is noisy. The appliance is not sup‐
ported properly.
Check if the appliance
stands stable.
Audible or visual alarm is
on.
The cabinet has been re‐
cently switched on or the
temperature in the appli‐
ance is too high.
Refer to "High Tempera‐
ture Alarm" and if the prob‐
lem still occurs contact the
nearest Authorized Service
Centre.
Power indicator light is
flashing.
An error has occurred in
measuring the temperature
or the appliance is not
working properly.
Contact the nearest Au‐
thorized Service Centre.
The lid doesn't close com‐
pletely.
Food packages are block‐
ing the lid.
Arrange the packages in
the right way, see the stick‐
er in the appliance.
There is excessive frost. Eliminate excess frost.
The lid is difficult to open. The lid gaskets are dirty or
sticky.
Clean the lid gaskets.
The valve is blocked. Check the valve.
The lamp does not work. The lamp is defective. Refer to "Replacing the
lamp".
The compressor operates
continually.
Temperature is set incor‐
rectly.
Refer to "Operation" chap‐
ter.
Large quantities of food to
be frozen were put in at
the same time.
Wait some hours and then
check the temperature
again.
The room temperature is
too high.
Refer to climate class chart
on the rating plate.
Food placed in the appli‐
ance was too warm.
Allow food to cool to room
temperature before storing.
The lid is not closed prop‐
erly.
Check if the lid closes well
and the gaskets are un‐
damaged and clean.
www.electrolux.com10

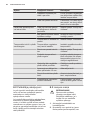
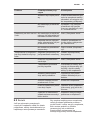
Problem Possible cause Solution
There is too much frost
and ice.
The lid is not closed cor‐
rectly or the gasket is de‐
formed/dirty.
Refer to "Closing the door".
The water drainage plug is
not correctly positioned.
Position the water drain‐
age plug in the correct
way.
Temperature is set incor‐
rectly.
Refer to "Operation" chap‐
ter.
The temperature in the ap‐
pliance is too low/too high.
The temperature regulator
is not set correctly.
Set a higher/lower temper‐
ature.
The door is not closed cor‐
rectly.
Refer to "Closing the door".
The products' temperature
is too high.
Let the product tempera‐
ture decrease to room tem‐
perature before storage.
Many products are stored
at the same time.
Store less products at the
same time.
The thickness of the frost
is greater than 4-5 mm.
Defrost the appliance.
The door has been opened
often.
Open the door only if nec‐
essary.
Products to be frozen are
placed too closely to each
other.
Make sure that there is
cold air circulation in the
appliance.
8.2 Customer Service
If your appliance is still not working
properly after making the above checks,
contact the nearest service centre.
To obtain fast service, it is essential that
when you apply for it you specify the
model and serial number of your
appliance which can be found either on
the guarantee certificate or on the rating
plate located on the external right side of
the appliance.
8.3 Replacing the lamp
WARNING!
Do not remove the lamp
cover at the time of
replacement. Do not operate
the freezer if the lamp cover
is damaged or missing.
1. Disconnect the mains plug from the
mains socket.
2. Replace the used lamp with a new
lamp of the same power and
specifically designed for household
appliances (the maximum power is
shown on the lamp cover).
3. Connect the mains plug to the mains
socket.
4. Open the lid. Make sure that the
lamp comes on.
ENGLISH 11

9. INSTALLATION
WARNING!
Refer to Safety chapters.
9.1 Positioning
CAUTION!
If you are discarding an old
appliance that has a lock or
catch on the lid, you must
ensure that it is made
unusable to prevent young
children being trapped
inside.
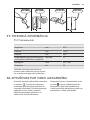
This appliance can be installed in a dry,
well ventilated indoor where the ambient
temperature corresponds to the climate
class indicated on the rating plate of the
appliance:
Climate
class
Ambient temperature
SN +10°C to + 32°C
N +16°C to + 32°C
ST +16°C to + 38°C
T +16°C to + 43°C
Some functional problems
might occur for some types
of models when operating
outside of that range. The
correct operation can only
be guaranteed within the
specified temperature range.
If you have any doubts
regarding where to install the
appliance, please turn to the
vendor, to our customer
service or to the nearest
Service Centre
The appliance shall have the
plug accessible after
installation.
9.2 Electrical connection
• Before plugging in, ensure that the
voltage and frequency shown on the
rating plate correspond to your
domestic power supply.
• The appliance must be earthed. The
power supply cable plug is provided
with a contact for this purpose. If the
domestic power supply socket is not
earthed, connect the appliance to a
separate earth in compliance with
current regulations, consulting a
qualified electrician.
• The manufacturer declines all
responsibility if the above safety
precautions are not observed.
• This appliance complies with the
E.E.C. Directives.
www.electrolux.com12

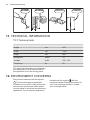
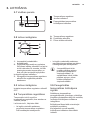
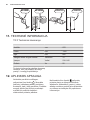
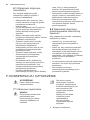
9.3 Ventilation requirements
The airflow behind the appliance must be
sufficient.
1. Put the freezer in horizontal position
on a firm surface. The cabinet must
be on all four feet.
2. Make sure that the clearance
between the appliance and rear wall
is 5 cm.
3. Make sure that the clearance
between the appliance and the sides
is 5 cm.
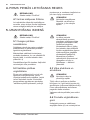
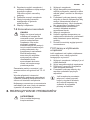
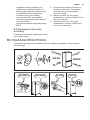
10. NOISES
There are some sounds during normal running (compressor, refrigerant circulation).
BRRR!
HISSS!
CLICK!
BLUBB!
CRACK!
SSSRR
R!
OK
CLICK!
CLICK!
SSSRRR!
SSSRRR!
BRRR!
BRRR!
HISSS!
HISSS!
ENGLISH 13

BLUBB!
BLUBB!
CRACK!CRACK!
11. TECHNICAL INFORMATION
11.1 Technical data
Height mm 876
Width mm 1325
Depth mm 665
Rising time Hours 31
Voltage Volts 230 - 240
Frequency Hz 50
The technical information are situated in
the rating plate on the external side of
the appliance and in the energy label.
12. ENVIRONMENT CONCERNS
Recycle the materials with the symbol
. Put the packaging in applicable
containers to recycle it. Help protect the
environment and human health and to
recycle waste of electrical and electronic
appliances. Do not dispose appliances
marked with the symbol with the
household waste. Return the product to
your local recycling facility or contact
your municipal office.
www.electrolux.com14

SATURS
1. DROŠĪBAS INFORMĀCIJA..............................................................................16
2. DROŠĪBAS NORĀDĪJUMI................................................................................17
3. LIETOŠANA......................................................................................................19
4. PIRMS PIRMĀS LIETOŠANAS REIZES.......................................................... 20
5. IZMANTOŠANA IKDIENĀ................................................................................ 20
6. PADOMI UN IETEIKUMI.................................................................................. 21
7. KOPŠANA UN TĪRĪŠANA.................................................................................22
8. PROBLĒMRISINĀŠANA.................................................................................. 23
9. UZSTĀDĪŠANA.................................................................................................25
10. TROKŠŅI........................................................................................................26
11. TEHNISKĀ INFORMĀCIJA............................................................................ 27
MĒS DOMĀJAM PAR JUMS
Pateicamies, ka iegādājāties Electrolux ierīci. Ierīces ražošanā un modernizēšanā
uzkrāta gadu desmitiem ilga pieredze. Tā radīta pārdomāta un mūsdienīga, tieši
kā jums. Katru reizi to lietojot, varat būt pārliecināti, ka gūsiet labus rezultātus.
Laipni lūdzam Electrolux!
Apmeklējiet mūsu mājas lapu:
Atradīsiet lietošanas padomus, brošūras, informāciju par traucējumu
novēršanu un apkopi:
www.electrolux.com/webselfservice
Reģistrējiet savu produktu, lai uzlabotu pakalpojumu:
www.registerelectrolux.com
Iegādājieties ierīcei oriģinālās rezerves daļas, materiālus un piederumus:
www.electrolux.com/shop
KLIENTU APKALPOŠANA UN PAKALPOJUMI
Iesakām izmantot oriģinālās rezerves daļas.
Sazinoties ar apkalpes dienestu, pārliecinieties, vai jums ir šādi dati: Modelis,
izstrādājuma Nr., sērijas numurs.
Šo informāciju var atrast tehnisko datu plāksnītē.
Drošības informācija brīdinājumam un piesardzībai
Vispārēja informācija un padomi
Informācija par apkārtējo vidi
Izmaiņu tiesības rezervētas.
LATVIEŠU
15

1. DROŠĪBAS INFORMĀCIJA
Pirms ierīces uzstādīšanas un lietošanas rūpīgi izlasiet
pievienotos norādījumus. Ražotājs neatbild par
bojājumiem, ko radījusi ierīces nepareiza uzstādīšana
vai lietošana. Saglabājiet šos norādījumus ierīces
tuvumā turpmākām uzziņām.
1.1 Bērnu un nespējīgu cilvēku drošība
• Šo ierīci drīkst izmantot bērni no 8 gadu vecuma un
cilvēki ar ierobežotām fiziskām, sensorām vai garīgām
spējām, vai pieredzes un zināšanu trūkumu atbildīgās
personas uzraudzībā vai, ja tie ir apmācīti par ierīces
drošu lietošanu un izprot potenciālos riskus.
• Neļaujiet bērniem rotaļāties ar ierīci.
• Tīrīšanu un lietotāja veikto apkopi nedrīkst veikt bērni
bez uzraudzības.
• Glabājiet iesaiņojuma materiālus bērniem
nepieejamās vietās.
1.2 Vispārīgi drošības norādījumi
• Ierīce paredzēta izmantošanai mājsaimniecībā un
līdzīgiem mērķiem, piemēram:
– lauku mājās, darbinieku virtuves zonās veikalos,
birojos un citās darba vietās
– Viesu lietošanai viesnīcās, moteļos, privātajās
viesnīcās un citās apdzīvojamās vidēs
• Sekojiet, lai ierīces korpusa vai iebūvētās
konstrukcijas ventilācijas atveres nebūtu aizsērējušas.
• Nelietojiet ražotāja neieteiktas mehāniskas ierīces vai
citus līdzekļus atkušanas procesa paātrināšanai.
• Nesabojājiet dzesētāja shēmu.
• Nelietojiet ēdiena uzglabāšanas paredzētajos
nodalījumos elektroierīces, ja vien to izmantošanu
neparedz ražotājs.
• Ierīces tīrīšanai neizmantojiet tvaiku un neizsmidziniet
ūdeni.
www.electrolux.com16

• Tīriet ierīci ar mitru, mīkstu drānu. Izmantojiet tikai
neitrālus mazgāšanas līdzekļus. Neizmantojiet
abrazīvus izstrādājumus, abrazīvus sūkļus,
šķīdinātājus vai metāla priekšmetus.
• Neglabājiet ierīcē sprāgstošas vielas, tādas kā
aerosoli ar uzliesmojošu virzošo spēku.
• Ja elektrības padeves vads ir bojāts, lai izvairītos no
nelaimes gadījumiem, to jānomaina ražotājam, servisa
pārstāvim vai kvalificētam speciālistam.
2. DROŠĪBAS NORĀDĪJUMI
2.1 Uzstādīšana
BRĪDINĀJUMS!
Ierīci drīkst uzstādīt tikai
kvalificēta persona.
• Noņemiet visu iepakojumu.
• Neuzstādiet un nelietojiet bojātu ierīci.
• Ievērojiet kopā ar ierīci piegādātās
uzstādīšanas norādes.
• Ievērojiet piesardzību, pārvietojot
ierīci, jo tā ir smaga. Vienmēr lietojiet
aizsargcimdus.
• Pārliecinieties, ka ap ierīci brīvi cirkulē
gaiss.
• Nogaidiet vismaz četras stundas,
pirms pieslēdzat ierīci pie elektrības
padeves. Tas nepieciešams, lai ļautu
eļļai ieplūst atpakaļ kompresorā.
• Neuzstādiet ierīci blakus radiatoriem,
plītīm, cepeškrāsnīm vai plīts
virsmām.
• Ierīces aizmugurējā virsma jānovieto
pret sienu.
• Neuzstādiet ierīci tiešos saules staros.
• Neuzstādiet ierīci vietās, kas ir pārāk
mitras vai pārāk aukstas, piemēram,
piebūvēs, garāžās vai vīna pagrabos.
• Pārvietojot ierīci, paceliet to aiz
priekšējās malas, lai nesaskrāpētu
grīdu.
2.2 Elektriskais savienojums
BRĪDINĀJUMS!
Var izraisīt ugunsgrēku un
elektrošoku.
• Ierīce jābūt iezemētai.
• Elektrības padeves pieslēgšana jāveic
sertificētam elektriķim.
• Pārliecinieties, ka informācija uz
tehnisko datu plāksnītes atbilst jūsu
elektrosistēmas parametriem. Ja
neatbilst, sazinieties ar elektriķi.
• Vienmēr izmantojiet pareizi uzstādītu,
drošu kontaktligzdu.
• Nelietojiet daudzkontaktu adapterus
vai pagarinātājus.
• Rīkojieties uzmanīgi, lai nesabojātu
elektriskās detaļas (piem.,
kontaktspraudni, kabeli, kompresoru).
Sazinieties ar servisa daļu vai
elektriķi, lai nomainītu elektriskās
detaļas.
• Strāvas kabelim jāatrodas zemāk par
spraudkontaktu.
• Pieslēdziet kontaktspraudni
kontaktligzdai tikai uzstādīšanas
beigās. Pārbaudiet, vai pēc
uzstādīšanas kontaktspraudnim var
brīvi piekļūt.
• Nekad neatslēdziet ierīci no tīkla,
velkot aiz barošanas kabeļa. Vienmēr
velciet aiz spraudkontakta.
2.3 Pielietojums
BRĪDINĀJUMS!
Savainojumu, apdegumu vai
elektrošoka risks.
• Nemainiet šīs ierīces specifikācijas.
• Neievietojiet elektriskās ierīces (piem.,
saldējuma pagatavošanas ierīci)
ierīcē, izņemot, ja ražotājs norādījis,
ka to var darīt.
LATVIEŠU 17

• Rīkojieties uzmanīgi, lai nesabojātu
dzesētāja shēmu. Tas satur izobutānu
(R600a), dabasgāzi, kas ir videi
praktiski nekaitīga. Šī gāze uzliesmo.
• Ja dzesētāja shēmā rodas bojājumi,
pārliecinieties, ka telpā nav liesmas
vai aizdegšanās avoti. Izvēdiniet
telpu.
• Neļaujiet karstiem priekšmetiem
saskarties ar ierīces plastmasas
daļām.
• Neglabājiet bezalkoholiskos dzērienus
saldētavas nodalījumā. Tas radīs
spiedienu dzēriena tvertnē.
• Neuzglabājiet ierīcē viegli
uzliesmojošas gāzes vai šķidrumus.
• Neievietojiet ierīcē, neturiet tās
tuvumā vai uz tās viegli uzliesmojošas
vielas vai ar viegli uzliesmojošām
vielām piesūcinātus priekšmetus.
• Nepieskarieties kompresoram vai
kondensatoram. Tie ir karsti.
• Neizņemiet un nepieskarieties
saldētavā ievietotajiem produktiem ar
slapjām vai mitrām rokām.
• Nesasaldējiet atkārtoti atkausētu
pārtiku.
• Ievērojiet uzglabāšanas norādījumus,
kas norādīti uz pārtikas iesaiņojuma.
2.4 Iekšējais apgaismojums
• Šajā ierīcē esošā lampa nav
paredzēta telpu apgaismojumam
mājsaimniecībā.
2.5 Apkope un tīrīšana
BRĪDINĀJUMS!
Pastāv savainojumu vai
ierīces bojājumu risks.
• Pirms apkopes izslēdziet ierīci un
atvienojiet to no elektrotīkla.
• Šīs ierīces dzsētājagregātā ir
ogļūdeņradis. Dzesētājagregāta
atkārtotas uzpildes darbus var veikt
tikai kvalificētas personas.
• Regulāri pārbaudiet ierīces aizplūdes
atveri un, ja nepieciešams, iztīriet to.
Ja izplūdes sistēma nosprostota,
atkausētais ūdens sakrāsies ierīces
apakšējā daļā.
2.6 Ierīces utilizācija
BRĪDINĀJUMS!
Pastāv savainošanās vai
nosmakšanas risks.
• Atvienojiet ierīci no elektropadeves.
• Nogrieziet strāvas kabeli un izmetiet
to.
• Izņemiet durvis, lai novērstu bērnu vai
dzīvnieku ieslēgšanu ierīcē.
• Šīs ierīces dzesētāja shēma un
izolācijas materiāli nekaitē ozona
slānim.
• Izolācijas slānis satur viegli
uzliesmojošu gāzi. Sazinieties ar
vietējo pašvaldību, lai noskaidrotu, kā
pareizi atbrīvoties no ierīces.
• Nesabojājiet dzesēšanas bloka daļu,
kas atrodas blakus siltummainim.
www.electrolux.com18

3. LIETOŠANA
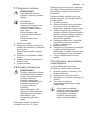
3.1 Vadības panelis
21 3
1
Temperatūras regulators
2
Jaudas indikators
3
Paaugstinātas temperatūras
brīdinājuma indikators
3.2 Ierīces ieslēgšana
B
C
A
A. Temperatūras regulators
B. Pusielādes stāvoklis
C. Pilnas ielādes stāvoklis
1. Iespraudiet kontaktdakšu
kontaktligzdā.
2. Pagrieziet temperatūras regulatoru
līdz pilnas ielādes stāvoklim un ļaujiet
ierīcei darboties 24 stundas, lai tiktu
sasniegta pareiza temperatūra, un
tikai pēc tam ievietojiet tajā pārtiku.
Iedegsies strāvas indikators.
3. Noregulējiet temperatūras regulatoru
atkarībā no uzglabātās pārtikas
daudzuma.
3.3 Ierīces izslēgšana
Iestatiet temperatūras regulatoru stāvoklī
OFF.
3.4 Temperatūras regulēšana
Temperatūru ierīcē regulē ar
temperatūras regulatoru, kas atrodas uz
vadības paneļa.
Lai lietotu ierīci, rīkojieties šādi:
• lai iegūtu minimālu aukstumu,
pagrieziet temperatūras regulatoru
līdz zemākajam iestatījumam.
• lai iegūtu maksimālu aukstumu,
pagrieziet temperatūras regulatoru
līdz augstākajam iestatījumam.
Ja sasaldēšanai ieliek
mazāku pārtikas apjomu,
pusielādes iestatījums ir
vispiemērotākais. Ja
sasaldēšanai ieliek lielāku
pārtikas apjomu, pilnas
ielādes iestatījums ir
vispiemērotākais.
3.5 Paaugstinātas
temperatūras brīdinājuma
signāls
Saldētavas temperatūras
paaugstināšanās (piemēram, elektrības
piegādes pārtraukuma dēļ) tiek norādīta,
izmantojot brīdinājuma indikatora
iedegšanos
Brīdinājuma fāzes laikā neievietojiet
saldētavā produktus.
Kad atjaunoti normāli apstākļi,
brīdinājuma indikators automātiski
izdziest.
LATVIEŠU 19

4. PIRMS PIRMĀS LIETOŠANAS REIZES
BRĪDINĀJUMS!
Skatiet sadaļu "Drošība".
4.1 Ierīces iekšpuses tīrīšana
Lai neitralizētu sākotnējo izstrādājuma
aromātu, pirms ierīces pirmās lietošanas
reizes mazgājiet iekšpusi un iekšējos
piederumus ar remdenu ziepjūdeni un
pēc tam rūpīgi nosusiniet tos.
UZMANĪBU!
Nelietojiet mazgāšanas
līdzekļus vai abrazīvus
pulverus, jo tie sabojās
apdari.
5. IZMANTOŠANA IKDIENĀ
BRĪDINĀJUMS!
Skatiet sadaļu "Drošība".
5.1 Svaigas pārtikas
sasaldēšana
Saldētava piemērota svaigu produktu
sasaldēšanai un sasaldētu produktu
ilgstošai uzglabāšanai.
Maksimālais saldētavā ievietojamo
produktu daudzums, ko var sasaldēt 24
stundu laikā, ir minēts tehnisko datu
plāksnītē.
1)
Sasaldēšana ilgst 24 stundas: šajā laikā
neievietojiet citus produktus.
5.2 Saldētas pārtikas
uzglabāšana
Pirmo reizi ieslēdzot ierīci vai arī pēc
ilgstošas neizmantošanas, pirms
ievietojat nodalījumā produktus, ļaujiet
ierīcei darboties vismaz 24 stundas
temperatūras regulatoram atrodoties
"saldētava pilnībā piekrauta" pozīcijā.
UZMANĪBU!
Ja sākas nejaušs
atkausēšanas process,
piemēram, elektroenerģijas
piegādes pārtraukuma dēļ
(elektrības piegādes
pārtraukuma laiks ir ilgāks
par tehnisko datu plāksnītē
minēto uzglabāšanas ilgumu
elektroenerģijas piegādes
pārtraukuma gadījumā),
atkausētos produktus
nekavējoties jāizmanto vai
jāpagatavo un pēc to
atdzišanas — atkārtoti
jāsasaldē.
5.3 Vāka atvēršana un
aizvēršana
UZMANĪBU!
Nevelciet rokturi ar
pārmērīgu spēku
Tā kā vāks ir aprīkots ar efektīvu
blīvējumu, to ir grūti atvērt uzreiz pēc
aizvēršanas (vakuuma klātbūtnes dēļ).
Pirms vāka atkārtotas atvēršanas
pagaidiet dažas minūtes.
Vakuuma vārsts palīdzēs jums atvērt
vāku.
5.4 Produktu uzglabāšanas
grozi
Uzkariniet grozus uz saldētavas
augšējās malas (A) vai novietojiet tos
1)
Skatiet sadaļu “Tehniskie dati"
www.electrolux.com20
Strona się ładuje...
Strona się ładuje...
Strona się ładuje...
Strona się ładuje...
Strona się ładuje...
Strona się ładuje...
Strona się ładuje...
Strona się ładuje...
Strona się ładuje...
Strona się ładuje...
Strona się ładuje...
Strona się ładuje...
Strona się ładuje...
Strona się ładuje...
Strona się ładuje...
Strona się ładuje...
Strona się ładuje...
Strona się ładuje...
Strona się ładuje...
Strona się ładuje...
Strona się ładuje...
Strona się ładuje...
Strona się ładuje...
Strona się ładuje...
Strona się ładuje...
Strona się ładuje...
Strona się ładuje...
Strona się ładuje...
Strona się ładuje...
Strona się ładuje...
Strona się ładuje...
Strona się ładuje...
Strona się ładuje...
Strona się ładuje...
Strona się ładuje...
Strona się ładuje...
-
 1
1
-
 2
2
-
 3
3
-
 4
4
-
 5
5
-
 6
6
-
 7
7
-
 8
8
-
 9
9
-
 10
10
-
 11
11
-
 12
12
-
 13
13
-
 14
14
-
 15
15
-
 16
16
-
 17
17
-
 18
18
-
 19
19
-
 20
20
-
 21
21
-
 22
22
-
 23
23
-
 24
24
-
 25
25
-
 26
26
-
 27
27
-
 28
28
-
 29
29
-
 30
30
-
 31
31
-
 32
32
-
 33
33
-
 34
34
-
 35
35
-
 36
36
-
 37
37
-
 38
38
-
 39
39
-
 40
40
-
 41
41
-
 42
42
-
 43
43
-
 44
44
-
 45
45
-
 46
46
-
 47
47
-
 48
48
-
 49
49
-
 50
50
-
 51
51
-
 52
52
-
 53
53
-
 54
54
-
 55
55
-
 56
56


Electrolux EC4200AOW1 Instrukcja obsługi
- Kategoria
- Zamrażarki
- Typ
- Instrukcja obsługi
w innych językach
- English: Electrolux EC4200AOW1 User manual
Powiązane artykuły
-
Electrolux EC2233AOW1 Instrukcja obsługi
-
Electrolux EC5231AOW Instrukcja obsługi
-
-
-
Electrolux EJ2801AOW2 Instrukcja obsługi
-
Electrolux EN3850DOX Instrukcja obsługi
-
Electrolux EJN2301AOW Instrukcja obsługi
-
-
-