
ES
FR
DE
EN
Owner’s Manual
Bedienungsanleitung
Mode d’emploi
Manual de instrucciones
ESPAÑOL
FRANÇAIS
DEUTSCH
ENGLISH
For information on assembling the keyboard stand, refer to the instructions at the end of this manual.
IMPORTANT – Check your power supply –
Make sure that your local AC mains voltage matches the voltage specified on the name plate on the bottom panel. In some areas a voltage selector may be
provided on the bottom panel of the main keyboard unit near the power cord. Make sure that the voltage selector is set for the voltage in your area. The voltage
selector is set at 240V when the unit is initially shipped. To change the setting use a "minus" screwdriver to rotate the selector dial so that the correct voltage appears
next to the pointer on the panel.
Weitere Informationen über die Montage des Keyboard-Ständers erhalten Sie in den Anweisungen am Ende dieses Handbuchs.
WICHTIG —Überprüfung der Stromversorgung—
Vergewissern Sie sich vor dem Anschließen an das Stromnetz, daß die örtliche Netzspannung den Betriebsspannungswerten auf dem Typenschild an der Unterseite
des Instruments entspricht. In bestimmten Regionen ist auf der Unterseite des Keyboards in der Nähe des Netzkabels ein Spannungswähler angebracht. Falls
vorhanden, muß der Spannungswähler auf die örtliche Netzspannung eingestellt werden. Der Spannungswähler wurde werkseitig auf 240 V voreingestellt. Zum
Verstellen drehen Sie den Spannungsregler mit einem Schlitzschraubendreher, bis der Zeiger auf den korrekten Spannungswert weist.
Pour obtenir les détails sur l'assemblage du pupitre du clavier, reportez-vous aux instructions figurant à la fin de ce manuel.
IMPORTANT —Contrôler la source d'alimentation—
Vérifiez que la tension spécifiée sur le panneau inférieur correspond à la tension du secteur. Dans certaines régions, l’instrument peut être équipé d’un sélecteur de
tension situé sur le panneau inférieur du clavier à proximité du cordon d'alimentation. Vérifiez que ce sélecteur est bien réglé en fonction de la tension secteur de
votre région. Le sélecteur de tension est réglé sur 240 V au depart d'usine. Pour modifier ce réglage, utilisez un tournevis à lame plate pour tourner le sélecteur afin
de mettre l'indication correspondant à la tension de votre région vis à vis du repère triangulaire situé sur le panneau.
Para información sobre el montaje del soporte del teclado, consulte las instrucciones al final de este manual.
IMPORTANTE —Verifique la alimentación de corriente—
Asegúrese de que tensión de alimentación de CA de su área corresponde con la tensión especificada en la placa de características del panel inferior. En algunas
zonas puede haberse incorporado un selector de tensión en el panel inferior de la unidad del teclado principal, cerca del cable de alimentación. Asegúrese de que
el selector de tensión esté ajustado a la tensión de su área. El selector de tensión se ajusta a 240V cuando la unidad sale de fábrica. Para cambiar el ajuste,
emplee un destornillador de cabeza "recta" para girar el selector de modo que aparezca la tensión correcta al lado del indicador del panel.

H11 Owner’s Manual
2
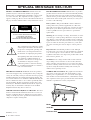
SPECIAL MESSAGE SECTION
PRODUCT SAFETY MARKINGS: Yamaha electronic
products may have either labels similar to the graphics
shown below or molded/stamped facsimiles of these graph-
ics on the enclosure. The explanation of these graphics
appears on this page. Please observe all cautions indicated on
this page and those indicated in the safety instruction section.
See bottom of Keyboard enclosure for graphic symbol markings.
The exclamation point within the equilat-
eral triangle is intended to alert the user to
the presence of important operating and
maintenance (servicing) instructions in
the literature accompanying the product.
The lightning flash with arrowhead sym-
bol, within the equilateral triangle, is
intended to alert the user to the presence
of uninsulated “dangerous voltage”
within the product’s enclosure that may
be of sufficient magnitude to constitute a
risk of electrical shock.
IMPORTANT NOTICE: All Yamaha electronic products
are tested and approved by an independent safety testing lab-
oratory in order that you may be sure that when it is properly
installed and used in its normal and customary manner, all
foreseeable risks have been eliminated. DO NOT modify this
unit or commission others to do so unless specifically autho-
rized by Yamaha. Product performance and/or safety stan-
dards may be diminished. Claims filed under the expressed
warranty may be denied if the unit is/has been modified.
Implied warranties may also be affected.
SPECIFICATIONS SUBJECT TO CHANGE: The infor-
mation contained in this manual is believed to be correct at
the time of printing. However, Yamaha reserves the right to
change or modify any of the specifications without notice or
obligation to update existing units.
ENVIRONMENTAL ISSUES: Yamaha strives to produce
products that are both user safe and environmentally friendly.
We sincerely believe that our products and the production
methods used to produce them, meet these goals. In keeping
with both the letter and the spirit of the law, we want you to
be aware of the following:
Battery Notice: This product MAY contain a small non-
rechargeable battery which (if applicable) is soldered in
place. The average life span of this type of battery is approx-
imately five years. When replacement becomes necessary,
contact a qualified service representative to perform the
replacement.
Warning: Do not attempt to recharge, disassemble, or incin-
erate this type of battery. Keep all batteries away from chil-
dren. Dispose of used batteries promptly and as regulated by
applicable laws. Note: In some areas, the servicer is required
by law to return the defective parts. However, you do have
the option of having the servicer dispose of these parts for
you.
Disposal Notice: Should this product become damaged
beyond repair, or for some reason its useful life is considered
to be at an end, please observe all local, state, and federal
regulations that relate to the disposal of products that contain
lead, batteries, plastics, etc.
NOTICE: Service charges incurred due to lack of knowl-
edge relating to how a function or effect works (when the
unit is operating as designed) are not covered by the manu-
facturer’s warranty, and are therefore the owners responsibil-
ity. Please study this manual carefully and consult your
dealer before requesting service.
NAME PLATE LOCATION: The graphic below indicates
the location of the name plate. The model number, serial
number, power requirements, etc., are located on this plate.
You should record the model number, serial number, and the
date of purchase in the spaces provided below and retain this
manual as a permanent record of your purchase.
Model
Serial No.
Purchase Date
CAUTION
RISK OF ELECTRIC SHOCK
DO NOT OPEN
CAUTION: TO REDUCE THE RISK OF ELECTRIC SHOCK.
DO NOT REMOVE COVER (OR BACK).
NO USER-SERVICEABLE PARTS INSIDE.
REFER SERVICING TO QUALIFIED SERVICE PERSONNEL.
92-469- q (bottom)

H11 Owner’s Manual
3
• This applies only to products distributed by Yamaha Music U.K. Ltd. (2 wires)
* This applies only to products distributed by YAMAHA CORPORATION OF AMERICA. (class B)
FCC INFORMATION (U.S.A.)
1. IMPORTANT NOTICE: DO NOT MODIFY THIS UNIT!
This product, when installed as indicated in the instruc-
tions contained in this manual, meets FCC requirements.
Modifications not expressly approved by Yamaha may
void your authority, granted by the FCC, to use the prod-
uct.
2. IMPORTANT: When connecting this product to accesso-
ries and/or another product use only high quality shielded
cables. Cable/s supplied with this product MUST be used.
Follow all installation instructions. Failure to follow instruc-
tions could void your FCC authorization to use this prod-
uct in the USA.
3. NOTE: This product has been tested and found to comply
with the requirements listed in FCC Regulations, Part 15
for Class “B” digital devices. Compliance with these
requirements provides a reasonable level of assurance
that your use of this product in a residential environment
will not result in harmful interference with other electronic
devices. This equipment generates/uses radio frequen-
cies and, if not installed and used according to the
instructions found in the users manual, may cause inter-
ference harmful to the operation of
other electronic devices. Compliance with FCC regula-
tions does not guarantee that interference will not occur in
all installations. If this product is found to be the source of
interference, which can be determined by turning the unit
“OFF” and “ON”, please try to eliminate the problem by
using one of the following measures:
Relocate either this product or the device that is being
affected by the interference.
Utilize power outlets that are on different branch (circuit
breaker or fuse) circuits or install AC line filter/s.
In the case of radio or TV interference, relocate/reorient
the antenna. If the antenna lead-in is 300 ohm ribbon
lead, change the lead-in to co-axial type cable.
If these corrective measures do not produce satisfactory
results, please contact the local retailer authorized to dis-
tribute this type of product. If you can not locate the
appropriate retailer, please contact Yamaha Corporation
of America, Electronic Service Division, 6600 Orangetho-
rpe Ave, Buena Park, CA90620
The above statements apply ONLY to those products dis-
tributed by Yamaha Corporation of America or its subsid-
iaries.
IMPORTANT NOTICE FOR THE UNITED KINGDOM
Connecting the Plug and Cord
IMPORTANT. The wires in this mains lead are coloured in accordance
with the following code:
BLUE : NEUTRAL
BROWN : LIVE
As the colours of the wires in the mains lead of this apparatus may not
correspond with the coloured makings identifying the terminals in your
plug proceed as follows:
The wire which is coloured BLUE must be connected to the terminal
which is marked with the letter N or coloured BLACK.
The wire which is coloured BROWN must be connected to the termi-
nal which is marked with the letter L or coloured RED.
Making sure that neither core is connected to the earth terminal of the
three pin plug.

ENGLISH
H11 Owner’s Manual
4
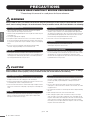
PRECAUTIONS
PLEASE READ CAREFULLY BEFORE PROCEEDING
* Please keep this manual in a safe place for future reference.
WARNING
Always follow the basic precautions listed below to avoid the possibility of serious injury or even death from electrical
shock, short-circuiting, damages, fire or other hazards. These precautions include, but are not limited to, the following:
• Only use the voltage specified as correct for the instrument. The required
voltage is printed on the name plate of the instrument.
• Check the electric plug periodically and remove any dirt or dust which may have
accumulated on it.
• Use only the supplied power cord/plug.
• Do not place the power cord near heat sources such as heaters or radiators, and
do not excessively bend or otherwise damage the cord, place heavy objects on
it, or place it in a position where anyone could walk on, trip over, or roll anything
over it.
• Be sure to connect to an appropriate outlet with a protective grounding
connection. Improper grounding can result in electrical shock.
• Do not open the instrument or attempt to disassemble the internal parts or
modify them in any way. The instrument contains no user-serviceable parts. If it
should appear to be malfunctioning, discontinue use immediately and have it
inspected by qualified Yamaha service personnel.
• Do not expose the instrument to rain, use it near water or in damp or wet
conditions, or place containers on it containing liquids which might spill into
any openings. If any liquid such as water seeps into the instrument, turn off the
power immediately and unplug the power cord from the AC outlet. Then have
the instrument inspected by qualified Yamaha service personnel.
• Never insert or remove an electric plug with wet hands.
• Do not put burning items, such as candles, on the unit.
A burning item may fall over and cause a fire.
• If the power cord or plug becomes frayed or damaged, or if there is a sudden
loss of sound during use of the instrument, or if any unusual smells or smoke
should appear to be caused by it, immediately turn off the power switch,
disconnect the electric plug from the outlet, and have the instrument inspected
by qualified Yamaha service personnel.
CAUTION
Always follow the basic precautions listed below to avoid the possibility of physical injury to you or others, or damage
to the instrument or other property. These precautions include, but are not limited to, the following:
• When removing the electric plug from the instrument or an outlet, always hold
the plug itself and not the cord. Pulling by the cord can damage it.
• Remove the electric plug from the outlet when the instrument is not to be used
for extended periods of time, or during electrical storms.
• Do not connect the instrument to an electrical outlet using a multiple-connector.
Doing so can result in lower sound quality, or possibly cause overheating in the
outlet.
• Read carefully the attached documentation explaining the assembly process.
Failure to assemble the instrument in the proper sequence might result in
damage to the instrument or even injury.
• Do not expose the instrument to excessive dust or vibrations, or extreme cold or
heat (such as in direct sunlight, near a heater, or in a car during the day) to
prevent the possibility of panel disfiguration or damage to the internal
components.
• Do not use the instrument in the vicinity of a TV, radio, stereo equipment,
mobile phone, or other electric devices. Otherwise, the instrument, TV, or radio
may generate noise.
• Do not place the instrument in an unstable position where it might accidentally
fall over.
• Before moving the instrument, remove all connected cables.
• When setting up the product, make sure that the AC outlet you are using is
easily accessible. If some trouble or malfunction occurs, immediately turn off
the power switch and disconnect the plug from the outlet. Even when the power
switch is turned off, electricity is still flowing to the product at the minimum
level. When you are not using the product for a long time, make sure to unplug
the power cord from the wall AC outlet.
Power supply/Power cord
Do not open
Water warning
Fire warning
If you notice any abnormality
Power supply/Power cord
Assembly
Location
(1)B-13 1/2

ENGLISH
H11 Owner’s Manual
5
• Before connecting the instrument to other electronic components, turn off the
power for all components. Before turning the power on or off for all
components, set all volume levels to minimum. Also, be sure to set the volumes
of all components at their minimum levels and gradually raise the volume
controls while playing the instrument to set the desired listening level.
• In the case of a model with a polished finish, gently remove dust and dirt with a
soft cloth. Do not wipe too hard since small particles of dirt can scratch the
instrument’s finish.
• When cleaning the instrument, use a soft, dry or slightly damp cloth. Do not use
paint thinners, solvents, cleaning fluids, or chemical-impregnated wiping
cloths.
• During extreme changes in temperature or humidity, condensation may occur
and water may collect on the surface of the instrument. If water is left, the
wooden parts may absorb the water and be damaged. Make sure to wipe any
water off immediately with a soft cloth.
•Take care that the key cover does not pinch your fingers, and do not insert a
finger or hand in any gaps on the key cover or instrument.
• Never insert or drop paper, metallic, or other objects into the gaps on the key
cover, panel or keyboard. If this happens, turn off the power immediately and
unplug the power cord from the AC outlet. Then have the instrument inspected
by qualified Yamaha service personnel.
• Do not place vinyl, plastic or rubber objects on the instrument, since this might
discolor the panel or keyboard.
• In the case of a model with a polished finish, bumping the surface of the
instrument with metal, porcelain, or other hard objects can cause the finish to
crack or peel. Use caution.
• Do not rest your weight on, or place heavy objects on the instrument, and do not
use excessive force on the buttons, switches or connectors.
• Do not use the instrument/device or headphones for a long period of time at a
high or uncomfortable volume level, since this can cause permanent hearing
loss. If you experience any hearing loss or ringing in the ears, consult a
physician.
• Do not place the bench in an unstable position where it might accidentally fall
over.
• Do not play carelessly with or stand on the bench. Using it as a tool or step-
ladder or for any other purpose might result in accident or injury.
• Only one person should sit on the bench at a time, in order to prevent the
possibility of accident or injury.
• If the bench screws become loose due to extensive long-term use, tighten them
periodically using the included tool.
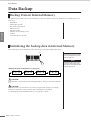
Saving and backing up your data
• Some data will be saved to internal memory of the H11 (page 44). The data is
maintained even when the power is turned off. For maximum data security
Yamaha recommends that you save your important data to the USB flash
memory. This provides a convenient backup if the internal memory is damaged
(page 45).
Backing up the USB storage device
•To protect against data loss through media damage, we recommend that you
save your important data onto two USB storage devices.
Always turn the power off when the instrument is not in use.
Connections
Maintenance
Handling caution
Using the bench (If included)
Saving data
Yamaha cannot be held responsible for damage caused by improper use or modifications to the instrument, or data that is lost or destroyed.
(1)B-13 2/2

H11 Owner’s Manual
6
ENGLISH
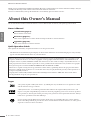
About this Owner’s Manual
Thank you for purchasing the Yamaha Digital Piano H11! We recommend that you read this manual carefully so that you
can fully take advantage of the advanced and convenient functions of the H11.
We also recommend that you keep this manual in a safe and handy place for future reference.
About this Owner’s Manual
The documentation for this instrument includes: Owner’s Manual (this document) and Quick Operation Guide.
Owner’s Manual
Introduction (page 2):
Please read this section first.
Reference (page 17):
This section explains how to make detailed settings for the H11’s various functions.
Appendix (page 58):
This section introduces reference material.
Quick Operation Guide
This explains the button/key assignments and how to use the panel controls.
*The illustrations and instrument panel displays as shown in this manual are for instructional purposes only, and may
appear somewhat different from those on your instrument.
Logos
“XG” greatly expands “GM System Level 1” by defining the ways in which voices are expanded or edited
and the structure and type of effects.
“GM System Level 2” is a standard specification that enhances the original “GM System Level 1” and
improves song data compatibility. It provides for increased polyphony, greater voice selection, expanded
voice parameters, and integrated effect processing. Tone generators and song data that meet the “GM Sys-
tem Level 2” specifications bear this GM2 logo.
GS was developed by the Roland Corporation. In the same way as Yamaha XG, GS is a major enhance-
ment of the GM specifically to provide more Voices and Drum kits and their variations, as well as greater
expressive control over Voices and effects.
This product incorporates and bundles computer programs and contents in which Yamaha owns copyrights or with
respect to which it has license to use others’ copyrights. Such copyrighted materials include, without limitation, all
computer software, style files, MIDI files, WAVE data, musical scores and sound recordings. Any unauthorized use of
such programs and contents outside of personal use is not permitted under relevant laws. Any violation of copyright
has legal consequences. DON’T MAKE, DISTRIBUTE OR USE ILLEGAL COPIES.
This device is capable of using various types/formats of music data by optimizing them to the proper format music
data for use with the device in advance. As a result, this device may not play them back precisely as their producers or
composers originally intended.
Copying of the commercially available musical data including but not limited to MIDI data and/or audio data is
strictly prohibited except for your personal use.

ENGLISH
Accessories
H11 Owner’s Manual
7
AVE-TCP™, a TCP/IP protocol stack by ACCESS Co., Ltd., is installed in this product.
Copyright© 1986–2008 ACCESS CO., LTD.
AVE™-SSL, an encryption module technology by ACCESS Co., Ltd., is installed in this product.
Copyright© 1986–2008 ACCESS CO., LTD.
Trademarks:
•Windows is a registered trademark of Microsoft® Corporation in the United States and other countries.
•The company names and product names in this manual are the trademarks or registered trademarks of their respective companies.
Accessories
• Owner’s Manual
This manual contains complete instructions for operating your H11.
• Quick Operation Guide
• Bench
• AC Power Cord
•My Yamaha Product User Registration
The PRODUCT ID on the sheet will be needed when you fill out the User Registration form.
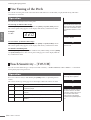
Tuning
Unlike an acoustic piano, the instrument does not need to be tuned. It always stays perfectly in tune.
Transporting
If you move to another location, you can transport the instrument along with your other belongings. You can move the
unit as it is (assembled) or you can disassemble the unit.
Tr ansport the keyboard horizontally. Do not lean it up against a wall or stand it up on its side. Do not subject the
instrument to excessive vibration or shock. When transporting the assembled instrument, make sure all screws are
properly tightened and have not been loosened by moving the instrument.

H11 Owner’s Manual
8
ENGLISH
Main Features
Main Features
Stylish and sophisticated digital piano
The instrument combines true piano sound in a modern, attractive cabinet that evokes the beauty of a
real acoustic grand piano–adding sophistication and musical expressiveness to your living space.
NW (Natural Wood) with synthetic ivory keytops
This type of keyboard features the feel of real ivory. The special Natural Wood keyboard also uses real-
wood white keys. The key surface is soft and slightly porous, giving the keys added grip and a natural
friction that lets you play easily. The authentic touch and feel of the keys goes far beyond existing elec-
tronic keyboards, it makes you feel as if you’re playing a real grand piano. This specially crafted key-
board lets you use techniques only possible on grand pianos, such as playing the same note successively
and having the sounds blend smoothly even without use of the damper pedal, or playing the same key
quickly and having perfect articulation without the sound cutting off unnaturally.
Moving Key
The H11 features an impressive moving keyboard—with the Moving Key function. Whatever songs
you play back on the instrument, including the included 50 piano preset songs (Classic & Jazz), songs
saved to USB flash memory, or songs from the Internet using the streaming service, you can enjoy the
performance visually as well as aurally. This makes the H11 a wonderful instrument to have at home, as
well as an eye-catching, ear-catching instrument for a restaurant, store or any public space.
AWM Dynamic Stereo Sampling
The H11 offers unmatched sonic realism as well as Yamaha’s original AWM Dynamic Stereo Sampling
tone-generation technology for rich, authentic voices. The GRAND PIANO 1 and 2 voices are com-
pletely constructed from samples painstakingly recorded from a full concert grand piano. The Grand
Piano 1 voice features three velocity-switched samples (Dynamic Sampling), special “Sustain Sam-
pling” that samples the unique resonance of an acoustic grand piano’s soundboard and strings when
the damper pedal is pressed, and “Keyoff Samples” that add the subtle sound produced when the keys
are released. These sophisticated features and advanced technologies ensure that the instrument
sounds and plays virtually the same as an actual acoustic piano.
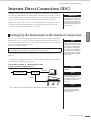
Internet Direct Connection (IDC)
Ya maha provides a special streaming service on its website that enables you to automatically play back
a wide variety of songs (song data) in various musical genres as background music directly on your
instrument.

ENGLISH
Table of Contents
H11 Owner’s Manual
9
Tab le of Contents
SPECIAL MESSAGE SECTION ...................... 2
About this Owner’s Manual........................ 6
Accessories .................................................. 7
Main Features ............................................. 8
Table of Contents ....................................... 9
Panel Controls and Terminals................... 10
Note Name................................................ 12
Accessing Various Background Music
(BGM) Functions .................................... 13
Before Using the H11................................ 14
Opening the key cover and lid...........................14
Closing the key cover and lid.............................14
Connecting the Power Cord..............................15
Turning the Power On.......................................15
Setting the Volume.............................................15
Using Headphones (option)..............................16
Using Music Rest (option) ................................16
Checking the version number ...........................16
Listening to the 50 Piano Preset Songs
(Classic & Jazz) ....................................... 17
Enjoying the Moving Key Feature.....................19
Listening to songs in
USB Flash Memory ................................. 20
Precautions when using
the USB [TO DEVICE] terminal............... 22
Handling the floppy disk drive (FDD)
and floppy disks ..................................... 23
Formatting USB storage media ................ 24
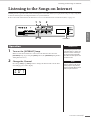
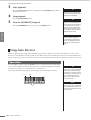
Listening to the Songs on Internet .......... 25
Song Auto Revoice .............................................26
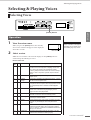
Selecting & Playing Voices........................ 27
Selecting Voices..................................................27
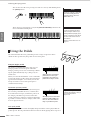
Using the Pedals .................................................28
Combining Two Voices (Dual mode)...............29
Saving the Voice Settings................................... 30
Selecting various digital reverb effects
(REVERB)...................................................... 31
Transposition – [TRANSPOSE] ....................... 31
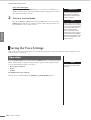
Fine Tuning of the Pitch.................................... 32
Touch Sensitivity – [TOUCH].......................... 32
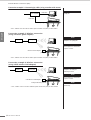
Internet Direct Connection (IDC)............. 33
Setting Up the Instrument to the Internet
Connection .................................................... 33
Connecting the Instrument to the Internet ..... 35
About the Internet Settings............................... 36
Checking the field strength
(when using a USB wireless LAN adaptor).. 38
Exporting the Connection Information ........... 39
Initializing Internet Settings.............................. 40
Internet Initial Settings...................................... 40
Glossary of Internet Terms ............................... 41
Connections ..............................................43
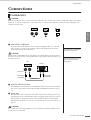
Connectors......................................................... 43
Data Backup .............................................. 44
Backup Data in Internal Memory..................... 44
Initializing the backup data in
Internal Memory ........................................... 44
Backing Up Data to USB Flash Memory.......... 45
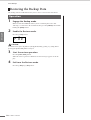
Restoring the Backup Data................................ 46
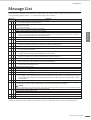
Message List ..............................................47
Troubleshooting........................................ 48
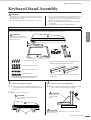
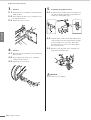
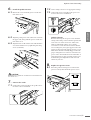
Keyboard Stand Assembly ........................49
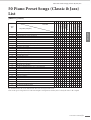
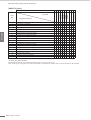
50 Piano Preset Songs
(Classic & Jazz) List................................. 53
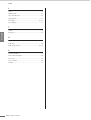
Index.......................................................... 55
Normal Setting List ...................................58
Optional Equipment.................................. 58
Specifications ............................................59
Introduction
Reference
Appendix

H11 Owner’s Manual
10
ENGLISH
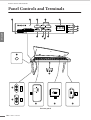
Panel Controls and Terminals
Panel Controls and Terminals
8
.
8
.
8
.
6 7 9
G
D
1
IF
E
H
C
B
A
02
453
8
Bottom panel

ENGLISH
Panel Controls and Terminals
H11 Owner’s Manual
11
The jacks and terminals on the underside of the instrument as shown here may seem to be in reverse from your perspec-
tive in front of the instrument. Make sure when using these to carefully check the names as printed on the panel before
making connections.
1 [POWER] switch ...........................p. 15
Tur ns the power on/off.
2 Power indicator............................p. 15
Lights up when the power is on.
3 [MASTER VOLUME] control ..........p. 15
Adjusts the volume level.
4 [BGM] button ..................p. 17, 20, 25
Switches the BGM mode on and off for [PRESET 1]/
[PRESET 2]/[USB]/[INTERNET]. For more infor-
mation, refer to page 13.
5 [–/NO]/[+/YES] button
For selecting a voice or a song, or setting values.
6 [PLAY/STOP] button .........p. 18, 21, 26
For starting/stopping song playback of the 50 piano
preset songs (Classic & Jazz), songs in USB flash
memory, or songs on from the Internet using the
streaming service.
7 [MOVING KEY] button .................p. 19
Enables the Moving Key feature, which automati-
cally moves the keys in response to song playback—
including that of the 50 piano preset songs, songs in
USB flash memory, and songs from the Internet
using the streaming service.
8 [MOVING KEY] status lamp ..........p. 19
Lights up in red if an error occurs while using the
Moving Key feature; lights up in white while the
Moving Key feature is on.
9 [VOICE] button ............................p. 27
For selecting voices from 10 internal sounds includ-
ing Grand Piano 1 and 2 (page 27). You can also
combine two voices (page 29) or add reverb effects
to the selected voice for your keyboard performance
(page 31).
0 Display .........................................p. 11
For showing various messages and certain settings of
the instrument. This may be unavailable, depending
on the status.
CAUTION
Do not turn off the power to the instrument while
flashing dashes appear in the display (indicating the
operation is in process). Doing so may damage the
data.
A [PRESET 1]/[PRESET 2] lamp .........p. 17
When this is lit, you can listen to the 50 piano preset
songs (Classic & Jazz).
B [USB] lamp...................................p. 20
When this is lit, you can listen to songs contained in
USB flash memory. Flashes while loading data from
USB Flash memory.
CAUTION
Do not remove the USB flash memory from the
instrument while flashing. Doing so may damage the
data.
C [INTERNET] lamp .........................p. 25
When this is lit, you can listen to songs on the Inter-
net. Flashes while accessing to the Internet.
D AUX OUT [L/L+R][R] jacks.............p. 43
For connecting recording equipment (such as a cas-
sette tape recorder), allowing you to record your per-
formance.
E [PHONES] jacks ............................p. 16
A set of standard stereo headphones can be plugged
in here for private practice.
F USB [TO DEVICE] terminal............p. 43
For connecting to a USB flash memory device,
allowing you to play back songs contained on the
device.
G Pedals ..........................................p. 28
For producing a range of expressive effects similar to
those produced by the pedals on an acoustic piano.
H [LAN] port.............................. p. 33, 43
By directly connecting the H11 to the Internet, you
can use the special streaming service on the Yamaha
website that enables you to automatically play back a
wide variety of songs (song data) in various musical
genres as background music directly on your instru-
ment.
I [AC IN] connector........................ p. 15
For connection of the power cord.
Display
•Check the operation on the display of the top panel as you
use the instrument.
•The display indicates different values, as shown below,
depending on the operation.
40
.
0005
One of the song numbers
from “50 Piano Preset
Songs (Classic & Jazz)”
Parameter value

H11 Owner’s Manual
12
ENGLISH
Note Name
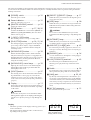
Note Name
A-1 B-1 C0 D0 E0 F0 G0 A0 B0 C1 D1 E1 F1 G1 A1 B1 C2 D2 E2 F2 G2 A2 B2 C3 D3 E3 F3 G3 A3 B3 C4 D4 E4 F4 G4 A4 B4 C5 D5 E5 F5 G5 A5 B5 C6 D6 E6 F6 G6 A6 B6 C7
A#-1 C#0
C#1
A#0F#0G#0D#0
D#1F#1G#1A#1C#2D#2F#2G#2A#2C#3D#3F#3G#3A#3C#4D#4F#4G#4A#4C#5D#5F#5G#5A#5C#6D#6F#6G#6A#6

ENGLISH
Accessing Various Background Music (BGM) Functions
H11 Owner’s Manual
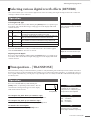
13
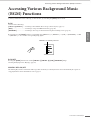
Accessing Various Background Music
(BGM) Functions
A variety of functions can be called up (as listed below) by switching the [BGM] button on/off.
BGM
Consists of the following:
[PRESET 1]/[PRESET 2]....... Listening to the 50 Piano Preset Songs (Classic & Jazz) (page 17)
[USB]................................... Listening to songs in USB flash memory (page 20)
[INTERNET] ....................... Listening to the songs on the internet using the streaming service (page 25)
Repeatedly press the [BGM] button to sequentially select [PRESET 1] → [PRESET 2] → [USB] → [INTERNET] → OFF
→ [PRESET 1] → etc., and the corresponding lamp lights.
BGM OFF
Pressing the [BGM] button turns off the [PRESET 1]/[PRESET 2]/[USB]/[INTERNET] lamps.
Selecting & Playing Voices (Playing) (page 27)
MOVING KEY ON/OFF
The Moving Key feature on the H11 makes it possible for the keys of the keyboard to move automatically in response to
song playback. For more information, refer to page 19.
PRESET 1 is currently selected

H11 Owner’s Manual
14
ENGLISH
Before Using the H11
Before Using the H11
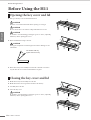
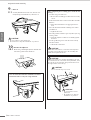
Opening the key cover and lid
1. Lift open the key cover and fold it backward.
CAUTION
Hold the cover with both hands when opening or closing it.
CAUTION
Do not release the cover until it is fully folded back or closed.
CAUTION
Be careful to avoid catching your fingers (yours or others, especially
children’s) when opening the cover.
2. Raise and hold the lid up as shown.
CAUTION
Raising the lid past the normal height can result in damage to the
instrument.
3. Raise the lid stay and carefully lower the lid so that the end of the
stay fits into the recess in the lid and holds it in place.
Closing the key cover and lid
1. Hold the lid stay and carefully raise the lid.
2. Hold the lid in its raised position and lower the lid stay.
3. Carefully lower the lid.
4. Close the key cover.
CAUTION
Be careful to avoid catching your fingers (yours or others, especially
children’s) when opening the cover.
q
w
e
Do not lift the lid any
higher than necessary.
r
e
w

ENGLISH
Before Using the H11
H11 Owner’s Manual
15
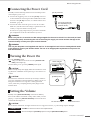
Connecting the Power Cord
Carefully read the following instructions and warnings before
connecting the power cord.
1. Connect the supplied power cord to the [AC IN] connector
on the instrument’s bottom panel. For an illustration of the
location of the [AC IN] connector, see “Panel Controls and
Te r minals” (page 10).
2. Connect the other end of the power cord to an AC outlet.
Make sure your H11 meets the voltage requirement for the
country or region in which it is being used.
In some areas, a plug adaptor may be provided to match the
pin configuration of the AC wall outlets in your area.
WARNING
Make sure your H11 is rated for the AC voltage supplied in the area in which it is to be used (as listed
on the bottom panel). Connecting the unit to the wrong AC supply can cause serious damage to the
internal circuitry and may even pose a shock hazard!
WARNING
Use only the AC power cord supplied with the H11. If the supplied cord is lost or damaged and needs
to be replaced, contact your Yamaha dealer. The use of an inappropriate replacement can pose a fire
and shock hazard!
Turning the Power On
Press the [POWER] switch.
The power indicator located above the [MASTER VOL-
UME]
control lights up.
To turn off the power, press the [POWER] switch again.
CAUTION
Never interrupt the power supply while the instrument is load-
ing data from a USB flash memory! Doing so can result in loss
of data.
CAUTION
Even when the instrument is turned off, electricity is still flow-
ing to the instrument at the minimum level. When you are not
using the instrument for a long time or during electrical
storms, make sure you unplug the AC power plug from the
wall AC outlet.
Setting the Volume
Initially set the [MASTER VOLUME] control about halfway
between the “MIN” and “MAX” settings. Then, when you start
playing, re-adjust the [MASTER VOLUME] control to the most
comfortable listening level.
CAUTION
Do not use the instrument at a high volume level for a long period of time, or your hearing may be damaged.
TERMINOLOGY
VOLUME: The volume level of the entire keyboard sound.
TIP
You can also adjust the [PHONES] output level using the [MASTER VOLUME] control.
[AC IN] connector
(The shape of plug dif-
fers depending on your
particular locale.)
Power indicator
[POWER] switch
The level decreases. The level increases.

H11 Owner’s Manual
16
ENGLISH
Before Using the H11
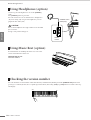
Using Headphones (option)
Connect a pair of headphones to one of the [PHONES]
jacks.
Two [PHONES] jacks are provided.
You can connect two sets of standard stereo headphones.
(If you are using only one pair of headphones, you can
plug them into either jack.)
CAUTION
Do not use headphones at a high volume for an extended
period of time.
Doing so may cause hearing loss.
Using Music Rest (option)
For information on installing the music rest, refer to the
owner’s manual for the music rest.
Optional music rest:
YAMAHA YMR-01
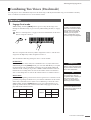
Checking the version number
You can check the version number of this instrument by simultaneously holding down the [MOVING KEY] button and
pressing A-1 on the keyboard (also see Quick Operation Guide). Press the
[–/NO] or [+/YES] button to return to the orig-
inal display.
standard stereo
phone plug
bottom
surface
A-1

ENGLISH
Listening to the 50 Piano Preset Songs (Classic & Jazz)
H11 Owner’s Manual
17
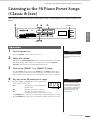
Listening to the 50 Piano Preset Songs
(Classic & Jazz)
The instrument features fifty built-in piano preset songs, including both classic pieces and jazz stan-
dards.
1 Turn the power on.
Press the [POWER] switch to turn the power on.
2 Adjust the volume.
Initially set the [MASTER VOLUME] control about half way between the “MIN”
and “MAX” settings. Then, when you start playing, re-adjust the [MASTER
VOLUME]
control to the most comfortable listening level.
3 Turn on the [PRESET 1] or [PRESET 2] lamp.
Press the [BGM] button to turn on the [PRESET 1] or [PRESET 2] lamp. Preset 1
contains a variety of well-known classical music pieces while Preset 2 contains
many popular jazz standards. For a list of all 50 piano preset songs, see page 53.
4 Play any of the 50 piano preset songs.
4-1 Press the [–/NO] or [+/YES] button to select the number
of the song you want to play.
rnd: Play all preset songs continuously in
random order.
ALL: Play all preset songs in sequence.
Sxx: Play all preset songs in each scene
(special sub categories within Classic or Jazz).
1 - 30 (PRESET 1): Select a preset song number and play only the selected song.
31 - 50 (PRESET 2): Select a preset song number and play only the selected song.
4-12
54-2
63
PRESET 1
TERMINOLOGY
On the H11, performance data
is called a “Song”. This includes
50 piano preset songs (Classic
& Jazz).
TERMINOLOGY
Random order:
The 50 Piano Preset Songs
(Classic & Jazz) are selected
and played back randomly by
the instrument—similar to the
shuffling of a deck of cards—
when pressing the [PLAY/
STOP] button.
Operation
008
Song number

H11 Owner’s Manual
18
ENGLISH
Listening to the 50 Piano Preset Songs (Classic & Jazz)
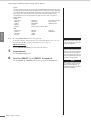
Scene:
The 50 Piano Preset Songs (Classic & Jazz) have been divided into twenty three groups
or categories, to match a variety of listening preferences and to let you select your favor-
ite songs based on a scene description. For instance, if you want to listen to some “Ele-
gant” songs, select scene number 4. The songs that match that category will play
sequentially. For a list of the 50 piano preset songs (Classic & Jazz), see page 53.
Scene Titles:
Classic
Jazz
4-2 Press the [PLAY/STOP] button to start playback.
On the H11, the keys of the keyboard move automatically in response to song
playback (Moving Key). For more information, refer to page 19.
Adjust the Volume
Use the [MASTER VOLUME] control to adjust the volume.
5 Stop playback.
Press the [PLAY/STOP] button.
6 Turn the [PRESET 1] or [PRESET 2] lamp off.
Turn the [PRESET 1] or [PRESET 2] lamp off by pressing the [BGM] button.
TIP
Feel free to play the keyboard
along with the preset song. You
can also change the voice play-
ing on the keyboard.
TIP
You can adjust the Reverb Type
(page 31) that is applied to the
voice you play on the keyboard
and for preset song playback.
The Touch sensitivity (page 32)
for the keyboard voice can also
be adjusted to your liking.
NOTE
When you select a different song
(or a different song is selected
during chained playback), an
appropriate Reverb Type will be
selected accordingly.
- Home Party
- Morning
- Upbeat
- Elegant
- Relaxing
- Nighttime
- Melancholy
- Mood Music
- Fantasy
- Baroque and Pre-romantic Music
- Pre-romantic (Chopin)
- Post-romantic
- Modern French
- Home Party
- Daytime
- Afternoon
- Evening
- Midnight
- Elegant
- Upbeat
- Ballad
- Innocent
- Mood Music

ENGLISH
Listening to the 50 Piano Preset Songs (Classic & Jazz)
H11 Owner’s Manual
19
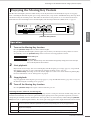
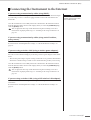
Enjoying the Moving Key Feature
The H11 has a Moving Key feature in which the keys of the keyboard move automatically in response to song play-
back—including the included 50 piano preset songs (Classic & Jazz), songs saved to USB flash memory, and songs from
the Internet using the streaming service. This makes the instrument a true pleasure to see as well as hear. For more
information on the relationship between the Moving Key and the background music (BGM) mode, see page 13.
1 Turn on the Moving Key function.
Press the [MOVING KEY] button so that its indicator lights.
Keep in mind that the Moving Key feature applies only to the keys of the keyboard; the pedals do not move
automatically even if the [MOVING KEY] button is turned on and song playback is started.
2 Start playback.
Play back the desired songs. You can use Moving Key with the 50 piano preset songs (page 17), songs in USB
flash memory (page 20), or songs on the Internet using the streaming service (page 25).
The [MOVING KEY] status lamp (next to the button) lights in red, if an error occurs while using Moving Key.
For more information, refer to “Message List” on page 47.
3 Stop playback.
Stop song playback of the 50 piano preset songs (page 17), songs in USB flash memory (page 20), or songs on
the Internet using the streaming service (page 25).
4 Turn off the Moving Key function.
Press the [MOVING KEY] button again so that its indicator goes out.
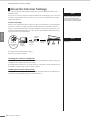
Selecting the Part (Channel) for Moving Key
Depending on the particular song data, the song you’re playing may have several parts. Under the normal setting (Auto), the
instrument automatically chooses the best part for Moving Key playing, based on the particular song data. If you want to
change this part, manually select the channel for the desired part. Press one of the C4-F5 keys while holding the
[MOVING
KEY]
button (also see Quick Operation Guide). The current part setting appears on the display while both controls are held.
Operation
TIP
Normal setting: ON
TERMINOLOGY
Normal setting:
The phrase “Normal setting” refers to the default setting (factory setting) that is active when you
first turn on the power to the instrument.
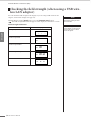
C4-D#5Keyboard part (channel) 1–16 and ON/OFF status “0” (ON) or “–” (OFF) appears on the display. Status can
be set for each Part. Hold down [MOVING KEY] button and repeatedly press the key to toggle ON/OFF.
E5 Even if the song changes, the current part is maintained. The part is not selected automatically. “OFF”
appears on the display.
F5 The best part for each song is selected automatically (Normal setting). “ON” appears on the display.
[MOVING KEY] button

H11 Owner’s Manual
20
ENGLISH
Listening to songs in USB Flash Memory
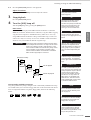
Listening to songs in USB Flash Memory
You can conveniently connect a USB flash memory device to the instrument and listen to songs recorded to that device
(on a computer). Before using a USB flash memory device, be sure to read “Precautions when using the USB [TO
DEVICE] terminal” on page 22.
CAUTION
While playing a USB song or while the [USB] lamp flashes, DO NOT pull out the USB flash memory or turn the power off.
Doing so can result in a loss of data.
Character Code
If the song cannot be loaded, you may need to change the character code setting.
International
Files with file names having the following characters can be loaded. (files with
names in Japanese cannot be loaded).
• Half-size characters: alphabet, numbers, marks, umlaut
Turn the power on while holding the A-1 and B-1 keys.
Japanese
Files with file names having the following characters can be loaded.
• Half-size characters: alphabet, numbers, marks, katakana
• Full-size characters: kanji, hiragana, katakana, alphabet
Turn the power on while holding the A-1 and A#-1 keys.
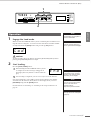
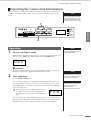
1 Turn on the [USB] lamp.
Make sure that the USB flash memory is connected to the instrument, then turn
on the
[USB] lamp by pressing the [BGM] button.
2 Play any of the USB songs.
2-1 Press the [–/NO] or [+/YES] button to select the number
of the song you want to play.
rnd: Play all USB songs continuously in random
order.
ALL: Play all USB songs in sequence.
001-600: Select the number of the desired USB song,
that which you’ve saved by using a computer
and play the song. The total number of avail-
able USB songs is 600.
2-1
32-2
41
USB
TIP
Normal setting: International
TERMINOLOGY
Normal setting:
The phrase “Normal setting”
refers to the default setting (fac-
tory setting) that is active when
you first turn on the power to the
instrument.
NOTE
Certain songs may take more
time than others to start play-
back. Keep in mind that this
also affects the time between
playback of successively played
songs.
Operation
008
Song number
Strona jest ładowana ...
Strona jest ładowana ...
Strona jest ładowana ...
Strona jest ładowana ...
Strona jest ładowana ...
Strona jest ładowana ...
Strona jest ładowana ...
Strona jest ładowana ...
Strona jest ładowana ...
Strona jest ładowana ...
Strona jest ładowana ...
Strona jest ładowana ...
Strona jest ładowana ...
Strona jest ładowana ...
Strona jest ładowana ...
Strona jest ładowana ...
Strona jest ładowana ...
Strona jest ładowana ...
Strona jest ładowana ...
Strona jest ładowana ...
Strona jest ładowana ...
Strona jest ładowana ...
Strona jest ładowana ...
Strona jest ładowana ...
Strona jest ładowana ...
Strona jest ładowana ...
Strona jest ładowana ...
Strona jest ładowana ...
Strona jest ładowana ...
Strona jest ładowana ...
Strona jest ładowana ...
Strona jest ładowana ...
Strona jest ładowana ...
Strona jest ładowana ...
Strona jest ładowana ...
Strona jest ładowana ...
Strona jest ładowana ...
Strona jest ładowana ...
Strona jest ładowana ...
Strona jest ładowana ...
Strona jest ładowana ...
Strona jest ładowana ...
Strona jest ładowana ...
Strona jest ładowana ...
Strona jest ładowana ...
Strona jest ładowana ...
-
 1
1
-
 2
2
-
 3
3
-
 4
4
-
 5
5
-
 6
6
-
 7
7
-
 8
8
-
 9
9
-
 10
10
-
 11
11
-
 12
12
-
 13
13
-
 14
14
-
 15
15
-
 16
16
-
 17
17
-
 18
18
-
 19
19
-
 20
20
-
 21
21
-
 22
22
-
 23
23
-
 24
24
-
 25
25
-
 26
26
-
 27
27
-
 28
28
-
 29
29
-
 30
30
-
 31
31
-
 32
32
-
 33
33
-
 34
34
-
 35
35
-
 36
36
-
 37
37
-
 38
38
-
 39
39
-
 40
40
-
 41
41
-
 42
42
-
 43
43
-
 44
44
-
 45
45
-
 46
46
-
 47
47
-
 48
48
-
 49
49
-
 50
50
-
 51
51
-
 52
52
-
 53
53
-
 54
54
-
 55
55
-
 56
56
-
 57
57
-
 58
58
-
 59
59
-
 60
60
-
 61
61
-
 62
62
-
 63
63
-
 64
64
-
 65
65
-
 66
66


w innych językach
- čeština: Yamaha H11 Návod k obsluze
- español: Yamaha H11 El manual del propietario
- italiano: Yamaha H11 Manuale del proprietario
- Deutsch: Yamaha H11 Bedienungsanleitung
- svenska: Yamaha H11 Bruksanvisning
- português: Yamaha H11 Manual do proprietário
- français: Yamaha H11 Le manuel du propriétaire
- Türkçe: Yamaha H11 El kitabı
- English: Yamaha H11 Owner's manual
- dansk: Yamaha H11 Brugervejledning
- русский: Yamaha H11 Инструкция по применению
- suomi: Yamaha H11 Omistajan opas
- Nederlands: Yamaha H11 de handleiding
- română: Yamaha H11 Manualul proprietarului
Powiązane dokumenty
-
Yamaha H11 instrukcja
-
-
-
-
-
-
-
-
-
