Dell PowerVault ML6000 Skrócona instrukcja obsługi
- Typ
- Skrócona instrukcja obsługi

www.dell.com | support.dell.com
Dell™ PowerVault™ ML6000
Getting Started Guide (English)
Příručka – začínáme (Czech)
Guide de démarrage rapide (French)
Erste Schritte (German)
Οδηγός «Πρώτα Βήματα» (Greek)
Podstawowe informacje (Polish)
Руководство по началу работы (Russian)
Guía de inicio (Spanish)
Başlama Rehberi (Turkish)
*JK926 A06*
JK926 A06

Notes, Cautions, and Warnings
NOTE: A NOTE indicates important information that helps you make better use of
your computer.
CAUTION: A CAUTION indicates potential damage to hardware or loss of data if
instructions are not followed.
WARNING: A WARNING indicates a potential for property damage, personal
injury, or death.
Poznámky, upozornění a varování
POZNÁMKA: POZNÁMKA označuje důležitou informaci, která vám pomůže lépe využít
váš počítač.
UPOZORNĚNÍ: UPOZORNĚNÍ označuje možné nebezpečí pro hardware nebo ztrátu
dat v případě, že nebudete postupovat podle pokynů.
VAROVÁNÍ: VAROVÁNÍ označuje možné riziko poškození majetku, zranění osob
nebo smrti.
Remarques, mises en garde et avertissements
REMARQUE : UNE REMARQUE désigne des informations importantes destinées à
vous aider à optimiser l'utilisation de votre ordinateur.
MISE EN GARDE : UNE MISE EN GARDE désigne un risque potentiel de
dommage matériel ou de perte de données en cas de non-respect des instructions.
AVERTISSEMENT : UN AVERTISSEMENT désigne un risque potentiel de
dommage de propriété, de blessures, voire de mort.

Anmerkungen, Vorsichts- und Warnhinweise
ANMERKUNG: Eine ANMERKUNG gibt Ihnen wichtige Informationen, die Ihnen
helfen, Ihren Computer besser nutzen zu können.
VORSICHTSHINWEIS: Ein VORSICHTSHINWEIS weist auf mögliche
Hardwareschäden oder Datenverluste hin, die eintreten können, wenn
Anweisungen nicht befolgt werden.
WARNHINWEIS: Ein WARNHINWEIS weist auf mögliche Gefahren von
Vermögensschäden, Verletzungsgefahren oder Lebensgefahr hin.
Σημειώσεις, Επισημάνσεις και Προειδοποιήσεις
ΣΗΜΕΙΩΣΗ: Η ένδειξη ΣΗΜΕΙΩΣΗ υποδεικνύει σημαντικές πληροφορίες που σας
βοηθούν να κάνετε καλύτερη χρήση του υπολογιστή σας.
ΠΡΟΣΟΧΗ: Η ένδειξη ΠΡΟΣΟΧΗ υποδεικνύει πιθανή πρόκληση ζημιάς στο υλικό ή
απώλεια δεδομένων σε περίπτωση μη τήρησης των οδηγιών.
ΠΡΟΕΙΔΟΠΟΙΗΣΗ: Η ένδειξη ΠΡΟΕΙΔΟΠΟΙΗΣΗ υποδεικνύει την πιθανότητα
πρόκλησης ζημιάς στην περιουσία, τραυματισμού ή θανάτου.
UWAGI, OSTRZEŻENIA i PRZESTROGA
UWAGA: UWAGA wskazuje istotną informację, pomagającą korzystać ze swojego
komputera z większą wydajnością.
OSTRZEŻENIE:
OSTRZEŻENIE wskazuje na mozlwiość uszkodzenia sprzętu
komputerowego lub utratę danych w przypadku nie przestrzegania wskazówek
zawartych w instrukcji obsługi.
OSTRZEŻENIE: OSTRZEŻENIE wskazuje na możliwość uszkodzenia własności,
uszczerbek na zdrowiu lub utratę życia.

Примечания, предостережения и
предупреждения
ПРИМЕЧАНИЕ: Знак «ПРИМЕЧАНИЕ» рядом с разделом указывает на
информацию, которая поможет вам более правильно пользоваться своим
компьютером.
ВНИМАНИЕ! Знак «ВНИМАНИЕ!» указывает на возможность повреждения
оборудования и потери данных в случае невыполнения инструкций.
ОСТОРОЖНО! Знак «ОСТОРОЖНО!» указывает на возможность нанесения
ущерба оборудованию или потери данных, если не соблюдаются данные
инструкции.
Notas, precauciones y advertencias
NOTA: Las NOTAS indican información importante que ayuda a utilizar mejor el
equipo.
PRECAUCIONES: Las PRECAUCIONES indican daños potenciales al hardware o
la pérdida de datos si no se observan las instrucciones.
ADVERTENCIA: Las ADVERTENCIAS indican un peligro potencial de datos a la
propiedad, lesiones personales o la muerte.
Notlar, İkazlar ve Uyarılar
BİR NOT: BİR NOT, bilgisayarınızı daha iyi kullanmanıza yardımcı olan önemli bilgilere
işaret eder.
BİR İKAZ: BİR İKAZ, talimatlara uyulmadığında donanıma oluşabilecek potansiyel
zarara ya da veri kaybına işaret eder.
UYARI: UYARI, maddi zarar, kişisel yaralanma ya da ölüm ihtimaline işaret eder.
____________________

Information in this document is subject to change without notice.
©Copyright © 2015 Dell Inc. All rights reserved.
This product is protected by U.S. and international copyright and intellectual property laws. Dell™
and the Dell logo are trademarks of Dell Inc. in the United States and/or other jurisdictions. All other
marks and names mentioned herein may be trademarks of their respective companies.
2015 - 08
Informace obsažené v tomto dokumentu podléhají změnám bez upozornění.
© 2015 Dell Inc. Všechna práva vyhrazena.
Tento výrobek je chráněn právními předpisy o autorských právech a o právech k duševnímu vlastnictví
Spojených států a mezinárodně platnými právními předpisy. Dell™ a logo Dell jsou ochranné známky
společnosti Dell Inc. ve Spojených státech a/nebo jiných jurisdikcích. Veškeré ostatní ochranné
známky a názvy uvedené v tomto dokumentu mohou být ochrannými známkami příslušných
společností.
2015 - 08
Les informations contenues dans ce document sont sujettes à modification sans préavis.
© 2015 Dell Inc. Tous droits réservés.
Ce produit est protégé par les lois américaines et internationales sur le droit d’auteur et la propriété
intellectuelle. Dell™ et le logo Dell sont des marques commerciales de Dell Inc. aux États-Unis et au
sein d’autres juridictions. Tous les autres noms et marques mentionnés dans le présent document sont
des marques commerciales de leurs entreprises respectives.
2015 - 08
Irrtümer und technische Änderungen vorbehalten.
© 2015 Dell Inc. Alle Rechte vorbehalten.
Dieses Produkt ist durch das US-amerikanische und internationale Urheberrecht und geistige
Eigentumsrecht geschützt. Dell™ und das Dell-Logo sind Marken von Dell Inc. in den USA und/oder
anderen Jurisdiktionen. Alle anderen hierin genannten Marken und Namen sind Handelsmarken der
jeweiligen Unternehmen.
2015 - 08
Οι πληροφορίες του παρόντος εγγράφου υπόκεινται σε αλλαγή χωρίς ειδοποίηση.
© 2015 Dell Inc. Με επιφύλαξη παντός δικαιώματος.
Το εν λόγω προϊόν προστατεύεται από τη διεθνή νομοθεσία και τη νομοθεσία των ΗΠΑ περί
προστασίας των δικαιωμάτων πνευματικής ιδιοκτησίας. Η ονομασία Dell™ και το λογότυπο Dell
είναι εμπορικά σήματα της εταιρείας Dell Inc. στις Ηνωμένες Πολιτείες ή/και σε άλλες δικαιοδοσίες.
Όλα τα άλλα σήματα και οι ονομασίες που αναφέρονται στο παρόν ενδέχεται να είναι εμπορικά
σήματα των αντίστοιχων εταιρειών τους.
2015 - 08
Informacje zawarte w niniejszym dokumencie mogą zostać zmienione bez uprzedzenia.
© 2015 Dell Inc. Wszelkie prawa zastrzeżone.
Niniejszy produkt jest chroniony amerykańskimi i zagranicznymi prawami autorskimi i prawami
własności intelektualnej. Dell™ i logotyp Dell są znakami towarowymi spółki Dell Inc. w USA i/lub
na terenie innych jurysdykcji. Wszystkie pozostałe znaki i nazwy podane w niniejszym dokumencie
mogą być znakami towarowymi ich właścicieli.
2015 - 08

Информация в настоящем документе подлежит изменению без уведомления.
©Dell Inc., 2015 г. Все права защищены.
Настоящее изделие защищено законодательством США и международным законодательством
в области авторских прав и интеллектуальной собственности. Dell™ и логотип Dell являются
товарными знаками компании Dell Inc. в США и/или других юрисдикциях. Все прочие знаки
и названия, упомянутые в настоящем документе, могут являться товарными знаками
соответствующих компаний.
2015 - 08
La información en este documento está sujeta a cambios sin previo aviso.
© 2015 Dell Inc. Todos los derechos reservados.
Este producto está protegido por las leyes de derechos de autor y propiedad intelectual internacionales
y de EE. UU. Dell™ y el logotipo de Dell son marcas comerciales de Dell, Inc. en Estados Unidos y
en otras jurisdicciones. Es posible que todas las demás marcas y nombres que se mencionan en este
documento sean marcas comerciales de sus respectivas empresas.
2015 - 08
Bu belgedeki bilgiler haber vermeksizin değiştirilebilir.
©Copyright © 2015 Dell Inc. Her hakkı saklıdır.
Bu ürün, ABD ve uluslararası telif hakkı yasaları ve fikri mülkiyet yasaları tarafından korunmaktadır.
Dell™ ve Dell logosu, Birleşik Devletler'de ve/veya diğer hükümetler nezdinde Dell Inc.'e ait
markalardır. Burada anılan diğer tüm markalar ve adlar, kendi şirketlerinin markaları olabilir.
2015 - 08
August 2015 P/N JK926 Rev. A06

Contents
1 Dell PowerVault ML6000
Getting Started Guide (English) . . . . . . . 17
Installing Your Library in a Rack . . . . . . . . . . . . 18
Installing a 14U Library in a Rack
. . . . . . . . . . . . 18
Cabling the Library
. . . . . . . . . . . . . . . . . . . . 20
Special Instructions for LTO-5 or Later
Tape Drives
. . . . . . . . . . . . . . . . . . . . . 20
Connecting Fibre Channel Cables to a Host
or Switch . . . . . . . . . . . . . . . . . . . . . . 21
Connecting Fibre Channel Cables Through a Fibre
Channel I/O Blade
. . . . . . . . . . . . . . . . . 22
Connecting Serial Attached SCSI (SAS) Cables . . 24
Finishing Cabling the Library
. . . . . . . . . . . . 25
Powering On the Library
. . . . . . . . . . . . . . . . . 27
Getting Started
. . . . . . . . . . . . . . . . . . . . . . 28
2 Příručka Dell PowerVault ML6000 –
začínáme (Czech) . . . . . . . . . . . . . . . . . . . 29
Instalace knihovny do stojanu . . . . . . . . . . . . . . . . . . . . . . . . 30
Instalace knihovny 14U do stojanu. . . . . . . . . . . . . . . . . . . . . 30
Zapojení kabeláže knihovny . . . . . . . . . . . . . . . . . . . . . . . . . . 32
Zvláštní pokyny pro páskové jednotky verze LTO-5
a novější . . . . . . . . . . . . . . . . . . . . . . . . . . . . . . . . . . . . . . 32

8 Contents
Připojování sběrnice optickým kabelem k hostiteli nebo
přepínači . . . . . . . . . . . . . . . . . . . . . . . . . . . . . . . . . . . . . .33
Připojování sběrnice s optickými kabely přes optickou
sběrnici I/O Blade . . . . . . . . . . . . . . . . . . . . . . . . . . . . . . .34
Sériové připojování dodávanými kabely SCSI (SAS) . . . .36
Dokončení kabeláže knihovny . . . . . . . . . . . . . . . . . . . . . .37
Elektrické napájení knihovny. . . . . . . . . . . . . . . . . . . . . . . . . 39
Začínáme . . . . . . . . . . . . . . . . . . . . . . . . . . . . . . . . . . . . . . . . . 40
3 Guide de démarrage rapide de
Dell PowerVault ML6000 (French) . . . . . . 41
Installation de votre bibliothèque dans un rack . . . . 42
Installation d’une bibliothèque 14U dans un rack
. . . . 43
Câblage de la bibliothèque
. . . . . . . . . . . . . . . 44
Instructions spéciales pour les lecteurs de
bande LTO-5 ou ultérieurs
. . . . . . . . . . . . . 44
Connexion des câbles Fibre Channel à un hôte
ou à un commutateur . . . . . . . . . . . . . . . . 45
Connexion des câbles Fibre Channel au moyen
d'une lame d'E/S Fibre Channel . . . . . . . . . . 46
Connexion des câbles SCSI (SAS)
. . . . . . . . . 48
Terminer le câblage de la bibliothèque
. . . . . . . 49
Mise sous tension de la bibliothèque
. . . . . . . . . . 51
Guide de démarrage rapide
. . . . . . . . . . . . . . . 52
4 Dell PowerVault ML6000
Erste Schritte (German)
. . . . . . . . . . . . . 53
Einbau Ihrer Bibliothek in ein Rack . . . . . . . . . . . 54

Installation einer 14U-Bibliothek in einem Rack . . . . 54
Verkabeln der Bibliothek
. . . . . . . . . . . . . . . . 56
Sonderanweisungen für LTO-5- oder neuere
Bandlaufwerke
. . . . . . . . . . . . . . . . . . . 56
Anschluss von Fibre Channel-Kabeln an einen
Host oder Switch . . . . . . . . . . . . . . . . . . 57
Anschluss von Fibre Channel-Kabeln über ein
Fibre Channel E/A-Blade . . . . . . . . . . . . . . 58
Anschluss von SAS-Kabeln
. . . . . . . . . . . . 60
Fertigstellen der Verkabelung der Bibliothek
. . . 61
Einschalten der Bibliothek
. . . . . . . . . . . . . . . 63
Erste Schritte
. . . . . . . . . . . . . . . . . . . . . . . 64
5 Dell PowerVault ML6000 Οδηγός
«Πρώτα Βήματα» (Greek) . . . . . . . . . . . . . 65
Εγκατάσταση της βιβλιοθήκης σε μεταλλικό φατνίο . . . . . . 66
Εγκατάσταση της βιβλιοθήκης 14U σε μεταλλικό φατνίο. . . 67
Καλωδίωση βιβλιοθήκης . . . . . . . . . . . . . . . . . . . . . . . . . . . . . 68
Ειδικές οδηγίες για μονάδες ταινίας LTO-5
ή νεότερης έκδοσης . . . . . . . . . . . . . . . . . . . . . . . . . . . . . 68
Σύνδεση καλωδίων οπτικών ινών σε κεντρικό
υπολογιστή ή μεταγωγέα . . . . . . . . . . . . . . . . . . . . . . . . . 69
Σύνδεση καλωδίων καναλιού οπτικών ινών μέσω
I/O blade καναλιού οπτικών ινών . . . . . . . . . . . . . . . . . . . 70
Σύνδεση σειριακά συνδεδεμένων καλωδίων SCSI
(SAS) . . . . . . . . . . . . . . . . . . . . . . . . . . . . . . . . . . . . . . . . 72
Ολοκλήρωση της σύνδεσης καλωδίων της βιβλιοθήκης
. . 73
Ενεργοποίηση της βιβλιοθήκης . . . . . . . . . . . . . . . . . . . . . . . 75
Τα πρώτα βήματα. . . . . . . . . . . . . . . . . . . . . . . . . . . . . . . . . . . 76

10 Contents
6 Dell PowerVault ML6000 Pierwsze
kroki- instrukcja obsługi (Polish) . . . . . . . . . 77
Instalacja biblioteki w obudowie . . . . . . . . . . . . . . . . . . . . . . 78
Instalacja biblioteki 14U w obudowie . . . . . . . . . . . . . . . . . . 78
Okablowanie biblioteki . . . . . . . . . . . . . . . . . . . . . . . . . . . . . . 80
Instrukcje specjalne dla napędu taśmowego LTO-5 i
późniejszych . . . . . . . . . . . . . . . . . . . . . . . . . . . . . . . . . . .80
Podłączanie kabli magistrali szeregowej do komputera
głównego lub przełącznika . . . . . . . . . . . . . . . . . . . . . . . . .81
Połącz kable magistrali szeregowej poprzez kasetę
I/O magistrali szeregowej . . . . . . . . . . . . . . . . . . . . . . . . .82
Łączenie kabli seryjnie przyłączonych SCSI (SAS) . . . . . .84
Zakończenie podłączenia kabli biblioteki . . . . . . . . . . . . . .85
Zasilanie biblioteki . . . . . . . . . . . . . . . . . . . . . . . . . . . . . . . . . 87
Rozpoczynając. . . . . . . . . . . . . . . . . . . . . . . . . . . . . . . . . . . . . 88
7 Руководство по началу работы с ленточной
библиотекой Dell PowerVault ML6000
(Russian) . . . . . . . . . . . . . . . . . . . . . . . . . 89
Установка библиотеки в стойку . . . . . . . . . . . . . . . . . . . . . 90
Установка библиотеки на 14 устройств в стойку . . . . . . 91
Подключение кабелей к библиотеке . . . . . . . . . . . . . . . . . 92
Специальные инструкции для стримеров LTO-5
и стримеров более поздних версий . . . . . . . . . . . . . . . .92
Подключение кабелей Fibre Channel к основной
системе или к коммутатору . . . . . . . . . . . . . . . . . . . . . . .94
Подключение кабелей Fibre Channel через блок
разъемов ввода/вывода Fibre Channel . . . . . . . . . . . . .95

Подключение кабелей с последовательным
интерфейсом SCSI (SAS) . . . . . . . . . . . . . . . . . . . . . . . . 96
Завершение подключения кабелей к библиотеке . . . . 97
Подача электропитания к библиотеке . . . . . . . . . . . . . . . . 99
Начало работы . . . . . . . . . . . . . . . . . . . . . . . . . . . . . . . . . . . 100
8 Guía de inicio de Dell PowerVault
ML6000 (Spanish) . . . . . . . . . . . . . . . . . 101
Instalación de la biblioteca en un bastidor . . . . . . . 102
Instalación de la biblioteca 14U en un bastidor
. . . . 103
Cableado de la biblioteca
. . . . . . . . . . . . . . . . 104
Instrucciones especiales para las unidades
de cinta LTO-5 o posteriores
. . . . . . . . . . . . 104
Conexión de cables Fibre Channel al host
o al conmutador . . . . . . . . . . . . . . . . . . 105
Conexión de cables Fibre Channel por medio
de una tarjeta de E/S Fibre Channel . . . . . . . . 106
Conexión de cables SCSI de conexión en serie
(SAS)
. . . . . . . . . . . . . . . . . . . . . . . . 108
Finalización del cableado de la biblioteca . . . . . 109
Encendido de la biblioteca
. . . . . . . . . . . . . . . 111
Inicio
. . . . . . . . . . . . . . . . . . . . . . . . . . . 112
9 Dell PowerVault ML6000 Başlama Rehberi
(Turkish) . . . . . . . . . . . . . . . . . . . . . . . . . 113
Kütüphanenizin bir Raf Sistemi içine Kurulması. . . . . . . . . 114
PowerVault ML6000'Ambalajından Çıkarmadan ve
Kurmadan Önce Bu Bölümü Okuyun . . . . . . . . . . . . . . . . . . 114

12 Contents
Raf Sistemi Kurulumu için Kütüphaneyi Hazırlama . . . . . . 115
Kütüphanenizin Ambalajından Çıkarılması . . . . . . . . . . . 115
Teyp Sürücüsünün (Sürücülerinin) Çıkarılması . . . . . . . . 115
Güç Kaynaklarının Çıkarılması . . . . . . . . . . . . . . . . . . . . 115
Kütüphane Kontrol Kanadının Çıkarılması . . . . . . . . . . . 116
Kütüphanenin bir Raf Sistemi içine Kurulması . . . . . . . . . . 116
Kuruluma Hazırlama . . . . . . . . . . . . . . . . . . . . . . . . . . . . 116
Rafa Montaj Raflarının Kurulumu . . . . . . . . . . . . . . . . . . 122
Raf Sistemine Kütüphanenin Kurulumu . . . . . . . . . . . . . 124
Kütüphanenin kablo bağlantılarının yapılması . . . . . . . . . . 129
LTO-5 ya da Sonraki Teyp Sürücüleri için
Özel Talimatlar . . . . . . . . . . . . . . . . . . . . . . . . . . . . . . . . 129
Fiber Kanal Kablolarını bir Sunucuya ya da
Anahtara Bağlama . . . . . . . . . . . . . . . . . . . . . . . . . . . . . 130
Fiber Kanal Kablosunu, Fiber Kanal I/O Kanadı
Aracılığıyla Bağlama . . . . . . . . . . . . . . . . . . . . . . . . . . . . 131
Seri Bağlama SCSI (SAS) Kablolarının Bağlanması . . . 133
Kütüphanenin Kablo Bağlantılarının Bitirilmesi . . . . . . . . 134
Kütüphanenin Çalıştırılması . . . . . . . . . . . . . . . . . . . . . . . . . 136
Başlama. . . . . . . . . . . . . . . . . . . . . . . . . . . . . . . . . . . . . . . . . . 137

Dell PowerVault ML6000 Getting Started Guide 17
Dell PowerVault ML6000 Getting
Started Guide (English)
WARNING: Before cabling your library, read the Dell™ PowerVault™ Systems
safety instructions in your Safety, Environmental and Regulatory Information
guide.
WARNING: All libraries must be installed in a rack having a main protective
earthing (grounding) terminal. For detailed installation information, see the Dell™
PowerVault™ ML6000 Tape Library User’s Guide (http://www.dell.com/support).
WARNING: The socket outlet shall be installed near the equipment and shall be
easily accessible.
WARNING: The front panel power switch is not the main disconnection device.
Please pull all main plugs out of the appliance inlets in order to switch off the
appliance completely.
WARNING: Before cabling your library, remove all interior packaging. Be sure to
remove the orange robot restraint assembly that secures the robot to the floor of
the library. In addition, remove the yellow strip in the I/E station. Save all
packaging materials and the orange robot restraint assembly in case you need to
move or ship the library in the future. For details, see the unpacking instructions
that came with your library and the Dell™ PowerVault™ ML6000 Tape Library
User’s Guide (http://www.dell.com/support).

18 Dell PowerVault ML6000 Getting Started Guide
Installing Your Library in a Rack
All Dell™ PowerVault™ ML6000 libraries must be installed in a rack.
• ML6010 CM is a single 5U Library Control Module.
• ML6020 CM consists of one (1) ML6010 CM 5U Library Control Module
and one (1) ML6000 EM 9U Library Expansion Module (14U total). See
special racking instructions "Installing a 14U Library in a Rack" on page 18.
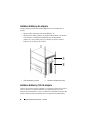
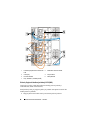
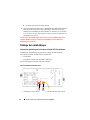
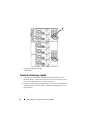
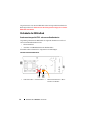
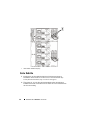
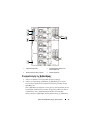
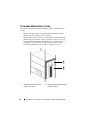
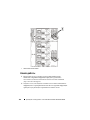
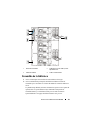
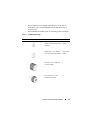
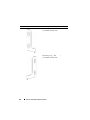
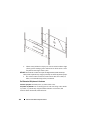
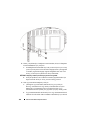
Installing a 14U Library in a Rack
Refer to the Dell™ PowerVault™ ML6000 Tape Library User’s Guide to
perform this procedure. Other documents about this library do not include
information about the 14U library being pre-assembled, which greatly simplifies
the installation of the ML6020 14U library in a rack.
1 5U Library Control Module (CM) 2 9U Library Expansion Module (EM)

Dell PowerVault ML6000 Getting Started Guide 19
The steps below describe modifications to the procedure “Installing the Library
in a Rack” which will make installing the 14U library in a rack easier. Read this
procedure before unpacking the library because the shipping restraints are left in
place to simplify installation.
NOTE:
This procedure assumes that you are installing a new library in a rack.
Do not take apart the 5U and 9U modules for this procedure, and do not remove
the shipping restraints. Leave the 14U library intact and the shipping restraints
in place.
1
Unpack the library from the shipping carton. Leave the orange robot shipping
restraint and the magazine shipping restraint in place until this procedure
directs you to remove it.
2
Follow the instructions for “Preparing for Installation” in the
Dell™
PowerVault™ ML6000 Tape Library User’s Guide
.
3
Follow the instructions for “Installing the Rack-mount Shelves” in the
Dell™ PowerVault™ ML6000 Tape Library User’s Guide.
4
For the procedure “Preparing Modules for Rack Installation”, follow these
steps:
a
Remove all tape drives, power supplies, and all cords and cables from
the library modules. The modules are much easier to lift into the rack
without the additional weight of the tape drives.
WARNING: Without tape drives, tape cartridges, or power supplies, a 5U Library
Control Module weighs approximately 60 lbs (27.2 kg). A 9U Library Expansion
Module, without tape drives, tape cartridges, or power supplies, exceeds 65 lbs
(29.5 kg). To avoid serious injury, at least two people are required to safely lift the
modules.
b
Do not remove the orange shipping restraint from the robot.
5
Follow the instructions for “Installing the Bottom Module in the Rack” in the
Dell™ PowerVault™ ML6000 Tape Library User’s Guide
with the
assembled 14U library.
Do not take apart the 5U and 9U modules for this
procedure. Follow the next step before powering on the library.
Ensure the library is secured properly and the installation in the rack is complete.
Remove all shipping restraints before powering up the library
.

20 Dell PowerVault ML6000 Getting Started Guide
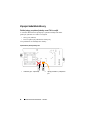
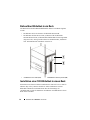
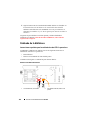
Cabling the Library
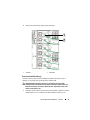
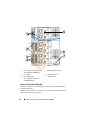
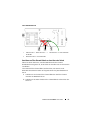
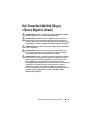
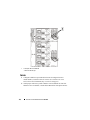
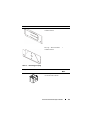
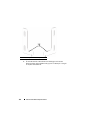
Special Instructions for LTO-5 or Later Tape Drives
Currently, the library does not support using the following features on LTO-5 or
later tape drives:
• Ethernet port
• Port 2 on dual-port tape drives
See the following two figures for details.
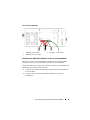
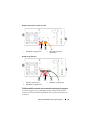
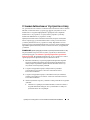
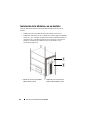
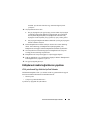
LTO-5 Fibre Channel Tape Drive
1 Ethernet port - do not use 2 Fibre Channel port - use this port

Dell PowerVault ML6000 Getting Started Guide 21
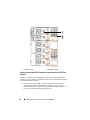
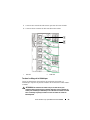
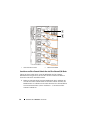
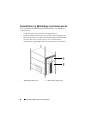
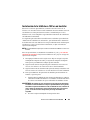
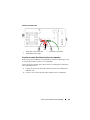
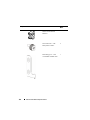
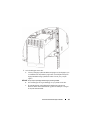
LTO-5 SAS Tape Drive
Connecting Fibre Channel Cables to a Host or Switch
Perform this step if your library contains Fibre Channel tape drives that you will be
connecting directly to a host or switch.
Use Fibre Channel cables to connect your host (or switch) to the library. For each
tape drive:
1
Connect one end of the Fibre Channel cable to the Fibre Channel port on the
tape drive.
2
Connect the other end of the Fibre Channel cable to your host or switch.
1 SAS port 1 - use this port 2 SAS port 2 - do not use
3 Ethernet port - do not use

22 Dell PowerVault ML6000 Getting Started Guide
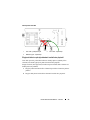
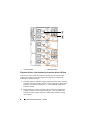
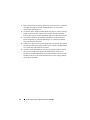
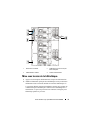
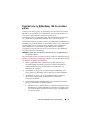
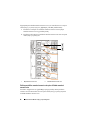
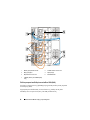
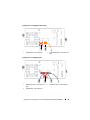
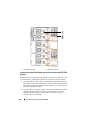
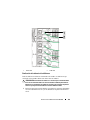
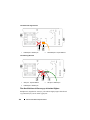
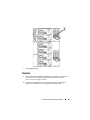
Connecting Fibre Channel Cables Through a Fibre Channel I/O Blade
Perform this step if your library contains Fibre Channel tape drives that you will be
connecting to your host or switch through a Fibre Channel I/O blade.
1
For each tape drive: Connect one end of a Fibre Channel cable to the Fibre
Channel port on the tape drive. Connect the other end of the Fibre Channel
cable to an initiator port (lower ports 3 – 6) on the nearest Fibre Channel I/O
blade.
2
For each Fibre Channel I/O blade: Connect one end of a Fibre Channel cable
to one of the target ports (upper ports 1 and 2) on the Fibre Channel I/O
blade. Connect the other end of the Fibre Channel cable to your host or
switch.
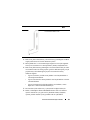
1 Fibre Channel port 2 Fibre Channel cable

Dell PowerVault ML6000 Getting Started Guide 23
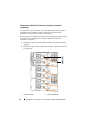
Use Ethernet cables to connect the LCB in the 5U Library Control Module to
each 9U Library Expansion Module that contains a Fibre Channel I/O blade.
For each Fibre Channel I/O blade installed in a 9U Library Expansion
Module:
3
Connect one end of the Ethernet cable to any of the four middle Ethernet
ports on the LCB Ethernet hub.
4
Connect the other end of the cable to the appropriate port on the 9U Library
Expansion Module. If the Fibre Channel I/O blade is installed in the upper
bay, use the port labelled "UPPER." If the Fibre Channel I/O blade is
installed in the lower bay, use the port labelled "LOWER."

24 Dell PowerVault ML6000 Getting Started Guide
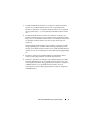
Connecting Serial Attached SCSI (SAS) Cables
Perform this step if your library contains serial attached SCSI (SAS) tape drives.
Use SAS cables to connect the SAS tape drives directly to the host. For each tape
drive:
1
Connect one end of the SAS cable to the SAS port on the tape drive.
2
Connect the other end of the SAS cable directly to the host.
1 LCB middle Ethernet ports 2 Fibre Channel I/O blade
3 Target ports 4 Initiator ports
5 Fibre Channel port 6 Ethernet cables
7 "UPPER" and "LOWER" ports
Strona się ładuje...
Strona się ładuje...
Strona się ładuje...
Strona się ładuje...
Strona się ładuje...
Strona się ładuje...
Strona się ładuje...
Strona się ładuje...
Strona się ładuje...
Strona się ładuje...
Strona się ładuje...
Strona się ładuje...
Strona się ładuje...
Strona się ładuje...
Strona się ładuje...
Strona się ładuje...
Strona się ładuje...
Strona się ładuje...
Strona się ładuje...
Strona się ładuje...
Strona się ładuje...
Strona się ładuje...
Strona się ładuje...
Strona się ładuje...
Strona się ładuje...
Strona się ładuje...
Strona się ładuje...
Strona się ładuje...
Strona się ładuje...
Strona się ładuje...
Strona się ładuje...
Strona się ładuje...
Strona się ładuje...
Strona się ładuje...
Strona się ładuje...
Strona się ładuje...
Strona się ładuje...
Strona się ładuje...
Strona się ładuje...
Strona się ładuje...
Strona się ładuje...
Strona się ładuje...
Strona się ładuje...
Strona się ładuje...
Strona się ładuje...
Strona się ładuje...
Strona się ładuje...
Strona się ładuje...
Strona się ładuje...
Strona się ładuje...
Strona się ładuje...
Strona się ładuje...
Strona się ładuje...
Strona się ładuje...
Strona się ładuje...
Strona się ładuje...
Strona się ładuje...
Strona się ładuje...
Strona się ładuje...
Strona się ładuje...
Strona się ładuje...
Strona się ładuje...
Strona się ładuje...
Strona się ładuje...
Strona się ładuje...
Strona się ładuje...
Strona się ładuje...
Strona się ładuje...
Strona się ładuje...
Strona się ładuje...
Strona się ładuje...
Strona się ładuje...
Strona się ładuje...
Strona się ładuje...
Strona się ładuje...
Strona się ładuje...
Strona się ładuje...
Strona się ładuje...
Strona się ładuje...
Strona się ładuje...
Strona się ładuje...
Strona się ładuje...
Strona się ładuje...
Strona się ładuje...
Strona się ładuje...
Strona się ładuje...
Strona się ładuje...
Strona się ładuje...
Strona się ładuje...
Strona się ładuje...
Strona się ładuje...
Strona się ładuje...
Strona się ładuje...
Strona się ładuje...
Strona się ładuje...
Strona się ładuje...
Strona się ładuje...
Strona się ładuje...
Strona się ładuje...
Strona się ładuje...
Strona się ładuje...
Strona się ładuje...
Strona się ładuje...
Strona się ładuje...
Strona się ładuje...
Strona się ładuje...
Strona się ładuje...
Strona się ładuje...
Strona się ładuje...
Strona się ładuje...
Strona się ładuje...
Strona się ładuje...
Strona się ładuje...
Strona się ładuje...
-
 1
1
-
 2
2
-
 3
3
-
 4
4
-
 5
5
-
 6
6
-
 7
7
-
 8
8
-
 9
9
-
 10
10
-
 11
11
-
 12
12
-
 13
13
-
 14
14
-
 15
15
-
 16
16
-
 17
17
-
 18
18
-
 19
19
-
 20
20
-
 21
21
-
 22
22
-
 23
23
-
 24
24
-
 25
25
-
 26
26
-
 27
27
-
 28
28
-
 29
29
-
 30
30
-
 31
31
-
 32
32
-
 33
33
-
 34
34
-
 35
35
-
 36
36
-
 37
37
-
 38
38
-
 39
39
-
 40
40
-
 41
41
-
 42
42
-
 43
43
-
 44
44
-
 45
45
-
 46
46
-
 47
47
-
 48
48
-
 49
49
-
 50
50
-
 51
51
-
 52
52
-
 53
53
-
 54
54
-
 55
55
-
 56
56
-
 57
57
-
 58
58
-
 59
59
-
 60
60
-
 61
61
-
 62
62
-
 63
63
-
 64
64
-
 65
65
-
 66
66
-
 67
67
-
 68
68
-
 69
69
-
 70
70
-
 71
71
-
 72
72
-
 73
73
-
 74
74
-
 75
75
-
 76
76
-
 77
77
-
 78
78
-
 79
79
-
 80
80
-
 81
81
-
 82
82
-
 83
83
-
 84
84
-
 85
85
-
 86
86
-
 87
87
-
 88
88
-
 89
89
-
 90
90
-
 91
91
-
 92
92
-
 93
93
-
 94
94
-
 95
95
-
 96
96
-
 97
97
-
 98
98
-
 99
99
-
 100
100
-
 101
101
-
 102
102
-
 103
103
-
 104
104
-
 105
105
-
 106
106
-
 107
107
-
 108
108
-
 109
109
-
 110
110
-
 111
111
-
 112
112
-
 113
113
-
 114
114
-
 115
115
-
 116
116
-
 117
117
-
 118
118
-
 119
119
-
 120
120
-
 121
121
-
 122
122
-
 123
123
-
 124
124
-
 125
125
-
 126
126
-
 127
127
-
 128
128
-
 129
129
-
 130
130
-
 131
131
-
 132
132
-
 133
133
-
 134
134


