
Item: 226568
233900
233917
233924
233931
235829
235836
BACK BAR REFRIGERATOR
User manual
Gebrauchsanweisung
Gebruiksaanwijzing
Instrukcja obsługi
Mode d’emploi
Istruzioni per l’utente
Instrucţiunile utilizatorului
Руководство по эксплуатации
Οδηγίες χρήσης
You should read this user manual carefully before using
the appliance.
Bevor Sie das Gerät in Betrieb nehmen, sollten
Sie diese Gebrauchsanweisung aufmerksam lesen.
Alvorens de apparatuur in gebruik te nemen dient
u deze gebruiksaanwijzing aandachtig te lezen.
Przed uruchomieniem urządzenia należy koniecznie
dokładnie przeczytać niniejszą instrukcję obsługi.
Lisez attentivement ce mode d’emploi avant d’utiliser
l’appareil .
Prima di utilizzare l’apparecchio in funzione leggere
attentamente le istruzioni per l’uso.
Citiţi cu atenţie prezentul manual de utilizare înainte de
folosirea aparatului.
Внимательно прочитайте руководство пользователя
перед использованием прибора.
Πρέπει να διαβάσετε αυτές τις οδηγίες χρήσης προσεκτικά
πριν χρησιµοποιήσετε τη συσκευή.

2
Keep these instructions with the appliance.
Diese Gebrauchsanweisung bitte beim Gerät aufbewahren.
Bewaar deze handleiding bij het apparaat.
Zachowaj instrukcję urządzenia
Gardez ces instructions avec cet appareil.
Conservate le istruzioni insieme all’apparecchio.
Păstraţi maualul de utilizare alături de aparat.
Хранить руководство вместе с устройством.
Φυλάξτε αυτές τις οδηγίες μαζί με τη συσκευή.
For indoor use only.
Nur zur Verwendung im Innenbereich.
Alleen voor gebruik binnenshuis.
Do użytku wewnątrz pomieszczeń.
Pour l’usage à l’intérieur seulement.
Destinato solo all’uso domestico.
Doar pentru uz la interior.
Использовать только в помещениях.
Για χρήση μόνο σε εσωτερικό χώρο.

Dear Customer,
Thank you for purchasing this Arktic appliance. Read this manual carefully, paying particular attention to
the safety regulations outlined below, before installing and using this appliance for the first time.
Safety regulations
• This appliance is intended for commercial use only.
• Only use the appliance for the intended purpose it was designed for as described in this
manual.
• The manufacturer is not liable for any damage caused by incorrect operation and
improper use.
• Keep the appliance and electrical plug away from water and other liquids. In the event
the appliance falls into water, immediately remove the power plug from the socket. Do
not use the appliance until it has been checked by a certified technician. Failure to follow
these instructions will cause life threatening risks.
• Never attempt to open the housing of the appliance by yourself.
• Do not insert objects into the housing of the appliance.
• Do not touch the plug with wet or damp hands.
•
Danger of electric shock! Do not attempt to repair the appliance by yourself, repairs
are only to be conducted by qualified personnel.
• Never use a damaged appliance! When it’s damaged, disconnect the appliance from the
socket and contact the retailer.
• Warning! Do not immerse the electrical parts of the appliance in water or other liquids.
• Never hold the appliance under running water.
• Regularly check the power plug and cord for any damage. When damaged it must be
replaced by a service agent or similarly qualified person in order to avoid danger or injury.
• Make sure the cord does not come in contact with sharp or hot objects and keep it away
from open fire. Never pull the power cord to unplug it from the socket, always pull the
plug instead.
• Make sure that the power cord and/or extension cord do not cause a trip hazard.
• Never leave the appliance unattended during use.
• Warning!
As long as the plug is in the socket the appliance is connected to the power
source.
• Turn off the appliance before unplugging it from the socket.
• Connect the power plug to an easily accessible electrical socket so that in case of emergency
the appliance can be unplugged immediately.
• Never carry the appliance by the cord.
• Do not use any extra devices that are not supplied together with the appliance.
• Only connect the appliance to an electrical outlet with the voltage and frequency mentioned
on the appliance label.
• Never use accessories other than those recommended by the manufacturer. Failure to do
so could pose a safety risk to the user and could damage the appliance. Only use original
parts and accessories.
3
NLEN

4
EN
• This appliance should not be operated by persons with reduced physical, sensory or mental
capabilities, or persons that have a lack of experience and knowledge.
• This appliance should, under any circumstances, not be used by children.
• Keep the appliance and its power cord out of reach of children.
• WARNING: ALWAYS switch off the appliance and unplug from power socket before
cleaning, maintenance or storage.
Special Safety Regulations
• This appliance is not intended to cool down the beverages or to store them in a long
period of time. They should be cooled down first (< 6 °C) before placing in the appliance.
• All technical activities like installation, maintenance or repair work must be performed
by qualified service personnel only.
• WARNING: Do not use mechanical devices or other means to accelerate the defrosting
process, other than those recommended by the manufacturer.
• WARNING: Do not damage the refrigerant circuit.
•
Caution! Risk of fire! The refrigerant used is R600a in this appliance. It is a
flammable refrigerant which is environmentally friendly. Although it is
flammable, it does not damage the ozone layer and does not increase the
greenhouse effect. The use of this coolant has, however, led to a slight
increase in the noise level of the appliance. In addition to the noise of the
compressor, you might be able to hear the coolant flowing around the
system. This is unavoidable, and does not have any adverse effect on the
performance of the appliance. Care must be taken during the transportation
and setting up of the appliance that no parts of the cooling system are
damaged. Leaking coolant can damage the eyes.
• The foam blowing agent used is Cyclopentane in this appliance. It is highly flammable.
• WARNING: Keep all ventilation openings in the appliance enclosure clear of obstruction.
Provide sufficient ventilation in the surrounding structure when building-in. Never block
the air flow suction and air outlet in order to keep air circulation.
• WARNING: Do not use electrical appliances inside the food storage compartments of the
appliance, unless they are of the type recommended by the manufacturer.
• Place the appliance on a clean, stable, dry, level surface only.
• Keep the appliance away from any hot surfaces and open flames. Protect the appliance
against heat, dust, direct sunlight, moisture, dripping and splashing water.
• During use, keep 10cm around the appliance free for ventilation.
• Do not use hard utensils on the glass surface. Do not use water jets or steam cleaners
during cleaning, do not immerse the whole appliance in water as the parts will get wet
and electric shock might be resulted.
• Do not place articles on top of the appliance. Do not place objects with open sources of
fire (e.g. candles) on top or beside the appliance. Do not place objects filled with water
(e.g. vases) on or near the appliance.
• Never cover the appliance during use. This may cause a fire hazard.

5
EN
• Do not wash the appliance with water. Washing can cause leakages and increase the risk
of electric shock.
• Do not make any additional openings on the appliance. Do not install any gadgets in the
appliance.
• Do not overload the racks inside to avoid damage. Max. loading of each rack is about 8kg.
• Do not attempt to climb up to the top of the appliance.
• CAUTION! Handle the glass surfaces with care; protect them from impacts to avoid
damage to property and personal injury.
Installing the appliance
• The appliance should not be tipped over an angle of 45°. After installing the appliance,
wait for 2 hours before connecting it to the electrical power supply to switch on. The same
applies if the appliance is moved at a later date.
• The appliance must always be installed in a dry environment.
• When installing, leave at least 10 cm clearance to the rear and to the left and right for
adequate ventilation. Leaving less room for ventilation may affect the efficiency.
• We strongly recommend to install the appliance in a place with good natural ventilation
to increase ventilation properties.
Electrical components and other dangers
• No other appliances should be plugged into the same socket as with this appliance.
• Do not place any dangerous products, such as fuel, alcohol, paint, flammable or
explosives, etc. inside or near the appliance as it may result a fire hazard.
• Do not store any medications in the appliance.
• Wait about 5 minutes before switch on the appliance again after the appliance has been
switched off or unplugged from the electrical power supply.
• Do not wash the appliance with water. Washing can cause leakage and increase the risk
of electric shock. No any parts/accessories can be under dishwasher.
Intended use
• This appliance is intended for professional use.
• This appliance is designed only to keep beer, in-
cluding beverages, under cool state and to dis-
play them for retail sale in restaurants, canteens,
other commercial enterprises such as bakeries,
butcheries, supermarkets, etc. Any other use
may lead to damage of the appliance or personal
injury.
• Operating the appliance for any other purpose
shall be deemed a misuse of the device. The user
shall be solely liable for improper use of the de-
vice.

6
EN
Grounding installation
This appliance is classified as protection class
I and must be connected to a protective ground.
Grounding reduces the risk of electric shock by
providing an escape wire for the electric current.
This appliance is fitted with a power cord that has a
grounding wire and grounded plug. The plug must
be plugged into an outlet that is properly installed
and grounded.
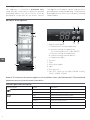
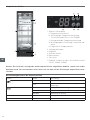
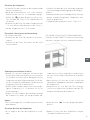
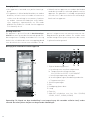
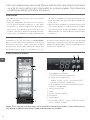
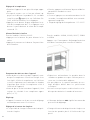
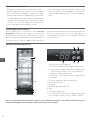
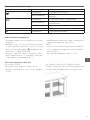
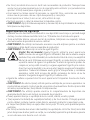
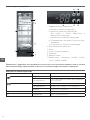
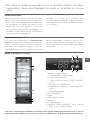
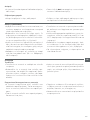
Main parts of the appliance
1. Digital control panel
a. Set button for setting temperature
b. Increase setting of temperature
For 233924 and 233931: Light ON/OFF
c. Decrease setting of temperature
d. Confirm setting / manual defrost
e. Temperature digits
2. Air vents
3. Shelf
4. Glass door handle
5. Light
6. Door key lock
7. ON / OFF switch for the light (226568, 233900,
233917, 235829, 235836)
Remark: The content of this manual applies for all listed items unless specified otherwise. The outlook and
appearance may vary from the shown illustrations.
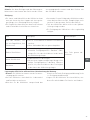
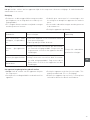
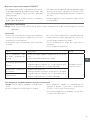
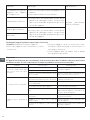
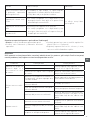
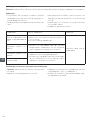
Indicator light status description
Symbol indicator Status Description
ON Under setting mode
OFF Operating under the setting condition
ON Compressor works and cooling active
OFF Compressor not works and cooling inactive
FLASH Preparing cooling process
C
ON Under refrigeration process
def
ON Under defrost process

7
EN
Set the temperature
• Plug into a suitable electrical outlet.
• When set indicator light is OFF, press and hold
1a. button for 3 to 4 seconds until
is shown on
the display. Then, release the 1a. button & press
1a. button again.
• Next, press 1b. button to increase the setting
temperature by 1°C or press 1c. button to de-
crease by 1°C.
• After that, press 1d. button to confirm the setting
and exit.
Note:
• If no button is pressed within 30 seconds, the
newly set temperature will be stored automati-
cally.
• The temperature setting ranges from 2°C to
10°C.
Switch the light ON/OFF
For 233924 and 233931
• Press 1b. button to switch ON the light.
• Press 1b. button again to switch OFF the light.
For 226568, 233900, 233917, 235829 and 235836
Press ON/OFF switch inside the cabinet to control
the light.
Loading the appliance
•
Always let the appliance reach the set tempera-
ture before placing or beverages inside the ap-
pliance. Check the cooling temperature display
and additionally put hand into the compartment
to feel the actual temperature.
•
Always cool down the beverages to their intended
temperature (< 6 °C) before storing in the appli-
ance.
•
Distribute the food evenly with sufficient sur-
rounding spacings go ensure proper air circula-
tion.
•
Do not exceed the maximum shelf load stated in
the technical specification.
•
Ensure the doors are always properly shut and
reduced the times of opening doors to minimum.
Defrost
•
The appliance will start defrost process automat-
ically for every 6 hours.
•
When def indicator is ON, the appliance is under
defrost process.
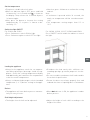
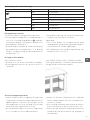
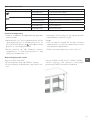
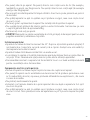
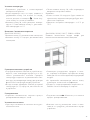
Shelf height adjustment
•
The height of each shelf can be adjusted.
•
Adjust the height of each shelf according to the
height of the items.

8
EN
Installation instructions
• Remove the appliance from the carton box, then
remove the external and internal packaging and
wrapping.
• Check to make sure the appliance is undamaged.
In case of incomplete delivery and damages, DO
NOT use the appliance. Please contact supplier
(See ==> Warranty).
• Let the appliance stand upright for about 2 hours.
This is to reduce the malfunction of the cooling
system from improper handling during transpor-
tation.
• Clean interior surface with warm water and soft
cloth. (See ==> Cleaning and Maintenance).
• Place the appliance on a horizontal, stable and
heat resist surface that is safe against water
splashes.
• Optimum working ambient temperature is be-
tween 16°C and 30°C. Otherwise, the functional-
ity will be limited.
• Ensure that there is sufficient ventilation. Keep
a minimum distance of 10 cm around the appli-
ance. Do not block the ventilation holes.
• For energy savings, always make sure the door
is closed.
Operation
Placement
• Place the appliance on a stable and level surface/
floor.
• Ensure the appliance is properly levelled using
a water spirit level (not supplied). Use furniture
levelling wedges, if you detect the appliance is
not levelled or wobbling.
• Let the appliance rest in its intended position for
about 2 hours before operating to prevent dam-
ages to the cooling circuit through shaken refrig-
erant.
Switching the appliance ON/OFF
• The appliance is switched ON once it is connect-
ed to the suitable electrical power supply. Simply
unplug to switch OFF the appliance.
• A sound will be heard when connected to the
power supply.
• Wait at least 5 minutes before plug in again the
after unplug the appliance or power sudden
break.
• Unplug the appliance when not in use.

9
EN
Cleaning and Maintenance
Attention: Always unplug the appliance from the electrical power outlet before cleaning & maintenance.
Cleaning
•
The exterior and interior surfaces can be cleaned
with a damp cloth and a little detergent.
•
Racks can be removed and washed in water.
•
Do not use water jet or steam cleaner for cleaning
and do not push the appliance under the water.
•
No any parts can be cleaned in the dishwasher.
•
Clean the appliance regularly.
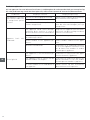
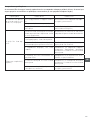
Parts How to clean Remark
All accessories such as
racks, rack holders, etc.
• Soak in warm, soapy water for about 10 to 20
minutes.
• Rinse under running water thoroughly.
Dry all parts well at last.
External glass surfaces
• Wipe clean with a soft cloth and a little neutral
detergent. Make sure no water or moisture en-
ters inside the of the appliance.
Interior glass surfaces
• Remove any food deposits.
• Wipe clean with a soft cloth and a little mild
detergent. Make sure no water or moisture en-
ters inside the of the appliance.
Glass door
Putting the appliance out of reach for a long period of time
• Attention: Always unplug the appliance from the
electrical power outlet.
• Remove all the food and beverage inside the ap-
pliance.
• Clean the appliance as described in Cleaning. (See
==> Cleaning).
• Store the appliance in a cool, clean place and keep
out of reach of the children.

10
EN
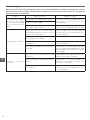
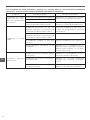
Troubleshooting
If the appliance does not function properly, please check the below table for the solution. If you are still
unable to solve the problem, please contact the supplier/service provider.
Problems Possible cause Possible solution
The appliance does not
start cooling after connect
to electrical power supply.
Thermal cut-out activated
Contact with the supplier/service provider
for repair.
The compressor is defective.
The power plug is connected correctly with
the power supply outlet.
Check the connection and make sure all
the connections are correctly connected.
Cooling is not enough.
The appliance is under strong sunlight radi-
ation or close to a heat source.
Move the appliance a new location to avoid
direct sunlight.
The doors are not properly closed or the
sealing gasket is defective.
Close the doors properly.
Too much food is placed inside the appli-
ance.
Place less food inside the appliance.
Surrounding ventilation is insufficient.
Check that if sufficient ventilation is pro-
vided by allowing at least 10cm away from
other objects or wall.
Too much noise
The appliance is not placed horizontally.
Check to make sure the appliance is placed
horizontally.
The appliance touches surrounding wall or
other objects.
Check to make sure that at least 10cm
away from other objects or wall.
There are some loose parts inside the ap-
pliance.
Contact with the supplier/service provider
for repair.
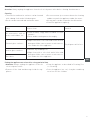
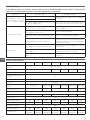
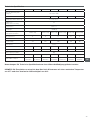
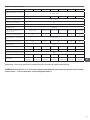
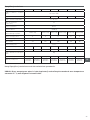
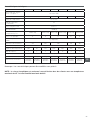
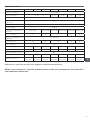
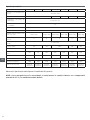
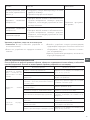
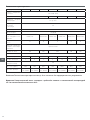
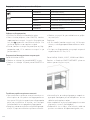
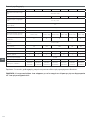
Technical specification
Item no. 226568 233900 233917 233924 233931 235829 235836
Operating voltage and
frequency
220-240V~ 50Hz
Rated current 1,0 A 1,7 A 1,5 A 1,0 A 1,5 A
Setting temperature range 2°C to 10°C
Recommended temperature
setting
4°C
Protection class Class I
Noise level < 70 dB (A)
Refrigerant used and injection
quantity
R600a / 40g R600a / 50g R600a / 60g R600a / 80g R600a / 50g R600a / 80g
Energy efficiency class D D E D E
Foam blowing agent Cyclopentane
Power of the light 4W 6W 24W 6W 9W
Climate class N-ST
Inside cabinet capacity 126L 93L 197L 293L 448L 200L 303L
Number of Shelves 3 2 4 5 10 4 6
Maximum shelf load 8kg
Net weight (approx.) 40kg 35kg 54kg 77kg 100kg 54kg 75kg
Outer dimension
600x530x
(H)900mm
500x500x
(H)900mm
900x500x
(H)900mm
600x515x
(H)1820mm
900x515x
(H)1820mm
900x500x
(H)900mm
1335x500x
(H)900mm

11
EN
Remark: Technical specification is subjected to change without prior notification.
NOTE: Energy class is in accordance with operation in climates with a maximum temperature of 25˚C
and maximum humidity of 60%.
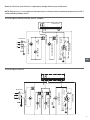
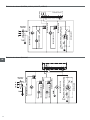
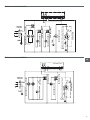
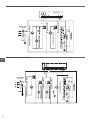
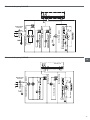
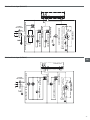
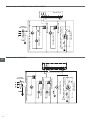
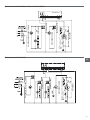
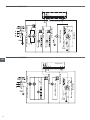
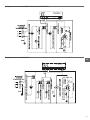
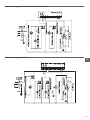
Circuit diagram (226568, 233900, 233917, 235829)
OVERLOAD
PROTECTOR PTC STARTER
TRANSFORMER
TRANSFORMER
EVAPORATOR FAN MOTOR
COMPRESSOR
PLUG FUSE
CONDENSOR MOTOR
THERMOSTAT
INTERIOR LIGHT
SWITCH
Circuit diagram (233924)
EVAPORATOR FAN MOTOR
COMPRESSOR
CONDENSOR MOTOR
THERMOSTAT
TRANSFORMER
INTERIOR LIGHT
TRANSFORMER
INTERIOR LIGHT
OVERLOAD
PROTECTOR PTC STARTER
PLUG FUSE

12
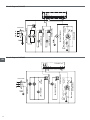
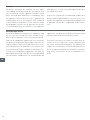
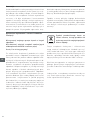
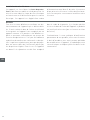
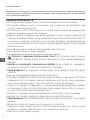
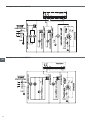
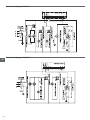
Circuit diagram (233931)
EVAPORATOR FAN MOTOR
COMPRESSOR
CONDENSOR MOTOR
THERMOSTAT
TRANSFORMER
INTERIOR LIGHT
TRANSFORMER
INTERIOR LIGHT
OVERLOAD
PROTECTOR PTC STARTER
PLUG FUSE
Circuit diagram (235836)
OVERLOAD
PROTECTOR PTC STARTER
TRANSFORMER
TRANSFORMER
EVAPORATOR FAN MOTOR
COMPRESSOR
PLUG FUSE
CONDENSOR MOTOR
THERMOSTAT
INTERIOR LIGHT
SWITCH
EN

13
EN
Warranty
Any defect affecting the functionality of the ap-
pliance which becomes apparent within one year
after purchase will be repaired by free repair or re-
placement provided the appliance has been used
and maintained in accordance with the instructions
and has not been abused or misused in any way.
Your statutory rights are not affected. If the appli-
ance is claimed under warranty, state where and
when it was purchased and include proof of pur-
chase (e.g. receipt).
In line with our policy of continuous product devel-
opment we reserve the right to change the product,
packaging and documentation specifications with-
out notice.
Discarding & Environment
When decommissioning the appliance, the prod-
uct must not be disposed of with other household
waste. Instead, it is your responsibility to dispose to
your waste equipment by handing it over to a des-
ignated collection point. Failure to follow this rule
may be penalized in accordance with applicable
regulations on waste disposal. The separate col-
lection and recycling of your waste equipment at
the time of disposal will help conserve natural re-
sources and ensure that it is recycled in a manner
that protects human health and the environment.
For more information about where you can drop off
your waste for recycling, please contact your local
waste collection company. The manufacturers and
importers do not take responsibility for recycling,
treatment and ecological disposal, either directly
or through a public system.

14
DE
Sehr geehrter Kunde,
Vielen Dank für den Kauf dieses Arktic Gerät. Lesen Sie dieses Handbuch sorgfältig und achten Sie
besonders auf die unten aufgeführten Sicherheitsvorschriften, bevor Sie dieses Gerät zum ersten Mal
installieren und verwenden.
Sicherheitsvorschriften
• Dieses Gerät ist nur für den gewerblichen Gebrauch bestim.
• Verwenden Sie das Gerät nur für den vorgesehenen Zweck, für den es entworfen wurde,
wie in diesem Handbuch beschrieben.
• Der Hersteller haftet nicht für Schäden, die durch fehlerhafte Bedienung und
unsachgemäße Verwendung verursacht werden.
• Halten Sie das Gerät und den elektrischen Stecker von Wasser und anderen Flüssigkeiten
fern. Falls das Gerät in Wasser fällt, entfernen Sie sofort den Netzstecker von der
Steckdose. Verwenden Sie das Gerät erst, wenn es von einem zertifizierten Techniker
überprüft wurde. Die Nichtbefolgung dieser Anweisungen führt zu lebensbedrohlichen
Risiken.
• Versuchen Sie niemals, das Gehäuse des Geräts selbst zu öffnen.
• Legen Sie keine Objekte in das Gehäuse der Appliance ein.
• Berühren Sie den Stecker nicht mit nassen oder feuchten Händen.
•
Gefahr eines elektrischen Schlags! Versuchen Sie nicht, das Gerät selbst zu
reparieren, Reparaturen sind nur von qualifiziertem Personal durchzuführen.
• Verwenden Sie niemals ein beschädigtes Gerät! Wenn es beschädigt ist, trennen Sie das
Gerät von der Steckdose und wenden Sie sich an den Händler.
• Warnung! Tauchen Sie die elektrischen Teile des Geräts nicht in Wasser oder andere
Flüssigkeiten ein.
• Halten Sie das Gerät niemals unter fließendem Wasser.
• Überprüfen Sie regelmäßig den Netzstecker und das Kabel auf Beschädigungen. Bei
Beschädigung muss es durch einen Dienstleister oder eine ähnlich qualifizierte Person
ersetzt werden, um Gefahren oder Verletzungen zu vermeiden.
• Stellen Sie sicher, dass das Kabel nicht mit scharfen oder heißen Gegenständen in
Berührung kommt und halten Sie es von offenem Feuer fern. Ziehen Sie niemals das
Netzkabel, um es von der Steckdose zu trennen, ziehen Sie stattdessen immer den
Stecker.
• Stellen Sie sicher, dass das Netzkabel und/oder das Verlängerungskabel keine
Auslösegefahr verursachen.
• Lassen Sie die Appliance während des Gebrauchs niemals unbeaufsichtigt.
• Warnung!
Solange sich der Stecker in der Steckdose befindet, wird das Gerät an die
Stromquelle angeschlossen.
• Schalten Sie die Appliance aus, bevor Sie sie vom Sockel trennen.
• Schließen Sie den Netzstecker an eine leicht zugängliche Steckdose an, so dass das Gerät
im Notfall sofort abgenommen werden kann.

15
DE
• Tragen Sie das Gerät niemals an der Schnur.
• Verwenden Sie keine zusätzlichen Geräte, die nicht zusammen mit der Appliance geliefert
werden.
• Schließen Sie das Gerät nur an eine Steckdose mit der Spannung und Frequenz an, die auf
dem Etikett des Gerätes angegeben ist.
• Verwenden Sie niemals anderes Zubehör als das vom Hersteller empfohlene Zubehör.
Andernfalls könnte ein Sicherheitsrisiko für den Benutzer darstellen und das Gerät
beschädigen. Verwenden Sie nur Originalteile und Zubehör.
• Dieses Gerät sollte nicht von Personen mit eingeschränkter körperlicher, sensorischer
oder geistiger Leistungsfähigkeit oder von Personen mit mangelnder Erfahrung und
Kenntnisnahme betrieben werden.
• Dieses Gerät sollte unter keinen Umständen von Kindern verwendet werden.
• Bewahren Sie das Gerät und das Netzkabel außerhalb der Reichweite von Kindern auf.
• ACHTUNG: Schalten Sie das Gerät immer aus und ziehen Sie es vor der Reinigung,
Wartung oder Lagerung von der Steckdose ab.
Besondere Sicherheitsvorschriften
• Das Gerät dient nicht zur Kühlung und Aufbewahrung von Getränken für einen längeren
Zeitraum. Die Getränke sollten vor ihrem Einbringen ins Gerät vorgekühlt werden (< 6 °C).
• Alle technischen Tätigkeiten, d.h. Montage-, Wartungs- und Reparaturarbeiten dürfen
nur von qualifiziertem Personal durchgeführt werden.
• WARNUNG: Verwenden Sie zwecks Beschleunigung des Abtauvorgangs weder
mechanische Geräte noch andere Werkzeuge als vom Hersteller empfohlen.
• WARNUNG: Der Umlauf des Kühlmediums darf nicht beschädigt werden.
•
Achtung! Es besteht Feuergefahr! Im Gerät wird R600a als Kältemittel
verwendet. Es ist ein umweltfreundliches, leicht brennbares Kältemittel.
Obwohl das Kältemittel leicht brennbar ist, ist es unschädlich für die
Ozonschicht und hat keinen Einfluss auf den Treibhauseffekt. Der Einsatz
dieses Kältemittels führt jedoch zu einem leichten Anstieg des Lärmpegels
des Gerätes. Neben dem Lärm des Verdichters kann der Benutzer das
Geräusch hören, das durch den Kältemittelstrom verursacht wird. Dieses
Phänomen lässt sich nicht vermeiden und hat keine negativen Auswirkungen
auf den Betrieb des Gerätes. Bei Transport und Aufstellung des Gerätes ist
besonders darauf zu achten, dass keine Teile des Kältesystems beschädigt
werden. Auslaufendes Kältemittel kann zu Augenschäden führen.
• Das in diesem Gerät verwendete Schaumtreibmittel ist Cyclopentan. Es ist leicht
entzündlich.
• WARNUNG: Verdecken Sie nicht die Belüftungsöffnungen im Gehäuse des Gerätes.
Wenn das Gerät umbaut ist, muss man sich davon überzeugen, ob für das Gerät auch
eine richtige Belüftung gewährleistet wird. Blockieren Sie niemals den Luftdurchfluss
um das Gerät herum, damit eine richtige Luftzirkulation abgesichert ist.
• WARNUNG: Innerhalb der Kammern der Kühlvitrine dürfen keine anderen Elektrogeräte
eingesetzt werden, als vom Hersteller empfohlen.

16
DE
• Das Gerät ist ausschließlich auf einer sauberen, stabilen, trockenen und horizontalen
Fläche aufzustellen.
• Lagern Sie es weit entfernt von heißen Flächen und offenem Feuer. Überzeugen Sie
sich, ob das Gerät nicht der Einwirkung hoher Temperaturen, Staub, Sonnenstrahlen,
Feuchtigkeit, tropfendem Wasser und Spritzern ausgesetzt ist.
• Überzeugen Sie sich, ob rundum die Kühlvitrine 10 cm Freiraum eingehalten wurde, um
eine richtige Belüftung zu gewährleisten.
• Es darf mit keinem harten Werkzeug gegen die Glasfläche der Kühlvitrine geschlagen
werden. Ebenso darf das Gerät nicht mit einem Wasserstrahl oder einer Dampfwäsche
gereinigt und das ganze Gerät darf wegen des Risikos eines Stromschlags nicht komplett
in Wasser getaucht werden.
• Legen Sie keine Gegenstände auf die Kühlvitrine. Bringen Sie keine Quellen des offenen
Feuers (z.B. angezündete Kerzen) bzw. mit Wasser gefüllte Gegenstände (z.B. Vasen) in
die Nähe des Gerätes.
• Das Gerät darf während der Nutzung nicht zugedeckt werden, da sonst Feuergefahr
besteht.
• Reinigen Sie die Kühlvitrine nicht mit Wasser. Beim Waschen des Gerätes kann Wasser
in den elektrischen Teil gelangen und so zu einem Stromschlag führen.
• Bringen Sie keine allzu großen Mengen von Lebensmitteln in die Vitrine, um ihrer
Beschädigung vorzubeugen. Die maximale Belastung eines jeden Faches beträgt ca. 8 kg.
• Probieren Sie nicht auf das Gerät zu steigen.
• SEIEN SIE VORSICHTIG! Seien Sie vorsichtig beim Umgang mit Glasflächen; schützen
Sie sie vor Stößen, um Schäden am Gerät und Verletzungen zu vermeiden.
Montage der Kühlvitrine
• Das Gerät darf mit keinem größeren Winkel als 45° geneigt stehen. Nach durchgeführter
Montage des Gerätes muss man vor seinem Anschluss an die Stromversorgung und
Inbetriebnahme 2 Stunden abwarten. Die obige Empfehlung betrifft auch die Situation,
wenn das Gerät zu einem späteren Termin an einen anderen Platz gestellt wird.
• Die Kühlvitrine muss unbedingt an einem trockenen Platz montiert werden.
• Während der Montage muss man hinter dem Gerät und an den beiden Seiten mindestens
10 cm Freiraum lassen, um eine richtige Belüftung gewährleisten zu können. Bei einem
geringeren Freiraum kann die Leistungsfähigkeit der Gerätes beeinflusst werden.
• Es wird empfohlen, die Montage der Kühlvitrine an einem Ort mit guter natürlicher
Belüftung durchzuführen, weil dadurch das Gerät entsprechend belüftet wird.
Elektrische Elemente und andere Gefahren
• Es darf keine andere Ausrüstung an die gleiche Stromversorgungsquelle angeschlossen
werden, an die das Gerät angeschlossen ist.
• Bringen Sie in der Kühlvitrine oder in seiner Nähe keine Gefahrenstoffe unter, und zwar
solche wie Kraftstoff, Alkohol, Farben, leichtbrennbare und explosive Materialien usw. –
es besteht Brandgefahr.

17
DE
• Lagern Sie im Gerät keine Arzneimittel.
• Nach dem Aus- oder Abschalten des Gerätes von der Stromversorgungsquelle muss
man ca. 5 Minuten bis zu seiner erneuten Inbetriebnahme abwarten.
• Reinigen Sie das Gerät nicht mit Wasser. Beim Waschen des Gerätes kann Wasser in den
elektrischen Teil gelangen und zu einem Stromschlag führen. Die Teile/Zubehör sind
nicht zum Waschen in der Spülmaschine geeignet.
Verwendungszweck des Gerätes
• Das Gerät ist für den professionellen Einsatz ge-
eignet.
• Dieses Gerät ist ausschließlich für die Lagerung
von Getränken (darunter Bier) bestimmt, um sie
kühl zu halten und zum Verkauf in Restaurants,
Kantinen oder anderen gewerblichen Einrichtun-
gen wie Bäckereien, Metzgereien, Supermärkten
usw. auszustellen. Die Verwendung des Gerätes
für andere Zwecke kann zu seiner Beschädigung
sowie zu Körperverletzungen führen.
• Jede andere Verwendung des Gerätes gilt als
nicht bestimmungsgemäß. Der Benutzer ist al-
lein verantwortlich für die unsachgemäße Nut-
zung des Gerätes.
Erdungsinstallation
Dieses Gerät ist als Schutzklasse I eingestuft und
muss mit einer Schutzerde verbunden werden. Die
Erdung reduziert das Risiko eines elektrischen
Schlags, indem ein Fluchtkabel für den elektri-
schen Strom bereitgestellt wird. Dieses Gerät ist
mit einem Netzkabel mit einem Erdungskabel und
einem geerdeten Stecker ausgestattet. Der Ste-
cker muss in eine Steckdose gesteckt werden, die
ordnungsgemäß installiert und geerdet ist.

18
DE
Hauptteile des Gerätes
1. Digitales Steuerpanel
a. Temperatureinstelltaste
b. Erhöhung der Temperatureinstellung
Für 233924 und 233931: Licht EIN/AUS
c. Verringerung der Temperatureinstellung
d. Bestätigung der Einstellung / manuelles Ab-
tauen
e. Eingestellter Temperaturwert
2. Lüftungsöffnungen
3. Regalfach
4. Griff der Glastür
5. Beleuchtung
6. Türschloss
7. EIN/AUS-Schalter für das Licht (226568, 233900,
233917, 235829, 235836)
Hinweis: Der Inhalt der vorliegenden Anweisung betrifft alle aufgeführten Modelle, soweit nicht anders
bestimmt wurde. Das Aussehen des Geräts kann sich von dem auf den Zeichnungen dargestellten unter-
scheiden.
Beschreibung des Status der Kontrollleuchten
Symbol Status Beschreibung
EIN Einstellmodus
AUS
Das Gerät arbeitet entsprechend den vorgenommenen
Einstellungen.
EIN Verdichter in Betrieb - Kühlung
AUS Verdichter nicht in Betrieb - keine Kühlung
BLINKEN Vorbereitung zur Kühlung
C
EIN Kühlungsprozess
def
EIN Abtauprozess

19
DE
Einstellen der Temperatur
• Schließen Sie den Stecker an die entsprechende
Elektrosteckdose an.
• Wenn die Kontrollleuchte „set” nicht leuchtet,
halten Sie die Taste 1a 3-4 Sekunden lang ge-
drückt, bis auf dem Display erscheint. Las-
sen Sie dann die Taste 1a los und drücken Sie
sie erneut.
• Drücken Sie die Taste 1b, um die Temperatur um
1 °C zu erhöhen, oder drücken Sie die Taste 1c,
um die Temperatur um 1 °C zu senken.
• Drücken Sie dann die Taste 1d, um die eingeführ-
ten Einstellungen und Ausgänge zu bestätigen.
Hinweis:
• Wird innerhalb von 30 Sekunden keine Taste ge-
drückt, wird die eingestellte Temperatur auto-
matisch gespeichert.
• Temperatureinstellbereich: von 2 °C bis 10 °C.
Einschalten / Ausschalten der Beleuchtung
Für 233924 und 233931
• Drücken Sie die Taste 1b., um das Licht einzus-
chalten.
• Drücken Sie die Taste 1b. erneut, um das Licht
auszuschalten.
Für 226568, 233900, 233917, 235829 und 235836
Drücken Sie den ON/OFF-Schalter im Inneren des
Gehäuses, um das Licht ein- und auszuschalten.
Einbringen von Getränken ins Gerät
• Warten Sie, bis die Temperatur im Inneren des
Gerätes den eingestellten Wert erreicht hat, bevor
Sie Getränke ins Gerät stellen. Überprüfen Sie die
Temperatur auf dem Display und legen Sie zusätz-
lich Ihre Hand in die Kühlkammer, um die aktuelle
Temperatur im Gerät zu kontrollieren.
• Kühlen Sie die Getränke immer zuerst auf eine ge-
eignete Temperatur (< 6 °C) ab, bevor Sie sie ins
Gerät einbringen.
• Ordnen Sie die Produkte gleichmäßig innerhalb
der Kammer an, wobei ein entsprechender Ab-
stand zwischen ihnen eingehalten werden muss,
um eine ausreichende Luftzirkulation zu gewähr-
leisten.
• Überschreiten Sie nicht die in der technischen
Spezifikation angegebene maximale Tragfähigkeit
des Regalfaches.
• Vergewissern Sie sich, dass die Tür richtig ge-
schlossen ist und achten Sie darauf, dass die Öff-
nung auf ein Minimum beschränkt ist.
Abauen
• Das Gerät beginnt alle 6 Stunden automatisch mit
dem Abtauen.
• Wenn die Taste „
def
” leuchtet, beginnt der Abtau-
prozess.
Einstellen der Höhe der Regalfächer
• Es ist möglich, die Höhe der Regalfächer zu än-
dern.
• Ändern Sie die Höhe der Regalfächer entspre-
chend den Produkten im Gerät.

20
DE
Installationshinweise
• Nehmen Sie das Gerät aus dem Karton heraus,
entfernen Sie die Innen- und Außenverpackung
sowie die Sicherungen.
• Überprüfen Sie es, ob das Gerät nicht beschädigt
ist. Bei einer unvollständigen Anlieferung oder
Beschädigungen darf das Gerät NICHT benutzt
werden. Setzen Sie sich mit dem Lieferanten in
Verbindung (Siehe ==> Garantie).
• Lassen Sie das Gerät ca. 2 Stunden vertikal ste-
hen. Damit soll der Spielraum für Fehlfunktionen
des Kühlsystems bei unsachgemäßer Handha-
bung während des Transports reduziert werden.
• Waschen Sie die Außenflächen mit einem wei-
chen, in warmes Wasser getauchten Tuch. (siehe
==> Reinigung und Wartung).
•
Das Gerät stellt man auf eine horizontale, stabile
Fläche, die gegen die Einwirkung hoher Tempe-
raturen und Spritzer von Flüssigkeiten beständig
ist.
•
Die Umgebungstemperatur am Betriebsort des
Gerätes sollte von 16 °C bis 30 °C betragen. An-
dernfalls kann das Gerät nicht richtig funktionie-
ren.
•
Gewährleisten Sie eine richtige Belüftung. Be-
lassen Sie einen Freiraum von mindestens 10 cm
rundum das Gerät. Blockieren Sie nicht die Lüf-
tungsöffnungen.
•
Um Energie zu sparen, achten Sie immer darauf,
dass die Tür geschlossen ist.
Betrieb
Aufstellung des Gerätes
•
Stellen Sie das Gerät auf eine stabile und ebene
Fläche oder auf den Boden.
•
Verwenden Sie eine Wasserwaage (nicht im Lie-
ferumfang enthalten), um sicherzustellen, dass
das Gerät korrekt ausgerichtet ist. Wenn Sie
feststellen, dass das Gerät nicht stabil steht oder
wackelt, verwenden Sie einen Möbelkeil.
•
Lassen Sie das Gerät ca. 2 Stunden vor seiner
Inbetriebnahme, um Schäden am Kühlkreislauf
durch falsche Kältemittelverteilung zu vermeiden.
Einschalten und Ausschalten des Gerätes (ON/OFF)
•
Das Gerät startet, wenn der Stecker an die ent-
sprechende Elektrosteckdose angeschlossen
wird. Ziehen Sie den Stecker aus der Steckdose,
um das Gerät auszuschalten.
•
Wenn das Gerät an eine Stromquelle angeschlos-
sen ist, ertönt ein Signalton.
•
Warten Sie nach dem Trennen des Gerätes oder
bei einem plötzlichen Stromausfall mindestens
5 Minuten, bevor Sie das Gerät wieder ans Netz
anschließen.
•
Wenn Sie das Gerät nicht benutzen, ziehen Sie
den Netzstecker aus der Steckdose.
Strona się ładuje...
Strona się ładuje...
Strona się ładuje...
Strona się ładuje...
Strona się ładuje...
Strona się ładuje...
Strona się ładuje...
Strona się ładuje...
Strona się ładuje...
Strona się ładuje...
Strona się ładuje...
Strona się ładuje...
Strona się ładuje...
Strona się ładuje...
Strona się ładuje...
Strona się ładuje...
Strona się ładuje...
Strona się ładuje...
Strona się ładuje...
Strona się ładuje...
Strona się ładuje...
Strona się ładuje...
Strona się ładuje...
Strona się ładuje...
Strona się ładuje...
Strona się ładuje...
Strona się ładuje...
Strona się ładuje...
Strona się ładuje...
Strona się ładuje...
Strona się ładuje...
Strona się ładuje...
Strona się ładuje...
Strona się ładuje...
Strona się ładuje...
Strona się ładuje...
Strona się ładuje...
Strona się ładuje...
Strona się ładuje...
Strona się ładuje...
Strona się ładuje...
Strona się ładuje...
Strona się ładuje...
Strona się ładuje...
Strona się ładuje...
Strona się ładuje...
Strona się ładuje...
Strona się ładuje...
Strona się ładuje...
Strona się ładuje...
Strona się ładuje...
Strona się ładuje...
Strona się ładuje...
Strona się ładuje...
Strona się ładuje...
Strona się ładuje...
Strona się ładuje...
Strona się ładuje...
Strona się ładuje...
Strona się ładuje...
Strona się ładuje...
Strona się ładuje...
Strona się ładuje...
Strona się ładuje...
Strona się ładuje...
Strona się ładuje...
Strona się ładuje...
Strona się ładuje...
Strona się ładuje...
Strona się ładuje...
Strona się ładuje...
Strona się ładuje...
Strona się ładuje...
Strona się ładuje...
Strona się ładuje...
Strona się ładuje...
Strona się ładuje...
Strona się ładuje...
Strona się ładuje...
Strona się ładuje...
Strona się ładuje...
Strona się ładuje...
Strona się ładuje...
Strona się ładuje...
Strona się ładuje...
Strona się ładuje...
Strona się ładuje...
Strona się ładuje...
Strona się ładuje...
Strona się ładuje...
Strona się ładuje...
Strona się ładuje...
-
 1
1
-
 2
2
-
 3
3
-
 4
4
-
 5
5
-
 6
6
-
 7
7
-
 8
8
-
 9
9
-
 10
10
-
 11
11
-
 12
12
-
 13
13
-
 14
14
-
 15
15
-
 16
16
-
 17
17
-
 18
18
-
 19
19
-
 20
20
-
 21
21
-
 22
22
-
 23
23
-
 24
24
-
 25
25
-
 26
26
-
 27
27
-
 28
28
-
 29
29
-
 30
30
-
 31
31
-
 32
32
-
 33
33
-
 34
34
-
 35
35
-
 36
36
-
 37
37
-
 38
38
-
 39
39
-
 40
40
-
 41
41
-
 42
42
-
 43
43
-
 44
44
-
 45
45
-
 46
46
-
 47
47
-
 48
48
-
 49
49
-
 50
50
-
 51
51
-
 52
52
-
 53
53
-
 54
54
-
 55
55
-
 56
56
-
 57
57
-
 58
58
-
 59
59
-
 60
60
-
 61
61
-
 62
62
-
 63
63
-
 64
64
-
 65
65
-
 66
66
-
 67
67
-
 68
68
-
 69
69
-
 70
70
-
 71
71
-
 72
72
-
 73
73
-
 74
74
-
 75
75
-
 76
76
-
 77
77
-
 78
78
-
 79
79
-
 80
80
-
 81
81
-
 82
82
-
 83
83
-
 84
84
-
 85
85
-
 86
86
-
 87
87
-
 88
88
-
 89
89
-
 90
90
-
 91
91
-
 92
92
-
 93
93
-
 94
94
-
 95
95
-
 96
96
-
 97
97
-
 98
98
-
 99
99
-
 100
100
-
 101
101
-
 102
102
-
 103
103
-
 104
104
-
 105
105
-
 106
106
-
 107
107
-
 108
108
-
 109
109
-
 110
110
-
 111
111
-
 112
112


w innych językach
- italiano: Hendi 233924 Manuale utente
- Deutsch: Hendi 233924 Benutzerhandbuch
- français: Hendi 233924 Manuel utilisateur
- Nederlands: Hendi 233924 Handleiding
- română: Hendi 233924 Manual de utilizare
Powiązane artykuły
-
Hendi 233788 Instrukcja obsługi
-
Hendi 235836 Instrukcja obsługi
-
-
-
Hendi 233610 Instrukcja obsługi
-
-
-
-
-