Indesit IWSB 61051 C ECO EU instrukcja
- Kategoria
- Pralki
- Typ
- instrukcja

GB
1
Contents
Installation, 2-3
Unpacking and levelling
Connecting the electricity and water supplies
The first wash cycle
Technical data
Care and maintenance, 4
Cutting off the water or electricity supply
Cleaning the washing machine
Cleaning the detergent dispenser drawer
Caring for the door and drum of your appliance
Cleaning the pump
Checking the water inlet hose
Precautions and tips, 5
General safety
Disposal
Description of the washing machine
and starting a wash cycle, 6-7
Control panel
Indicator lights
Starting a wash cycle
Wash cycles, 8
Table of wash cycles
Personalisation, 9
Setting the temperature
Functions
Detergents and laundry, 10
Detergent dispenser drawer
Preparing the laundry
Garments requiring special care
Load balancing system
Troubleshooting, 11
Service, 12
IWSB 61051
Instructions for use
WASHING MACHINE
English,1
GB
UA
Українська, 13
CZ
SK PL HU
Česky,25
Slovensky,37 Polski,49
Magyar,61

2
GB
! This instruction manual should be kept in a safe
place for future reference. If the washing machi-
ne is sold, transferred or moved, make sure that
the instruction manual remains with the machine
so that the new owner is able to familiarise him-
self/herself with its operation and features.
! Read these instructions carefully: they con-
tain vital information relating to the safe instal-
lation and operation of the appliance.
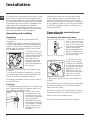
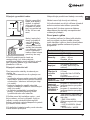
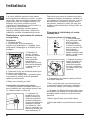
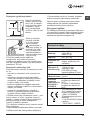
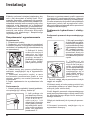
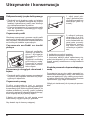
Unpacking and levelling
Unpacking
1. Remove the washing machine from its
packaging.
2. Make sure that the washing machine has
not been damaged during the transportation
process. If it has been damaged, contact the
retailer and do not proceed any further with
the installation process.
3. Remove the 4 pro-
tective screws (used
during transportation)
and the rubber wa-
sher with the cor-
responding spacer,
located on the rear
part of the appliance
(see figure).
4. Close off the holes using the plastic plugs
provided.
5. Keep all the parts in a safe place: you will
need them again if the washing machine ne-
eds to be moved to another location.
! Packaging materials should not be used as
toys for children.
Levelling
1. Install the washing machine on a flat sturdy
floor, without resting it up against walls, furni-
ture cabinets or anything else.
2. If the floor is not
perfectly level, com-
pensate for any une-
venness by tightening
or loosening the
adjustable front feet
(see figure); the angle
of inclination, measu-
red in relation to the
worktop, must not
exceed 2°.
Levelling the machine correctly will provide
it with stability, help to avoid vibrations and
excessive noise and prevent it from shifting
while it is operating. If it is placed on carpet or
a rug, adjust the feet in such a way as to allow
a sufficient ventilation space underneath the
washing machine.
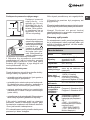
Connecting the electricity and
water supplies
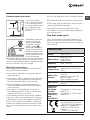
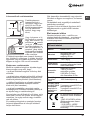
Connecting the water inlet hose
1. Insert seal A into the
end of the inlet hose
and screw the latter
onto a cold water tap
with a 3/4 gas threaded
mouth (see figure).
Before making the con-
nection, allow the wa-
ter to run freely until it
is perfectly clear.
2. Connect the inlet
hose to the washing
machine by screwing
it onto the correspon-
ding water inlet of the
appliance, which is
situated on the top
right-hand side of the
rear part of the ap-
pliance (see figure).
3. Make sure that the hose is not folded over
or bent.
! The water pressure at the tap must fall within
the values indicated in the Technical details
table (see next page).
! If the inlet hose is not long enough, contact a
specialised shop or an authorised technician.
! Never use second-hand hoses.
! Use the ones supplied with the machine.
Installation
A

GB
3
65 - 100 cm
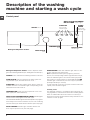
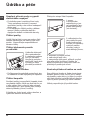
Connecting the drain hose
Connect the drain
hose, without bending
it, to a drainage duct
or a wall drain located
at a height between
65 and 100 cm from
the floor;
Alternatively, place the
drain hose over the
edge of a washbasin
or bathtub, by faste-
ning the guide
(which can be purcha-
sed at the technical as-
sistance centre) to the
tap (see figure).The free
end of the hose should
not be underwater.
! We advise against the use of hose extensions;
if it is absolutely necessary, the extension must
have the same diameter as the original hose and
must not exceed 150 cm in length.
Electrical connections
Before plugging the appliance into the electri-
city socket, make sure that:
•thesocketisearthedandcomplieswithall
applicable laws;
•thesocketisabletowithstandthemaximum
power load of the appliance as indicated in
the Technical data table (see opposite);
•thepowersupplyvoltagefallswithinthe
values indicated in the Technical data table
(see opposite);
•thesocketiscompatiblewiththeplugof
the washing machine. If this is not the case,
replace the socket or the plug.
! The washing machine must not be installed
outdoors, even in covered areas. It is extreme-
ly dangerous to leave the appliance exposed
to rain, storms and other weather conditions.
! When the washing machine has been instal-
led, the electricity socket must be within easy
reach.
! Do not use extension cords or multiple sockets.
! The cable should not be bent or compressed.
! The power supply cable must only be repla-
ced by authorised technicians.
Warning! The company shall not be held
responsible in the event that these regulations
are not respected.
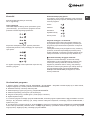
The first wash cycle
Once the appliance has been installed, and
before you use it for the first time, run a wash
cycle with detergent and no laundry, using the
wash cycle 2.
Technical data
Model
IWSB 61051
Dimensions
width 59.5 cm
height 85 cm
depth 40 cm
Capacity
from 1 to 6 kg
Electrical
connections
please refer to the technical
data plate fixed to the ma-
chine
Water con-
nection
maximum pressure 1 MPa
(10 bar)
minimum pressure 0.05
MPa (0.5 bar)
drum capacity 40 litres
Spin speed
up to 1000 rotations per
minute
Test wash
cycles in
accordan-
ce with
directives
1061/2010
and
1015/2010
Programme 2: Cotton stan-
dard 60°C;
Programme 3: Cotton stan-
dard 40°C.
This appliance conforms to
the following EC Directives:
- EMC 2014/30/EU (Electro-
magnetic Compatibility)
- LVD 2014/35/EU (Low
Voltage)
- 2012/19/EU (WEEE)

4
GB
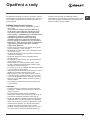
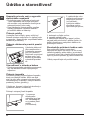
Care and maintenance
Cutting off the water and electri-
city supplies
•Turnoffthewatertapaftereverywashcycle.
This will limit wear on the hydraulic system
inside the washing machine and help to pre-
vent leaks.
•Unplugthewashingmachinewhencleaning
it and during all maintenance work.
Cleaning the washing machine
The outer parts and rubber components of the
appliance can be cleaned using a soft cloth
soaked in lukewarm soapy water. Do not use
solvents or abrasives.
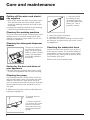
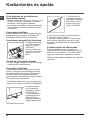
Cleaning the detergent dispenser
drawer
Remove the dispenser
by raising it and pul-
ling it out (see figure).
Wash it under running
water; this operation
should be repeated
frequently.
Caring for the door and drum of
your appliance
•Alwaysleavetheportholedoorajarinorder
to prevent unpleasant odours from forming.
Cleaning the pump
The washing machine is fitted with a self-cle-
aning pump which does not require any main-
tenance. Sometimes, small items (such as
coins or buttons) may fall into the pre-chamber
which protects the pump, situated in its bot-
tom part.
! Make sure the wash cycle has finished and
unplug the appliance.
To access the pre-
chamber:
1. using a screwdri-
ver, remove the cover
panel on the lower
front part of the wa-
shing machine (see
figure);
2. unscrew the lid
by rotating it anti-
clockwise (see figu-
re): a little water may
trickle out. This is
perfectly normal;
3. clean the inside thoroughly;
4. screw the lid back on;
5. reposition the panel, making sure the hooks
are securely in place before you push it onto
the appliance.
Checking the water inlet hose
Check the inlet hose at least once a year. If
there are any cracks, it should be replaced
immediately: during the wash cycles, water
pressure is very strong and a cracked hose
could easily split open.
! Never use second-hand hoses.

GB
5
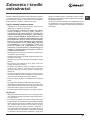
Precautions and tips
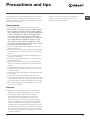
! This washing machine was designed and constructed in
accordance with international safety regulations. The fol-
lowing information is provided for safety reasons and must
therefore be read carefully.
General safety
• Thisappliancewasdesignedfordomesticuseonly.
• This appliance can be used by children aged
from 8 years and above and persons with re-
duced physical, sensory or mental capabilities
or lack of experience and knowledge if they
have been given supervision or instruction
concerning use of the appliance in a safe way
and understand the hazards involved. Chil-
dren shall not play with the appliance. Clea-
ning and user maintenance shall not be made
by children without supervision.
• Donottouchthemachinewhenbarefootorwithwetor
damp hands or feet.
• Donotpullonthepowersupplycablewhenunplugging
the appliance from the electricity socket. Hold the plug
and pull.
• Donotopenthedetergentdispenserdrawerwhilethe
machine is in operation.
• Donottouchthedrainedwaterasitmayreachextreme-
ly high temperatures.
• Neverforcetheportholedoor.Thiscoulddamagethe
safety lock mechanism designed to prevent accidental
opening.
• Iftheappliancebreaksdown,donotunderanycircum-
stances access the internal mechanisms in an attempt
to repair it yourself.
• Alwayskeepchildrenwellawayfromtheappliancewhile
it is operating.
• Thedoorcanbecomequitehotduringthewashcycle.
• Iftheappliancehastobemoved,workinagroupoftwo
or three people and handle it with the utmost care. Never
try to do this alone, because the appliance is very heavy.
• Beforeloadinglaundryintothewashingmachine,make
sure the drum is empty.
Disposal
• Disposingofthepackagingmaterials:observelocal
regulations so that the packaging may be re-used.
• TheEuropeanDirective2012/19/EUonWaste
Electrical and Electronic Equipment, requires that
old household electrical appliances must not be
disposed of in the normal unsorted municipal waste
stream. Old appliances must be collected separately
in order to optimise the recovery and recycling of the
materials they contain and reduce the impact on human
health and the environment. The crossed out “wheeled
bin” symbol on the product reminds you of your obliga-
tion, that when you dispose of the appliance it must be
separately collected.
Consumers should contact their local authority or
retailer for information concerning the correct
disposal of their old appliance.

6
GB
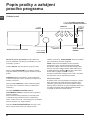
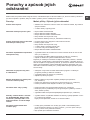
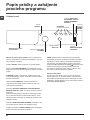
Detergent dispenser drawer: used to dispense deter-
gents and washing additives (see “Detergents and laundry”).
ON/OFF button: switches the washing machine on and off.
WASH CYCLE knob: programmes the wash cycles. Du-
ring the wash cycle, the knob does not move.
FUNCTION buttons with indicator light: used to select the
available functions. The indicator light corresponding to the
selected function will remain lit.
TEMPERATURE knob: sets the temperature or the cold
wash cycle (see “Personalisation”).
WASH CYCLE PROGRESS/DELAY TIMER
indicator light
s:
used to monitor the progress of the wash cycle.
The illuminated indicator light shows which phase is in progress.
If the Delay Timer function has been set, the time remaining
until the wash cycle starts will be indicated (see next page).
DOOR LOCKED indicator light: indicates whether the
door may be opened or not (see next page).
START/PAUSE button with indicator light: starts or tem-
porarily interrupts the wash cycles.
N.B. To pause the wash cycle in progress, press this
button; the corresponding indicator light will flash orange,
while the indicator light for the current wash cycle phase
will remain lit in a fixed manner. If the DOOR LOCKED
indicator light is switched off, the door may be opened
(wait approximately 3 minutes).
To start the wash cycle from the point at which it was inter-
rupted, press this button again.
Standby mode
This washing machine, in compliance with new energy sa-
ving regulations, is fitted with an automatic standby system
which is enabled after about 30 minutes if no activity is
detected. Press the ON-OFF button briefly and wait for the
machine to start up again.
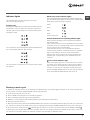
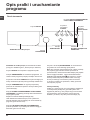
Description of the washing
machine and starting a wash cycle
WASH CYCLE PROGRESS/
DELAY TIMER indicator lights
DOOR LOCKED
indicator light
START/
PAUSE
button with
indicator light
Control panel
Detergent dispenser drawer
ON/OFF
button
WASH CYCLE
knob
TEMPERATURE
knob
FUNCTION
buttons with
indicator lights

GB
7
Indicator lights
The indicator lights provide important information.
This is what they can tell you:
Delayed start
If the DELAY TIMER function has been activated (see “Per-
sonalisation”), after the wash cycle has been started the
indicator light corresponding to the selected delay period
will begin to flash:
As time passes, the remaining delay will be displayed and
the corresponding indicator light will flash:
The set programme will start once the selected time delay
has expired.
Wash cycle phase indicator lights
Once the desired wash cycle has been selected and has be-
gun, the indicator lights switch on one by one to indicate which
phase of the cycle is currently in progress.
Function buttons and corresponding indicator lights
When a function is selected, the corresponding indicator
light will illuminate.
If the selected function is not compatible with the program-
med wash cycle, the corresponding indicator light will flash
and the function will not be activated.
If the selected function is not compatible with another
function which has been selected previously, the indicator
light corresponding to the first function selected will
flash and only the second function will be activated; the
indicator light corresponding to the enabled option will
remain lit.
Door locked indicator light
When the indicator light is on, the porthole door is locked
to prevent it from being opened; make sure the indicator
light is off before opening the door (wait approximately 3
minutes). To open the door during a running wash cycle,
press the START/PAUSE button; the door may be opened
once the DOOR LOCKED indicator light turns off.
Starting a wash cycle
1. Switch the washing machine on by pressing the ON/OFF button. All indicator lights will switch on for a few seconds, then
they will switch off and the START/PAUSE indicator light will pulse.
2. Load the laundry and close the door.
3. Set the WASH CYCLE knob to the desired programme.
4. Set the washing temperature (see “Personalisation”).
5. Measure out the detergent and washing additives (see “Detergents and laundry”).
6. Select the desired functions.
7. Start the wash cycle by pressing the START/PAUSE button and the corresponding indicator light will remain lit in a fixed man-
ner, in green. To cancel the set wash cycle, pause the machine by pressing the START/PAUSE button and select a new cycle.
8. At the end of the wash cycle the indicator light will switch on. The door can be opened once the DOOR LOCKED
indicator light turns off (wait approximately 3 minutes). Take out your laundry and leave the appliance door ajar to make sure
the drum dries completely. Switch the washing machine off by pressing the ON/OFF button.
Wash
Rinse
Spin
Drain
End of wash cycle

8
GB
Sport Intensive (
wash cycle
12) is for washing heavily soiled sports clothing fabrics (tracksuits, shorts, etc.); for best
results, we recommend not exceeding the maximum load indicated in the “Table of wash cycles”.
Sport Light (
wash cycle
13) is for washing lightly soiled sports clothing fabrics (tracksuits, shorts, etc.); for best results,
we recommend not exceeding the maximum load indicated in the “Table of wash cycles”. We recommend using a
liquid detergent and dosage suitable for a half-load.
Sport Shoes (
wash cycle
14) is for washing sports shoes; for best results, do not wash more than 2 pairs simultaneously.
The 20° wash cycles (20° Zone) offer effective washing performance at low temperatures, reducing electricity usage and
expenditure while benefitting the environment.The 20° wash cycles meet all requirements:
Cotton Standard 20° (programme 6) ideal for lightly soiled cotton loads. The effective performance levels achieved at cold
temperatures, which are comparable to washing at 40°, are guaranteed by a mechanical action which operates at varying
speed, with repeated and frequent peaks.
Mix Light (programme 7) ideal for mixed loads (cotton and synthetics) with a normal soil level. The effective performance
levels achieved at cold temperatures are guaranteed by a mechanical action which operates at varying speed, across set
average intervals.
20’ Refresh (programme 8) ideal for refreshing and washing lightly soiled garments in a few minutes. It lasts just 20 minutes
and therefore saves both time and energy. It can be used to wash different types of fabrics together (except for wool and
silk), with a maximum load of 1.5 kg.
Wash cycles
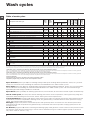
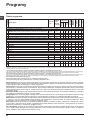
Table of wash cycles
The length of cycle shown on the display or in this booklet is an estimation only and is calculated assuming standard working conditions. The actual duration can vary according to factors such as
water temperature and pressure, the amount of detergent used, the amount and type of load inserted, load balancing and any wash options selected.
1) Test wash cycle in compliance with directive 1061/2010: set wash cycle 2 with a temperature of 60°C.
This cycle is designed for cotton loads with a normal soil level and is the most efficient in terms of both electricity and water consumption; it should be used for garments
which can be washed at 60°C. The actual washing temperature may differ from the indicated value.
2) Test wash cycle in compliance with directive 1061/2010: set wash cycle 3 with a temperature of 40°C.
This cycle is designed for cotton loads with a normal soil level and is the most efficient in terms of both electricity and water consumption; it should be used for garments
which can be washed at 40°C. The actual washing temperature may differ from the indicated value.
For all Test Institutes:
2) Long wash cycle for cottons: set wash cycle 3 with a temperature of 40°C.
3) Synthetic program along: set wash cycle 4 with a temperature of 40°C.
Wash cycles
Description of the wash cycle
Max.
temp.
(°C)
Max.
speed
(rpm)
Detergents
Max.
load (kg)
Residual
dampness %
Energy
consum-
ption kWh
Total water lt
Cycle
duration
Pre-
wash
Wash
Fabric
softener
Daily
1
Cotton with prewash: extremely soiled whites.
90°
1000
6
62 1,81 65 150’
2
Cotton Standard 60° (1): heavily soiled whites and resistant colours.
60°
(Max. 90°)
1000
-
6
62 1,04 48,0 205’
3
Cotton Standard 40° (2): lightly soiled whites and delicate colours.
40°
1000
-
6
62 1,03 65 190’
4
Synthetics: heavily soiled resistant colours.
60°
800
-
3
44 0,70 40 105’
4
Synthetics (3): lightly soiled resistant colours.
40°
800
-
3
44 0,47 38 95’
5
Mix Colored: lightly soiled whites and delicate colours.
40°
1000
-
6
62 0,64 50 85’
20° Zone
6
Cotton Standard 20°: lightly soiled whites and delicate colours.
20°
1000
-
6
- - - 170’
7 Mix Light
20°
800
-
6
- - - 120’
8 20’ Refresh
20°
800
-
1,5
- - - 20’
Special
9
Silk/Curtains: for garments in silk and viscose, lingerie.
30°
0
-
1
- - - 55’
10
Wool: for wool, cashmere, etc.
40°
800
-
1
- - - 65’
11 Jeans
40°
800
-
2,5
- - - 70’
Sport
12 Sport Intensive
30° 600 -
2,5
- - - 85’
13 Sport Light
30° 600 -
2,5
- - - 60’
14 Sport Shoes
30° 600 -
Max. 2
Pairs
- - - 55’
Partial wash cycles
Rinse
-
1000
- -
6
- - - 36’
Spin + Drain
-
1000
- - - 6
- - - 16’

GB
9
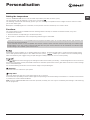
Setting the temperature
Turn the TEMPERATURE knob to set the wash temperature (see Table of wash cycles).
The temperature may be lowered, or even set to a cold wash .
The washing machine will automatically prevent you from selecting a temperature which is higher than the maximum value
set for each wash cycle.
! Exception: if the 2 programme is selected, the temperature can be increased up to a value of 90°C.
Functions
The various wash functions available with this washing machine will help to achieve the desired results, every time.
To activate the functions:
1. Press the button corresponding to the desired function;
2. the function is enabled when the corresponding indicator light is illuminated.
Note:
- If the selected function is not compatible with the programmed wash cycle, the corresponding indicator light will flash and
the function will not be activated.
- If the selected function is not compatible with another function which has been selected previously, the indicator light
corresponding to the first function selected will flash and only the second function will be activated; the indicator light
corresponding to the enabled option will remain lit.
Selecting this option enables you to suitably adjust drum rotation, temperature and water to a reduced load of lightly soiled
cotton and synthetic fabrics (refer to the
“Table of wash cycles”
). “ ” enables you to wash in less time thereby saving
water and electricity. We suggest using a liquid detergent suitably measured out to the load quantity.
The function saves energy by not heating the water used to wash your laundry - an advantage both to the environment
and to your energy bill. Instead, intensified wash action and water optimisation ensure great wash results in the same average
time of a standard cycle.
For the best washing results we recommend the usage of a liquid detergent.
1000-500
Press this button to reduce the spin speed.
Delay timer
This timer delays the start time of the wash cycle by up to 12 hours.
Press the button repeatedly until the indicator light corresponding to the desired delay time switches on. The fifth time the button
is pressed, the function will be disabled.
N.B. Once the START/PAUSE button has been pressed, the delay time can only be modified by decreasing it until launching
the set programme.
Personalisation

10
GB
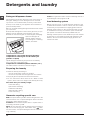
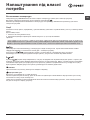
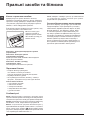
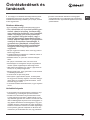
Detergents and laundry
Detergent dispenser drawer
Good washing results also depend on the correct dose of
detergent: adding too much detergent will not necessa-
rily result in a more efficient wash, and may in fact cause
build up on the inside of your appliance and contribute to
environmental pollution.
! Do not use hand washing detergents because these create
too much foam.
! Use powder detergent for white cotton garments, for pre-
washing, and for washing at temperatures over 60°C.
! Follow the instructions given on the detergent packaging.
Open the detergent di-
spenser drawer and pour
in the detergent or washing
additive, as follows.
compartment 1: Pre-wash detergent (powder)
compartment 2: Detergent for the wash cycle
(powder or liquid)
Liquid detergent should only be poured in immediately
prior to the start of the wash cycle.
compartment 3: Additives (fabric softeners, etc.)
The fabric softener should not overflow the grid.
Preparing the laundry
•Dividethelaundryaccordingto:
- the type of fabric/the symbol on the label
- the colours: separate coloured garments from whites.
•Emptyallgarmentpocketsandcheckthebuttons.
• Do not exceed the values listed in the “Table of wash
cycles”, which refer to the weight of the laundry when dry.
How much does your laundry weigh?
1 sheet 400-500 g
1 pillow case 150-200 g
1 tablecloth 400-500 g
1 bathrobe 900-1200 g
1 towel 150-250 g
Garments requiring special care
Silk: use special wash cycle 9 to wash all silk garments. We
recommend the use of special detergent which has been
designed to wash delicate clothes.
Curtains: fold curtains and place them in a pillow case or
mesh bag. Use wash cycle 9.
Wool: all wool garments can be washed using programme
10, even those carrying the “hand-wash only” label.
For best results, use special detergents and do not exceed
1 kg of laundry.
1
2
3
Jeans: Turn garments inside-out before washing and use a
liquid detergent. Use programme 11.
Load balancing system
Before every spin cycle, to avoid excessive vibrations and
to distribute the load in a uniform manner, the drum rotates
continuously at a speed which is slightly greater than the
washing rotation speed. If, after several attempts, the load
is not balanced correctly, the machine spins at a reduced
spin speed. If the load is excessively unbalanced, the
washing machine performs the distribution process instead
of spinning. To encourage improved load distribution and
balance, we recommend small and large garments are
mixed in the load.

GB
11
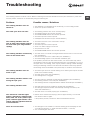
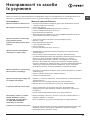
Troubleshooting
Your washing machine could fail to work. Before contacting the Technical Assistance Centre (see “Assistance”), make sure
that the problem cannot be not solved easily using the following list.
Problem:
The washing machine does not
switch on.
The wash cycle does not start.
The washing machine does not
take in water (the indicator light for
the first wash cycle stage flashes
rapidly).
The washing machine continuously
takes in and drains water.
The washing machine does not
drain or spin.
The washing machine vibrates a lot
during the spin cycle.
The washing machine leaks.
The “Functions” indicator lights
and the “start/pause” indicator light
flash, while one of the “phase in pro-
gress” indicator lights and the “door
locked” indicator light will remain lit
in a fixed manner.
There is too much foam.
Possible causes / Solutions:
• Theapplianceisnotpluggedintothesocketfully,orisnotmakingcontact.
• Thereisnopowerinthehouse.
• Thewashingmachinedoorisnotclosedproperly.
• TheON/OFFbuttonhasnotbeenpressed.
• TheSTART/PAUSEbuttonhasnotbeenpressed.
• Thewatertaphasnotbeenopened.
• Adelayedstarthasbeenset(see “Personalisation”).
• Thewaterinlethoseisnotconnectedtothetap.
• Thehoseisbent.
• Thewatertaphasnotbeenopened.
• Thereisnowatersupplyinthehouse.
• Thepressureistoolow.
• TheSTART/PAUSEbuttonhasnotbeenpressed.
• Thedrainhoseisnotfittedataheightbetween65and100cmfromthefloor
(see “Installation”).
• Thefreeendofthehoseisunderwater(see “Installation”).
• Thewalldrainagesystemisnotfittedwithabreatherpipe.
If the problem persists even after these checks, turn off the water tap, switch
the appliance off and contact the Assistance Service. If the dwelling is on one of
the upper floors of a building, there may be problems relating to water drainage,
causing the washing machine to fill with water and drain continuously. Special
anti-draining valves are available in shops and help to avoid this inconvenience.
• Thewashcycledoesnotincludedraining:somewashcyclesrequirethedrain
phase to be started manually.
• Thedrainhoseisbent(see “Installation”).
• Thedrainageductisclogged.
• Thedrumwasnotunlockedcorrectlyduringinstallation(see “Installation”).
• Thewashingmachineisnotlevel(see “Installation”).
• Thewashingmachineistrappedbetweencabinetsandwalls(see “Installation”).
• Thewaterinlethoseisnotscrewedonproperly(see “Installation”).
• Thedetergentdispenserdrawerisblocked(forcleaninginstructions,see
“Care and maintenance”).
• Thedrainhoseisnotfixedproperly(see “Installation”).
• Switchoffthemachineandunplugit,waitforapproximately1minuteand
then switch it back on again.
If the problem persists, contact the Technical Assistance Service.
• Thedetergentisnotsuitableformachinewashing(itshoulddisplaythetext
“for washing machines” or “hand and machine wash”, or the like).
• Toomuchdetergentwasused.

12
GB
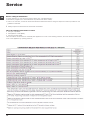
Service
Before calling for Assistance:
• Check whether you can solve the problem alone (see “Troubleshooting”);
• Restarttheprogrammetocheckwhethertheproblemhasbeensolved;
• Ifthisisnotthecase,contactanauthorisedTechnicalAssistanceCentreusingthetelephonenumberprovidedonthe
guarantee certificate.
! Always request the assistance of authorised technicians.
Have the following information to hand:
• thetypeofproblem;
• theappliancemodel(Mod.);
• theserialnumber(S/N).
This information can be found on the data plate applied to the rear of the washing machine, and can also be found on the
front of the appliance by opening the door.

13
UA
Українська
Зміст
Встановлення, 14-15
Розпакування та вирівн‘ювання
Підключення води й електроенергії
Перший цикл прання
Технiчнi данi
Чищення та догляд, 16
Відключення води й електричного живлення
Очищення пральної машини
Чищення касети для пральних засобів
Догляд за люком та барабаном
Чищення насосу
Контроль труби подачі води
Заходи безпеки та поради, 17
Загальна безпека
Утилiзацiя
Опис пральної машини та запуску
програм, 18-19
Панель керування
Iндикаторнi лампи
Як запустити програму
Програми, 20
Таблиця програм
Налаштування пiд власнi потреби, 21
Встановлення температури
Опції
Пральнi засоби та білизна, 22
Касета для пральних засобiв
Підготовка білизни
Особливi речi
Система балансування завантаження
Несправності та засоби їх усунення, 23
Допомога, 24
UA
ПРАЛЬНА МАШИНА
IWSB 61051
Iнструкцiя з використання

14
UA
A
Встановлення
! Необхідно зберігати дану брошуру, щоб
мати нагоду звернутися до неї у будь-який
момент. У випадку продажу, передачі іншій
особі або переїзду переконайтеся, що інструкція
перебуває разом із пральною машиною й новий
власник може ознайомитися з її принципами
роботи й відповідними запобіжними заходами.
! Уважно вивчіть інструкцію: в ній міститься
важлива інформація щодо встановлення,
використання та безпеки.
Розпакування та вирівнювання
Розпакування
1. Розпакування пральної машини
2. Вдоскональтеся, що машина не зазнала
ушкоджень пiд час транспортування. Якщо вона
має пошкодження, не виконуйте нiяких пiдключень
та негайно зверніться до постачальника.
3. Видаліть
4 запобіжнi
гвинти для
транспортування
та прокладку
з відповідною
розпірною деталлю,
якi знаходяться
позаду (див.
малюнок).
4. Закрийте отвори пластиковими заглушками
з комплекту постачання.
5. Збережіть усі деталі: якщо пральна
машина має перевозитися, їх потрібно
встановити знову.
! Забороняйте дiтям гратися з упаковками.
Вирівнювання
1. Встановіть пральну машину на рiвній та
твердій підлозі, не притуляючи її до стін,
меблів, тощо.
2. Якщо пiдлога
не є iдеально
горизонтальною,
компенсуйте
нерiвностi за
допомогою переднiх
нiжок (див. малюнок)
– розкручуючи чи
закручуючи їх; кут
нахилу вiдносно
робочої поверхнi не
повинен перевищувати 2°.
Належне вирiвнювання надає стабільність
машині та запобігає вібрації, шуму та
перес уванню під ча с роботи. При
встановленнi машини на килимовому
покритті або килимi відрегулюйте ніжки
таким чином, щоб залишити під пральною
машиною достатній простір для вентиляції.
Підключення води й
електроенергії
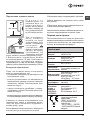
Пiд’єднання труби подачі води
1. Âñòàâòå ïðîêëàäêó
À ó ê³íåöü øëàíãó äëÿ
ïîäà÷³ âîäè òà âêðóò³òü
éîãî ó êðàí ç õîëîäíîþ
âîäîþ ç ð³çüáîþ 3/4
(äèâ. ìàëþíîê).
Ïåðåä ïiäêëþ÷åííÿì
ñïóñòiòü âîäó, äîêè
âîíà íå ñòàíå
ïðîçîðîþ.
2. Підключіть трубу
подачі води до
пральної машини,
прикрутивши її до
роз’єму для води,
який знаходиться
угорі праворуч
на задньому боцi
машини (див.
малюнок).
3. Зверніть увагу, щоб труба не мала
згинів та утисків.
! Тиск води в крані має відповідати
значенням у таблиці Технічних даних (див.
сторінку поруч).
! Якщо довжини труби подачi води не
вистачає, зверніться у спеціалізовану
крамницю або до уповноваженого
фахівця.
! Не використовуйте ніколи труби, що вже
були у користуванні.
! Використовуйте труби з комплекту
постачання до машини.

15
UA
65 - 100 cm
Підключення зливного шланга
П і д к л ю ч і т ь
зливний шланг, не
згинаючи його, до
к а н а л і з а ц і й н о г о
каналу або до входу
до такого каналу на
стіні, на відстані від 65
до 100 см від підлоги;
Або ж встановіть
в и х і д з л и в н о г о
шл ан га на кра й
рукомийника або
ванни, поєднавши
н а п р я м н у
( п р и д б а т и я к у
можна у сервiсному
центрi) до крану
(див.малюнок). Не
залишайте вільний
кінець зливного шланга зануреним у воду.
! Використання подовжувача шланга
не рекомендоване. В разi необхiдностi
використання подовжувача шлангу,
переконайтеся у тому, що він має той самий
діаметр та його довжина не перевищує 150 см.
Електричні підключення
Перш нiж вставити вилку в електричну
розетку, переконайтеся, що:
• розетка має заземлення у відповідності до
встановлених норм;
• розетка розрахована на максимальне
навантаження у межах потужності машини,
зазначене у таблиці Технічних даних (див.
малюнок поруч);
• напруга живлення перебуває у межах,
зазначених у таблиці Технічних даних (див.
малюнок поруч);
• розетка підходить до вилки пральної машини.
В іншому випадку замініть розетку або вилку.
! Машину не можна встановлювати поза
приміщенням, навіть в захищених мiсцях,
тому що дуже небезпечно піддавати її
впливу дощу і грози.
! Коли машину вже встановлено, забезпечте
вільний доступ до електричної розетки.
! Не використовуйте подовжувачі й трійники.
! Шнур живлення не повинен мати згинів
або утисків.
! Проводити замiну шнуру живлення можуть
тiльки вповноваженi фахiвцi.
Увага! Компанія знімає з себе відповідальність
за умови недотримання вказаних норм.
Перший цикл прання
Пiсля встановлення та перш нiж розпочати
використання машини, виконайте цикл прання
з пральним засобом але не завантажуючи
бiлизну, встановивши програму 2.
Технiчнi данi
Модель IWSB 61051
Розмiри
ширина 59,5 см
висота 85 см
глибина 40 см
Кiлькiсть
бiлизни
вiд 1 до 6 кг
Електричні
підключення
див. шильдік з
технiчними даними на
машинi
Водопровднi
пiдключення
максимальний тиск 1
мПа (10 бар)
мiнiмальний тиск 0,05
мПа (0,5 бар)
об’єм баку – 40 лiтри
Швидкiсть
центрифуги
до 1000 обертiв на
хвилину
Програми
контролю
згiдно з
нормою
1061/2010
1015/2010
програма 2;
Бiла бавовна 60°C.
програма 3;
Бiла бавовна 40°C.
Цей прилад вiдповiдає
таким європейським
директивам:
- EMC 2014/30/EU
(Електромагнітна
сумiснiсть)
- 2012/19/EU - (WEEE)
- LVD 2014/35/EU (Низька
напруга)

16
UA
Догляд та очищення
Відключення води й електричного
живлення
• Закривайте водопровідний кран після
кожного прання. У такий спосіб зменшується
знос гідравлічної частини машини й
усувається небезпека протікання.
• Виймайте штепсель з розетки під час
миття машини та під час робіт з технічного
обслуговування.
Очищення пральної машини
Зовнішня частина і гумові деталі можуть митися
тканиною, змоченою у теплій воді й милі. Не
використовуйте розчинники або абразивнi засоби.
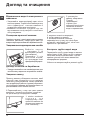
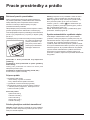
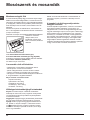
Чищення касети для пральних засобів
В и й м i т ь к а с ет у
, пiднявши її та
витягнувши назовнi
(див. малюнок).
Пр ом ий те ї ї під
проточною водою;
ця процедура має
проводитися регулярно.
Догляд за люком та барабаном
• Завжди залишайте люк напiввідкритим для
запобігання утворенню неприємних запахів.
Чищення насосу
Пральну машину обладнано насосом, який
здатний сам очищатися та не вимагає
технічного обслуговування. Може трапитися
так, що дрібні речi (монети, ґудзики) потраплять
до попередньої камери, яка захищає насос та
розташована в його нижній частині.
! Переконайтеся у тому, що цикл прання
закінчено, і витягніть штепсель з розетки.
Як дістатися до попередньої камери:
1. зніміть зовнішню
п а н е л ь н а
передньому боці
пральної машини за
допомогою викрутки
(див. малюнок);
2. розгвинтіть
кришку, обертаючи
її проти
годинникової
стрілки (див.
малюнок): витікання
незначної кiлькостi
води є нормальним;
3. акуратно очистіть всереденi;
4. знову накрутіть кришку;
5. встановіть панель на місце,
пересвідчіться у тому, що гачки були
вставлені у відповiдні петлі, пiсля чого
притиснiть її до машини.
Контроль труби подачі води
Перевіряйте трубу подачі води не менше
одного разу на рік. Якщо на ній є тріщини
та щілини, вона підлягає заміні: під час
прання сильний тиск може викликати
непередбачені розриви.
! Ніколи не використовуйте уживані труби.

17
UA
Запобіжні заходи та
поради
! Машину була спроектовано і вироблено у відповідності
з міжнародними нормами безпеки. Це попередження
надаються задля вашої безпеки, і тому їх треба уважно
прочитати.
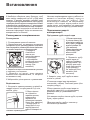
Загальна безпека
• Даний прилад спроектований виключно для
побутового використання.
• Дозволяється користування цим
приладом дітьми віком від 8 років,
а також особами з обмеженими
фізичними, сенсорними або розумовими
можливостями або особами без
належного досвіду і знань, якщо вони
перебувають під постійним контролем
або проінструктовані щодо правил з
небезпечного використання приладу
і усвідомлюють ступені ризику. Не
дозволяйте дітям гратися з приладом.
Операції з очищення і догляду не повинні
виконуватися дітьми без належного
контролю.
• Не торкайтеся до машини голими ногами або
мокрими чи вологими руками й ногами.
• Не виймайте штепсель з електричної розетки,
витягуючи його за шнур, тримайтеся тільки за самий
штепсель.
• Не вiдкривайте касету з пральними засобами пiд
час роботи машини.
• Не торкайтеся води, що зливається, вона може
мати підвищену температуру.
• У жодному випадку не докладайте надмірних
зусиль до люку: це може ушкодити запобiжний
механiзм проти випадкових вiдкривань.
• Якщо машина не працює у разi поломки, у жодному
випадку не робіть спроб самостійно виконати
ремонт внутрішніх механізмів.
• Завжди слiдкуйте, щоб дiти не наближалися до
працюючої машини.
• Пiд час прання люк нагрiватиметься.
• Пересування машини має здiйснюватися двома
або трьома особами за умови надзвичайної
обережностi. Ніколи не переміщуйте машину
самотужки, тому що вона дуже важка.
• Перш ніж завантажити білизну, перевірте, щоб
барабан був порожній.
Утилізація
• Утилізація пакувального матеріалу:
додержуйтесь місцевих норм, так як пакування
може бути використане повторно.
• Європейська директива 2012/19/EU з відходів
електричної й електронної апаратури передбачає, що
побутові електроприлади не можуть перероблятися
у звичайному порядку для твердих міських відходів.
Відпрацьовані побутові прилади мають збиратися
окремо для оптимізації відновлення та рециклу
матеріалів, що входять до їхнього складу, та з метою
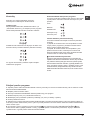
усунення потенційної шкоди для здоров’я та довкілля.
Символ перекресленого кошика, зображений на всіх
виробах, нагадує про необхідність окремої утилізації.
Для подальшої інформації щодо правильної
утилізації побутової техніки, їхні власники можуть
звернутися до вiдповiдних мiських служб або до
постачальника.

18
UA
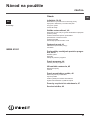
Касета з пральним засобом: для завантаження
пральних засобiв та засобiв догляду (див. “Пральнi
засоби та бiлизна”).
Кнопка УВIМКНЕННЯ/ВИМКНЕННЯ: для увiмкнення
й вимкнення пральної машини
Ручка ПРОГРАМИ: для задання бажаних програм. Під
час програми ручка залишається нерухомою.
Кнопки та індикаторні лампи ОПЦІЯ: для вибору
наявних опцій. Iндикаторна лампа обраної опцiї
залишається увiмкненою.
Ручка ТЕМПЕРАТУРА: для установки температури
або холодного прання (див. “Налаштування пiд
власнi потреби”).
IНДИКАТОРНI ЛАМПИ УВIМКНЕННЯ ЦИКЛУ/
ВIДСТРОЧЕНОГО ПУСКУ: для спостереження за
станом програми прання.
Увiмкнена iндикаторна лампа вказує на активовану
фазу.
При заданнi опцiї “Вiдстрочений пуск” вiдображається
час, який залишився до запуску програми (див.
сторiнку поруч).
Iндикаторна лампа ЛЮК ЗАБЛОКОВАНО: для
перевiрки того, чи люк може вiдкриватись (див.
сторiнку поруч).
Кнопка та індикаторна лампа ПУСК/ПАУЗА: для
запуску програм або для їх тимчасового переривання.
Увага: щоб установити в режим паузи поточне
прання, натиснiть на цю кнопку, вiдповiдна кнопка
почне блимати помаранчевим кольором, в той час
як iндикаторна лампа поточної фази свiтитиметься
постiйним свiтлом. Якщо індикаторна лампа ЛЮК
ЗАБЛОКОВАНО згасне, можна відкривати люк для
завантаження білизни (Приблизно через 3 хвилини).
Щоб продовжити прання з місця, де воно було
перервано, знову натисніть на цю кнопку.
Режим очiкування
Вiдповiдно до норм, пов’язаних з заощадження
енергiї, цю пральну машину оснащено системою
автовимкнення (stand by), яка активується через 30
секунд вiдсутностi роботи з боку машини. Швидко
натиснiть кнопку УВIМКНЕННЯ/ВИМКНЕННЯ та
зачекайте вiдновлення роботи машини.
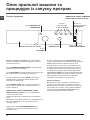
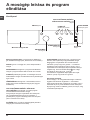
Опис пральної машини та
процедури iз запуску програм
Панель керування
Ручка
ТЕМПЕРАТУРА
Ручка
ПРОГРАМИ
Касета для пральних засобiв
IНДИКАТОРНI ЛАМПИ УВIМКНЕННЯ
ЦИКЛУ/ ВIДСТРОЧЕНОГО ПУСКУ
Кнопки з
iндикаторними
лампами ОПЦIЯ
Кнопка УВIМКНЕННЯ/
ВИМКНЕННЯ
Індикаторна лампа
ЛЮК ЗАБЛОКОВАНО
Кнопка та
iндикаторна лампа
ПУСК/ПАУЗА

19
UA
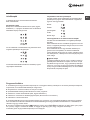
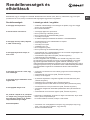
Індикаторнi лампи
Індикаторнi лампи надають важливу iнформацiю
От на що вони вказують:
Вiдстрочений пуск
Якщо активованоопцiю“Вiдстрочений пуск” (див.
“Налаштування пiд власнi потреби”), тодi пiсля
запуску програми розпочне блимати iндикаторна лампа,
пов’язана з вiдстрочкою, яку було задано:
Протягом усього часу шляхом блимання вiдповiдної
iндикаторної лампи вiдображається час вiдстрочення,
який залишився до запуску:
Пiсля завершення вибраного часу вiдстрочки
розпочнеться задана програма.
Iндикаторнi лампи поточних операцiй
Пiсля обрання та запуску бажаного циклу прання
iндикаторнi лампи вмикаються по черзi, щоб вказати
на стан програми:
Кнопки опцiй та вiдповiднi iндикаторнi лампи
Пiсля виборуопцiї вiдповiдна iндикаторна лампа
починає свiтитися.
Якщо вибрана опція несумісна з заданою програмою,
індикаторна лампа почне блимати й опція не
активується.
Якщо вибрана опція не є сумісною з іншою, раніше
вибраною, індикаторна лампа попередньої функції
почне блимати, при цьому буде активовано тільки
останню опцiю, засвiтиться індикаторна лампа
активованої опцiї.
Iндикаторна лампа ЛЮК ЗАБЛОКОВАНО
Увiмкнена iндикаторна лампа вказує на те, що люк
заблокований; вiдкривати люк можна лише коли ця
лампа не свiтиться (Приблизно через 3 хвилини).
Щоб відкрити люк під час виконання циклу, натисніть
кнопку ПУСК/ПАУЗА; якщо індикаторна лампа ЛЮК
ЗАБЛОКОВАНО згасла, це означає, що можна
відкрити люк.
Як запустити програму
1. Увiмкнiть пральну машину, натиснувши на кнопку УВIМКНЕННЯ/ВИМКНЕННЯ. Усi iндикаторнi лампи
увiмкнуться на декiлька секунд, потiм згаснуть та почне блимати iндикаторна лампа ПУСК/ПАУЗА
2. Завантажте бiлизну й закрийте люк.
3. Встановiть за допомогою ручки ПРОГРАМ бажану програму.
4. Встановiть температуру прання (див. “Налаштування пiд власнi потреби”).
5. Додайте пральнi засоби та засоби догляду (див. “Пральнi засоби та бiлизна”).
6. Виберiть бажанi опцiї.
7. Запустiть програму, натиснувши кнопку ПУСК/ПАУЗА й вiдповiдна iндикаторна лампа загориться зеленим
свiтлом. Для скасування заданого циклу встановiть машину в режим паузи, натиснувши кнопку ПУСК/ПАУЗА, та
оберiть новий цикл.
8. Наприкiнцi програми почне свiтитися iндикаторна лампа “END”. Якщо індикаторна лампа ЛЮК ЗАБЛОКОВАНО
згасне, можна відкривати люк для завантаження білизни (Приблизно через 3 хвилини). Виймiть бiлизну
та залиште люк напiввiдкритим, щоб висушити барабан. Вимкнiть пральну машину, натиснувши на кнопку
УВIМКНЕННЯ/ВИМКНЕННЯ.
IНДИКАТОРНI ЛАМПИ УВIМКНЕННЯ
ЦИКЛУ/ ВIДСТРОЧЕНОГО ПУСКУ
Прання
Полоскання
Вiджим
Злив
Кiнець прання

20
UA
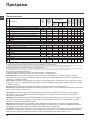
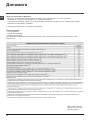
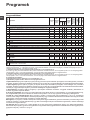
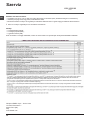
Програми
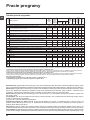
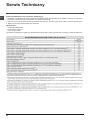
Таблиця програм
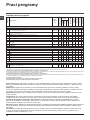
Тривалість циклу, вказана на дисплеї або в керівництві, разрахована на основі стандартних умов роботи. Фактичний час може залежати від чисельних факторів, таких як температура і
тиск подаваної води, температура у приміщенні, кількість миючого засобу, кількість і тип завантаженої білизни, зрівноваження завантаженої білизни, додаткові обрані опції.
1) Програма керування згiдно до норми 1061/2010: встановити програму 2 з температурою 60°C.
Цей цикл призначений для прання бавовняних речей із звичайним ступенем забруднення. Ефективність циклу підвищується завдяки комбінованому споживанню енергії та води. Він
має використовуватися для речей, які придатні для прання при температурі 60°C. Фактична температура прання може дещо відрізнятися від заявленої.
2) Довга програма бавовна: встановити програму 3 з температурою 40°C.
Цей цикл призначений для прання бавовняних речей із звичайним ступенем забруднення. Ефективність циклу підвищується завдяки комбінованому споживанню енергії та води. Він
має використовуватися для речей, які придатні для прання при температурі 40°C. Фактична температура прання може дещо відрізнятися від заявленої.
Для всiх Установ з проведення випробувань:
2) Програма тривалого прання речей з бавовни: встановити програму 3 з температурою 40°C.
3) Програма тривалого прання синтетичних речей: встановити програму 4 з температурою 40°C.
Sport Intensive (програма 12) розрахована для прання сильно забрудненого спортивного одягу (спортивнi
костюми, шкарпетки, тощо); для отримання найкращих результатiв не перевищуйте максимальне завантаження,
зазначене у “Таблицi програм”.
Sport Light (програма 13) розрахована для прання не дуже забрудненого спортивного одягу (спортивнi костюми,
шкарпетки, тощо); для отримання найкращих результатiв не перевищуйте максимальне завантаження, зазначене
у “Таблицi програм”.
Використовуйте рiдкий пральний засiб та відміряйте дозу для половинного завантаження.
Sport Shoes (програма 14) розрахована для прання спортивного взуття; для отримання найкращих результатiв не
завантажуйте бiльше 2 пар взуття.
Програми 20° (20° Zone) забезпечують добре прання при низьких температурах з меншим використанням
електричної енергії, що призводить до енергозаощадження і позитивного впливу на довкілля. Програми 20°
відповідають усім вимогам:
Бавовна 20° (програма 6) ідеальна для бавовняних забруднених речей. Добре прання, в тому числі у холодній
воді, яке можна порівняти з пранням при 40°, гарантується механічною роботою, яка здійснюється на змінній
швидкості із частими повторюваними піками.
Mix Light (програма 7) ідеальна для змішаних речей (бавовняних і синтетичних) із середнім ступенем забруднення.
Добре прання, в тому числі у холодній воді, яке можна порівняти з пранням при 40°, гарантується механічною роботою,
яка здійснюється на змінній швидкості із середніми і чітко визначеними інтервалами.
20’ Refresh (програма 8) ідеальний цикл для освіжування е прання злегка забруднених речей за декілька хвилин.
Її тривалiсть складає лише 20 хвилин, що заощаджує енергоспоживання та час. Можна випрати разом тканини
рiзноманiтної структури (за вийнятком вовни та шовку) при максимальному завантаженнi у 1,5 кг.
Ïðîãðàìè
Опис програми
Макс.
темп.
(°C)
Макс.
швидкiсть
(обертiв
за хвили-
ну)
Пральний засіб
Макс.
заван-
тажен-
ня (кг)
Остаточна
вологість
Споживання
електроенергії
Загальна
кількість води
Тривалiсть
циклу
Попе-
реднє
прання
Прання
Пом’
якшу-
вач
Щоденнi (Daily)
1
Бавовна з попереднім пранням: білі надзвичайно забруднені.
90°
1000
6
62 1,81 65 150’
2
Бавовна (1): бiлi та кольоровi міцні сильно забрудненi.
60°
(Max. 90°)
1000
-
6
62 1,04 48,0 205’
3
Бавовна (2): білі та кольорові делікатні слабо забруднені.
40°
1000
-
6
62 1,03 65 190’
4
Синтетичні: кольоровi мiцнi тканини дуже забрудненi
60°
800
-
3
44 0,70 40 105’
4
Синтетичні (3): кольоровi мiцнi тканини дуже забрудненi
40°
800
-
3
44 0,47 38 95’
5
Бавовна кольоровi: слабо забруднені та кольорові делікатні.
40°
1000
-
6
62 0,64 50 85’
20° Zone
6
Бавовна: білі та кольорові делікатні слабо забруднені.
20°
1000
-
6
- - - 170’
7
Mix Light
20°
800
-
6
- - - 120’
8
20’ Refresh
20°
800
-
1,5
- - - 20’
Спецiальнi (Special)
9
Шовк/Штори: Для речей з шовку, вiскози, нижньої бiлизни.
30°
0
-
1
- - - 55’
10
Вовна: Для вовни, кашемiру, тощо.
40°
800
-
1
- - - 65’
11
Jeans
40°
800
-
2,5
- - - 70’
Спорт
12
Sport Intensive
30° 600 -
2,5
- - - 85’
13
Sport Light
30° 600 -
2,5
- - - 60’
14
Sport Shoes
30° 600 -
Макс
2 пари
- - - 55’
Неповнi
Полоскання
-
1000
- -
6
- - - 36’
Вiджимання + Зливання
-
1000
- - - 6
- - - 16’
Strona się ładuje...
Strona się ładuje...
Strona się ładuje...
Strona się ładuje...
Strona się ładuje...
Strona się ładuje...
Strona się ładuje...
Strona się ładuje...
Strona się ładuje...
Strona się ładuje...
Strona się ładuje...
Strona się ładuje...
Strona się ładuje...
Strona się ładuje...
Strona się ładuje...
Strona się ładuje...
Strona się ładuje...
Strona się ładuje...
Strona się ładuje...
Strona się ładuje...
Strona się ładuje...
Strona się ładuje...
Strona się ładuje...
Strona się ładuje...
Strona się ładuje...
Strona się ładuje...
Strona się ładuje...
Strona się ładuje...
Strona się ładuje...
Strona się ładuje...
Strona się ładuje...
Strona się ładuje...
Strona się ładuje...
Strona się ładuje...
Strona się ładuje...
Strona się ładuje...
Strona się ładuje...
Strona się ładuje...
Strona się ładuje...
Strona się ładuje...
Strona się ładuje...
Strona się ładuje...
Strona się ładuje...
Strona się ładuje...
Strona się ładuje...
Strona się ładuje...
Strona się ładuje...
Strona się ładuje...
Strona się ładuje...
Strona się ładuje...
Strona się ładuje...
Strona się ładuje...
-
 1
1
-
 2
2
-
 3
3
-
 4
4
-
 5
5
-
 6
6
-
 7
7
-
 8
8
-
 9
9
-
 10
10
-
 11
11
-
 12
12
-
 13
13
-
 14
14
-
 15
15
-
 16
16
-
 17
17
-
 18
18
-
 19
19
-
 20
20
-
 21
21
-
 22
22
-
 23
23
-
 24
24
-
 25
25
-
 26
26
-
 27
27
-
 28
28
-
 29
29
-
 30
30
-
 31
31
-
 32
32
-
 33
33
-
 34
34
-
 35
35
-
 36
36
-
 37
37
-
 38
38
-
 39
39
-
 40
40
-
 41
41
-
 42
42
-
 43
43
-
 44
44
-
 45
45
-
 46
46
-
 47
47
-
 48
48
-
 49
49
-
 50
50
-
 51
51
-
 52
52
-
 53
53
-
 54
54
-
 55
55
-
 56
56
-
 57
57
-
 58
58
-
 59
59
-
 60
60
-
 61
61
-
 62
62
-
 63
63
-
 64
64
-
 65
65
-
 66
66
-
 67
67
-
 68
68
-
 69
69
-
 70
70
-
 71
71
-
 72
72


Indesit IWSB 61051 C ECO EU instrukcja
- Kategoria
- Pralki
- Typ
- instrukcja
w innych językach
- slovenčina: Indesit IWSB 61051 C ECO EU Užívateľská príručka