TRUVISION DVR 17 CCTV Digital Video Recorders instrukcja
- Typ
- instrukcja

P/N 1102-EN • REV A • ISS 31AUG22
TruVision DVR 17 Quick
Start Guide
EN
TruVision DVR 17 Quick Start Guide
DE
TruVision DVR 17 Schnellstartanleitung
ES
Guía de inicio rápido de TruVision DVR 17
FR
Guide de démarrage rapide du TruVision DVR 17
IT
Guida di avvio rapido di TruVision DVR 17
NL
TruVision DVR 17 Snel aan de slag-gids
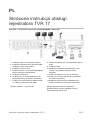
PL
Instrukcja szybkiego uruchamiania rejestratora TruVision
DVR 17
PT
Guia Rápido do TruVision DVR 17
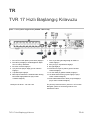
TR
TruVision DVR 17 Hızlı Başlangıç Kılavuzu

Copyright © 2022 Carrier. All rights reserved. Specifications subject to change
without prior notice. TruVision names and logos are a product brand of
Aritech, a part of Carrier. Other trade names used in this document may
be trademarks or registered trademarks of the manufacturers or
vendors of the respective products
While every precaution has been taken during the preparation of this
manual to ensure the accuracy of its contents, Carrier assumes no
responsibility for errors or omissions.
Trademarks
and patents
Trade names used in this document may be trademarks or registered
trademarks of the manufacturers or vendors of the respective products.
Contact
information
EMEA: firesecurityproducts.com
Australian/New Zealand: firesecurityproducts.com.au/

TruVision DVR 17 Quick Start Guide EN-1
EN
TruVision DVR 17 Quick Start
Guide
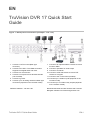
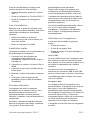
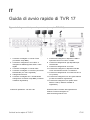
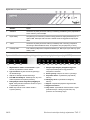
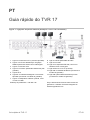
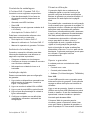
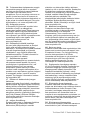
Figure
1: Back panel connections (Example: TVR 1716)
1. Connect a CCTV monitor (BNC-type
connector).
2. Connect to an HDTV. The HDMI connection
supports both digital audio and video.
3. Connect to a VGA monitor.
4. Connect a microphone for bi-directional audio
(not recorded).
5. Connect to ground.
6. Connect up to 16 analog cameras to BNC-type
connectors (depends on the recorder model)
7. Connect to an optional USB 3.0 device such as a
mouse or HDD.
8. Connect to speakers for audio output
9. Connect to a network.
10. Connect to a RS-485 device such as a PTZ
camera or a keypad.
11. Connect to the 12 VDC PSU (included).
12. Connect up to 16 alarm inputs (depends on the
recorder model)
13. Connect up to four alarm relay outputs (depends
on the recorder model).
Default IP address - 192.168.1.82
Download the latest recorder firmware and TruVision
Navigator software from firesecurityproducts.com.

2 -EN TruVision DVR 17 Quick Start Guide
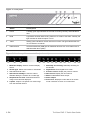
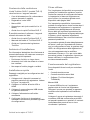
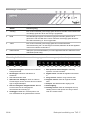
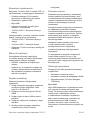
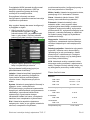
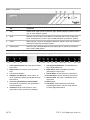
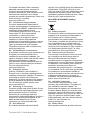
Figure
2: Front panel
Name Description
1
. Power A steady green light indicates the recorder is working correctly. Red indicates a
fault.
2
. HDD Light blinks red when data is being read from or written to the HDD. A
steady red
light indicates an HDD exception or error.
3
. Tx/Rx Steady green indicates a normal network connection. No light indicates that it is
not connected to a network.
4
. USB interface Universal Serial Bus (USB) port for additional devices such as a USB mouse or
USB Hard Disk Drive (HDD).
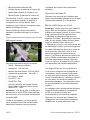
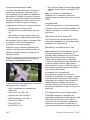
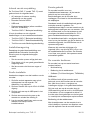
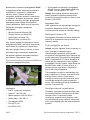
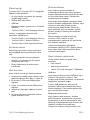
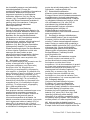
Figure
3: Live view quick access toolbar (web mode)
1. Multiview display: Select a multiview display
format.
2. Stream type: Select main stream or substream
3. Start bidirectional audio
4. QR code for UltraSync: Scan the code to
facilitate adding the recorder to a mobile app.
5. Stop/start all live view: Freeze/unfreeze live
image of the cameras displayed.
6. Capture: Capture a snapshot of a video image
from the selected camera.
7. Start/stop all recording: Start/stop recording for
all cameras.
8. Digital Zoom: Enter digital zoom mode.
9. Previous screen: Display the previous camera.
10. Next screen: Display the next camera.
11. Mute: Enable/disable audio output.
12. Alarm output:
13. Full screen: Display the video tiles in full screen
mode. Click ESC to return to normal mode.

TruVision DVR 17 Quick Start Guide EN-3
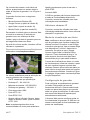
Package contents
The TruVision DVR 17 (model TVR 17) is
shipped with the following items:
• AC power cord or external power supply
(depending on the model)
• Recorder including HDDs
• USB mouse
• Rack mounts (8 and 16-channel models
only)
• TruVision DVR 17 Quick Start Guide
You can download the software and the
following manuals from our web site:
• TruVision DVR 17 Quick Start Guide
• TruVision DVR 17 User Manual
• TruVision Recorder Operator Guide
Installation environment
Refer to the user manual for detailed
information, but observe these important
requirements:
• Place the unit in a secure location.
• Ensure that the unit is in a well-ventilated
area.
• Do not expose the unit to rain or moisture.
Quick install
Recommended steps for setting up the
recorder:
1. Connect all the devices required to the
back panel of the recorder. See Figure 1
on page 1.
2. Connect a monitor to the VGA or HDMI
output.
3. Connect the mouse to the USB port in the
front panel.
4. Connect the power supply to the unit and
turn on the power.
5. Set up the unit with the required settings
using the setup Wizard.
First time use
The recorder has an express installation
wizard on the local monitor that lets you easily
configure basic recorder settings when first
used. The wizard is not available on the
webpage.
By default, the setup wizard will start once the
recorder has loaded. The wizard walks you
through some of the more important settings
of your recorder. Select the preferred
language for the system and then set the
administrator password. There is no default
password provided.
The wizard will then guide you through the
menus to set the time and date, network
configuration, HDD management, and
recording configuration.
When all the required changes have been
entered, click Finish to exit the wizard. The
recorder is now ready to use. Recording starts
automatically.
Operating the recorder
There are several ways to control the unit:
• Mouse control
• Web browser control
• Software (TruVision Navigator, TVRMobile)
USB mouse
The USB mouse provided with the recorder
operates all the functions of the recorder. The
mouse lets you navigate and make changes to
settings in the user interface.
Connect the mouse to the recorder by
plugging the mouse USB connector into the
USB port on the back or front panel. The
mouse is immediately operational, and the
pointer should appear.
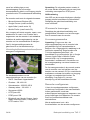
Web browser control
The recorder’s web browser lets you view,
record, and play back videos as well as
manage all aspects of the recorder from any
PC with internet access. The browser’s easy-
to-use controls give you quick access to all
recorder functions. See Figure 4 on page 4.

4 -EN TruVision DVR 17 Quick Start Guide
The recorder works with the following
browsers:
• Microsoft Internet Explorer (IE)
• Google Chrome (from version 45)
• Apple Safari (from version 10)
• Mozilla Firefox (from version 52)
To access the unit, open a web browser and
enter the IP address assigned to the recorder
as a web address.
Install the recorder web plug-in to see live
camera images.
In the logon screen, enter the user ID and
password.
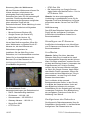
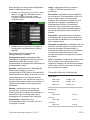
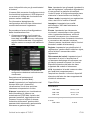
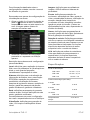
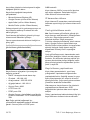
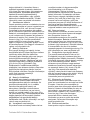
Figure 4: Web browser interface (live view
shown)
The default values for recorder network
settings are:
• DHCP: Disabled by default.
• IP address - 192.168.1.82
• Subnet mask - 255.255.255.0
• Gateway address - 192.168.1.1
• Server Port: 8000
• HTTP Port: 80
• RTSP port: 554
• When using Google Chrome, Apple Safari,
or Mozilla Firefox - port in HTTP mode:
7681
Note: The following ports need to be
forwarded in the router to connect properly:
Server port and RTSP port.
OSD control
The recorder’s OSD does not provide full
access to all the functionalities available.
Refer to the user manual for more detailed
information.
Adding IP cameras
Refer to the user manual for detailed
information on how to add IP cameras to the
recorder.
Live view mode
Note: Ensure that you have installed the
recorder web plug-in to see live camera
images. If using Edge, refer to the technical
note “Using Edge browser with TruVision
devices” that is available from our web site. If
using Google Chrome, Apple Safari, or Mozilla
Firefox, click “Download Plug-in” on top right
of screen to download the plug-in for these
browsers.
Live mode is the normal operating mode of the
unit where you watch live pictures from the
cameras. There are several shortcut buttons
at the bottom of the screen to access
frequently used functions. See Figure 3 on
page 2 for a description of the functions
available.
Configuring the recorder
You can configure the recorder parameters
from the Configuration button in the menu
toolbar. When selected, it displays a submenu
panel that lets you edit a group of settings.
Most menus are available only to system
administrators.
The web browser lets you configure all the
functionalities of the recorder. The OSD has a
more limited access to the functionalities that
can be modified.
Refer to the recorder user manual for detailed
information on configuring the unit.

TruVision DVR 17 Quick Start Guide EN-5
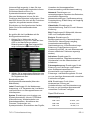
To access the configuration menus from
live view:
1. Click the Configuration button via the
web, or via the OSD, in the menu
toolbar at the top of the screen. The image
below shows an example of the web
interface.
2. Select the desired configuration submenu
and tab in the screen that appears.
Description of the configuration submenus
(via the web):
Local: Settings for the web browser
application such as live view parameters, and
where to store snapshots and video exports.
System: Settings for the viewing system
information, time, RTSP/web authentication,
restore default parameters, update firmware,
search system logs, restricting access,
camera password management, camera
management, and user management.
Network: Settings for network related aspects
of the recorder including general network
settings, certificate management, port
forwarding, email setup, and pairing with
UltraSync.
Video/Audio: Settings for video recording,
dual-VCA, and V-stream encoding.
Image: Settings for image quality, camera
OSD, and privacy masking.
Event: Settings for motion detection, video
tampering, video loss, alarm input/output,
exception notification, face detection, cross
line detection, intrusion detection, and
intrusion panel connection. (Extra functions
may be displayed depending on the camera
model).
Record: Settings for recording schedules,
hard drive management, holiday periods, and
overwriting recordings.
Vehicle Detection: Settings for detecting
vehicles and capturing a snapshot of its
license plate to compare against allowed and
blocked lists. Functions available depend on
whether they are supported by the camera
model.
VCA: Video content analysis settings for
behavior analysis and face capture. Functions
available depend on whether they are
supported by the camera model.
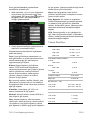
Specifications
Power
supply:
TVR 1704c 12 VDC – 1.5 A
TVR 1708 12 VDC – 3.3 A
TVR 1716 12 VDC – 5 A
Power consumption (without HDD):
4
-channel
TVR 1704c ≤ 10 W
8
-channel
TVR 1708 ≤ 15 W
16
-channel
TVR 1716 ≤ 19 W
Operating temperature:
-10 to +55ºC
Relative humidity:
10 to 90%
Dimensions (W x H x D):
TVR 1704
c 315 × 48 × 240 mm
TVR 1708
385 × 52 × 315 mm
TVR 1716
385 × 52 × 315 mm
Weight
(without HDD):
TVR 1704
c ≤ 1.16 kg
TVR 1708
≤ 1.78 kg
TVR 1716
≤ 2.1 kg

6 -EN TruVision DVR 17 Quick Start Guide
Legal and regulatory information
Copyright
© 2022 Carrier. All rights reserved.
Specifications subject to change without prior
notice. TruVision names and logos are a
product brand of Aritech, a part of Carrier.
Other trade names used in this document may
be trademarks or registered trademarks of the
manufacturers or vendors of the respective
products
While every precaution has been taken during
the preparation of this manual to ensure the
accuracy of its contents, Carrier assumes no
responsibility for errors or omissions.
Certifications
Contact information
EMEA: firesecurityproducts.com
Australian/New Zealand:
firesecurityproducts.com.au/
Product documentation
Please scan the QR code to download the
electronic version of the product
documentation and to access the contact
information. The manuals are available in
several languages.

TruVision DVR 17 Quick Start Guide EN-7
DE
TVR 17 Schnellstartanleitung
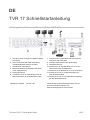
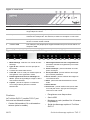
Abbildung
1: Anschlüsse an der Rückseite (Beispiel: TVR 1716)
1. Anschluss eines VSS (CCTV)-Monitors (BNC-
Anschluss)
2. HDTV-Anschluss (Die HDMI-Verbindung
unterstützt digitales Audio und Video.)
3. Anschluss für VGA-Monitor
4. Mikrofonanschluss für bidirektionales Audio
(nicht aufgezeichnet)
5. Erdungsanschluss
6. Anschluss von bis zu 16 Analogkameras an
BNC-Anschlüsse (je nach Rekordermodell)
7. Anschluss für ein optionales USB 3.0-Gerät wie
eine Maus oder eine HDD
8. Lautsprecheranschluss für Audioausgang
9. Netzwerkanschluss
10. Anschluss an ein RS-485-Gerät, wie z. B. eine
PTZ-Kamera oder ein Bedienpult
11. Anschluss an ein Netzteil mit 12 V DC (enthalten)
12. Anschluss von bis zu 16 Alarmeingängen (je
nach Rekordermodell)
13. Anschluss von bis zu vier Alarmrelais-Ausgängen
(je nach Rekordermodell)
Standard-IP-Adresse – 192.168.1.82
Laden Sie die neueste Rekorderfirmware und die
TruVision Navigator-Software von
www.firesecurityproducts.com herunter.

8-DE TVR 17 Schnellstartanleitung
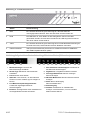
Abbildung
2: Frontbedienelement
Name Beschreibung
1
. Netz Eine konstant leuchtende grüne LED zeigt an, dass der Rekorder
ordnungsgemäß funktioniert. Eine rote LED weist auf einen Fehler hin.
2
. HDD Die LED blinkt rot, wenn Daten auf der HDD gelesen oder auf die HDD
geschrieben werden. Eine konstant leuchtende rote LED zeigt eine Ausnahme
oder einen Fehler auf der HDD an.
3
. Tx/Rx Eine konstant leuchtende grüne LED zeigt eine normale Netzwerkverbindung an.
Leuchtet keine LED, ist das Gerät mit keinem Netzwerk verbunden.
4
. USB-Schnittstelle USB (Universal Serial Bus)-Anschluss für zusätzliche Geräte wie USB-Maus
oder USB-Festplattenlaufwerk (HDD).
Abbildung
3: Symbolleiste für den Schnellzugriff im Live- Modus (Webmodus)
1. Mehrfachanzeige: Format für die
Mehrfachanzeige auswählen
2. Stream-Typ: Mainstream oder Substream
auswählen
3. Bidirektionales Audio starten
4. QR-Code: Code scannen, um den Rekorder
einfacher zu einer mobilen App hinzufügen zu
können.
5. Live-Modus komplett stoppen/starten:
Livebild der angezeigten Kameras
fixieren/freigeben.
6. Erfassen: Schnappschuss eines Videobilds von
der ausgewählten Kamera aufnehmen.
7. Alle Aufnahmen starten/stoppen: Aufnahme für
alle Kameras starten/stoppen
8. Digitalzoom: In Digitalzoom-Modus wechseln
9. Vorheriger Bildschirm: Bild der vorherigen
Kamera anzeigen
10. Nächster Bildschirm: Bild der nächsten Kamera
anzeigen
11. Audio aus: Audioausgang
aktivieren/deaktivieren
12. Alarmausgang:
13. Vollbild: Videokacheln im Vollbildmodus
anzeigen. Auf ESC klicken, um zum normalen
Modus zurückzukehren.

TVR 17 Schnellstartanleitung DE-9
Lieferumfang
Die folgenden Teile sind im Lieferumfang des
TruVision DVR 17 (Modell TVD 17) enthalten:
• AC-Netzkabel oder externes Netzteil (je
nach Modell)
• Rekorder inklusive HDDs
• USB-Maus
• Rack-Halterungen (nur 8- und 16-Kanal-
Modelle)
• TruVision DVR 17 Schnellstartanleitung
Sie können die Software und die folgenden
Handbücher von unserer Website
herunterladen:
• TruVision DVR 17 Schnellstartanleitung
• TruVision DVR 17 Benutzerhandbuch
• TruVision-Rekorder Bedieneranleitung
Installationsumgebung
Ausführliche Informationen finden Sie im
Benutzerhandbuch. Beachten Sie jedoch
Folgendes:
• Stellen Sie das Gerät an einem
geschützten Ort auf.
• Stellen Sie sicher, dass das Gerät in einer
gut belüfteten Umgebung installiert wird.
• Achten Sie darauf, dass das Gerät vor
Regen oder Feuchtigkeit geschützt ist.
Schnellinstallation
Empfohlene Schritte für das Einrichten des
Rekorders:
1. Schließen Sie alle erforderlichen Geräte an
der Rückseite des Rekorders an. Siehe
Abbildung 1 auf Seite 7.
2. Schließen Sie einen Monitor an den VGA-
oder HDMI-Ausgang an.
3. Schließen Sie die Maus an den USB-Port
des Frontbedienelements an.
4. Schließen Sie das Netzkabel an und
schalten Sie das Gerät ein.
5. Nehmen Sie die erforderlichen
Geräteeinstellungen mithilfe des Setup-
Assistenten vor.
Erstmalige Verwendung
Der Rekorder verfügt auf dem lokalen Monitor
über einen Express-Installationsassistenten,
der bei der erstmaligen Verwendung die
Konfiguration grundlegender
Rekordereinstellungen erleichtert. Der
Assistent ist auf der Webseite nicht verfügbar.
Der Setup-Assistent wird standardmäßig
gestartet, sobald der Rekorder bereit ist. Der
Assistent führt Sie durch die wichtigsten
Einstellungen Ihres Rekorders. Wählen Sie
die gewünschte Sprache für das System aus
und legen Sie anschließend das
Administratorpasswort fest. Ein
Standardpasswort ist nicht festgelegt.
Der Assistent führt Sie anschließend durch die
Menüs, um Uhrzeit und Datum,
Netzwerkkonfiguration, Festplattenverwaltung
sowie Aufnahmekonfiguration festzulegen.
Wenn Sie alle erforderlichen Änderungen
vorgenommen haben, klicken Sie auf
Fertigstellen, um den Setup-Assistenten zu
beenden. Der Rekorder ist nun einsatzbereit.
Die Aufnahme wird automatisch gestartet.
Bedienung des Rekorders
Es bestehen verschiedene Möglichkeiten, das
Gerät zu steuern:
• Steuerung über die Maus
• Steuerung über den Webbrowser
• Software (TruVision Navigator, TVRMobile)
USB-Maus
Die mit dem Rekorder mitgelieferte USB-Maus
steuert alle Funktionen des Rekorders. Mit der
Maus können Sie in der Benutzeroberfläche
navigieren und Änderungen an den
Einstellungen vornehmen.
Schließen Sie die Maus an den Rekorder an,
indem Sie den Maus-USB-Anschluss in den
USB-Anschluss am Frontbedienelement
einstecken. Die Maus ist sofort betriebsbereit
und der Cursor sollte angezeigt werden.

10-DE TVR 17 Schnellstartanleitung
Steuerung über den Webbrowser
Mit dem Rekorder-Webbrowser können Sie
Videos anzeigen, aufzeichnen und
wiedergeben sowie alle Aspekte des
Rekorders über jeden PC mit Internetzugriff
verwalten. Die benutzerfreundlichen
Steuerelemente des Browsers ermöglichen
einen schnellen Zugriff auf alle
Rekorderfunktionen. Siehe Abbildung 4 unten.
Der Rekorder funktioniert mit folgenden
Browsern:
• Microsoft Internet Explorer (IE)
• Google Chrome (ab Version 45)
• Apple Safari (ab Version 10)
• Mozilla Firefox (ab Version 52)
Um auf das Gerät zuzugreifen, öffnen Sie
einen Webbrowser und geben Sie die IP-
Adresse ein, die dem Rekorder als
Webadresse zugewiesen ist.
Installieren Sie das Web-Plug-in des
Rekorders, um Live-Kamerabilder zu sehen.
Geben Sie im Anmeldebildschirm die
Benutzer-ID und das Passwort ein.
Abbildung 4: Webbrowser-Oberfläche
(Live-Modus dargestellt)
Die Standardwerte für die
Netzwerkeinstellungen des Rekorders sind:
• DHCP: Standardmäßig deaktiviert.
• IP-Adresse – 192.168.1.82
• Subnetzmaske – 255.255.255.0
• Gateway-Adresse – 192.168.1.1
• Server-Port: 8000
• HTTP-Port: 80
• RTSP-Port: 554
• Bei Verwendung von Google Chrome,
Apple Safari oder Mozilla Firefox – Port im
HTTP-Modus: 7681
Hinweis: Um eine ordnungsgemäße
Verbindung zu gewährleisten, muss für die
folgenden Ports eine Weiterleitung im Router
eingerichtet werden: Server-Port und RTSP-
Port.
OSD-Steuerung
Das OSD des Rekorders bietet nicht vollen
Zugriff auf alle verfügbaren Funktionen.
Ausführliche Informationen finden Sie im
Benutzerhandbuch.
Hinzufügen von IP-Kameras
Ausführliche Informationen zum Hinzufügen
von IP-Kameras zum Rekorder finden Sie im
Benutzerhandbuch.
Live-Modus
Hinweis: Stellen Sie sicher, dass das
Rekorder-Web-Plug-in installiert ist, damit
Live-Kamerabilder angezeigt werden können.
Wenn Sie Edge verwenden, machen Sie sich
mit dem technischen Hinweis „Verwenden des
Edge-Browsers mit TruVision-Geräten“
vertraut, der auf unserer Website verfügbar
ist. Wenn Sie Google Chrome, Apple Safari
oder Mozilla Firefox verwenden, klicken Sie
oben rechts auf dem Bildschirm auf „Plug-in
herunterladen“, um das Plug-in für diese
Browser herunterzuladen.
Der Live-Modus ist der normale
Betriebsmodus des Geräts, in dem Sie die
Live-Bilder der Kameras sehen. Unten auf
dem Bildschirm befinden sich mehrere
Schaltflächen für den Schnellzugriff auf häufig
verwendete Funktionen. Eine Beschreibung
der verfügbaren Funktionen finden Sie in
Abbildung 3 auf Seite 8.
Konfigurieren des Rekorders
Sie können die Rekorderparameter über die
Schaltfläche „Konfiguration“ in der Menüleiste
konfigurieren. Bei Auswahl wird ein

TVR 17 Schnellstartanleitung DE-11
Untermenüfeld angezeigt, in dem Sie eine
Gruppe von Einstellungen bearbeiten können.
Die meisten Menüs sind nur für
Systemadministratoren zugänglich.
Über den Webbrowser können Sie alle
Funktionen des Rekorders konfigurieren. Über
das OSD können Sie nicht auf alle Funktionen
zugreifen, die geändert werden können.
Einzelheiten zur Konfiguration des Gerätes
finden Sie im Benutzerhandbuch des
Rekorders.
So greifen Sie im Live-Modus auf die
Konfigurationsmenüs zu:
1. Klicken Sie im Webmodus auf die
Schaltfläche Konfiguration oder auf dem
OSD in der Menüleiste am oberen
Bildschirmrand auf . Das folgende Bild
zeigt ein Beispiel der Weboberfläche.
2. Wählen Sie im angezeigten Bildschirm das
gewünschte Konfigurationsuntermenü und
die Registerkarte aus.
Beschreibung der
Konfigurationsuntermenüs (über den
Webmodus):
Lokal: Einstellungen für die Webbrowser-
Anwendung, z. B. Parameter des Live-Modus
und Speicherort von Schnappschüssen und
Videoexporten.
System: Einstellungen zum Anzeigen von
Systeminformationen, Uhrzeit, RTSP/Web-
Authentifizierung, Wiederherstellen von
Standardparametern, Aktualisieren der
Firmware, Durchsuchen von
Systemprotokollen, Einschränken des Zugriffs,
Verwalten der Kamerapasswörter,
Kameraverwaltung und Benutzerverwaltung.
Netzwerk: Einstellungen von
netzwerkbezogenen Aspekten des Rekorders,
einschließlich allgemeiner
Netzwerkeinstellungen, Zertifikatsverwaltung,
Portweiterleitung, E-Mail-Setup und Kopplung
mit UltraSync.
Video/Audio: Einstellungen für
Videoaufzeichnung, Dual-VCA und V-Stream-
Kodierung.
Bild: Einstellungen für Bildqualität, Kamera-
OSD und Privatsphäre-Maske.
Ereignis: Einstellungen für
Bewegungserkennung, Videomanipulation,
Videoverlust, Alarmeingang/-ausgang,
Ausnahmebenachrichtigung,
Gesichtserkennung, Linienüberschreitungs-
Erkennung, Einbruchserkennung und
Verbindung mit EMZ. (Je nach Kameramodell
können zusätzliche Funktionen angezeigt
werden).
Aufnahme: Einstellungen für
Aufnahmezeitpläne, Festplattenverwaltung,
Urlaubszeiten und das Überschreiben von
Aufnahmen.
Fahrzeugerkennung: Einstellungen für die
Erkennung von Fahrzeugen und Erfassen
eines Schnappschusses des Kfz-
Kennzeichens zum Vergleichen mit
Zulassungs- und Blockierungslisten. Es sind
nur vom jeweiligen Kameramodell unterstützte
Funktionen verfügbar.
VCA: Einstellungen für die Video-
Inhaltsanalyse in Bezug auf
Verhaltensanalyse und Gesichtserkennung.
Es sind nur vom jeweiligen Kameramodell
unterstützte Funktionen verfügbar.
Spezifikationen
Stromversorgung:
TVR 1704c 12 VDC, 1,5 A
TVR 1708 12 VDC, 3,3 A
TVR 1716 12 VDC, 5 A

12-DE TVR 17 Schnellstartanleitung
Leistungsaufnahme (ohne HDD):
4
-Kanal
TVR 1704, ≤ 10 W
8
-Kanal
TVR 1708 ≤ 15 W
16
-Kanal
TVR 1716 ≤ 19 W
Betriebstemperatur:
-10 bis +55 ºC
Relative
Luftfeuchtigkeit:
10 bis 90 %
Abmessungen (B × H × T):
TVR 1704
, 315 × 48 × 240 mm
TVR 1708
385 × 52 × 315 mm
TVR 1716
385 × 52 × 315 mm
Gewicht (ohne HDD):
TVR 1704
, ≤ 1,16 kg
TVR 1708
≤ 1,78 kg
TVR 1716
≤ 2,1 kg
Rechtliche Hinweise
Copyright
© 2022 Carrier. Alle Rechte vorbehalten.
Technische Daten können ohne vorherige
Ankündigung geändert werden. TruVision-
Namen und -Logos sind Produktmarken von
Aritech, einem Unternehmen von Carrier.
Andere in diesem Dokument verwendete
Handelsnamen können Marken oder
eingetragene Marken der Hersteller oder
Anbieter der betreffenden Produkte sein.
Trotz aller Sorgfalt bei der Erstellung dieses
Handbuchs bezüglich der Richtigkeit der
Inhalte übernimmt Carrier keine
Verantwortung für Fehler oder Auslassungen.
Zertifizierungen
Kontaktinformationen
EMEA: firesecurityproducts.com
Australien/Neuseeland:
firesecurityproducts.com.au/
Produktdokumentation
Bitte scannen Sie den QR-Code, um die
elektronische Version der
Produktdokumentation herunterzuladen und
die Kontaktinformationen aufzurufen. Die
Handbücher sind in mehreren Sprachen
verfügbar.

Guía de inicio rápido de TVR 17 13
ES
Guía de inicio rápido de TVR 17
Figura
1: Conexiones del panel posterior (ejemplo: TVR 1716)
1. Conexión de un monitor CCTV (conector tipo
BNC).
2. Conexión a un dispositivo HDTV. La conexión
HDMI admite tanto audio como vídeo digital.
3. Conexión a un monitor VGA.
4. Conexión de un micrófono para audio
bidireccional (no grabado).
5. Conexión a tierra.
6. Conexión de hasta 16 cámaras analógicas a
conectores de tipo BNC (en función del modelo
de grabador)
7. Conexión a un dispositivo USB 3.0 opcional,
como un ratón o un disco duro.
8. Conexión a los altavoces para la salida de audio.
9. Conexión a una red.
10. Conexión a un dispositivo RS-485 como, por
ejemplo, una cámara PTZ o un teclado.
11. Conexión a FA de 12 V CC (incluido).
12. Conexión de hasta 16 entradas de alarma (en
función del modelo de grabador).
13. Conexión de hasta cuatro salidas de relé de
alarma (en función del modelo de grabador).
Dirección IP predeterminada: 192.168.1.82
Descargue el último firmware del grabador y el
software TruVision Navigator de
www.firesecurityproducts.com

14-ES Guía de inicio rápido de TVR 17
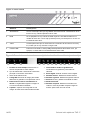
Figura
2: Panel frontal
Nombre Descripción
1
. Alimentación Una luz verde fija indica que el grabador está funcionando correctamente. Si se
ilumina en rojo, indica la presencia de un fallo.
2
. HDD La luz parpadea en rojo cuando se están leyendo o escribiendo datos en la
unidad de disco duro. La luz roja fija indica que hay una excepción o un error en
la unidad de disco duro.
3
. Tx/Rx Cuando permanece fijo en verde indica una conexión de red normal. Si no hay
luz, indica que no hay conexión a ninguna red.
4
. Interfaz USB Puerto bus universal en serie (USB) para dispositivos adicionales como, por
ejemplo, un ratón USB o una unidad de disco duro USB.
Figura
3: Barra de herramientas de acceso rápido de visualización en directo (modo web)
1. Pantalla de vista múltiple: Seleccionar un
formato de pantalla de vista múltiple.
2. Tipo de transmisión: Seleccionar transmisión
principal o transmisión secundaria.
3. Iniciar audio bidireccional.
4. Código QR: Escanear el código para añadir
fácilmente el grabador a una aplicación móvil.
5. Detener/iniciar toda la visualización en
directo: Congelar/descongelar la imagen en
vivo de las cámaras mostradas.
6. Capturar: Capturar una fotografía de una
imagen de vídeo de la cámara seleccionada.
7. Iniciar/detener todas las grabaciones:
Iniciar/detener la grabación para todas las
cámaras.
8. Zoom digital: Permite acceder al zoom digital.
9. Pantalla anterior: Muestra la cámara anterior.
10. Pantalla siguiente: Muestra la siguiente cámara.
11. Silenciar: activa y desactiva la salida de audio.
12. Salida de alarma:
13. Pantalla completa: Muestra los mosaicos de
vídeo en modo de pantalla completa. Haga clic
en ESC para volver al modo normal.

Guía de inicio rápido de TVR 17 ES-15
Contenido del paquete
La unidad DVR 17 (modelo TVR 17) de
TruVision se suministra con los siguientes
elementos:
• Cable de alimentación de CA o fuente de
alimentación externa (según el modelo)
• Grabador que incluye discos duros
• Ratón USB
• Montaje en rack (solo modelos de 8 y 16
canales)
• Guía de inicio rápido de TruVision DVR 17
Puede descargar el software y los siguientes
manuales de nuestro sitio web:
• Guía de inicio rápido de TruVision DVR 17
• Manual de usuario de TruVision DVR 17
• Guía del operador del grabador TruVision
Entorno de instalación
Consulte el manual de usuario para obtener
información detallada; tenga en cuenta
además estos requisitos importantes:
• Coloque la unidad en un lugar seguro.
• Asegúrese de que la unidad esté en una
zona bien ventilada.
• No exponga la unidad a la lluvia ni a la
humedad.
Instalación rápida
Pasos recomendados para configurar el
grabador:
1. Conecte todos los dispositivos necesarios
al panel posterior del grabador. Consulte la
Figura 1 en la página 13.
2. Conecte un monitor a la salida VGA o
HDMI.
3. Conecte el ratón al puerto USB del panel
frontal.
4. Conecte la fuente de alimentación a la
unidad y encienda la unidad.
5. Configure la unidad con los parámetros
necesarios, usando el asistente de
configuración.
Primer uso
El grabador cuenta con un asistente de
instalación rápida en el monitor local que le
permite establecer con facilidad los ajustes
básicos del grabador cuando se utiliza por
primera vez. El asistente no está disponible
en la página web.
El asistente de configuración se iniciará de
forma predeterminada una vez que se haya
cargado el grabador. Le guiará por algunos de
los parámetros de configuración más
importantes de su grabador. Seleccione el
idioma que prefiera para el sistema y defina la
contraseña de administrador. No se
proporciona una contraseña predeterminada.
Después, el asistente le guiará por los menús
para establecer la hora y fecha, la
configuración de red, la administración de
HDD y la configuración de grabación.
Una vez introducidos todos los cambios
necesarios, haga clic en Finalizar para salir
del asistente de configuración. El grabador ya
puede utilizarse. La grabación se iniciará de
manera automática.
Funcionamiento del grabador
Existen varias formas de controlar la unidad:
• Control mediante ratón
• Control mediante navegador web
• Software (TruVision Navigator, TVRMobile)
Ratón USB
El ratón USB que se suministra con el
grabador controla todas las funciones del
grabador. El ratón le permite navegar y
realizar cambios en las opciones de la interfaz
de usuario.
Conecte el ratón al grabador insertando el
conector USB del ratón en el puerto USB
situado en el panel frontal o trasero. El ratón
se puede utilizar de forma inmediata y el
puntero debe aparecer en pantalla.
Control mediante navegador web
El navegador web del grabador le permite ver,
grabar y reproducir vídeos, así como

16-ES Guía de inicio rápido de TVR 17
administrar todos los aspectos del grabador
desde cualquier PC con acceso a Internet.
Los sencillos controles del explorador le
ofrecen un rápido acceso a todas las
funciones del grabador. Consulte la Figura 4 a
continuación.
El grabador funciona con los siguientes
navegadores:
• Microsoft Internet Explorer (IE)
• Google Chrome (desde la versión 45)
• Apple Safari (desde la versión 10)
• Mozilla Firefox (desde la versión 52)
Para acceder a la unidad, abra el navegador
web e introduzca la dirección IP asignada el
grabador, como si fuese una dirección web.
Instale el complemento web del grabador para
ver las imágenes en directo de la cámara.
En la pantalla de acceso, introduzca el ID de
usuario y la contraseña.
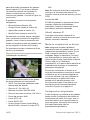
Figura 4: interfaz del navegador web
(visualización en directo)
Los valores predeterminados de los ajustes
de red del grabador son los siguientes:
• DHCP: Los siguientes parámetros están
desactivados por defecto:
• Dirección IP: 192.168.1.82
• Máscara de subred: 255.255.255.0
• Dirección de puerta de enlace: 192.168.1.1
• Puerto del servidor: 8000
• Puerto HTTP: 80
• Puerto RTSP: 554
• Al usar Google Chrome, Apple Safari o
Mozilla Firefox, el puerto en modo HTTP:
7681
Nota: Es necesario direccionar los siguientes
puertos en el enrutador para obtener una
conexión correcta: puerto del servidor y puerto
RTSP.
Control de OSD
El OSD del grabador no proporciona acceso
completo a todas las funcionalidades
disponibles. Consulte el manual de usuario
para obtener información detallada.
Añadir cámaras IP
Para saber cómo añadir cámaras IP al
grabador, consulte el manual de usuario para
obtener información detallada.
Modo de visualización en directo
Nota: Asegúrese de haber instalado el
complemento web del grabador para ver las
imágenes de las cámaras en directo. Si usa
Edge, consulte la nota técnica "Usar el
navegador Edge con dispositivos TruVision"
que está disponible en nuestro sitio web. Si
utiliza Google Chrome, Apple Safari o Mozilla
Firefox, haga clic en "Descargar
complemento" en la parte superior derecha de
la pantalla para descargar el complemento
para estos navegadores.
El modo de visualización en directo es el
modo de funcionamiento normal de la unidad,
mediante el que se visualizan imágenes en
vivo de las cámaras. Hay varios botones de
acceso directo en la parte inferior de la
pantalla que le permiten acceder a las
funciones más usadas. Para obtener una
descripción de las funciones disponibles,
consulte la Figura 3 en la página 14.
Configuración del grabador
Puede configurar los parámetros del grabador
desde el botón Configuración de la barra de
herramientas del menú. Si lo pulse, verá un
panel de submenú que le permite editar un
grupo de ajustes. La mayoría de los menús
solo están disponibles para los
administradores del sistema.

Guía de inicio rápido de TVR 17 ES-17
El navegador web le permite configurar todas
las funcionalidades del grabador. El OSD
tiene un acceso más limitado a las
funcionalidades que se pueden modificar.
Para obtener información detallada sobre la
configuración del grabador, consulte el
Manual de usuario.
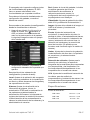
Para acceder a los menús de configuración
desde la visualización en directo:
1. Haga clic en el botón Configuración a
través de la web, o en mediante el
OSD, en la barra de herramientas del
menú en la parte superior de la pantalla.
La siguiente imagen muestra un ejemplo
de la interfaz web.
2. Seleccione el submenú y la pestaña de
configuración deseados en la pantalla que
aparece.
Descripción de los submenús de
configuración (a través de web):
Local: Ajustes de la aplicación del navegador
web, como los parámetros de la visualización
en directo y dónde almacenar las fotografías y
las exportaciones de vídeo.
Sistema: Ajustes de visualización de la
información del sistema, la hora, la
autenticación RTSP/web, la restauración de
los parámetros predeterminados, la
actualización del firmware, la búsqueda de
registros del sistema, la restricción de acceso,
la administración de las contraseñas de la
cámara, la administración de las cámaras y la
administración de usuarios.
Red: Ajustes de la red del grabador, incluidos
los ajustes generales de la red, la
administración de certificados, el
redireccionamiento de puertos, la
configuración del correo electrónico y el
emparejamiento con UltraSync.
Vídeo/Audio: Ajustes de grabación de vídeo,
doble VCA y codificación de transmisión V.
Imagen: Ajustes de la calidad de la imagen, el
OSD de la cámara y la máscara de
privacidad.
Evento: Ajustes de la detección de
movimiento, la manipulación del vídeo, la
pérdida de vídeo, la entrada/salida de alarma,
la notificación de excepción, la detección de
rostros, la detección de cruce de línea, la
detección de intrusiones y la conexión del
panel de intrusión. (Es posible que se
muestren más funciones según el modelo de
cámara).
Grabar: Ajustes de los horarios de grabación,
la administración del disco duro, los periodos
de vacaciones y la sobrescritura de
grabaciones.
Detección de vehículos: Ajustes para la
detección de vehículos y la captura de
fotografías de las matrículas para compararlas
con las permitidas y las bloqueadas. Las
funciones disponibles dependen de si son
compatibles con el modelo de cámara.
VCA: Ajustes de los análisis del contenido de
los vídeos, para los análisis de
comportamiento y la detección de rostros. Las
funciones disponibles dependen de si son
compatibles con el modelo de cámara.
Especificaciones
Fuente de alimentación:
TVR 1704c 12 V CC – 1,5 A
TVR 1708 12 V CC – 3,3 A
TVR 1716 12 V CC – 5 A

18-ES Guía de inicio rápido de TVR 17
Consumo de energía (sin HDD):
4
canales
TVR 1704c ≤10 W
8 canales
TVR 1708 ≤15 W
16 canales
TVR 1716 ≤19 W
Temperatura de
funcionamiento:
−10 a 55 °C
Humedad relativa:
Del 10 al 90 %
Dimensiones (An. x Al. x Pro.):
TVR 1704
c 315 × 48 × 240 mm
TVR 1708
385 × 52 × 315 mm
TVR 1716
385 × 52 × 315 mm
Peso (sin HDD):
TVR 1704
c ≤1,16 kg
TVR 1708
≤1,78 kg
TVR 1716
≤2,1 kg
Información legal y normativa
Copyright
© 2022 Carrier. Reservados todos los
derechos. Disposiciones sujetas a
modificaciones sin previo aviso. Los nombres
y los logotipos de TruVision son una marca de
producto de Aritech, una parte de Carrier. Los
demás nombres de marcas utilizados en este
documento pueden ser marcas comerciales o
marcas comerciales registradas de los
fabricantes o proveedores de los respectivos
productos.
Aunque se han tomado todas las
precauciones durante la elaboración de este
manual para garantizar la exactitud de su
contenido, Carrier no asume ninguna
responsabilidad por errores u omisiones.
Certificaciones
Información de contacto
EMEA: firesecurityproducts.com
Australia/Nueva Zelanda:
firesecurityproducts.com.au/
Documentación del producto
Escanee el siguiente código QR para
descargar la versión electrónica de la
documentación del producto y acceder a la
información de contacto. Los manuales están
disponibles en varios idiomas.
Strona się ładuje...
Strona się ładuje...
Strona się ładuje...
Strona się ładuje...
Strona się ładuje...
Strona się ładuje...
Strona się ładuje...
Strona się ładuje...
Strona się ładuje...
Strona się ładuje...
Strona się ładuje...
Strona się ładuje...
Strona się ładuje...
Strona się ładuje...
Strona się ładuje...
Strona się ładuje...
Strona się ładuje...
Strona się ładuje...
Strona się ładuje...
Strona się ładuje...
Strona się ładuje...
Strona się ładuje...
Strona się ładuje...
Strona się ładuje...
Strona się ładuje...
Strona się ładuje...
Strona się ładuje...
Strona się ładuje...
Strona się ładuje...
Strona się ładuje...
Strona się ładuje...
Strona się ładuje...
Strona się ładuje...
Strona się ładuje...
Strona się ładuje...
Strona się ładuje...
Strona się ładuje...
Strona się ładuje...
Strona się ładuje...
Strona się ładuje...
Strona się ładuje...
Strona się ładuje...
Strona się ładuje...
Strona się ładuje...
-
 1
1
-
 2
2
-
 3
3
-
 4
4
-
 5
5
-
 6
6
-
 7
7
-
 8
8
-
 9
9
-
 10
10
-
 11
11
-
 12
12
-
 13
13
-
 14
14
-
 15
15
-
 16
16
-
 17
17
-
 18
18
-
 19
19
-
 20
20
-
 21
21
-
 22
22
-
 23
23
-
 24
24
-
 25
25
-
 26
26
-
 27
27
-
 28
28
-
 29
29
-
 30
30
-
 31
31
-
 32
32
-
 33
33
-
 34
34
-
 35
35
-
 36
36
-
 37
37
-
 38
38
-
 39
39
-
 40
40
-
 41
41
-
 42
42
-
 43
43
-
 44
44
-
 45
45
-
 46
46
-
 47
47
-
 48
48
-
 49
49
-
 50
50
-
 51
51
-
 52
52
-
 53
53
-
 54
54
-
 55
55
-
 56
56
-
 57
57
-
 58
58
-
 59
59
-
 60
60
-
 61
61
-
 62
62
-
 63
63
-
 64
64


TRUVISION DVR 17 CCTV Digital Video Recorders instrukcja
- Typ
- instrukcja
w innych językach
- español: TRUVISION DVR 17 CCTV Digital Video Recorders Guía del usuario
- italiano: TRUVISION DVR 17 CCTV Digital Video Recorders Guida utente
- Deutsch: TRUVISION DVR 17 CCTV Digital Video Recorders Benutzerhandbuch
- português: TRUVISION DVR 17 CCTV Digital Video Recorders Guia de usuario
- français: TRUVISION DVR 17 CCTV Digital Video Recorders Mode d'emploi
- Türkçe: TRUVISION DVR 17 CCTV Digital Video Recorders Kullanici rehberi
- Nederlands: TRUVISION DVR 17 CCTV Digital Video Recorders Gebruikershandleiding