
MARKIZA SAMOCHODOWA . . . . . . . . . . . . . . . . . . . . . . . . . . . . . . .
TOLDO PARA COCHE . . . . . . . . . . . . . . . . . . . . . . . . . . . . . . . . . . .
TOLDO PARA CARRO . . . . . . . . . . . . . . . . . . . . . . . . . . . . . . . . . . .
AUTÓ PONYVATETŐ . . . . . . . . . . . . . . . . . . . . . . . . . . . . . . . . . . . .
AUVENT DE VOITURE. . . . . . . . . . . . . . . . . . . . . . . . . . . . . . . . . . . .
CAR AWNING. . . . . . . . . . . . . . . . . . . . . . . . . . . . . . . . . . . . . . . .
AUTO-MARKISE . . . . . . . . . . . . . . . . . . . . . . . . . . . . . . . . . . . . . .
TENDĂ AUTO. . . . . . . . . . . . . . . . . . . . . . . . . . . . . . . . . . . . . . . .
АВТОМОБИЛЬНЫЙ ТЕНТ . . . . . . . . . . . . . . . . . . . . . . . . . . . . . . . .
TENDA DA SOLE . . . . . . . . . . . . . . . . . . . . . . . . . . . . . . . . . . . . . .
AUTOLUIFEL. . . . . . . . . . . . . . . . . . . . . . . . . . . . . . . . . . . . . . . . .
54185
MANUAL DE INSTRUCCIONES · INSTRUCTION MANUAL · GUIDE D’UTILISATION · BEDIENUNGSANLEITUNG ·
MANUALE D’USO · MANUAL DE INSTRUÇÕES · MANUAL DE INSTRUCŢIUNI · HANDLEIDING ·
ÜZEMELTETÉSI UTASÍTÁS · РУКОВОДСТВО ПО ЭКСПЛУАТАЦИИ · INSTRUKCJA OBSŁUGI

MANUAL DE INSTRUCCIONES
ES
PRESENTACIÓN DEL PRODUCTO
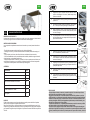
Un toldo para vehículos es un accesorio para coches que ayuda a proteger el vehículo del sol,
así como a proteger su coche o camión de los fenómenos meteorológicos.
INSTRUCCIONES DE SEGURIDAD
Lea y comprenda completamente estas instrucciones de uso y montaje antes de instalar su
toldo.
- El toldo debe mantenerse alejado del fuego y de objetos inamables.
- Mantenga a los niños y a las mascotas fuera del área de trabajo durante el montaje y el
ajuste.
- Tenga cuidado con el viento. No utilice el toldo en condiciones de viento excesivo.
- Si no está familiarizado con los procedimientos de instalación, debería encargar la instala-
ción del producto a un instalador profesional.
- Asegure siempre el toldo con estacas y cuerdas. Si no lo hace, puede provocar lesiones, así
como daños en el producto y en su vehículo si el toldo se levanta por un viento inesperado.
- Una jación incorrecta podría causar lesiones corporales graves.
DESCRIPCIÓN CANT.
Toldo de coche 1
Clavija 4
Cuerda 2
Perno de acero inoxidable de 8 x 20mm 4
Soporte en “L” 2
Tornillo cuadrado de 8 x 20mm 2
Llave inglesa 1
CONTENIDO
MONTAJE
El toldo debe montarse a una altura adecuada para que las puertas del vehículo puedan
abrirse sin que se enganche la parte inferior del toldo.
Debe jarse a lo largo de su longitud al menos en dos puntos, preferiblemente en tres. Se in-
cluyen dos juegos de piezas de montaje (4 tuercas y tornillos), el tercer juego debe comprarse
por separado. Asegúrese de que la longitud no jada en cada extremo del toldo no supere los
700 mm.
1. Asegúrese de que su vehículo tiene una barra de techo
como la de la imagen. Si no es así, debe comprar una y
jarla en su vehículo.
2. Corte parte de la cinta de goma según la medida del so-
porte en “L”.
3. Introduzca el tornillo cuadrado de 8x20mm y je el soporte
en “L”. Para jar el otro soporte siga los mismos pasos.
4. Monte el toldo del coche en los soportes con los pernos.
Deslice los pernos en el carril de montaje del toldo, como
se ve en la imagen.
5. Los pernos pueden colocarse en cualquier parte de la lon-
gitud del toldo para que correspondan a los puntos de -
jación más adecuados.
1. Desbloquee las hebillas y abra la cremallera de la bolsa de
PVC. A continuación, extienda el toldo.
2. Despliegue los dos postes laterales. Extiéndalos y asegu-
re sus extremos con la barra del extremo frontal como se
muestra en la imagen.
3. Despliegue los dos postes de soporte y extiéndalos. Ajuste
cada pata a la altura deseada y gire la parte inferior de la
pata para bloquearla.
4. Utilice las cuerdas, las estacas y la clavija para jar aún
más el toldo.
5. Fije las patas al suelo utilizando los lazos de cuerda en los
extremos y la cuerda de sujeción para asegurarlas en caso
de viento.
PRECAUCIONES
• Asegure siempre el toldo con estacas y cuerdas de sujeción - Esto evitará que el viento
levante el toldo y cause daños a su toldo y/o a su vehículo.
• No guarde el toldo mojado - El toldo está hecho de material 100% poliéster con un forro
de PVC laminado y es totalmente impermeable. Aunque este material es excepcionalmente
resistente al ataque de hongos, se formará moho si el toldo se almacena húmedo durante
períodos prolongados. El toldo puede guardarse mojado durante periodos limitados, pero
debe abrirse y dejarse secar lo antes posible.
• Inspecciones antes del uso - Compruebe periódicamente que todas las tuercas y tornillos
que sujetan el toldo al vehículo están apretados y en buen estado.
• En caso de lluvia, asegúrese de que el toldo está colocado en un ángulo adecuado para
permitir que el agua de lluvia escurra y no se acumule en la parte superior del toldo. En caso
de viento, es esencial que el toldo se je al suelo para evitar que se dañe el toldo y el vehícu-
lo.
5418554185

INSTRUCTIONS MANUAL
EN
PRODUCT PRESENTATION
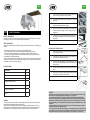
An awning for vehicles is a car accessory that helps shade the vehicle from the sun as well as
protecting your car or truck from the meteorological phenomena
SAFETY INSTRUCTIONS
Please read and fully understand these operating and tting instructions prior to installing your
awning.
- The awning should be kept away from re and inammable objects.
- Keep children and pets out of the work area during assembly and adjustment.
- Use caution in windy conditions! Do not use awning in excessively windy conditions!
- If you are not thoroughly familiar with the installation procedures, you should have the pro-
duct installed by a professional installer.
- Always secure the awning with stake and ropes. Failure to do so may result in injury as well as
damage to the product and your vehicle if the awning is lifted by unexpected wind. Improper
attachment could cause serious bodily injury.
DESCRIPTION QTY
Car awning 1
Peg 4
Rope 2
8 x 20mm stainless steel bolt 4
“L” bracket 2
8 x 20mm square Screw 2
Wrench 1
PACKAGE CONTENT
PROCEED WITH THE INSTALLATION
ASSEMBLY
The awning needs to be mounted at a suitable height so that the doors of the vehicle can be
opened without snagging the bottom of the awning.
It should be attached along its length at least two points preferably three points. Two sets
of mounting parts (4 nuts & bolts) are included, the third set needs to be bought separately.
Ensure that the unsecured length at each end of the awning does not exceed 700mm.
1. Ensure your vehicle has a roof bar like in the picture. If not,
you have to buy one and x it on your vehicle.
2. Cut o part of the rubber strip according to the “L” bracket
dimension.
3. Slide in the 8x20mm square screw, x the “L” bracket. To x
the other bracket follow the same steps.
4. Mount the car awning on the brackets with the bolts. Slide
the bolts into the mounting rail of the awning, as seen in
the picture.
5. The bolts can be positioned anywhere along the length of
the awning to correspond to the most appropriate moun-
ting points.
1. Unlock the buckles and unzip the zipper on the PVC bag.
Then extend the awning.
2. Unfold the two side poles. Extend them and secure their
ends with the front-end bar as shown.
3. Unfold the two supporting poles and extend them. Set
each leg to the desired height and twist the bottom half of
the leg to lock.
4. Use the ropes, stakes and the peg to further secure the aw-
ning.
5. Peg the legs to the ground using the rope loops in the feet
and guy rope to secure in case of winds.
CAUTIONS
• Always secure the awning with pegs and guy ropes - This will prevent the wind from lifting
the awning and causing damage to your awning and/ or your vehicle.
• Do not store the awning wet - The awning is made from 100% Polyester material with a
laminated PVC lining and is fully waterproof. Whilst this material is exceptionally resistant to
fungal attack, mildew will form if the awning is stored wet for extended periods. The awning
can be stored away wet for limited periods, but should be opened and allowed to dry as soon
as possible.
• Inspections before using - Regularly check that all nuts and bolts attaching your awning to
your vehicle are tight and in good condition.
• In the event of rain, ensure that the awning is set to an appropriate angle to allow rain water
to run o and not accumulate on top of the awning. In windy conditions it is essential that the
awning be secured to the ground to prevent damage to the awning and to the vehicle.
5418554185

GUIDE D’UTILISATION
FR
PRÉSENTATION DU PRODUIT
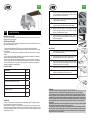
Cet auvent pour véhicules est un accessoire automobile qui permet de créer un abri dans le
prolongement de votre véhicule.
INSTRUCTIONS DE SÉCURITÉ
Nous vous invitons à lire et à comprendre entièrement ces instructions d’utilisation et de mon-
tage avant d’installer ce produit.
- Cet auvent doit être maintenu à l’écart du feu et de tout type d’objet inammable.
- Maintenez les enfants et les animaux domestiques à distance durant la phase de montage
et d’installation.
- Soyez prudent s’il y a du vent durant cette phase ! N’utilisez pas ce produit en cas de vents
violents !
- Si vous n’êtes pas parfaitement familiarisé avec les procédures d’installation, veuillez faire
installer le produit par un installateur professionnel.
- Assurez-vous de bien xer l’auvent avec les piquets et les cordes fournies. Le non-respect
de cette consigne peut entraîner des blessures, endommager votre produit ou votre véhicule
si l’auvent est soulevé par un vent puissant. S’il n’est pas xé correctement, ce produit peut
entraîner des blessures corporelles graves.
DESCRIPTION QTÉ
Auvent de voiture 1
Piquet 4
Corde 2
Boulon en acier inoxydable 8 x 20 mm 4
Support en L 2
Vis carrée 8 x 20 mm 2
Clé 1
PACKAGE CONTENT
INSTALLATION
ASSEMBLAGE
L’auvent doit être monté à une hauteur appropriée pour que les portes du véhicule puissent
être ouvertes sans accrocher le bas de l’auvent.
Il doit être xé sur sa longueur à au moins deux points d’attache, voire en trois points de pré-
férence. Deux jeux de pièces de xation (4 écrous et boulons) sont inclus, le troisième jeu doit
être acheté séparément. Veillez à ce que la longueur non xée à chaque extrémité de l’auvent
ne dépasse pas 700 mm.
1. Assurez-vous que votre véhicule est bien équipé d’une ba-
rre de toit comme sur la photo. Sinon, vous devrez en ache-
ter une et l’installer sur votre véhicule.
2. Coupez une partie de la bande de caoutchouc en fonction
de la dimension du support en L.
3. Glissez la vis carrée 8 x 20 mm, xez le support en L. Pour
xer l’autre support, veuillez répéter les mêmes étapes.
4. Montez l’auvent de voiture sur les supports à l’aide des
boulons. Faites glisser les boulons dans le rail de montage
du store, comme indiqué sur l’image.
5. Les boulons peuvent être positionnés n’importe où sur la
longueur de l’auvent pour correspondre aux points de xa-
tion les plus appropriés.
1. Déverrouillez les boucles et ouvrez la fermeture éclair du
sac en PVC. Déployez l’auvent.
2. Déployez les deux poteaux latéraux. Déployez-les et xez
leurs extrémités avec la barre avant, comme indiqué.
3. Dépliez les deux poteaux de support et étendez-les. Réglez
chaque barre à la hauteur souhaitée et tournez la moitié
inférieure de la barre pour la verrouiller.
4. Utilisez les cordes et les piquets pour mieux xer l’auvent.
5. Fixez les barres au sol en utilisant les boucles de corde et la
corde pour sécuriser la xation en cas de vent.
ATTENTION
- Fixez toujours l’auvent à l’aide des piquets et des cordes fournies, cela empêchera le vent de
soulever votre auvent, ce qui pourrait endommager votre auvent et/ou votre véhicule.
- Ne stockez jamais votre auvent s’il est mouillé. Ce produit est fabriqué à partir d’un maté-
riau 100 % polyester, avec une doublure en PVC laminé, il est entièrement étanche. Bien que
ce matériau soit exceptionnellement résistant aux attaques fongiques, de la moisissure peut
se former si l’auvent est stocké en milieu humide durant de longues périodes. Ce produit peut
être stocké humide durant une période réduite, mais il doit être ouvert et mis à sécher dès
que possible.
• Inspections avant utilisation : vériez régulièrement que tous les écrous et boulons qui xent
votre produit à votre véhicule sont bien serrés et en bon état.
• En cas de pluie, veillez à ce que l’auvent soit légèrement incliné, pour permettre à l’eau de
pluie de s’écouler et ainsi éviter qu’elle s’accumuler sur la partie supérieure de l’auvent. Dans
des conditions de vent, il est essentiel que votre auvent soit xé au sol pour éviter d’endom-
mager votre auvent ou votre véhicule.
5418554185

BEDIENUNGSANLEITUNG
DE
PRODUKTPRÄSENTATION
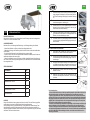
Eine Markise für Fahrzeuge ist ein Autozubehör, das ein Fahrzeug oder einen Lastwagen bes-
chattet und vor Sonne und Wetter schützt.
SICHERHEITSHINWEISE
Bitte lesen Sie vor der Montage diese Bedienungs- und Montageanleitung Ihrer Markise.
- Halten Sie die Markise von Feuer und brennbaren Gegenständen fern.
- Während der Montage und Einstellung dürfen sich keine Kinder und Haustiere im Arbeitsbe-
reich benden.
- Vorsicht bei Wind! Benutzen Sie die Markise nicht bei zu starkem Wind!
- Lassen Sie das Produkt von einem professionellen Installateur installieren, wenn Sie mit den -
Installationsverfahren nicht vertraut sind.
- Sichern Sie die Markise immer mit Pöcken und Seilen. Andernfalls könnten Sie verletzt und
das Produkt und Ihr Fahrzeug beschädigt werden, wenn die Markise durch unerwartete Wind-
böen angehoben wird.
BESCHREIBUNG ANZ.
Auto-Markise 1
Pock 4
Seil 2
Edelstahlbolzen 8 x 20 mm 4
L-Halterung 2
Vierkantschraube 8 x 20 mm 2
Schraubenschlüssel 1
VERPACKUNGSINHALT
MIT DER INSTALLATION FORTFAHREN
MONTAGE
Bringen Sie die Markise in einer geeigneten Höhe an, damit die Türen des Fahrzeugs geönet
werden können, ohne dass die Unterseite der Markise eingeklemmt wird.
Sie wird entlang ihrer Länge an mindestens zwei, vorzugsweise drei Punkten befestigt. Zwei
Sätze Befestigungszubehör (4 Schrauben und Bolzen) sind im Lieferumfang enthalten, der
dritte Satz ist separat erhältlich. Stellen Sie sicher, dass die ungesicherte Länge an jedem Ende
der Markise 700 mm nicht überschreitet.
1. Achten Sie darauf, dass Ihr Fahrzeug einen wie in der Abbil-
dung gezeigten Dachträger hat. Ist das nicht der Fall, kau-
fen Sie den Dachträger und bringen ihn an Ihrem Fahrzeug
an.
2. Schneiden Sie einen Teil des Gummistreifens entsprechend
den Abmessungen der L-Halterung ab.
3. Schieben Sie die 8 x 20 mm Vierkantschraube ein und be-
festigen Sie die L-Halterung. Montieren Sie mit den glei-
chen Schritten die andere Halterung.
4. Befestigen Sie die Markise mit den Bolzen an den Halterun-
gen. Schieben Sie die Bolzen in die Montageschiene der
Markise, wie auf der Abbildung zu sehen.
5. Die Bolzen können an jeder beliebigen Stelle der Markise
an den am besten geeigneten Befestigungspunkten posi-
tioniert werden.
1. Entriegeln Sie die Schnallen und önen Sie den Reißvers-
chluss der PVC-Tasche. Fahren Sie das Vorzelt aus.
2. Klappen Sie die beiden Seitenstangen aus. Ziehen Sie sie
aus und befestigen Sie ihre Enden wie gezeigt an der vor-
deren Stange.
3. Klappen Sie die beiden Stützstangen aus und fahren Sie sie
aus. Stellen Sie jedes Bein auf die gewünschte Höhe ein und
drehen Sie die untere Hälfte des Beins, um es zu arretieren.
4. Verwenden Sie die Seile, Pöcke und den Hering, um die
Markise zu sichern.
5. Befestigen Sie die Beine mit den Seilschlaufen an den
Füßen und dem Abspannseil am Boden, um sie bei Wind
zu sichern.
Vorsichtsmaßnahmen
– Sichern Sie die Markise immer mit Heringen und Abspannseilen. So verhindern Sie, dass der
Wind die Markise anhebt und Schäden an der Markise bzw. Ihrem Fahrzeug verursacht.
– Lagern Sie die Markise nicht feucht. Die Markise besteht aus 100 % Polyester mit einem la-
minierten PVC-Futter und ist wasserdicht. Das Material ist zwar außerordentlich widerstands-
fähig gegen Pilzbefall, doch bildet sich Schimmel, wenn die Markise über längere Zeit feucht
gelagert wird. Sie können die Markise für eine begrenzte Zeit feucht lagern, sie muss jedoch
so schnell wie möglich geönet und getrocknet werden..
– Kontrollen vor der Benutzung. Überprüfen Sie regelmäßig, ob alle Schrauben und Bolzen, mit
denen die Markise am Fahrzeug befestigt ist, fest angezogen und in gutem Zustand sind.
– Achten Sie bei Regen darauf, dass die Markise in einem angemessenen Winkel aufgestellt
wird, damit das Regenwasser ablaufen kann und sich nicht auf der Markise ansammelt. Befes-
tigen Sie die Markise bei Wind unbedingt am Boden, um Schäden an der Markise und am
Fahrzeug zu vermeiden.
5418554185

MANUALE D’USO
IT
PRESENTAZIONE DEL PRODOTTO
Una tenda da sole è un accessorio per auto che aiuta a proteggere il veicolo dal sole, nonché
a proteggere l’auto o il camion dai fenomeni atmosferici
ISTRUZIONI DI SICUREZZA
Leggere comprendere attentamente le presenti istruzioni per l’uso e il montaggio, prima di
procedere con l’installazione della tenda.
- Tenere la tenda da sole lontana dal fuoco e da oggetti inammabili.
- Tenere bambini e animali lontani dall’area di lavoro durante l’assemblaggio e le riparazioni.
- Agire con cautela in condizioni di vento! Non utilizzare la tenda in condizioni di rache di
vento forte!
- Se non si conoscono in modo approfondito le procedure di installazione del prodotto, dovre-
bbe essere un installatore professionista ad occuparsene.
- Fissare sempre la tenda con pali e corde. L’impossibilità nel farlo potrebbe comportare danni
al prodotto e al veicolo, se la tende viene sollevata da un vento improvviso. Se la tenda non
venisse attaccata in modo corretto, si potrebbero causare gravi lesioni personali.
DESCRIZIONE QTÀ
Tenda da sole 1
Picchetto 4
Corda 2
Bullone in acciaio inox da 8 x 20 mm 4
Staa a "L" 2
Vite quadrata da 8 x 20 mm 2
Chiave inglese 1
CONTENUTO DELLA CONFEZIONE
PROCEDERE CON L’INSTALLAZIONE
ASSEMBLAGGIO
La tenda deve essere montata a un’altezza idonea, in modo che le porte del veicolo si possano
aprire senza impigliarsi nella parte inferiore della tenda.
Dovrebbe essere attaccata nel senso della lunghezza in almeno due punti, preferibilmente tre
punti. Sono inclusi due set di parti di montaggio (4 dadi e bulloni), il terzo set deve essere ac-
quistato separatamente. Accertarsi che la lunghezza non ssata a ogni estremità della tenda
non superi i 700 mm
1. Assicurarsi che il veicolo sia dotato di una barra sul tetto,
come in foto. In caso contrario, è necessario acquistarne
una e installarla sul veicolo.
2. Tagliare parte della striscia in gomma in base alle dimen-
sioni della staa a "L".
3. Far scorrere la vite quadrata da 8 x 20 mm, ssare la staa
a "L". Per ssare l'altra staa, seguire gli stessi passaggi.
4. Montare la tenda da sole sulle stae, utilizzando i bulloni.
Far scorrere i bulloni nella guida di montaggio della tenda,
come si vede in foto.
5. I bulloni possono essere posizionati in qualsiasi punto nel
senso della lunghezza della tenda, in corrispondenza ai
punti di ssaggio più appropriati.
1. Sbloccare le chiusure e aprire la cerniera della borsa in PVC.
Dopodiché, aprire la tenda.
2. Spiegare le aste laterali. Allungarli e ssarne le estremità
alla barra frontale, come si vede in foto.
3. Aprire i due pali di supporto e allungarli. Impostare ogni
gamba all'altezza desiderata e ruotare la metà inferiore
per bloccarla.
4. Utilizzare le corde, i pali e il picchetto per ssare ulterior-
mente la tenda.
5. Fissare le gambe al terreno creando con la corda degli
anelli intorno ai piedi e i tiranti per ssarla in caso di vento.
PRECAUZIONI
• Fissare sempre la tenda con picchetti e tiranti, ciò impedirà che il vento sollevi la tenda e
provochi danni alla tenda stessa e/o al veicolo.
• Non riporre la tenda bagnata. La tenda è realizzata in poliestere al 100%, con un rivestimen-
to in PVC laminato, ed è completamente impermeabile. Questo materiale è eccezionalmente
resistente agli attacchi fungini, tuttavia, si formerà della mua se la tenda viene conservata
bagnata per lunghi periodi. La tenda può essere conservata bagnata per periodi di tempo
limitati, tuttavia, deve essere aperta il prima possibile, per consentirle di asciugarsi.
• Ispezioni prima dell’uso. Controllare regolarmente che tutti i dadi e i bulloni ssano la tenda
al veicolo siano ben serrati e si trovino nella giusta posizione.
• In caso di pioggia, assicurarsi che la tenda sia impostata a una giusta angolazione, per
consentire alla pioggia di scorrere via e di non accumularsi in cima alla tenda. In condizioni
di vento, è essenziale che la tenda sia ssata al terreno, per prevenire danni alla tenda e al
veicolo.
5418554185

APRESENTAÇÃO DO PRODUTO
PT
PRODUKTPRÄSENTATION
Um toldo para veículos é um acessório auto que lhe ajuda a proteger o veículo do sol, assim
como a proteger o seu carro ou carrinha de fenómenos meteorológicos
INSTRUÇÕES DE SEGURANÇA
Leia e interiorize totalmente estas instruções de funcionamento e de montagem antes de
instalar o seu toldo.
- O toldo deve ser mantido afastado de chamas abertas e de objetos inamáveis.
- Mantenha crianças e animais afastados da área de trabalho durante a montagem e ajuste
do toldo.
- Tenha cuidado em circunstâncias de vento! Não use o toldo caso esteja demasiado ventoso!
- Se não estiver bastante familiarizado(a) com os procedimentos de instalação, peça a um
instalador prossional que se encarregue dela.
- Prenda sempre o toldo com estacas e cordas. Não fazer isto pode vir a causar lesões, assim
como danos o produto e no seu veículo caso o toldo seja levantado por ventos inesperados. A
xação inapropriada pode causar lesões corporais graves.
DESCRIÇÃO QTD
Toldo para carro 1
Estaca 4
Corda 2
Parafuso de aço inoxidável 8 x 20 mm 4
Suporte “L” 2
Parafuso quadrado 8 x 20 mm 2
Chave 1
CONTEÚDOS DA EMBALAGEM
PROSSIGA COM A INSTALAÇÃO
MONTAGEM
É necessário montar o toldo a uma altura adequada, para que seja possível abrir as portas do
veículo sem raspar no fundo do toldo.
Deve ser xado no sentido da largura em pelo menos dois pontos e, de preferência, em três.
Estão incluídos no kit dois jogos de peças de montagem (4 porcas e parafusos), sendo neces-
sário comprar o terceiro jogo em separado. Assegure-se de que a porção não xa de cada
ponta do toldo não excede 700 mm.
1. Assegure-se de que o seu veículo possui uma barra de te-
jadilho, conforme mostrado na imagem. Caso não tenha,
terá de comprar uma e xá-la no seu veículo.
2. Corte parte da tira de borracha, de acordo com a di-
mensão do suporte “L”.
3. Encaixe o parafuso quadrado de 8x20 mm, xando o su-
porte “L”. Para xar o outro suporte, siga o mesmo proce-
dimento.
4. Monte o toldo para carro nos suportes com os parafusos.
Encaixe os parafusos no carril de montagem do toldo,
como mostrado na imagem.
5. Os parafusos podem ser colocados em qualquer ponto ao
longo do toldo, permitindo fazer correspondência com os
pontos de xação mais adequados.
1. Desaperte as velas e o fecho do saco de PVC. Depois dis-
to, desenrole o toldo.
2. Abra os dois postes laterais. Estenda-os e preda as pontas
deles com a barra de remate dianteira, como mostrado.
3. Desdobre os dois postes de apoio e estenda-os. Coloque
cada uma das pernas na altura desejada e gire a metade
inferior da perna para travar.
4. Use as cordas, os postes e as estacas para prender melhor
o toldo.
5. Crave as pernas no chão usando voltas de corda nos pés e
corda de reforço para xar em caso de vento.
AVISOS
• Prenda sempre o toldo com estacas e cordas de reforço - isto impedirá que o vento levante
o toldo, causando danos nele ou no veículo.
• Não guarde o toldo enquanto estiver molhado - o toldo é feito de um material 100% Poliés-
ter, com um forro de PVC laminado e é totalmente à prova de água. Apesar de este mate-
rial ser excecionalmente resistente a fungos, pode formar-se bolor no toldo caso ele seja
armazenado molhado por longos períodos. O toldo pode ser guardado molhado apenas por
breves períodos, devendo ser aberto e deixado a secar assim que possível.
• Inspeção pré-utilização - verique regularmente que todas as porcas e parafusos que pren-
dem o toldo ao seu veículos estão apertados e em boas condições.
• Caso chova, assegure-se de que o toldo está colocado num ângulo adequado para permitir
o escoamento da água da chuva, de maneira a que esta não se acumule no topo do toldo.
Em condições de vento, é essencial que o toldo esteja preso ao chão para impedir que se
danique ou que danique o veículo.
5418554185

MANUAL DE INSTRUCŢIUNI
RO
PREZENTARE PRODUS
O tendă pentru vehicule este un accesoriu auto, care ajută la umbrirea vehiculului împotriva
razelor de soare, precum și la protejarea mașinii sau camionului dv. împotriva fenomenelor
meteo
INSTRUCȚIUNI DE SIGURANȚĂ
Vă rugăm să citiți și să înțelegeți deplin aceste instrucțiuni de funcționare și asamblare înainte
de instalarea tendei dv.
- Tenda trebuie ferită de foc și obiecte inamabile.
- Nu lăsați copiii și animalele de companie în zona de lucru în timpul asamblării și ajustării.
- Fiți prudent în condiții de vânt! Nu utilizați tenda în condiții de vânt excesiv!
-Dacă nu sunteți complet familiarizat cu procedurile de instalare, ar trebui ca produsul să e
instalat de un instalator profesionist.
- Asigurați întotdeauna tenda cu picheți și frânghii. În caz contrar, se pot produce vătămări
corporale, precum și deteriorarea produsului și a autovehiculului dvs. în cazul în care tenda
este ridicată de un vânt neașteptat. Atașarea necorespunzătoare ar putea produce vătămări
corporale serioase.
DESCRIERE CANT.
Tendă auto 1
Țăruș 4
Frânghie 2
8 x 20mm bolțuri din oțel inoxidabil 4
Suport în „L” 2
8 x 20mm Șurub cu cap pătrat 2
Cheie xă 1
CONȚINUTUL PACHETULUI
CONTINUAȚI CU INSTALAREA
ASAMBLARE
Tenda trebuie montată la o înălțime corespunzătoare pentru ca ușile vehiculului să se poată
deschide fără a găuri fundul tendei.
Aceasta trebuie atașată pe lungimea vehiculului în cel puțin două puncte, de preferat în
trei puncte. Sunt incluse două seturi de piese pentru montaj (4 piulițe & bolțuri), al treilea set
trebuie cumpărat separat. Asigurați-vă că lungimea neasigurată a ecărui capăt al tendei nu
depășește 700mm.
1. Asigurați-vă că vehiculul dv. deține o bară pe acoperiș, ca
în imagine. Dacă nu, va trebui să vă cumpărați una și să o
xați pe vehiculul dv.
2. Tăiați o parte din banda de cauciuc în funcție de dimensiu-
nea suportului în "L".
3. Introduceți șurubul pătrat de 8x20mm și xați suportul în
"L". Pentru xarea celuilalt suport urmați aceiași pași.
4. Montați tenda auto pe suporturi cu bolțuri. Introduceți
bolțurile în șina de montaj a tendei, cum se vede în imagine.
5. Bolțurile pot poziționate oriunde pe lungimea tendei,
pentru a corespunde celor mai potrivite puncte de mon-
tare.
1. Desfaceți cataramele și deschideți fermoarul de pe sacul
de PVC. Apoi extindeți tenda.
2. Desfaceți cei doi stâlpi laterali. Întindeți-i și xați-le cape-
tele cu bara frontală, ca în imagine.
3. Desfaceți cei doi stâlpi de sprijin și întindeți-i. Reglați eca-
re picior la înălțimea dorită și răsuciți jumătatea inferioară
a piciorului pentru a-l bloca.
4. Utilizați frânghii, pari și țăruși pentru a asigura mai bine ten-
da.
5. Prindeți picioarele de sol folosind buclele de frânghie din
picioare și frânghia de ancorare pentru a le xa în caz de
vânt.
ATENȚIONARE:
• Fixați întotdeauna tenda cu țăruși și frânghii de ancorare - Acest lucru va împiedica vântul
să ridice tenda și să provoace deteriorarea acesteia și/sau a vehiculului dv.
• Nu depozitați tenda umedă - Tenda este din material 100% Poliester cu căptușeală din PVC
laminat și este complet impermeabilă. În vreme ce acest material este extraordinar de rezis-
tent la atacul fungilor, se va forma mucegai dacă tenda va depozitată umedă pe perioade
prelungite de timp. Tenda poate depozitată umedă pentru perioade limitate de timp, dar
trebuie întinsă și uscată cât mai curând posibil.
• Inspecții înainte de utilizare - Vericați cu regularitate dacă toate șaibele și bolțurile care
atașează tenda de vehiculul dv. sunt strânse și sunt în stare bună.
• În caz de ploaie, asigurați-vă că tenda se aă într-un unghi corespunzător, care să permită
apei de ploaie să se scurgă și să nu se acumuleze pe acoperișul tendei. În condiții de vânt,
este esențial ca tenda să e xată la sol pentru a preveni deteriorarea tendei și a vehiculului.
5418554185

INSTRUCTIEHANDLEIDING
NL
PRODUCTPRESENTATIE
Een luifel voor voertuig is een accessoire voor auto’s dat een voertuig in de schaduw zet en uw
auto of vrachtwagen beschermt tegen meteorologische fenomenen.
VEILIGHEIDSINSTRUCTIES
Lees de gebruiksaanwijzing en montagehandleiding grondig door voordat u uw luifel gaat
installeren.
- De luifel dient uit de buurt van vuur en brandbare voorwerpen te worden gehouden.
- Houd kinderen en huisdieren uit de buurt tijdens het assembleren en verstellen.
- Let goed op als het waait! Niet gebruiken als er een harde wind staat!
- U kunt het product laten installeren door een professionele installateur als u niet goed weet
hoe u het product moet installeren.
- Maak de luifel altijd vast met een staken en touwen. Als u dit niet doet, dan kan dit leiden
tot letsel en schade aan het product en uw voertuig als de luifel wordt opgetild door een on-
verwachte windvlaag. Een verkeerde montage kan tot ernstig letsel leiden.
BESCHRIJVING STKS
Autoluifel 1
Tentharing 4
Touw 2
8 x 20 mm roestvrijstalen bout 4
”L”-beugel 2
8 x 20 mm vierkante schroef 2
Moersleutel 1
VERPAKKINGSINHOUD
GA VERDER MET HET INSTALLEREN
ASSEMBLEREN
De luifel dient op een geschikte hoogte te worden aangebracht en zodanig dat de deuren van
het voertuig geopend kunnen worden zonder dat deze in contact komen met de luifel.
De luifel dient in de lengte op ten minste twee punten, bij voorkeur drie punten, te worden
aangesloten. Er zijn twee sets aan montage-onderdelen (4 moeren en bouten) meegeleverd.
De derde set dient apart te worden gekocht. Zorg ervoor dat de losse lengte aan elke uiteinde
van de luifel niet langer is dan 700 mm.
1. Zorg ervoor dat uw voertuig is uitgerust met een dakbalk
zoals te zien is in de afbeelding. Als dat niet het geval is,
dan dient u er een te kopen en op uw voertuig te monteren.
2. Zijn het deel van de rubberen strook af volgens de afmetin-
gen van de ”L”-beugel.
3. Schuif de 8 x 20 mm vierkante schroef erin, en monteer de
”L”-beugel. Voer dezelfde procedure uit om de andere beu-
gel vast te monteren.
4. Gebruik de bouten om de autoluifel op de beugels te mon-
teren. Schuif de bouten in de montagerail van de luifel zoals
geïllustreerd in de afbeelding.
5. De bouten kunnen overal in de lengte van de luifel worden
gepositioneerd om overeen te komen met de meest ges-
chikte montagepunten.
1. Ontsluit de gespen en trek de ritssluiting van de PVC-zak
open. Maak daarna de luifel langer.
2. Vouw de twee zijpalen uit. Maak ze langer en maak hun
uiteinden vast aan de balk aan de voorzijde zoals geïllus-
treerd.
3. Vouw de twee steunpalen uit en maak ze langer. Stel elke
poot in op de gewenste lengte en draai het onderste deel
van de poot een halve slag om deze vast te zetten.
4. Gebruik touwen, staken en de tentharing om de luifel nog
verder vast te zetten.
5. Zet de poten vast in de grond met behulp van lussen in de
voetjes en gebruik een scheerlijn als er wind staat.
OPGELET
• Maak de luifel altijd vast met tentharingen en scheerlijnen - dit zal voorkomen dat de wind
de luifel optilt en schade veroorzaakt bij uw luifel en/of voertuig.
• Berg de luifel niet op als deze nat is - De luifel is gemaat van 100% polyester en gelamineerd
met een PVC-voering die volledig water bestendig is. Hoewel dit materiaal heel erg bes-
tendig is tegen schimmels, kan er meeldauw ontstaan als de luifel voor lange periode wordt
opgeborgen. De luifel kan voor korte perioden nat worden opgeborgen, maar dient de kans
te krijgen zo snel mogelijk te drogen.
• Inspectie vóór gebruik - Inspecteer regelmatig alle moeren en bouten die uw luifel bevesti-
gen op uw voertuig om te controleren of ze goed vastzitten en in goede conditie zijn.
• Zorg ervoor dat de luifel in de juiste hoek is ingesteld zodat het regenwater, in geval van
regen, er vanaf loopt en geen plas bovenop de luifel vormt. Het is van belang dat de luifel
vastgezet wordt op de grond om schade aan de luifel en het voertuig te voorkomen als het
waait.
5418554185

ÜZEMELTETÉSI UTASÍTÁS
HU
A TERMÉK BEMUTATÁSA
A jármű árnyékoló ponyva olyan gépkocsi tartozék, melynek segítségével árnyékolhatja jármű-
vét a napsütésben vagy megvédheti az időjárási jelenségektől
BIZTONSÁGI ÚTMUTATÓ
Kérjük, gyelmesen olvassa el és értelmezze a kezelési és felszerelési utasításokat, mielőtt
felállítja az árnyékoló ponyvát.
- Az árnyékoló ponyvát tűztől és gyúlékony anyagoktól védeni kell.
- Az összeszerelés és beállítás során tartsa távol a gyermekeket és a házi kedvenceket.
- Szeles körülmények között óvatosan járjon el. Ne használja az árnyékoló ponyvát túlzottan
szeles körülmények között.
- Ha nem ismeri alaposan a felszerelési eljárásokat, ajánlatos pro szakembert felkérni a ter-
mék telepítésére.
- Az árnyékoló ponyvát mindig rögzítse cövek és zsinór segítségével. Ennek elmulasztása
sérülést, illetve a termék vagy járműve károsodását okozhatja, ha az árnyékoló ponyvát a szél
váratlanul felemeli. A nem megfelelő rögzítés súlyos sérülést okozhat.
LEÍRÁS DARABSZÁM
Autó ponyvatető 1
Cövek 4
Zsinór 2
8 x 20 mm-es rozsdamentes acél csavar 4
“L” konzol 2
8 x 20 mm-es négyszögletes csavar 2
Csavarkulcs 1
A CSOMAG TARTALMA
FOLYTASSA A TELEPÍTÉST
ÖSSZESZERELÉSI ÚTMUTATÓ
Az árnyékoló ponyvát megfelelő magasságban kell felszerelni, hogy a jármű ajtaját ki lehessen
nyitni anélkül, hogy súrolná az árnyékoló ponyvát.
Hosszában legalább két helyen, lehetőleg három helyen kell rögzíteni. A felszerelési tartozékok-
ból két készlet (4 csavar és 4 anya) mellékelve van, a harmadik szettet Önnek kell megvásárol-
nia. Gondoskodjon róla, hogy az árnyékoló tető nem rögzített hossza a tető egyik végén sem
haladja meg a 700 mm-t.
1. Győződjön meg róla, hogy járművén a képen bemutatot-
thoz hasonló tetőrúd található. Ha nem ez a helyzet, vá-
sárolnia kell ilyen tetőrudat, és fel kell szerelnie a járműre.
2. Vágja le a gumicsík egy részét, az „L” konzol méretének me-
gfelelően.
3. Csúsztassa be a 8x20 mm-es négyszög csavart, rögzítse az
„L”-konzolt. A másik konzol rögzítéséhez hajtsa végre ugya-
nezeket a lépéseket.
4. Szerelje fel az árnyékoló ponyvát a konzolokra a csava-
rokkal. Csúsztassa a csavarokat az árnyékoló ponyva rö-
gzítősínjébe az ábrának megfelelően.
5. A csavar bárhol elhelyezhető a ponyva hosszában, hogy az
a legmegfelelőbb rögzítési pontnál legyen.
1. Oldja ki a csomókat és cipzározza ki a nejlonzsák cipzárját.
Azután húzza ki az árnyékolót.
2. Hajtsa ki a két oldalsó oszlopot. Feszítse ki őket és rögzítse
végüket az elülső rúddal, ahogy az ábrán látható.
3. Hajtsa ki és feszítse ki a két tartóoszlopot. Állítson be min-
den lábat a kívánt magasságra és fordítsa el a láb alsó
felét a rögzítéshez.
4. A zsinórok, cövekek és csap segítségével erősítse meg az
árnyékoló rögzítését.
5. Szorítsa a lábakat a talajhoz a zsinór hurkok segítségével,
szél esetén pedig a sátorzsinórral.
Figyelmeztetések
• Mindig rögzítse az árnyékoló ponyvát cövekkel és sátorzsinórral - Így megakadályozhatja,
hogy a szél felemelje az árnyékoló ponyvát, amitől a ponyva és a jármű is megsérülhet.
• Ne tárolja nedvesen a ponyvát - A ponyva 100% poliészterből készült, laminált PVC béléssel,
és tökéletesen vízhatlan. Bár ez az anyag kivételesen ellenálló a gombásodásnak, a hosszabb
ideig nedvesen tárolt ponyván megtelepszik a penész. Az árnyékolót rövid ideig lehet nedve-
sen tárolni, de amint lehetséges, ki kell nyitni és meg kell szárítani.
• Átvizsgálás használat előtt - Rendszeresen ellenőrizze, hogy az árnyékolót a járműhöz rögzí-
tő anyák és csavarok szorosak és megfelelő állapotban vannak.
• Eső esetén gondoskodjon róla, hogy a ponyva megfelelő szögben van állítva ahhoz, hogy az
esővíz lefusson róla, és ne gyűljön össze rajta. Szeles időben alapvetően fontos, hogy rögzítse
a ponyvát a talajhoz a ponyva és a jármű sérülésének elkerülése érdekében.
5418554185

РУКОВОДСТВО ПО ЭКСПЛУАТАЦИИ
RU
ОПИСАНИЕ ПРОДУКТА
Автомобильный тент помогает защитить легковой или грузовой автомобиль от солнечного
света и неблагоприятных метеоусловий
ПРАВИЛА ТЕХНИКИ БЕЗОПАСНОСТИ
Перед установкой автомобильного тента прочтите и поймите настоящую инструкцию по
эксплуатации и установке.
- Автомобильный тент следует устанавливать вдали от огня и воспламеняемых объектов.
- Во время настройки и регулировки не допускайте нахождения в рабочей зоне детей и
домашних животных.
- Соблюдайте меры предосторожности в ветренных условиях! Не используйте тент при
чрезмерно сильном ветре!
- Если вы не знакомы с процедурой установки, процедура установки должна выполняться
техническим специалистом.
- Всегда закрепляйте тент колышками и веревками. Несоблюдение этого правила может
привести к травмам и повреждению изделия и автомобиля при подъеме тента ветром.
Неправильное закрепление может привести к серьезным травмам.
НАИМЕНОВАНИЕ КОЛ-
ВО
Автомобильный тент 1
Колышек 4
Веревка 2
Болт из нержавеющей стали 8 x 20 мм 4
L-образный кронштейн 2
Винт с квадратной головкой 8 x 20 мм 2
Гаечный ключ 1
СОДЕРЖИМОЕ УПАКОВКИ
УСТАНОВКА
СБОРКА
Тент должен устанавливаться на подходящей высоте, чтобы двери автомобиля можно было
открыть, не задевая тент.
Тент необходимо закрепить по длине как минимум в двух, или, предпочтительно, в трех
точках. В комплект входит два комплекта для установки (4 гайки и болта), третий комплект
необходимо приобрести отдельно. Убедитесь, что незакрепленная длина с каждого края
тента не превышает 700 мм.
1. Удостоверьтесь, что у вашего автомобиля имеются
рейлинги на крыше, как показано на рисунке. Если
рейлингов нет, необходимо приобрести их и установить
на автомобиль.
2. Отрежьте резиновую ленту по размеру L-образного
кронштейна.
3. Вставьте винт с квадратной головкой 8х20 мм и закрепите
L-образный кронштейн. Чтобы зафиксировать второй
кронштейн, выполните те же действия.
4. Закрепите автомобильный тент на кронштейнах
болтами. Вставьте болты в монтажную перекладину
тента, как показано на рисунке.
5. Болты можно устанавливать в любой точке по длине
палатки, выбрав наиболее подходящие для установки
точки.
1. Расстегните пряжки и застежку-молнию на чехле из ПВХ.
Затем разверните тент.
2. Разложите две боковые опоры. Вытяните их и закрепите
концы в передней перекладине, как показано на
рисунке.
3. Разложите две опоры и вытяните их. Отрегулируйте
ножки до желаемой высоты и поверните нижнюю
половину ножки, чтобы заблокировать ее.
4. Дополнительно зафиксируйте тент веревками и
колышками.
5. Зафиксируйте ножки на земле, используя кольца веревок,
и используйте оттяжку веревки на случай ветра.
Внимание
• Всегда закрепляйте тент колышками и оттяжками из веревки — это предотвратит подъем
тента ветром и повреждение тента и/или автомобиля.
• Не храните тент в мокром состоянии - Тент изготовлен из 100% полиэстера с несколькими
слоями ПВХ и полностью водонепроницаем. Несмотря на то, что материал исключительно
устойчив к поражению грибком, при длительном хранении тента в мокром состоянии
возможно образование плесени. Палатку можно хранить в мокром состоянии в течение
небольшого промежутка времени, но в таком случае ее следует как можно скорее
открыть и высушить.
• Проверки перед использованием - Регулярно проверяйте, чтобы все гайки и болты,
которыми крепится тент, были в надлежащем состоянии и надежно затянуты.
• В случае дождя убедитесь, что тент установлен под углом, позволяющим стекать
дождевой воде с тента. В ветренных условиях важно, чтобы тент был зафиксирован на
земле, чтобы предотвратить повреждение тента и автомобиля.
5418554185

INSTRUKCJA OBSŁUGI
PL
PREZENTACJA WYROBU
Markiza samochodowa to wyposażenie dodatkowe samochodu, które pomaga osłonić pojazd
przed słońcem jak też ochronić Twój samochód lub ciężarówkę przed zjawiskami meteorolo-
gicznymi.
INSTRUKCJE BEZPIECZEŃSTWA
Prosimy, przed zainstalowaniem Twojej markizy przeczytaj i w pełni zrozum te instrukcje instala-
cji i użytkowania.
- Markizę trzeba trzymać z dala od ognia i przedmiotów łatwopalnych.
- Podczas montażu i regulacji nie pozwól dzieciom i zwierzętom domowym zbliżać się do mie-
jsca pracy.
- Zachowaj ostrożność, gdy wieje wiatr. Nie korzystaj z markizy, gdy wiatr wieje z nadmierną
siłą.
- Jeśli sądzisz, że niedostatecznie rozumiesz procedurę instalacji, markiza powinna zostać
zainstalowana przez zawodowego instalatora.
- Zawsze zabezpiecz markizę palikiem i linkami. Jeśli markiza zostanie uniesiona przez nieocze-
kiwany powiew wiatru, zaniedbanie tego może spowodować obrażenia cielesne jak też uszko-
dzenia markizy i Twojego pojazdu. Niewłaściwe zamocowanie może spowodować poważne
obrażenia cielesne.
OPIS ILOŚĆ
Markiza samochodowa 1
Śledzie 4
Linki 2
8 x 20 mm śrub z nierdzewnej stali 4
Wspornik w kształcie litery „L” 2
8 x 20 mm śrub kwadratowych 2
Klucz francuski 1
ZAWARTOŚĆ OPAKOWANIA
KONTYNUUJ INSTALOWANIE
MONTAŻ
Markiza musi zostać zamontowana na odpowiedniej wysokości, tak by drzwi pojazdu można
było otwierać bez zaczepiania o jej część dolną.
Powinna ona być zamocowana na całej długości w co najmniej dwóch, a najlepiej w trzech
punktach. Dwa zestawy części montażowych (4 nakrętki i śruby) znajdują się w opakowaniu,
trzeci trzeba nabyć osobno. Dopilnuj, żeby na każdym końcu markizy długość odcinka nieza-
bezpieczonego nie przekraczała 700 mm.
1. Upewnij się, że Twój pojazd ma relingi i szyny dachowe, ta-
kie jak na ilustracji. Jeśli nie, musisz je kupić i zamontować.
2. Odetnij część gumowego paska odpowiednio do rozmiaru
wspornika „L”.
3. Wsuń kwadratową śrubę 8 x 20 mm i zamocuj wspornik „L”.
W taki sam sposób zamocuj pozostały wspornik.
4. Za pomocą śrub przymocuj markizę samochodową do ws-
porników. Wsuń śruby do szyny montażowej markizy, jak na
ilustracji.
5. Śruby te można umieścić w dowolnym miejscu, na całej
długości markizy, stosownie do najbardziej odpowiednich
punktów zamocowania.
1. Rozepnij klamry i rozsuń suwak na torbie z PCW. Rozwiń
markizę.
2. Rozłóż dwa słupki boczne. Rozciągnij je i zabezpiecz ich
końce w przedniej szynie, jak na ilustracji.
3. Rozłóż dwa słupki podpierające i rozciągnij je. Ureguluj wy-
sokość każdej z nóg do pożądanego poziomu i przekręć jej
dolną połowę, by ją zablokować w tej pozycji.
4. Dla dalszego zamocowania markizy użyj linek, kołków i śle-
dzi.
5. Przytwierdź nogi do gruntu za pomocą śledzi, wstawiając
je w pętle z linki u ich stóp, zabezpiecz linkami na wypadek
powiewów wiatru.
Ostrożnie!
• Zawsze zabezpieczaj markizę śledziami i linkami. Zapobieże to uniesieniu markizy przez wiatr
i uszkodzeniu Twojej markizy i/lub Twojego pojazdu.
• Nie odkładaj markizy do przechowania, gdy jest mokra. Jest ona sporządzona z materiału
będącego w 100% poliestrem, z laminowaną wykładziną z PCW i jest w pełni nieprzemakal-
na. O ile materiał ten jest wyjątkowo odporny na atak grzybów, jeśli mokra markiza będzie
przechowywana przez dłuższy czas, pojawi się na niej pleśń.. Mokrą markizę można odłożyć na
przechowanie na ograniczony czas, ale należy ją rozłożyć i dać jej wyschnąć, gdy tylko będzie
to możliwe.
• Oględziny przed użyciem - regularnie sprawdzaj, czy wszystkie śruby i nakrętki mocujące
Twoją markizę do Twojego pojazdu są dociągnięte i czy są w dobrym stanie.
• W razie deszczu, dopilnuj, żeby markiza była ustawiona pod odpowiednim kątem, który
pozwoli wodzie ściekać a nie gromadzić się w jej górnej część. Podczas wiatru markiza musi
być bezpiecznie przytwierdzona do gruntu, aby zapobiec uszkodzeniu jej samej i pojazdu.
5418554185

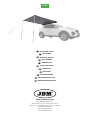
MARKIZA SAMOCHODOWA
TOLDO PARA COCHE
TOLDO PARA CARRO
AUTÓ PONYVATETŐ
AUVENT DE VOITURE
CAR AWNING
AUTO-MARKISE
TENDĂ AUTO
АВТОМОБИЛЬНЫЙ ТЕНТ
TENDA DA SOLE
AUTOLUIFEL
54185
www.jbmcamp.com
JBM CAMPLLONG, S.L.U.
CIM La Selva - Ctra. Aeropuerto km. 1,6
Nave 2.2 - CP 17185 Vilobí d’Onyar - GIRONA
jbm@jbmcamp.com
Tel. +34 972 405 721
Fax. +34 972 245 437
-
 1
1
-
 2
2
-
 3
3
-
 4
4
-
 5
5
-
 6
6
-
 7
7
-
 8
8
-
 9
9
-
 10
10
-
 11
11
-
 12
12
-
 13
13


w innych językach
- español: JBM 54185 Guía del usuario
- italiano: JBM 54185 Guida utente
- Deutsch: JBM 54185 Benutzerhandbuch
- português: JBM 54185 Guia de usuario
- français: JBM 54185 Mode d'emploi
- Nederlands: JBM 54185 Gebruikershandleiding
- română: JBM 54185 Manualul utilizatorului
Inne dokumenty
-
Dometic PerfectWall PW 1000 Instrukcja obsługi
-
-
-
-
Dometic PW1100 Instrukcja obsługi
-
-
Dometic Rally AIR, Rally AIR DA, Club AIR, Grande AIR, Ace AIR, Leggera AIR Instrukcja obsługi
-
-
Dometic Rally AIR Pro 240 TG Instrukcja obsługi
-