
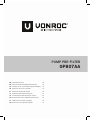
PUMP PRE-FILTER
GP807AA
EN
Original Instructions 04
DE
Übersetzung Der Originalbetriebsanleitung 06
NL
Vertaling van de oorspronkelijke gebruiksaanwijzing
09
FR
Traduction de la notice originale 12
ES
Traducción del manual original 14
IT
Traduzione delle istruzioni originali 17
SV
Översättning av bruksanvisning i original 20
DA
Oversættelse af den originale brugsanvisning 22
PL
Tłumaczenie instrukcji oryginalnej 25
RO
Traducere a instruciunilor originale 27

WWW.VONROC.COM
2
5 6
2 7
A
1
4
3
9
8
B2
17
B1
73

WWW.VONROC.COM
3
1 3 711
810 9
C
D
Tighten Loosen
5
4
2
6

4
EN
WWW.VONROC.COM
1. SAFETY INSTRUCTIONS
Read the enclosed safety warnings, the additional
safety warnings and the instructions. Failure to
follow the safety warnings and the instructions may
result in electric shock, fire and/or serious injury.
Save the safety warnings and the instructions for
future reference.
The following symbols are used in the user
manual or on the product:
Read the user manual.
Denotes risk of personal injury, loss of life
or damage to the tool in case of non-obser-
vance of the instructions in this manual.
Not intended for use by children.
Protect the pre-filter against frost.
SAFETY WARNINGS
THIS APPLIANCE CAN BE USED BY CHILDREN AGED
FROM 8 YEARS AND ABOVE AND PERSONS WITH
REDUCED PHYSICAL, SENSORY OR MENTAL CAPA-
BILITIES OR LACK OF EXPERIENCE AND KNOWL-
EDGE IF THEY HAVE BEEN GIVEN SUPERVISION OR
INSTRUCTION CONCERNING USE OF THE APPLIANCE
IN A SAFE WAY AND UNDERSTAND THE HAZARDS
INVOLVED. CHILDREN SHALL NOT PLAY WITH THE
APPLIANCE. CLEANING AND USER MAIN- TENANCE
SHALL NOT BE MADE BY CHILDREN WITHOUT
SUPERVISION.
Please read these instructions carefully and
thoroughly before using this appliance and keep
them for future reference. It is very important that
you understand how to use this appliance safely so
please take the time to familiarise yourself with the
requirements as outlined in these instructions.
• If you are in any doubt what so ever about using
this appliance, we strongly recommend that
you employ the services of a suitably qualified
person.
• Keep children and pets well away from the
work area and never allow children to use this
appliance at any time.
• When not in use, keep this appliance stored in a
safe place out of reach of children.
• Never leave the appliance unattended when in
use.
• Using water pressure must not be higher than
10 bar / 1 MPa to avoid the damage of product.
• Do not use the pre-filter for drinking water.
• The temperature of the liquid conveyed may not
exceed 35 °C.
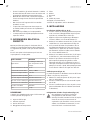
2. PRODUCT INFORMATION
The pump pre-filter is intended for private use for
household water supply and irrigation of gardens, it
is not intended for commercial use.
It is solely intended for clear and rain water.
Model No. GP807AA
Application Pre-filtering of water
(suction side of the pump)
Filter element height 12 cm
Max. operating pressure 10 bar / 1 MPA
Mesh width 0.15 mm
Max. water temperature 35°C
Water inlet connection G1" internal thread
Water outlet connection G1" internal thread
Threaded coupling size G1" external thread
Replacement pre-filter GP809AA
Weight 0.7 kg
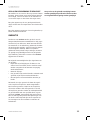
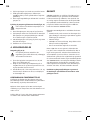
DESCRIPTION
The numbers in the text refer to the diagrams on
page 2-3.
1. Water inlet
2. Top section
3. Water outlet
4. Transparant housing
5. Filter
6. Spanner
7. Couplings
8. Screws
9. Wall bracket
10. Plug (air outlet)
11. Suction hose (not included)

EN
5
WWW.VONROC.COM
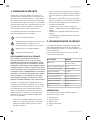
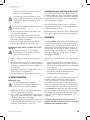
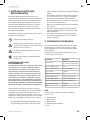
3. INSTALLING
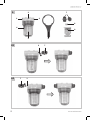
Installing the filter (Fig. A, B, C)
1. Insert the filter (5) into the transparent housing
(4) and screw the housing onto the top section
(2) by using a spanner (6).
2. Apply thread seal tape (Teflon tape) to the
threaded coupling (7).
3. Screw the coupling (7) airthight into the filter
outlet (3), as shown on figure B1.
4. If the coupling of the suction hose (11) has a
female thread, an extra coupling (7) is needed.
Apply thread seal tape (Teflon tape, not includ-
ed) to the threaded coupling (7).
5. Screw the coupling (7) airthight into the filter
inlet (1), as shown on figure B2.
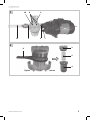
6. Screw the pre-filter airthight on the water inlet
of the garden pump, as shown on figure C.
When the filter touches the ground, it is recom-
mended to use a wooden block between the
pump and the ground. The feet of the pump can
be bolted to the wooden block.
Wall bracket (Fig. A, C)
The supplied wall bracket makes it possible to
attach the filter to a pole or wall.
1. Put the wall bracket (9) on the top section (2).
2. Mount the wall bracket (9) by tightening the
four screws (8).
3. Mount the wall bracket (9) to a pole or wall by
tightening two screws or bolts (not included).
Attaching the suction hose (Fig. A, C)
Don't use any hose connection system
fittings or standard water hoses on the
suction side! A suction hose (11) set with
suitable coupling (G1" thread) and foot
valve must be used. The foot valve prevents
the return flow of the water at the end of
the pumping process.
25mm, 32mm or 38mm (inner diameter)
suction hose (11) must be used to achieve
maximum flow rate.
The suction hose (11) should be as short as
possible.
1. Fill suction hose (11) with clean tap water.
2. Apply thread seal tape (Teflon tape, not included)
to the threaded suction hose coupling.
3. Screw the suction hose coupling airthight into
the water inlet (1).
Filling the pump and filter with water (Fig. A, C)
Air in the filter will stop the garden pump
from working properly.
1. Unscrew and remove the air outlet (10) plug.
2. Fill the pump with clean tap water. Do not over-
fill the pump. See the pump manual. Check that
the filter is also filled with water.
3. Place the air outlet (10) plug back, do not over-
tighten.
4. The pre-filter is now ready for use.
4. MAINTENANCE
Cleaning (Fig. A, D)
For optimal performance it is recommended
to regularly change the filter (5) depending
on level of use.
1. Carefully remove the transparant housing (4) by
using a spanner (6).
2. Use a mild soap and water solution to clean the
filter (5) and the transparant housing (4) and
afterwards rinse with clean water.
3. Insert the filter (5) into the transparent housing
(4) and screw the housing onto the top section
(2) by using a spanner (6).
STORAGE AND FROST POTECTION
The pre-filter and accessories that are not completely
drained can be destroyed by frost. Completely drain
the pre-filter and accessories and protect them
against frost.
Keep this appliance in well-ventilated dry premises
with temperature not going below +5°C.
When not in use, keep this appliance stored in a
safe place out of reach of children.

6
DE
WWW.VONROC.COM
WARRANTY
VONROC products are developed to the highest
quality standards and are guaranteed free of
defects in both materials and workmanship for the
period lawfully stipulated starting from the date of
original purchase. Should the product develop any
failure during this period due to defective material
and/or workmanship then contact VONROC directly.
The following circumstances are excluded from this
guarantee:
• Repairs and or alterations have been made
or attempted to the machine by unauthorized
service centers;
• Normal wear and tear;
• The tool has been abused, misused or
improperly maintained;
• Non-original spare parts have been used.
This constitutes the sole warranty made by compa-
ny either expressed or implied. There are no other
warranties expressed or implied which extend
beyond the face hereof, herein, including the im-
plied warranties of merchantability and fitness for
a particular purpose. In no event shall VONROC be
liable for any incidental or consequential damages.
The dealers remedies shall be limited to repair or
replacement of nonconforming units or parts.
The product and the user manual are subject to
change. Specifications can be changed without
further notice.
1. SICHERHEITSHINWEISE
Lesen Sie die beigefügten Sicherheitswarnungen,
die zusätzlichen Sicherheitswarnungen und die
Anweisungen. Die Nichteinhaltung der Sicher-
heitswarnungen und der Anweisungen kann in
einem Stromschlag, Brand und/oder in schweren
Verletzungen resultieren. Bewahren Sie die Sicher-
heitswarnungen und Anweisungen für künftige
Referenzzwecke auf.
Die folgenden Symbole werden im Benutzerhand-
buch oder auf dem Produkt verwendet:
Lesen Sie das Benutzerhandbuch.
Bedeutet, dass bei Nichtbeachtung der
Anweisungen in dieser Anleitung Verletzun-
gen, Tod oder Beschädigung des Werk-
zeugs die Folge sein können.
Nicht zur Verwendung durch Kinder
bestimmt.
Schützen Sie den Vorfilter vor Frost.
SICHERHEITSHINWEISE
DIESES GERÄT DARF VON KINDERN AB 8 JAHREN
UND PERSONEN MIT EINGESCHRÄNKTEN KÖR-
PERLICHEN, SENSORISCHEN ODER GEISTIGEN
FÄHIGKEITEN ODER FEHLENDER ERFAHRUNG UND
KENNTNISSEN BENUTZT WERDEN, WENN SIE IN
SICHERER WEISE BEAUFSICHTIGT ODER EINGEWIE-
SEN WURDEN UND DIE DAMIT VERBUNDENEN GE-
FAHREN VERSTEHEN. KINDER DÜRFEN NICHT MIT
DEM GERÄT SPIELEN. DIE REINIGUNG UND PFLEGE
DURCH DEN BENUTZER DARF VON KINDERN NICHT
OHNE AUFSICHT DURCHGEFÜHRT WERDEN.
Bitte lesen Sie diese Anleitung vor dem Gebrauch
des Geräts sorgfältig und gründlich durch und be-
wahren Sie sie zum späteren Nachschlagen auf. Es
ist sehr wichtig, dass Sie genau verstehen, wie Sie
dieses Gerät sicher verwenden können. Nehmen
Sie sich daher bitte die Zeit, sich mit den Anforde-
rungen in dieser Anleitung vertraut zu machen.
• Wenn Sie Zweifel haben, wie Sie dieses Gerät
richtig verwenden, empfehlen wir Ihnen drin-
gend, die Dienste einer entsprechend qualifi-
zierten Person in Anspruch zu nehmen.

DE
7
WWW.VONROC.COM
• Halten Sie Kinder und Haustiere vom Arbeitsbe-
reich des Geräts fern und erlauben Sie Kindern
niemals, es zu benutzen.
• Das Gerät an einem sicheren Ort außerhalb der
Reichweite von Kindern lagern, wenn es nicht in
Gebrauch ist.
• Lassen Sie das Gerät nie unbeaufsichtigt, wäh-
rend es läuft.
• Der Wasserdruck darf nicht höher als 10bar /
1MPa sein, um Produktschäden zu vermeiden.
• Verwenden Sie den Vorfilter nicht für Trinkwas-
ser.
• Die Temperatur der geförderten Flüssigkeit darf
35°C nicht überschreiten.
2. PRODUKTINFORMATIONEN
Der Pumpenvorfilter ist zur Bewässerung privater
Gärten über das Leitungswassersystem vorge-
sehen, er ist nicht zur gewerblichen Verwendung
bestimmt.
Er ist nur für klares Wasser und Regenwasser
bestimmt.
Modellnr. GP807AA
Anwendung Vorfilterung von Wasser
(Saugseite der Pumpe)
Filterelementhöhe 12 cm
Maximaler Betriebsdruck 10 bar / 1 MPA
Maschenbreite 0,15 mm
Max. Wassertemperatur 35°C
Wasserzulaufanschluss G1"-Innengewinde
Wasserablaufanschluss G1"-Innengewinde
Größe der Gewindekupplung G1"-Außengewinde
Ersatz-Vorfilter GP809AA
Gewicht 0,7 kg
BESCHREIBUNG
Die Zahlen im Text beziehen sich auf die Abbildun-
gen auf den Seiten 2-3.
1. Wasserzulauf
2. Oberteil
3. Wasserablauf
4. Transparentes Gehäuse
5. Filter
6. Schraubenschlüssel
7. Kupplungen
8. Schrauben
9. Wandhalterung
10. Stopfen (Luftauslass)
11. Saugschlauch (nicht enthalten)
3. INSTALLATION
Installation des Filters (Abb. A, B, C)
1. Setzen Sie den Filter (5) in das transparente Ge-
häuse (4) ein und schrauben Sie das Gehäuse
dann mit Hilfe eines Schraubenschlüssels (6)
auf das Oberteil (2).
2. Bringen Sie an der Gewindekupplung (7) Gewin-
dedichtungsband (Teflon-Band) an.
3. Schrauben Sie die Kupplung (7) luftdicht in den
Filterauslass (3), siehe AbbildungB1.
4. Wenn die Kupplung des Saugschlauchs (11)
ein Innengewinde hat, wird eine zusätzliche
Kupplung (7) benötigt. Bringen Sie an der
Gewindekupplung (7) Gewindedichtungsband
(Teflon-Band, nicht enthalten) an.
5. Schrauben Sie die Kupplung (7) luftdicht in den
Filtereinlass (1), siehe AbbildungB2.
6. Schrauben Sie den Vorfilter luftdicht auf
den Wasserzulauf der Gartenpumpe, siehe
AbbildungC. Wenn der Filter dabei den Boden
erreicht, empfiehlt es sich, einen Holzklotz zwi-
schen Pumpe und Boden zu legen. Die Füße der
Pumpe können mit dem Holzklotz verschraubt
werden.
Wandhalterung (Abb. A, C)
Die mitgelieferte Wandhalterung ermöglicht die
Befestigung des Filters an einem Mast oder an
einer Wand.
1. Setzen Sie die Wandhalterung (9) auf das Ober-
teil (2).
2. Montieren Sie die Wandhalterung (9), indem Sie
die vier Schrauben (8) festziehen.
3. Montieren Sie die Wandhalterung (9) an einem
Mast oder an einer Wand, indem Sie zwei
Schrauben oder Bolzen (nicht enthalten) fest-
ziehen.
Anbringen des Saugschlauchs (Abb. A, C)
Bringen Sie an der Saugseite keine
Verbindungsstücke für Schlauchanschluss-
systeme oder Standardwasserschläuche an!
Es muss ein Saugschlauchset (11) mit
passendem Kupplungsstück (G1"-Gewinde)

8
DE
WWW.VONROC.COM
und Fußventil verwendet werden. Das
Fußventil verhindert das Zurückfließen des
Wassers am Ende des Pumpvorgangs.
Ein Saugschlauch mit 25mm, 32mm oder
38mm Innendurchmesser (11) sollte
verwendet werden, um die maximale Durch-
flussrate zu erreichen.
Der Saugschlauch (11) sollte möglichst kurz
sein.
1. Den Saugschlauch (11) mit sauberem Leitungs-
wasser füllen.
2. Bringen Sie am Gewindeteil der Saugschlauch-
kupplung Dichtungsband (Teflon-Band, nicht
enthalten) an.
3. Schrauben Sie die Saugschlauchkupplung luft-
dicht in den Wasserzulauf (1).
Füllen von Pumpe und Filter mit Wasser (Abb. A, C)
Luft im Filter verhindert, dass die Garten-
pumpe ordnungsgemäß funktioniert.
1. Schrauben Sie den Luftauslassstopfen (10) ab
und legen Sie ihn beiseite.
2. Füllen Sie die Pumpe mit sauberem Leitungs-
wasser. Dabei die Pumpe nicht überfüllen.
Pumpenhandbuch beachten. Achten Sie darauf,
dass auch der Filter mit Wasser gefüllt ist.
3. Den Luftauslassstopfen (10) wieder anbringen,
dabei nicht zu fest anziehen.
4. Der Vorfilter ist jetzt einsatzbereit.
4. WARTUNG
Reinigung (Abb. A, D)
Für eine optimale Leistung wird empfohlen,
den Filter (5) je nach Nutzungsgrad
regelmäßig zu wechseln.
1. Entfernen Sie das transparente Gehäuse (4)
vorsichtig mit einem Schraubenschlüssel (6).
2. Reinigen Sie den Filter (5) und das transparente
Gehäuse (4) mit einer milden Seifenlauge und
spülen Sie anschließend mit sauberem Wasser
nach.
3. Setzen Sie den Filter (5) in das transparente Ge-
häuse (4) ein und schrauben Sie das Gehäuse
dann mit Hilfe eines Schraubenschlüssels (6)
auf das Oberteil (2).
LAGERUNG UND FROSTSCHUTZ
Wenn Flüssigkeiten nicht vollständig aus dem Vor-
filter und dem Zubehör abgelassen werden, können
sie durch Frost zerstört werden.
Entleeren Sie Vorfil-
ter und Zubehör daher vollständig und schützen Sie
sie vor Frost.
Bewahren Sie das Gerät an einem gut belüfteten,
trockenen Ort auf, an dem die Temperatur nicht
unter +5°C fällt.
Das Gerät an einem sicheren Ort außerhalb der
Reichweite von Kindern lagern, wenn es nicht in
Gebrauch ist.
GARANTIE
VONROC-Produkte werden nach den höchsten
Qualitätsstandards entwickelt und sind für den
gesetzlich festgelegten Zeitraum ab dem Datum
des ursprünglichen Kaufs garantiert frei von Mate-
rial- und Verarbeitungsfehlern. Sollte das Produkt
während dieses Zeitraums aufgrund von Material-
und/oder Verarbeitungsfehlern ausfallen, wenden
Sie sich bitte direkt an VONROC.
Folgende Umstände sind aus der Garantie ausge-
schlossen:
• An der Maschine wurden von nicht autorisierten
Servicestellen Reparaturen und/oder Änderun-
gen vorgenommen oder versucht;
• Normaler Verschleiß;
• Das Gerät wurde missbräuchlich oder falsch
verwendet oder unsachgemäß gewartet;
• Es wurden keine Originalersatzteile verwendet.
Dies ist die einzige ausdrückliche oder stillschwei-
gende Garantie, die das Unternehmen übernimmt.
Es gibt keine weiteren ausdrücklichen oder still-
schweigenden Garantien, die über die hierin ent-
haltenen Angaben hinausgehen, einschließlich der
stillschweigenden Garantien der Gebrauchstaug-
lichkeit und Eignung für einen bestimmten Zweck.
VONROC haftet in keinem Fall für zufällige Schäden
oder Folgeschäden. Die Rechtsmittel des Händlers
beschränken sich auf die Reparatur oder den Aus-
tausch der nicht konformen Geräte oder Teile.
Das Produkt und die Bedienungsanleitung können
Änderungen unterliegen. Technische Daten können
ohne vorherige Ankündigung geändert werden.

NL
9
WWW.VONROC.COM
1. VEILIGHEIDSINSTRUCTIES
Lees de bijgesloten veiligheidswaarschuwingen,
de aanvullende veiligheidswaarschuwingen en de
instructies. Geeft ugeen gevolg aan de veiligheids-
waarschuwingen en de instructies dan kan dat een
elektrische schok, brand en/of ernstig letsel tot
gevolg hebben. Bewaar de veiligheidswaarschu-
wingen en de instructies zodat uze later ook nog
kunt raadplegen.
De volgende symbolen worden gebruikt in de ge-
bruiksaanwijzing of op het product:
Lees de gebruiksaanwijzing.
Duidt op risico op persoonlijk letsel, gevaar
van een ongeluk met dodelijke afloop of
beschadiging van het gereedschap als de
instructies in deze handleiding niet worden
opgevolgd.
Niet bedoeld voor gebruik door kinderen.
Bescherm de voorfilter tegen vorst.
VEILIGHEIDSWAARSCHUWINGEN
DIT APPARAAT MAG WORDEN GEBRUIKT DOOR
KINDEREN VANAF 8 JAAR EN DOOR PERSONEN
MET VERMINDERDE LICHAMELIJKE, ZINTUIGLIJKE
OF GEESTELIJKE VERMOGENS, OF MET EEN GE-
BREK AAN ERVARING EN KENNIS, MITS ZIJ ONDER
TOEZICHT STAAN OF GEÏNSTRUEERD ZIJN BETREF-
FENDE HET VEILIG GEBRUIK VAN HET APPARAAT
EN ZICH BEWUST ZIJN VAN DE ERMEE VERBON-
DEN RISICO’S. KINDEREN MOGEN NIET MET HET
APPARAAT SPELEN. REINIGING EN GEBRUIKERSON-
DERHOUD MOGEN NIET DOOR KINDEREN ZONDER
TOEZICHT WORDEN UITGEVOERD.
Lees voor udit apparaat in gebruik neemt, deze in-
structies aandachtig en grondig door, en bewaar ze
voor toekomstig gebruik. Het is zeer belangrijk dat
ubegrijpt hoe udit apparaat veilig moet gebruiken,
neem dus de tijd om kennis te nemen van de eisen
zoals deze in deze instructies uiteen worden gezet.
• Als uop welke manier dan ook twijfelt over het
gebruiken van dit apparaat, adviseren wij uten
zeerste de diensten van een geschikte persoon
met de juiste kwalificaties in te roepen.
• Houd kinderen en huisdieren op voldoende af-
stand van het werkgebied en laat nooit kinderen
dit apparaat gebruiken.
• Berg het apparaat, wanneer uhet niet gebruikt,
op buiten bereik van kinderen.
• Laat het apparaat nooit onbeheerd achter wan-
neer het in gebruik is.
• De waterdruk mag niet hoger zijn dan 10 bar/
1 MPa, om beschadiging van het product te
voorkomen.
• Gebruik de voorfilter niet voor drinkwater.
• De temperatuur van de vloeistof die wordt
gepompt mag niet hoger zijn dan 35 °C.
2. PRODUCTINFORMATIE
De voorflter van de pomp is bedoeld voor parti-
culier gebruik voor huishoudelijk watertoevoer en
de irrigatie van tuinen, het is niet bestemd voor
commercieel gebruik.
Het is uitsluitend ontworpen en bestemd voor
schoon water en regenwater.
Modelnr. GP807AA
Toepassing Het voorfilteren van water
(zuigzijde van de pomp)
Hoogte van het filterelement 12 cm
Max. operationele druk 10 bar / 1 MPA
Maaswijdte 0,15 mm
Max. watertemperatuur 35 °C
Aansluiting watertoevoer G1" interne schroefdraad
Aansluiting waterafvoer G1" interne schroefdraad
Afmeting schroefdraadaan-
sluiting G1" externe schroefdraad
Vervanging voorfilter GP809AA
Gewicht 0,7 kg
BESCHRIJVING
De nummers in deze tekst verwijzen naar de di-
agrammen op pagina 2-3.
1. Water-ingang
2. Motorbehuizing
3. Water-uitgang
4. Transparante behuizing
5. Filter
6. Moersleutel

10
NL
WWW.VONROC.COM
7. Koppelingen
8. Schroeven
9. Wandbeugel
10. Plug (luchtafvoer)
11. Zuigslang (niet meegeleverd)
3. INSTALLEREN
Filter installeren (Afb. A, B, C)
1. Plaats de filter (5) in de transparante behuizing
(4) en schroef de behuizing m.b.v. een moer-
sleutel (6) op het bovenste gedeelte (2).
2. Breng schroefdraadtape (Teflon tape) aan op de
schroefdraadaansluiting (7).
3. Schroef de koppeling (7) luchtdicht in de filter-
afvoer (3), zoals weergegeven in afbeelding B1.
4. Als de koppeling van de zuigslang (11) een
binnendraad heeft, is een extra koppeling (7)
vereist. Breng schroefdraadtape (Teflon tape,
niet meegeleverd) aan op de schroefdraadaan-
sluiting (7).
5. Schroef de koppeling (7) luchtdicht in de filter-
toevoer (1), zoals weergegeven in afbeelding
B2.
6. Schroef de voorfilter luchtdicht op de water-
toevoer van de waterpomp voor de tuin, zoals
weergegeven in afbeelding C. Als de filter de
grond raakt, wordt geadviseerd om een houten
blok tussen de pomp en de grond aan te bren-
gen. De basis van de pomp kan aan het houten
blok worden bevestigd.
Muurbeugel (Afb. A, C)
De meegeleverde muurbeugel maakt het mogelijk
om de filter op een paal of op de muur te bevesti-
gen.
1. Bevestig de muurbeugel (9) aan het bovenste
gedeelte (2).
2. Monteer de muurbeugel (9) door de vier schroe-
ven (8) aan te draaien.
3. Monteer de muurbeugel (9) op een paal of muur
door het met twee schroeven of bouten (niet
meegeleverd) te bevestigen.
De zuigslang bevestigen (Afb. A, C)
Gebruik aan de zuigzijde geen bevestigin-
gen van een systeem voor slangaansluitin-
gen of standaard waterslangen!! Een
zuigslangset (11) met een daarvoor
geschikte koppeling (G1" schroefdraad) en
voetklep moeten worden gebruikt. De
voetklep voorkomt het terugstromen van
het water aan het einde van het pomppro-
ces.
Een zuigslang (11) met een binnendiameter
van 25 mm, 32 mm of 38 mm moet worden
gebruikt om de maximale doorstroomsnel-
heid te realiseren.
De zuigslang (11) dient zo kort mogelijk te
zijn.
1. Vul de zuigslang (11) met schoon kraanwater.
2. Breng schroefdraadtape (Teflon tape, niet mee-
geleverd) aan op de schroefdraadaansluiting
van de zuigslang.
3. Schroef de zuigslangaansluiting luchtdicht op
de watertoevoer (1).
De pomp en filter vullen met water (Afb. A, C)
Lucht in de filter, zal het goed functioneren
van de waterpomp voor de tuin stoppen
resp. hinderen.
1. Schroef de plug van de luchtafvoer (10) los en
verwijder het.
2. Vul de pomp met schoon kraanwater. De pomp
niet.bovenmatig vullen. Zie de handleiding van
de pomp. Controleer of de filter ook is gevuld
met water.
3. Plaats de plug van de luchtafvoer (10) weer
terug, niet te krachtig vastdraaien.
4. De voorfilter is nu gereed voor gebruik.
4. ONDERHOUD
Reinigen (Afb. A, D)
Voor de beste prestaties raden wij aan om
het filter (5) regelmatig te vervangen,
hetgeen afhankelijk is van de frequentie van
het gebruik.
1. Verwijder de transparante behuizing (4) voor-
zichtig m.b.v. een moersleutel (6).
2. Gebruik milde zeep en water om de filter (5) en
de transparante behuizing (4) te reinigen en
spoel het daarna af met schoon water.
3. Plaats de filter (5) in de transparante behuizing
(4) en schroef de behuizing m.b.v. een moer-
sleutel (6) op het bovenste gedeelte (2).

NL
11
WWW.VONROC.COM
OPSLAG EN BESCHERMING TEGEN VORST
De voorfilter en accessoires die nog resterend water
bevatten,
kunnen door vorst onherstelbaar worden
beschadigd. Laat al het water uit de voorfilter en
accessoires lopen en bescherm hen tegen vorst.
Berg het apparaat op in een goed geventileerde,
droge ruimte waar de temperatuur niet daalt onder
+5°C.
Berg het apparaat, wanneer uhet niet gebruikt, op
buiten bereik van kinderen.
GARANTIE
Producten van VONROC worden op basis van de
hoogste kwaliteitsnormen ontwikkeld en zijn gega-
randeerd vrij van defecten, zowel voor wat betreft
het materiaal als de afwerking, gedurende de door
de wet bepaalde periode, startend vanaf de datum
van de originele aankoop. Mocht het product
gedurende deze periode enige storingen vertonen
als gevolg van gebrekkig materiaal en/of gebrek-
kige afwerking, dient direct contact met VONROC
opgenomen te worden.
De volgende omstandigheden zijn uitgesloten van
de garantie:
• Reparatie en/of wijzigingen die door en niet
erkend servicecentrum aan de machine werd/
werden aangebracht of waartoe een poging
werd ondernomen;
• Normale slijtage;
• Het gereedschap werd misbruikt, verkeerd werd
gebruikt en/of onjuist werd onderhouden.
• Niet-originele reserveonderdelen werden ge-
bruikt.
Dit betreft de enige garantie die door de organi-
satie, impliciet of expliciet, wordt aangeboden.
Geen andere garanties, impliciet noch expliciet,
die verder strekken dan deze garantie, inclusief
de impliciete garanties inzake de verkoopbaarheid
en geschiktheid voor een specifiek doel. In geen
geval zal VONROC aansprakelijk zijn voor inciden-
tele schade of gevolgschade. De oplossingen van
de dealers zullen beperkt zijn tot de reparatie of
het vervangen van niet-conforme eenheden of
onderdelen.
Het product en de gebruiksaanwijzing kunnen
worden gewijzigd. Specificaties kunnen zonder
voorafgaande kennisgeving worden gewijzigd.

12
FR
WWW.VONROC.COM
1. CONSIGNES DE SÉCURITÉ
Veuillez lire les avertissements de sécurité, les
avertissements supplémentaires de sécurité ainsi
que toutes les instructions jointes. Le non-respect
des avertissements de sécurité et des instructions
peut entraîner des chocs électriques, des incendies
et/ou de graves blessures. Conservez tous les aver-
tissements de sécurité et toutes les instructions
afin de pouvoir vous yréférer dans le futur.
Les symboles qui suivent sont utilisés dans le
manuel d'utilisation ou sur le produit :
Lisez le manuel d'utilisation.
Indique un risque de blessure, de décès ou
de détérioration de l'outil en cas de
non-respect des consignes de ce manuel.
Utilisation par les enfants interdite.
Protégez le préfiltre du gel.
AVERTISSEMENTS LIÉS À LA SÉCURITÉ
CET APPAREIL PEUT ÊTRE UTILISÉ PAR DES
ENFANTS ÂGÉS DE 8 ANS ET PLUS ET PAR DES
PERSONNES AUX CAPACITÉS PHYSIQUES, SENSO-
RIELLES OU INTELLECTUELLES RÉDUITES, OU QUI
MANQUENT D'EXPÉRIENCE ET DE CONNAISSANCES,
À CONDITION QU'ILS SOIENT SUPERVISÉS OU QU'ILS
AIENT ÉTÉ FORMÉS SUR LA FAÇON SÛRE D'UTILISER
L'APPAREIL ET QU'ILS COMPRENNENT LES RISQUES
ENCOURUS. LES ENFANTS NE DOIVENT PAS JOUER
AVEC L'APPAREIL. LE NETTOYAGE ET LES OPÉRA-
TIONS DE MAINTENANCE NE DOIVENT PAS ÊTRE
EXÉCUTÉS PAR DES ENFANTS SANS SURVEILLANCE.
Veillez àlire soigneusement l'intégralité de ces
consignes avant d'utiliser l'appareil et àles conser-
ver pour pouvoir vous yréférer dans le futur. Il est
très important que vous compreniez comment
utiliser ce produit de façon sûre, merci donc de
veiller àprendre le temps nécessaire pour vous
familiariser avec les prescriptions mentionnées
dans ces instructions.
• Si vous avez le moindre doute quant àl'utili-
sation de cet appareil, nous vous conseillons
fortement de faire appel aux services d'une
personne qualifiée.
• Veillez àmaintenir les enfants et les animaux
domestiques àl'écart de la zone d'utilisation et
ne laissez jamais les enfants utiliser cet appa-
reil.
• Lorsqu’il n’est pas utilisé, rangez cet appareil
dans un endroit sûr, hors de portée des enfants.
• Ne laissez jamais l'appareil sans surveillance
pendant son utilisation.
• La pression de l'eau ne doit pas dépasser
10bars / 1 MPa afin de ne pas endommager le
produit.
• N'utilisez pas le préfiltre pour filtrer de l'eau
potable.
• La température du liquide pompé ne doit pas
dépassée 35 °C.
2. INFORMATIONS SUR LE PRODUIT
Le préfiltre de pompe est destiné àun usage privé
pour l'approvisionnement en eau des maisons et
pour l'irrigation des jardins, il n'est pas destiné àun
usage commercial.
Il est uniquement destiné àservir avec de l'eau
claire et de l'eau de pluie.
N° de modèle GP807AA
Application Préfiltre àeau (côté aspira-
tion de la pompe)
Hauteur de l'élément filtrant 12 cm
Pression de service maxi 10 bars / 1 MPA
Largeur du maillage 0,15 mm
Température de l'eau maxi 35°C
Raccord d'arrivée d'eau Filetage intérieur G1"
Raccord de sortie d'eau Filetage intérieur G1"
Taille du raccord fileté Filetage extérieur G1"
Préfiltre de rechange GP809AA
Poids 0,7 kg
PRÉSENTATION
Les numéros dans le texte renvoient aux dia-
grammes des pages 2 à3.
1. Arrivée d'eau
2. Section haute
3. Sortie d'eau
4. Corps transparent
5. Filtre

FR
13
WWW.VONROC.COM
6. Clé
7. Raccords
8. Vis
9. Équerre murale
10. Bouchon (sortie d'air)
11. Tuyau d'aspiration (non fourni)
3. INSTALLATION
Installer le filtre (Fig. A, B, C)
1. Insérez le filtre (5) dans le corps transparent
(4) et vissez le corps dans la partie haute (2)
àl'aide d'une clé (6).
2. Appliquez du ruban d'étanchéité pour filetage
(bande en téflon) sur le raccord fileté (7).
3. Vissez le raccord (7) de façon hermétique dans
la sortie du filtre (3), comme illustré par la
figure B1.
4. Si le raccord du tuyau d'aspiration (11) dispose
d'un raccord femelle, un adaptateur (7) est
nécessaire. Appliquez du ruban d'étanchéité
pour filetage (bande en téflon, non fournie) sur
le raccord fileté (7).
5. Vissez le raccord (7) de façon hermétique
sur l'arrivée d'eau (1), comme illustré par la
figureB2.
6. Vissez le préfiltre de façon hermétique sur l'arri-
vée d'eau de la pompe de jardin, comme illustré
par la figure C. Si le filtre touche le sol, il est
recommandé d'utiliser une cale en bois entre la
pompe et le sol. Il est possible de boulonner les
pieds de la pompe dans un bloc de bois.
Équerre murale (Fig. A, C)
L'équerre murale fournie permet de fixer le filtre sur
un poteau ou un mur.
1. I nstallez l'équerre murale (9) sur la partie haute
(2).
2. Fixez l'équerre murale (9) en serrant les quatre
vis (8).
3. Installez l'équerre murale (9) sur un poteau ou
un mur àl'aide de deux vis ou de deux boulons
(non fournis).
Installer le tuyau d'aspiration (Fig.A, C)
N'utilisez aucun raccord de tuyau ou tuyau
d'eau standard côté aspiration! Il faut
utiliser un tuyau d'aspiration (11) doté d’un
raccord approprié (filetage G1") et un
clapet de pied. Le clapet de pied empêche
le retour de l'eau àla fin du cycle de
pompage.
Pour que le débit soit maximum, un tuyau
d'aspiration (11) de 25mm, 32mm ou
38mm (diamètre intérieur) doit être utilisé.
Le tuyau d'aspiration (11) doit être aussi
court que possible.
1. Remplissez le tuyau d'aspiration (11) d'eau du
robinet propre.
2. Appliquez du ruban d'étanchéité pour filetage
(bande en téflon, non fournie) sur le raccord
fileté du tuyau d'aspiration.
3. Vissez le raccord du tuyau d'aspiration de façon
hermétique dans l'arrivée d'eau (1).
Remplir la pompe et le filtre d’eau (Fig.A, C)
La présence d'air dans le filtre empêche la
pompe de fonctionner correctement.
1. Dévissez et retirez le bouchon de sortie d'air
(10).
2. Remplissez la pompe d'eau du robinet propre.
Ne remplissez pas trop la pompe. Consultez la
notice de la pompe. Contrôlez que le filtre soit
également rempli d'eau.
3. Réinstallez le bouchon de sortie d'air (10) sans
trop le serrer.
4. Le préfiltre est alors prêt àl'emploi.
4. MAINTENANCE
Nettoyage (Fig. A, D)
Pour que les performances restent
optimales, il est recommandé de remplacer
le filtre (5) régulièrement, en fonction de
l'utilisation.
1. Retirez le corps transparent (4) avec soin
àl'aide d'une clé (6).
2. Utilisez une solution àbase d'eau et de savon
doux pour laver le filtre (5) et le corps transpa-
rent (4) avant de les rincer àl'eau claire.
3. Insérez le filtre (5) dans le corps transparent
(4) et vissez le corps dans la partie haute (2)
àl'aide d'une clé (6).

14
ES
WWW.VONROC.COM
RANGEMENT ET PROTECTION CONTRE LE
GEL
Le préfiltre et les accessoires peuvent être endom-
magés par le gel s'ils ne sont pas complètement
vidangés. Veillez àparfaitement vidanger le pré-
filtre et les accessoires et àles protéger du gel.
Conservez l'appareil dans un local bien aéré où la
température ne descend pas en dessous de +5°C.
Lorsqu’il n’est pas utilisé, rangez cet appareil dans
un endroit sûr, hors de portée des enfants.
GARANTIE
Les produits VONROC sont développés avec les
normes de qualité les plus hautes et ils sont
garantis pour être exempts de défaut de pièces et
de main d'œuvre pour la durée stipulée par la loi et
àcompter de la date d'achat initiale. Si, au cours
de cette période, le produit devait rencontrer une
quelconque panne due àun défaut de pièce ou de
main d'œuvre, contactez VONROC directement.
Les conditions suivantes sont exclues de la garan-
tie :
• Réparations ou modifications sur la machine,
faites ou tentées par des réparateurs non
agréés ;
• Usure normale ;
• Utilisation abusive ou incorrecte ou mainte-
nance incorrecte de l'outil ;
• Utilisation de pièces détachées non d'origine.
Ce qui précède représente l'unique garantie, expli-
cite ou implicite, proposée par la société. Il n'existe
aucune autre garantie, explicite ou implicite, qui
puisse dépasser le cadre de la présente garantie,
ycompris les garanties implicites de qualité mar-
chande et d'adaptation àun usage particulier. En
aucun cas, VONROC ne saurait être tenu respon-
sable pour les dommages accidentels ou consécu-
tifs. Les recours des revendeurs sont limités àla
réparation ou au remplacement des équipements
ou des pièces non conformes.
Le produit et la notice d'utilisation sont sujets
àmodifications. Les caractéristiques peuvent être
modifiées sans notification préalable.
1. INSTRUCCIONES DE SEGURIDAD
Lea las advertencias de seguridad, las advertencias
de seguridad adicionales y las instrucciones adjun-
tas. Si no respeta las advertencias de seguridad y
las instrucciones, pueden ocasionarse descargas
eléctricas, incendios y/o lesiones graves. Guarde
las advertencias de seguridad y las instrucciones
para su futura consulta.
En el manual de usuario y en el producto se em-
plean los siguientes símbolos:
Lea el manual de usuario.
Denota riesgo de lesiones personales,
muerte o daños a la herramienta en caso de
incumplimiento de las instrucciones del
presente manual.
No previsto para ser utilizado por niños.
Proteja el prefiltro contra las heladas.
ADVERTENCIAS DE SEGURIDAD
ESTE APARATO PUEDE SER UTILIZADO POR NIÑOS A
PARTIR DE 8 AÑOS DE EDAD Y POR PERSONAS CON
CAPACIDADES FÍSICAS, SENSORIALES O MENTALES
REDUCIDAS O QUE CAREZCAN DE EXPERIENCIA
Y CONOCIMIENTOS, SI ESTÁN SUPERVISADAS O
CAPACITADAS SOBRE EL USO DEL APARATO DE
MODO SEGURO Y SI COMPRENDEN LOS PELIGROS
QUE SUPONE. LOS NIÑOS NO DEBEN JUGAR CON EL
APARATO. LA LIMPIEZA Y EL MANTENIMIENTO DE
USUARIO NO DEBEN SER EFECTUADOS POR NIÑOS
NO SUPERVISADOS.
Lea detenidamente todas estas instrucciones antes
de usar el aparato y guárdelas para futuras con-
sultas. Es muy importante que entienda cómo usar
este aparato en modo seguro; para ello, tómese el
tiempo necesario para familiarizarse con los requi-
sitos indicados en estas instrucciones.
• Si tiene alguna duda sobre el uso del aparato, le
recomendamos encarecidamente que consulte
a una persona debidamente cualificada.
• Mantenga a los niños y a las mascotas alejados
del área de trabajo, y nunca permita que los
niños usen este aparato.

ES
15
WWW.VONROC.COM
• Cuando no use el aparato, guárdelo en un lugar
seguro, fuera del alcance de los niños.
• Nunca deje el aparato sin vigilancia cuando
esté funcionando.
• La presión del agua de servicio no debe ser
superior a 10 bar/ 1 MPa, para no dañar el
producto.
• No use el prefiltro para el agua potable.
• La temperatura del líquido transportado no pue-
de superar los 35 °C.
2. INFORMACIÓN SOBRE EL
PRODUCTO
El prefiltro para la bomba está destinado a uso
privado, para el suministro de agua doméstica y
el riego de jardines, y no ha sido previsto para uso
comercial.
Ha sido concebido para usar únicamente con agua
limpia y de lluvia.
Modelo n.º GP807AA
Aplicación Prefiltrado del agua (lado
de aspiración de la bomba)
Altura del elemento filtrante 12 cm
Presión de servicio máx. 10 bar / 1 MPA
Ancho de malla 0,15 mm
Temperatura máx. agua 35 °C
Conexión entrada de agua Rosca interna G1"
Conexión salida de agua Rosca interna G1"
Tamaño acoplamiento
roscado Rosca externa G1"
Prefiltro de repuesto GP809AA
Peso 0.7 kg
DESCRIPCIÓN
Los números del texto se refieren a los diagramas
de las páginas 2-3.
1. Entrada de agua
2. Parte superior
3. Salida de agua
4. Carcasa transparente
5. Filtro
6. Llave
7. Acoplamientos
8. Tornillos
9. Soporte de pared
10. Tapón (salida de aire)
11. Manguera de aspiración (no incluida)
3. INSTALACIÓN
Instalación del filtro (Fig. A, B, C)
1. Inserte el filtro (5) en la carcasa transparente
(4) y atornille la carcasa en la parte superior (2)
utilizando una llave (6).
2. Aplique cinta de sellado de roscas (cinta de
teflón) en el acoplamiento roscado (7).
3. Enrosque el acoplamiento estanco (7) en la
salida del filtro (3), como se muestra en la figu-
raB1.
4. Si el acoplamiento de la manguera de aspira-
ción (11) tiene una rosca hembra, se necesita
un acoplamiento adicional (7). Aplique cinta de
sellado de roscas (cinta de teflón, no suminis-
trada) en el acoplamiento roscado (7).
5. Enrosque el acoplamiento estanco (7) en la
entrada del filtro (1), como se muestra en la
figuraB2.
6. Atornille el prefiltro estanco en la entrada de
agua de la bomba de jardín, como se muestra
en la figura C. Si el filtro toca el suelo, se reco-
mienda colocar un bloque de madera entre la
bomba y el suelo. Los pies de la bomba pueden
atornillarse al bloque de madera.
Soporte de pared (Fig. A, C)
Usando el soporte de pared suministrado se puede
fijar el filtro a un poste o a la pared.
1. Coloque el soporte de pared (9) en la parte
superior (2).
2. Monte el soporte de pared (9) utilizando los
cuatro tornillos (8).
3. Monte el soporte de pared (9) en un poste o
pared colocando y apretando dos tornillos o
pernos (no suministrados).

16
ES
WWW.VONROC.COM
Colocación de la manguera de aspiración
(Fig.A,C)
No utilice ningún accesorio del sistema de
conexión de la manguera ni mangueras de
agua estándar en el lado de aspiración.
Debe utilizarse un juego de manguera de
aspiración (11) con un acoplamiento
adecuado (rosca G1") y una válvula de
aspiración. La válvula de aspiración impide
el retorno del agua al final del proceso de
bombeo.
Para obtener el máximo caudal, debe
utilizarse una manguera de aspiración (11)
de 25 mm, 32 mm o 38 mm (diámetro
interior).
La manguera de aspiración (11) debe ser lo
más corta posible.
1. Llene la manguera de aspiración (11) con agua
corriente limpia.
2. Aplique cinta de sellado de roscas (cinta de
teflón, no suministrada) en el acoplamiento
roscado de la manguera de aspiración.
3. Atornille el acoplamiento estanco de la man-
guera de aspiración en la entrada de agua (1).
Llenado de la bomba y del filtro con agua (Fig. A, C)
Si el filtro tiene aire, la bomba de jardín no
funcionará correctamente.
1. Desenrosque y saque el tapón de salida de aire
(10).
2. Llene la manguera de aspiración con agua
corriente limpia. No llene excesivamente la
bomba. Consulte el manual de la bomba. Com-
pruebe también que el filtro esté lleno de agua.
3. Vuelva a poner el tapón de aire (10), sin apre-
tarlo demasiado.
4. El prefiltro ya está listo para usar.
4. MANTENIMIENTO
Limpieza (Fig. A, D)
Para conseguir el máximo rendimiento, se
recomienda cambiar el filtro (5) periódica-
mente, según la intensidad de uso.
1. Retire con cuidado la carcasa transparente (4)
utilizando una llave (6).
2. Utilice una solución de agua con jabón suave
para limpiar el filtro (5) y la carcasa transparen-
te (4) y después enjuáguelos con agua limpia.
3. Inserte el filtro (5) en la carcasa transparente
(4) y atornille la carcasa en la parte superior (2)
utilizando una llave (6).
ALMACENAMIENTO Y PROTECCIÓN CONTRA
EL HIELO
El prefiltro y los accesorios que no estén totalmente
drenados pueden destruirse con las heladas. Drene
totalmente el prefiltro y los accesorios para prote-
gerlos contra el hielo.
Guarde el aparato en un lugar bien ventilado y seco
en el que la temperatura no sea inferior a +5°C.
Cuando no use el aparato, guárdelo en un lugar
seguro, fuera del alcance de los niños.
GARANTÍA
Los productos VONROC han sido fabricados con los
estándares de calidad más elevados y garantiza-
mos que están exentos de defectos relacionados
con los materiales y la mano de obra durante el
período legalmente establecido a partir de la fecha
de compra original. Si el producto presenta algún
fallo durante este periodo de los materiales y/o la
mano de obra, póngase en contacto directamente
con VONROC.
Las siguientes circunstancias están excluidas de
esta garantía:
• Si se han realizadas o se ha intentado realizar
reparaciones o alteraciones en la máquina por
parte de centros de servicio no autorizados;
• Desgaste normal;
• La herramienta ha sido usada impropiamente,
mal utilizada o mantenida incorrectamente;
• Si se han utilizado piezas de repuesto no origi-
nales.
Esta constituye la única garantía, expresa e
implícita, ofrecida por la empresa. No existen
otras garantías expresas o implícitas distintas a la
especificada en el presente documento, incluidas
las garantías implícitas de comerciabilidad y de
adecuación a un propósito particular. VONROC

IT
17
WWW.VONROC.COM
no será responsable bajo ninguna circunstancia
de ningún daño incidental o consecuente. Los
recursos de los distribuidores están limitados a la
reparación o sustitución de las unidades o piezas
no conformes.
El producto y el manual de usuario están sujetos a
variaciones. Las especificaciones pueden variarse
sin aviso previo.
1. ISTRUZIONI DI SICUREZZA
Leggere le avvertenze di sicurezza contenute in
questo manuale, le avvertenze di sicurezza aggiun-
tive ele istruzioni. La mancata osservanza delle
avvertenze eistruzioni di sicurezza potrebbe dar
luogo ascosse elettriche, incendi e/olesioni per-
sonali gravi. Conservare le avvertenze di sicurezza
ele istruzioni per riferimenti futuri.
Isimboli riportati di seguito vengono utilizzati all'in-
terno del manuale per l'utilizzatore oppure sono
indicati sul prodotto:
Leggere il manuale per l'utilizzatore.
Denota il rischio di lesioni personali, morte
odanni all'apparecchio in caso di mancata
osservanza delle istruzioni contenute in
questo manuale.
Prodotto non concepito per l'uso da parte
dei bambini.
Proteggere il pre-filtro dal gelo.
AVVERTENZE DI SICUREZZA
QUESTO APPARECCHIO PUÒ ESSERE UTILIZZATO DA
BAMBINI DAGLI 8 ANNI IN SU EDA PERSONE CON
CAPACITÀ FISICHE, SENSORIALI OMENTALI RIDOTTE
OINESPERTE, PURCHÉ ESSI SIANO SORVEGLIATI
OISTRUITI IN MERITO ALL’USO DELL’APPARECCHIO
IN SICUREZZA ECOMPRENDANO IPERICOLI INE-
RENTI. ACCERTARSI CHE IBAMBINI NON GIOCHINO
CON L’APPARECCHIO. GLI INTERVENTI DI PULIZIA
EMANUTENZIONE DELL'APPARECCHIO DA PARTE
DELL'UTILIZZATORE NON DEVONO ESSERE ESEGUITI
DA BAMBINI SENZA SUPERVISIONE.
Prima di utilizzare questo apparecchio, leggere
attentamente eafondo queste istruzioni econ-
servarle per riferimento futuro. È molto importante
comprendere come utilizzare questo apparecchio
in sicurezza; pertanto, invitiamo aprendersi il
tempo necessario per acquisire familiarità con
irequisiti descritti in queste istruzioni.
• Per qualsiasi dubbio sull'utilizzo di questo ap-
parecchio, consigliamo vivamente di rivolgersi
aun professionista in possesso delle compe-
tenze necessarie.

18
IT
WWW.VONROC.COM
• Tenere ibambini egli animali domestici adebita
distanza dall'area di lavoro enon consentire mai
ai bambini di utilizzare questo apparecchio.
• Quando non viene usato, conservare l'apparec-
chio in un luogo sicuro, fuori dalla portata dei
bambini.
• Non lasciare mai l'apparecchio incustodito
quando è acceso.
• La pressione dell’acqua non deve superare
un 10 bar/1 MPa per evitare che il prodotto si
danneggi.
• Non usare il pre-filtro per l’acqua potabile.
• La temperatura del liquido pompato non deve
superare i35 °C.
2. INFORMAZIONI RELATIVE AL
PRODOTTO
Questo pre-filtro per pompa è destinato all'uso
privato per l'approvvigionamento idrico domestico
el'irrigazione di giardini enon per finalità commer-
ciali.
Esso è concepito esclusivamente per l'uso con
acqua piovana eacqua pulita.
Codice modello GP807AA
Applicazione
Pre-filtraggio dell'acqua
(lato di aspirazione della
pompa)
Altezza dell'elemento filtrante 12 cm
Pressione di esercizio max. 10 bar / 1 MPA
Dimensione maglia del filtro 0,15 mm
Temperatura dell'acqua max. 35 °C
Raccordo ingresso dell'acqua Filettatura interna G1"
Raccordo scarico dell'acqua Filettatura interna G1"
Dimensione raccordi filettati Filettatura esterna G1"
Pre-filtro di ricambio GP809AA
Peso 0,7 kg
DESCRIZIONE
Inumeri che compaiono nel testo si riferiscono agli
schemi riportati alle pagine 2-3.
1. Ingresso dell'acqua
2. Sezione superiore
3. Uscita dell'acqua
4. Alloggiamento trasparente
5. Filtro
6. Chiave
7. Raccordi
8. Viti
9. Staffa da parete
10. Tappo (scarico dell'aria)
11. Tubo di aspirazione (non in dotazione)
3. INSTALLAZIONE
Installazione del filtro (Fig. A, B, C)
1. Inserire il filtro (5) nell'alloggiamento trasparen-
te (4) eavvitare l'alloggiamento sopra la parte
superiore (2) utilizzando la chiave (6).
2. Applicare del nastro sigillante per filettature
(nastro in Teflon) sul raccordo filettato (7).
3. Avvitare il raccordo atenuta d'aria (7) allo scari-
co del filtro (3), come mostrato nella Fig. B1.
4. Se il raccordo del tubo di aspirazione (11) ha
una filettatura femmina occorre usare un rac-
cordo extra (7). Applicare del nastro sigillante
per filettature (nastro in Teflon, non in dotazio-
ne) sul raccordo filettato (7).
5. Avvitare il raccordo atenuta d'aria (7) all’ingres-
so del filtro (1), come mostrato nella Fig. B2.
6. Avvitare il pre-filtro atenuta d'aria alla presa
dell'acqua della pompa da giardino, come
illustrato nella Fig. C. Se il filtro tocca terra, si
consiglia di interporre un blocco di legno tra la
pompa eil terreno. Ipiedi della pompa possono
essere fissati al blocco di legno con delle viti.
Staffa da parete (Fig. A, C)
La staffa da parete in dotazione consente di fissare
il filtro aun palo oauna parete.
1. Montare la staffa da parete (9) alla parte supe-
riore (2) del prefiltro.
2. Fissare la staffa da parete (9) serrando le quat-
tro viti (8).
3. Fissare la staffa da parete (9) aun palo oauna
parete utilizzando due viti obulloni (non forniti
in dotazione).
Collegamento del tubo di aspirazione (Fig. A, C)
Non utilizzare raccordi per sistemi di
collegamento di tubi flessibili otubi
idraulici flessibili standard sul lato di aspira-
zione! È necessario usare un tubo di
aspirazione (11) flessibile con un raccordo
adatto (con filettatura esterna G1") euna
valvola di fondo. La valvola di fondo

IT
19
WWW.VONROC.COM
impedisce il riflusso dell'acqua al termine
del processo di pompaggio.
Per ottenere la portata massima occorre
usare un tubo di aspirazione (11) flessibile
con diametro interno di 25 mm, 32 mm
o38 mm.
Il tubo di aspirazione (11) dovrà essere il
più corto possibile.
1. Riempire il tubo flessibile di aspirazione (11)
con acqua del rubinetto.
2. Applicare del nastro sigillante per filettature
(nastro in Teflon, non in dotazione) sul raccordo
filettato del tubo di aspirazione.
3. Avvitare il raccordo del tubo di aspirazione
atenuta d'aria all'ingresso dell'acqua (1).
Riempimento della pompa edel filtro con l'acqua
(Fig. A, C)
L'eventuale presenza di aria nel filtro
interromperà il corretto funzionamento
della pompa da giardino.
1. Svitare etogliere il tappo di scarico dell'aria
(10).
2. Riempire la pompa con acqua pulita del rubinet-
to, ma non eccessivamente. Si veda il manuale
della pompa. Controllare che anche il filtro sia
pieno d'acqua.
3. Riposizionare il tappo di scarico dell'aria (10),
senza serrarlo eccessivamente.
4. Aquesto punto il pre-filtro è pronto per l'uso.
4. MANUTENZIONE
Pulizia (Fig. A, D)
Per ottenere prestazioni ottimali si
raccomanda di sostituire regolarmente il
filtro (5) in base al livello di utilizzo.
1. Rimuovere con cautela l'alloggiamento traspa-
rente (4) utilizzando la chiave (6).
2. Pulire il filtro (5) el'alloggiamento trasparente
(4) con una soluzione di acqua esapone neutro,
quindi sciacquare con acqua pulita.
3. Inserire il filtro (5) nell'alloggiamento trasparen-
te (4) eavvitare l'alloggiamento sopra la parte
superiore (2) utilizzando la chiave (6).
CONSERVAZIONE EPROTEZIONE DAL GELO
Se l'acqua non viene scaricata completamente dal
pre-filtro edagli accessori
, un'eventuale esposizio-
ne al gelo può causare danni gravissimi. Svuotare
completamente il pre-filtro egli accessori dall'ac-
qua eproteggerli dal gelo.
Conservare questo apparecchio in un ambiente
asciutto eben ventilato, in cui la temperatura non
scenda al di sotto di +5 °C.
Quando non viene usato, conservare l’apparecchio
in un luogo sicuro, fuori dalla portata dei bambini.
GARANZIA
Iprodotti VONROC sono sviluppati secondo gli stan-
dard di qualità più elevati esono garantiti esenti
da difetti sia per quanto riguarda imateriali che la
lavorazione per il periodo stabilito per legge ade-
correre dalla data di acquisto iniziale. Se durante
questo periodo il prodotto dovesse presentare dei
difetti di materiali e/odi lavorazione, contattare
direttamente VONROC.
Le seguenti circostanze sono escluse dalla garan-
zia:
• esecuzione otentativo di esecuzione di ripa-
razioni omodifiche all'apparecchio da parte di
personale di centri di assistenza non autorizzati;
• usura normale;
• maltrattamento, uso in maniera impropria oma-
nutenzione inadeguata dell'apparecchio;
• utilizzato di ricambi non originali.
La presente costituisce l'unica garanzia espressa
oimplicita fornita dall'azienda. Non sono con-
cesse altre garanzie, né espresse né implicite,
oltre aquelle descritte nel presente documento,
comprese le garanzie implicite di commerciabilità
edi idoneità per uno scopo particolare. In nessun
caso VONROC sarà ritenuta responsabile di alcun
danno incidentale oconsequenziale. Irimedi offerti
dai rivenditori si limiteranno alla riparazione oalla
sostituzione delle unità odei componenti non
conformi.
Il prodotto eil manuale per l'utilizzatore sono
soggetti amodifiche. Idati tecnici possono essere
modificati senza ulteriore notifica.

20
SV
WWW.VONROC.COM
1. SÄKERHETSANVISNINGAR
Läs de medföljande säkerhetsvarningarna, de kom-
pletterande säkerhetsvarningarna och anvisning-
arna. Underlåtenhet att följa säkerhetsvarningarna
och anvisningarna kan orsaka elstöt, brand och/
eller allvarlig skada. Spara säkerhetsvarningarna
och anvisningarna för framtida bruk.
Följande symboler används i användarhandboken
eller på produkten:
Läs användarhandboken.
Anger risk för personskada, dödsfall eller
skada på verktyget om anvisningarna i
denna handbok inte följs.
Inte avsedd att användas av barn.
Skydda förfiltret mot frost.
SÄKERHETSVARNINGAR
DENNA APPARAT KAN ANVÄNDAS AV BARN FRÅN
8 ÅR OCH PERSONER MED NEDSATT FYSISK ELLER
PSYKISK FÖRMÅGA ELLER BRISTANDE ERFARENHET
ELLER KUNSKAP, OM DE ÖVERVAKAS ELLER FÅR
INSTRUKTIONER OM HUR APPARATEN ANVÄNDS
PÅ ETT SÄKERT SÄTT OCH ÄR MEDVETNA OM
RISKERNA. BARN FÅR INTE LEKA MED APPARATEN.
RENGÖRING OCH ANVÄNDARUNDERHÅLL SKA INTE
UTFÖRAS AV BARN UTAN ÖVERVAKNING.
Läs dessa instruktioner noggrant innan du an-
vänder apparaten och förvara dem för framtida
referens. Det är mycket viktigt att du förstår hur du
använder apparaten på ett säkert sätt, så ta dig tid
att bekanta dig med kraven som beskrivs i dessa
instruktioner.
• Om du är osäker på något sätt när det gäller
att använda denna apparat, rekommenderar
vi starkt att du anlitar en lämplig kvalificerad
person.
• Håll barn och husdjur långt borta från arbets-
området och låt aldrig barn använda apparaten.
• När det inte används bör redskapet förvaras
utom räckhåll för barn på en säker plats.
• Lämna aldrig apparaten utan uppsikt när den
används.
• Användning av vattentryck får inte vara högre
än 10 bar/1 MPa för att undvika skador på
produkten.
• Använd inte förfiltret för dricksvatten.
• Temperaturen på den transporterade vätskan
får inte överstiga 35 °C.
2. PRODUKTINFORMATION
Pumpförfiltret är avsett för privat bruk för vatten-
försörjning i hemmet och bevattning av trädgårdar,
det är inte avsedd för kommersiellt bruk.
Det är enbart avsett för rent vatten och regnvatten.
Modell-nr GP807AA
Användning Förfiltrering av vatten
(pumpens sugsida)
Filterelement höjd 12 cm
Max. drifttryck 10 bar / 1 MPA
Nätbredd 0,15 mm
Max vattentemperatur 35 °C
Anslutning för vatteninlopp G1”, innergänga
Vattenutloppsanslutning G1”, innergänga
Gängad kopplingsstorlek G1” yttergänga
Extra förfilter GP809AA
Vikt 0,7 kg
BESKRIVNING
Siffrorna i texten hänvisar till diagrammen på
sidorna 2-3.
1. Vatteninlopp
2. Övre del
3. Vattenutlopp
4. Transparent hölje
5. Filter
6. Skiftnyckel
7. Kopplingar
8. Skruvar
9. Väggfäste
10. Plugg (luftutlopp)
11. Sugslang (ingår ej)
Strona się ładuje...
Strona się ładuje...
Strona się ładuje...
Strona się ładuje...
Strona się ładuje...
Strona się ładuje...
Strona się ładuje...
Strona się ładuje...
Strona się ładuje...
Strona się ładuje...
Strona się ładuje...
Strona się ładuje...
-
 1
1
-
 2
2
-
 3
3
-
 4
4
-
 5
5
-
 6
6
-
 7
7
-
 8
8
-
 9
9
-
 10
10
-
 11
11
-
 12
12
-
 13
13
-
 14
14
-
 15
15
-
 16
16
-
 17
17
-
 18
18
-
 19
19
-
 20
20
-
 21
21
-
 22
22
-
 23
23
-
 24
24
-
 25
25
-
 26
26
-
 27
27
-
 28
28
-
 29
29
-
 30
30
-
 31
31
-
 32
32


w innych językach
- español: Vonroc GP807AA Instrucciones de operación
- italiano: Vonroc GP807AA Istruzioni per l'uso
- Deutsch: Vonroc GP807AA Bedienungsanleitung
- français: Vonroc GP807AA Mode d'emploi
- dansk: Vonroc GP807AA Betjeningsvejledning
- Nederlands: Vonroc GP807AA Handleiding
- română: Vonroc GP807AA Instrucțiuni de utilizare
Powiązane artykuły
-
Vonroc GP525AC Instrukcja obsługi
-
Vonroc GP530AC Instrukcja obsługi
-
Vonroc PW503AC Instrukcja obsługi
-
Vonroc PW504AC Instrukcja obsługi
-
-
Vonroc VC501AC Instrukcja obsługi
-
Vonroc SP508AC Instrukcja obsługi
-
Vonroc VC504AC Instrukcja obsługi
-