
http://www.laptopking.com/manuals/servicemanualtemplete.htm[12/25/2010 12:29:54 AM]
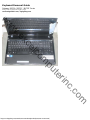
Keyboard Removal Guide
Gateway NV53A / NV55C / NV59C Series
Removal may vary slightly from model to model
excelcomputerinc.com / laptopking.com
www.excelcomputerinc.com

http://www.laptopking.com/manuals/servicemanualtemplete.htm[12/25/2010 12:29:54 AM]
First, remove the battery.
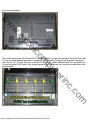
Next, push back the 4 tabs (NV53A and NV59C) as shown (photo 1) to unlock the keyboard. The NV55C has 6 tabs.
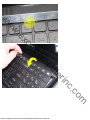
You can use a small flathead screwdriver or similar tool. Photo 2 shows a closeup of one of the tabs. The tabs are
above the 'F4', 'F8', 'F12' and 'DEL' keys on the NV53A and NV59C models. Additional tabs 'ESC' and 'Speaker Up
Volume' are on the NV55C model. Now, just pull upward on the keyboard and lay it on its face to gain access to the
keyboard cable.
www.excelcomputerinc.com

http://www.laptopking.com/manuals/servicemanualtemplete.htm[12/25/2010 12:29:54 AM]
www.excelcomputerinc.com

http://www.laptopking.com/manuals/servicemanualtemplete.htm[12/25/2010 12:29:54 AM]
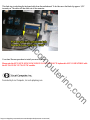
This final step is unlocking the keyboard cable from the motherboard. To do this move the black clip approx. 1/32"
towards you. The cable will then slide out of the connector.
Your done! Reverse procedure to install your new keyboard.
Please note the NV52 NV53 NV54 NV56 NV58 NV59 NV73 NV78 NV79 keyboard is NOT COMPATIBLE with
the NV53A NV59C NV73A NV79C models.
Presented by Excel Computer, Inc and Laptopking.com
www.excelcomputerinc.com
-
 1
1
-
 2
2
-
 3
3
-
 4
4


Gateway NV55C Series Instrukcja obsługi
- Typ
- Instrukcja obsługi
- Ten podręcznik jest również odpowiedni dla
w innych językach
- English: Gateway NV55C Series User manual
Inne dokumenty
-
Yamaha D-3 Instrukcja obsługi
-
-
-
-
-
-
Dell Latitude 5300 2-in-1 Chromebook Enterprise Instrukcja obsługi
-
-
-