Dell PowerVault MD1120 Skrócona instrukcja obsługi
- Typ
- Skrócona instrukcja obsługi

Dell™ PowerVault™ MD1120
Storage Enclosure
Getting Started
With Your System
Začínáme se systémem
Mise en route de votre système
Handbuch zum Einstieg
Τα πρώτα βήματα με το σύστημά σας
Rozpoczęcie pracy z systemem
Начало работы с системой
Procedimientos iniciales con el sistema
Sistem Başlangıç Kılavuzu
תכרעמה ע הדובעה תליחת


Dell™ PowerVault™ MD1120
Storage Enclosure
Getting Started
With Your System

Notes, Notices, and Cautions
NOTE: A NOTE indicates important information that helps you make better use
of your computer.
NOTICE: A NOTICE indicates either potential damage to hardware or loss of data
and tells you how to avoid the problem.
CAUTION: A CAUTION indicates a potential for property damage, personal injury,
or death.
____________________
Information in this document is subject to change without notice.
© 2008 Dell Inc. All rights reserved.
Reproduction of these materials in any manner whatsoever without the written permission of Dell Inc.
is strictly forbidden.
Trademarks used in this text: Dell, the DELL logo, PowerEdge, PowerVault and Dell OpenManage
are trademarks of Dell Inc.; Intel, Pentium and Celeron are registered trademarks of Intel Corporation;
Microsoft, Windows and Windows Server are either trademarks or registered trademarks of Microsoft
Corporation in the United States and/or other countries.
Other trademarks and trade names may be used in this document to refer to either the entities
claiming the marks and names or their products. Dell Inc. disclaims any proprietary interest
in trademarks and trade names other than its own.
Model AMT
April 2010 P/N HP304 Rev. A02

Getting Started With Your System 3
System Features
This section describes the major hardware and software features of your
system. It also provides information about other documents you may need
when setting up your system and how to obtain technical assistance.
Major features of your system include:
• Enclosure storage in an efficient rack-mount 2U design
• Capacity for 24 2.5-inch, hot-plug, 3.0-Gbps, SAS hard drives
• Host-based RAID support via a PERC 6/E adapter
• Redundant hot-plug power supply and cooling modules that are combined
for easy serviceability
• Optional second enclosure management module (EMM) for redundant
system management capability
• Support for either of the following direct-attach configurations:
– Unified mode for direct connectivity of up to 24 hard drives
– Split mode (with dual EMMs) providing direct connectivity to drives
0 through 11 on one EMM and a separate direct connectivity to drives
12 through 23 on the second EMM
• Support for up to three daisy-chained storage enclosures in unified mode
for a total of 72 hard drives
• In-band enclosure management provided through SCSI enclosure services
(SES)
• RAID and system management using Dell OpenManage™ Server
Administrator Storage Management Service or OpenManage IT Assistant.
• Four sensors for monitoring ambient temperatures
• Over-temperature shutdown capability
• Audible warning for critical component failure (disabled by default)
• Support for a wide range of servers (See your system’s readme file for
supported systems. An updated readme can be viewed from the Dell
website at
support.dell.com
)

4 Getting Started With Your System
Other Information You May Need
CAUTION: See the safety and regulatory information that shipped with your
system. Warranty information may be included within this document or as
a separate document.
•The
Rack Installation Instructions
or
Rack Installation Guide
included
with your rack solution describes how to install your system into a rack.
•The
Hardware Owner’s Manual
provides information about system
features and describes how to troubleshoot the system and install or
replace system components.
• CDs included with your system provide documentation and tools for
configuring and managing your system.
• Release notes or readme files may be included to provide last-minute
updates to the system or documentation or advanced technical reference
material intended for experienced users or technicians.
Obtaining Technical Assistance
If you do not understand a procedure in this guide or if the system does not
perform as expected, see your Hardware Owner’s Manual.
Dell Enterprise Training and Certification is available; see dell.com/training
for more information. This service may not be offered in all locations.
Installation and Configuration
CAUTION: Before performing the following procedure, read and follow the safety
instructions and important regulatory information that shipped with your system.
For additional safety best practices information, see
www.dell.com/regulatory_compliance.
This section describes the steps to set up your system for the first time.
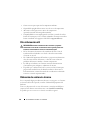
Unpacking the System
Unpack your system and identify each item.
Keep all shipping materials in case you need them later.

Getting Started With Your System 5
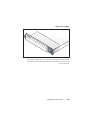
Installing the Rails and System in a Rack
Once you have read the "Safety Instructions" located in the rack installation
documentation for your system, install the rails and the system in the rack.
See your rack installation documentation for instructions on installing your
system in a rack.

6 Getting Started With Your System
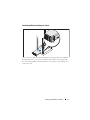
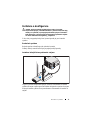
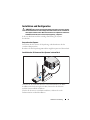
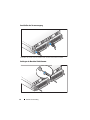
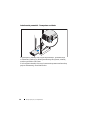
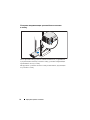
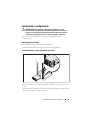
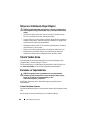
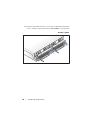
Connecting the Power
Connect both power cables to the power supply/cooling fan modules.
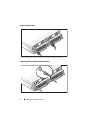
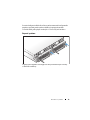
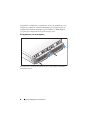
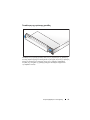
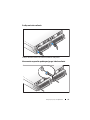
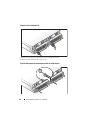
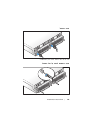
Attaching the Power Cord Retention Bracket

Getting Started With Your System 7
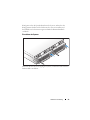
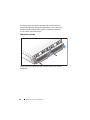
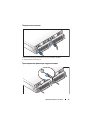
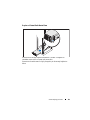
Configure the storage mode for your system by setting the configuration
switch on the front of the system and cabling the EMM(s) according to
the instructions provided in the Hardware Owner’s Manual.
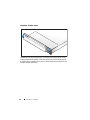
Turning on the System
Power on the system by turning on both power supply/cooling fan modules.

8 Getting Started With Your System
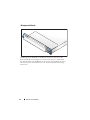
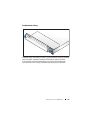
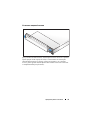
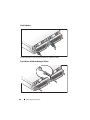
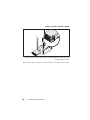
Installing the Bezel
Install the bezel, if desired, by inserting the right edge of the bezel into the
right front loop on the system, and then pressing the left edge of the bezel to
the system until the bezel snaps into place. (Bezel design may vary slightly
from the illustration above.)

Getting Started With Your System 9
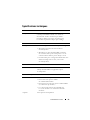
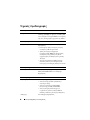
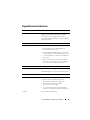
Technical Specifications
Drives
SAS hard drives Up to 24 2.5-inch SAS hot-plug hard
drives (3.0 Gbps), at speeds of 10K or
15K rpm (See your system readme file
for supported disk capacities.)
Connectivity
Configurations Support for either of the following
configurations:
• Unified mode for direct connectivity to
24 hard drives
• Split mode with dual EMMs providing
a direct connectivity to drives 0 though
11 and a separate direct connectivity to
drives 12 though 23
• Up to three daisy-chained storage
enclosures in unified mode for a total
of 72 hard drives
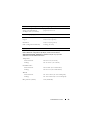
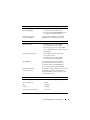
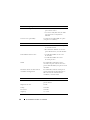
Enclosure Modules
EMMs One or two hot-pluggable modules
Each EMM has one temperature sensor
Backplane Board
Connectors
• 24 SAS hard drive connectors
• Two power supply/cooling fan module
connectors
• Two sets of EMM connectors
(6 connectors each EMM)
• One control panel connector for front
LEDs and enclosure mode switch
Sensors Two temperature sensors

10 Getting Started With Your System
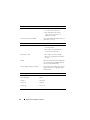
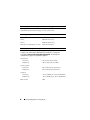
Back-Panel Connectors
SAS connectors (per EMM)
• One SAS (SFF 8470) "IN" connector
for connection to the host
• One SAS (SFF 8470) "OUT"
connector for expansion to an
additional enclosure
Serial connector (per EMM) One 6-pin UART mini-DIN connector
(for factory use only)
LED Indicators
Front panel
• One two-color LED indicator
for system status
• Two single-color LED indicators
for power and split mode
Hard-drive carrier
• One single-color activity LED
• One two-color LED status indicator
per drive
EMM Three two-color LED status indicators,
one each for the two EMM SAS ports
and one for the EMM status
Power supply/cooling fan module Three LED status indicators for power
supply status, power supply/fan fault,
and AC status
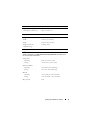
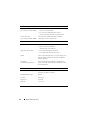
Power Supplies
Wattage 485 W maximum continuous; 604 W peak
Heat dissipation 200 W
Voltage 100–240 V
Frequency 50/60 Hz
Amperage 7.5–3.75 A

Getting Started With Your System 11
Available Hard Drive Power (Per Slot)
Supported hard drive power
consumption (continuous)
Up to 0.5 A at +12 V
Up to 1.2 A at +5 V
Physical
Height 8.60 cm (3.375 inches)
Width 44.50 cm (17.5 inches)
Depth 46.40 cm (18.25 inches)
Weight (maximum
configuration kg)
23.60 kg (52 lb)
Environmental
NOTE: For additional information about environmental measurements for specific
system configurations, see dell.com/environmental_datasheets. This system is not
for use in an office environment.
Temperature
Operating
Storage
10° to 35°C (50° to 95°F)
–40° to 65°C (–40° to 149°F)
Relative humidity
Operating
Storage
20% to 80% (noncondensing)
5% to 95% (noncondensing)
Altitude
Operating
Storage
–16 to 3,048 m (–50 to 10,000 ft)
–16 to 10,600 m (–50 to 35,000 ft)
BTU per hour 1430

12 Getting Started With Your System

Dell™ PowerVault™ MD1120
Uzavřené svazkové úložiště
Začínáme se systémem

Poznámky, upozornění a varování
POZNÁMKA:
POZNÁMKA označuje důležitou informaci, s jejíž pomocí
lépe využijete svůj počítač.
UPOZORNĚNÍ:
UPOZORNĚNÍ poukazuje na možnost poškození hardwaru
nebo ztráty dat a poskytuje návod, jak se danému problému vyhnout.
POZOR: POZOR označuje hrozící nebezpečí poškození majetku,
poranění nebo usmrcení osob.
____________________
Informace obsažené v tomto dokumentu podléhají změnám bez předchozího upozornění.
© 2008 Dell Inc. Všechna práva vyhrazena.
Jakákoli reprodukce těchto materiálů bez písemného povolení společnosti Dell Inc.
je přísně zakázána.
Ochranné známky použité v tomto textu: Dell, logo DELL, PowerEdge, PowerVault
a Dell OpenManage jsou ochranné známky společnosti Dell Inc. Intel, Pentium a Celeron
jsou registrované ochranné známky společnosti Intel Corporation. Microsoft, Windows a
Windows Server jsou ochranné známky nebo registrované ochranné známky společnosti
Microsoft Corporation v USA a dalších zemích.
V tomto dokumentu mohou být použity další ochranné známky a obchodní názvy buď s odkazem
na právnické osoby a organizace, které uplatňují na dané ochranné známky a obchodní názvy nárok,
nebo s odkazem na jejich výrobky. Společnost Dell Inc. nemá vlastnické zájmy vůči ochranným
známkám a obchodním názvům jiným než svým vlastním.
Model AMT
Duben 2010 Č. dílu HP304 Rev. A02

Začínáme se systémem
15
Systémové funkce
V této části jsou popsány hlavní hardwarové a softwarové funkce systému.
Jsou v ní obsaženy i informace o doplňujících dokumentech, které můžete
potřebovat při instalaci systému, a informace k odborné pomoci.
Mezi hlavní funkce systému patří:
•
Uzavřené svazkové úložiště v účelně řešené konstrukci pro instalaci
do stojanu 2U
•
Kapacita pro 24 za provozu připojitelných 2,5palcových pevných
disků SAS podporujících datové přenosy rychlostí 3,0 Gb/s
•
Podpora hostitelského řadiče RAID přes adaptér PERC 6/E
•
Záložní napájecí zdroj připojitelný za provozu kombinovaný s chladicími
moduly pro snadnou údržbu
•
Volitelný druhý modul pro správu svazků EMM (Enclosure Management
Module) poskytující redundantní správu systému
•
Podpora libovolné z následujících konfigurací přímého připojení:
–
Sjednocený režim pro přímé připojení až 24 pevných disků
–
Rozdělený režim (s dvěma moduly EMM) poskytující přímé připojení
disků 0 až 11 k prvnímu modulu EMM a oddělené přímé připojení disků
12 až 23 k druhému modulu EMM
•
Podpora až tří zřetězených uzavřených svazkových úložiš
″
ve sjednoceném
režimu pro celkem 72 pevných disků
•
Vnitřní správa úložiště prostřednictvím služby SES (SCSI Enclosure
Services)
•
Správa diskového pole RAID a systému pomocí služby Dell OpenManage™
Server Administrator Storage Management Service nebo nástroje
OpenManage IT Assistant
•
Čtyři senzory pro sledování okolní teploty
•
Funkce vypnutí při přehřátí
•
Zvukové varování při selhání důležitých komponent (ve výchozím nastavení
vypnuté)
•
Podpora širokého spektra serverů (informace o podporovaných systémech
naleznete v souboru readme k systému. Aktualizovaný soubor readme
naleznete na webu společnosti Dell na adrese
support.dell.com
)

16
Začínáme se systémem
Další užitečné informace
POZOR: Prostudujte si informace o bezpečnosti a předpisech,
které byly dodány se systémem. Informace o záruce je součástí
tohoto dokumentu nebo je přiložena samostatně.
•
Pokyny pro instalaci do stojanu
nebo
Příručka pro instalaci do stojanu
dodané se stojanovým řešením popisují instalaci systému do stojanu.
•
Příručka majitele hardwaru
obsahuje informace o funkcích systému
a popisuje řešení problémů se systémem a instalaci nebo výměnu
komponent.
•
Disky CD dodané se systémem obsahují dokumentaci a nástroje pro
konfiguraci a správu systému.
•
Součástí dodávky mohou být také poznámky k verzi nebo soubory readme,
které obsahují poslední aktualizace k systému nebo dokumentaci, případně
rozšířené technické materiály určené zkušeným uživatelům a technikům.
Odborná pomoc
Nerozumíte-li některému z postupů popsaných v této příručce nebo nepracuje-li
systém podle očekávání, nahlédněte do Příručky majitele hardwaru.
Společnosti Dell rovněž nabízí školení a certifikaci (Dell Enterprise Training
and Certification). Další informace najdete na adrese dell.com/training.
Tato služba nemusí být nabízena ve všech regionech.

Začínáme se systémem
17
Instalace a konfigurace
POZOR: Před provedením následujícího postupu si pročtěte
bezpečnostní pokyny a důležité informace o plnění norem, které byly
dodány se systémem, a postupujte podle těchto pokynů a informací.
Další informace o doporučených bezpečnostních opatřeních najdete
na adrese www.dell.com/regulatory_compliance.
V této části jsou popsány kroky, které je nutné provést při první instalaci
systému.
Rozbalení systému
Rozbalte systém a identifikujte jeho jednotlivé součásti.
Veškerý obalový materiál uschovejte pro případ pozdější potřeby.
Instalace kolejniček a systému do stojanu
Nejprve si přečtěte Bezpečnostní pokyny uvedené v dokumentaci k instalaci
systému do stojanu a potom proveďte instalaci kolejniček a systému do stojanu.
Pokyny k instalaci systému do stojanu naleznete v dokumentaci k instalaci do
stojanu.

18
Začínáme se systémem
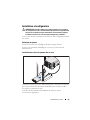
Připojení ke zdroji napětí
Připojte oba napájecí kabely ke zdrojům napájení kombinovaným s moduly
s chladicími ventilátory.
Umístění napájecích kabelů do retenčních svorek
Strona się ładuje...
Strona się ładuje...
Strona się ładuje...
Strona się ładuje...
Strona się ładuje...
Strona się ładuje...
Strona się ładuje...
Strona się ładuje...
Strona się ładuje...
Strona się ładuje...
Strona się ładuje...
Strona się ładuje...
Strona się ładuje...
Strona się ładuje...
Strona się ładuje...
Strona się ładuje...
Strona się ładuje...
Strona się ładuje...
Strona się ładuje...
Strona się ładuje...
Strona się ładuje...
Strona się ładuje...
Strona się ładuje...
Strona się ładuje...
Strona się ładuje...
Strona się ładuje...
Strona się ładuje...
Strona się ładuje...
Strona się ładuje...
Strona się ładuje...
Strona się ładuje...
Strona się ładuje...
Strona się ładuje...
Strona się ładuje...
Strona się ładuje...
Strona się ładuje...
Strona się ładuje...
Strona się ładuje...
Strona się ładuje...
Strona się ładuje...
Strona się ładuje...
Strona się ładuje...
Strona się ładuje...
Strona się ładuje...
Strona się ładuje...
Strona się ładuje...
Strona się ładuje...
Strona się ładuje...
Strona się ładuje...
Strona się ładuje...
Strona się ładuje...
Strona się ładuje...
Strona się ładuje...
Strona się ładuje...
Strona się ładuje...
Strona się ładuje...
Strona się ładuje...
Strona się ładuje...
Strona się ładuje...
Strona się ładuje...
Strona się ładuje...
Strona się ładuje...
Strona się ładuje...
Strona się ładuje...
Strona się ładuje...
Strona się ładuje...
Strona się ładuje...
Strona się ładuje...
Strona się ładuje...
Strona się ładuje...
Strona się ładuje...
Strona się ładuje...
Strona się ładuje...
Strona się ładuje...
Strona się ładuje...
Strona się ładuje...
Strona się ładuje...
Strona się ładuje...
Strona się ładuje...
Strona się ładuje...
Strona się ładuje...
Strona się ładuje...
Strona się ładuje...
Strona się ładuje...
Strona się ładuje...
Strona się ładuje...
Strona się ładuje...
Strona się ładuje...
Strona się ładuje...
Strona się ładuje...
Strona się ładuje...
Strona się ładuje...
Strona się ładuje...
Strona się ładuje...
Strona się ładuje...
Strona się ładuje...
Strona się ładuje...
Strona się ładuje...
Strona się ładuje...
Strona się ładuje...
Strona się ładuje...
Strona się ładuje...
Strona się ładuje...
Strona się ładuje...
-
 1
1
-
 2
2
-
 3
3
-
 4
4
-
 5
5
-
 6
6
-
 7
7
-
 8
8
-
 9
9
-
 10
10
-
 11
11
-
 12
12
-
 13
13
-
 14
14
-
 15
15
-
 16
16
-
 17
17
-
 18
18
-
 19
19
-
 20
20
-
 21
21
-
 22
22
-
 23
23
-
 24
24
-
 25
25
-
 26
26
-
 27
27
-
 28
28
-
 29
29
-
 30
30
-
 31
31
-
 32
32
-
 33
33
-
 34
34
-
 35
35
-
 36
36
-
 37
37
-
 38
38
-
 39
39
-
 40
40
-
 41
41
-
 42
42
-
 43
43
-
 44
44
-
 45
45
-
 46
46
-
 47
47
-
 48
48
-
 49
49
-
 50
50
-
 51
51
-
 52
52
-
 53
53
-
 54
54
-
 55
55
-
 56
56
-
 57
57
-
 58
58
-
 59
59
-
 60
60
-
 61
61
-
 62
62
-
 63
63
-
 64
64
-
 65
65
-
 66
66
-
 67
67
-
 68
68
-
 69
69
-
 70
70
-
 71
71
-
 72
72
-
 73
73
-
 74
74
-
 75
75
-
 76
76
-
 77
77
-
 78
78
-
 79
79
-
 80
80
-
 81
81
-
 82
82
-
 83
83
-
 84
84
-
 85
85
-
 86
86
-
 87
87
-
 88
88
-
 89
89
-
 90
90
-
 91
91
-
 92
92
-
 93
93
-
 94
94
-
 95
95
-
 96
96
-
 97
97
-
 98
98
-
 99
99
-
 100
100
-
 101
101
-
 102
102
-
 103
103
-
 104
104
-
 105
105
-
 106
106
-
 107
107
-
 108
108
-
 109
109
-
 110
110
-
 111
111
-
 112
112
-
 113
113
-
 114
114
-
 115
115
-
 116
116
-
 117
117
-
 118
118
-
 119
119
-
 120
120
-
 121
121
-
 122
122
-
 123
123
-
 124
124


