Sharp HT-SB140(MT) Instrukcja obsługi
- Kategoria
- Głośniki soundbar
- Typ
- Instrukcja obsługi

User manual
HT-SB140
2.0 Soundbar Home Theatre System
EN DE
NL RUIT PL
FRES

Trademarks
The Bluetooth® word mark and logos are registered trademarks owned by
Bluetooth SIG,. Inc.
The terms HDMI, HDMI High-De nition Multimedia Interface, HDMI Trade dress
and the HDMI Logos are trademarks or registered trademarks of HDMI Licensing
Administrator, Inc.

EN
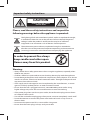
Important safety instructions
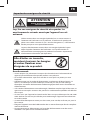
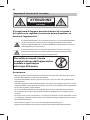
CAUTION
RISK OF ELECTRIC SHOCK
DO NOT OPEN
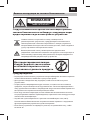
Please, read these safety instructions and respect the
following warnings before the appliance is operated:
The lightning ash with arrowhead symbol, within an equilateral triangle,
is intended to alert the user to the presence of uninsulated “dangerous
voltage” within the product’s enclosure that may be of su cient
magnitude as to constitute a risk of electric shock to persons.
The exclamation point within an equilateral triangle is intended to
alert the user to the presence of important operating and maintenance
(servicing) instructions in the literature accompanying the appliance.
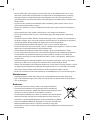
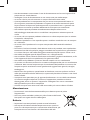
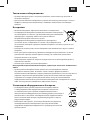
In order to prevent re always
keep candles and other open
ames away from this product.
Warning:
• Always follow basic safety precautions when using this applience, especially when
children are present.
• Children should be supervised to ensure that they do not play with the appliance.
• Do not damage the power cord, neither do not place any heavy objects on it, do not
strech it or bend it. Also do not attach extension cables. Damage to the power cord
may occur re or electric shock.
• If the supply cord is damaged, it must be replaced by the manufacturer, a service
agent or similarly qualied persons in order to avoid a hazard.
• Ensure that the unit is plugged into an AC 220-240V 50Hz power outlet. Using
higher voltage may cause the unit to malfunction or even re catching.
• If the power plug does not t into your outlet, do not force the plug into an electri-
cal socket if it does not t.
• Turn o the unit before unplugging it from power source to completely switch it o .
• Do not disconnect or connect the power cord with wet hands. It may cause an
electric shock.
• Disconnect the power cord if it is not used for a long time.
• Ensure that the mains plug is always easily accessible.
EN

2
• This product does not contain any parts that are serviceable by the user. In case
of a fault, contact the manufacturer or authorised service department. Exposing
the internal parts inside the device may endanger your life. The manufacturers
guarantee does not extend to faults caused by repairs carried out by unauthorised
third parties.
• Do not use this product immediately after unpacking. Wait until it warms up to
room temperature before using it.
• Ensure this product is used in moderate climates only (not in tropical/subtropical
climates).
• Place product on a at, stable surface that is not subject to vibrations.
• Ensure the product and its parts is not overhanging the edge of the supporting
furniture.
• To reduce the risk of fire, electric shock or damage to this product, do not expose it
to direct sunlight, dust, rain and moisture. Never expose it to dripping or splashing
and do not place objects filled with liquids on or near the product.
• Do not place objects lled with liquids, such as vases, on the apparatus.
• Do not install near any heat sources such as radiators, heat registers, stoves, or other
apparatus (including ampli ers) that produce heat.
• Do not place the product where the humidity is high and ventilation is poor.
• Ensure a minimum distance of 5 cm around the apparatus for su cient ventilation.
Do not block any ventilation openings of this product. Always ensure that the
ventilation openings are not covered with items such as newspapers, table-cloths,
curtains, etc.
• NEVER let anyone, especially children, push anything into holes, slots or any other
openings in the unit’s casing as this could result in a fatal electric shock.
• Storms are dangerous for all electric appliances. If the mains or aerial wiring is struck
by lightning, the appliance might get damaged, even if it is turned o . You should
disconnect all the cables and connectors of the appliance before a storm.
• Excessive sound pressure from earphones and headphones can cause hearing loss.
Maintenance
• Unplug the power cable from the power source before cleaning the appliance.
• Use a soft and clean rag to clean the outside of the unit. Never clean it with chemi-
cals or detergent.
Batteries
• Observe the correct polarity when inserting the batteries.
• Do not expose batteries to high temperatures and do not
place them on locations where the temperature might increase
quickly, e.g. near the re or on the direct sunshine.
• Do not expose batteries to excessive radiant heat, do not throw
them into the re, do not disassemble them and do not try to
recharge un-rechargeable batteries. They could leak or explode.
• Never use di erent batteries together or mix new and old ones.
• When the Remote Control is not to be used for a long time
(more than a month), remove the battery from the Remote Control to prevent it
from leaking.

EN
• If the batteries leak, wipe away the leakage inside the battery compartment and
replace the batteries with new ones.
• Do not use any batteries other than those specied.
Do not ingest battery, chemical burn hazard
• If the battery is swallowed, it can cause severe internal burns in just 2 hours and
lead to death. Keep new and used batteries away from children. If the battery
compartment does not close securely, stop using the product and keep it away from
children. If you think batteries might have been swallowed or placed inside any part
of the body, seek immediate medical attention.
Disposal of this equipment and Batteries
• Do not dispose of this product or its batteries as unsorted municipal
waste. Return it to a designated collection point for the recycling
of WEEE in accordance with local law. By doing so, you will help to
conserve resources and protect the environment.
• Most of the EU countries regulate the disposal of batteries by law.
Contact your retailer or local authorities for more information.
• The shown above appears on electrical and electronivcal equipment
and batteries (or the packaging) to remind users of this. If "Hg" or 'Pb'
appears below the symbol, this mean that the battery cantains traces
of mercury (Hg) or lead (Pb), respectively.
• Users are requested to use existing return facilities for used equipment
and batteries.
CE and UKCA Statement:
• Hereby, Sharp Consumer Electronics Poland sp. z o.o. declares that this audio device
is in compliance with the essential requirements and other relevant provisions of
RED Directive 2014/53/EU and UK Radio Equipment Regulations 2017.
• The full text of the EU declaration of conformity is available by following the link
www.sharpconsumer.eu and then entering download section of your model and
choosing “CE Statements”.
Trademarks:
The Bluetooth word mark and logos are registered trademarks
owned by Bluetooth SIG,. Inc.
The terms HDMI and HDMI High-De nition Multimedia
Interface, and the HDMI Logo are trademarks or registered
trademarks of HDMI Licensing, LLC in the United States and
other countries.
EN

4
Accessories
• 1x Remote control
• 1x User manual
• 1x UK power cord
• 1x EU power cord
• 2x Wall Bracket
• 1x Set of wall-mounting screws
• 1x Quick start guide
• 2 x AAA battery
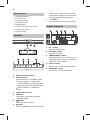
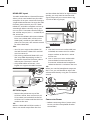
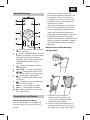
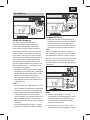
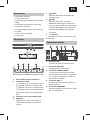
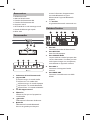
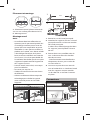
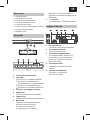
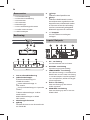
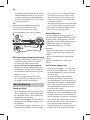
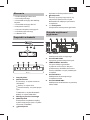
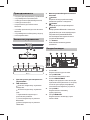
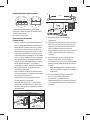
Controls
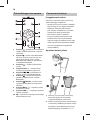
1
321
1. Remote Control Sensor
2. LED Indicators
• Red indicator: In STANDBY mode.
• Green indicator: In AUX mode.
• Orange indicator: In Optical mode.
• Blue indicator: In Bluetooth mode.
•• White indicator: In HDMI ARC
mode.
3. Wall bracket screws
4. button
Switch the unit between ON and
STANDBY mode.
5. button
Select the play function.
6. button
Select the Bluetooth mode. Press and
hold to activate the pairing function
in Bluetooth mode or disconnect the
existing paired Bluetooth device.
7. +/- buttons
Increase/decrease the volume level.
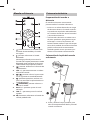
Inputs/Outputs
1. AC~ Socket
Connect power cord.
2. OPTICAL Socket
Opticial input jack.
3. SERVICE ONLY Socket
The USB socket is for service only. It is
not designed to charge smartphones,
tablets or similar devices.
4. AUX 1 Socket
Connect to an external audio device.
5. HDMI ARC Socket
Connect to a TV via HDMI cable.
4 5 6 7
1 2 3 4 51

•
EN
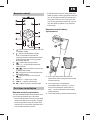
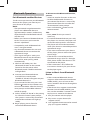
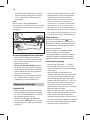
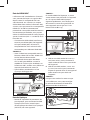
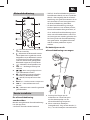
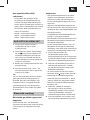
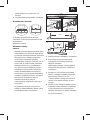
Remote control
1. – Switch the unit between ON and
STANDBY mode.
2. – Select the Bluetooth mode.
Press and hold to activate the
pairing function in Bluetooth mode
or disconnect the existing paired
Bluetooth device.
3. – Select the play function.
4. VOL +/- – Increase/decrease the
volume level.
5. / – Skip to previous/next track
in Bluetooth mode.
6. – Play/pause/resume playback in
Bluetooth mode.
7. – (MUTE) Mute or resume the
sound.
8. BASS +/- – Adjust bass level.
9. TRE +/- – Adjust treble level.
10. EQ – Select a preset sound mode.
First time installation
Remote control preparation
The provided Remote Control allows the
unit to be operated from a distance.
• Even if the Remote Control is operated
within the e ective range 6m, remote
control operation may be impossible
if there are any obstacles between the
unit and the remote control.
• If the Remote Control is operated near
other products which generate infrared
rays, or if other remote control devices
using infra-red rays are used near the
unit, it may operate incorrectly. Conver-
sely, the other products may operate
incorrectly.
Remote control battery
replacement
1. Press and slide the back cover to
open the battery compartment of the
remote control.
2. Insert two AAA size batteries
(included). Make sure the (+) and (–)
ends of the batteries match the (+)
and (–) ends indicated in the battery
compartment.
3. Close the battery compartment cover.
EN

6
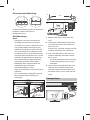
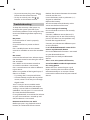
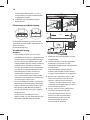
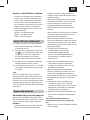
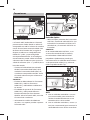
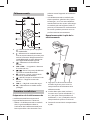
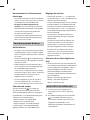
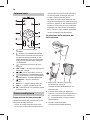
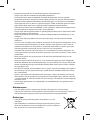
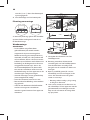
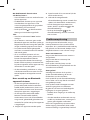
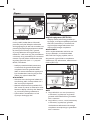
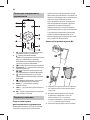
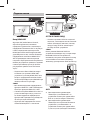
Placement and Mounting
AB
A: Normal Placement (place Soundbar on
leveled surface in front of TV)
B: Wall Mounting
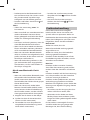
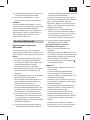
Wall Mounting
NOTE:
Installation must be carried out by
quali ed personnel only. Incorrect
assembly can result in severe personal
injury and property damage (if you
intend to install this product yourself,
you must check for installations such
as electrical wiring and plumbing that
may be buried inside the wall). It is the
installer’s responsibility to verify that
the wall will safely support the total
load of the unit and wall brackets.
Additional tools (not included) are
required for the installation.
Do not overtighten screws.
Keep this instruction manual for future
reference.
Use an electronic stud nder to check
the wall type before drilling and
mounting.
914мм
12
Пористый
уплотнитель
914мм
3
> 32мм
4мм
(5мм)
4
914мм
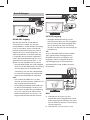
1. Remove the screws from the main
unit.
2. Attach the wall brackets to the main
unit with the screws removed from
the main unit.
If necessary, stick EVA sponge into the
brackets to balance the soundbar.
3. Drill 2 parallel holes in the wall. The
distance between the holes should
be 914 mm.
Firmly x one dowel into each hole
in the wall and then insert screws
into them.
4. Leave a 5mm gap between the wall
and the screw’s head. Lift the unit
with the attached wall brackets over
the heads of the screws and slot into
place.
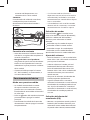
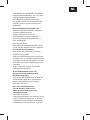
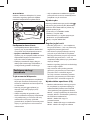
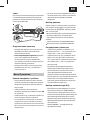
Connections

EN
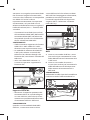
HDMI ARC input
The ARC (Audio Return Channel) function
allows you to send audio from your ARC-
compliant TV to your sound bar through a
single HDMI connection. To enjoy the ARC
function, please ensure your TV is both
HDMI-CEC and ARC compliant and set up
accordingly. When correctly set up, you
can use your TV remote control to adjust
the volume output (VOL +/- and MUTE) of
the sound bar.
Connect the HDMI cable (not included)
from unit‘s HDMI (ARC) socket to the
HDMI (ARC) socket on your ARC com-
pliant TV. Then press the remote control
to select HDMI ARC.
TIPS:
• Your TV must support the HDMI-CEC
and ARC function. HDMI-CEC and ARC
must be set to On.
• The setting method of HDMI-CEC and
ARC may di er depending on the TV.
For details about ARC function, please
refer to your TV owner’s manual.
• Only HDMI cables of version 1.4 or
higher can support the ARC function.
OPTICAL input
• Remove the protective cap of the
OPTICAL socket, then connect an OP-
TICAL cable (not included) to the TV’s
OPTICAL OUT socket and the OPTICAL
socket on the unit.
TIP:
While in HDMI ARC/OPTICAL mode, if
there’s no sound output from the unit
and the HDMI ARC/OPTICAL lights ashes
quickly, you may need to activate PCM
signal output on your source device (eg.
TV, DVD or Blu-ray player).
AUX
A. Use a RCA to 3.5mm audio cable (not
included) to connect the TV’s audio
output sockets to the AUX 1 socket
on the unit.
B. Use a 3.5mm to 3.5mm audio cable
(not included) to connect the TV’s
or external audio device headphone
socket to the AUX 1 socket on the unit.
TIP:
When you use the headphone output on
the TV set, you will be able to adjust the
volume level directly using the TV remote
control.
EU
UK
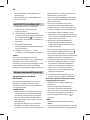
Connect to Power
• Before connecting the AC power cord,
ensure you have completed all other
connections.
EN

8
• Risk of product damage! Ensure that
the power supply voltage corresponds
to the voltage printed on the back or
the underside of the unit.
• Connect the mains cable to the AC~
Socket of the unit and then into a
mains socket.
Basic Operation
Standby/ON
• When you rst connect the unit to the
main socket, the unit will be in STAND-
BY mode. The POWER indicator will
light up red.
• Press the button on the remote cont-
rol to switch the main unit ON or OFF.
• Disconnect the main plug from the
main socket if you want to switch the
unit o completely.
If a TV or an external device (Only for AUX
socket) is connected, the unit will switch
on automatically when the TV or the
external device is switched on.
When the unit has no input signal for
over 15 minutes, it will automatically
switch to Standby mode.
Select Modes
Press the button on the unit
repeatedly or press the AUX, BT
(Bluetooth), OPTICAL, HDMI ARC buttons
on the remote control to select the
desired mode.
• Red indicator: In STANDBY mode.
• Green indicator: In AUX mode.
• Orange indicator: In Optical mode.
• Blue indicator: In Bluetooth mode.
•• White indicator: In HDMI ARC mode.
Adjust the Volume
Press the + / - buttons on the unit or
press the VOL+ / VOL- buttons on the
remote control to adjust the volume.
If you wish to turn the sound o ,
press the MUTE button on the remote
control. Press the MUTE button again or
press the VOL+ / VOL- buttons on the
unit or on the remote control to resume
normal listening.
While adjusting the volume, the status
indicator ashes quickly.
While the volume level reaches its
maximum level, if you press the VOL+
button again, the status indicator
ashes once. While the volume level
reaches its minimum level, if you press
the VOL- button again, the status
indicator ashes once.
Select Equaliser (EQ) E ect
• While playing, press the EQ button on
the remote control to select between
preset equalisers: Movie (recom-
mended for viewing movies), Music
(recommended for listening to music),
NEWS (recommended for listening to
NEWS).
MOVIE - LED ash orange
MUSIC - LED ash blue
NEWS - LED ash green
AUX/OPTICAL/HDMI ARC
1. Ensure that the unit is connected to
the TV or audio device.
2. While in ON mode, press the
button on the unit repeatedly or press
the AUX, OPTICAL, HDMI ARC buttons
on the remote control to select the
desired mode.
3. Operate your audio device directly for
playback features.
4. Press the VOL +/– button to adjust the
volume to your desired level.
TIP:
While in HDMI ARC/OPTICAL mode, if
there’s no sound output from the unit
and the HDMI ARC/OPTICAL lights ashes
quickly, you may need to activate PCM
signal output on your source device (eg.
TV, DVD or Blu-ray player).

•
EN
Bluetooth Operation
Pair Bluetooth-enabled Devices
The rst time you connect your Bluetooth
device to this player, you need to pair
your device to this player.
NOTE:
The operational range between this
player and a Bluetooth device is
approximately 8 meters (without any
object between the Bluetooth device
and the unit).
Before you connect a Bluetooth device
to this unit, ensure you know the
device’s capabilities.
Compatibility with all Bluetooth de-
vices is not guaranteed.
Any obstacle between this unit and
a Bluetooth device can reduce the
operational range.
If the signal strength is weak, your
Bluetooth receiver may disconnect,
but it will re-enter pairing mode
automatically.
1. While in ON mode, press the
(Bluetooth) button on the remote
control or on the unit to select
Bluetooth mode. The Blue indicator
will light ash.
2. Activate your Bluetooth device
and select the search mode.
“SHARP HT-SB140” will appear on your
Bluetooth device list.
If you cannot nd the unit, press and
hold the button on the remote cont-
rol to be searchable. After the “Pairing”
voice prompt and the Blue indicator
will ash rapidly.
3. Select “SHARP HT-SB140” in the pairing
list. After the “Paired” voice prompt,
the system is successfully connected
and the Blue indicator will light up
solidly.
4. Begin playing music from the
connected Bluetooth device.
To disconnect the Bluetooth function,
you can:
Switch to another function on the unit.
Disable the Bluetooth function on
your device.The device is successfully
disconnected from the unit after the
“Disconnected” voice prompt.
Press and hold the button on the
remote control.
TIPS:
• Enter „0000“ for the password if
necessary.
• If no other Bluetooth device pairs with
this player in 2 minutes, the player will
reconnect to the previous connection.
• The player will also be disconnected
when your device is moved beyond the
operational range.
• If you want to reconnect your device
to this player, place it within the opera-
tional range.
• If the device is moved beyond the
operational range, when it is brought
back, please check if the device is still
connected to the player.
• If the connection is lost, follow the
instructions above to pair your device
to the player again.
Listen to Music from Bluetooth
Device
If the connected Bluetooth device
supports Advanced Audio Distribution
Pro le (A2DP), you can listen to the
music stored on the device through the
soundbar‘.
If the device also supports Audio Video
Remote Control Pro le (AVRCP), you
can use the soundbar‘s remote control
to play music stored on the device.
1. Pair your device with the player.
2. Play music via your device (if it
supports A2DP).
3. Use supplied remote control to control
play (if it supports AVRCP).
EN

10
To pause/resume play, press the
button on the remote control.
To skip to a track, press the /
buttons on the remote control.
Troubleshooting
To keep the warranty valid, never try
to repair the system yourself. If you
encounter problems when using this unit,
review the following before requesting
service.
No power
Ensure that the AC cord is properly
connected.
Ensure that there is power at the AC
outlet.
Press standby button on the remote
control or soundbar to turn the soundbar
on.
No sound
Increase the volume. Press Volume Up on
the remote control or on the right side of
the soundbar.
Press MUTE on the remote control to
ensure the soundbar is not muted.
Press source buttons to select a di erent
input source.
When using either of the Digital input, if
there is no audio:
Try setting the TV output to PCM or
Connect directly to your Blu-ray/other
source, some TVs do not pass through
digital audio.
Your TV may be set to variable audio
output. Con rm that the audio output
setting is set to FIXED or STANDARD, not
VARIABLE. Consult your TV’s user manual
for more detailed information.
If using Bluetooth, ensure that the volume
on your source device is turned up and
that the device is not muted.
Remote control does not work
Before you press any playback control
button, rst select the correct source.
Reduce the distance between the remote
control and the unit.
Insert the battery with its polarities (+/-)
aligned as indicated.
Replace the battery.
Aim the remote control directly at the
sensor on the front of the unit.
I hear buzzing or humming
Ensure all cables and wires are securely
connected.
Connect a di erent source device (TV,
Blu-ray player, etc) to see if the buzzing
persists. If it does not, the problem may
be with the original device.
Connect your device to a di erent input
on the soundbar.
I can’t nd the Bluetooth name of this
unit on my Bluetooth device
Ensure the Bluetooth function is activated
on your Bluetooth device.
Re-pair the unit with your Bluetooth
device.
This is a 15 mins power o function,
one of the ERPII standard requirement
for saving power
When the unit’s external input signal
level is too low, the unit will be turned
o automatically in 15 minutes. Please
increase the volume level of your external
device.

DE
Wichtige Sicherheitsanweisungen
VORSICHT
GEFAHR AUF STROMSCHLAG
NICHT ÖFFNEN
Bitte lesen Sie sich diese Sicherheitsanweisungen durch und
beachten Sie, bevor Sie das Gerät in Betrieb nehmen, auf die
folgenden Warnhinweise:
Das Dreieckszeichen mit Blitzsymbol verweist auf nicht isolierte
„gefährliche Spannungen“ im Gerätegehäuse, die so hoch sein können,
dass sie eine Gefahr von Stromschlägen bilden.
Das Dreieckszeichen mit Ausrufungszeichen verweist auf wichtige
Funktions - und Wartungshinweise (Reparatur) in der dem Gerät
beigelegten Bedienungsanleitung.
Halten Sie Kerzen und o enes
Feuer von diesem Produkt fern,
um einen Brand zu vermeiden.
Warnung:
• Halten Sie sich während der Nutzung dieses Geräts immer an die allgemeinen
Sicherheitshinweise, insbesondere, wenn Kinder in der Nähe sind.
• Kinder sollten beaufsichtigt werden, um sicherzustellen, dass sie nicht mit dem
Gerät spielen.
• Das Stromkabel darf weder beschädigt, noch dürfen schwere Objekte darauf
abgelegt werden, außerdem dürfen Sie es nicht dehnen oder verbiegen. Schließen
Sie auch keine Verlängerungskabel an. Schäden am Stromkabel können zu einem
Feuer oder Stromschlag führen.
• Wenn das Stromversorgungskabel beschädigt ist, muss es vom Hersteller, einem
Servicetechniker oder einer ähnlich quali zierten Person ausgetauscht werden, um
Gefährdungen zu vermeiden.
• Stellen Sie sicher, dass die Einheit an eine AC 220-240V 50Hz Steckdose angeschlos-
sen wird. Eine höhere Spannung kann zu Fehlfunktionen oder sogar zu einem Brand
führen.
• Wenn der Stecker nicht in die Steckdose passt, dürfen Sie keine Gewalt anwenden,
um einen nicht passenden Stecker in die Steckdose zu drücken.
• Schalten Sie die Einheit aus, bevor Sie sie von der Stromversorgung trennen, um sie
so vollständig abzuschalten.
• Vermeiden Sie es, das Stromkabel mit nassen Händen anzuschließen oder zu tren-
nen. Dies könnte andernfalls zu einem Stromschlag führen.
• Trennen Sie das Stromkabel, wenn es längere Zeit nicht verwendet wird.
• Stellen Sie sicher, dass der Hauptstecker immer leicht zugänglich ist.
DE

12
• Dieses Produkt enthält keine Teile, die vom Benutzer gewartet werden können.
Setzen Sie sich im Fall eines Defekts mit dem Hersteller oder der autorisierten
Kundenabteilung in Verbindung. Teile aus dem Inneren des Geräts freizulegen kann
lebensgefährlich sein. Die Garantie der Hersteller gilt nicht für Defekte, die durch
von nicht autorisierte Dritten durchgeführte Reparaturen entstehen.
• Benutzen Sie dieses Produkt nicht direkt nach dem Auspacken. Warten Sie, bis es
sich auf Zimmertemperatur erwärmt hat, ehe sie es einschalten.
• Stellen Sie sicher, dass dieses Produkt ausschließlich in Umgebungen mit mildem
Klima verwendet wird (kein tropisches oder subtropisches Klima).
• Stellen Sie das Produkt auf eine ache, stabile Ober äche, die keinen Erschütterun-
gen ausgesetzt ist.
• Das Produkt und dessen Teile dürfen nicht über die Kante delelte tragenden Möbel-
stücks hinausragen.
• Um das Risiko eines Feuers, Stromschlags oder Schäden an diesem Produkt zu re-
duzieren, sollten Sie es nicht direktem Sonnenlicht, Staub, Regen oder Feuchtigkeit
aussetzen. Setzen Sie es niemals tropfendem oder spritzendem Wasser aus und
positionieren Sie keine mit Flüssigkeiten gefüllten Objekte auf oder neben dem
Produkt.
• Setzen Sie keine mit Flüssigkeit gefüllten Objekte wie Vasen auf das Gerät.
• Installieren Sie das Produkt nicht in der Nähe von Heizquellen, wie etwa Heizungen,
Heizregister, Öfen oder anderen Apparaten (einschließlich Verstärker), die Hitze
produzieren.
• Platzieren Sie das Gerät nicht an Orten mit hoher Feuchtigkeit und mangelhafter
Belüftung.
• Sorgen Sie für einen Mindestabstand von 5 cm rund um das Gerät, um eine ausrei-
chende Belüftung sicherzustellen. Vermeiden Sie es, Belüftungsö nungen an die-
sem Produkt zu blockieren. Sorgen Sie immer dafür, dass die Belüftungsö nungen
nicht durch Gegenstände, z. B. Zeitungen, Tischdecken, Gardinen usw. verdeckt sind.
• Lassen Sie NIEMALS jemanden, ganz besonders nicht Kinder, etwas in die Löcher,
Spalten oder anderen Ö nungen des Gerätegehäuses stopfen, da dies zu einem
folgenschweren Stromschlag führen kann.
• Gewitter sind für alle elektrischen Geräte gefährlich. Wenn das Strom- oder Anten-
nenkabel vom Blitz getro en wird, kann das Gerät, auch wenn es ausgeschaltet ist,
beschädigt werden. Bei einem herannahenden Gewitter sollten Sie alle Kabel und
Stecker des Gerätes ausstecken.
• Ein exzessiver Schalldruck von Kopfhörern kann zu einem Hörverlust führen.
Wartung
• Trennen Sie vor dem Reinigen des Geräts das Stromkabel von der Stromquelle.
• Verwenden Sie einen weichen und sauberen Lappen, um die Außen ächen der
Einheit zu reinigen. Verwenden Sie beim Reinigen niemals Chemikalien oder
Reinigungsmittel.
Batterien
• Achten Sie beim Einlegen der Batterien auf die richtige Polarität.
• Setzen Sie Batterien keinen hohen Temperaturen aus und
legen Sie sie nicht an Stellen ab, wo sich die Temperatur schnell
erhöht, z. B. neben einem Feuer oder in die direkte Sonnenein-
strahlung.
• Setzten Sie Batterien keiner übermäßigen Strahlungswärme
aus, werfen Sie sie nicht ins Feuer oder bauen sie auseinander
und versuchen Sie nicht, nicht au adbare Batterien aufzuladen.
Sie könnten undicht werden oder explodieren.
• Verwenden Sie niemals unterschiedliche Batterien oder vermi-
schen neue mit alten.

DE
• Wenn Sie die Fernbedienung für längere Zeit nicht verwenden (länger als einen
Monat), sollten Sie die Batterie aus der Fernbedienung nehmen, um ein Auslaufen
zu verhindern.
• Wenn die Batterien auslaufen, wischen Sie die ausgelaufene Flüssigkeit im Batterie-
fach weg und ersetzen die Batterien durch neue.
• Verwenden Sie immer nur die angegebenen Batterien.
• Batterie nicht verschlucken, Gefahr von chemischen Verbrennungen
• Wenn die Batterie verschluckt wird, kann dies zu schweren inneren Verbrennungen
innerhalb von nur 2 Stunden führen und tödlich sein. Bewahren Sie neue und
gebrauchte Batterien für Kinder unzugänglich auf. Wenn das Batteriefach nicht fest
geschlossen werden kann, sollten Sie das Gerät nicht weiter verwenden und es für
Kinder unzugänglich aufbewahren. Wenn Sie vermuten, dass Batterien verschluckt
oder in irgendein Körperteil eingeführt wurden, müssen Sie sofort medizinische
Hilfe in Anspruch nehmen.
Entsorgung dieses Geräts und von Batterien
• Entsorgen Sie dieses Produkt oder dessen Batterien niemals über den
normalen Hausmüll. Geben Sie es entsprechend den gesetzlichen
Regelungen vor Ort bei dem für das Recycling von WEEE vorgese-
henen Sammelpunkt ab. Damit helfen Sie, Ressourcen einzusparen
und die Umwelt zu schützen.
• In den meisten EU-Ländern gelten für die Entsorgung von Batterien
besondere Gesetze und Vorschriften. Weitere Informationen erhalten
Sie von Ihrem Händler oder den örtlichen Behörden.
• Der oben aufgeführte Text erscheint auf elektrischen und elektro-
nischen Geräten und Batterien (oder der Verpackung), um Nutzer
entsprechend zu erinnern. Wenn unter dem Symbol „Hg“ oder „Pb“
erscheint, bedeutet dies, dass die Batterie jeweils Spuren von Quecksil-
ber (Hg) oder Blei (Pb)enthält.
• Nutzer werden darum gebeten, für gebrauchte Geräte und Batterien
bestehende Rückgabeeinrichtungen zu nutzen.
Informationen gültig für Deutschland
• Altgeräte sind getrennt zu sammeln und zu entsorgen. Besitzer von Altgeräten
tragen damit zur sicheren Entsorgung bei und helfen, mögliche umwelt- oder
gesundheitsschädlichen Folgen zu vermeiden.
• Entnehmbare Altbatterien und Altakkumulatoren, die zerstörungsfrei zu entnehmen
sind, sind vor der Entsorgung zu entfernen und getrennt zu behandeln.
• Informationen über gescha ene Sammel- bzw. Rückgabemöglichkeiten sowie die
Verp ichtungen des Handels/der Vertreiber gegenüber Endnutzern zur kostenfreien
Rücknahme von Altgeräten nden Sie auf der lokalen Website des Herstellers des
Produktes (www.sharpconsumer.eu), oder wenden Sie sich an den Händler, von
dem das Produkt bezogen wurde.
• Achtung: Die Verantwortung für das Löschen von personenbezogenen Daten, die
sich auf dem zu entsorgenden Gerät be nden, liegt beim Endnutzer!
• Das Symbol mit der durchgestrichenen Mülltonne weist darauf hin, dass Produkte,
deren Batterien/Akkumulatoren und/oder Verpackungen getrennt vom Hausmüll
gesammelt und entsorgt werden müssen. Der schwarze Balken zeigt an, dass das
Produkt nach dem 13. August 2005 auf den Markt gebracht wurde.
CE- und UKCA-Erklärung:
• Sharp Consumer Electronics Poland Sp. z o.o. erklärt hiermit, dass dieses Audiogerät
den wesentlichen Anforderungen und weiteren entsprechenden Vorschriften der
RED-Verordnung 2014/53/EU und der britischen Funkgeräteverordnung von 2017
entspricht.
• Der vollständige Text der EU-Konformitätserklärung ist unter folgendem Link
verfügbar: www.sharpconsumer.com, und anschließend ö nen Sie den Download-
Abschnitt Ihres Modells und wählen „CE-Erklärungen”.
DE

14
Zubehör
• 1x Fernbedienung
• 1x Benutzerhandbuch
• 1x GB Stromkabel
• 1x EU Stromkabel
• 2x Wandhalterung
• 1x Satz Wandbefestigungsschrauben
• 1x Schnellstart-Handbuch
• 2 x Batterie vom TypAAA
Steuerelemente
1
321
1. Fernbedienungssensor
2. LED-Anzeigen
• Rote Anzeige: Im STANDBY-Modus.
• Grüne Anzeige: Im AUX-Modus.
• Orange Anzeige: Im optischen
Modus.
• Blaue Anzeige: Im Bluetooth-Mo-
dus.
•• Weiße Anzeige: Im HDMI
ARC-Modus.
3. Wandhalterungsschrauben
4. taste
Zwischen ON und STANDBY-Modus
wechseln.
5. taste
Wählen Sie die Funktion Play.
6. taste
Wählen Sie einen Bluetooth-Modus.
Drücken und halten, um die Funktion
Koppeln im Bluetooth-Modus zu
aktivieren oder um das bestehende
gekoppelte Bluetooth-Gerät zu
trennen.
7. +/- tasten
Lautstärke regulieren.
Eingänge/Ausgänge
1. AC~ Steckplatz
Stromkabel anschließen.
2. OPTICAL Steckplatz
Optische Eingangsbuchse.
3. SERVICE ONLY Steckplatz
Der USB-Steckplatz dient nur der
Wartung. Er eignet sich nicht für das
Au aden von Smartphones, Tablets
oder ähnlichen Geräten.
4. AUX 1 Steckplatz
Mit einem externen Audiogerät
verbinden.
5. HDMI ARC Anschluß
Über ein HDMI-Kabel mit dem
Fernseher verbinden.
4 5 6 7
1 2 3 4 51

•
DE
Fernbedienung
1. – zwischen ON (EIN) und STANDBY-
Modus wechseln.
2. – wählen Sie den Bluetooth-Modus.
Drücken und halten, um die Funktion
Koppeln im Bluetooth-Modus zu
aktivieren oder um das bestehende
gekoppelte Bluetooth-Gerät zu
trennen.
3. – wählen Sie die Play-Funktion
(Wiedergabe).
4. VOL+/VOL- – Lautstärke regulieren.
5. / – im Bluetooth-Modus zum
vorherigen/nächsten Track springen.
6. – Wiedergabe im Bluetooth-
Modus abspielen/pausieren/weiter
abspielen.
7. – (STUMM) Stumm schalten oder
Ton erneut einschalten.
8. BASS +/- – Basspegel einstellen.
9. TRE +/- – Höhenpegel einstellen.
10. EQ – Wählen Sie einen voreigestell-
ten Sound-Modus.
Erstmalige Installation
Fernsteuerung einrichten
Dank der beigefügten Fernbedienung
kann das Gerät aus der Ferne bedient
werden.
• Selbst wenn die Fernbedienung
innerhalb des e ektiven Bereichs von
6 m bedient wird, kann ihr Betrieb
unmöglich sein, wenn sich zwischen
der Einheit und der Fernbedienung
Hindernisse be nden.
• Wenn die Fernbedienung in der Nähe
von anderen Produkten, die Infrarot-
strahlen generieren, betrieben wird,
oder wenn andere Fernsteuerungs-
geräte, die Infrarotstrahlen verwenden,
in der Nähe der Einheit verwendet
werden, arbeitet diese womöglich nicht
ordnungsgemäß. Umgekehrt arbeiten
auch die anderen Geräte womöglich
fehlerhaft.
Batterie der Fernbedienung
austauschen
1. Drücken Sie auf die hintere
Abdeckung und schieben Sie
sie auf, um das Batteriefach der
Fernbedienung zu ö nen.
2. Legen Sie zwei AAA-Batterien ein
(beiliegend). Vergewissern Sie sich,
dass die Pole (+) und (-) der Batterie
DE

16
entsprechend den Polen (+) und (-)
ausgerichtet sind, die im Batteriefach
angegeben werden.
3. Schließen Sie die Abdeckung des
Batteriefachs.
Platzierung und Befestigung
AB
A: Normale Platzierung (Setzen Sie die
Soundbar auf eine ebene Ober äche vor
dem Fernseher)
B: Wandmontierung
Wandmontierung
HINWEIS:
Die Installation darf nur von einem
quali zierten Fachmann vorgenommen
werden. Eine unsachgemäße Montage
kann zu schweren Verletzungen oder
Geräteschäden führen (wenn Sie dieses
Produkt selbst installieren möchten,
müssen Sie die Wand auf Installationen
im Inneren wie elektrische Kabel und
Rohrleitungen prüfen). Die Person,
welche die Installation vornimmt,
muss sicherstellen, dass die Wand die
Gesamtlast der Einheit und Halterungs-
vorrichtungen tragen kann.
Für die Installation werden zusätzliche
Werkzeuge (nicht beigefügt) benötigt.
Ziehen Sie die Schrauben nicht zu fest.
Bewahren Sie die Betriebsanleitung
zum Nachschlagen zu einem späteren
Zeitpunkt auf.
Nutzen Sie einen elektronischen
Balkensucher, um vor dem Bohren und
Montieren den Wandtyp zu prüfen.
914мм
12
Пористый
уплотнитель
914мм
3
> 32мм
4мм
(5мм)
4
914мм
1. Entfernen Sie die Schrauben aus der
Haupteinheit.
2. Nutzen Sie die aus der Haupteinheit
entfernten Schrauben, um die
Wandhalterungen an der Haupteinheit
zu befestigen.
Falls erforderlich, kleben Sie das
Schaumsto Streifen auf den Halter
um ggf. Unebenheiten auszugleichen.
3. Bohren Sie 2 parallele Löcher in die
Wand. Der Abstand zwischen den
Löchern sollte 914 mm betragen.
- Drücken Sie den Dübel in das Loch
in der Wand und befestigen Sie dann
die Schraube im Dübel.
4. Lassen Sie eine 5 mm große Lücke
zwischen der Wand und dem
Schraubenkopf. Heben Sie die
Einheit mit den angebrachten
Wandbefestigungen über die
Schraubenköpfe in die die
entsprechende Position.

DE
Anschlüsse
HDMI ARC-Eingang
Die ARC-Funktion (Audio Return
Channel) erlaubt Ihnen, Audio von
Ihrem ARC-kompatiblen Fernseher
über einen einzigen HDMI-Anschluss
an Ihre Soundbar zu schicken. Um die
ARC-Funktion zu genießen, stellen Sie
bitte sicher, dass Ihr Fernseher sowohl
HDMI-CEC als auch ARC-kompatibel ist,
und richten Sie ihn entsprechend ein.
Bei korrekter Einrichtung können Sie
Ihre Fernsehfernbedienung nutzen, um
die Lautstärke (VOL +/- und MUTE) der
Soundbar zu regulieren.
Schließen Sie das HDMI-Kabel (nicht
beigefügt) vom HDMI (ARC)-Steckplatz
der Einheit an den HDMI (ARC)-Steck-
platz an Ihrem ARC-kompatiblen
Fernseher an. Wählen Sie dann per
Knopfdruck auf Ihrer Fernbedienung
HDMI ARC aus.
TIPPS:
• Ihr Fernseher muss die HDMI-CEC und
ARC-Funktion unterstützen. HDMI-CEC
und ARC müssen auf On gestellt sein.
• Die Einstellungsmethoden HDMI-CEC
und ARC können je nach Fernseh-
gerät variieren. Für weitere Details zur
ARC-Funktion nehmen Sie bitte die
Bedienungsanleitung Ihres Fernsehers
zur Hand.
• Nur HDMI Kabel der Version 1.4 oder
höher unterstützen die ARC Funktion
Eingang OPTICAL
• Entfernen Sie die Schutzabdeckung,
schließen Sie dann ein OPTICAL-Kabel
(nicht enthalten) an den Steckplatz
OPTICAL OUT des Fernsehers und den
Steckplatz OPTICAL auf der Einheit an.
TIPP:
Wenn im HDMI ARC/OPTICAL-Modus
kein Sound von der Einheit kommt und
die HDMI ARC/OPTICAL-Lichter schnell
blinken, müssen Sie womöglich den PCM-
Signalausgang auf Ihrem Quellengerät
(z. B. Fernseher, DVD oder Blu-Ray Player)
aktivieren.
AUX
A. Nutzen Sie ein RCA zu 3,5 mm
Audiokabel (nicht beigefügt), um die
Steckplätze des TV-Audioausgangs
mit dem AUX 1-Steckplatz an der
Einheit zu verbinden.
B. Nutzen Sie ein 3,5 mm zu 3,5 mm
Audiokabel (nicht beigefügt), um die
DE

18
Kopfhörersteckplätze des Fernsehers
oder externen Audiogeräts mit dem
AUX 1-Steckplatz an der Einheit zu
verbinden.
TIPP:
Bei Anschluss über den Kopfhörer
Ausgang des TV Gerätes, benutzen Sie die
TV Fernbedienung um die Lautstärke zu
regulieren.
EU
UK
An eine Stromquelle anschließen
• Bevor Sie das Wechselstromkabel
anschließen, müssen Sie sicherstellen,
dass Sie alle anderen Anschlüsse vor-
genommen haben.
• Risiko von Geräteschäden! Stellen
Sie sicher, dass die Stromversorgungs-
spannung der auf der Rückseite oder
Unterseite der Einheit angegebenen
Spannung entspricht.
• Schließen Sie das Hauptkabel an den
AC~-Steckplatz der Einheit und an-
schließend an eine Steckdose an.
Allgemeiner Betrieb
Standby/ON
• Wenn Sie die Einheit das erste Mal an
eine Steckdose anschließen, be ndet
sie sich im STANDBY-Modus. Die POW-
ER-Anzeige leuchtet rot auf.
• Drücken Sie die entsprechende
Taste auf der Fernbedienung, um die
Haupteinheit ein- oder auszuschalten
(ON/OFF).
• Ziehen Sie den Hauptstecker aus der
Netzsteckdose, wenn Sie die Einheit
vollständig abschalten möchten.
Wenn ein Fernseher oder ein externes
Gerät (nur für AUX-Steckplatz) an-
geschlossen ist, schaltet sich die Einheit
automatisch ein, wenn der Fernseher
oder das externe Gerät eingeschaltet ist.
Wenn die Einheit für mehr als 15 Minuten
kein Eingangssignal empfängt, wechselt
sie automatisch in den Standby-Modus.
Modi wählen
Drücken Sie mehrmals die -Taste
auf der Einheit oder die Tasten AUX, BT
(Bluetooth), OPTICAL, HDMI ARC auf der
Fernbedienung, um den gewünschten
Modus auszuwählen.
• Rote Anzeige: Im STANDBY-Modus.
• Grüne Anzeige: Im AUX-Modus.
• Orange Anzeige: Im optischen Modus.
• Blaue Anzeige: Im Bluetooth-Modus.
•• Weiße Anzeige: Im HDMI ARC-Modus.
Lautstärkeregelung
Drücken Sie die Tasten + / - auf der
Einheit oder tasten VOL+ / VOL- auf
der Fernbedienung, um die Lautstärke
anzupassen.
Wenn Sie den Ton vollständig ab-
schalten möchten, drücken Sie die MU-
TE-Taste auf der Fernbedienung. Drü-
cken Sie die MUTE-Taste erneut oder
drücken Sie die Tasten VOL+ / VOL- auf
der Einheit oder der Fernbedienung,
um den Ton wieder einzuschalten.
Während des Einstellens der Lautstärke
blinkt die Statusanzeige.
Wenn Sie die Taste VOL+ erneut drü-
cken und die Lautstärke ihre maximale
Stufe erreicht hat, blinkt die Status-
anzeige einmal auf. Wenn Sie die Taste
VOL- erneut drücken und die Lautstärke
ihre minimale Stufe erreicht hat, blinkt
die Statusanzeige einmal auf.
Strona się ładuje...
Strona się ładuje...
Strona się ładuje...
Strona się ładuje...
Strona się ładuje...
Strona się ładuje...
Strona się ładuje...
Strona się ładuje...
Strona się ładuje...
Strona się ładuje...
Strona się ładuje...
Strona się ładuje...
Strona się ładuje...
Strona się ładuje...
Strona się ładuje...
Strona się ładuje...
Strona się ładuje...
Strona się ładuje...
Strona się ładuje...
Strona się ładuje...
Strona się ładuje...
Strona się ładuje...
Strona się ładuje...
Strona się ładuje...
Strona się ładuje...
Strona się ładuje...
Strona się ładuje...
Strona się ładuje...
Strona się ładuje...
Strona się ładuje...
Strona się ładuje...
Strona się ładuje...
Strona się ładuje...
Strona się ładuje...
Strona się ładuje...
Strona się ładuje...
Strona się ładuje...
Strona się ładuje...
Strona się ładuje...
Strona się ładuje...
Strona się ładuje...
Strona się ładuje...
Strona się ładuje...
Strona się ładuje...
Strona się ładuje...
Strona się ładuje...
Strona się ładuje...
Strona się ładuje...
Strona się ładuje...
Strona się ładuje...
Strona się ładuje...
Strona się ładuje...
Strona się ładuje...
Strona się ładuje...
Strona się ładuje...
Strona się ładuje...
Strona się ładuje...
Strona się ładuje...
Strona się ładuje...
Strona się ładuje...
Strona się ładuje...
Strona się ładuje...
Strona się ładuje...
Strona się ładuje...
Strona się ładuje...
Strona się ładuje...
Strona się ładuje...
Strona się ładuje...
Strona się ładuje...
Strona się ładuje...
Strona się ładuje...
Strona się ładuje...
Strona się ładuje...
Strona się ładuje...
Strona się ładuje...
Strona się ładuje...
-
 1
1
-
 2
2
-
 3
3
-
 4
4
-
 5
5
-
 6
6
-
 7
7
-
 8
8
-
 9
9
-
 10
10
-
 11
11
-
 12
12
-
 13
13
-
 14
14
-
 15
15
-
 16
16
-
 17
17
-
 18
18
-
 19
19
-
 20
20
-
 21
21
-
 22
22
-
 23
23
-
 24
24
-
 25
25
-
 26
26
-
 27
27
-
 28
28
-
 29
29
-
 30
30
-
 31
31
-
 32
32
-
 33
33
-
 34
34
-
 35
35
-
 36
36
-
 37
37
-
 38
38
-
 39
39
-
 40
40
-
 41
41
-
 42
42
-
 43
43
-
 44
44
-
 45
45
-
 46
46
-
 47
47
-
 48
48
-
 49
49
-
 50
50
-
 51
51
-
 52
52
-
 53
53
-
 54
54
-
 55
55
-
 56
56
-
 57
57
-
 58
58
-
 59
59
-
 60
60
-
 61
61
-
 62
62
-
 63
63
-
 64
64
-
 65
65
-
 66
66
-
 67
67
-
 68
68
-
 69
69
-
 70
70
-
 71
71
-
 72
72
-
 73
73
-
 74
74
-
 75
75
-
 76
76
-
 77
77
-
 78
78
-
 79
79
-
 80
80
-
 81
81
-
 82
82
-
 83
83
-
 84
84
-
 85
85
-
 86
86
-
 87
87
-
 88
88
-
 89
89
-
 90
90
-
 91
91
-
 92
92
-
 93
93
-
 94
94
-
 95
95
-
 96
96


Sharp HT-SB140(MT) Instrukcja obsługi
- Kategoria
- Głośniki soundbar
- Typ
- Instrukcja obsługi
w innych językach
- español: Sharp HT-SB140(MT) El manual del propietario
- italiano: Sharp HT-SB140(MT) Manuale del proprietario
- Deutsch: Sharp HT-SB140(MT) Bedienungsanleitung
- français: Sharp HT-SB140(MT) Le manuel du propriétaire
- Nederlands: Sharp HT-SB140(MT) de handleiding