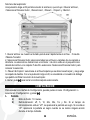
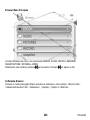
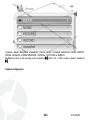
Ingo PMP-10 Instrukcja obsługi
- Kategoria
- Odtwarzacze MP3 / MP4
- Typ
- Instrukcja obsługi

PMP 4.3”

1
ENGLISH
INTRODUCTION
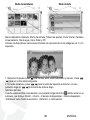
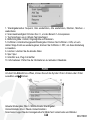
Thank you for your purchase of this Portable Multimedia Player. Now you can carry your
music and videos around with your favourite character. Read this manual before using your
player and keep it for future reference.
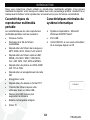
Portable Multimedia Player features Computer system requirements
Your Portable Multimedia Player has the
following features:
• TOUCH Panel
• Stores 4Gb of multimedia files
• Plays MP3, WMA, WAV, OGG, FLAC
and ACC music files
• Plays RM, RMVB, AVI, MKV, WMV,
VOB, MOV, FLV, ASF, MP4, 3GP, MPG
and MPEG video files.
• Plays JPEG, BMP, GIF, TIF and PNG
pictures.
• Plays and records FM Radio
• Voice Recorder
• Plays TXT format eBooks
• Transfers files from your computer over
a USB cable.
• Included microSD slot to expand
memory
• Built-in rechargeable battery
• TV out
• Operating System: Microsoft Windows
2000/XP/Vista/7
• USB port
• CD/DVD drive, if you want to transfer
music from CD
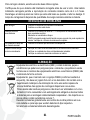
PRODUCT SUPPORT
There is a dedicated help line for this product if you have problems. For help and advice ring:
UK 0871 780 0079 FRANCE 0891 65 01 01 SPAIN 902 023 951
Please have your receipt ready when you call. You can also contact us via email:
[email protected] or visit us at http://www.ingodevices.com.
12U008_V1

2
ENGLISH
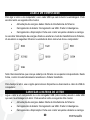
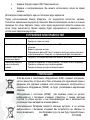
CAUTION
At full volume, prolonged listening of portable music player may damage user's
hearing.
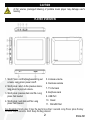
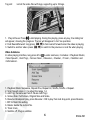
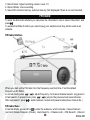
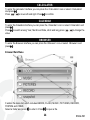
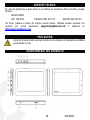
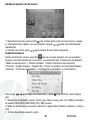
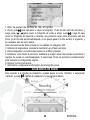
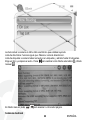
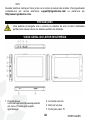
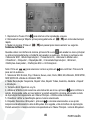
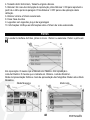
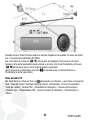
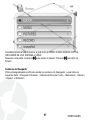
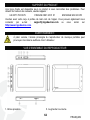
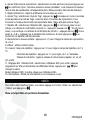
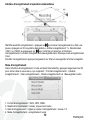
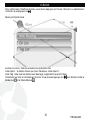
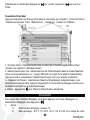
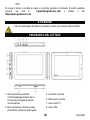
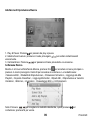
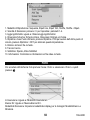
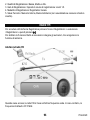
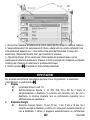
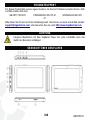
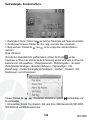
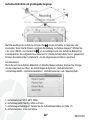
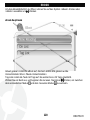
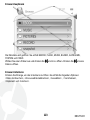
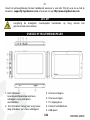
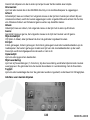
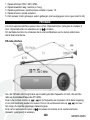
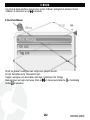
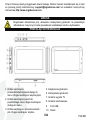
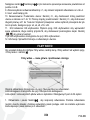
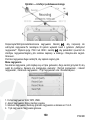
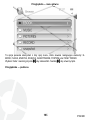
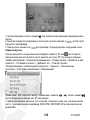
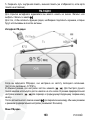
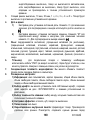
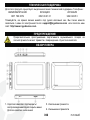
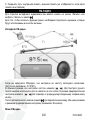
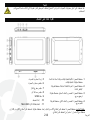
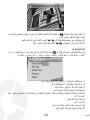
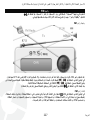
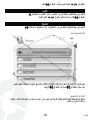
PLAYER OVERVIEW
1. Short Press: confirm/play/pause/bring out
a menu. Long press: power on/off.
2. Short press: return to the previous menu;
long press: to pop out a menu.
3. Short press: previous item and file. Long
press: fast rewind.
4. Short press: next item and file. Long
press: fast forward.
5. Increase volume.
6. Decrease volume
7. TV-Out Jack
8. Earphone Jack
9. USB Port
10. Reset
11. MicroSD Slot
Key Operation: Short press: Press the key for less than 1 second. Long Press: press the key
for more than 3 seconds. Hold: Keep the key pressed.

3
ENGLISH
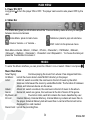
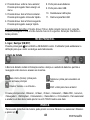
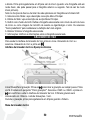
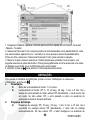
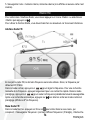
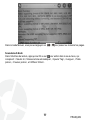
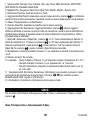
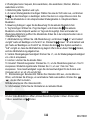
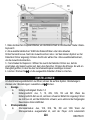
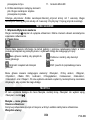
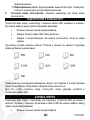
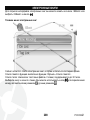
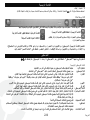
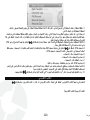
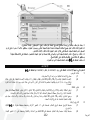
MAIN MENU
1. Power ON / OFF
Long press to turn the player ON or OFF. The player can be set to auto power OFF by the
user.
2. Status Bar
The Status Bar gives you information about the Time and battery status and let you navigate
between menus and access
Home Menu: press to main menu
Volume: Volume + or Volume –
Submenu: press to pop out submenu
ESC: return to the previous menu
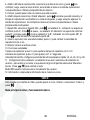
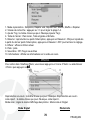
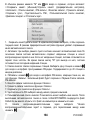
Main Menu includes <Music>, <Video>, <Photo>, <Recorder>, <FM Radio>, <EBook>,
<Browser>, <Setting>, <Calculator>, <Calendar> and <Stopwatch>. To choose the item just
press the Touchscreen to access it.
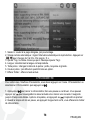
MUSIC
To enter the Music interface you can press the <Music> icon or select <Music> and press .
Music Main Menu
Now Playing: Continue playing the music from where it has stopped last time .
All Music: List all the music stored under MUSIC directory in the player.
Artist: Artist list; select one artist, the next level is the list of music by the artist.
Unknown Artist saved the music by unidentified artist. The function of Unknown
Album and Unknown Genre are the same.
Album: Album list; select one album, the next level is the list of music in the album.
Genre: Genre list; select one genre, the next level is the list of music of this genre.
My Music List: Five lists in total; each list contains the music classified by user.
Dir List: Internal Memory, External Memory. Internal Memory contains all music files in
the player. External Memory lists all music files in card and this list will not be
displayed if no card inserted.
Record List: List all the recording files.

4
ENGLISH
My Rating: List five ratings (1-5 Stars); each rating displays all the music of the ratings.
User can rate music according to the favorites.
Tag List: List all the music tag set by user; supporting up to 32 tag lists.
Music playing interface
1. Play & Pause: Press to switch between play and pause.
2. Fast Rewind/Forward: long press / to fast rewind /forward.
3. Change music: Press / to switch to the previous or next music.
Music Submenu
While you are in the music interface, press M or to enter main menu or long press M Key
to enter submenu. The items are: <Select EQ>, <Play Mode>, <Screen Size>, <Add to My
Playlist>, <Set Rating>, <Add Tag>, <AB Repeat>, <Variable Speed Playback>, <Delete>,
<Advanced>, <EQ Settings> and <Information>.
Note: Press / to choose between items, and press to confirm, press M to exit.
1. Select EQ: Normal, Pop, Classic, Soft, Jazz, Rock, DBB, User EQ, SRS WOW, SRS WOW
HD and SRS User Mode.
2. Play Mode: Sequence, Repeat One, Repeat All, Shuffle, Shuffle + Repeat and Intro.

5
ENGLISH
3. Screen Size: Spectrum and lyric.
4. Add to My Play list: select one list among the five and press to confirm adding; then
return to the previous level; you may find the music in the corresponding play list in <Main
Menu-My Music List>.
5. Set Rating: set the rating for the current music.
6. Add Tag: Select <Add Tag>, press , the current music and its time point will be added to
Tag List, and then it returns to playing interface. You may find the music in the corresponding
list in <Main Menu-Tag List>.
7. AB Repeat: Select <AB Repeat>, press , ‘A-’ is highlighted, indicating “waiting to confirm
point A”. Press again, “-B” is highlighted, indicating “waiting to confirm point B”, then press
, the icon changes to “A-B”, indicating AB repeat starts. If press at this time, AB repeat
will be cancelled.
8. Variable Speed Playback: Press </> to change playing speed from -4 to 4.
9. Delete: delete the current file.
10. Advanced: Replay Times: Press </> to adjust repeat time, from 1 to 10.
Replay Intervals: Press </> to adjust, from 1 sec to 7sec.
Scan Speed: set the speed of fast rewind/forward, x2, x4, x8, x16 and x32.
11. EQ Settings: User EQ: Select <User EQ> to enter, long press M to select different bars.
Press / to change the value.
SRS User Mode: The same as <User EQ>.
12. Information: Check the information of the current music.
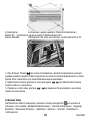
VIDEO
To enter the Video interface you can press the <Video> icon or select <Video> and press .
Video Main Menu and Basic Operation
Now Playing: The function is the same as that of <Music- Now Playing>.
Dir List: The function is the same as that of <Music-Dir List>.

6
ENGLISH
Tag List: List all the video files with tags, supporting up to 32 tags.
1.Play & Pause: Press to start playing. During the playing, press any key, the sliding bar
will appear, showing the progress. The bar will disappear in 3s if no operation.
2. Fast Rewind/forward: long press / to fast rewind/ forward when the video is playing.
3. Switch to another video: press / to switch to the previous or next file when playing.
Video Submenu
In video playing interface, long press M or to enter submenu; it includes: <Playback Mode>,
<Scan Speed>, <Add Tag>, <Screen Size>, <Resume>, <Delete>, <Track>, <Subtitle> and
<Information>.
1. Playback Mode: Sequence, Repeat One, Repeat All, Shuffle, Shuffle + Repeat.
2. Scan Speed: press </> to adjust the range 1-4.
3. Add Tag: the same as that of <Music-Add Tag>
4. Screen Size: Full Screen, Original Size and Scale.
5. Resume: Breakpoint play, press Resume > ON to play from last stop point, press Resume
> OFF to finish this setting.
6. Delete: delete the current file.
8. Track: track
9. Subtitle: off, Plug-in subtitles

7
ENGLISH
10. Information: Check the information of the current video file.
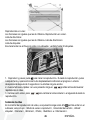
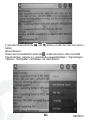
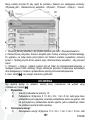
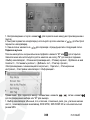
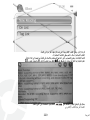
PHOTO
To enter the Music interface you can press the <Photo> icon or select <Photo> and press .
Now Playing: Same as that of <Music-Now Playing>.
Dir List: Same as that of <Music-Dir List>.
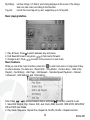
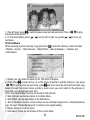
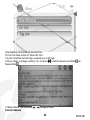
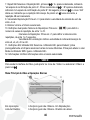
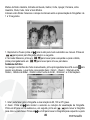
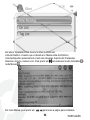
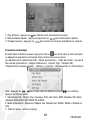
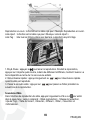
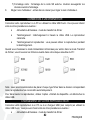
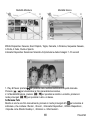
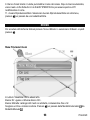
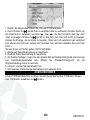
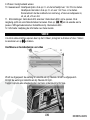
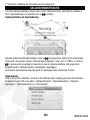
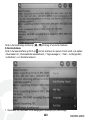
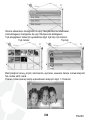
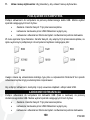
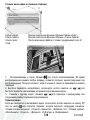
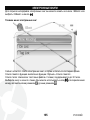
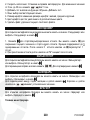
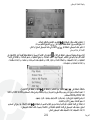
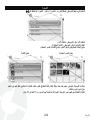
Scan Mode: Set display mode of pictures: List Mode and Thumbnail.
Thumbnail mode List Mode
Slide Effect: Random, Fly In, Chessboard, Cut, Erase, Louver, Random Line, Water Wave,
Cube, Rotate and Off.
Slide Interval: Select picture playing interval: 1-10 Sec.

8
ENGLISH
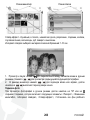
1. Play & Pause: press to switch between auto and manual mode. Press / to play
the previous/next photo,
2. In Thumbnail Mode, press / to move left or right, long press / to move up
and down.
Photo Submenu
When browsing a photo manually, long press M or to enter the submenu, which includes
<Rotate>, <Zoom>, <Slide Interval>, <Slide Effect>, <Set as Desktop >, <Delete> and
<Information>.
1. Rotate: you can rotate the photo by 90, 180 and 270 degree.
2. Zoom: Press to keep zoom in or out the photo. Press M to exit the submenu, then press
/ move the photo up and down, press and M to move the photo left and right; long
press M to exit from Zoom (when a photo is zoom in/out, you can’t switch to the previous or
next photo, you should exit zoom first).
Note: Zoom and Rotate functions are invalid to GIF pictures.
3. Slide Interval: see the description in the Main Menu.
4. Slide Effect: see the description in the Main Menu.
5. Set as Desktop: Set the current picture as the desktop background or startup/shutdown
logo. Or select “default background” to restore to its original setting.
6. Delete: Delete the current photo.
7. Information: Check the information of the current photo.

9
ENGLISH
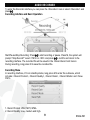
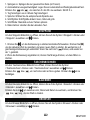
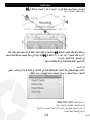
AUDIO RECORDER
To enter the Recorder interface you can press the <Recorder> icon or select <Recorder> and
press .
Recording Interface and Basic Operation
Start\Pause\Stop Recording: Press to start recording or pause. Press M, the system will
prompt “Stop Record?” select <YES> or <NO> and press to confirm and return to the
recording interface. The recorded file will be saved in the <Music-Record List-Voice>.
During recording, long press M to save the recorded file.
Recording Menu
In recording interface, if it is in standby status, long press M to enter the submenu, which
includes: <Record Format>, <Record Quality>, <Record Gain>, <Record Mode> and <Save
Path>.
1. Record Format: WAV, MP3, WMA.
2. Record Quality: Low, medium and high.

10
ENGLISH
3. Record Gain: Adjust recording volume: Level 1-5.
4. Record Mode: Voice recording.
5. Save Path: Internal memory, external memory (Not displayed if there is no card inserted).
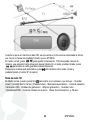
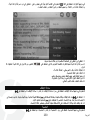
FM RADIO
To enter the Recorder interface you can press the <Recorder> icon or select <Recorder> and
press .
To enable the Radio Function you need to plug your earphones as they will be used as an
antenna.
FM Radio Interface
When you start up the FM radio it’s in the frequency used last time. If not the default
frequency is 87.5MHz.
In normal mode, press / to adjust frequency. For manual channel search, long press it
to fast search. In preset mode, press / to jump to the previous/next saved channel.
After auto search, press to switch between normal and preset modes(show channel No.)
FM Radio Menu
In Normal Mode, presses M or to enter the submenu, which includes: <Save Channel>
(normal)/<Delete Channel> (Preset), <Auto Search>, <Channel List>, <FM Record>, <Record

11
ENGLISH
Quality>, <Record Gain>, <Save Path>, <FM Sensitivity>, <User Channel List>, <Tuner
Region> and <Mute>.
1. Save Channel /Delete Channel: In normal mode, select it to save the current channel. In
the preset mode, delete the saved channel of auto search.
2. Auto Search: When selected the system will start auto search. When finishing search, the
system will automatically save the searched stations and play the first one. If no station found,
the system will stop at the first frequency point. During the search, press M to exit, the system
will stop at the last searched station.
3. Channel List:List the saved stations. Select one station and press to enter the FM
listening interface. Support up to 20 stations per band.
4. FM Record: Press to enter FM recording interface, the operation is the same as that of
<Recorder>. The recorded file will be saved to <Music-Record List-FM Record>.
5. Record Quality: The same as <Recorder>.
6. Record Gain: The same as <Recorder>.
7. Save Path: The same as <Recorder>.
8. FM sensitivity: Choose between low, medium and high.
9. User Channel List: User can define channel name. After auto search, a Default.ini file is
generated in U-Disk\SYSTEM\FM, you can open the file on PC and modify its file name.
11. Start Playing/Mute: Select Start Playing/Mute in the submenu, press to switch between
them.
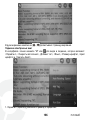
EBOOK
To enter the E-Book interface you can press the <EBook> icon or select <EBook> and press
.
E-Book Main menu

12
ENGLISH
Now Reading: List the eBook read last time.
Dir List: the same as that of <Music-Dir List>.
Tag List: list all the text with tags, supporting up to 32 tags.
Choose a book, and begin reading. You can press to switch between Auto Mode and
Manual Mode .
In Manual Mode, you can press / to page up/down.
E-Book Submenu

13
ENGLISH
In the reading interface, press M or to enter the submenu, which includes: <skip to>,<Auto
Reading Speed>, <Add Tag>, <Language>, <Font Size>, <Font Color>, and <Delete File>.
1. Skip to: skip to the designated page, by percentage.
2. Auto Reading Speed: Set auto play interval. Press / to change from 5s to 30s. Step:
5s.
3. Add Tag: the same as <Music-Add Tag>.
3. Language: select the corresponding language.
4. Font Size: change font size: small, medium and large.
5. Font color: default and the four colors optional.
6. Delete File: delete the current text.
STOPWATCH
To enter the StopWatch interface you can press the <StopWatch> icon or select
<StopWatch> and press .
1. Press to start/pause/continue counting. You can press to save the current value and
start a new one. It supports up to 5 simultaneous counts. After the 5
th
if you press it will
restart the 1
st
one.
2. When counting is paused, long press M, you can clear the counting box.

14
ENGLISH
CALCULATOR
To enter the calculator interface you can press the <Calculator> icon or select <Calculator>
and press .
Press / to move left and right. Press to confirm.
CALENDAR
To enter the Calendar interface you can press the <Calendar> icon or select <Calendar> and
press .
Press to switch among Year, Month and Date, short and long press / to change the
value.
BROWSER
To enter the Browser interface you can press the <Browser> icon or select <Browser> and
press .
Browser Main Menu
It enters the menu list, which includes EBOOK, FLASH, MUSIC, PICTURES, RECORD,
SYSTEM and VIDEO.
Select a folder and press to enter it. Press to open a file.

15
ENGLISH
Browser Submenu
Long press M to enter submenu, which includes: <Search File>, <Select\Cancel All>,
<Select> , <Move>, <Copy> and <Delete>.
1. Search File: it enters the keyboard to fast search the file. Refer to <Music-Key Board>
2. Select\Cancel All: select all files/folders under the current folder/dir. Once selected, a red √
will show on the small icon before the file/folder. Press M or select <Select\Cancel All> to
cancel the selection.
3. <Move>&<Copy>: first select the file/folder to be moved/copied, and then select the target
folder. Long press M, it will pop up the dialog box prompting you to confirm the move/copy.
4. Delete: press to delete the selected file/folder.
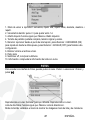
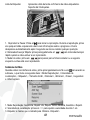
SETTINGS
To enter the Settings interface you can press the <Settings> icon or select <Settings> and
press .
1. Display
1) Backlight Brightness: 1-5 levels.
2) Backlight: Off, 5, 10, 20S, 30S, 1M and 5M. If the backlight time is off, then no
black screen. If it is not off, the screen will turn black if no operation during the
set duration.
2. Power Saving
1) Power Saving: Off, 10S, 30S, 1M, 5M and 10M. If the power saving is off, the
player will not shut down automatically; if it is not off, the player will shut down

16
ENGLISH
in case no operation during the set duration.
2) Sleep Mode: Off, 10M, 30M, 1Hr, 2Hr, 3Hr, 4Hr and 5Hr. The player will shut
down when the set time reaches.
3. Date and Time
1) Adjust Date: Set system date. Press </> to change the value and long press
to confirm and exit.
2) Adjust Time: Set system time. Press M to switch among hour, minute and
press </> to change the value. Press to conform and exit.
4. Language: Support English, Simplified Chinese (default), Traditional Chinese,
Japanese, Korean, French, German, Italian, Dutch, Portuguese, Spanish, Swedish,
Czech, Danish, Polish, Russian, Turkish, Hebrew, Thai, Hungarian, Romanian , Arabic,
Indonesia, Malaysian, Vietnamese, Norwegian, Finnish, Greek and Hindi.
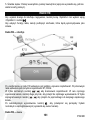
5. TV OUT: To connect your player to the TV you need to use a YPbPr cable
(Not included).
The display will turn off and you can operate the PMP using the key
navigation explained in the manual.
6. Sync media playlist: You can refresh the PMP playlist after transferring files from the
computer.
7. Advanced:
1) Information: User Name, Firmware Version, Memory Total Space, Memory Free
Space, Card Capacity, Card Free Space, External Capacity and External Free
Capacity.
2) Select Font: You can define your own font, by saving the font file in Disk
<SYSTEM-FONTS> to replace the default one.
3) Select Key Tone: Select between the four key tones or turn Key Tone Off.
4) Effect Setting: Fly In, Cube, Rotate and Off.
5) Search Folder: On or Off.
6) Format Internal Memory: Format the player. It will erase all data. Please save
data before format.
7) Format Card: Format the external SD Card. Please save data before format.
8. Set User Name: Enter Keyboard to set user name.

17
ENGLISH
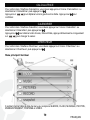
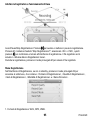
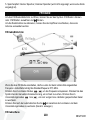
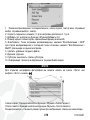
CONNECT TO COMPUTER
Connect your player to PC using the supplied USB cable. You can choose between the three
following modes:
• Power & Data: File transfer mode
• Charge: Charge through USB. Player will turn off.
• Charge & Play: You can use the player while it charges.
When choose Power & Data to enter File Transfer mode, you will find the following files in
your PC removable disk:
Note: we recommend that you put each file type under the corresponding folder. This way the
player will automatically recognise them.
To disconnect the player, use the option to remove devices and unplug the USB cable.
CHARGING YOUR PLAYER
Connect your player to a PC or USB charger (Not included) using the supplied USB cable.
You can choose between the three following modes:
• Power & Data: File transfer mode
• Charge: Charge through USB. Player will turn off.
• Charge & Play: You can use the player while it charges.
To charge choose one of the latest two options.
Make sure the battery is fully charged before using your player. A fully charger battery allows
you to reproduce content during about 4–6 hours. Recharge the player when the battery is

18
ENGLISH
low or when the player shuts down. Charging times will vary depending on the amount of
residual charge in the battery.
TROUBLESHOOTING
No power
Confirm whether the battery is installed correctly;
Confirm whether the player is opened
No sound in the earphone
Confirm the volume is not “0” and check whether the earphone is connected
well.
Keep the earphone clean.
The broken MP3 may make some noises, even unable to play the music, please
ensure the music file complete.
The letters on the screen
are in an abnormal shape
Confirm the language you select is available.
Unable to download music
normally
Check whether the USB line is broken or connected well.
Check whether the driver is installed appropriately.
Check whether there exists a blank memory inside.
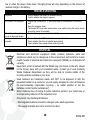
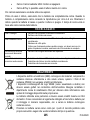
DISPOSAL
Electrical and electronic equipment (EEE) contains materials, parts and
substances which can be dangerous to the environment and harmful to human
health if waste of electrical and electronic equipment (WEEE) is not disposed of
correctly.
Equipment, which is marked with the WEEE logo (as shown on the left), should
not be thrown away with your household waste. Contact your Local Authority
Waste Disposal Department as they will be able to provide details of the
recycling options available in your area.
Used batteries are hazardous waste and NOT to be disposed of with the
household waste! As a consumer you are legally obligated to return all batteries
for environmentally responsible recycling – no matter whether or not the
batteries contain harmful substances*).
Return batteries free of charge to public collection points in your community or
to shops selling batteries of the respective kind.
Only return fully discharged batteries.
• Rechargeable batteries should be charged under adult supervision.
• The supply terminals are not to be short-circuited.

19
ENGLISH
• Used batteries are hazardous waste and NOT to be disposed of the household
waste!!! Return the batteries to your dealer or to collection points in your
community.
• Keep batteries away from children. Children might swallow batteries.
Contact a physician immediately if a battery was swallowed.
• Check your batteries regularly to avoid battery leakage.
• Batteries shall not be exposed to excessive heat such as sunshine, fire or the
like.
• CAUTION: Danger of explosion if battery is incorrectly replaced
Ingo Devices assumes no responsibility for any errors that may appear in this
manual.
Due to our continuous improvement, Ingo Devices reserves the right to change
without notice, product offerings, specifications and compatibility.
www.ingodevices.com
Strona się ładuje...
Strona się ładuje...
Strona się ładuje...
Strona się ładuje...
Strona się ładuje...
Strona się ładuje...
Strona się ładuje...
Strona się ładuje...
Strona się ładuje...
Strona się ładuje...
Strona się ładuje...
Strona się ładuje...
Strona się ładuje...
Strona się ładuje...
Strona się ładuje...
Strona się ładuje...
Strona się ładuje...
Strona się ładuje...
Strona się ładuje...
Strona się ładuje...
Strona się ładuje...
Strona się ładuje...
Strona się ładuje...
Strona się ładuje...
Strona się ładuje...
Strona się ładuje...
Strona się ładuje...
Strona się ładuje...
Strona się ładuje...
Strona się ładuje...
Strona się ładuje...
Strona się ładuje...
Strona się ładuje...
Strona się ładuje...
Strona się ładuje...
Strona się ładuje...
Strona się ładuje...
Strona się ładuje...
Strona się ładuje...
Strona się ładuje...
Strona się ładuje...
Strona się ładuje...
Strona się ładuje...
Strona się ładuje...
Strona się ładuje...
Strona się ładuje...
Strona się ładuje...
Strona się ładuje...
Strona się ładuje...
Strona się ładuje...
Strona się ładuje...
Strona się ładuje...
Strona się ładuje...
Strona się ładuje...
Strona się ładuje...
Strona się ładuje...
Strona się ładuje...
Strona się ładuje...
Strona się ładuje...
Strona się ładuje...
Strona się ładuje...
Strona się ładuje...
Strona się ładuje...
Strona się ładuje...
Strona się ładuje...
Strona się ładuje...
Strona się ładuje...
Strona się ładuje...
Strona się ładuje...
Strona się ładuje...
Strona się ładuje...
Strona się ładuje...
Strona się ładuje...
Strona się ładuje...
Strona się ładuje...
Strona się ładuje...
Strona się ładuje...
Strona się ładuje...
Strona się ładuje...
Strona się ładuje...
Strona się ładuje...
Strona się ładuje...
Strona się ładuje...
Strona się ładuje...
Strona się ładuje...
Strona się ładuje...
Strona się ładuje...
Strona się ładuje...
Strona się ładuje...
Strona się ładuje...
Strona się ładuje...
Strona się ładuje...
Strona się ładuje...
Strona się ładuje...
Strona się ładuje...
Strona się ładuje...
Strona się ładuje...
Strona się ładuje...
Strona się ładuje...
Strona się ładuje...
Strona się ładuje...
Strona się ładuje...
Strona się ładuje...
Strona się ładuje...
Strona się ładuje...
Strona się ładuje...
Strona się ładuje...
Strona się ładuje...
Strona się ładuje...
Strona się ładuje...
Strona się ładuje...
Strona się ładuje...
Strona się ładuje...
Strona się ładuje...
Strona się ładuje...
Strona się ładuje...
Strona się ładuje...
Strona się ładuje...
Strona się ładuje...
Strona się ładuje...
Strona się ładuje...
Strona się ładuje...
Strona się ładuje...
Strona się ładuje...
Strona się ładuje...
Strona się ładuje...
Strona się ładuje...
Strona się ładuje...
Strona się ładuje...
Strona się ładuje...
Strona się ładuje...
Strona się ładuje...
Strona się ładuje...
Strona się ładuje...
Strona się ładuje...
Strona się ładuje...
Strona się ładuje...
Strona się ładuje...
Strona się ładuje...
Strona się ładuje...
Strona się ładuje...
Strona się ładuje...
Strona się ładuje...
Strona się ładuje...
Strona się ładuje...
Strona się ładuje...
Strona się ładuje...
Strona się ładuje...
Strona się ładuje...
Strona się ładuje...
Strona się ładuje...
Strona się ładuje...
Strona się ładuje...
Strona się ładuje...
Strona się ładuje...
Strona się ładuje...
Strona się ładuje...
Strona się ładuje...
Strona się ładuje...
Strona się ładuje...
Strona się ładuje...
Strona się ładuje...
Strona się ładuje...
Strona się ładuje...
Strona się ładuje...
Strona się ładuje...
Strona się ładuje...
Strona się ładuje...
Strona się ładuje...
Strona się ładuje...
Strona się ładuje...
Strona się ładuje...
Strona się ładuje...
Strona się ładuje...
Strona się ładuje...
Strona się ładuje...
Strona się ładuje...
Strona się ładuje...
Strona się ładuje...
Strona się ładuje...
Strona się ładuje...
Strona się ładuje...
Strona się ładuje...
Strona się ładuje...
Strona się ładuje...
Strona się ładuje...
Strona się ładuje...
Strona się ładuje...
Strona się ładuje...
Strona się ładuje...
Strona się ładuje...
Strona się ładuje...
Strona się ładuje...
Strona się ładuje...
Strona się ładuje...
Strona się ładuje...
Strona się ładuje...
Strona się ładuje...
Strona się ładuje...
Strona się ładuje...
Strona się ładuje...
Strona się ładuje...
Strona się ładuje...
Strona się ładuje...
Strona się ładuje...
Strona się ładuje...
Strona się ładuje...
Strona się ładuje...
Strona się ładuje...
Strona się ładuje...
Strona się ładuje...
Strona się ładuje...
Strona się ładuje...
Strona się ładuje...
Strona się ładuje...
Strona się ładuje...
Strona się ładuje...
Strona się ładuje...
-
 1
1
-
 2
2
-
 3
3
-
 4
4
-
 5
5
-
 6
6
-
 7
7
-
 8
8
-
 9
9
-
 10
10
-
 11
11
-
 12
12
-
 13
13
-
 14
14
-
 15
15
-
 16
16
-
 17
17
-
 18
18
-
 19
19
-
 20
20
-
 21
21
-
 22
22
-
 23
23
-
 24
24
-
 25
25
-
 26
26
-
 27
27
-
 28
28
-
 29
29
-
 30
30
-
 31
31
-
 32
32
-
 33
33
-
 34
34
-
 35
35
-
 36
36
-
 37
37
-
 38
38
-
 39
39
-
 40
40
-
 41
41
-
 42
42
-
 43
43
-
 44
44
-
 45
45
-
 46
46
-
 47
47
-
 48
48
-
 49
49
-
 50
50
-
 51
51
-
 52
52
-
 53
53
-
 54
54
-
 55
55
-
 56
56
-
 57
57
-
 58
58
-
 59
59
-
 60
60
-
 61
61
-
 62
62
-
 63
63
-
 64
64
-
 65
65
-
 66
66
-
 67
67
-
 68
68
-
 69
69
-
 70
70
-
 71
71
-
 72
72
-
 73
73
-
 74
74
-
 75
75
-
 76
76
-
 77
77
-
 78
78
-
 79
79
-
 80
80
-
 81
81
-
 82
82
-
 83
83
-
 84
84
-
 85
85
-
 86
86
-
 87
87
-
 88
88
-
 89
89
-
 90
90
-
 91
91
-
 92
92
-
 93
93
-
 94
94
-
 95
95
-
 96
96
-
 97
97
-
 98
98
-
 99
99
-
 100
100
-
 101
101
-
 102
102
-
 103
103
-
 104
104
-
 105
105
-
 106
106
-
 107
107
-
 108
108
-
 109
109
-
 110
110
-
 111
111
-
 112
112
-
 113
113
-
 114
114
-
 115
115
-
 116
116
-
 117
117
-
 118
118
-
 119
119
-
 120
120
-
 121
121
-
 122
122
-
 123
123
-
 124
124
-
 125
125
-
 126
126
-
 127
127
-
 128
128
-
 129
129
-
 130
130
-
 131
131
-
 132
132
-
 133
133
-
 134
134
-
 135
135
-
 136
136
-
 137
137
-
 138
138
-
 139
139
-
 140
140
-
 141
141
-
 142
142
-
 143
143
-
 144
144
-
 145
145
-
 146
146
-
 147
147
-
 148
148
-
 149
149
-
 150
150
-
 151
151
-
 152
152
-
 153
153
-
 154
154
-
 155
155
-
 156
156
-
 157
157
-
 158
158
-
 159
159
-
 160
160
-
 161
161
-
 162
162
-
 163
163
-
 164
164
-
 165
165
-
 166
166
-
 167
167
-
 168
168
-
 169
169
-
 170
170
-
 171
171
-
 172
172
-
 173
173
-
 174
174
-
 175
175
-
 176
176
-
 177
177
-
 178
178
-
 179
179
-
 180
180
-
 181
181
-
 182
182
-
 183
183
-
 184
184
-
 185
185
-
 186
186
-
 187
187
-
 188
188
-
 189
189
-
 190
190
-
 191
191
-
 192
192
-
 193
193
-
 194
194
-
 195
195
-
 196
196
-
 197
197
-
 198
198
-
 199
199
-
 200
200
-
 201
201
-
 202
202
-
 203
203
-
 204
204
-
 205
205
-
 206
206
-
 207
207
-
 208
208
-
 209
209
-
 210
210
-
 211
211
-
 212
212
-
 213
213
-
 214
214
-
 215
215
-
 216
216
-
 217
217
-
 218
218
-
 219
219
-
 220
220
-
 221
221
-
 222
222
-
 223
223
-
 224
224
-
 225
225
-
 226
226
-
 227
227
-
 228
228
-
 229
229
-
 230
230
-
 231
231
-
 232
232
-
 233
233
-
 234
234
-
 235
235
-
 236
236
-
 237
237
-
 238
238


Ingo PMP-10 Instrukcja obsługi
- Kategoria
- Odtwarzacze MP3 / MP4
- Typ
- Instrukcja obsługi
w innych językach
- español: Ingo PMP-10 El manual del propietario
- italiano: Ingo PMP-10 Manuale del proprietario
- Deutsch: Ingo PMP-10 Bedienungsanleitung
- português: Ingo PMP-10 Manual do proprietário
- français: Ingo PMP-10 Le manuel du propriétaire
Inne dokumenty
-
Hyundai MPC 827 FM Instrukcja obsługi
-
 Yarvik PMP MAXM Skrócona instrukcja obsługi
-
-
Yamaha RX-V3900 Instrukcja obsługi
-
Yarvik Maxm PMP-400 Instrukcja obsługi
-
-
Hyundai MPC 401 FM Instrukcja obsługi
-
NGS 8GB Bebop Instrukcja obsługi
-
-
