
CANDY HOOVER GROUP Via Comolli 16 Brugherio – Italy
Instrukcje użytkownika
Pokyny pro uživatele
Navodila za uporabnika
PIEKARNIKI
TROUBY
PEČICE
15
28
54
41
PL
CZ
SK
SL
Návod na použitie
PEČENIE
Uputstva za upotrebu
RERNE
67SR
User Instructions
OVENS
2EN

EN 2
Safety Indications
General Instructions
Product description
Display description
Cooking Modes
General notes on cleaning
Maintenance
Troubleshooting
Installation
Summary
3
7
9
10
12
13
13
14
80

EN 3
• During cooking, moisture may condense inside the oven cavity
or on the glass of the door. This is a normal condition. To reduce
this eect, wait 10-15 minutes after turning on the power be-
fore putting food inside the oven. ln any case, the condensation
disappears when the oven reaches the cooking temperature.
• Cook the vegetables in a container with a lid instead of an open
tray.
• Avoid leaving food inside the oven after cooking for more than
15/20 minutes.
• WARNING: the accessible parts can become hot when the oven
is in use. Young children should be kept at a safe distance.
• WARNING: the accessible parts can become hot when the grill
is in use. Children should be kept at a safe distance.
• Disconnect the appliance from the mains electricity supply be-
fore carrying out any work or maintenance.
• WARNING: in order to avoid any danger caused by the acciden-
tal resetting of the thermal interruption device, the appliance
should not be powered by an external switching device, such as
a timer, or be connected to a circuit that is regularly switched on
and o.
• Children under 8 should be kept at a safe distance from the ap-
pliance if not continuously supervised.
• Children should not play with the appliance.
• The appliance can be used by those aged 8 or over and by those
with limited physical, sensorial or mental capacities, without
experience or knowledge of the product, only if supervised or
provided with instruction as to the operation of the appliance,
in a safe way with awareness of the possible risks.
• Cleaning and maintenance should not be carried out by unsu-
pervised children.
• Do not use rough or abrasive materials or sharp metal scrapers
to clean the oven door glasses, as they can scratch the surface
Safety Indications

EN 4
and cause the glass to shatter.
• The oven must be switched o before removing the removable
parts. After cleaning, reassemble them according the instruc-
tions.
• Only use the meat probe recommended for this oven.
• Do not use a steam cleaner or high pressure spray for cleaning
operations.
• WARNING: the appliance and accessible parts become hot
during use. Be careful not to touch any hot parts.
• WARNING: ensure that the appliance is switched o before re-
placing the bulb, to avoid the possibility of electric shocks.
• IF THE OVEN IS PROVIDED BY THE MANUFACTURER WITH-
OUT PLUG:
THE APPLIANCE MUST NOT BE CONNECTED TO THE POW-
ER SOURCE USING PLUG OR SOCKETS, BUT MUST BE DI-
RECTLY CONNECTED TO THE SUPPLY MAINS. The con-
nection to the power source must be carried out by a suitably
qualied professional. In order to have an installation compliant
to the current safety legislation the oven must be connect-
ed only placing an omnipolar breaker, with contact separation
compliant to the requirements for overvoltage category III,
between the appliance and the power source. The omnipolar
breaker must bear the maximum connected load and must be
in line with current legislation. The yellow-green earth cable
should not be interrupted by the breaker. The omnipolar break-
er used for the connection must be easily accessible when the
appliance is installed.
The connection to the power source must be carried out by a
suitably qualied professional considering the polarity of the
oven and of the power source.
The disconnection must be achieved incorporating a switch in
the xed wiring in accordance with the wiring rules
• IF THE OVEN IS PROVI ED BY THE MANUFACTURER WITH
PLUG:

EN 5
The socket must be suitable for the load indicated on the tag
and must have ground contact connected and in operation.
The earth conductor is yellow-green in colour. This operation
should be carried out by a suitably qualied professional. ln case
of incompatibility between the socket and the appliance plug,
ask a qualied electrician to substitute the socket with another
suitable type. The plug and the socket must be conformed to
the current norms of the installation country. Connection to the
power source can also be made by placing an omnipolar break-
er, with contact separation compliant to the requirements for
overvoltage category III, between the appliance and the pow-
er source that can bear the maximum connected load and that
is in line with current legislation. The yellow-green earth cable
should not be interrupted by the breaker. The socket or omnip-
olar breaker used for the connection should be easily accessi-
ble when the appliance is installed.
The disconnection may be achieved by having the plug accessi-
ble or by incorporating a switch in the xed wiring in accordance
with the wiring rules.
• lf the power cable is damaged, it should be substituted with a
cable or special bundle available from the manufacturer or by
contacting the customer service department. The type of pow-
er cable must be H05V2V2-F. This operation should be carried
out by a suitably qualied professional. The earth conductor
(yellow-green) must be approximately 10 mm longer than the
other conductors. For any repairs, refer only to the Customer
Care Department and request the use of original spare parts.
• Failure to comply with the above can compromise the safety of
the appliance and invalidate the guarantee.
• Any excess of spilled material should be removed before clean-
ing.
• A long power supply failure during an occurring cooking phase
may cause a malfunction of the monitor. ln this case contact
customer service.

EN 6
• The appliance must not be installed behind a decorative door in
order to avoid overheating.
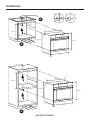
• When you place the shelf inside, make sure that the stop is di-
rected upwards and in the back of the cavity. The shelf must be
inserted completely into the cavity.
• When inserting the grid tray pay attention that the anti-slide
edge is positioned rearwards and upwards.
• WARNING: Do not line the oven walls with aluminium foil or sin-
gle-use protection available from stores. Aluminium foil or any
other protection, in direct contact with the hot enamel, risk
melting and deteriorating the enamel of the insides.
• WARNING: Never remove the oven door seal.
• CAUTION: Do not rell the cavity bottom with water during
cooking or when the oven is hot.
• No additional operation/setting is required in order to operate
the appliance at the rated frequencies.
• The oven can be located high in a column or under a worktop.
Before xing, you must ensure good ventilation in the oven
space to allow proper circulation of the fresh air required for
cooling and protecting the internal parts. Make the openings
specied on last page according to the type of tting.
• For a correct use of the oven it is advisable not to put the food in
direct contact with the racks and trays, but to use oven papers
and / or special containers.

EN 7
General Instructions
Safety Indications
We thank you for choosing one of our products. For the best results with your oven, you should
read this manual carefully and retain it for future reference. Before installing the oven, take note
of the serial number so that you can give it to customer service sta if any repairs are required.
Having removed the oven from its packaging, check that it has not been damaged during trans-
portation. If you have doubts, do not use the oven and refer to a qualied technician for advice.
Keep all of the packaging material (plastic bags, polystyrene, nails) out of the reach of children.
When the oven is switched on for the rst time, strong smelling smoke can develop, which is
caused by the glue on the insulation panels surrounding the oven heating for the rst time. This
is absolutely normal and, if it occurs, you should wait for the smoke to dissipate before putting
food in the oven. The manufacturer accepts no responsibility in cases where the instructions
contained in this document are not observed.
NOTE: the oven functions, properties and accessories cited in this manual will vary, depending
on the model you have purchased.
Only use the oven for its intended purpose, that is only for the cooking of foods; any other use, for
example as a heat source, is considered improper and therefore dangerous. The manufacturer
cannot be held responsible for any damage resulting from improper, incorrect or unreasonable
usage.
The use of any electrical appliance implies the observance of some fundamental rules:
- do not pull on the power cable to disconnect the plug from the socket;
- do not touch the appliance with wet or damp hands or feet;
- in general the use of adaptors, multiple sockets and extension cables is not recommended;
- in case of malfunction and/or poor operation, switch o the appliance and do not tamper with it.
Electrical Safety
ENSURE THAT AN ELECTRICIAN OR QUALIFIED TECHNICIAN MAKES THE ELECTRICAL
CONNECTIONS. The power supply to which the oven is connected must conform with the
laws in force in the country of installation. The manufacturer accepts no responsibility for any
damage caused by the failure to observe these instructions. The oven must be connected to
an electrical supply with an earthed wall outlet or a disconnector with multiple poles, depending
on the laws in force in the country of installation. The electrical supply should be protected with
suitable fuses and the cables used must have a transverse section that can ensure correct sup-
ply to the oven.
CONNECTION
The oven is supplied with a power cable that should only be connected to an electrical supply
with 220-240 Vac power between the phases or between the phase and neutral. Before the oven
is connected to the electrical supply, it is important to check:
- power voltage indicated on the gauge;
- the setting of the disconnector.

EN 8
The grounding wire connected to the oven’s earth terminal must be connected to the earth ter-
minal of the power supply.
WARNING
Before connecting the oven to the power supply, ask a qualied electrician to check the conti-
nuity of the power supply’s earth terminal. The manufacturer accepts no responsibility for any
accidents or other problems caused by failure to connect the oven to the earth terminal or by an
earth connection that has defective continuity.
NOTE: as the oven could require maintenance work, it is advisable to keep another wall socket
available so that the oven can be connected to this if it is removed from the space in which it is
installed. The power cable must only be substituted by technical service sta or by technicians
with equivalent qualications.
A low light around the central main switch could be present when the oven is o. This is a normal
behavior. I can be removed just turning the plug upside down or swapping the supply terminals.
Recommendations
Installation
After each use of the oven, a minimum of cleaning will help keep the oven perfectly clean.
Do not line the oven walls with aluminium foil or single-use protection available from stores. Al-
uminium foil or any other protection, in direct contact with the hot enamel, risks melting and de-
teriorating the enamel of the insides. In order to prevent excessive dirtying of your oven and the
resulting strong smokey smells, we recommend not using the oven at very high temperature. It
is better to extend the cooking time and lower the temperature a little. In addition to the acces-
sories supplied with the oven, we advise you only use dishes and baking moulds resistant to very
high temperatures.
The manufacturers have no obligation to carry this out. If the assistance of the manufacturer is
required to rectify faults arising from incorrect installation, this assistance is not covered by the
guarantee. The installation instructions for professionally qualied personnel must be followed.
Incorrect installation may cause harm or injury to people, animals or belongings. The manufac-
turer cannot be held responsible for such harm or injury.
The oven can be located high in a column or under a worktop. Before xing, you must ensure good
ventilation in the oven space to allow proper circulation of the fresh air required for cooling and
protecting the internal parts. Make the openings specied on last page according to the type of
tting.

EN 9
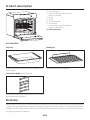
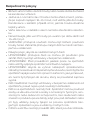
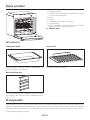
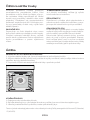
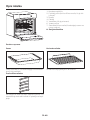
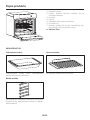
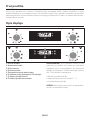
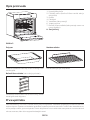
1. Control panel
2. Shelf positions (lateral wire
grid if included)
3. Grids
4. Trays
5. Fan (if present)
6. Oven door
7. Lateral wire grids (if present:
only for at cavity)
8. Serial number
Product description
ACCESSORIES
Drip tray Metal grid
Collects residues that drip when cooking food
on the grills.
Holds baking trays and plates.
Lateral wire grids (only if present)
Located on both sides of the oven cavity, holds
metal grills and drip pans.
1
2
7
3
8
4
6
5
First Use
PRELIMINARY CLEANING; Clean the oven before using for the rst time. Wipe over external surfaces with
a damp soft cloth. Wash all accessories and wipe inside the oven with a solution of hot water and washing
up liquid. Set the empty oven to the maximum temperature and leave on for about 1 hour, this will remove
any lingering smells of newness.

EN 10
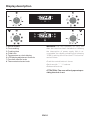
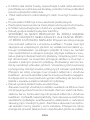
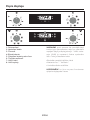
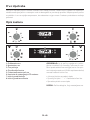
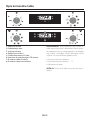
Display description
1. Minute minder
2. Clock setting
3. Cooking time
4. Child Lock
5. Temperature or clock display
6. LCD display adjustment controls
7. Function selector knob
8. Thermostat selector knob
WARNING: the rst operation to carry out
after the oven has been installed or following
the interruption of power supply (this is re-
cognizable the display pulsating and showing
12:00 ) is setting the correct time. This is achie-
ved as follows.
•Push the central button 4 times
•Set time with “-” “+” buttons.
•Release all buttons.
ATTENTION: The oven will only operate pro-
viding the clock is set.
87
1 3
5
6
2 4

EN 11
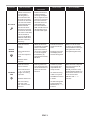
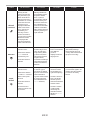
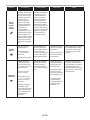
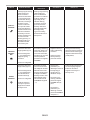
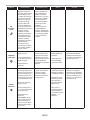
FUNCTION HOW TO ACTIVATE
HOW TO
DEACTIVATE
WHAT IT DOES WHY IT IS NEEDED
KEY LOCK
Child Lock function
is activated by
touching Set (+)
for a minimum of 5
seconds. From this
moment on all other
function are locked
and the display will
ash STOP and
preset time inter-
mittently. From this
moment on all other
functions are locked,
LED of child lock
turn on, the display
will ash STOP and
present time inter-
mittently
Child Lock function
is deactivated by
touching touchpad
Set (+) again for a mi-
nimum of 5 seconds.
From this moment
on all functions are
selectable again.
From this moment
LED of child lock turn
o and all functions
are selectable again.
MINUTE
MINDER
Push the central
button
1 times
Press the buttons
“-” “+”
to set the required
time
Release all the
buttons
When the set time
as elapsed an audible
alarm is activated
(this alarm will stop
on its own, however
it can be stopped
immediately by
pressing the button)
SELECT.
Sounds an alarm at
the end of the set
time.
During the process,
the display shows
the remaining time.
Allows to use the oven
as alarm clock (could be
activated either with ope-
rating the oven or with
out operating the oven)
COOKING
TIME
Push the central
button 2 times
Press the buttons
“-” or “+”to set the
lenght of cooking
required
Release all buttons
Set the cooking
function with
the oven function
selector
Push any button to
stop the signal. Push
the central button to
return to the clock
function.
It allows to preset
the cooking time
required for the
recipe chosen.
To check how long
is left to run press
the SELECT button
2 Times.
To alter/change the
preset time press
SELECT and “-” “+”
buttons.
When the time is elapsed
the oven will switch o
automatically.
Should you wish to stop
cooking earlier either turn
the function selector to 0,
or set time to 0:00
(SELECT and “-” “+”
buttons)

EN 12
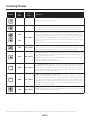
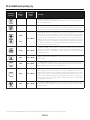
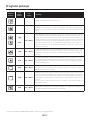
Cooking Modes
* Tested in accordance with the EN 60350-1 for the purpose of energy consumption declaration and energy class.
Symbol
T °C
de-
fault
T °C
range Function
LAMP: Turns on the oven light.
DEFROST: When the dial is set to this position. The fan circulates air at
room temperature around the frozen food so that it defrosts in a few min-
utes without the protein content of the food being changed or altered.
180
210
50 ÷ MAX
MULTI-LEVEL: We recommend you use this method for poultry, pastries,
sh and vegetables. Heat penetrates into the food better and both the
cooking and preheating times are reduced. You can cook dierent foods
at the same time with or without the same preparation in one or more po-
sitions. This cooking method gives even heat distribution and the smells
are not mixed.
Allow about ten minutes extra when cooking foods at the same time.
190 50 ÷ MAX * COOK LIGHT: This function allows to cook in a healthier way, by re-
ducing the amount of fat or oil required. The combination of heating ele-
ments with a pulsating cycle of air ensures a perfect baking result.
210 50 ÷ MAX
BOTTOM HEATING + FAN: The bottom heating element is used with the
fan circulating the air inside the oven. This method is ideal for juicy fruit
ans, tarts, quiches and pâté.
It prevents food from drying and encourages rising in cakes, bread dough
and other bottom-cooked food.
Place the shelf in the bottom position.
220 50 ÷ MAX
* CONVENTIONAL: Both top and bottom heating elements are used.
Preheat the oven for about ten minutes. This method is ideal for all tradi-
tional roasting and baking. For seizing red meats, roast beef, leg of lamb,
game, bread, foil wrapped food (papillotes), aky pastry. Place the food
and its dish on a shelf in mid position.
200 50 ÷ MAX
GRILL : use the grill with the door closed.
The top heating element is used alone and you can adjust the temper-
ature. Five minutes preheating is required to get the elements red-hot.
Success is guaranteed for grills, kebabs and gratin dishes. White meats
should be put at a distance from the grill; the cooking time is longer, but
the meat will be tastier. You can put red meats and sh llets on the shelf
with the drip tray underneath.
220 50 ÷ MAX PIZZA - With this function hot air circulated in the oven to ensure perfect
result for dishes such as pizza or cake.

EN 13
The lifecycle of the appliance can be extended
through regular cleaning. Wait for the oven to
cool before carrying out manual cleaning op-
erations. Never use abrasive detergents, steel
wool or sharp objects for cleaning, so as to not
irreparably damage the enamelled parts. Use
only water, soap or bleach-based detergents
(ammonia).
GLASS PARTS
It is advisable to clean the glass window with
absorbent kitchen towel after every use of
the oven. To remove more obstinate stains,
you can use a detergent-soaked sponge, well
wrung out, and then rinse with water.
OVEN WINDOW SEAL
If dirty, the seal can be cleaned with a slightly
General notes on cleaning
REMOVAL AND CLEANING OF THE SIDE RACKS
1. Remove the wire racks by pulling them in the direction of the arrows (see below)
2. To clean the wire racks either put them in the dishwasher or use a wet sponge, ensuring that they
are dried afterwards.
3. After the cleaning process install the wire racks in reverse order.”
Maintenance
damp sponge.
ACCESSORIES
Clean accessories with a wet, soapy sponge
before rinsing and drying them: avoid using
abrasive detergents.
DRIP PAN
After using the grill, remove the pan from the
oven. Pour the hot fat into a container and
wash the pan in hot water, using a sponge and
washing-up liquid.
If greasy residues remain, immerse the pan in
water and detergent. Alternatively, you can
wash the pan in the dishwasher or use a com-
mercial oven detergent. Never put a dirty pan
back into the oven.
CHANGING THE BULB
1. Disconnect the oven from the mains supply.
2. Undo the glass cover, unscrew the bulb and replace it with a new bulb of the same type.
3. Once the defective bulb is replaced, replace the glass cover.
This product contains one or more light sources of energy eciency class G (Lamp) /F (10 Led).

EN 14
Waste management and environmental protection
This appliance is labelled in
accordance with European Di-
rective 2012/19/EU regarding
electric and electronic appli-
ances (WEEE). The WEEE con-
tain both polluting substances
(that can have a negative ef-
fect on the environment) and base elements
(that can be reused). It is important that the
WEEE undergo specic treatments to cor-
rectly remove and dispose of the pollutants
and recover all the materials. Individuals can
play an important role in ensuring that the
WEEE do not become an environmental prob-
lem; it is essential to follow a few basic rules:
- the WEEE should not be treated as domestic
waste;
- the WEEE should be taken to dedicated col-
lection areas managed by the town council or a
registered company.
In many countries, domestic collections may
be available for large WEEEs. When you buy a
new appliance, the old one can be returned to
the vendor who must accept it free of charge
as a one-o, as long as the appliance is of an
equivalent type and has the same functions as
the purchased appliance.
Troubleshooting
Problem Possible cause Solution
the oven does not heat
up The clock is not set Set the clock
The oven does not
heat up A cooking function and temperature has
not been set Ensure that the necessary settings
are correct
No reaction of the
touch user interface Steam and condensation on the user in-
terface panel
Clean with a microber cloth the
user interface panel to remove the
condensation layer
SAVING AND RESPECTING THE ENVIRON-
MENT
Where possible, avoid pre-heating the oven
and always try to ll it. Open the oven door as
infrequently as possible, because heat from
the cavity disperses every time it is opened.
For a signicant energy saving, switch o the
oven between 5 and 10 minutes before the
planned end of the cooking time, and use the
residual heat that the oven continues to gen-
erate. Keep the seals clean and in order, to
avoid any heat dispersal outside of the cavity.
If you have an electric contract with an hour-
ly tari, the “delayed cooking” programme
makes energy saving more simple, moving the
cooking process to start at the reduced tari
time slot.

PL 15
Instrukcje bezpieczeństwa
Instrukcje ogólne
Opis produktu
Opis wyświetlacza
Tryby pieczenia
Czyszczenie i konserwacja piekarnika
Konserwacja
Rozwiązywanie problemów
Installation
Spis treści
16
20
22
23
25
26
26
27
80

PL 16
• Podczas gotowania wilgoć może skraplać się do komory pieka-
rnika lub na szybkę drzwiczek. Jest to zjawisko normalne. Aby
je ograniczyć, należy poczekać od 10 do 15 minut po włączeniu
urządzenia, zanim żywność zostanie umieszczona w piekarniku.
Skropliny znikną, gdy piekarnik osiągnie temperaturę pieczenia.
• Warzywa najlepiej piec w pojemniku z pokrywą zamiast otwar-
tego naczynia.
• Unikać pozostawiania żywności wewnątrz piekarnika po piec-
zeniu na dłużej niż 15/20 minut.
• OSTRZEŻENIE: urządzenie i niektóre z elementów nagrzewają
się w trakcie ich działania. Uważać, aby nie dotknąć jakiejkolwiek
gorącej części.
• OSTRZEŻENIE: W trakcie użytkowania piekarnika dostępne
części mogą się silnie nagrzać. Małe dzieci powinny znajdować
się w bezpiecznej odległości.
• OSTRZEŻENIE: Przed przystąpieniem do jakichkolwiek prac lub
konserwacji należy odłączyć urządzenie od sieci elektrycznej.
• W celu uniknięcia zagrożenia związanego z przypadkowym
ponownym włączeniem wyłącznika termicznego urządzenie nie
powinno być zasilane przez zewnętrzne urządzenie przełącza-
jące, takie jak regulator czasowy, lub podłączone do obwodu,
który jest regularnie włączany i wyłączany.
• Dzieci poniżej 8. roku życia muszą zachować bezpieczną
odległość od urządzenia, jeśli nie są pod stałym nadzorem.
• Nie należy zezwalać dzieciom na zabawę z urządzeniem.
Urządzenie to może być obsługiwane przez dzieci w wieku 8
lat lub więcej oraz osoby o ograniczonej zdolności zycznej,
czuciowej lub psychicznej bądź nieposiadające doświadcze-
nia i wiedzy, jeśli są one pod nadzorem lub poinstruowano je w
zakresie bezpiecznej obsługi urządzenia i zrozumiały one po-
tencjalne zagrożenia, mając świadomość możliwych zagrożeń.
• Czyszczenie i konserwacja nie powinny być wykonywane przez
Instrukcje bezpieczeństwa

PL 17
dzieci bez nadzoru.
• Do czyszczenia szybek drzwiczek piekarnika nie należy używać
szorstkich lub ściernych materiałów ani ostrych metalowych
skrobaków, ponieważ mogą one porysować powierzchnię i
spowodować rozbicie szkła.
• Piekarnik musi być wyłączony przed wyjęciem ruchomych częś-
ci.
• Po wyczyszczeniu zmontować je zgodnie z instrukcjami.
• Używać wyłącznie termosondy zalecanej dla tego piekarnika.
• Nie stosować do czyszczenia urządzeń parowych ani spray’u
wysokociśnieniowego.
• Jeśli piekarnik jest dostarczany przez producenta bez wtyczki:
URZĄDZENIE NIE MOŻE BYĆ PODŁĄCZONE DO ŹRÓDŁA
ZASILANIA ZA POMOCĄ WTYCZKI LUB GNIAZDEK, LECZ
MUSI BYĆ PODŁĄCZONE BEZPOŚREDNIO DO SIECI ELEK-
TRYCZNEJ. Podłączenie do źródła zasilania musi być wykonane
przez specjalistę z odpowiednimi kwalikacjami. W celu uzyska-
nia instalacji zgodnej z aktualnymi przepisami bezpieczeństwa,
piekarnik musi być podłączony wyłącznie z wyłącznikiem wielo-
biegunowym, z separacją styków zgodną z wymaganiami dla
kategorii nadnapięciowej III, pomiędzy urządzeniem a źródłem
zasilania. Wyłącznik wielobiegunowy musi wytrzymać maksy-
malną moc przyłączeniową i musi być zgodny z obowiązują-
cymi przepisami. Żółto-zielony przewód uziemienia nie może
być zasłaniany przez wyłącznik. Wyłącznik wielobiegunowy
zastosowany do podłączenia powinien być po zainstalowan-
iu urządzenia łatwo dostępny. Podłączenie do źródła zasilania
musi być wykonane przez specjalistę z odpowiednimi kwalik-
acjami z uwzględnieniem biegunowości piekarnika i źródła zasi-
lania. Odłączenie powinno następować poprzez przełącznik w
stałym okablowaniu zgodnie z obowiązującymi przepisami w
zakresie okablowania.
• Jeśli piekarnik jest dostarczany przez producenta z wtyczką:
Gniazdko musi być odpowiednie do obciąż nia wskazanego na

PL 18
tabliczce i musi posadać podłączony oraz działający styk uz-
iemiający.
Uziemienie oznaczone jest kolorem żółto-zielonym. Ta
czynność musi być wykonana przez specjalistę z odpowiedni-
mi kwalikacjami. W razie niezgodności pomiędzy gniazdem i
wtyczką urządzenia, należy poprosić wykwalikowanego elek-
tryka o zastąpienie gniazda innym odpowiednim typem. Wtycz-
ka i gniazdo muszą być zgodne z obowiązującymi normami
kraju instalacji. Podłączenie do źródła zasilania można również
wykonać, umieszczając wyłącznik wielobiegunowy, z separac-
ją styków zgodną z wymogami dla kategorii przepięciowej III, w
miejscu pomiędzy urządzeniem i źródłem zasilania, które może
wytrzymać maksymalne obciążenie i jest to zgodne z obowiązu-
jącymi przepisami. Żółto-zielony kabel uziemiający nie powin-
ien być przerwany przez ten wyłącznik. Gniazdo oraz wyłącznik
wielobiegunowy zastosowany do podłączenia powinien być po
zainstalowaniu urządzenia łatwo dostępny. Odłączenie umożli-
wia się poprzez zapewnienie dostępu do wtyczki lub wstawienie
przełącznika do stałego okablowania zgodnie z obowiązujący-
mi przepisami w zakresie okablowania.
• Jeśli przewód zasilający jest uszkodzony, musi być zastąpiony
kablem lub specjalną wiązką przewodów udostępnianą przez
producenta lub wskazaną po skontaktowaniu się z działem
obsługi klientów.
• Kabel zasilający musi być typu H05V2V2-F.
• Czynność tę powinien przeprowadzić odpowiednio wykwali-
kowany specjalista. Przewód uziemiający (żółto-zielony) musi
być o około 10 mm dłuższy niż pozostałe przewody. W przypad-
ku jakichkolwiek napraw należy zwracać się wyłącznie do działu
obsługi klienta i zażądać zastosowania oryginalnych części
zamiennych.
• Nieprzestrzeganie powyższej wskazówki może zakłócić bez-
pieczeństwo urządzenia i spowodować utratę gwarancji.
• Nadmiar rozlanych substancji należy usunąć przed czyszczeni-

PL 19
em urządzenia.
• Długa awaria zasilania podczas etapu gotowania może spow-
odować usterkę monitora. W takiej sytuacji należy się skontak-
tować z biurem obsługi klienta.
• Aby uniknąć przegrzewania się, urządzenia tego nie należy in-
stalować za panelem dekoracyjnym.
• W razie umieszczania we wnętrzu półki należy się upewnić, że
ogranicznik jest skierowany w górę i w stronę tylną komory. Pół-
ka musi być włożona całkowicie do komory.
• Podczas wkładania tacy siatkowej należy zwrócić uwagę, aby
krawędź antypoślizgowa była ustawiona do tyłu i do góry.
• OSTRZEŻENIE: Nie zakrywać ścianek piekarnika folią alumin-
iowa ani dostępnymi na rynku foliami jednorazowymi. Folia alu-
miniowa lub jakiekolwiek inne zabezpieczenia w bezpośrednim
kontakcie z powierzchniami gorącej emalii mogłyby stopić się i
uszkodzić emaliowane powierzchnie wewnątrz piekarnika.
• OSTRZEŻENIE: Nigdy nie usuwaj uszczelki z drzwiczek pieka-
rnika.
• PRZESTROGA: Nie napełniać wodą dna komory podczas got-
owania lub gdy piekarnik jest gorący.
• W przypadku obsługiwania urządzenia przy częstotliwościach
znamionowych nie są wymagane żadne dodatkowe czynności/
ustawienia.
• Piekarnik można umieścić wysoko w słupku lub pod blatem
roboczym. Przed montażem zapewnić dobrą wentylację w
przestrzeni piekarnika, aby umożliwić właściwą cyrkulację
świeżego powietrza potrzebnego do chłodzenia i ochrony częś-
ci wewnętrznych. Otwory podane na ostatniej stronie wykonać
zgodnie z typem okucia.
• W celu prawidłowego użytkowania piekarnika nie zaleca się
umieszczania żywności w bezpośrednim kontakcie z rusztami i
tacami, ale używania papieru do pieczenia i/lub specjalnych po-
jemników.

PL 20
Instrukcje ogólne
Wskazówki dotyczące bezpieczeństwa
Dziękujemy za wybór jednego z naszych produktów. Aby jak najlepiej wykorzystywać posiadany
piekarnik, zachęcamy do uważnego przeczytania niniejszej instrukcji i starannego przechowy-
wania jej, aby móc z niej skorzystać w razie potrzeby w przyszłości. Przed zainstalowaniem
piekarnika należy zanotować jego numer seryjny, aby móc podać go personelowi biura obsługi
klienta, gdyby wymagane były jakiekolwiek naprawy. Po wyjęciu piekarnika z opakowania należy
sprawdzić, czy nie uległ on uszkodzeniu podczas transportu. W razie jakichkolwiek wątpliwości
nie należy korzystać z piekarnika i zwrócić się do wykwalikowanego technika w celu uzyskania
porady. Należy trzymać z dala od dzieci wszystkie materiały opakowania (folie ochronne, styro-
pian, kołki).
Podczas pierwszego uruchomienia piekarnika może z niego wydobyć się silny dym o nieprzy-
jemnym zapachu, który jest spowodowany przez klej na panelach izolacyjnych wokół rozgrzewa-
nego po raz pierwszy piekarnika.
Jest to zjawisko całkowicie normalne i należy wówczas poczekać, aż dym całkowicie się ulotni,
przed umieszczeniem żywności w piekarniku. Producent zrzeka się wszelkiej odpowiedzialności
za sytuacje będące wynikiem nieprzestrzegania instrukcji podanych w niniejszym dokumencie.
UWAGA: Wymienione w niniejszej instrukcji funkcje, właściwości i akcesoria piekarnika mogą być
różne w zależności od zakupionego modelu.
Z piekarnika należy korzystać wyłącznie zgodnie z jego przeznaczeniem, czyli wyłącznie do piec-
zenia żywności; wszelkie inne próby użytkowania, na przykład jako źródło ciepła, uważane są za
niewłaściwe, a tym samym niebezpieczne. Producent nie może ponosić odpowiedzialności za
jakiekolwiek uszkodzenia będące skutkiem nieprawidłowego, błędnego lub nierozsądnego użyt-
kowania.
Obsługa jakiegokolwiek urządzenia elektrycznego wiąże się z koniecznością przestrzegania
pewnych istotnych zasad:
- Nie ciągnąć za przewód zasilania w celu odłączenia go od gniazdka prądowego;
- Nie dotykać urządzenia mokrymi lub wilgotnymi dłońmi bądź stopami;
- Ogólnie rzecz biorąc, odradza się stosowania adapterów, gniazdek wielokrotnych i przedłużaczy;
- W razie usterki i/lub nieprawidłowego działania urządzenia należy je wyłączyć i nie naruszać go.
Bezpieczeństwo elektryczne
PRZYŁĄCZA ELEKTRYCZNE POWINNY ZOSTAĆ WYKONANE PRZEZ ELEKTRYKA LUB
WYKWALIFIKOWANEGO TECHNIKA. Sieć zasilająca, do której podłączany jest piekarnik,
powinna być zgodna z przepisami obowiązującymi w kraju jego instalacji. Producent zrzeka się
wszelkiej odpowiedzialności za ewentualne uszkodzenia będące wynikiem nieprzestrzegania
takich przepisów. Piekarnik powinien być podłączony do sieci elektrycznej za pomocą gniazd-
ka ściennego z uziemieniem lub poprzez wielobiegunowy wyłącznik, w zależności od przepisów
obowiązujących w kraju instalacji. Zasilanie elektryczne powinno być zabezpieczone odpowied-
nimi bezpiecznikami i powinny być używane przewody o przekroju poprzecznym, który zapewni
prawidłowe zasilanie piekarnika.
PODŁĄCZANIE
Piekarnik jest dostarczany z kablem zasilającym, który powinien być podłączany wyłącznie do
sieci elektrycznej o napięciu 220-240 V AC pomiędzy fazami lub pomiędzy fazą i przewodem
Strona się ładuje...
Strona się ładuje...
Strona się ładuje...
Strona się ładuje...
Strona się ładuje...
Strona się ładuje...
Strona się ładuje...
Strona się ładuje...
Strona się ładuje...
Strona się ładuje...
Strona się ładuje...
Strona się ładuje...
Strona się ładuje...
Strona się ładuje...
Strona się ładuje...
Strona się ładuje...
Strona się ładuje...
Strona się ładuje...
Strona się ładuje...
Strona się ładuje...
Strona się ładuje...
Strona się ładuje...
Strona się ładuje...
Strona się ładuje...
Strona się ładuje...
Strona się ładuje...
Strona się ładuje...
Strona się ładuje...
Strona się ładuje...
Strona się ładuje...
Strona się ładuje...
Strona się ładuje...
Strona się ładuje...
Strona się ładuje...
Strona się ładuje...
Strona się ładuje...
Strona się ładuje...
Strona się ładuje...
Strona się ładuje...
Strona się ładuje...
Strona się ładuje...
Strona się ładuje...
Strona się ładuje...
Strona się ładuje...
Strona się ładuje...
Strona się ładuje...
Strona się ładuje...
Strona się ładuje...
Strona się ładuje...
Strona się ładuje...
Strona się ładuje...
Strona się ładuje...
Strona się ładuje...
Strona się ładuje...
Strona się ładuje...
Strona się ładuje...
Strona się ładuje...
Strona się ładuje...
Strona się ładuje...
Strona się ładuje...
Strona się ładuje...
Strona się ładuje...
Strona się ładuje...
-
 1
1
-
 2
2
-
 3
3
-
 4
4
-
 5
5
-
 6
6
-
 7
7
-
 8
8
-
 9
9
-
 10
10
-
 11
11
-
 12
12
-
 13
13
-
 14
14
-
 15
15
-
 16
16
-
 17
17
-
 18
18
-
 19
19
-
 20
20
-
 21
21
-
 22
22
-
 23
23
-
 24
24
-
 25
25
-
 26
26
-
 27
27
-
 28
28
-
 29
29
-
 30
30
-
 31
31
-
 32
32
-
 33
33
-
 34
34
-
 35
35
-
 36
36
-
 37
37
-
 38
38
-
 39
39
-
 40
40
-
 41
41
-
 42
42
-
 43
43
-
 44
44
-
 45
45
-
 46
46
-
 47
47
-
 48
48
-
 49
49
-
 50
50
-
 51
51
-
 52
52
-
 53
53
-
 54
54
-
 55
55
-
 56
56
-
 57
57
-
 58
58
-
 59
59
-
 60
60
-
 61
61
-
 62
62
-
 63
63
-
 64
64
-
 65
65
-
 66
66
-
 67
67
-
 68
68
-
 69
69
-
 70
70
-
 71
71
-
 72
72
-
 73
73
-
 74
74
-
 75
75
-
 76
76
-
 77
77
-
 78
78
-
 79
79
-
 80
80
-
 81
81
-
 82
82
-
 83
83


Candy FIDC N655 Instrukcja obsługi
- Typ
- Instrukcja obsługi
- Niniejsza instrukcja jest również odpowiednia dla
w innych językach
- slovenčina: Candy FIDC N655 Používateľská príručka
Powiązane artykuły
Inne dokumenty
-
Hoover HOE3161IN/E Instrukcja obsługi
-
-
-
-
-
-
Haier HWO60SM2B9BH Instrukcja obsługi
-
Haier H6 ID25G3YTB Skrócona instrukcja obsługi