
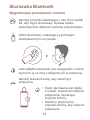
HUAWEI TalkBand
Quick Start

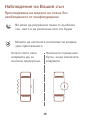
Want to learn how to shoot photos using
remote control or turn on the screen with
your wrist? Touch About in the app for more
information.
Figures in this guide are for your reference only.

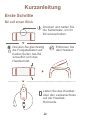
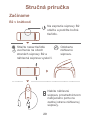
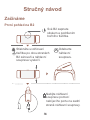
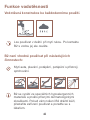
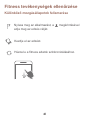
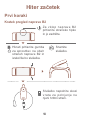
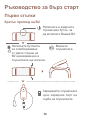
1
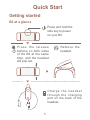
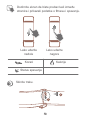
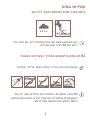
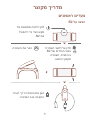
Press and hold the
side key to power
on your B2.
Press the release
buttons on both sides
of the B2 at the same
time, and the headset
will pop out.
Remove the
headset.
Charge the headset
through the charging
port on the back of the
headset.
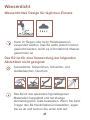
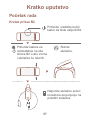
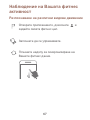
Getting started
B2 at a glance
Quick Start

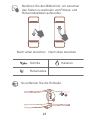
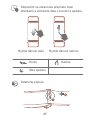
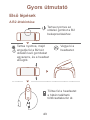
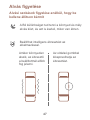
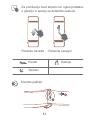
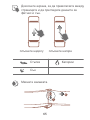
2
1
2
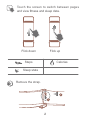
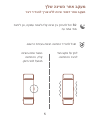
Touch the screen to switch between pages
and view tness and sleep data.
Flick down Flick up
Steps Calories
Sleep state
Remove the strap.

3
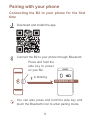
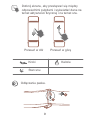
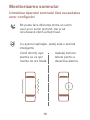
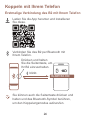
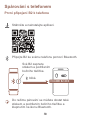
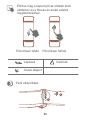
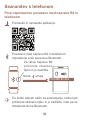
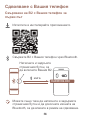
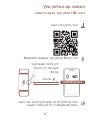
Pairing with your phone
Connecting the B2 to your phone for the first
time
Download and install the app.
Connect the B2 to your phone through Bluetooth.
Press and hold the
side key to power
on your B2.
is blinking.
You can also press and hold the side key and
touch the Bluetooth icon to enter pairing mode.

4
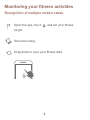
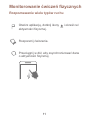
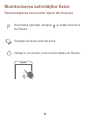
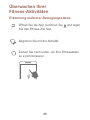
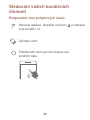
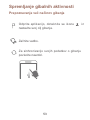
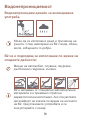
Monitoring your tness activities
Recognition of multiple motion states
Open the app, touch , and set your tness
target.
Start exercising.
Drag down to sync your tness data.

5
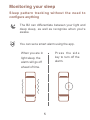
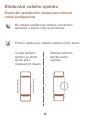
Monitoring your sleep
Sleep pattern tracking without the need to
congure anything
The B2 can differentiate between your light and
deep sleep, as well as recognize when you're
awake.
You can set a smart alarm using the app.
When you are in
light sleep, the
alarm will go off
ahead of time.
Press the side
key to turn off the
alarm.

6
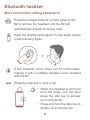
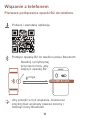
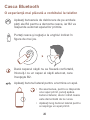
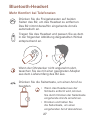
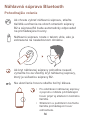
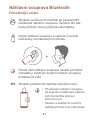
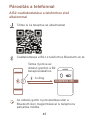
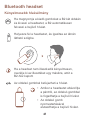
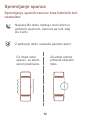
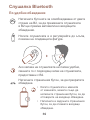
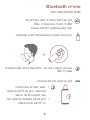
Bluetooth headset
More convenient calling experience
Press the release buttons on both sides of the
B2 to remove the headset, and the B2 will
automatically answer incoming calls.
Wear the headset and adjust it to the angle shown
in the following gure.
If the headset cover does not fit comfortably,
replace it with a suitable headset cover included
with the B2.
Press the side key to end a call.
• When the headset is removed
from the strap, you can also
press the side key to answer
an incoming call.
• Press and hold the side key to
decline an incoming call.

7
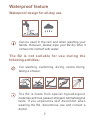
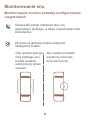
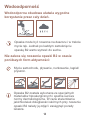
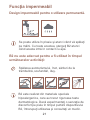
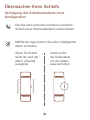
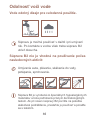
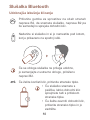
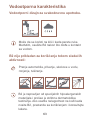
Waterproof feature
Waterproof design for all-day use.
Can be used in the rain and when washing your
hands. However, please wipe your B2 dry after it
comes into contact with water.
Car washing, swimming, diving, scuba diving,
taking a shower.
The B2 is made from special hypoallergenic
materials and has passed stringent dermatological
tests. If you experience skin discomfort when
wearing the B2, discontinue use and consult a
doctor.
The B2 is not suitable for use during the
following activities:

8
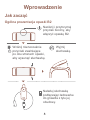
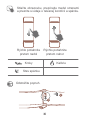
Naciśnij i przytrzymaj
przycisk boczny, aby
włączyć opaskę B2.
Wciśnij równocześnie
przyciski zwalniające
po obu stronach opaski,
aby wysunąć słuchawkę.
Wyjmij
słuchawkę.
Naładuj słuchawkę
podłączając ładowarke
do gniazda z tyłu jej
obudowy.
Jak zacząć
Ogólna prezentacja opaski B2
Wprowadzenie

9
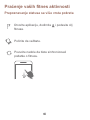
1
2
Dotknij ekranu, aby przełączać się między
odpowiednimi pulpitami i wyświetlać dane na
temat aktywności zycznej i na temat snu.
Przesuń w dół Przesuń w górę
Kroki Kalorie
Stan snu
Odłączanie paska.

10
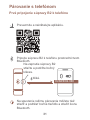
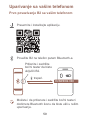
Wiązanie z telefonem
Pierwsze podłączenie opaski B2 do telefonu
Pobierz i zainstaluj aplikację.
Podłącz opaskę B2 do telefonu przez Bluetooth.
Naciśnij i przytrzymaj
przycisk boczny, aby
włączyć opaskę B2.
miga.
Aby przejść w tryb wiązania, można też
przytrzymać wciśnięty klawisz boczny i
dotknąć ikony Bluetooth.

11
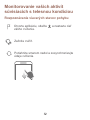
Monitorowanie ćwiczeń zycznych
Rozpoznawanie wielu typów ruchu
Otwórz aplikację, dotknij ikony i określ cel
aktywności zycznej.
Rozpocznij ćwiczenia.
Przeciągnij w dół, aby zsynchronizować dane
o aktywności zycznej.

12
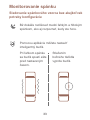
Monitorowanie snu
Monitorowanie snu bez potrzeby kongurowania
czegokolwiek
Opaska B2 potra odróżniać fazy snu
głębokiego i płytkiego, a także rozpoznawać stan
wybudzenia.
Za pomocą aplikacji można uaktywnić
inteligentny budzik.
Gdy opaska wykryje
fazę płytkiego snu,
budzik zostanie
uaktywniony przed
czasem.
Aby wyłączyć budzik,
wystarczy nacisnąć
przycisk boczny.

13
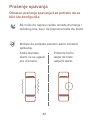
Słuchawka Bluetooth
Wygodniejsze prowadzenie rozmów
Naciśnij przyciski zwalniające z obu stron opaski
B2, aby wyjąć słuchawkę. Opaska będzie
automatycznie odbierać rozmowy przychodzące.
Załóż słuchawkę, ustawiając ją pod kątem
przedstawionym na rysunku.
Jeśli wkładka słuchawki jest niewygodna, można
wymienić ją na inną z dołączonych w komplecie.
Naciśnij klawisz boczny, aby zakończyć
połączenie.
• Kiedy słuchawka jest zdjęta
z opaski, można też odbierać
połączenia, naciskając
przycisk boczny.
• Naciśnij i przytrzymaj
przycisk boczny, aby odrzucić
połączenie.

14
Wodoodporność
Wodoodporna obudowa ułatwia wygodne
korzystanie przez cały dzień.
Opaska może być noszona na deszczu i w trakcie
mycia rąk. Jednak po każdym zamoknięciu
opaskę B2 warto wytrzeć do sucha.
Mycie samochodu, pływanie, nurkowanie, kąpiel/
prysznic.
Opaska B2 została wykonana ze specjalnych
materiałów hipoalergicznych i spełnia surowe
normy dermatologiczne. W razie stwierdzenia
jakichkolwiek dolegliwości skórnych przy noszeniu
opaski B2 należy ją zdjąć i zasięgnąć porady
lekarza.
Nie zaleca się noszenia opaski B2 w czasie
poniższych form aktywności:

15
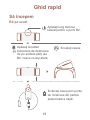
Apăsaţi lung butonul
lateral pentru a porni B2.
Apăsaţi simultan
butoanele de deblocare
de pe ambele părţi ale
B2; casca va ieşi afară.
Scoateţi casca.
Încărcaţi casca prin portul
de încărcare din partea
posterioară a căştii.
Să începem
B2 pe scurt
Ghid rapid

16
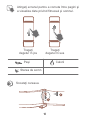
1
2
Atingeţi ecranul pentru a comuta între pagini şi
a vizualiza date privind tnessul şi somnul.
Trageţi
degetul în jos
Trageţi
degetul în sus
Paşi Calorii
Starea de somn
Scoateţi cureaua.

17
Sincronizarea cu telefonul
Conectarea B2 la telefon pentru prima dată
Descărcaţi şi instalaţi aplicaţia.
Conectaţi B2 la telefon prin Bluetooth.
Apăsaţi lung butonul
lateral pentru a porni
B2.
clipeşte.
De asemenea, puteţi apăsa lung butonul lateral
şi atinge pictograma Bluetooth pentru a accesa
modul de sincronizare.

18
Monitorizarea activităţilor zice
Recunoaşterea mai multor tipuri de mişcare
Deschideţi aplicaţia, atingeţi şi setaţi obiectivul
de tness.
Începeţi să faceţi exerciţii zice.
Glisaţi în jos pentru a sincroniza datele de tness.
Strona się ładuje...
Strona się ładuje...
Strona się ładuje...
Strona się ładuje...
Strona się ładuje...
Strona się ładuje...
Strona się ładuje...
Strona się ładuje...
Strona się ładuje...
Strona się ładuje...
Strona się ładuje...
Strona się ładuje...
Strona się ładuje...
Strona się ładuje...
Strona się ładuje...
Strona się ładuje...
Strona się ładuje...
Strona się ładuje...
Strona się ładuje...
Strona się ładuje...
Strona się ładuje...
Strona się ładuje...
Strona się ładuje...
Strona się ładuje...
Strona się ładuje...
Strona się ładuje...
Strona się ładuje...
Strona się ładuje...
Strona się ładuje...
Strona się ładuje...
Strona się ładuje...
Strona się ładuje...
Strona się ładuje...
Strona się ładuje...
Strona się ładuje...
Strona się ładuje...
Strona się ładuje...
Strona się ładuje...
Strona się ładuje...
Strona się ładuje...
Strona się ładuje...
Strona się ładuje...
Strona się ładuje...
Strona się ładuje...
Strona się ładuje...
Strona się ładuje...
Strona się ładuje...
Strona się ładuje...
Strona się ładuje...
Strona się ładuje...
Strona się ładuje...
Strona się ładuje...
Strona się ładuje...
Strona się ładuje...
Strona się ładuje...
Strona się ładuje...
Strona się ładuje...
Strona się ładuje...
Strona się ładuje...
Strona się ładuje...
-
 1
1
-
 2
2
-
 3
3
-
 4
4
-
 5
5
-
 6
6
-
 7
7
-
 8
8
-
 9
9
-
 10
10
-
 11
11
-
 12
12
-
 13
13
-
 14
14
-
 15
15
-
 16
16
-
 17
17
-
 18
18
-
 19
19
-
 20
20
-
 21
21
-
 22
22
-
 23
23
-
 24
24
-
 25
25
-
 26
26
-
 27
27
-
 28
28
-
 29
29
-
 30
30
-
 31
31
-
 32
32
-
 33
33
-
 34
34
-
 35
35
-
 36
36
-
 37
37
-
 38
38
-
 39
39
-
 40
40
-
 41
41
-
 42
42
-
 43
43
-
 44
44
-
 45
45
-
 46
46
-
 47
47
-
 48
48
-
 49
49
-
 50
50
-
 51
51
-
 52
52
-
 53
53
-
 54
54
-
 55
55
-
 56
56
-
 57
57
-
 58
58
-
 59
59
-
 60
60
-
 61
61
-
 62
62
-
 63
63
-
 64
64
-
 65
65
-
 66
66
-
 67
67
-
 68
68
-
 69
69
-
 70
70
-
 71
71
-
 72
72
-
 73
73
-
 74
74
-
 75
75
-
 76
76
-
 77
77
-
 78
78
-
 79
79
-
 80
80


